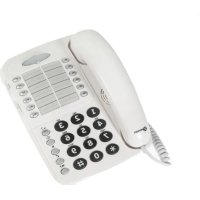
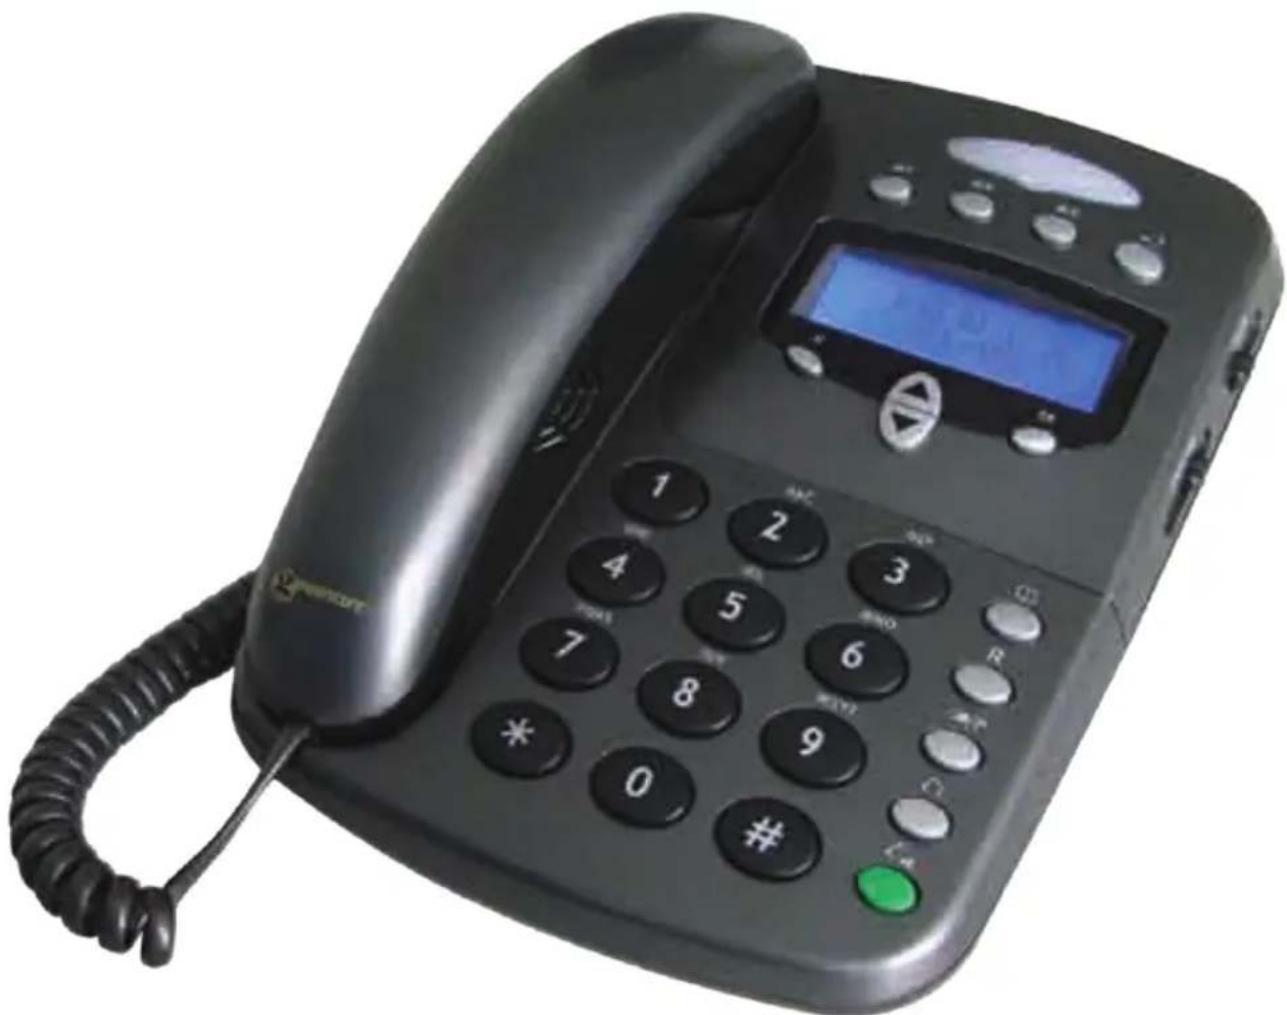
CL1400 - Desk Phone GEEMARC - Free user manual and instructions
Find the device manual for free CL1400 GEEMARC in PDF.
Frequently Asked Questions - CL1400 GEEMARC
User questions about CL1400 GEEMARC
0 question about this device. Answer the ones you know or ask your own.
Ask a new question about this device
Download the instructions for your Desk Phone in PDF format for free! Find your manual CL1400 - GEEMARC and take your electronic device back in hand. On this page are published all the documents necessary for the use of your device. CL1400 by GEEMARC.
USER MANUAL CL1400 GEEMARC
AMPLIFIED DESK TELEPHONE WITH
CALLER IDENTIFICATION
TELEPHONE MULTIFONCTIONS
geemarc Telecom SA
Caution: This telephone product is specifically designed for people with hearing difficulties and is provided with a handset earpiece volume control for individual requirements. Due care must be taken by all users that the handset earpiece volume control is set to the lowest level acceptable by each respective user. Care should therefore be exercised to ensure that any new users are familiar with this requirement.
- Ringer level adjustment 10
- Shaker option setting 11
- Date / Hour format 11
- Time & date setting 13
- Set the language 14
- Screen contrast adjustment 16
- Auto-on-hook 16
- Auto-screen sizing 17
- Area and Long distance code 18
- Time break recall - "R" 19
- Dialing types and grounding 20
USING THE PHONE
- Answering a call 21
- Making a call 22
-Last number redial 23 - Recall last 30 number dialled 24
INDEX
- Delete last 30 numbers dialled 24
-R,*and#keys25 - Storing a number in memory 26
- Dialling stored numbers 26
RECEIVING VOLUME AND TONE 27
PHONE BOOK
- Creating a phone book entry 29
-Create an entry from the incoming call list 31 - Delete a phone book entry 32
- Modify a phone book entry 32
- Make a call from a phone book entry 33
ADVANCED FUNCTIONS
- Use the incoming call list 34
- Recall a number from the CID list 37
- Delete a record from the CID list 38
-Delete all records from the CID list 38 - Call waiting 39
- Message waiting 41
OPTIONS
- Headset and neck loop 42
- Shaker 43
GUARANTEE 44
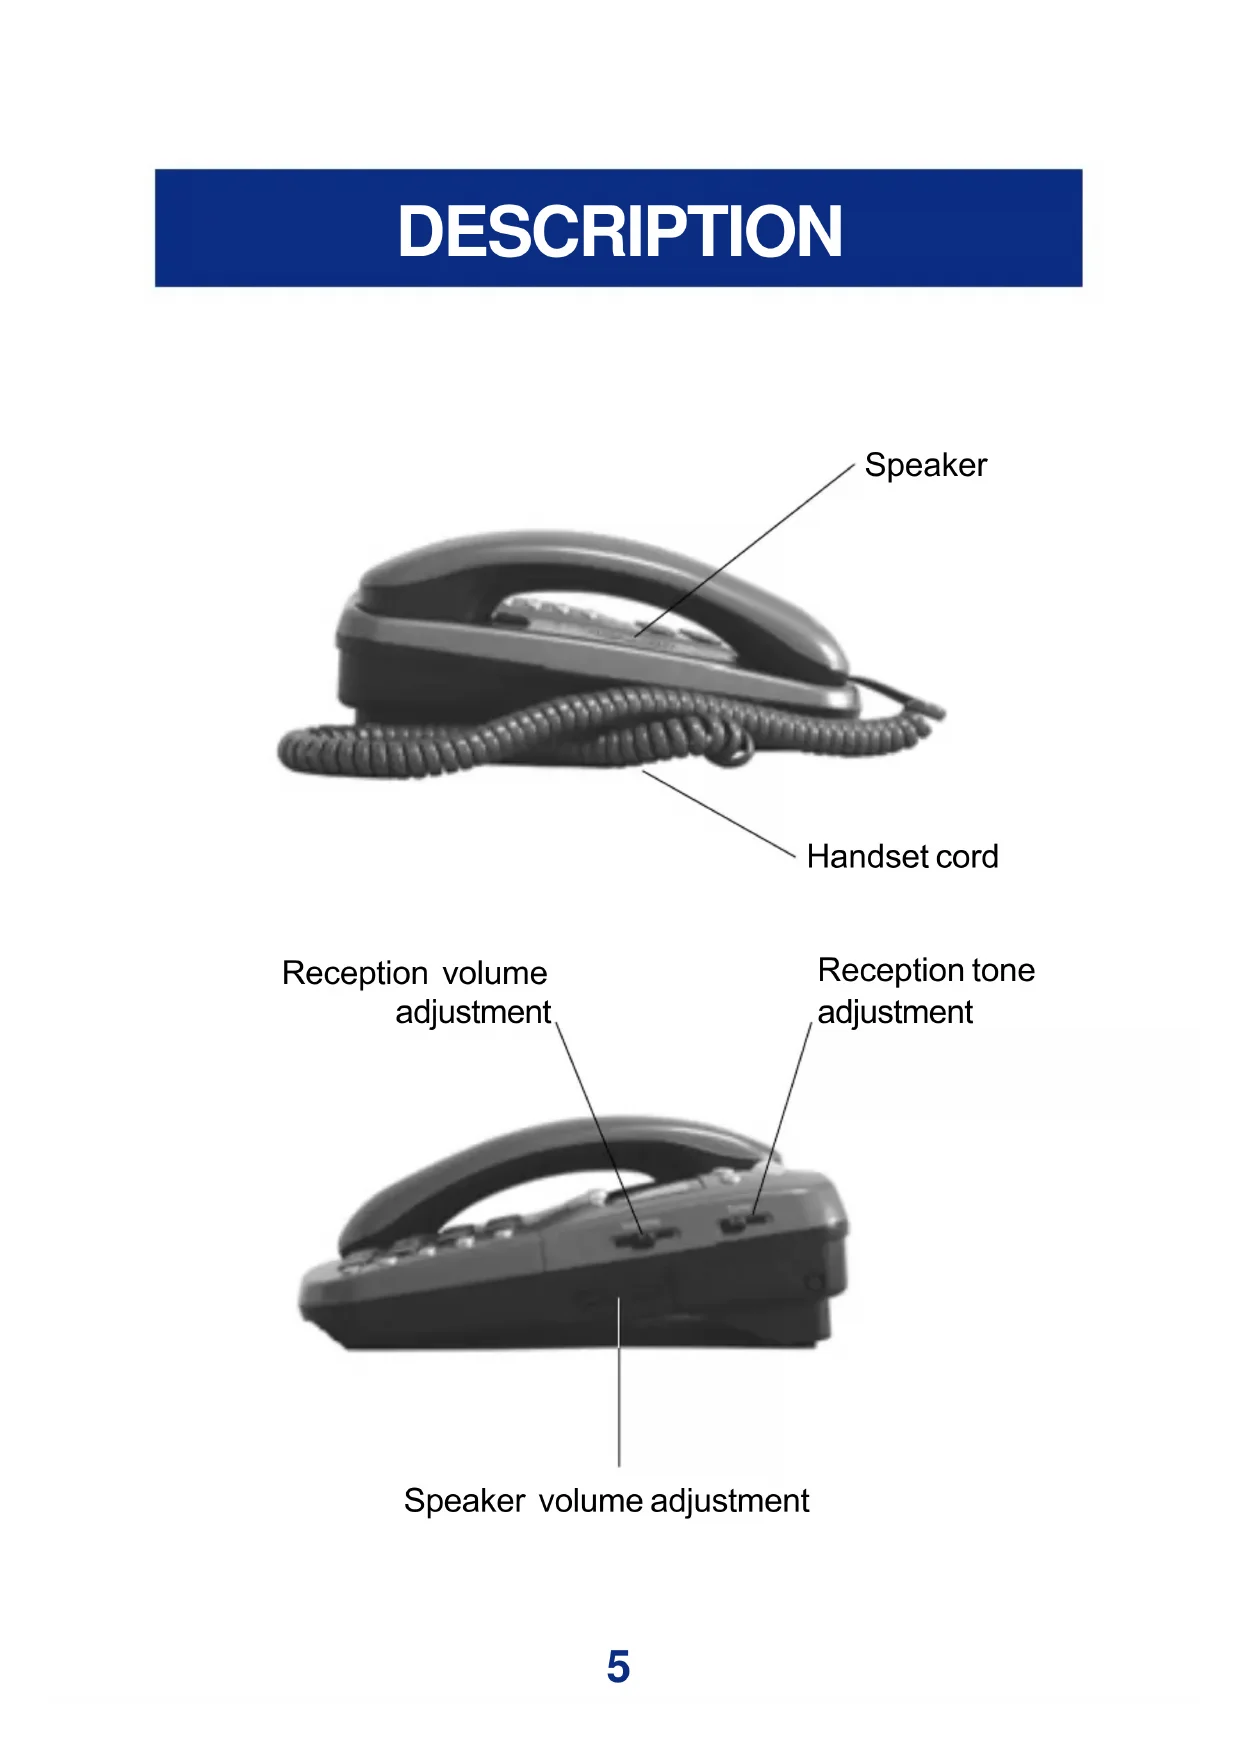
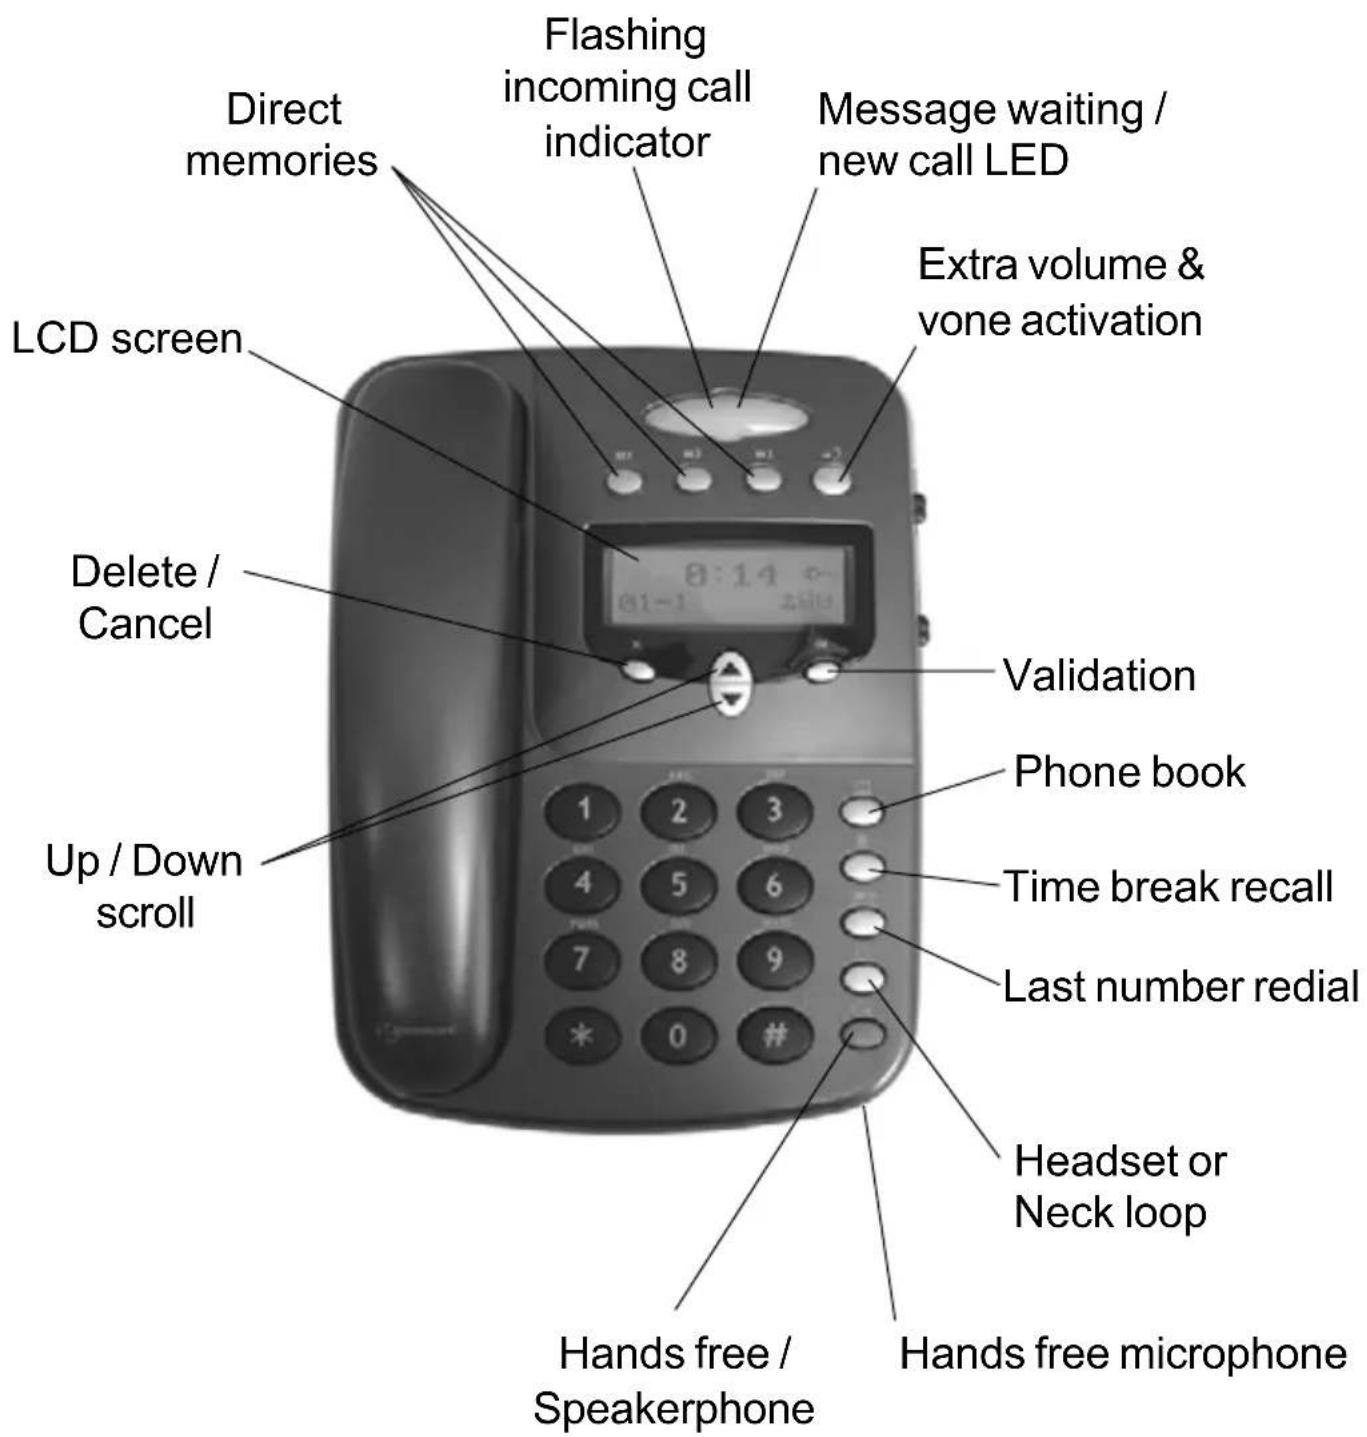
DESCRIPTION
1- DESCRIPTIF GENERAL
DESCRIPTION
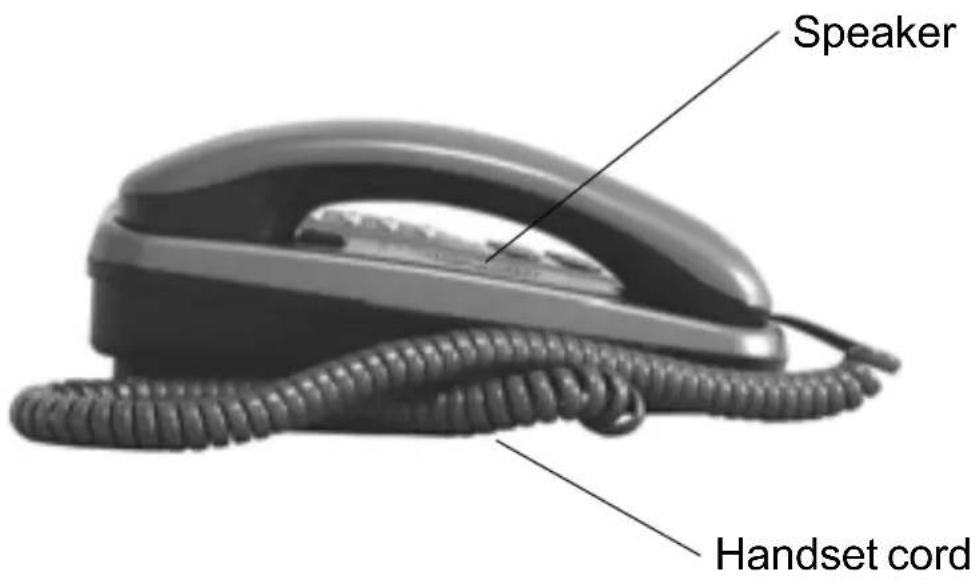
Speaker volume adjustment
DESCRIPTION
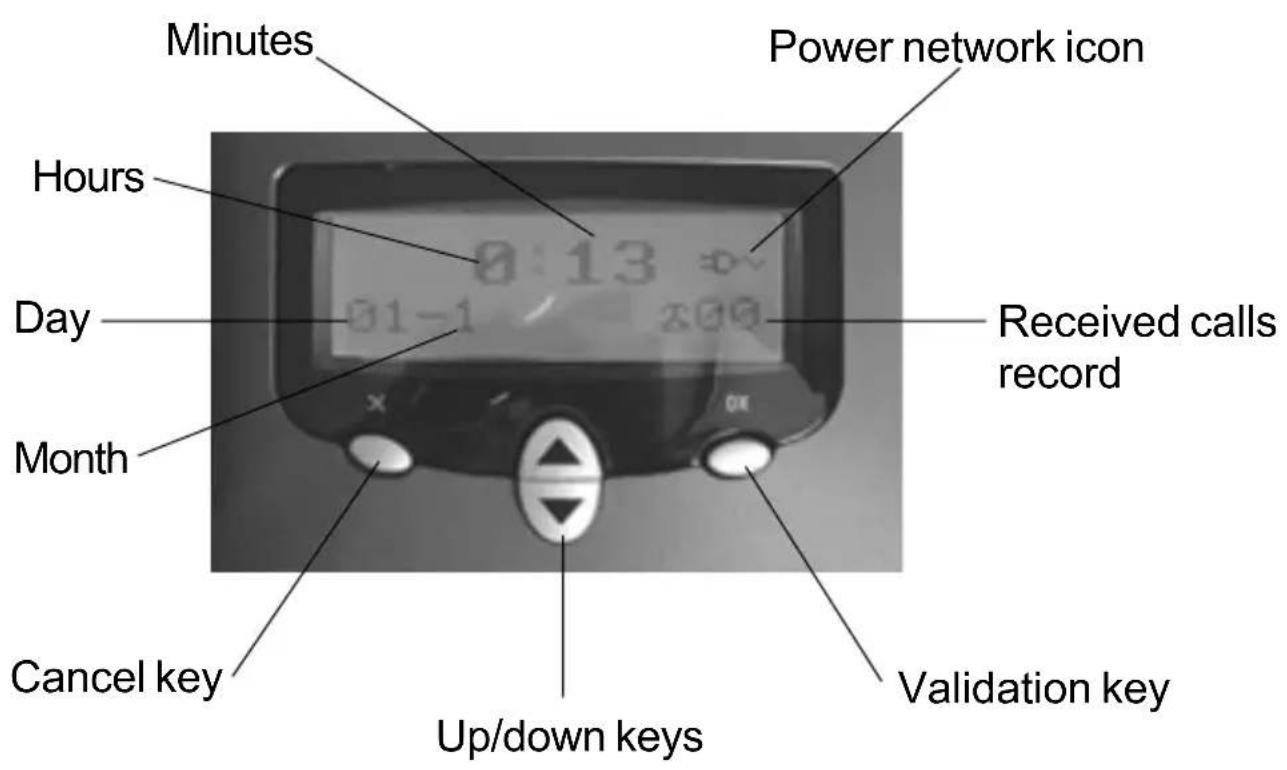
2-LCD SCREEN
Screen example (On hook position)
-
OK key is used to confirm action or a choice on the screen.
-
keys are used to scroll through the menu.
- In general, the X key is used to cancel an action/entry, it can also be used to confirm a choice (for example to cancel a stored number).
DESCRIPTION
3 - SCREEN DISPLAY
Your CL1400 shows on the LCD screen different icons to help you using the telephone.

The telephone is supplied by battery + battery indicator

The telephone is supplied by adaptor

Screen contrast level.

Speaker is activated.

Precede the CID call record number.

To show new records.
INSTALLATION
CONNECTING
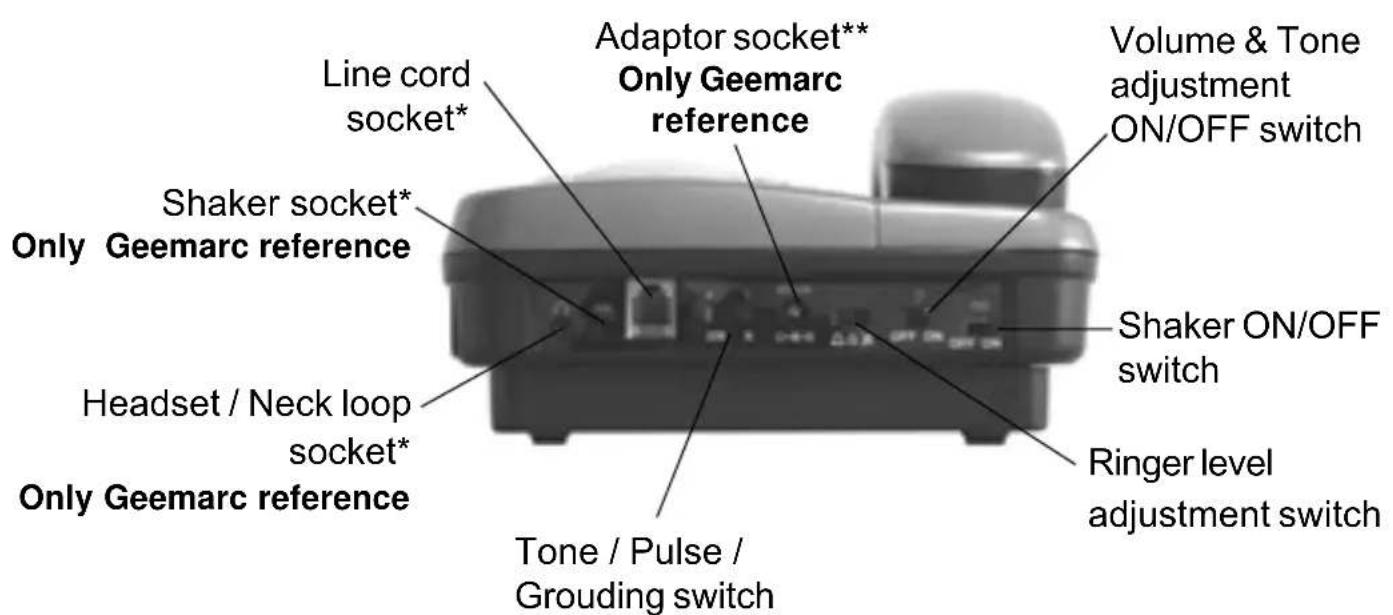
Important: Only Shaker, Headset and Adaptor with Geemarc reference can be connected to the sockets.
- Connect the handset.
- Open the battery compartment.
- Insert 4 alkaline batteries without mercury (AAA 1.5V type not supplied) with good polarity into the compartment located on the telephone base.
Note : Do not use rechargeable batteries, do not do not dispose batteries in household waste. Pay attention to your local battery disposal regulations.
INSTALLATION
- Replace the battery cover.
- Connect the line cord to the socket located at the rear of telephone, then connect the plug to the wall socket(*).
- Connect the adaptor plug to the adaptor socket located on the back of the telephone, then connect it to the wall socket (^**) . Please choose an adaptor wall socket near your line plug to enable you to unplug the adaptor quickly in case of a problem.
Note: The adaptor is required to make the telephone work properly. Batteries are necessary in case of network power failure to save a stored number in memory and are required for phone book use.
If the adaptor is accidentally unplugged (or in case of power failure) and if the batteries are empty or not in place, minimal restricted phone features only will work (such as making a call or answering an incoming call).
SETTINGS
1 - RINGER LEVEL ADJUSTMENT
You can change the ringer volume to a desired level. Ringer level adjustment switch located on the upper side allows the ringer to be switched HI, LOW or OFF:

:Hi

: Low
: Off
Your phone comes with the ringer switched to «High».
If you don't like the ringer melody, you can choose a new one by changing the settings as follows:
In on hook position,
- Press and hold OK and keys together.
- Use the keys to select «SET PHONE».
- Press the OK key to confirm.
- Select «SET RING»
- Press the OK key to confirm.
- Select the ring you would like.
- Press the OK key to confirm.
- New ring will be heard.
- Press the X key 3 times to exit.
SETTINGS
2 - SHAKER OPTION SETTING
A two-position switch located on the upper side allows to activate (ON) or deactivate (OFF) the shaker CLA2 (not included).
For more information on this option please refer to p.43.
3 - CHOOSING DATE / HOUR FORMAT
Date format
You can choose between two date formats: Day - Month or Month - Day.
In on hook position,
- Press and hold OK and keys together.
- Use the or keys to select «SET PHONE».
- Press the OK key to confirm.
- Select « DATE FORMAT »
- Press the OK key to confirm.
- Select « DAY-MONTH» or « MONTH-DAY »
- Press the OK key to confirm.
- Press the X key twice to exit.
SETTINGS
Hour format
You can choose between two hour formats: 12 hours or 24 hours.
In on hook position,
- Press and hold OK and keys together.
- Use the ▲ or ▼ keys to select «SET PHONE».
- Press the OK key to confirm.
- Select « HOUR FORMAT »
- Press the OK key to confirm.
- Select «12 HOUR» or «24 HOUR».
- Press the OK key to confirm.
- Press the X key twice to exit.
If you choose «12 HOUR», hours before noon will be displayed with «AM» and «PM» for the hours after noon.
SETTINGS
4 - TIME & DATE SETTING
In on hook position,
- Press and hold OK and keys together.
- Use the or keys to select «SET TIME».
- Press the OK key to confirm.
- Select « HOUR FORMAT »
- Press the OK key to confirm.
- Use the ▲or Keys to select the correct hour.
- Press the OK key to confirm the Hour and move to Minutes setting.
- Use the or keys to select the correct minute.
- When the time is set press OK to pass to Month and Day setting.
- Press the X key to exit.
Note: When you receive your first call, date and time will be set automatically if you have the CID feature.
SETTINGS
5 - SET THE LANGUAGE
You can choose between 16 different languages including English and French.
To change the language, follow the instructions below:
In on hook position,
- Press and hold OK and keys together.
- Use the or keys to select «SET PHONE».
- Press OK key to confirm.
- Use the or keys to select «SET LANGUAGE».
- Press OK key to confirm.
- Select the desirable language using keys.
- Press the OK key to confirm.
- Press X key twice to exit.
SETTINGS
6 - SCREEN CONTRAST ADJUSTMENT
Your screen has a backlight which automatically switches off after 15 seconds of inactivity.
Follow the instructions below to set the screen contrast:
In on hook position,
- Press and hold OK and keys together.
- Use the keys to select «SET PHONE».
- Press the OK key to confirm.
- Select «LCD CONTRAST».
- Press the OK key to confirm.
- Scroll with keys to adjust the contrast level.
- Press the X key to exit.
SETTINGS
7 - AUTO- ON HOOK
This function automatically cancels the line after 8 seconds if the line is busy.
In on hook position,
- Press and hold OK and keys together.
- Use the keys to select «SET PHONE».
- Press the OK key to confirm.
- Use the keys to select «AUTO ON HOOK».
- Press the OK key to confirm.
- Use the keys to select «ON» or «OFF» to activate or deactivate the function.
- Press the OK key to confirm.
- Press the X key twice to exit.
SETTINGS
8 - AUTO-SCREEN SIZING
If the auto-screen sizing is activated, the screen can display up to 18 digits of the number you dial, otherwise only 8 digits will be displayed on the screen.
To activate/deactivate the auto-screen sizing follow the instructions below:
In on hook position,
- Press and hold OK and keys together.
- Use the keys to select «SET PHONE».
- Press the OK key to confirm.
- Use the keys to select «DIM:X---->x».
- Press the OK key to confirm.
- Use the keys to select «ON» or «OFF» to activate or deactivate the function.
- Press the OK key to confirm.
- Press the X key twice to exit.
SETTINGS
9 - AREA & LONG DISTANCE CODE SETTING
Your telephone needs to distinguish between local and long distance calls.
First of all you have to program your area code.
In on hook position,
- Press and hold the OK and keys together.
- Use the keys to select «SET PHONE».
- Press the OK key to confirm.
- Use the keys to select «SET AREA&LDS».
- Press the OK key to confirm.
- Use the keys to select the correct area code.
- Press the OK key to move from digit to digit.
- When the area code is set, press the OK key and this will lead you to LDS (long distance code) setting.
- The LCD will show SET LDS CODE.
- Set the LDS code in the same manner as the area code.
- Press the X key to exit.
SETTINGS
10 - TIME BREAK RECALL SETTING - “R” FUNCTION
Check the Time Break Recall setting of your CL1400. For the UK the Time Break Recall should be set to 100mS . Other settings - 300mS and 600mS are used outside the UK.
If you wish to change this value, follow instructions below:
In on hook position,
- Press and hold OK and keys together.
- Use the keys to select «SET PHONE».
- Press the OK key to confirm.
- Use the keys to select «SET FLASH».
- Press the OK key to confirm.
- Select a new setting, 300 or 600ms and press OK to confirm.
- Press the X key twice to exit.
SETTINGS
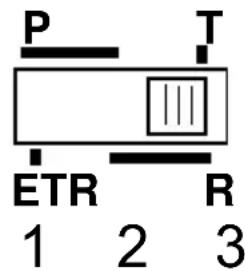
11 - DIALING TYPES AND GROUNDING
A switch ETR/PR/T located on the upper side is equipped on some models. If you wish to connect your CL1400 to a public UK/French switch-board (PBX), move switch ETR/PR/T to position 3 (T). This will ensure optimal compatibility of your phone with most (99%) PBX.
Positions:
Position 1:
Pulse dialing. The R is grounded. This option can be used only within the UK in very special cases.
Position 2:
Pulse dialing. The R is set according to the determined adjustment (see « Time Break Recall Setting for R Function» p.19).
Position 3:
Tone dialing. The R is set according to the determined adjustment (see « Time Break Recall Setting for R Function» p.19).
USING THE PHONE
1 - ANSWERING A CALL
During an incoming call, your phone will ring and bright indicator of incoming call will flash. The Number or/and the Name of the caller will be displayed on the screen, if you have subscribed to the CID service.
When the phone is calling:
- Lift the handset and speak.
- On completion of the call, carefully replace the handset in the cradle to release the line.
Your CL1400 allows you to speak "hands free", so that surrounding people could also hear the conversation.
- Press the key to speak with your caller hands free.
- Press the /key again to release the line.
USING THE PHONE
2 - MAKING A CALL
- Lift the handset.
- Wait the dial tone and dial required number (it will be dispalyed on the screen while dialing).
- On completion of the call carefully replace the handset in the cradle to release the line.
You can also use the «hands free» function to make a call:
- Press the /key without lifting the handset.
- Dial the desired number as soon as you hear the dial tone.
- When the person answers you, you can speak hands free. You can adjust the volume using slide buttons (VOLUME) located on the right side of your telephone.
- On completion of the call, press the key to clear the line.
USING THE PHONE
Note:
To deactivate the «hands free» function during a call, lift the handset.
Call time counter will be displayed a second after the call is engaged.
During a call, if you wish to use the «hands free» function:
- Press and hold the key and replace the handset on the cradle at the same time.
- Then release the key.
- Hands free function is activated.
3- LAST NUMBER REDIAL
With this function you can redial the last previously dialed number.
- Lift the handset or press the or key.
- await the dial tone and press / P key.
- A previously dialed number will be automatically redialed.
USING THE PHONE
4-RECALL LAST 30 DIALED NUMBERS
You can call back the last 30 dialed numbers.
To call back one of them, follow instructions below: In on hook position,
- Press the OK key.
The screen will display "DIALED", the last number dialed, the total of numbers, date and hour of call records.
-
Use the or keys to scroll through the record menu and select the number you wish to dial.
-
Lift the handset or press the
The number will be automatically dialled.
5 - DELETING LAST 30 DIALED NUMBERS
In on hook position,
- Press the OK key.
The screen will display "DIALED".
USING THE PHONE
- Use the ▲or keys to scroll through the
record menu and select the number you wish to delete.
- Press the X key.
The screen will display "DEL ?".
- Press again the X key to confirm.
- Press the OK key to exit.
6 - R, and # KEYS
These are used with the new services provided on digital exchanges. For details please contact your network operator.
USING THE PHONE
7 - STORING A NUMBER IN MEMORY
Your phone can store 3 direct memories. (30 digits maximum for each memory).
To store a number in direct memory please follow the instructions below:
In on hook position,
- Dial the desired number.
- Press and hold one of the buttons M1, M2 or M3 for 2-3 seconds.
The LCD display will show SAVE OK.
- The number is stored.
- Press the X key to exit.
8-DIALINGSTOREDNUMBERS
- Lift the handset or press or and await the dial tone.
- Press one of direct memories M1, M2 or M3, the stored number will be dialed automatically.
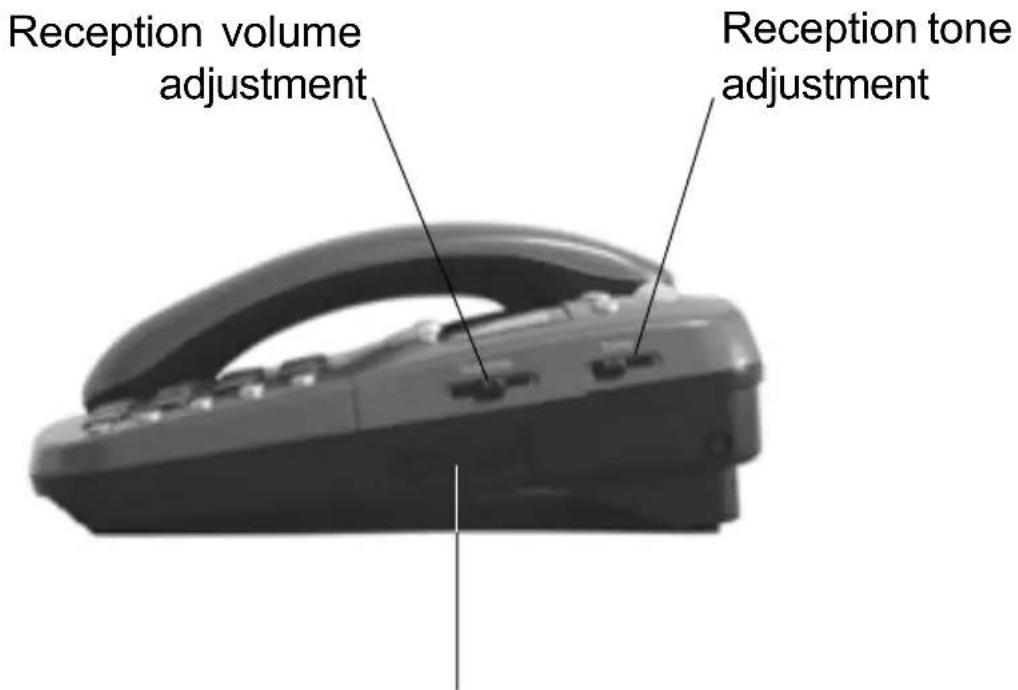
RECEIVING VOLUME AND TONE
You can increase the volume and adjust the receiving tone according to your own hearing requirements.
The button allows extra-receiving volume and tone functions to be activated during the conversation.
When the function is activated, the red light of extra-receiving and tone function located near the button is lit.
Use the TONE and VOLUME buttons to adjust the level according to your own hearing requirements.
Tone and volume adjustment (15dB to 30dB) is only activated when the switch located at the upper side of your phone is set to ON. When this button is set to OFF only the volume can be adjusted from 0dB to 15dB.
RECEIVING VOLUME AND TONE
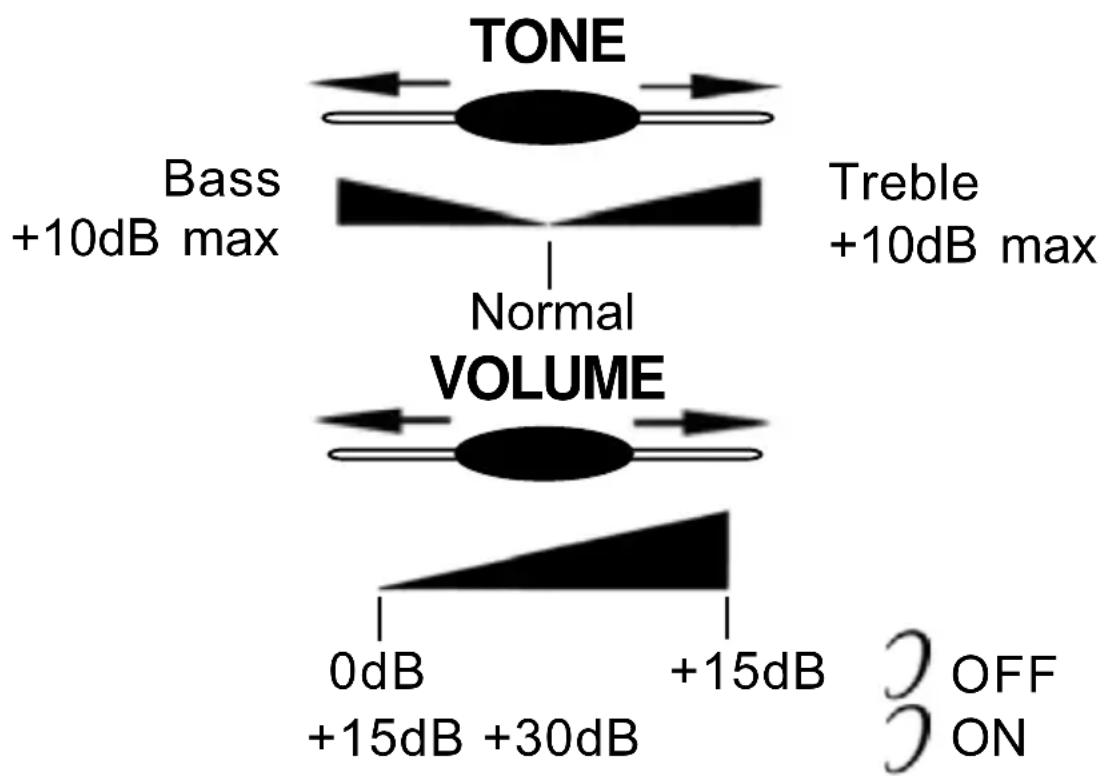
Note: When the tone (treble), earpiece volume and sending levels are set to the maximum, whistling may appear. If whistling occurs the sending level settings should be decreased (sending level switch is located at the upper side of your phone. When the switch is located behind the phone is ON, the extra-receiving and tone functions are automatically activated each time you use the phone. When the switch is switched to OFF, you will need to activate the function by pressing the button
PHONE BOOK
You can store 99 entries into the phone book with the name and phone numbers of your correspondent.
1-CREATING A PHONE BOOK ENTRY
In on hook position,
- Press and hold OK and keys together.
- Use the or keys to select «PHONE BOOK».
- Press the OK key to confirm.
- Use the keys to select «ADD».
- Press the OK key to confirm.
- Enter the number (30 digits max. per memory).
- Use the X key to delete a wrong digit.
- Press the OK key to confirm the number and enter the name corresponding to entered number.
- Select the desired letter by pressing the corresponding key.
While typing the name you can use the following table or the letters printed on the keypad to help you.
PHONE BOOK
| Key | Characters | Key | Characters |
| 1 | 1. ? - " < | 6 | M N O m n o 6 0 0 |
| 2 | A B C a b c 2 E Φ | 7 | P Q R S p q r s 7 |
| 3 | D E F d e f 3 | 8 | T U V t u v 8 U |
| 4 | G H I g h l 4 | 9 | W X Y Z w x y z 9 |
| 5 | J K L j k l 5 | 0 | 0 + & @ / $ % |
- To insert a «space», press on the OK key twice.
- If the next letter is the same as the previous letter (or located on the same key), press first on the OK key to move and select the desired letter.
- Use the X key to delete a wrong letter.
- When the name is correct, press the OK key for 3 seconds to confirm the Number and Name storage.
- Now you can create a new entry.
- Press the X key to exit.
Note : If you wish to insert a pause in the stored number, press the key whilst entering (a P will be displayed on the screen).
PHONE BOOK
2-CREATING AN ENTRY FROM THE INCOMING CALL LIST
If you have subscribed to a Caller Identification Service (CID feature), you have the possibility to create an entry from the incoming call list because each call is stored into the phone book as a CID entry.
In on hook position,
- Press or key.
Incoming calls will be displayed on the screen.
- Use and keys to select the number that you wish to store in the phone book from incoming calls list.
- Press and hold the OK key until the last number digit flashes. You may update the number at this stage.
- Confirm the number by pressing the OK button.
- You can now modify and enter the name of the caller with the correct number or press and hold for 3 seconds the OK key to confirm the proposed CID name.
- Press the X key to exit.
PHONE BOOK
3 - DELETING A PHONE BOOK ENTRY
In on hook position,
- Press the key.
- Use keys to select the number you wish to delete.
- Press the X key, the screen will display « DEL?»
- Press the X key again to confirm.
- Press the OK key to exit.
4-MODIFYING A PHONE BOOK ENTRY
In on hook position,
- Press the key.
- Use keys to select the number you wish to modify.
- Press and hold the OK key until the last digit flashes.
- Press the X key to modify the number and insert a new number.
- Press the OK key.
- You can now modify the name.
- Press the X key to delete a letter.
PHONE BOOK
For help see the «CREATING A PHONE BOOK ENTRY» p.29 to modify the name.
- Press the OK key for 3 seconds to confirm the new entry.
- Press the X key to exit.
5 - DIALING FROM A PHONE BOOK ENTRY
In on hook position,
- Press the key.
- Use Key to select the number you wish to dial. You can also get access quickly to a phone book entry by entering the first letter of the name.
- Lift the handset or press /or
- The number will be dialled automatically.
Note : You can review the incoming call list during a call by pressing the OK key, then use the keys to move through the phone book list.
ADVANCED FUNCTIONS
CID FEATURES
1 - USE THE INCOMING CALL LIST
Associated with the CID feature, the call list allows you to store the incoming calls. When the call list memory is full, a new call will take the place of the oldest one. Each call is stored as an entry with the date, the hour and in rotation order as received.
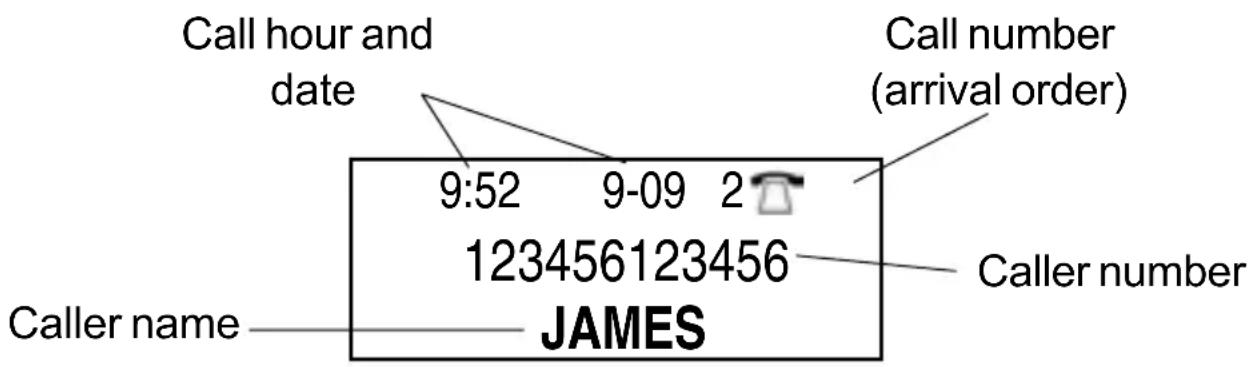
Note : If the caller does not wish to show his phone number or his name, the screen will display PRIVATE.
9:52
9-093

PRIVATE
ADVANCED FUNCTIONS
CID FEATURES
If the number is unknown by the telephone center (international incoming call for example), the screen will display OUT OF AREA:
9:52
9-09


OUT OF AREA
When the same caller calls several times, only the last call will be stored in the incoming call records list and the screen will display + after the number of records.
9:52
9-09
N 2+
654321654321
HELEN
Note : During the entries review, the screen will display N for a new entry which has not been reviewed.
ADVANCED FUNCTIONS
CID FEATURES
When a new call is received, the new call LED will flash and the screen displays:
| 9:52 | 9-09 |
| 28 | 01 |
| TOTAL NEW | |
This example shows the total number of calls in the incoming call list is 28 with a new one.
To review the new calls, use the & keys.
| 16:53 | |
| 16-6 | 28 |
When all new calls have been reviewed, the new call LED will disappear and the screen will return to idle state after a few seconds.
The total number of incoming call entries on the incoming call list will still be displayed on the screen.
| 12:55 | |
| 18-6 | 00 |
When the incoming call list is empty (if records have been deleted for example) the screen will display 00.
ADVANCED FUNCTIONS
CID FEATURES
2 - RECALL A NUMBER FROM THE CID LIST
In on hook position,
- Use the keys to scroll through the records and select the required number to dial.
- Lift the handset or press the /or the keys.
- The number will be dialled automatically.
Note : The call back function from incoming call list is not available for a number which displays PRIVATE or OUT OF AREA.
ADVANCED FUNCTIONS
CID FEATURES
3 - DELETE A SELECTED RECORD FROM THE CID LIST
In on hook position,
- Use the keys to move into the list and select the required number to delete.
- Press the X key.
The screen display «DEL?» - Press the X key again to confirm.
- Press the OK key to exit.
4 - DELETING ALL RECORDS FROM THE CID LIST
In on hook position,
- Press the or key.
- Press and hold the X key until the screen displays « ALL DEL?».
- Press the X key again to confirm.
- Press the OK key to confirm.
ADVANCED FUNCTIONS
CALL WAITING
With this function you are made aware that a new call is coming through while you are conversing with your other caller. You can switch between callers at this stage - take the new call without disconnecting the previous one.
This function is available if you have subscribed for call waiting service at your local network provider.
The call waiting function is factory set to "OFF". To activate this function, follow the instructions below: In on hook position,
- Press and hold OK and keys together.
- Use the or keys to select «SET PHONE».
- Press the OK key to confirm.
- Use the or keys to select «CALL WAITING».
- Press the OK key to confirm.
- Use the or keys to select «ON».
- Press the OK key to confirm.
- Press the X key twice to exit.
ADVANCED FUNCTIONS
CALL WAITING
Note : When the call waiting function is activated on your telephone and you wish to deactivate it, simply select «OFF» within the « CALL WAITING» menu.
- When you are in conversation with caller N^ 1 . CID information will be displayed on the screen (Name and Number).
9:52
9-091

123456123456
CALLER N°1
- A beep tone will be heard when a second call is incoming. Caller N°2 CID information will be displayed on the screen (Name and Number).
9:52
9-091

654321654321
CALLER N°2
For more information about the « CALL WAITING» service contact your network provider.
Note: If you don’t answer call N^2 , the call will be recorded into the incoming call list. Then you will be able to call them later.
ADVANCED FUNCTIONS
MESSAGE WAITING
Your CL1400 gives a possibility to your caller to leave a message for you.
You will be informed about the new message by the screen note « MSG WAITING», the message waiting LED will be also activated.
9:52
9-09
N1
3103
MSG WAITING
Note: « MSG WAITING» will be displayed to indicate message not read. After call redords review note « MSG WAITING» will be automatically removed from the screen.
OPTIONS
HEADSET AND NECK LOOP
The Geemarc Headset CLA3 allows you to make or receive calls hands free.
The Geemarc Neck Loop CLA7 is an inductive appliance for the hearing impaired using their hearing aid in T position. It allows to adjust the level of reception for better hearing.
- Connect the Headset or the Neck Loop to the socket marked located on the back of your phone.
- Press the key to initialize the dial tone.
-Compose your number and speak.
Note: You may adjust reception volume and tone using VOLUME and TONE keys located on the right side of your telephone. You have to connect first the adaptor to activate the VOLUME and TONE adjustment function.
OPTIONS
SHAKER
The Geemarc Shaker CLA2 is designed for hearing impaired to allow them "feel" the phone call. The shaker also allows to discretely get a phone call.
If you want to use the shaker, connect it to the shaker socket marked located on the back of your phone.
When you get an incoming call, the shaker is activated simultaneously with the phone ring.
Note: To activate the shaker function, make sure that switch ON/OFF located on the back of your phone is switched to ON.
Important: For your safety's sake do not connect other shaker model but Geemarc model CLA2, any other shaker model may damage your phone.
GUARANTEE
From the moment your Geemarc product is purchased, Geemarc guarantee it for the period of one year. During this time, all repairs or replacements (at our discretion) are free of charge. Should you experience a problem then contact our helpline or visit our website at www.geemarc.com. The guarantee does not cover accidents, negligence or breakages to any parts. The product must not be tampered with or taken apart by anyone who is not an authorised Geemarc representative. The Geemarc guarantee in no way limits your legal rights.
IMPORTANT: YOUR RECEIPT IS PART OF YOUR GUARANTEE AND MUST BE RETAINED AND PRODUCED IN THE EVENT OF A WARRANTY CLAIM
Please note: The guarantee applies to the United Kingdom only.
DECLARATION: Geemarc Telecom SA hereby declares that this product is in compliance with the essential requirements and other relevant provisions of the Radio and Telecommunications Terminal Equipment Directive 1999/5/EEC and in particular article 3 section 1a, 1b and section 2. The telephone does not operate if the line current is lower than 18mA .
Electrical connection : The apparatus is designed to operate from a 230V 50Hz supply only. (Classified as «hazardous voltage» according to EN60950 standard). The apparatus does not incorporate an integral power on/off switch. To disconnect the power, either switch off supply at the mains power socket or unplug the AC adaptor. When installing the apparatus, ensure that the mains power socket is readily accessible.
Telephone connection : Voltages present on the telecommunication network are classified TNV-3 (Telecommunication Network Voltage) according to the EN60950 standard.
The declaration of conformity may be consulted at www.geemarc.com
RECYCLING DIRECTIVES
he WEEE (Waste Electrical and Electronic Equipment) has been put in place for the products at the end of their useful life are recycled in the best way.
When this product is finished with, please do not put it in your domestic waste bin.
Please use one of the following disposal options:
-
Remove the batteries and deposit them in an appropriate WEEE skip. Deposit the product in an appropriate WEEE skip.
-
Or, hand the old product to the retailer. If you purchase a new one, they should accept it.
Thus if you respect these instructions you ensure human health and environmental protection.


For product support and help visit our website at www.geemarc.com
telephone 01707 384438
or fax 01707 832529
SOMMAIRE
DESCRIPTION
Hertfordshire, AL7 1SB
For product support:
01707 384438
www.geemarc.com

eemarc
Telecom SA
FRANCE
Parc de l'Etoile