
CL1100 - Desk Phone GEEMARC - Free user manual and instructions
Find the device manual for free CL1100 GEEMARC in PDF.
| Product Type | Amplified Desk Telephone |
| Brand | Geemarc |
| Model | CL1100 |
| Power Supply | Via line cord |
| Backup Power | 4 AAA 1.5V batteries (not included) for ringer amplification |
| Reception Amplification | From 0 to 30 dB (15 dB without compensator, 30 dB with) |
| Tone Adjustment | Yes, with switchable reception compensator |
| Transmission Volume | Adjustable via rear switch |
| Ringer | 3 levels (off, low, high) and 3 melodies (9 combinations) |
| Flashing Call Indicator | Yes, flashes on incoming call |
| Direct Memories | 12 keys (M1 to M12) |
| R (Flash) Key | For France Télécom services, adjustable time 100/300 ms |
| Mute Key | Cuts microphone during conversation |
| Last Number Redial | Yes, via dedicated key |
| Dialing Type | Multifrequency (pulse possible depending on setting) |
| Hearing Aid Compatibility | T-position available |
| Cleaning | Slightly damp cloth, no detergent |
| Operating Temperature | 5 °C to 45 °C |
| Warranty | 2 years |
| Standards | Compliant with EU directive 2014/53/EU |
Frequently Asked Questions - CL1100 GEEMARC
User questions about CL1100 GEEMARC
0 question about this device. Answer the ones you know or ask your own.
Ask a new question about this device
Download the instructions for your Desk Phone in PDF format for free! Find your manual CL1100 - GEEMARC and take your electronic device back in hand. On this page are published all the documents necessary for the use of your device. CL1100 by GEEMARC.
USER MANUAL CL1100 GEEMARC
Amplified Desk Telephone With Volume And Tone Control
!!! Please refer to our website: www.geemarc.com for an up to date user guide, as there may be important updates and changes you need to be aware of !!!
INDEX 2
DESCRIPTION 3
SETTING UP 5
- Connecting the telephone 5
- Ringer settings. 5
- Dialling types and grounding (UK version) 6
- Time break recall switch 6
VOLUME AND TONE ADJUSTMENT 7
- Receiving volume and tone 7
- Sending volume level adjustment 7
USING THE PHONE 8
- Answering incoming call 8
- Making a call. 8
-Last number radial 8 - Recall, * & # buttons 8
-Mute button. 8 - Storing telephone numbers. 9
- Dialling stored number 9
SAFETY INFORMATION 10
GUARANTEE 11
RECYCLING DIRECTIVES 12
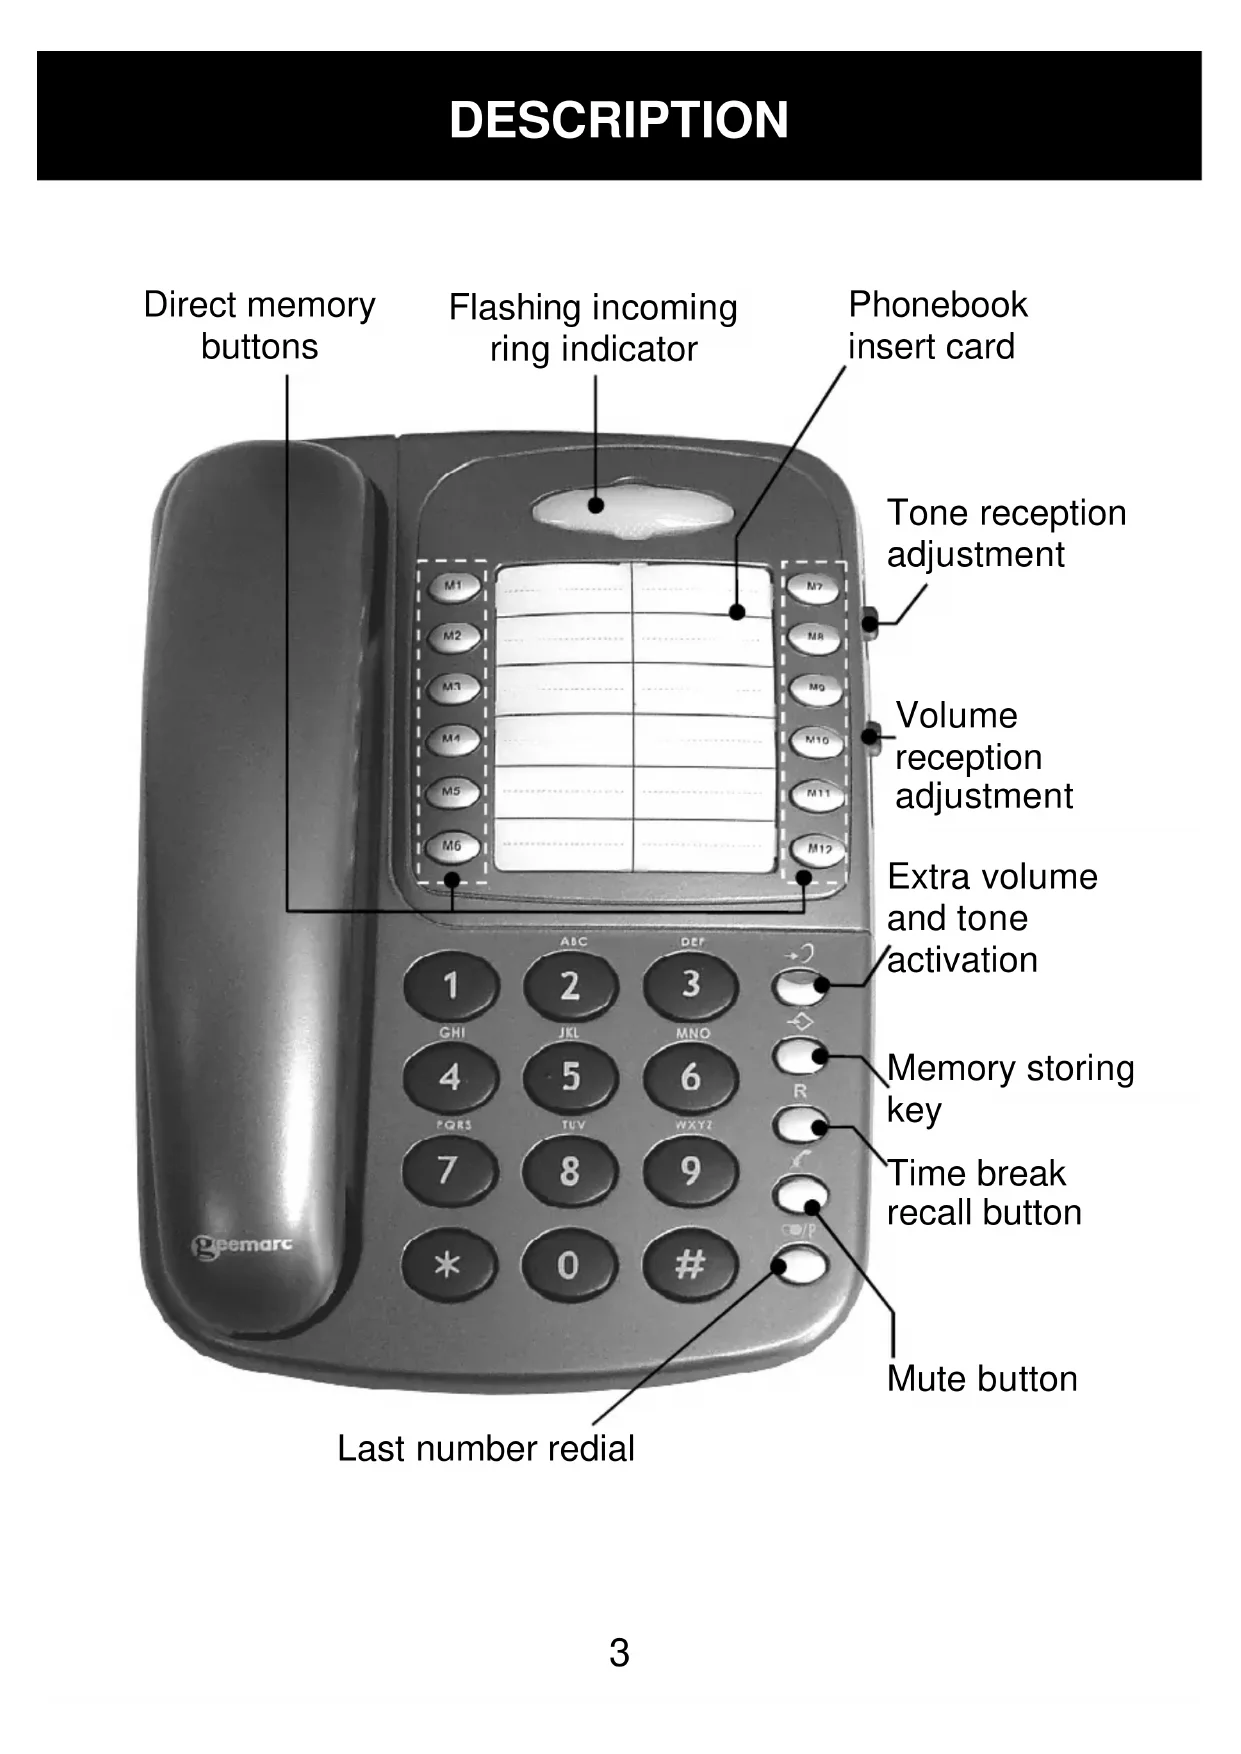
DESCRIPTION
DESCRIPTION
1-CONNECTING THE TELEPHONE
- Connect the handset cord.
- Open the battery compartment by pulling back the latch.
- Insert correctly 4 × AAA 1.5V alkaline batteries (not supplied) in the battery compartment (*). Batteries are required if you wish to increase the ringer level up to 10 dB.
- Snap the battery door back in place.
- Connect the line cord to the socket (^)
(*) Classified TNV-3 according to EN60950 standard.
2 - RINGER SETTINGS
A switch located on the upper side allows the ringer to be switched HI, LOW, OFF :

:Off,

:Low,

:Hi
Your phone comes with the ringer switched to «High» and the melody set to «6»:
| Low | Mid | High | ||
| Melody 1 | 1 | 2 | 3 | |
| Melody 2 | 4 | 5 | 6 (by default) | |
| Melody 3 | 7 | 8 | 9 |
If you don't like the ringer melody, you can choose a new one by changing the settings as per instructions below:
- Lift the handset.
- Press button.
- Press # button.
- Press any of the 1 - 9 dial keys.
The new ringer settings will be activated with the next incoming call.
Note: The ringer level will be increased up to 10 dB if you insert batteries into the battery compartment.
3 - DIALLING TYPES AND GROUNDING
A switch ETR/PR/T located on the upper side is equipped on some models. If you wish to connect your CL1100 to a public UK/French switch-board (PBX), move switch ETR/PR/T to position 3 (T). This will ensure optimal compatibility of your phone with most (99%) PBX.
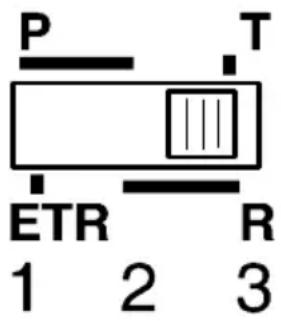
Positions:
Position 1:
Pulse dialling. The R is grounded. This option can be used only within the UK in very special cases.
Position 2:
Pulse dialling. The R is set according to the determined adjustment (see «Time Break Recall Setting for R Function» p.5).
Position 3:
Tone dialling. The R is set according to the determined adjustment (see «Time Break Recall Setting for R Function» p.5).
If you are using your CL1100 with a hearing aid, set your hearing aid to "T" position.
4 -TIME BREAK RECALL SWITCH (300/100)
Check the Time Break Recall setting of your CL1100. For the UK the Time Break Recall should be set to 100mS . It can be switched to 300mS for other locations or PBX's.
TONE AND VOLUME ADJUSTMENT
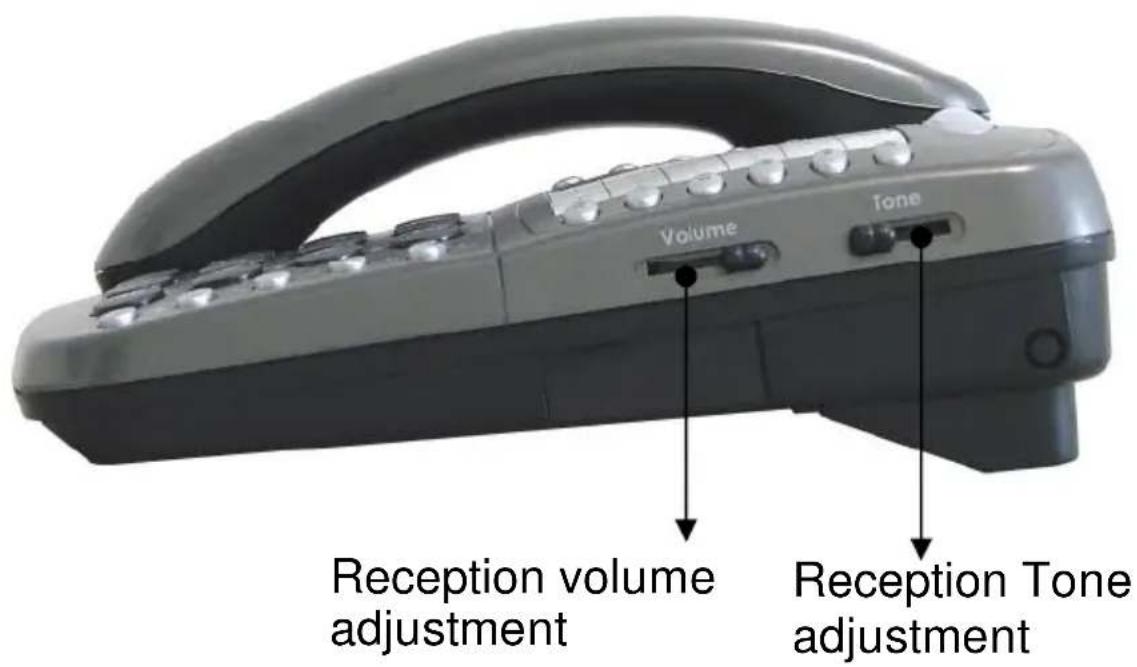
1 - RECEIVING VOLUME AND TONE ADJUSTMENT
You can adjust the receiving volume and tone according to your own hearing requirements.
The button allows extra volume and tone functions to be activated or deactivated during the conversation.
Tone and volume adjustment (15dB to 30dB) is only activated when the switch located at the upper side of your phone is set to ON. When this button is set to OFF only the volume can be adjusted from 0 dB to 15 dB.
When the function is activated, the red light of extra receiving and tone function button +s lit.
Note: When the tone (treble), earpiece volume and sending levels are set to the maximum, whistling may occur. If whistling occurs the sending level settings should be decreased with the switch
Adjust the TONE and VOLUME buttons to fit the levels to your own hearing requirements.
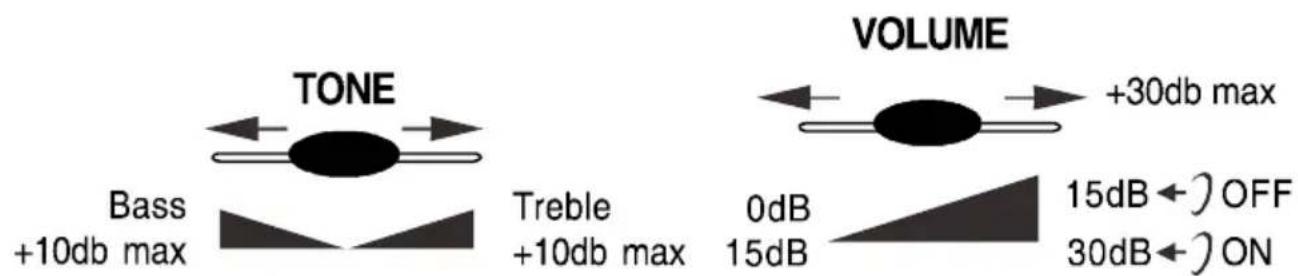
2 - SENDING VOLUME LEVEL ADJUSTMENT
If your voice is quiet or called parties have difficulty hearing you, you can increase the sending level volume with the switch located on the upper side. You can also decrease the sending volume if required.

USING THE PHONE
1 - ANSWERING INCOMING CALLS
- When an incoming call is received the phone will ring and the incoming call indicator will flash. To answer the call lift the handset and speak.
- On completion of the call, carefully replace the handset in the cradle to release the line.
2 - MAKING A CALL
- Lift the handset.
- await the dial tone and dial required number.
- On completion of the call, carefully replace the handset in the cradle.
3 - LAST NUMBER REDIAL
- Lift the handset.
- await the dial tone and press button.
- A previously dialled number will be automatically redialled (not in use for memory numbers).
4 - RECALL, & # BUTTONS
These are used with the new services provided on digital exchanges. For details please contact your network operator.
5-MUTE BUTTON
If you wish to speak privately to someone else in the room without your caller overhearing, press and hold the × button. You will still be able to hear the caller but they cannot hear you during the mute operation. To resume normal conversation, release the × button.
USING THE PHONE
6 - STORING TELEPHONE NUMBERS
Your telephone CL1100 can store 12 direct memories.
To store a number please follow instructions below:
- Lift the handset.
- Press button.
- Press M1, M2, ... M12 to locate the number.
- Dial the number.
- Press again Button.
Numbers will be lost after few hours if you disconnect your phone. Entering a new number in the same location will automatically erase the previous number.
7 - DIALLING STORED NUMBERS
- Lift the handset and await the dial tone
- Press the appropriate location button M1, M2... M12 and the number stored in this location will be dialed automatically.
To register your stored phone numbers, use the index located on the front of your phone.
SAFETY INFORMATION
General
Do not open the unit. Contact the helpline for all repairs.
Cleaning
Clean the telephone with a soft cloth. Never use polishes or cleaning agents – as these could damage the finish or the electrics inside.
Environmental
Do not expose to direct sunlight.
Always ensure there is a free flow of air over the surfaces of the telephone.
Do not place any part of your product in water and do not use it in damp or humid conditions e.g. bathrooms.
Do not expose your product to fire or other hazardous conditions.
Unplug your phone from the telephone socket during thunderstorms to prevent damage to your telephone. Your guarantee does not cover thunderstorm damage.
The telephone is designed for working within a temperature range of 5^ to 45^ .
GUARANTEE
From the moment your Geemarc product is purchased, Geemarc guarantee it for the period of two years. During this time, all repairs or replacements (at our discretion) are free of charge. Should you experience a problem then contact our help line or visit our website at www.geemarc.com. The guarantee does not cover accidents, negligence or breakages to any parts. The product must not be tampered with or taken apart by anyone who is not an authorized Geemarc representative. The Geemarc guarantee in no way limits your legal rights.
IMPORTANT: YOUR RECEIPT IS PART OF YOUR GUARANTEE AND MUST BE RETAINED AND PRODUCED IN THE EVENT OF A WARRANTY CLAIM.
Please note: The guarantee applies to the United Kingdom only
DECLARATION: Geemarc Telecom SA hereby declares that this product is in compliance with the essential requirements and other relevant provisions of the Radio and Telecommunications Terminal Equipment Directive RED 2014/53/UE.
The CE declaration of conformity may be consulted at www.geemarc.com
Telephone connection: Voltages present on the telecommunication network are classified TNV-3 (Telecommunication Network Voltage) according to the EN60950 standard.
CE
RECYCLING DIRECTIVES
The WEEE (Waste Electrical and Electronic Equipment) has been put in place for products at the end of their useful life, so that these products are recycled in the best way.
When this product is finished with, please do not put it in your domestic waste bin.
Please use one of the following disposal options:
- Remove the batteries and deposit them in an appropriate WEEE skip. Deposit the product in an appropriate WEEE skip.
- Or, hand the old product to the retailer. If you purchase a new one, they should accept it.
Thus if you respect these instructions you ensure human health and environmental protection.


For product support and help visit our website at
www.geemarc.com
E-mail: help@geemarc.com
Telephone 01707 387602

- Amplified Desk Telephone With Volume And Tone Control
- DESCRIPTION
- 1-CONNECTING THE TELEPHONE
- - RINGER SETTINGS
- - DIALLING TYPES AND GROUNDING
- Position 1:
- Position 2:
- Position 3:
- -TIME BREAK RECALL SWITCH (300/100)
- TONE AND VOLUME ADJUSTMENT
- - RECEIVING VOLUME AND TONE ADJUSTMENT
- - SENDING VOLUME LEVEL ADJUSTMENT
- USING THE PHONE
- - ANSWERING INCOMING CALLS
- - MAKING A CALL
- - LAST NUMBER REDIAL
- - RECALL, & # BUTTONS
- 5-MUTE BUTTON
- - STORING TELEPHONE NUMBERS
- - DIALLING STORED NUMBERS
- SAFETY INFORMATION
- General
- Cleaning
- Environmental
- GUARANTEE
- IMPORTANT: YOUR RECEIPT IS PART OF YOUR GUARANTEE AND MUST BE RETAINED AND PRODUCED IN THE EVENT OF A WARRANTY CLAIM.
- RECYCLING DIRECTIVES
Brand : GEEMARC
Model : CL1100
Category : Desk Phone