650 iQ S Meeting - Office chair Bioswing - Free user manual and instructions
Find the device manual for free 650 iQ S Meeting Bioswing in PDF.
| Product type | Ergonomic office chair |
| Brand | Bioswing |
| Model | 650 iQ S Meeting |
| Technology | 3D BIOSWING seating system (cushioned and controlled movement in all directions) |
| Seat height | Adjustable with gas lift (lever under the seat) |
| Seat tilt | Adjustable in permanent contact or fixed position (lever) |
| Seat depth | Adjustable (lever to slide the cushion) |
| Armrests | Adjustable in height, width, depth and orientation (depending on version) |
| Lumbar support | Adjustable in height and intensity (knob) |
| Synchro mechanism | Coordinates seat/back movement, adjustable back pressure |
| Headrest | Adjustable in height and tilt |
| Maximum load | 125 kg |
| Casters | Adaptable: hard casters for carpet, soft casters for hard floors |
| Maintenance | Cloth and mild soap, vacuum cleaner, specific leather products (test first) |
| Safety | Seated use only; gas lift must be replaced by a professional |
| Warranty | 5 years (excluding normal wear, 8h/day use, max 125 kg) |
| Manufacturer | HAIDER BIOSWING GmbH |
Frequently Asked Questions - 650 iQ S Meeting Bioswing
User questions about 650 iQ S Meeting Bioswing
0 question about this device. Answer the ones you know or ask your own.
Ask a new question about this device
Download the instructions for your Office chair in PDF format for free! Find your manual 650 iQ S Meeting - Bioswing and take your electronic device back in hand. On this page are published all the documents necessary for the use of your device. 650 iQ S Meeting by Bioswing.
USER MANUAL 650 iQ S Meeting Bioswing
Congratulations on your new BIOSWING®!
BIOSWING seating systems come with a unique 3D technology: A multifunctional seat, which can be moved in multiple directions and is dampened in a controlled manner, dynamically reflecting the body's energy.
Your brain responds to this by sending constant impulses to your postural muscles. The body and mind achieve active balance. BIOSWING® seating systems significantly increase concentration, well-being, and performance.

The BIOSWING 3D Multifunctional Seat.

Please read the following instructions in order to be able to use all available settings.
We wish you great pleasure as soon as you take place in the new BIO-SWING® experience.
Your HAIDER BIOSWING Team

- Customized settings for each individual's needs!

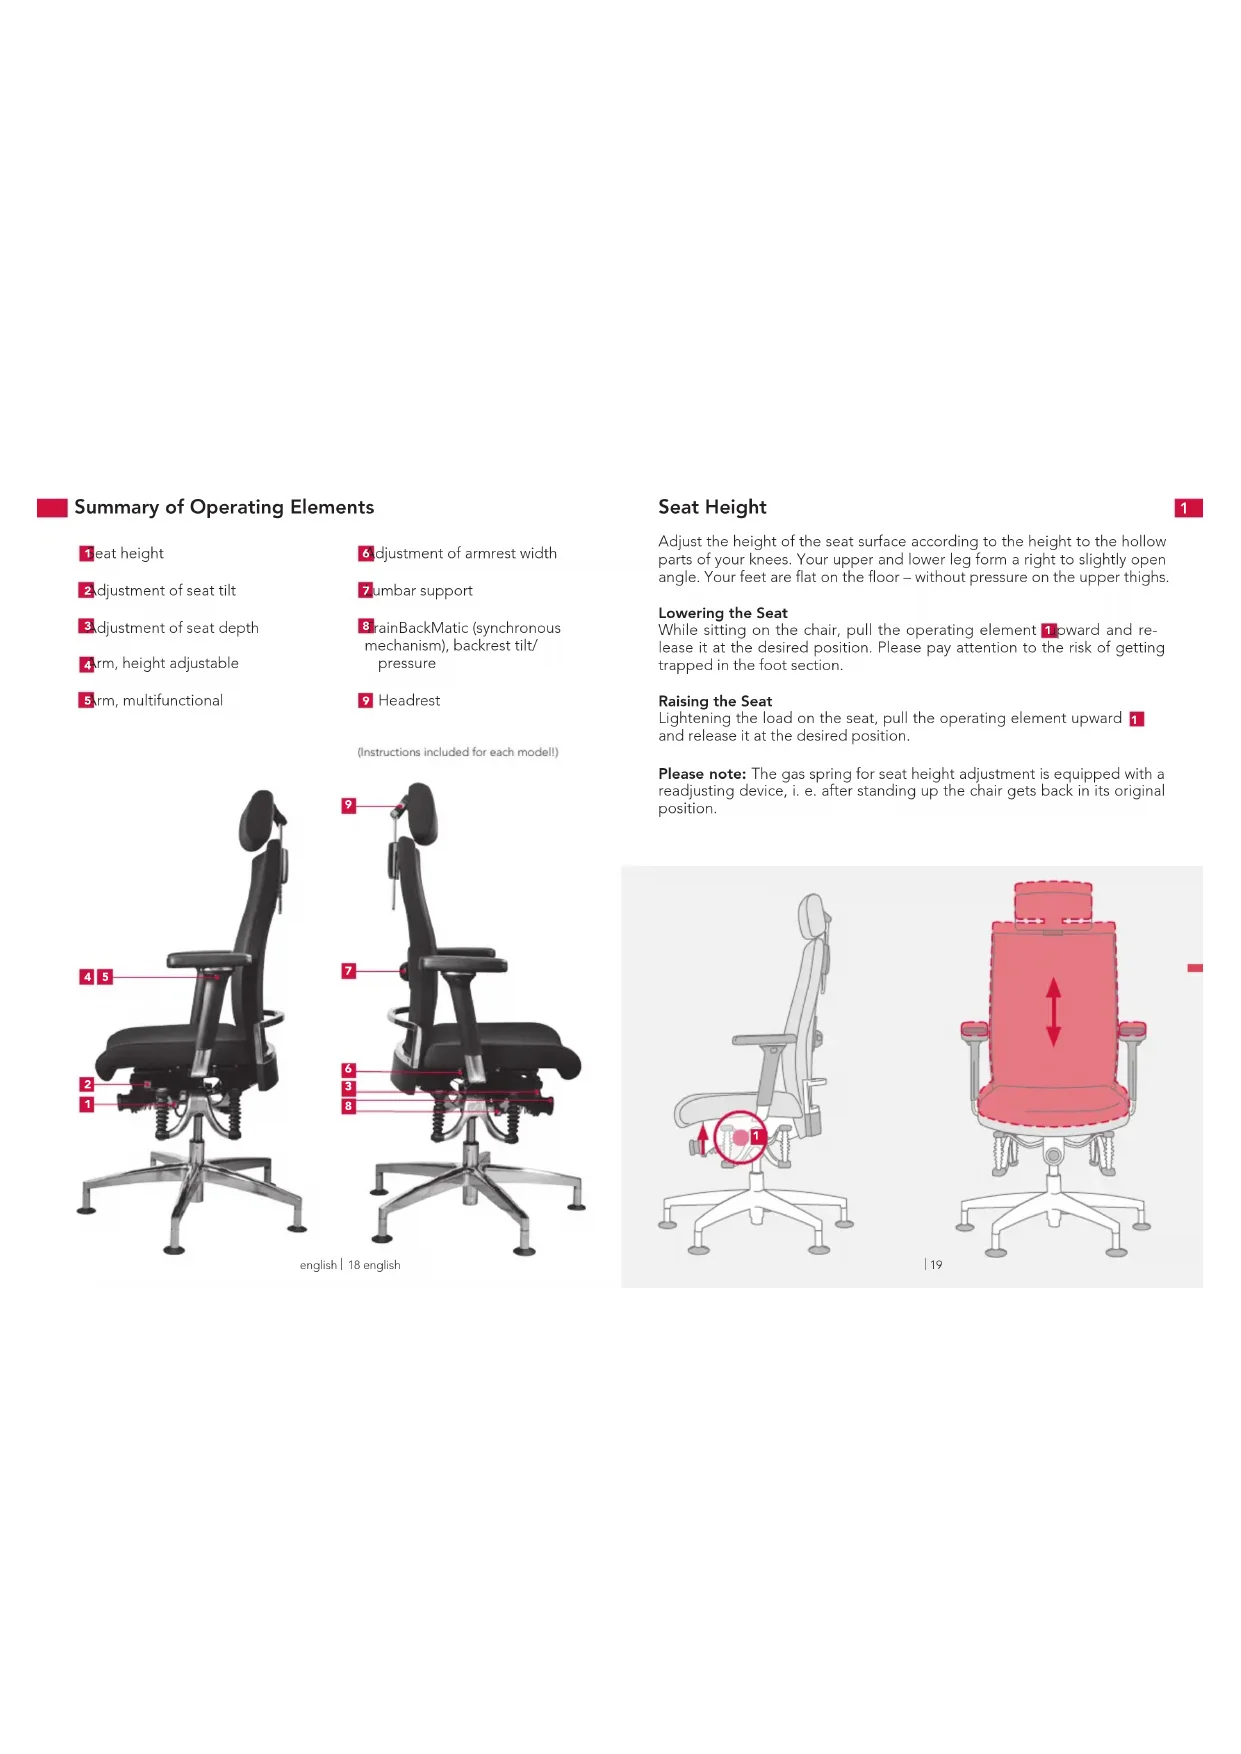
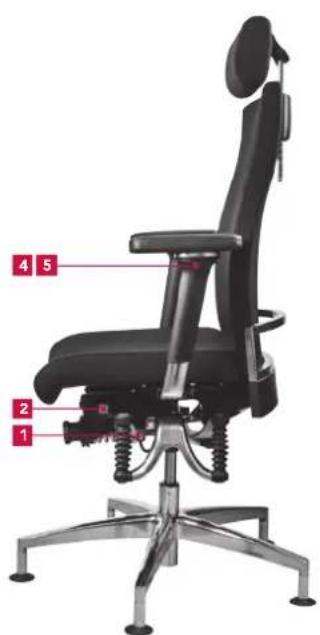
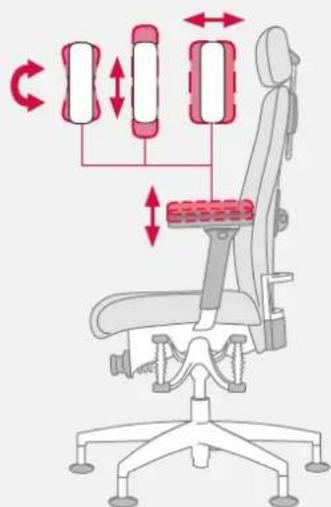
Summary of Operating Elements
1eat height
2 adjustment of seat tilt
3 adjustment of seat depth
4rm, height adjustable
5rm, multifunctional
6adjustment of armrest width
7umbar support
8 RainBackMatic (synchronous mechanism), backrest tilt/ pressure
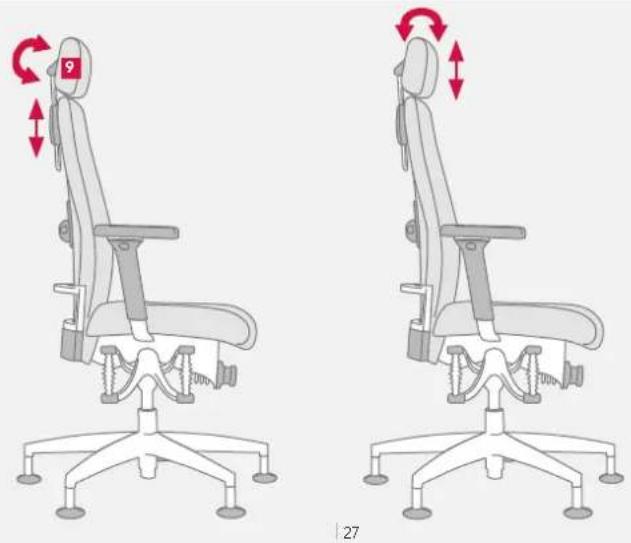
9 Headrest
(Instructions included for each model!)

english | 18 english
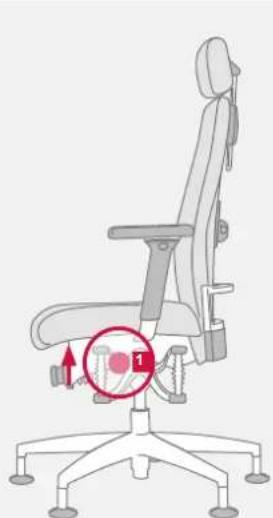
Seat Height
Adjust the height of the seat surface according to the height to the hollow parts of your knees. Your upper and lower leg form a right to slightly open angle. Your feet are flat on the floor without pressure on the upper thighs.
Lowering the Seat
While sitting on the chair, pull the operating element upward and release it at the desired position. Please pay attention to the risk of getting trapped in the foot section.
Raising the Seat
Lightening the load on the seat, pull the operating element upward and release it at the desired position.
Please note: The gas spring for seat height adjustment is equipped with a readjusting device, i. e. after standing up the chair gets back in its original position.
19
1
2 Adjustment of Seat Tilt
To support the physically correct tilt of the pelvis, you can adjust the seat surface either by utilizing the permanent-contact mechanism or by adjusting it for individually desired inclination. The seat tilt facilitates the straightening of the spinal column.
Seat Tilt with Permanent-contact Mechanism
While sitting on the chair, press the operating element 2 toward the front and then downward. The whole seat surface reclines according to the shift of your body weight and the position of your upper leg. To deactivate the setting, pull the operating element upward again.
Individually Adjusted Seat Tilt
While sitting, push the operating element 2 toward the front and adjust the required tilt by shifting your body weight and upper leg. Then release the operating element when complete.
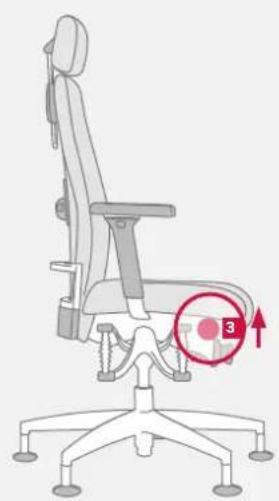
Adjustment of Seat Depth
The adjustment of the seat depth helps you to adjust the seat surface to the length of your upper leg. Make sure that the front edge of the seat is at a distance of six inches from the hollow part of the knee.
Individually Adjusted Seat Surface
While sitting, pull the operating element 3 upward, while simultaneously pushing the seat cushion forward and backward until the desired position is reached. Then release the operating element when complete.

21
3
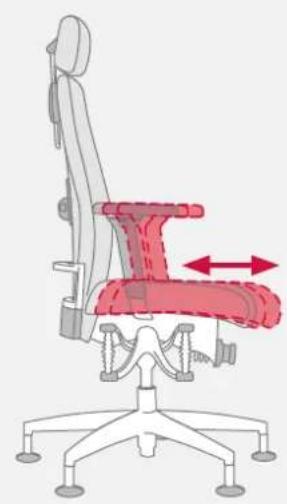
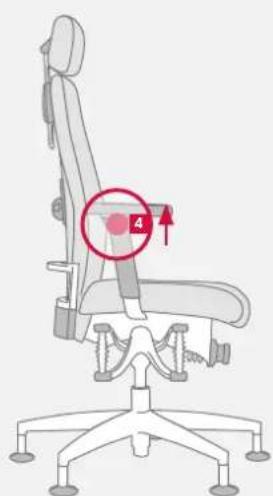
4 Arm, Height adjustable (1F)
To relieve the strain on shoulders and neck, the arms can be adjusted in height. Adapt the height so that you do not feel any tension in the shoulder area.
Adjustment of Arm in Height
Push the operating element 4, adjust the arms to the desired height, and then release the operating element.
(The arms can also be adjusted to the desired width. The armrest supports are located at the bottom of the seat cushion. Loosen the two visible screws and adjust the width. To achieve a wider setting, adjust the arms to the outermost hole of the threaded bushes and then tighten the screws firmly.)
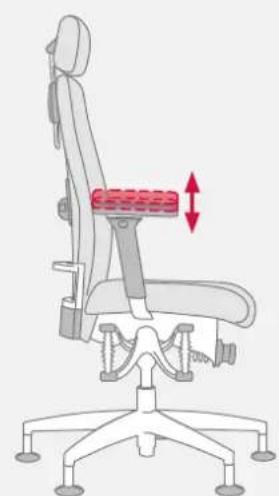
Multifunctional Armrest (4F)
The arm rests may be adjusted in height, in order to relief the shoulder and neck musculature. Please adjust the height that way, so that you don't feel any tightness in the shoulder. Additionally you may align the supports of the arm rests in width and profundity in accordance with the particular proportions of the upper part of the body, and rotate them in respect to the position of the forearm.
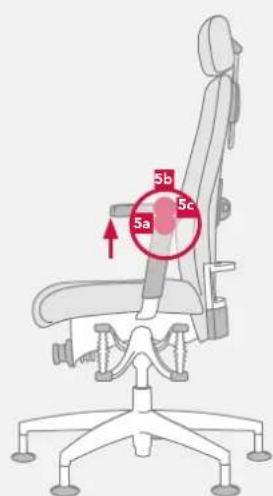
Adjustment of Armrest in Height
Push the operating element 5a adjust the arms to the desired height, and then release the operating element.
Adjustment and Movement of Armrests in Width and Depth
While noticing some resistance, push the armrests 5b rightward/leftward or forward/backward. The armrests can be rotated by using the button 5c located at the inner side of the armrest.
(The arms can also be adjusted to the desired width. The armrest supports are located at the bottom of the seat cushion. Loosen the two visible screws and adjust the width. To achieve a wider setting, adapt the arms to the outermost hole of the threaded bushes and then tighten the screws firmly.)
english|22 english
23
6 Adjustment of Armrest Width
To arrange the width of the armrests to one's individual needs, the armrests can be adjusted.
To Adjust Armrests
Turn the quick knob 6 located at the end of the armrest support clockwise, pull the armrest support inward or outward, and then tighten the knob again by turning it counterclockwise.
Please note: Adjusting the armrests to the smallest width can restrict the operating function of the armrest "height adjustable/multifunctional."
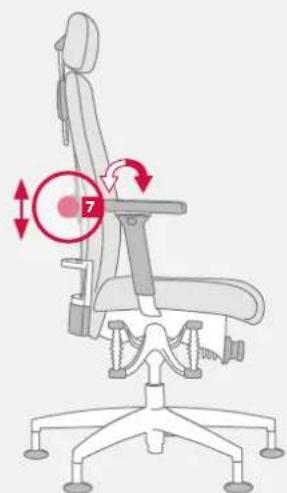
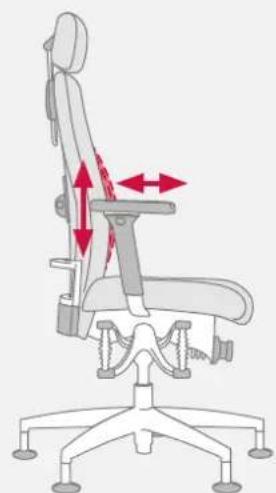
Lumbar Support
With the individually adjustable lumbar support you can adapt the curvature in the area of the lumbar lordosis. Adjust the curvature roughly at the height of the belt so that your lumbar spine receivers optimal support.
Adjustment of Lumbar Support to Shape of Back
Turning the rotary control 7 on the outer side of the backrest clockwise increases the curvature of the spine. Meanwhile, turning the rotary control 7 counterclockwise reduces the curvature of the spine.
Adjustment of Lumbar Support to Height
The height of the lumbar support can be adjusted by moving the rotary control located on the outer side of the backrest upward or downward into one of the holes on the elongated guide.


english|24 english
25
7
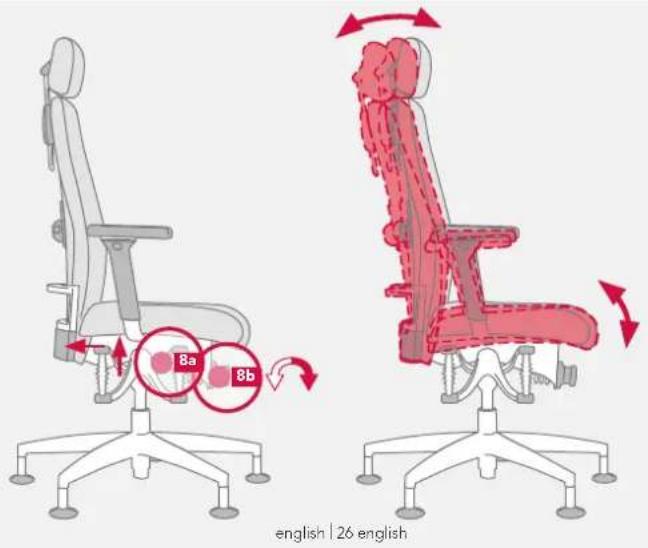
8 TrainBackMatic (Synchronous Mechanism)
The TrainBackMatic responds to the backrest pressure and automatically synchronizes seat and backrest for a physically beneficial motion sequence. Try to adjust the backrest pressure level so that you never feel to have to apply too much force to lean back. In this way, you motivate yourself to change your sitting position frequently; thus, promoting positive lumbar effects.
Adjustment of Backrest Tilt: Individually or with Permanent Contact
While sitting, pull the operating element 8a upward. The backrest follows your movements. As soon as you release the lever, the backrest is fixed. You can activate the permanent-contact mechanism by pulling the operating element 8apward and subsequently pushing it backward.
Individually Adapted Back Pressure
While sitting, pull the operating element 出 upward and then push backward so that you can adjust the back of the seat's tilt. Turn the hand wheel 出 , which is located in the middle under the seat surface, clockwise to increase the back pressure. Meanwhile, turning the hand wheel counterclockwise decreases the back pressure.
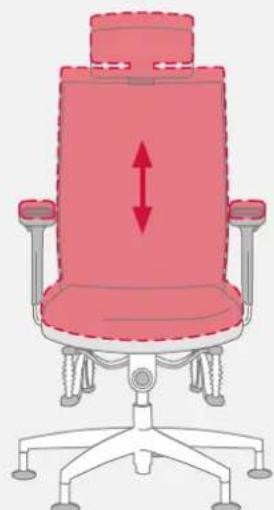
Headrest
The headrest supports the relief of the cervical spine, especially in the backward tilted posture of relaxation. The headrest can individually be adjusted in height and tilt.
Individual Adjustment of Headrest
While noticing some resistance, one can push the headrest upward or downward. The integrated joint guarantees an optimal adjustment.

Special Notes
Use the office swivel chair only - as intended - to sit on it. Never stand on the chair.
Gas Spring
In order to adjust the height, only specialist staff is allowed to make changes and perform work in the area of the gas spring. Do not heat or open the pneumatic spring with force.
Castors
For your safety, the office swivel chair is equipped in series with self-braking castors in order to impede the movement of an empty chair.
Pay attention to the correct choice of castors according to the floor covering.
If the chair is used on a soft floor (e.g. carpet), it should be equipped with hard castors. Hard castors are single-colored.
If the chair is used on a hard floor (e.g. parquet, linoleum, tiles), it should be equipped with soft castors. Soft castors are two-colored, which means that the tread has a different color.
Maintenance and Care
If the office swivel chair is used as intended, it is maintenance-free. Clean paint/plastic and metal surfaces with a soft hand brush or cloth with mild detergent, soap, or grease-dissolving liquid. According to how much the chair is used, a regular cleaning of the upholstery cover is recommended. The fabric/micro-fiber cover can be made dirt free by vacuum-cleaning it or with the help of standard dry foam. Leather coverings can be kept smooth for years by using standard leather-care products (solar radiation). Stains should be treated immediately. Check the effect of cleaning products first at a place that is not visible. Otherwise, select cleaning-agents can cause color discrepancies when compared to the untreated areas.
This certificate guarantees regular and thorough quality inspections.
HAIDER BIOSWING GmbH guarantees perfect quality and full functionality of its products.
The warranty lasts five years in consideration of normal wear and tear
involved in 8 hours use per day with a maximum weight load of 125kg
The warranty is valid from date of delivery/distribution of the product to our contracting partner.
(If you use the product continuously, contact us to request information about the time of the warranty and the warranty restrictions; the regulations can also be found on www.bioswing.de.)
This product has been carefully mounted and inspected by our employees.
Signature
In case of a complaint, please tell us the following serial number.
Serial number:
Your contracting partner: