
01910 - Thermostat Vimar - Free user manual and instructions
Find the device manual for free 01910 Vimar in PDF.

| Product type | Surface-mounted electronic chronothermostat |
| Brand | Vimar |
| Model | 01910 |
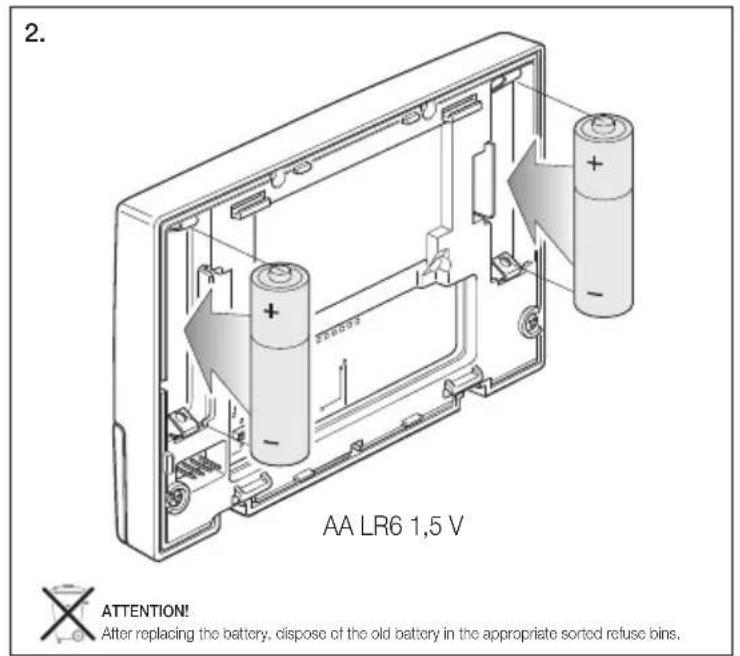
| Power supply | 2 AA LR6 1.5 V alkaline batteries (not supplied) |
| Battery life | More than one year |
| Relay output | Changeover 5(2) A 250 V~ |
| Control type | ON/OFF |
| Temperature setting range | Heating/Cooling: 5°C to 35°C; Frost protection: 4°C to 15°C |
| Reading accuracy | ≤ ±0.5 °C between +15 °C and +30 °C; ≤ ±0.8 °C at extremes |
| Resolution | 0.1 °C |
| Adjustable hysteresis | From 0.1 °C to 1 °C |
| Programming | Weekly, 3 temperature levels + frost protection, 15-minute step |
| Main functions | Manual/auto mode, frost protection, timed shutdown, °C/°F selection, reset, activation by telephone dialer |
| Display | Ambient temperature, time, day, graphical daily profile |
| Radio connection | Possible with actuators 01923/01924 via transmitter module 01921.1 |
| Protection degree | IP30 |
| Electrical class | II |
| Operating temperature | 0 °C to +40 °C |
| Installation | Surface-mounted, height 1.5 m, wall mounting or on flush box |
| Maintenance | Clean with a soft dry cloth. Replace used batteries. |
| Safety | Installation by a qualified technician. Comply with current electrical standards. |
| Spare parts | Standard AA batteries, optional radio modules (01921.1, 01923, 01924) |
| ErP classification | Class I, contribution 1% (EU regulation 811/2013) |
Frequently Asked Questions - 01910 Vimar
User questions about 01910 Vimar
0 question about this device. Answer the ones you know or ask your own.
Ask a new question about this device
Download the instructions for your Thermostat in PDF format for free! Find your manual 01910 - Vimar and take your electronic device back in hand. On this page are published all the documents necessary for the use of your device. 01910 by Vimar.
USER MANUAL 01910 Vimar
Surface electronic chronothermostat
Surface-mounted electronic chronothermostat 19
FRANÇAIS
11. CONFORMITA NORMATIVA.
When the symbol flashes, the batteries are dying. REPLACE THEM AS SOON AS POSSIBLE!
When the symbol slit, the output relay automatically switches OFF. REPLACE THE BATTERIES!
Programs and settings are not erased when the batteries are low or when changing them. After replacing the batteries, the time and day of the week must be reset.
VIMAR
CONTENTS.
1.Description. 20
2. Scope 20
3. Installation 20
4. Front view and view of controls 22
5. Connections Circulation pumps, burners, solenoid valves 23
Motor-operated valves 23
Phone dialer control 24
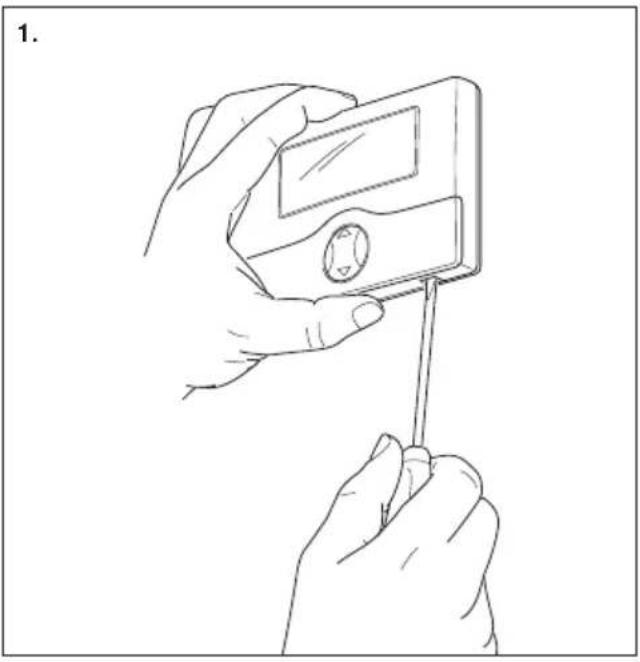
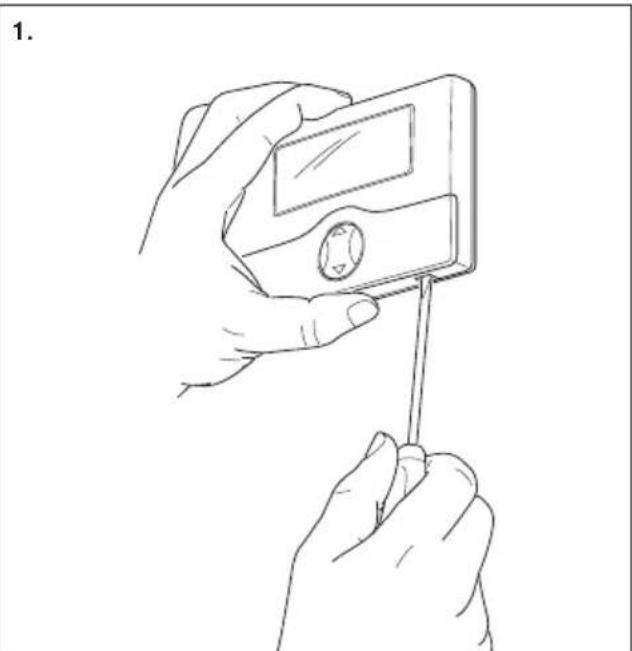
Fitting/Replacing power batteries 25
6. Functions of the buttons 26
7. Programming 28
8. Operation 31
9. Characteristics 34
10. Installation rules 35
11. Conformity to standards 35
1.DESCRIPTION.
Electronic timer-thermostat for ON/OFF ambient temperature control (heating and air-conditioning), daily/weekly programming, class I temperature control device (contribution 1% ), change-over relay output 5(2) A 250 V~, powered by batteries AA LR6 1.5 V (not supplied), wall mounting.
2. SCOPE.
The chronothermostat is suitable for ambient temperature control by regulating the supply circuit of the burner or heat pump (heating), or the supply circuit of the air conditioner (air conditioning), to maintain ideal temperature conditions seven days a week.
The large display shows the ambient temperature, day, time, the operating status of the system and the daily temperature profile set for the current program.

VIMAR
3. INSTALLATION.
The device must be surface-mounted at a height of 1.5m from floor level, in a position suitable for correctly measuring the ambient temperature. Do not install in niches, behind doors and curtains, or in areas affected by heat sources or outdoor weather.
The base of the device has 4 slots for fastening directly to the wall with 6 mm screws and studs (not included),or for installation in inset boxes with screws placed 60 mm or 83.5 mm apart (standard 3-module rectangular boxes).
Use in dry, non-dusty environments at a temperature between 0^ and +40^ .


21-ENGLISH
4. FRONT VIEW AND VIEW OF CONTROLS
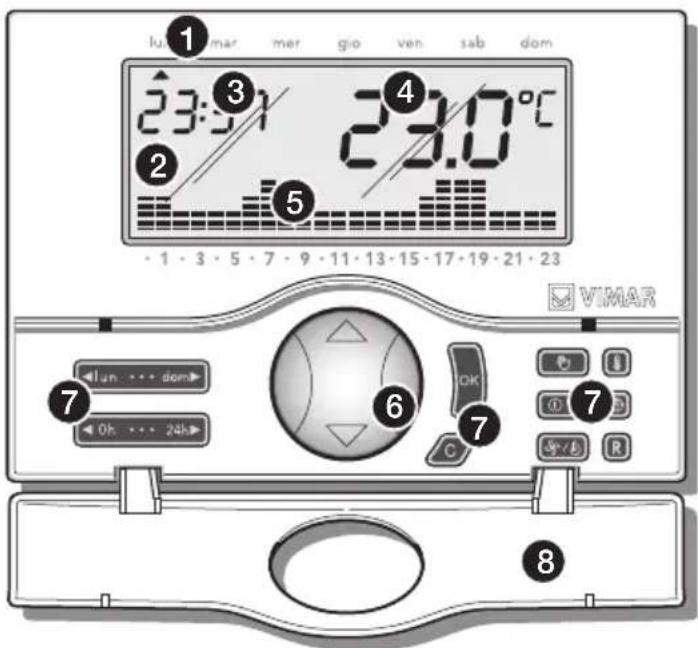
-
Days of the week:
-
lun = Monday
- mar = Tuesday
- mer = Wednesday
- gio = Thursday
- ven = Friday
-
sab = Saturday
dom = Sunday -
Display.
- Current time.
- Ambient temperature.
- Daily profile for the currently active program.
- "Mouse" button to control the basic functions.
- Function setting buttons.
- Flipping front cover.
5. CONNECTIONS.
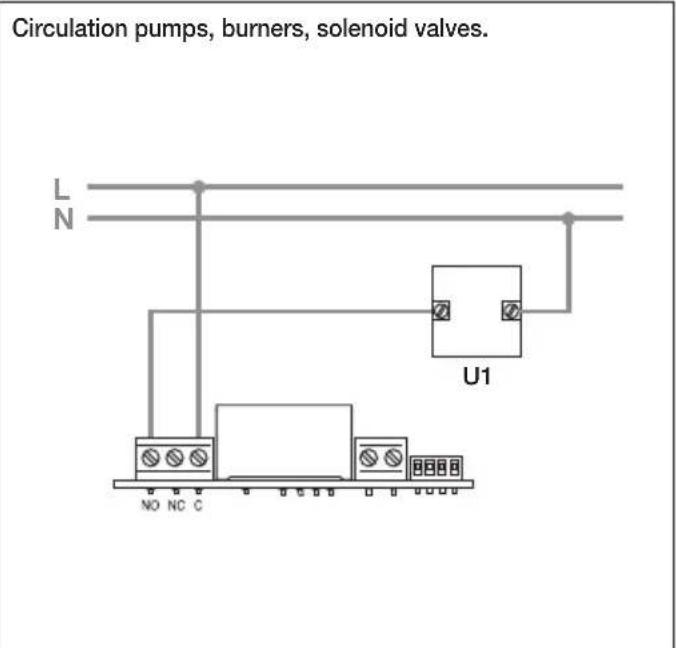
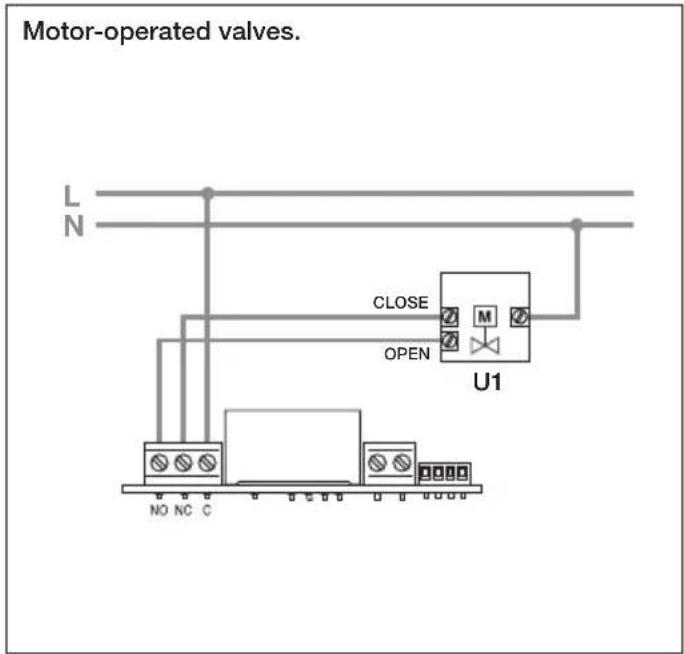

VIMAR
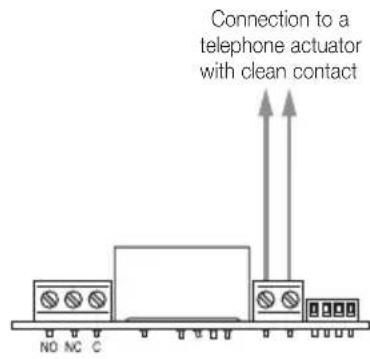
Phone dialer control.
It is possible to control the timer-thermostat remotely with a phone dialer connected to the terminals.
By closing the contact, the timer-thermostat operation is forced in manual mode and the buttons are locked; in this condition, the flashing symbol is displayed if you press any button.
On opening the contact the timer-thermostat is forced onto:
- Antifreeze mode if heating is on.
- OFF if air-conditioning is on. In this phase the keys of the timer-thermostat are not locked and it is possible to operate the device.
24-ENGLISH

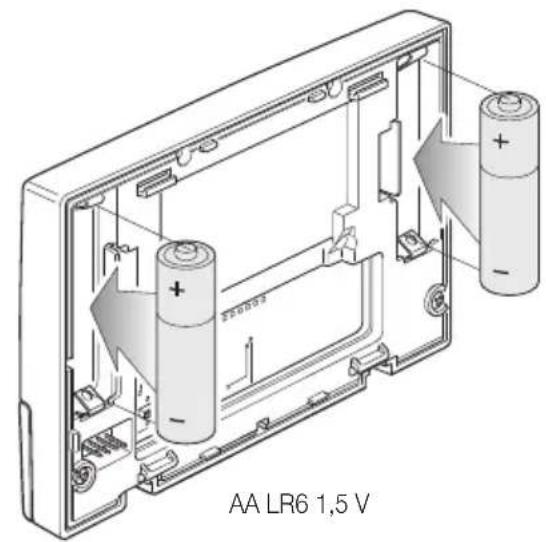
Fitting/Replacing power batteries.
6. FUNCTIONS OF THE BUTTONS.
- Buttons

Make it possible to enter the "Programming" function and select the day to be programmed, and to copy the program.
- Buttons

Make it possible to enter the "Programming" function and select the time to be programmed.
- Button

Edit the selected parameters (i.e. temperature increase/decrease)
- Button

Confirm the settings.
- Button

Delete or return to the previous screen.
- Button

When the chronothermostat is on, selects manual or automatic

VIMAR
mode. When the chronothermostat is off, pressing once turns it on in manual mode, pressing twice turns it on in automatic mode.
- Button

Pressed in sequence, sets the functions: "Off", "Off on timer", "Antifreeze" (available only in heating).
OFF.
Makes it possible to shut off the chronothermostat. The display shows time and temperature and the output relay remains OFF.
ANTIFREEZE
Available only in heating, sets a minimum temperature level to avoid damaging the wires, or to prevent the temperature from falling below a given safety level.
- OFF ON TIMER.
Makes it possible to shut off the chronothermostat for a desired time period, up to 99 hours.
- Button

Holding down this button makes it possible to select the operating mode of the chronothermostat, choosing between "Heating" or "Air-conditioning".
- Button
Pressed in sequence, makes it possible to set the values for the "Antifreeze temperature", of the "Temperature levels T1-T2-T3", the "Hysteresis", and "Temperature scale".
- TEMPERATURE LEVELS.
Displays and/or modifies the values of the temperature setpoints T1, T2, T3 for both heating and cooling programs.
HYSTERESIS.
Adjusts the value of the temperature hysteresis parameter. Hysteresis is the amount by which the ambient temperature can deviate from the set-point before the system is switched on and off. By adapting the hysteresis parameter to the type of system, it is possible to prevent repeated switch-on and switch-off around the set-point value; systems with high inertia (for example with cast iron radiators) require a low hysteresis value, whereas systems with low inertia (for example fan-convectors) require a higher value.
Example.
With a temperature set-point of 20^ and a hysteresis of 0.3^ , the system will switch on when the ambient temperature drops
below 19.7^ , and will switch off when the ambient temperature reaches 20.3^ .
- TEMPERATURE SCALE.
Used for setting the units of measurement for temperature, choosing between degrees Celsius and degrees Fahrenheit.
- Button
Sets the current day of the week and time. In programming, it is used to set the time in 15-minute increments.
- Button
When this button is held down, all parameters set return to their original default status (clock reset, user programs deleted, return to default values for the 3 temperature levels).
7.PROGRAMMING
Make the electrical connections, install the appliance and lastly insert the batteries.
- Setting date and time
Before starting to program the timer-thermostat, it is advisable to set the current date and time.
- Press the button; the device's display will show only the arrow at the top indicating the date and time to set.
Using the button, move the arrow onto the current date. - Press the button to confirm and pass on to set the time; the two digits indicating the hour will start blinking.
- Set the current hour with the button.
- Press the OK button to confirm and pass on to set the minutes; the two digits indicating the minutes will start blinking.

VIMAR
- Set the current minutes with the button.
- Press the button to confirm and quit.
- Setting the temperature levels
The temperature levels are the temperatures that will later be entered in the automatic program that will be created. The timer-thermostat has 3 temperature levels T1, T2 and T3 as well as T antifreeze.
-
Press the button; the device's display will show only T* (anti-freeze) with the reference value blinking.
Using the button, set the desired antifreeze temperature. -
Press the button to confirm and pass on to set the temperature T1; the display will show the reference value blinking.
- Using the button, set the desired temperature T1.

VIMAR
- Press the button to confirm and pass on to set the temperature T2; the display will show the reference value blinking
Using the button, set the desired temperature T2. - Press the button to confirm and pass on to set the temperature T3; the display will show the reference value blinking.
Using the button, set the desired temperature T3. - Press the button to confirm; the display will show the icon diff and the related hysteresis that blinks on 00.2^
Using the button, set the desired hysteresis. -
Press the button to confirm and pass on to set the temperature scale; the display will show the current temperature with the unit of measurement blinking ( ^ C Celsius or ^ F Fahrenheit).
Using the button, set the desired unit of measurement (in Italy they use °C). -
Press the button to confirm and quit.
- Creating the automatic program
With this procedure you can create the time program that, for each day of the week, controls the room temperature (heating and air-conditioning) according to the settings T1, T2 and T3.
- Press the button on the button to 0h 24
enter the program creation menu; the display will show a blinking arrow on the day of the week. - Select the desired day with the button.
When creating the program you are always recommended to start from Monday.
Using the button, select the time; the display will show 00:00 and alongside the set temperature level T1 or T2 or T3.

VIMAR
Using the button, set the desired temperature level; the display will show the histogram changing according to the setting.
Using the button, select the following hours (from 01.00 to 23:00) and with the button, set the desired temperature level for each one of them.
The display will show the histogram for the selection.
- After setting the temperature for 23:00, press the button to confirm; program creation for Monday is then concluded.
- Press the button to select Tuesday; the display will show the arrow on mar and the COPY icon blinking.
- If you want Tuesday's program to be the same as Monday's, press the button; Monday's program will be copied onto Tuesday
- Whereas, if you want to set the program differently, press the button and proceed by setting the desired temperature level for each hour.
The procedure for creating the automatic program must then be repeated in the same way for all the other days of the week.
3. OPERATION
When the timer-thermostat has been programmed it can be set in operation.
If the relay is on, the display will show the symbol in the winter (heating) or the symbol in the summer (air-conditioning).
The symbol indicates there is a TX radio module or no relay module; wait for at most 2 minutes for automatic recognition or do a reset.
- Setting manual operation
- If the timer-thermostat is working in automatic mode, press the button to pass onto manual mode; the display will show the
Using the button, select the desired temperature then press the OK button to confirm.
If necessary, wait approximately 5 seconds for the operation to be confirmed.

VIMAR
- Setting automatic operation
- If the timer-thermostat is working in manual mode, press the button to pass onto automatic mode; the display will show the histogram for the program's day selection.
In this case it is possible to pass onto manual mode temporarily, for example when the desired temperature is not the programmed temperature, by selecting the setting with the button and waiting approximately 5 seconds for the operation to be confirmed.
The new setting will remain active until the next programmed temperature level change, after which the saved program will be restored.
To go back onto automatic operating mode immediately, press the button.

VIMAR
- Switch-off
- Press the button; the display will show the OFF symbol blinking alongside the temperature.
- Press the button to confirm.
To switch the timer-thermostat back on, press the button.
Timed switch-off
- Press the button; the display will show the OFF symbol blinking alongside the temperature.
- Press the button again; the display will show two blinking digits indicating the number of hours (h) to set.
Using the button, select the desired number of hours (from 1 to 99) and then press the button to confirm.
The timer-thermostat will then stay off for the set period of time after
which it will switch on going into the prior operating mode (manual or automatic).
Antifreeze
- Press the button; the display will show the OFF symbol blinking alongside the temperature.
- Press the button again; the display will show two blinking digits to set if you want timed switch-off for the device.
- Press the button a third time; the display will show 3 blinking digits indicating the antifreeze temperature to set (from 04.0^ to 15^ ).
- Using the button, select the desired temperature and then press the button to confirm.
With the heating system off, the display will show the antifreeze symbol next to the measured temperature.

- Summer/winter selection
This type of function is only used when, besides the heating system, it is also necessary to control the air-conditioning system with the timer-thermostat.
- Press and hold down the button; the display will show the symbol or the symbol
Using the button, select the symbol for the winter season and the symbol for the summer and press the button to confirm.
In air-conditioning operation (summer), the steps performed on the timer-thermostat are the opposite to the ones in heating operation (winter).
9. CHARACTERISTICS
Supply voltage: 3V d.c. with 2 AA LR6 1,5 V batteries (not included)
- Batteries life: up to 1 year
Output: 5(2) A 250V - change-over relay output
Type of regulation: ON/OFF
It is possible to create a radio link with actuators 01923 and 01924 by replacing the relay module with the transmitter module 01921.1
- Updating of display temperature: every 20 s
- Ambient temperature display range: 0^ + 40^
- Resolution of the reading: 0,1^
- Resolution of the settings: 0,1^
- Precision of the reading:
- ≤ ±0,5 °C between +15 °C and +30 °C
- ≤ ±0.8 °C at the temperature extremes
Hysteresis: adjustable between 0,1 ^ C and 1^ -
Thermostat operating range:
-
+4°C - +15°C in antifreeze mode
- +5°C - +35°C in heating or cooling mode
Clock accuracy: ≤ ± 1 s a day

VIMAR
Principal functions:
- hourly temperature settings in 15-minute steps
- 3 programmable temperature set-points for heating + 3 temperature set-points for cooling + 1 antifreeze level
-
weekly programming
-
1 automatic program that may be set by the user (for both heating and air-conditioning)
- possibility of forcing the program by manually adjusting the temperature
- regulation for both heating and cooling systems
-antifreeze function - possibility of timed switch off
remote activation option via telephone dialler - select between display in degrees Celsius and Fahrenheit
device reset
Protection degree: IP30
Class II equipment:
Number of manual cycles: 3.000
Number of automatic cycles: 100.000
- Type of contact opening: micro-breakdown
- Type of action: 1CU
-Tracking index:PTI175
- Pollution status: 2 (normal)
- Impulsive rated voltage: 4000 V
- Ambient temperature range during transport: -25°C + 60°C
- Operating temperature: T40 (0 °C +40 °C)
ErP classification (Reg. EU 811/2013): class I, contribution 1%
Software class: A
WEEE - Information for users
If the crossed-out bin symbol appears on the equipment or packaging, this means the product must not be included with other general waste at the end of its working life. The user must take the worn product to a sorted waste center, or return it to the retailer when purchasing a new one. Products for disposal can be consigned free of charge (without any new purchase obligation) to retailers with a sales area of at least 400m^2 , if they measure less than 25cm . An efficient sorted waste collection for the environmentally friendly disposal of the used device, or its subsequent recycling, helps avoid the potential negative effects on the environment and people's health, and encourages the re-use and/or recycling of the construction materials.
10. INSTALLATION RULES.
Installation should be carried out by qualified staff in compliance with the current regulations regarding the installation of electrical equipment in the country where the products are installed.
11. CONFORMITY TO STANDARDS.
LV Directive. EMC Directive.
Standards EN 60730-1, EN 60730-2-7, EN 60730-2-9.
REACH (EU) Regulation no. 1907/2006 - Art.33. The product may contain traces of lead.
ATTENTION!
It is possible to control the timer-thermostat remotely with a phone dialer connected to the terminals.
Introduction/Remplacement batteries alimentation.
2.

ATTENTION!
11. CONFORMITE AUX NORMES.
Directive BT. Directive EMC.
Normes EN 60730-1, EN 60730-2-7, EN 60730-2-9.
- DIFERENTIAL TÉRMICO.
- FRANÇAIS
- CONFORMITA NORMATIVA.
- VIMAR
- CONTENTS.
- 1.DESCRIPTION.
- SCOPE.
- INSTALLATION.
- FRONT VIEW AND VIEW OF CONTROLS
- CONNECTIONS.
- Phone dialer control.
- FUNCTIONS OF THE BUTTONS.
- - Buttons
- - Button
- OFF.
- ANTIFREEZE
- - OFF ON TIMER.
- - TEMPERATURE LEVELS.
- HYSTERESIS.
- Example.
- - TEMPERATURE SCALE.
- 7.PROGRAMMING
- - Setting date and time
- - Setting the temperature levels
- - Creating the automatic program
- OPERATION
- - Setting manual operation
- - Setting automatic operation
- - Summer/winter selection
- CHARACTERISTICS
- WEEE - Information for users
- INSTALLATION RULES.
- CONFORMITY TO STANDARDS.
- ATTENTION!
- CONFORMITE AUX NORMES.
- - DIFERENTIAL TÉRMICO.
Brand : Vimar
Model : 01910
Category : Thermostat