
20446 - Thermostat Vimar - Free user manual and instructions
Find the device manual for free 20446 Vimar in PDF.

| Product type | Electronic chronothermostat |
| Brand | Vimar |
| Model | 20446 |
| Power supply | 3 V DC via 2 AA LR6 1.5 V batteries |
| Output | Changeover relay 5(2) A 250 V~ |
| Control type | ON/OFF |
| Heating/cooling setting range | +5°C to +35°C |
| Antifreeze range | +4°C to +15°C |
| Resolution | 0.1°C |
| Accuracy | ≤ ±0.5°C between +15°C and +30°C |
| Thermal differential | Adjustable from 0.1°C to 1°C |
| Programming | Daily and weekly, 3 temperature levels + antifreeze |
| Functions | Off, timed off, manual, timed manual, automatic, antifreeze |
| Input for remote activation | Yes, via telephone dialer (potential-free contact) |
| Protection degree | IP40 with anti-extraction device, IP20 without |
| Operating temperature | 0°C to +40°C |
| Compliance | LVD directive, EMC directive, EN 60730 standards |
| ErP class | Class I, contribution 1% |
Frequently Asked Questions - 20446 Vimar
User questions about 20446 Vimar
0 question about this device. Answer the ones you know or ask your own.
Ask a new question about this device
Download the instructions for your Thermostat in PDF format for free! Find your manual 20446 - Vimar and take your electronic device back in hand. On this page are published all the documents necessary for the use of your device. 20446 by Vimar.
USER MANUAL 20446 Vimar
Battery-timer-thermostat
Battery-timer-thermostat 19
FRANÇAIS
12. CONFORMITA NORMATIVA.
Direttiva BT.
Direttiva EMC.
When the symbol flashes, the batteries are dying.
REPLACE THEM AS SOON AS POSSIBLE!
When the symbol is lit, the output relay automatically switches OFF.
REPLACE THE BATTERIES!
Programs and settings are not erased when the batteries are low or when changing them.
After replacing the batteries, the time and day of the week must be reset.
VIMAR
CONTENTS.
1.Description 20
2. Field of application 20
3. Installation 20
4. Front view, controls and display 21
5. Connections 5.1. Circulation pumps, burners, solenoid valves 22
5.2.Motorized valves 22
5.3. Phone dialer control 23
5.4. Insertion/Replacement of buffer battery 24
5.5. Insertion/Replacement of supply battery 26
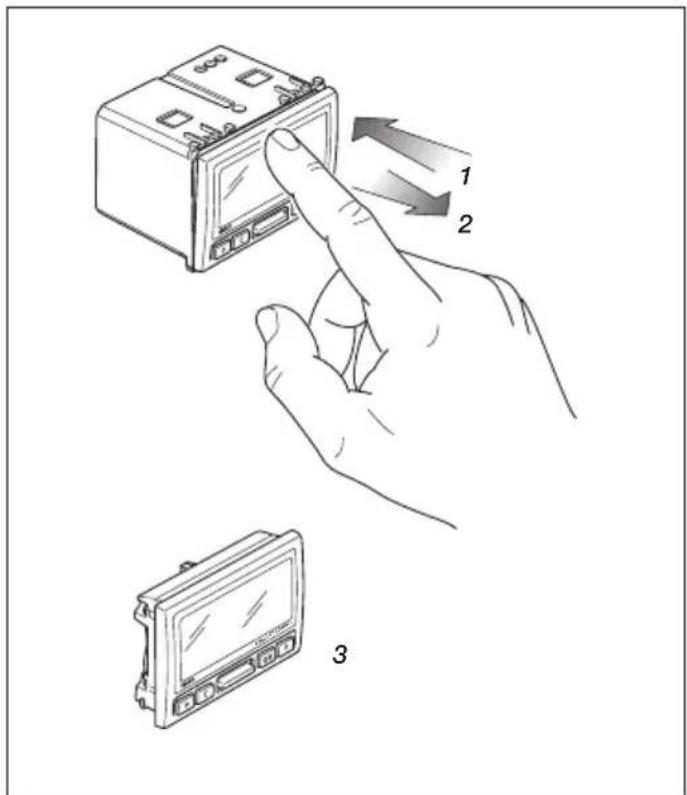
6. Anti-removal device 27
7. Key functions 28
8. Operation 29
9. Programming 30
10 Main characteristics 34
11. Installation rules 35
11. Conformity to standards 35
1.DESCRIPTION
Electronic timer-thermostat for ON/OFF ambient temperature control (heating and air-conditioning), daily/weekly programming, class I temperature control device (contribution 1% ), input for remote switching of phone dialer on/off, change-over relay output 5(2) A 250V , powered by batteries AA LR6 1.5 V - 3 modules.
2. FIELD OF APPLICATION
The appliance is designed to control room temperature by acting on the control circuit of the burner or circulation pump (heating) or on the control circuit of the air conditioner (air conditioning), ensuring an ideal temperature, every day, throughout the week.
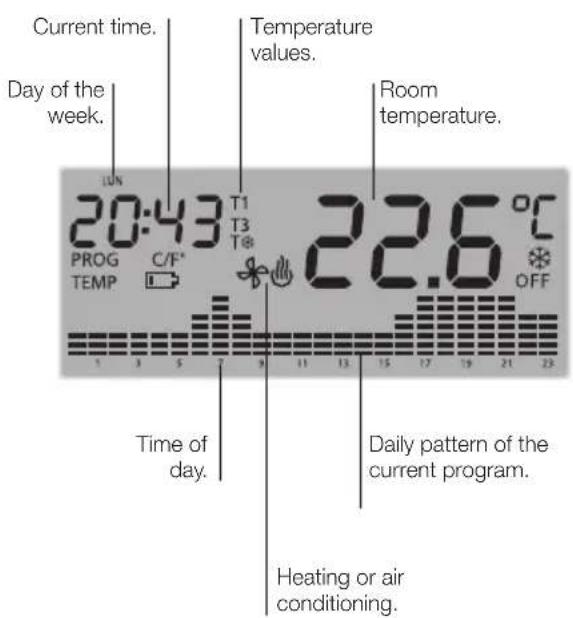
The large display shows the room temperature, day, time, system operating status and the daily temperature profile set for the current program.

VIMAR
3. INSTALLATION.
The appliance must be installed in flush or surface mounting boxes with Eikon, Arké and Plana frames and plates at a height of 1.5m off the floor in a suitable position for correctly detecting the ambient temperature. It must not be installed in niches, behind doors and curtains or in areas affected by sources of heat or atmospheric factors. In particular, it must not be installed on outer walls or in association with appliances that generate heat (e.g. dimmers or lamps).
It should be used in dry, dust-free places at a temperature between 0^ and +40^ .
4. FRONT VIEW, CONTROLS AND DISPLAY.
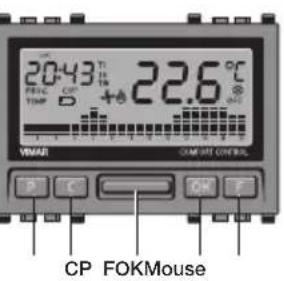
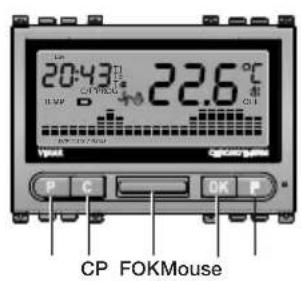
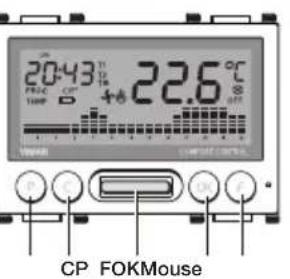
P: Access to programming mode.
C: Delete or return to the previous screen.
Mouse: To set numerical values and for scrolling.
OK: Confirm or continue to the next screen.
F: Select operating mode.

VIMAR

VIMAR
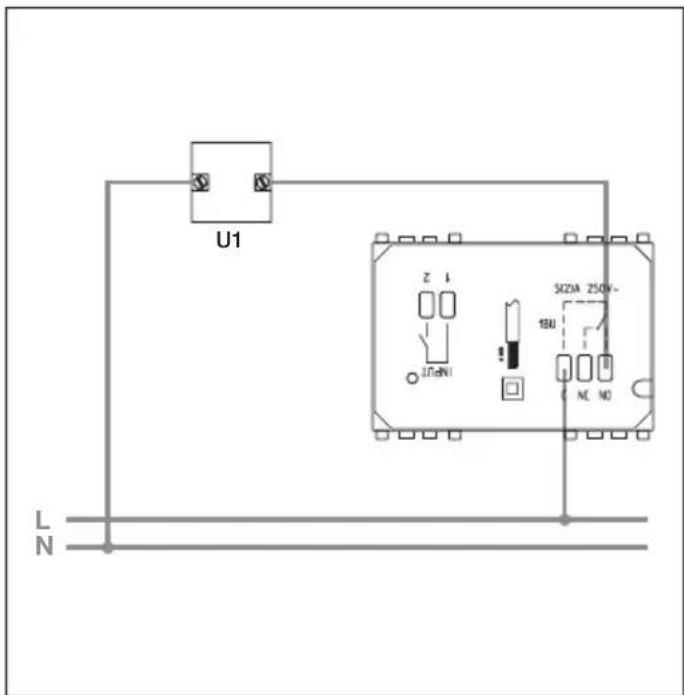
5. CONNECTIONS.
5.1 - Circulation pumps, burners, solenoid valves.
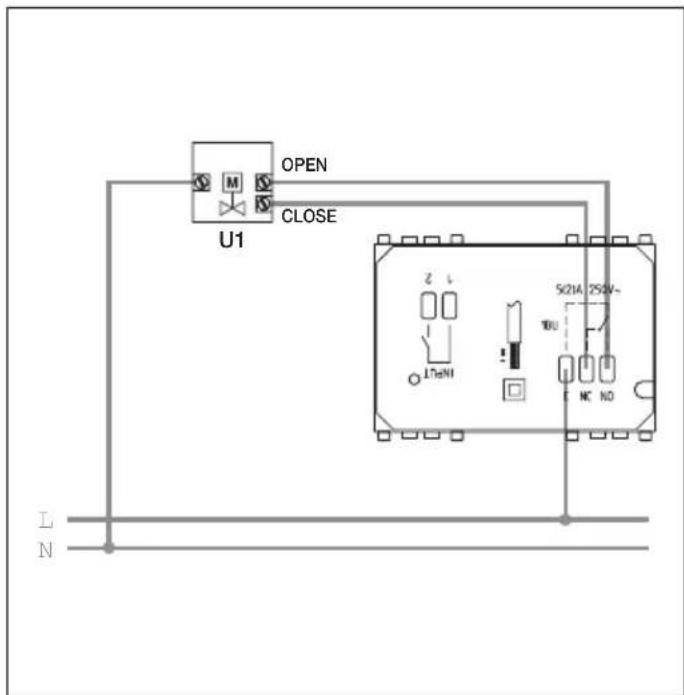
5.2 - Motorized valves.

VIMAR
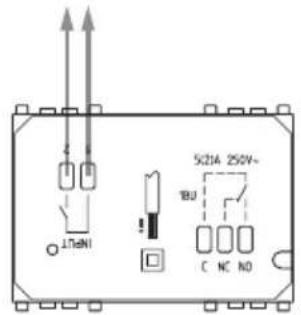
5.3 - Phone dialer control.
It is possible to control the timer-thermostat remotely with a phone dialer connected to the INPUT terminals.
By closing the contact, the timer-thermostat is forced onto manual operation and the keys P, C, “▲” “▼” (horizontal bar), OK, F are locked (if any key is pressed the display will show the symbol blinking for approximately 3 s).
On opening the contact the timer-thermostat is forced onto:
- Antifreeze mode if heating is on.
- OFF if air-conditioning is on. In this phase the keys of the timer-thermostat are not locked and it is possible to operate the device.
Connection with phone actuator with clean contact without potential only SELV environment.

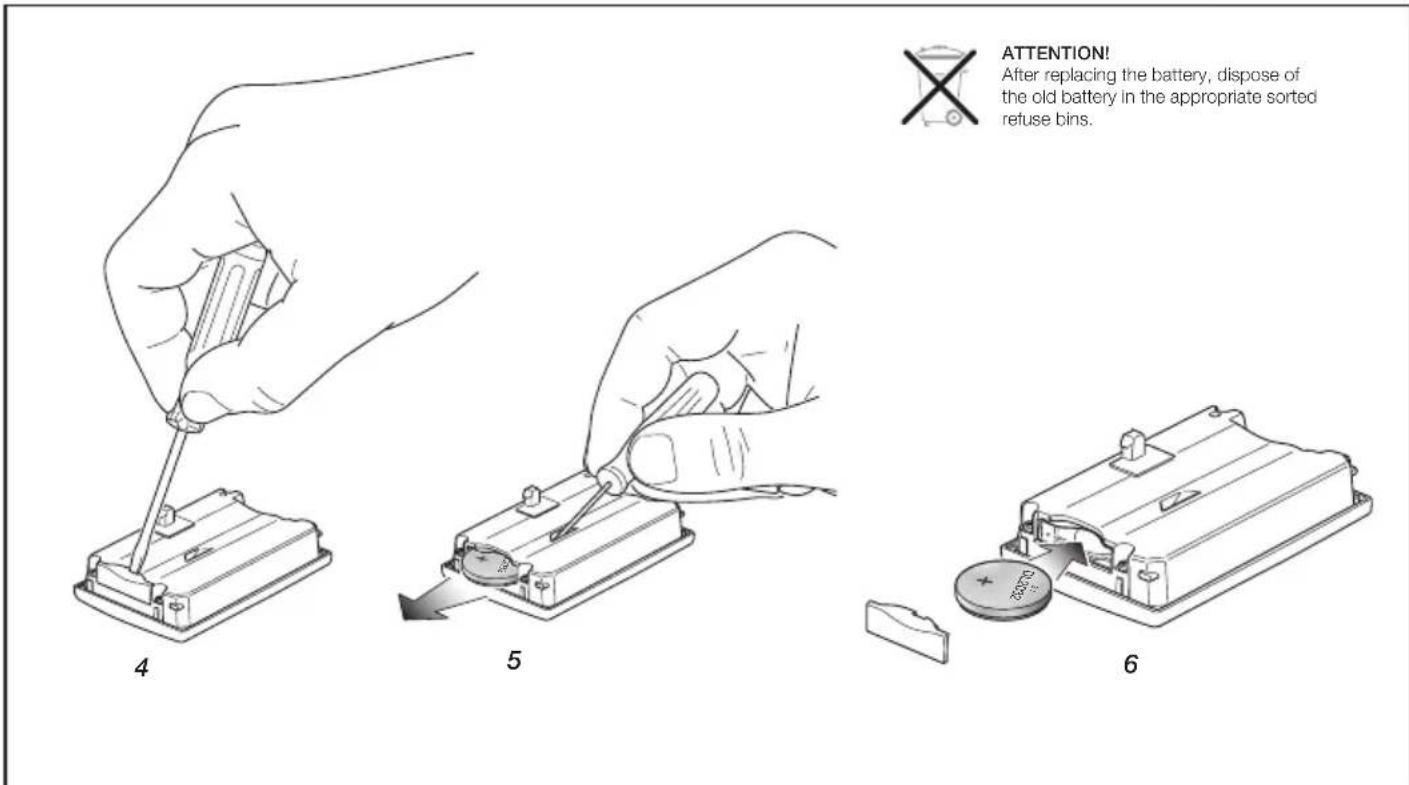
5.4 - Insertion/Replacement of buffer battery.
The buffer battery (type CR2032) permits changing the settings and programming even when the appliance has been removed from its seat. In addition, it ensures updating the time and day and the operation of the display for at least 10 days if there is no mains voltage.
When the timer-thermostat is taken out of its seat the display shows the l symbol.
It is not, moreover, possible to control the relay output.
The buffer battery is necessary for the appliance to work properly.

VIMAR

VIMAR
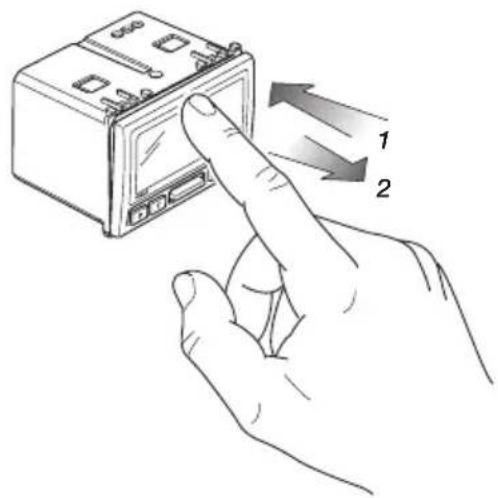
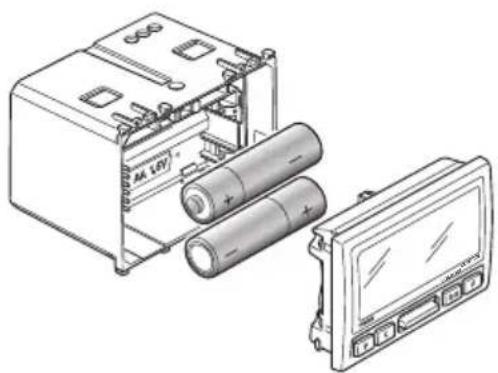
5.5 - Insertion/Replacement of supply battery.
The empty battery symbol on the display indicates that the battery charge is running down.
Warning! In this phase the output status is always OFF.
To restore operation it is necessary to change the batteries.

ATTENTION!
After replacing the battery, dispose of the old battery in the appropriate sorted refuse bins.
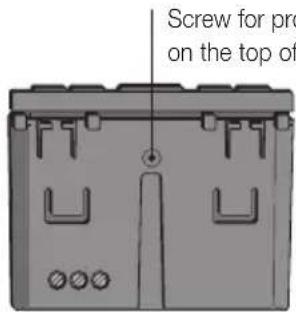
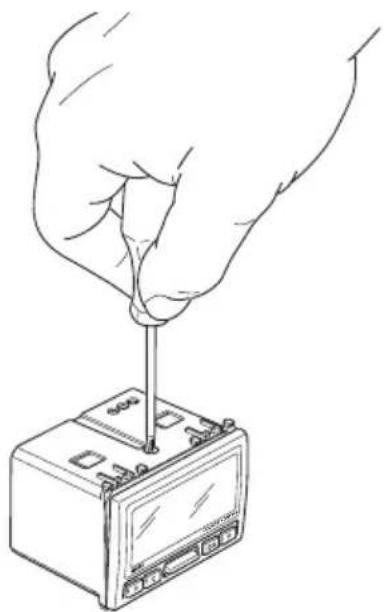
6.ANTI-REMOVAL DEVICE.

VIMAR
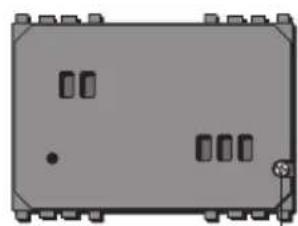
Screw for protection against removal, on the rear of the switch
7. KEY FUNCTIONS.
- KEY P.
Used to access the various programming modes.
Pressed in sequence, it permits setting the:
- time and day of the week;
- automatic program;
- temperature values for manual, antifreeze, temperature levels T1, T2, T3 and temperature differential operation;
- heating or air conditioning;
- temperature scale.
- KEY C.
Used to cancel a modification or exit a mode and return to the previous one.
- KEY“▲”“▼”(vertical bar).
Used to edit and/or scroll through the selected parameters (increase/decrease numerical values and temperature levels, select the day of the week, etc.).
- KEY OK.
Confirm settings.

VIMAR
- KEY F.
Used to select the timer-thermostat operating mode. Pressed in sequence, it permits setting:
- switch-off;
timed switch-off;
-antifreeze; - manual;
timed manual; - automatic.
8. OPERATION.
Make the electrical connections, install the appliance and then insert the batteries.
If the relay is on, the flame symbol is shown in the winter or the propeller symbol in the summer.
SWITCH-OFF
Used to switch off the system.
Press key F until the required mode is displayed (OFF blinking), then press the OK key.
TIMED SWITCH-OFF.
Used to switch off the system for a set time.
Press key F until the required mode is displayed (symbols and OFF blinking); using key “▲” “▼” set the time (max 99 hours), then press the OK key.
N.B. It is not possible to access the Timed Switch-Off mode if the appliance is already OFF or in another timed status.

VIMAR
ANTIFREEZE
Used to set a minimum temperature level to avoid damage to pipework or prevent the temperature from falling below a certain safety level.
Press key F until the required mode is displayed (symbol blinking); using key “▲” “▼” set the temperature (from 4 to 15 °C), then press the OK key.
N.B. It is not possible to access the Antifreeze mode if the appliance is on Air Conditioning.
MANUAL.
Used to set switching the heating or air-conditioning on and off manually.
Press key F until the required mode is displayed (symbol blinking), then press the OK key.
TIMED MANUAL
Used to set manual operation for a set time. Press key F until the required mode is displayed (symbols linking); using key “▲”“▼” set the time (max 99 hours), then press the OK key.
N.B. It is not possible to access the Timed Manual mode if the appliance is already on Manual or in another timed status.
AUTOMATIC
Used to set operation according to the previously configured automatic program.
Press key F until the required mode is displayed (temperature histograms blinking); then press the OK key.
N.B. It is possible to force the temperature values temporarily with the key "▲" "▼" (for example when the required value is higher or lower than the predefined one); this forcing will not however, alter the set program.

VIMAR
9.PROGRAMMING.
- SETTING THE TIME AND DAY.
Used to set the current time and day.
- Press key P until the required mode is displayed (name of day blinking); using key “▲” “▼” set the day of the week, then press the OK key.
- Using key “▲” “▼” set the hour (hours blinking), then press the OK key.
- Using key “▲” “▲” set the minutes (minutes blinking), then press the OK key.

VIMAR
AUTOMATIC PROGRAM.
Used to modify the automatic program for each day of the week.
Programming starts from hour 0 and ends with the selection of the temperature level for hour 23.
- Press key P until the required mode is displayed (name of day blinking, PROG and temperature histograms lit up steady); using key "▲" "▼" set the day of the week, then press the OK key.
- Using key "▲" "▼" set the valid temperature level for the selected time (histogram blinking), then press the OK key.
- Repeat the above point for all the hours from 0 to 23; scrolling is done with keys C and OK (to pass on to the next hour press OK, to go back to the previous hour press C).
- After setting hour 23 the display will show COPY blinking; by pressing OK the program that has just been set will be copied onto the next day whereas by pressing C the programming can be done hour by hour.
N.B. In addition, it is possible to set the time to activate the temperature levels in steps of 15 minutes.
After selecting the time to set the temperature level, press in sequence key F (the interval of 15, 30 and 45 minutes is shown on the display at the top left by the selected time).
Example: You want to program the timer-thermostat so that on Thursday at 7:45 it moves onto temperature level T3.
- Press key P until the automatic program is displayed;
- Using key “▲” “▼” select Thursday (GIO blinking);
- Press the OK key to select hour 7 (histogram blinking);
Using key "▲" "▼" set the temperature level on T3; - Press key F to display 07:45 at top left on the display;
- Press the OK key to confirm the setting.
TEMPERATURE VALUES.
Used to set all the temperature values utilized for manual, antifreeze, automatic (temperature levels T1, T2, T3) and temperature differential operation.
- Manual.
Press key P until the required mode is displayed (temperature blinking); using key “▲” “▼” set the required temperature, then press the OK key to confirm and pass on to setting antifreeze.
- Antifreeze.
Using key "▲" "▼" (TEMP lit up steady and temperature value blinking), set the antifreeze value (from 4 to 15^ ), then press the OK key to confirm and pass on to setting temperature level T1.
Level T1.
Using key "▲" "▼" (TEMP and T1 lit up steady and temperature value blinking), set the required value for level T1, then press the OK key to confirm and pass on to setting temperature level T2.

VIMAR
Level T2.
Using key "▲" "▼" (TEMP and T2 lit up steady and temperature value blinking), set the required value for level T2, then press the OK key to confirm and pass on to setting temperature level T3.
- Level T3.
Using key "▲" "▼" (TEMP and T3 lit up steady and temperature value blinking), set the required value for level T3, then press the OK key to confirm and pass on to setting the temperature differential.
- Temperature differential.
Using key "▲" "▼" (TEMP and diff lit up steady and value blinking), set the required value for the temperature differential (from 0.1 to 1^ ), then press the OK key to confirm and exit the menu.

HEATING OR AIR CONDITIONING.
Used to select the timer-thermostat operating mode, choosing from heating or air conditioning.
Press key P until the required mode is displayed (symbol blinking); using key “▲” “▼” set the required operation, then press the OK key to confirm.
- TEMPERATURE SCALE.
Used to set the unit of measurement of the temperature, choosing from between degrees Celsius (^) and degrees Fahrenheit (^) .
Press key P until the required mode is displayed (symbol ^ C or F blinking); using key "A" "V" set the required scale, then press the OK key to confirm.
10. MAIN CHARACTERISTICS
Supply voltage: 3V d.c. with 2 AA LR6 1.5 V batteries (pro
- Battery life: over a year.
Output: relay with 5(2) A 250V clean change-over contact
- Adjustment type: ON/OFF.
- Displayed temperature update: every 20 s.
- Room temperature display: 0^ + 40^ .
- Reading resolution: 0.1^ .
- Settings resolution: 0.
- Reading accuracy:
-
≤ 0.5^ between +15^ and +30^ ;
-
≤ 0.8^ at the extremes.
-
Temperature differential: adjustable from 0.1^ to 1^ .
-
Adjustment range:
-
+4°C - +15°C on antifreeze;
- +5 °C - +35 °C on heating or air conditioning.
Clock error: ≤ ± 1 s a day. - Main functions:

VIMAR
- hourly temperature setting;
- 3 programmable temperature levels for heating + 3 temperature levels for air conditioning + 1 antifreeze level;
- weekly programming;
- 1 automatic program that can be set by the user (for both heating and air conditioning);
- possibility of forcing the program by changing the temperature manually;
- adjustment for heating and air conditioning;
-antifreeze function; -
possibility of turning off with timer;
turning on with a phone actuator;
display in degrees Celsius or Fahrenheit;
device reset. -
Protection rating:
-
IP40 with screw against removal included;
- IP20 with screw against removal not included.

VIMAR
- Appliances of class II: with SELV circuits.
Number of manual cycles: 3,000.
Number of automatic cycles: 100,000. - Type of contact opening: micro-disconnection.
- Type of action: 1 BU.
- Tracking index: PTI175.
- Pollution rating: 2 (normal).
Nominal pulse voltage: 4,000 V. - Ambient temperature during transport: -25^ + 60^ .
- Operating temperature: T40 (0 °C +40 °C).
ErP classification (Reg. EU 811/2013): class I, contribution 1%
Software class: A.
11. INSTALLATION RULES.
Installation should be carried out by qualified personnel in compliance with the current regulations regarding the installation of electrical equipment in the country where the products are installed.
12. CONFORMITY TO STANDARDS.
LV Directive.
EMC Directive.
Standards EN 60730-1, EN 60730-2-9.

WEEE - Information for users
If the crossed-out bin symbol appears on the equipment or packaging, this means the product must not be included with other general waste at the end of its working life. The user must take the worn product to a sorted waste center, or return it to the retailer when purchasing a new one. Products for disposal can be consigned free of charge (without any new purchase obligation) to retailers with a sales area of at least 400 m², if they measure less than 25 cm. An efficient sorted waste collection for the environmentally friendly disposal of the used device, or its subsequent recycling, helps avoid the potential negative effects on the environment and people's health, and encourages the re-use and/or recycling of the construction materials.
ATTENTION!
2. CHAMP D'APPLICATION.
- Warmedifferential.
AHHE - Evnpwon twv xpnotow
To auBolo diaypaueyou kouo atoppmuatov, otou utapxei ETADV OTN OaKEUN h OTN Oaukeuaia TNC, UTOeIKVUEI OTTOPOIOv oTO tEOACNSdiAPKEIA GWCOTU PPTEVA uAALLEyETAI XwpiataoTuTNOAOTAAToppmuata. Te ToeAOCTXPHG
O xpnntng pnteia va avalaei va npadwae to Tpoiov oe eva katalanno kevtpo diaqopootoinync ouaoyns n va to tnpaodoe iotov avitnpooTNO kata tvn ayopa evoc vou Tpoivtos. 2kataatnata TTWAnos ME EIKPaveia TTWAnoeewv Toulambdaotov 400 m2 mptoei va npadoothe opeav, xwpic kaia utoxpewon yia ayopa aalww npoiovtw, ta Tpoiovta via diaheon, ME diaaactaeis kipotece ano 25 cm. H eIapknis diapopootinveu oulloyn, tpokeijevou vEekivneai
n 106evn diokaia avakukwong, ETEEpyaia cai TepiabaovtikoupatngdiheonTG ouakeunuoubaale OTNV atopuyn apvntikow eTTIWOWV yia to pTeiabauov kai TNY uyeia kTPOWBe TNY etavaxpanotolnan n/ka avakkwnTuv uikow atto aToOAia atoteleitain ouakeun.
C
49400392B0 03 1810

VIMAR
Viale Vicenza, 14
36063 Marostica VI - Italy www.vimar.com
- FRANÇAIS
- CONFORMITA NORMATIVA.
- VIMAR
- CONTENTS.
- 1.DESCRIPTION
- FIELD OF APPLICATION
- INSTALLATION.
- FRONT VIEW, CONTROLS AND DISPLAY.
- CONNECTIONS.
- - Phone dialer control.
- - Insertion/Replacement of buffer battery.
- - Insertion/Replacement of supply battery.
- Warning! In this phase the output status is always OFF.
- ATTENTION!
- 6.ANTI-REMOVAL DEVICE.
- KEY FUNCTIONS.
- - KEY P.
- - KEY C.
- - KEY F.
- OPERATION.
- SWITCH-OFF
- TIMED SWITCH-OFF.
- ANTIFREEZE
- MANUAL.
- TIMED MANUAL
- AUTOMATIC
- 9.PROGRAMMING.
- - SETTING THE TIME AND DAY.
- AUTOMATIC PROGRAM.
- TEMPERATURE VALUES.
- - Manual.
- - Antifreeze.
- Level T1.
- Level T2.
- - Level T3.
- - Temperature differential.
- HEATING OR AIR CONDITIONING.
- - TEMPERATURE SCALE.
- MAIN CHARACTERISTICS
- INSTALLATION RULES.
- CONFORMITY TO STANDARDS.
- WEEE - Information for users
- CHAMP D'APPLICATION.
- - Warmedifferential.
- AHHE - Evnpwon twv xpnotow
Brand : Vimar
Model : 20446
Category : Thermostat