Flexbar 000030094 - Fridge Gamko - Free user manual and instructions
Find the device manual for free Flexbar 000030094 Gamko in PDF.
| Brand | Gamko |
| Model | Flexbar 000030094 |
| Product type | Modular refrigerator with drawers and doors |
| Climatic category | N: from +16 °C to +32 °C |
| Power supply | 220-240 V / 50 Hz / 1~ |
| Refrigerant | R134A (PRP 1300) |
| Adjustable temperature range | +2 °C to +12 °C (standard +6 °C) |
| Thermostat | T66-XW60K |
| Power consumption | 500 W (depending on module), some modules 80 W |
| Dimensions (W×D×H with feet) | Variable: from 80×420×550 mm to 540×560×880 mm depending on module |
| Weight | From 10 kg to 52 kg depending on module |
| Front materials | Anthracite, stainless steel or glass |
| Lighting | EQUAL-LED (standard on glass elements, optional on solid ones) |
| Locking | Centralized (optional electronic CELS) |
| Main features | Flexible modular system, infinite number of combinations, bottle rack possible |
| Maintenance and cleaning | Clean with water and mild detergent, avoid chlorine, clean condenser, magnetic seals, drawer rails |
| Safety | Grounding required, do not obstruct grilles, keep alcoholic beverages sealed, do not use as step |
| Spare parts and repairability | Power cord replaceable by manufacturer or authorized, repairs by authorized technician |
Frequently Asked Questions - Flexbar 000030094 Gamko
User questions about Flexbar 000030094 Gamko
0 question about this device. Answer the ones you know or ask your own.
Ask a new question about this device
Download the instructions for your Fridge in PDF format for free! Find your manual Flexbar 000030094 - Gamko and take your electronic device back in hand. On this page are published all the documents necessary for the use of your device. Flexbar 000030094 by Gamko.
USER MANUAL Flexbar 000030094 Gamko
Chapter 1 General information 26
-Safety precautions 27
- Product description 28
- Type plate
29
Chapter 2 Installation 30
- Change direction of swing door 30
- How to couple segments together 31
- How does it work 32
- Installing the product 32
-Fitting storage racks 33
-Remove drawers 33 - Power supply 34
Chapter 3 Split segments 35
- Fitting the waste pipe 35
- Electrical schedule split segments 36
Chapter 4 Using the appliance 37
- Prior to use 37
- Thermostat 37
-Filling the cabinet 37
Chapter 5 Maintenance 38
- Cleaning the cabinet 38
- Cleaning of bottle compartment 38
-Fault finding 39
Chapter 6 Technical information 40
- Manufacturer's declaration 43
-WEEE-regulations 44
-GWP-table 45
Chapter 1 General information
CAREFUL! - DANGER - Ignoring this sign and remarks may put you into personal danger.
CAREFUL! - WARNING - Ignoring this sign and remarks may result in damage to your product.

HINT! - Useful hints to make the best use of your product.
Thank you for choosing a Gamko product.
These user instructions also contain your maintenance instructions.
Always keep this document near your product, so that you can refer to it when needed. Please read this manual thoroughly prior to installation of the product. Non compliance with the user instructions may cause serious damage to the product and will render the warranty invalid. Correct use of the product will prolong its useful life.
All installations have to conform to local governmental and municipal legislation and the machine Directive 98/37/EG. In case of doubt please contact the Gamko service organisation or your supplier. The information contained in this manual can be changed without prior notice.
Technical safety
- Prior to use check the plug and plug lead for any damage.
- Hold the plug when removing the plug from the socket.
- Check whether the power supply is suitable for this product.
- Ensure that the product is standing firmly and level.
- Always have repairs carried out by qualified service engineers.
- To avoid damage to the product a damaged plug lead may only be replaced by the manufacturer or a qualified service engineer.
Refrigerant
This product contains a refrigerant. The quantity used in the product is stated on the type plate.
Large quantities of refrigerant can lead to suffocation.
- When exposed to fire the container can burst open or explode.
- Always ensure that there is sufficient ventilation in the room where the appliance is located.
- Never gain access to a room which might contain refrigerant.
- Refrigerant can cause burns.
During operation
- Only use this product for storing wrapped food or beverages.
- Never use the product as a step.
- Never store electrical appliances in the product.
- Always store beverages with a high percentage of alcohol standing upright and tightly closed.
- Ensure that ventilation grilles both in and outside the cabinet remain unobstructed.
- In case of emergency the plug should be removed from the socket.
- Ensure that the ambient temperature does not exceed the climate classification (N: from +16 °C to +32 °C).
After Use
- Make sure that the product is stored and disposed off safely (see WEEE-regulations on page 44).
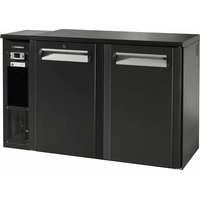
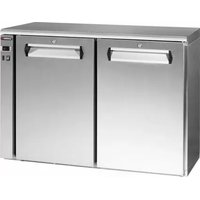
Product description
The Flexbar: an endless number of combinations of a cooled, fl exible bar system with amongst other things, EQUAL-LED lighting ans central electronic locking system.
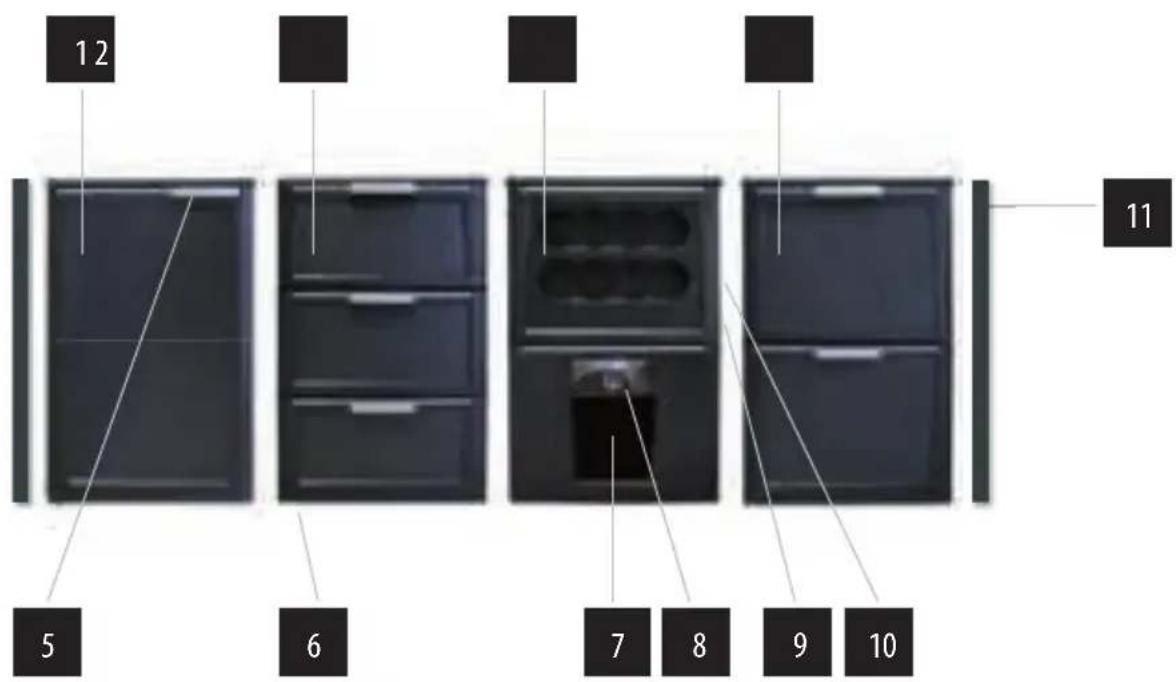
1 Doorsegment 7 Air inlet
2 3-drawer segment 8 Electronic thermostat
3 Machine unit with bottle compartment 9 Air outlet
4 2-drawer segment 10 Type plate
5 Exchangeable doors / handgrips 11 Endpanel
6 Adjustable feet
Optional extras: glass front segments (drawers too), central electronic locking system and coloured EQUAL-LED.
Type plate

Climate classification
A refrigerator is produced for optimal performance within certain ambient temperatures. This product is suitable for the following classification: N: from +16^ to +32^ .
Refrigeration
Refrigerant can cause burns or, after exposure to air, lead to suffocation!
Chapter 2 Installation

Tip! Select the opening direction before installing the segment.
Altering the opening direction
1 Open the door and remove the cover cap at the top of the frame. Do so by placing a screw driver's flat head into the holes underneath and gently twist.
2 Close the door and remove the upper hinge by loosening the 2 screws.
3 Remove the door by lifting it carefully away from the lower hinge.
4 Remove the lower hinge by loosening the 2 screws.
5 Fit the hinge from step 2 at the other lower side (diagonally opposite).
6 Remove the hand grip and trim strip by partially removing the magnetic frame and the screws and attachment strip this conceals.
7 Fit the trim strip, attachment strip and hand grip to the hinge position on the other side, using the 4 screws.
8 Press the magnetic frame back into its original position.
9 Replace the door and fit the upper hinge cover cap using the 2 screws (i.e. the hinge which you removed in step 4).
10 Place the cover back on. Slide the cover backwards (never downwards).

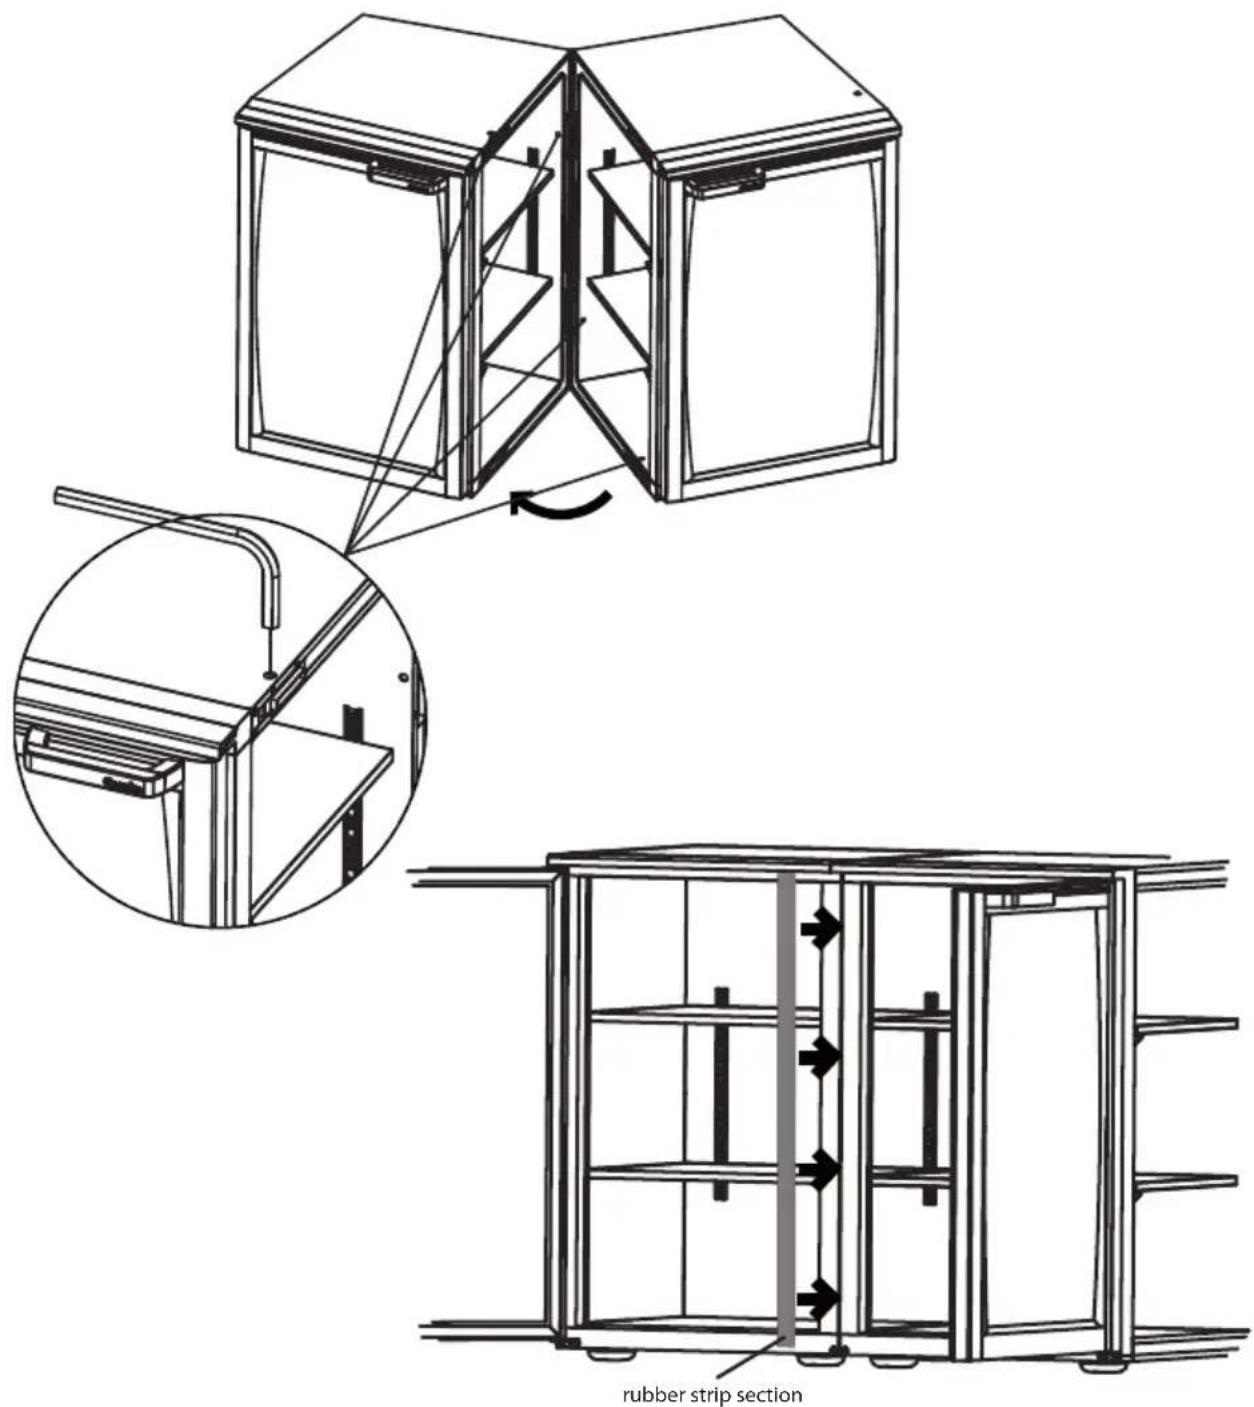
Linking segments
1 Slide the segments together.
2 Make sure the units are correctly connected.
3 Using a 6mm Allen key via the openings, rotate the 4 linking hooks until 2 clicks are heard.
4 Place the cover caps on the openings to prevent ingress of dirt.
5 In case of joint segments place rubber strip section into the seam between two segments.
Position of machine unit
Note: the maximum number of storage segments per machine unit!

Hint! Never install the refrigerator next to a heat source!

How does it work
A refrigerator works by extracting heat from the space to be refrigerated and to release this in the surrounding area. For maximum air circulation it is recommended to allow at least 10cm space around the refrigerator. Be very careful never to obstruct the air inlets and outlets.

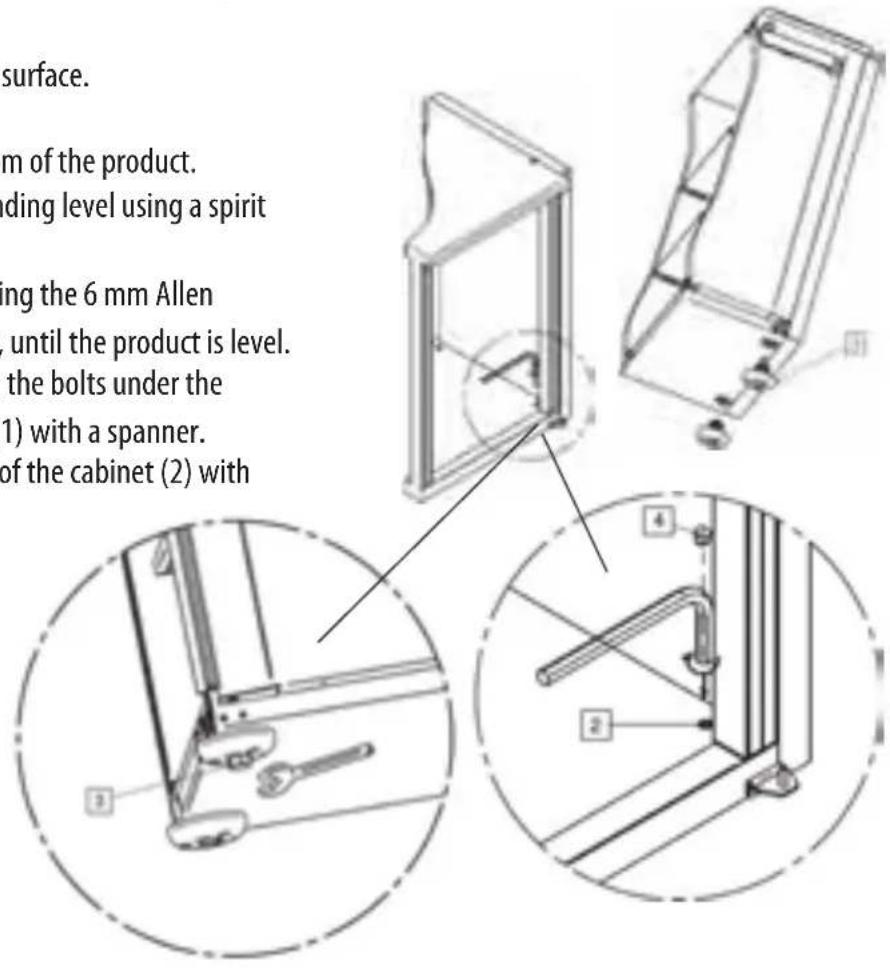
Installing the product
Place the product on a smooth surface.
1 Slide the feet (1) in the bottom of the product.
2 Make sure the product is standing level using a spirit level.
3 Tighten the feet (1) by inserting the 6mm Allen key in the holes provided (2), until the product is level.
4 For a closed segment tighten the bolts under the cabinet (3) holding the feet (1) with a spanner.
5 Cover the holes at the inside of the cabinet (2) with the supplied plugs (4).
Fitting storage racks
1 Hook pin (1) in openings (2) of rails (C).
2 Push bottom part (B) towards side (A).
3 This causes pin (3) to slot into the next opening (4) in the rails.
4 Fit the other 3 pins at the same height.
5 Place the storage rack (D) sliding the pins (5) in the openings (6).

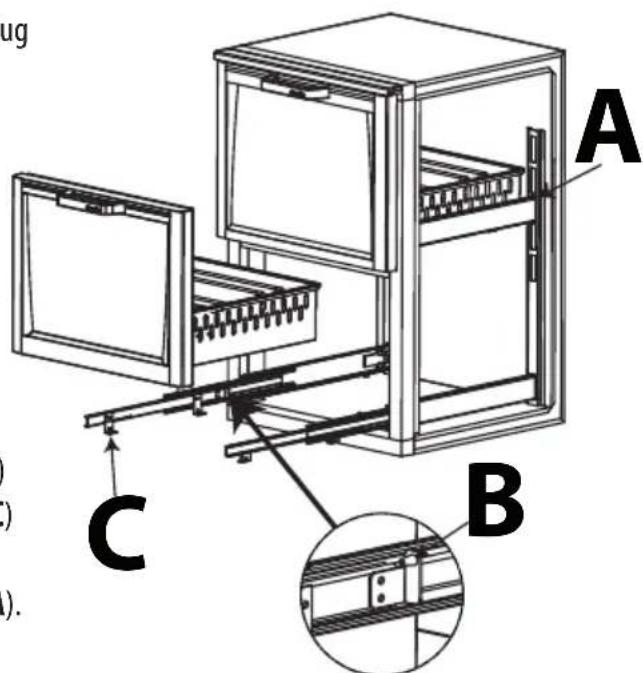
Removing drawers
Remove drawer
1 Open the drawer
2 Where lighting is used, disconnect the lighting plug on the (righthand) inner face of the stile (A).
3. Take hold of the front and rear
4. Raise the front
5 Slide the drawer forwards
6 Remove the drawer from the rails
Install drawer
1 Place the rear with the openings over the pins (B)
2 Place the front with the openings over the pins (C)
3 Where lighting is used, connect the lighting plug located on the (righthand) inner face of the stile (A).
Power supply

- This product uses a separate device cable as the power cable. If this device cable is damaged it must be replaced with an original cable supplied by the producer.
- In case of emergency: remove the plug lead from the socket.
- The socket should be within easy reach of the cabinet.
- Check for the correct power supply, referred to the information on the type plate.
- Ensure that the plug lead cannot become trapped or snagged.
- If necessary the plug lead can be extended by a qualified electrician.
- We do not recommend the use of an extension lead.
Fluctuations in the power supply can cause damage, which causes the cabinet to switch off. Gamko cannot be held responsible for any consequential damage.
Chapter 3 Split units
The installation of the appliance and the condenser unit may only be carried out by your local service organisation team or a qualified installer. The type of condenser unit to be used is to be determined in consultation with your local service organisation or a qualified installer.
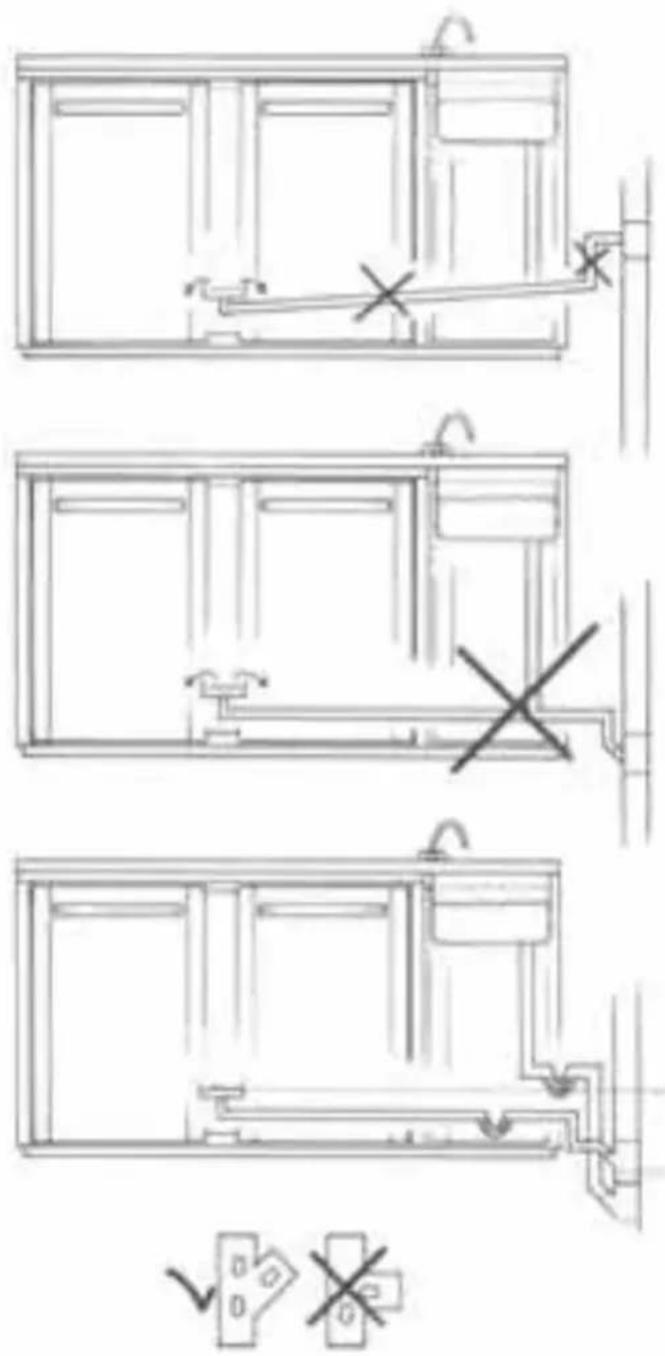
Fitting the waste pipe
- Install the cabinet following the instructions.
- Connect the waste pipe to the drains.
- Ensure that the drain pipe slopes down and is fitted lower than the evaporator drip tray in the cabinet.
- Fit a siphon to prevent bad odours coming into the cabinet.
- Pay attention that the siphon does not obstruct the flow too much.
- Fit separate waste pipes for drip tray and rinsing bowl.
Always use T- connectors 45^ - Always connect the overflow to the drains (in extreme circumstances it may be possible that the evaporation capacity is not sufficient).
Electrical schedule split units
Connecting power supply
The plug lead has to be connected to an approved plug or power supply. The plug has to be connected by a qualified installer following the local electrical guidelines.


| NL FR | DL UK | |||
| T1 | Trafo 24V | Trafo 24V | Trafo 24V | Transfo 24V |
| E1 | LED | LED | LED | LED |
| X1 | Electronischethermostat | ElektronischerThermostat | ElectronicThermostat | ThermostatElectronique |
| R1 | T.probe spaceT Fuhler RaumT voilresistancescape | |||
| T2 | Trafo max 21V | Trafo max 21V | Trafo max 21V | Transfo max 21V |
| T3 | Trafo 12V | Trafo 12V | Trafo 12V | Transfo 12V |
| M1 | Verdamper fanmotor | Verdampfer lufter | Evaporator Fanmotor | Evaporateur Ventilateur |
| Y1 | Magneetklep Magnet Ventil | Solenoid Valve | Électrovanne | |
| S1 | Niveau schakelaar Nivo Shalter | Level switch | Interrupteur Niveau | |
| M2 | Pomp Pumpe | Pump | Pompe | |
| S2 | Read contact | Schaltzelle | Read contact Résistance | |
| S3 | slot | Schloss | Lock | Serrure |
| VerwarmingskabelH1 | Heizelement | Heating element | Résistance | |
Chapter 4 Using the appliance
Prior to use
- Clean the cabinet prior to use. For further details we refer to the maintenance section.
- Leave the installation to stand for at least 2 hours before switching on the cabinet.
- Check that the correct fuse is fitted.

EMERGENCY STOP
REMOVE THE PLUG FROM THE SOCKET!
Thermostat
Gamko use various types of thermostat in our products. Please consult TECHNICAL MATTERS in Section 6 for the correct thermostat.For thermostat controls and settings, see the thermostat manual supplied separately.
Filling the cabinet
- This product is only to be used for the refrigeration of beverages.
- Fill the cabinet during a period when it is least used. Repeatedly opening of the door will slow down the refrigeration of the products.
- Beverages with a high alcohol percentage should always be stored properly sealed in an upright position
To guarantee optimal performance and air circulation the air vents of the cabinets should NEVER be obstructed.


NEVER use the cabinet to store electrical appliances!

HINT! Apply the so called first-in first-out principle when serving beverages out of the cabinet. This to ensure that the coldest product is served.
Chapter 5 Maintenance
Cleaning the cabinet
Proper maintenance of the product will guarantee a long useful life. Gamko strongly advises to take out a maintenance contract.
DIY maintenance
- Before first use the cabinet should be cleaned using water and a mild detergent.
- Intensive use requires regular cleaning.
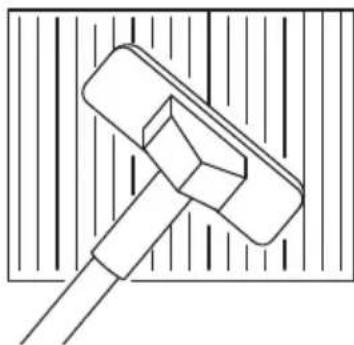
- Regularly clean the condenser using a vacuum cleaner.
- Check and clean the magnetic seals on a regular basis. If the seal is not airtight it will have a negative effect on the refrigeration performance.
- Clean the drawer runners monthly, we recommend a light application of bearing grease once a year.
Cleaning of bottle compartment
Is your Flexbar equipped with a bottle compartment? In that case you ought to regularly check on pollution and excessive condensation. You do so by opening the compartment as a drawer (1). Then subsequently you remove the cradle container from the drawer as shown on the picture below (2). The container can now easily be cleaned (i.e. in a dish washer).

The bottle compartment comes standard with a plastic tube. By means of this tube you can easily adapt the depth of the container to the various height of the bottles.
Attention!
- Do not dismantle any fixed components when cleaning the machine unit!
- Do not use aggressive abrasives or detergents.
The condenser can have sharp edges, clean with care! - Clean glass doors with a mild detergent.
- Clean the condenser more frequently if installed in a dusty environment.
- Clean stainless steel with water and Ph neutral detergent, rinse and dry with a soft cloth.
Fault finding
Please note!
Always remove the plug from the socket when carrying out repairs!
The cabinet does not start.
- Check the plug.
- Restore the power supply by replacing a faulty fuse or by using the on/off switch.
- Contact your local service organisation.
Temperature is too high, in spite of recent adjustment of thermostat.
- Check/repair power supply.
- Remove contents which may obstruct ventilation.
- Clean magnetic strip, replace if necessary.
- Defrost evaporator.
Temperature is too low, in spite of recent adjustment of thermostat.
- Thermostat is faulty. Contact your local service organisation.
Water leak
- Defrost regularly - if necessary extra manual defrost cycle.
- Clean/unblock water drip tray.
- Clean the defrost water evaporator tray.
- Contact your local service organisation.
Plug lead
- To prevent accidents the plug lead, if damaged, may only be replaced by the service/maintenance organisation or qualified installer.
Chapter 6 Technical information
| Power supply 220-240 V / 50Hz / 1~ | |
| Refrigerant R134A | |
| Thermostat T66-XW60K | |
| Type X/1HB X/MU | ||
| Cooling capacity 656 Watt* (10 cc) 656 Watt* (10 cc) | ||
| Power consumption 500 Watt* 500 Watt* | ||
| Temperature range +2°C / +12°C +2°C / +12°C standard: +6°C standard: +6°C | ||
| Weight | 52 Kg | 43 Kg |
| Dimensions WxDxH (incl. legs) | 540 x 560 x 860/880 mm | 410 x 560 x 860/880 mm |
| Type X/PTMU | X/PTVS20 | |
| Cooling capacity 656 Watt* (10cc) | 656 Watt* (potiential) | |
| Power consumption 500 Watt* 80 Watt* | ||
| Temperature range +2°C / +12°C +2°C / +12°C standard: +6°C standard: +6°C | ||
| Weight | 45 Kg | 25 Kg |
| Dimensions WxDxH (incl. legs) | 410 x 600 x 860/880 mm | 200 x 600 x 860/880 mm |
| Type X/VS00 | X/VS20 | |
| Cooling capacity 656 Watt* (potiential) | 656 Watt* (potiential) | |
| Power consumption 20 Watt* | 80 Watt* | |
| Temperature range +2°C / +12°C +2°C / +12°C standard: +6°C standard: +6°C | ||
| Weight | 10 Kg | 21 Kg |
| Dimensions WxDxH (incl. legs) | 80 x 420 x 550 mm | 200 x 560 x 860/880 mm |
| Type X/EP*** | |
| Dimensions DxH 510 x 840 mm | |
| Panel Depth (D) | 00 mm (non insulated), 20 mm or 40 mm |
| Exterior | antracite or stainless-look |
| Weight | 2 kg or 10 kg |
Type X/2****
Dimensions DxH (incl. legs) 560 x 860/880 mm
Whith 410mm or 540mm
Construction door or drawer
Front antracite, stainless steel-look or glass
Weight from 16 till 25kg
illumination Standard on glassfront segments (optional in case of solid front)
Type X/3**** X/3DHB***
Dimensions DxH (incl. legs) 560 x 860/880 mm 560 x 860/880 mm
Construction Drawers (2× 1 / 2) Painter (1 / 2) + bottle comp.
Front antracite, st. steel-look or glass antracite, st. steel-look or glass
Whith 410mm or 540mm 410mm or 540mm
Weight 31kg or 39kg 33kg or 42kg
illumination Standard on glassfront segments (optional in case of solid front)
Type X/4**** X/5****
Dimensions DxH (incl. legs) 560 x 860/880 mm 560 x 860/880 mm
Construction Drawers (7 / 12 + 5 / 12) Drawers (5 / 12 + 7 / 12)
Front antracite, st. steel-look or glass antracite, st. steel-look or glass
Whith 410mm or 540mm 410mm or 540mm
Weight 31kg or 39kg 33kg or 42kg
illumination Standard on glassfront segments (optional in case of solid front)
Type X/6**** X/6DHB***
Dimensions DxH (incl. legs) 560 × 860 / 880 mm 560 × 860 / 880 mm
Construction Printer (3× 1 / 3) Drawers (2× 1 / 3) + bottle comp.
Front antracite, st. steel-look or glass antracite, st. steel-look or glass
Whith 410mm or 540mm 410mm or 540mm
Weight 35kg or 45kg 37kg or 47kg
illumination Standard on glassfront segments (optional in case of solid front)
Type X/6DVB***
X/6DM***
Dimensions DxH (incl. legs) 560 × 860 / 880 mm 560 × 860 / 880 mm
Construction Drawers (2 x 1/3) + Drawers (2 x 1/3) + bottle storage bin in worktop 1/3 coffee fold-out drawer
Front antracite, st. steel-look or glass antracite or stainless steel-look
Whith 410mm or 540mm 410mm
Weight 31-35 kg or 41-45 kg 33 kg
illumination Standard on glassfront segments (optional in case of solid front)
| Type X/7**** X/7DHB*** | |
| Dimensions DxH (incl. legs) 560 x 860/880 mm 560 x 860/880 mm | |
| Construction Drawers (1/3 + 2/3) Printer (2/3) + bottle comp. | |
| Front antracite, st. steel-look or glass antracite, st. steel-look or glass | |
| Whith 410 mm or 540 mm 410 mm or 540 mm | |
| Weight 27 kg or 35 kg 32 kg or 41 kg | |
| illumination Standard on glassfront segments (optional in case of solid front) | |
| Type X/7DVB*** X/7DM*** | ||
| Dimensions DxH (incl. legs) 560 x 860/880 mm 560 x 860/880 mm | ||
| Construction Drawers (2 x 1/3) + Drawers (2 x 1/3) + bottle storage bin in worktop | 1/3 coffee fold-out drawer | |
| Front antracite, st. steel-look or glass antracite or stainless steel-look | ||
| Whith 410 mm or 540 mm 410 mm | ||
| Weight 27 - 31 kg or 35 - 39 kg | 30 kg | |
| illumination Standard on glassfront segments (optional in case of solid front) | ||
| Type X/OS** | X/PT** | |
| Dimensions DxH (incl. legs) 560 x 860/880 mm 560 x 860/880 mm | ||
| Construction without front | pass through storage segment | |
| without doors | ||
| Whith 410 mm or 540 mm 410 mm or 540 mm | ||
| Weight 12 kg or 15 kg 10 kg or 12 kg | ||
| illumination Standard on glassfront segments (optional in case of solid front) | ||
| Type X/FRONT**** | X/AC2**** | |
| Dimensions DxH | 40 x 800 mm | 100 x 840 mm |
| Construction | door for X/OS** or X/PT** | frame + door |
| Front antracite, st. steel-look or glass antracite, st. steel-look or glass | ||
| Whith 400 mm or 530 mm 410 mm or 540 mm | ||
| Weight | 5 kg or 6 kg | 6 kg or 10 kg |
| Type X/OSDISH** | |
| Dimensions DxH (incl. legs) 540 x 560 x 860/880 mm | |
| Construction without front with 3 drawers for use with rinsing machine racks | |
| Whith rinsing machine racks | 400 mm or 500 mm |
| Weight 20 kg or 17 kg | |
Manufacturer's Declaration
(directive 98/37/EG, Appendix II, sub B)
PROHIBITION ON TAKING INTO USE
Manufacturer: Gamko Holding BV
Address: Mon Plaisir 75
4879 AL, Etten-Leur
The Netherlands
Hereby declares that product type:
X/** (except models X/SC** and X/SF**)
Does not fully comply with the requirements of:
- The Machinery Directive (98/37/EC)
Does meet the requirements of:
- The EMC Directive (Directive 89/336/EEC)
- The Low Voltage Directive (2006/95/EC)
- The Pressure Equipment Directive (97/23/EC)
It is prohibited to take the machine specified in this declaration into use unless it has been built into another machine or is combined with other machines to create a machine which meets the conditions specified in the Machinery Directive (98/37/EC).
Etten-Leur, 31-01-2008
P. Naaijkens
Manager Engineering and Quality Control
IMPORTANT: PLEASE READ THESE INSTRUCTIONS CAREFULLY PRIOR TO INSTALLATION. KEEP THESE INSTRUCTIONS IN A SAFE PLACE. THE INFORMATION CONTAINED IN THIS BROCHURE IS IMPORTANT FOR THE DISPOSAL OR RE-USE OF THIS PRODUCT AT THE END OF ITS USEFUL LIFE.
Gamko Holding BV is attentive of the care of the environment and meets all requirements contained in the Directive 2002/96/CE, known as WEEE, or the Directive referring to Waste from Electrical and Electronic Equipment. This product conforms to the directive 2002/96/CE. At the end of its useful life the product, which is to be processed separate from household waste, should be transferred to a collection point of separate waste from electrical and electronic equipment. The objective of the Directive 2002/96/CE is to combat the increasing volumes of waste from electrical and electronic equipment, to increase the re-use of electrical and electronic equipment ("EEE") and finally to limit the total volume of waste EEE ("WEEE") destined to be disposed of.
The symbol of the crossed out waste bin indicates that this product is subject to the application of this Directive. It is the responsibility of the user to transfer the product to specialized collection points, as indicated by local legislation or the distributor. In case of installation of a new product the old WEEE product can be collected by the distributor at the same time. The manufacturer, importer and distributor are responsible for the collection and processing of the waste which is collected directly or through a collection point. Any violation of the above mentioned Directive will result in sanction measures in all of these countries. In general Gamko Holding BV applies the "CECED interpretation" (European Committee of Manufacturers of Electrical household appliances) according to which the WEEE legislation is applicable to portable air conditioners, dehumidifiers, window- air conditioning, split systems up to 12 kW, frigo's and plug in freezer compartments. Nevertheless it is possible that in the various member countries differences in legislation are detected. In case some products are not included on the list of WEEE products following national legislation, the national legislation should be adhered to, the WEEE directives applicable to products that are not included in the scope of these national legislations should be omitted. The directive does not apply to products sold outside the European Union. In case the product is to be sold outside the European Union, it is not necessary to adhere to the WEEE directive, however, the vendor/distributor has to guarantee that local legislation is being observed. For further information please refer to the local authority for waste collection, the vendor/distributor/ installer who supplied the product or directly to Gamko.
GWP-table
This product contains fluorinated gases covered by the Kyoto Protocol.
Chemical Name of the Gas (see type plate) R134A R404A
Global Warming Potential (GWP) of the gas 1300 3784
Caution
a. Hermetically sealed system.
b. Emission of the contained fluorinated gas shall be prevented. The fluorinated gas may never be vented to the atmosphere during installation, service and disposal. When leak of the contained fluorinated gas is detected, the leak shall be repaired and stopped as soon as possible.
c. Only qualified service personnel are allowed to access and service this product.
d. Handling of the fluorinated gas in this product, such as moving of the product, re-charging of the gas, shall comply with REGULATION (EC) No 842/2006 on certain fluorinated gases and relevant local legislation.
Sommaire
Type X/4**** X/5****
- La directive relative aux machines (Directive 98/37/CE)
Satisfontauxdispositionsde:
Manager Engineering et Quality Control
IMPORTANT: LIRE ATTENTIVEMENT LES INSTRUCTIONS AVANT DE PROCESSER AU MONTAGE. LES PRESENTES INSTRUCTIONS DOIVENT ETRE CONSERVÉES DANS UN ENDROIT SûR. LES INFORMATIONS CONTENUES DANS LA PRESENTE BROCHURE SONT IMPORTANTES EN CAS DE TRANSPORT OU DE RECYCLAGE DE L'APPAREIL À LA FIN DE LA DURée DE SERVICE DE L'APPAREIL.