
PG 8059 - Dishwasher MIELE - Free user manual and instructions
Find the device manual for free PG 8059 MIELE in PDF.
| Product type | Professional dishwasher |
| Brand | Miele |
| Model | PG 8059 |
| Dimensions (H x W x D) | 820 mm x 598 mm x 600 mm (height adjustable +60 mm) |
| Depth with door open | 1,200 mm |
| Net weight | 70 kg |
| Electrical supply | See rating plate (voltage, frequency, fuse protection) |
| Water temperature | Cold water max. 20 °C, hot water max. 65 °C |
| Max. static water pressure | 1,000 kPa |
| Noise level (Short programme) | 57 dB(A) (LwA), 45 dB(A) (LpA) |
| Protection type | IP21 |
| Wash programmes | Short, Universal, Intensive, Cutlery, Super Short, Special Glass, Glass Express, Hygiene Plus, Vario TD, Glasses, Plastics, Eco, Regeneration, Cold, Drain |
| Capacity of regeneration salt reservoir | Approx. 2 kg (first fill) |
| Capacity of rinse aid reservoir | Approx. 300 ml |
| Detergent dosing | Powder (dispenser up to 60 ml) or liquid via external DOS module |
| DOS module | Connectivity for up to 2 external dosing modules |
| AutoOpen function | Automatic door opening at end of programme |
| Automatic shutdown | Yes, adjustable |
| Usage | Professional: healthcare facilities, hospitals, restaurants, hotels |
| Safety instructions | Do not use with solvents, do not open door during operation, non-potable water |
| Spare parts | Only original Miele parts |
| Repairability | Miele after-sales service or qualified technician |
| Documents supplied | Abridged user manual, full instruction manual available online |
| Warranty | See general terms and conditions (not detailed in the manual) |
Frequently Asked Questions - PG 8059 MIELE
User questions about PG 8059 MIELE
0 question about this device. Answer the ones you know or ask your own.
Ask a new question about this device
Download the instructions for your Dishwasher in PDF format for free! Find your manual PG 8059 - MIELE and take your electronic device back in hand. On this page are published all the documents necessary for the use of your device. PG 8059 by MIELE.
USER MANUAL PG 8059 MIELE
Guide to the machine 23
Appliance overview 23
Control panel 24
Correct use 25
Full documentation 25
Warning and Safety instructions 26
Symbols used 28
Disposal of your old dishwasher 28
Before using for the first time 29
Opening and closing the door 32
Opening the door 32
Closing the door 32
Filling the container for dishwasher salt 33
Adding rinsing agent 34
Operation 35
Adding cleaning agent 35
Tips for the Super short programme 35
Dispensing module. 36
Switching on 37
Selecting a programme 37
Starting the programme 38
End of programme 38
Switching off. 38
Programme chart 39
Technical data 40
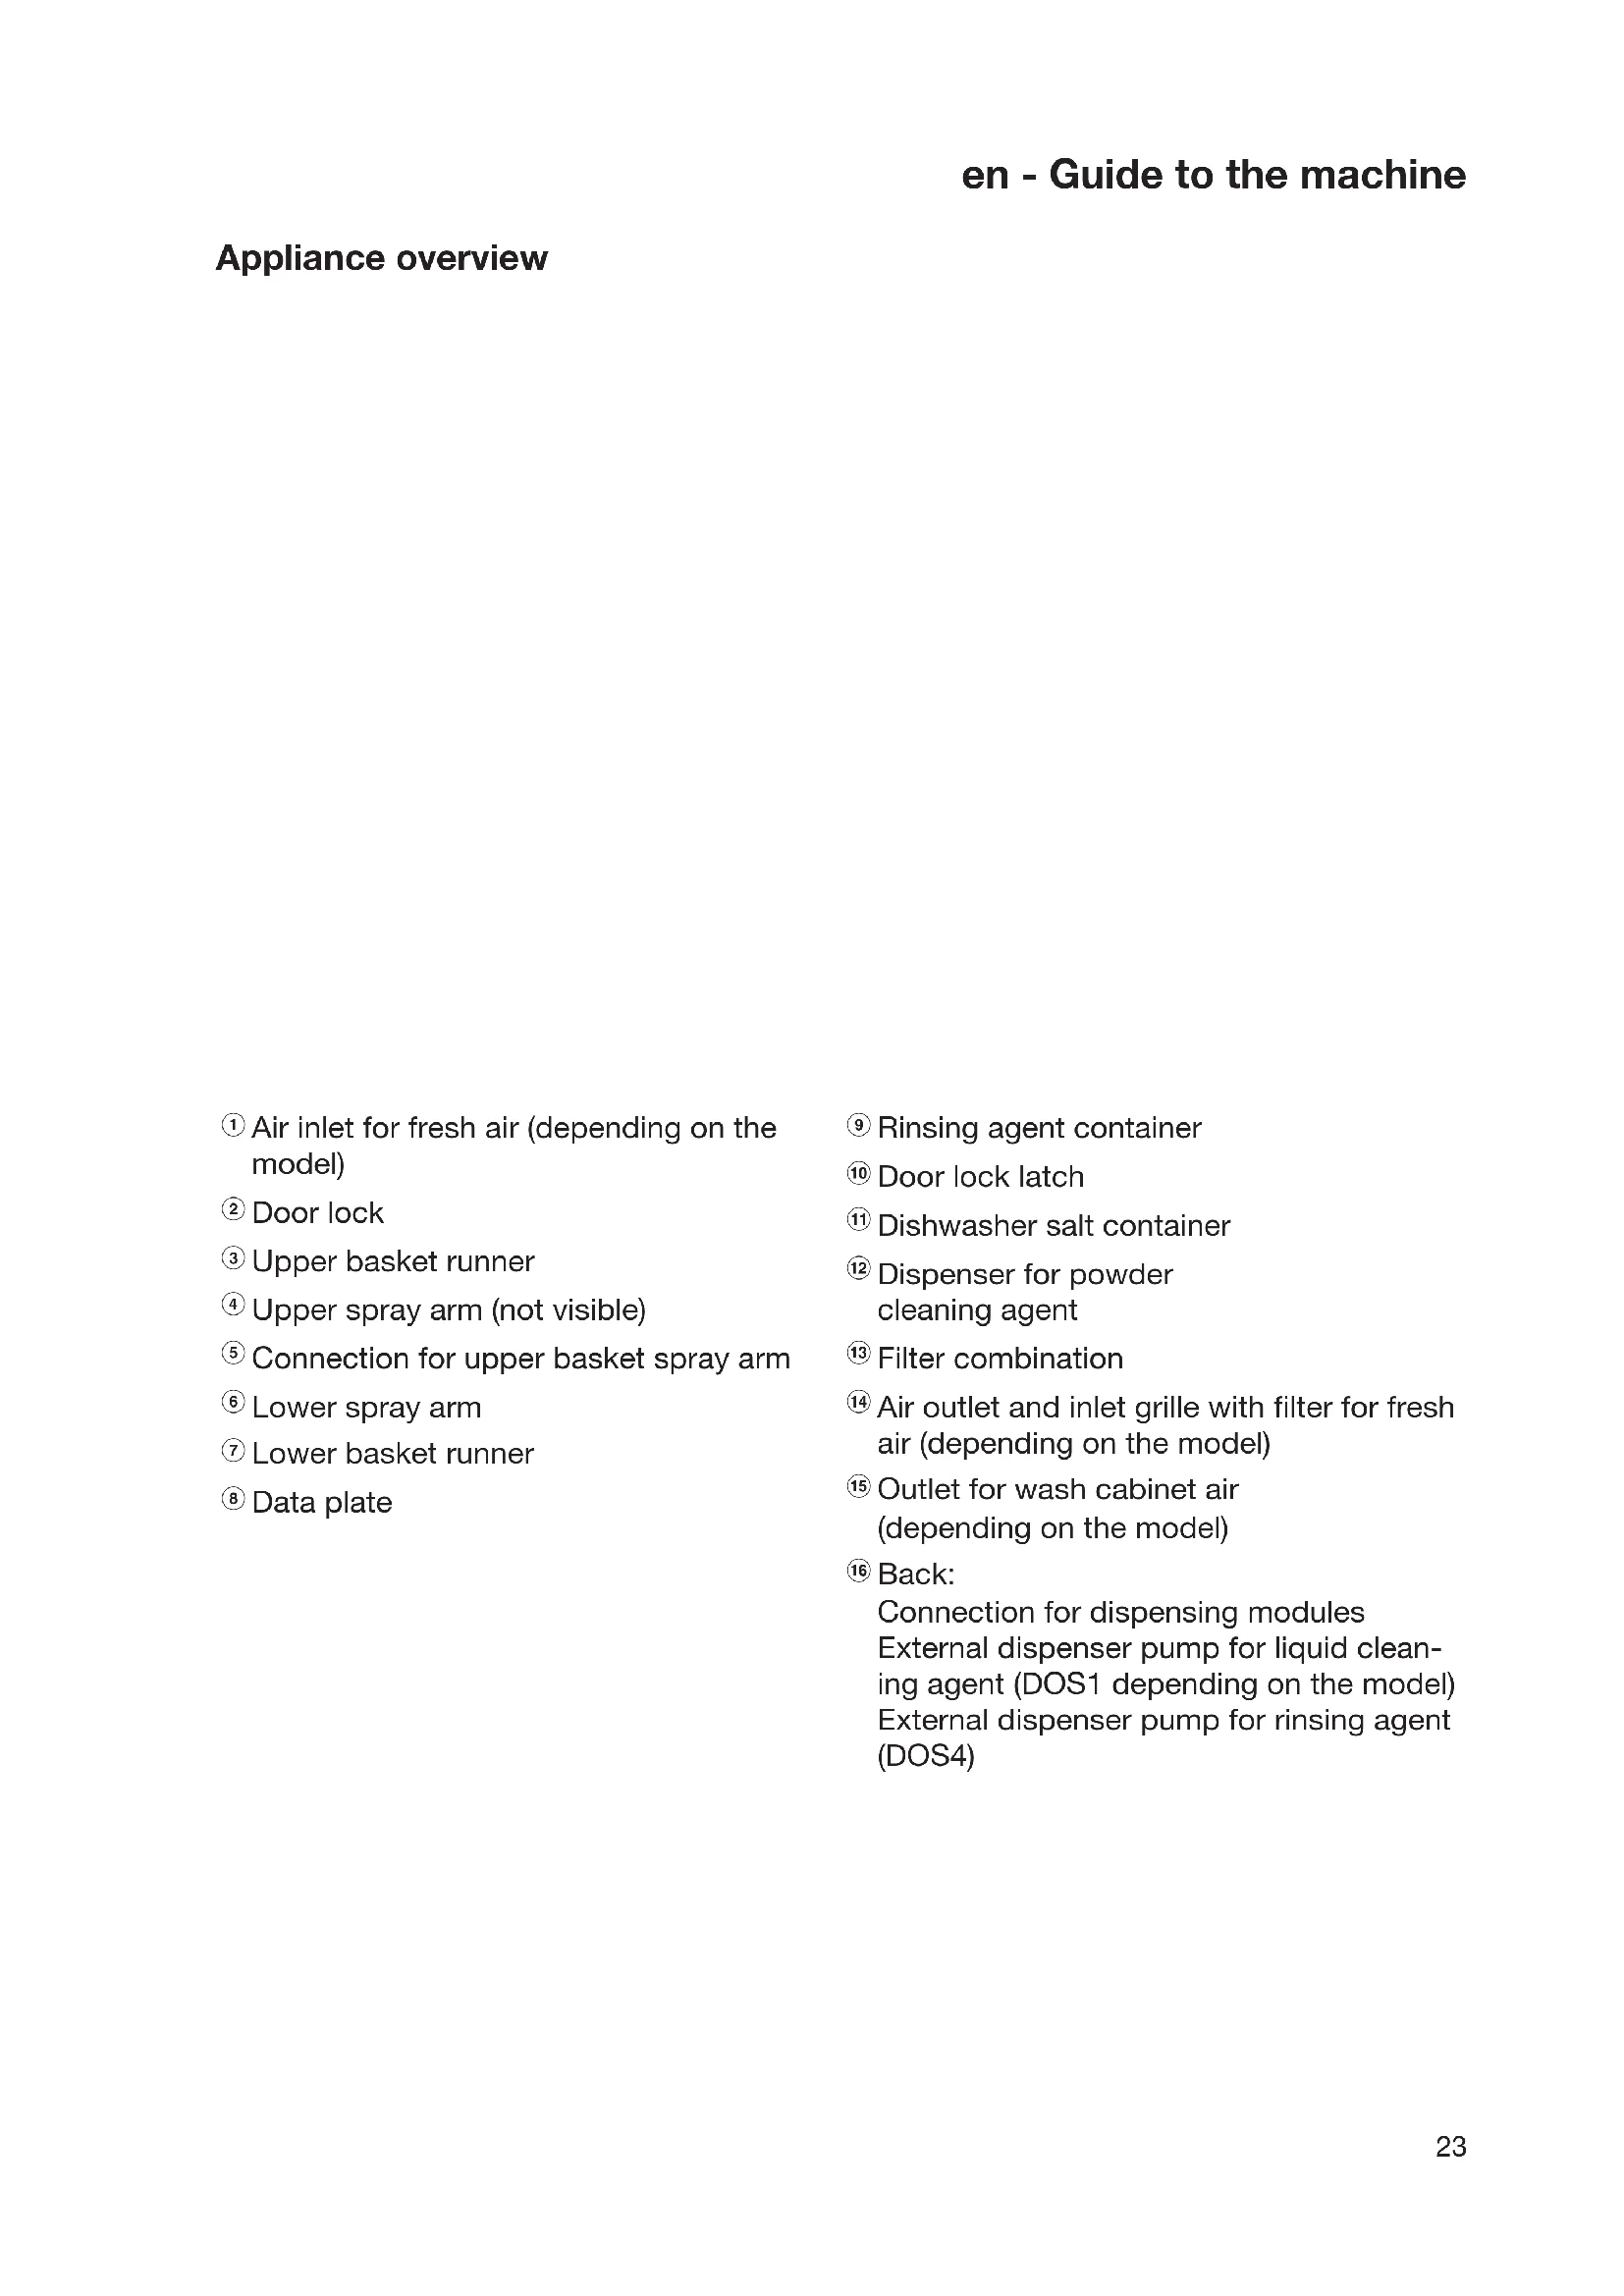
Appliance overview
① Air inlet for fresh air (depending on the model)
② Door lock
③ Upper basket runner
④ Upper spray arm (not visible)
⑤ Connection for upper basket spray arm
^6 Lower spray arm
⑦ Lowerbasketrunner
Data plate
Rinsing agent container
Door lock latch
① Dishwasher salt container
Dispenser for powder cleaning agent
Filter combination
Air outlet and inlet grille with filter for fresh air (depending on the model)
⑤ Outlet for wash cabinet air (depending on the model)
16 Back: Connection for dispensing modules External dispenser pump for liquid cleaning agent (DOS1 depending on the model) External dispenser pump for rinsing agent (DOS4)
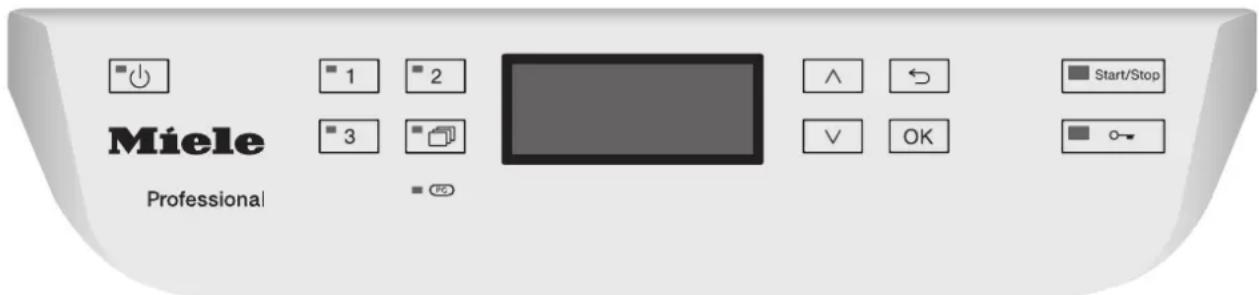
Control panel
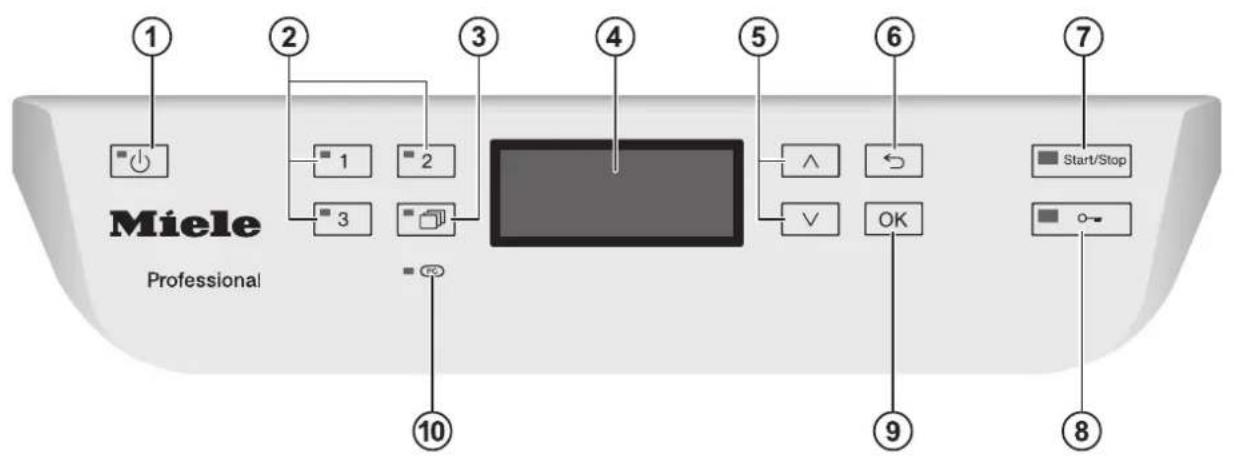
① button (on/off)
Turns the commercial dishwasher on and off
^2 Buttons 1-3 (programme selection buttons)
Direct-access pushbuttons for storing favourite programmes
③ button (further programmes)
For selecting additional programmes
④ Display
User interface
⑤ ∧ and button (arrow buttons)
For navigating in the user interface
念 button (cancel or back)
For cancelling a process in the user interface
(not for cancelling programmes)
⑦ Start/Stop button
For starting or cancelling a programme
button (door release)
Opening the door
⑨ OK button (confirmation)
For selecting options or confirming entries in the user interface
10 Service interface PC
Testing and transmission point for the Miele Customer Service Department
This dishwasher with its short programme running times and powerful cleaning performance is intended for commercial use in
Care and nursing homes
- Hospitals (commercial dishwashers with the Vario TD programme only)
- Restaurants and pubs
Hotels and guesthouses
- Similar commercial environments
The dishwasher is subsequently referred to as a dishwasher in these operating instructions.
Glasses, cutlery and crockery are referred to generally as crockery when not more specifically defined.
This machine is designed exclusively for use as a "dishwasher" for cleaning loads as described in these instructions. Conversions, modifications and any other use are not permitted.
This dishwasher is intended for stationary, indoor use only.
The special inserts should only be used for their specific application.
This dishwasher may not be used to clean medical products or devices.
This dishwasher can only be used by people with reduced physical, sensory or mental capabilities, or lack of experience or knowledge, if they are supervised whilst using it or have been shown how to use it in a safe way and understand and recognise the consequences of incorrect operation.
This dishwasher must only be operated by appropriately trained personnel. They must be instructed and trained regularly.
Children should be supervised in the vicinity of the dishwasher. Never allow children to play with the machine. There is a danger that children might shut themselves in the dishwasher.
Children must not use the dishwasher.
Full documentation
These short instructions contain a summary only. They are not a substitute for the operating instructions supplied with the appliance. You can access the full operating instructions and other up-to-date documentation relating to your appliance on the Miele website: http://www.miele.co.uk/professional/user-manuals
In order to access the documentation, you will need the model number or serial number for your commercial dishwasher. Both are shown on the data plate, located at the top of the door.
Correct installation
Do not install this dishwasher in an area where there is a risk of explosion or freezing conditions.
Be careful before and while installing the dishwasher. Wear protective gloves.
To ensure stability a built-under dishwasher must only be installed beneath a continuous worktop that is bolted to the adjacent cabinetry.
In order to reduce the risk of damage from condensation, the furniture in the area around the dishwasher must be designed for commercial use.
Technical safety
This dishwasher must only be commissioned, repaired and maintained by the Miele Customer Service Department, a dealer or a suitably qualified service technician. Unauthorized installation, maintenance and repairs can cause considerable danger for the user.
This dishwasher must only be operated by appropriately trained personnel. They must be instructed and trained regularly.
Before using the dishwasher, check it for any externally visible damage. Do not use a damaged dishwasher. This could be dangerous.
In the event of a damaged or leaking dishwasher, switch off at the power supply immediately and call the Miele Customer Service Department, a Miele dealer or a suitably qualified service technician.
- Faulty components must only be replaced by genuine Miele original spare parts. Only when these parts are fitted can Miele guarantee the correct functioning and safety of the appliance.
The electrical safety of this dishwasher can only be guaranteed when correctly earthed. If in any doubt, please have the electrical installation tested by a qualified electrician.
Please follow the advice on installation in these instructions and the separate Installation diagram.
Before connecting the appliance, ensure that the connection data on the data plate (voltage, frequency and fuse rating) match the mains electrical supply.
There must be no electrical sockets behind the dishwasher. There is a danger of overheating and risk of fire if the dishwasher is pushed up against a plug. See "Electrical connection" in the main operating instructions for further information.
- Do not connect the dishwasher to the mains electricity supply via a multi-socket unit or an extension lead. These do not guarantee the required safety of the machine (e.g. danger of overheating).
Warning. Do not open the casing of the dishwasher. Any contact with live connections or tampering with the electrical or mechanical components of the dishwasher will endanger your safety and may lead to machine malfunctions.
The dishwasher must not be used if the electrical connection cable is damaged. A damaged connection cable may only be replaced by a suitable connection cable of the same type. For safety reasons, such replacement may only be carried out by the Miele Customer Service Department or a qualified service technician.
The dishwasher must be disconnected from the mains electricity supply before any maintenance or repair work is carried out.
The plastic housing of the water connection contains electrical components. It must not be dipped in water.
There are electrical wires in the water inlet hose. Do not shorten the water inlet hose, even if it is too long.
Correct use
This dishwasher is designed for operation with water and cleaning agents suitable for use in commercial dishwashers only. Organic solvents and flammable liquid agents must not be used in it.
This could cause an explosion, damage rubber or plastic components in the dishwasher and cause liquids to leak out of it.
Unsuitable cleaning agents could adversely affect components of the dishwasher or the items being cleaned.
Do not sit, stand or lean on the opened door. This would tip or damage the dishwasher.
After any plumbing work the water pipework to the dishwasher will need to be vented. If this is not done, components can be damaged.
Please be aware that the dishwasher may be operating at high temperatures. When the door is opened there is a danger of burning or scalding. Items, baskets and inserts must be allowed to cool down before they are unloaded. Any water remaining in containers could still be very hot. Empty them into the wash chamber before taking them out.
The water in the cabinet must not be used as drinking water.
Pre-treating items (for example with washing-up liquid and other cleaning agents) as well as some types of soiling and some cleaning agents can cause a build-up of foam in the wash cabinet. Foam can have an adverse effect on the cleaning result.
Foam escaping from the wash cabinet can cause damage to the dishwasher. If foam escapes the programme must be cancelled immediately and the machine must be disconnected from the mains electrical supply.
- When using cleaning agents and specialised products, it is essential that the manufacturer's instructions are followed. Cleaning agents must only be used for the purpose they are designed for by the manufacturer to avoid any material damage or the occurrence of strong chemical reactions (e.g. oxyhydrogen explosion).
To avoid material damage and corrosion, do not allow any acids or solutions containing chlorides or metals which are not rust-proof to get into the wash cabinet.
Do not wash items soiled with ash, sand, wax, lubricating grease or paint in the dishwasher. These materials will cause damage to the dishwasher.
Do not clean the dishwasher or near vicinity with a hose or a pressure washer.
Ensure that the outer casing of the machine does not come into contact with solutions or steam containing acid to avoid any corrosion damage.
Be careful when sorting items with sharp pointed ends and positioning them in the dishwasher that you do not hurt yourself or create a danger for others. Sharp knives, forks, etc. should be placed in baskets with the pointed ends facing downwards.
The grille of dishwashers with active drying must not be blocked or sealed.
Accessories
- Only use genuine Miele original spare parts and accessories with this dishwasher. Using spare parts or accessories from other manufacturers will invalidate the guarantee and Miele cannot accept liability.
Only use Miele baskets and inserts with this dishwasher. Using baskets and inserts made by other manufacturers, or making modifications to Miele accessories can cause unsatisfactory cleaning results, for which Miele cannot be held liable. Any resultant damage would not be covered by the guarantee.
Symbols used

Warning:
Observe the operating instructions
Warning:
Danger of electric shock
Disposal of your old dishwasher
For safety and environmental reasons, dispose of all chemical agents according to the manufacturer's instructions and to safety regulations. Safety goggles and protective gloves should be worn.
Remove or disable the door lock prior to disposal of the dishwasher, so that children cannot become trapped inside (see "Caring for the environment").
Commissioning
During commissioning, the following settings must be carried out. You will be asked to programme settings one after the other automatically and currently selected values will have a tick beside them.
Commissioning follows a set process that cannot be interrupted.
The commercial dishwasher will guide you automatically through the steps required.
Reactivation is carried out during the first programme following commissioning. If the first programme after commissioning is not completed and the commercial dishwasher is then switched off, the commissioning process must be carried out again.
Switching on
Make sure that the dishwasher is connected to the electricity supply.
Press the button until the button's LED lights up.
Setting the language
The commissioning process automatically begins at the language setting screen, where you will be prompted to set the display language.

Use the and arrow buttons to select the desired language and confirm your choice with the OK button.
Setting the temperature unit
The display will then change to the screen for setting the temperature unit.
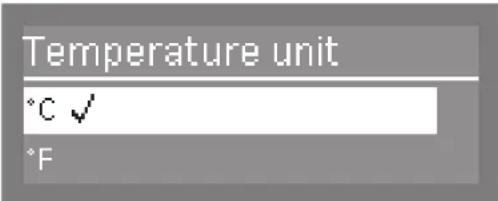
Use the and arrow buttons to select the desired temperature unit and confirm your choice with the OK button.
Setting the date format
The display will then change to the screen for setting the date format.

Use the and arrow buttons to select the desired date format and confirm your choice with the OK button.
Setting the date
The display will then change to the screen for setting the date.

Use the arrow buttons (higher) and V (lower) to set the day, month and year, and confirm each entry with the OK button.
Setting the clock format
The display will change to the screen for setting the clock format.

Use the and arrow buttons to select the desired clock format, and confirm your choice with the OK button.
Setting the time
The display will change to the screen for setting the time of day.

Use the arrow buttons (higher) and V (lower) to set the hours and minutes, and confirm each entry with the OK button.
If you have selected 12 h for the clock format, "am" (in the morning) or "pm" (in the afternoon) will appear beside the time.
Setting the water hardness
The display will change to the screen for setting the water hardness.
The commercial dishwasher must be programmed for the water hardness level in your area.
- Your local water authority will be able to advise you of the water hardness level in your area.
- Where the water hardness fluctuates (e.g. between 8 and 17^ ), always programme the dishwasher to the higher value (17^ in this example).
In the event of a fault, it will help the servicetechnician if you know the hardness of yourlocal water supply.
Therefore, please enter the water hardness:
°dH
The dishwasher is programmed at the factory for a water hardness level of 3.4 mmol/l (19 °dH - German scale).
Water hardness
19°dH
[0-70*dH]
Use the arrow buttons (higher) and V (lower) to set the water hardness level required and confirm your entry by pressing the OK button.
See "Filling the container for dishwasher salt" for more information about setting the water hardness level.
Water connections
The display will then change to the screen for setting the water connections.
This setting can be switched off if the commercial dishwasher cannot be connected to all available water connections.
If individual water connections are switched off, they can only be reactivated by the Miele Customer Service Department.
If a DI water connection is not available and you wish to use the Beer glasses programme (depending on the model), the controls on the dishwasher have to be reprogrammed by the Miele Customer Service Department to enable the final rinse to be carried out with cold water.
Plumbing connections
Accept
Cold water
Use the and arrow buttons to select the water connections which are not connected and confirm your choice using the OK button.
The tick will be removed from the box and the water connection will then be switched off.
- Select Accept to save your selection and confirm using the OK button.
Commissioning completed
Commissioning is successfully completed and the following message will appear in the display.

Press the OK button.
The commercial dishwasher is now ready for use.
Miele
PROFESSIONAL
PG 80XX
The status display appears for 3 seconds. Then the first direct-access pushbutton programme will appear in the display.
Opening the door
The door can only be opened if the commercial dishwasher is connected to the electrical supply and is switched on (the LED in the button is lit up).
The control panel for the commercial dishwasher also serves as a door handle.
Press the 一 button to open the door. The LED in the button goes out as soon as the door is unlocked.
- Grasp the handle underneath the control panel and lower the door to open.
Pressing the button during operation can interrupt the programme. A programme which is already running should only be interrupted if strictly necessary, e.g. if the load is moving significantly.
Closing the door
Push the baskets right in.
- Raise the door upwards and push it gently until the catch audibly engages. The door will be drawn automatically into its final closed position by the closing mechanism.
Danger of squashing fingers due to the door closing
There is a danger of squashing fingers when the door is drawn into its final closed position.
Do not put your hand inside the door as is closing.
If the door cannot be closed properly by the mechanism because it is obstructed by crockery or other similar objects, Door blocked or F 433 will appear in the display and the mechanism will open.
- Remove the obstruction from the door closing area.
The dishwasher can only remain leakproof if the automatic closing mechanism has drawn the door into the final closed position.
Be sure not to use too much force when closing the door, as the comfort door locking mechanism will open it again.
Filling the container for dishwasher salt
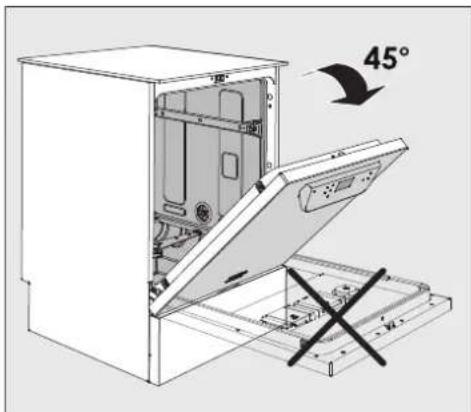
- When filling the salt container, only open the door halfway to ensure that all the salt gets into the container.
Press the open button on the lid of the salt container in the direction of the arrow. The flap will spring open.
Open the funnel.
Do not pour any water into the salt container!
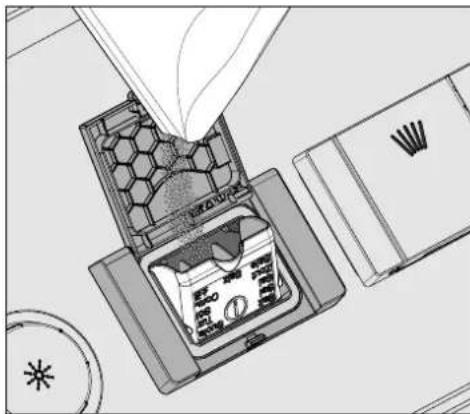
- Add salt into the container until the funnel is full but still closes easily. The salt container will take approx. 2kg of salt on the first fill depending on the degree of coarseness.
Subsequent refills may take less salt, as there may still be salt remaining in the container.
If there is water present in the container, it may be forced out by the added salt.
Clean any excess salt from around the container opening and the seal surrounding it, and then close the flap.
- To avoid corrosion in the wash cabinet, run the Cold programme (without any items in the dishwasher) immediately after refilling the salt container. This will dilute and rinse away any remaining traces of salt.
Adding rinsing agent
Open the door fully.
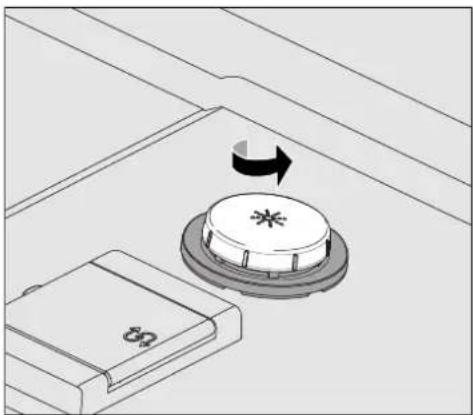
- Unscrew the lid of the rinsing agent container.
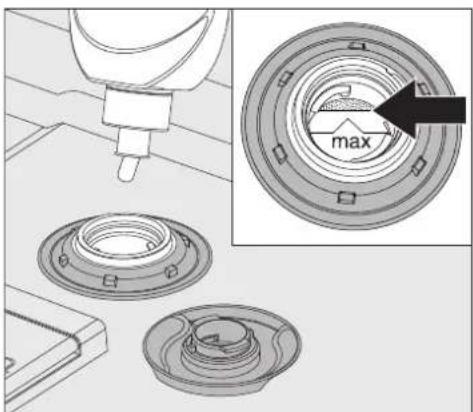
- Add rinsing agent only until it is up to the maximum mark on the edge of the funnel on the container.
The container holds approx. 300ml
Screw the lid of the rinsing agent container back on tightly so that water cannot get into the container during the wash cycle.
- Run the "Cold" programme to rinse away any spilled rinsing agent. This prevents over-foaming occurring during the next programme.
Adding cleaning agent
Only use cleaning agent suitable for commercial dishwashers.
Suitable products are available from Miele Professional.
The cleaning agent can be dispensed in powder form via the powder cleaning agent dispenser or in liquid form via an external dispensing module (optional accessory - see "Dispensing module").
Detergent tabs can be used. An exception to this is the Super short programme (depending on the model).
Only use detergent tabs that are quick dissolving. Suitable detergent tabs are available from Miele Professional.
Powder cleaning agent
Only use powder cleaning agent or detergent tabs in the door dispenser compartment.
Add powder cleaning agent or a detergent tab to the powder cleaning agent dispenser before every wash programme (except Super short, Cold, Reactivation and Drain). Follow the tips on the Super short programme.
- Add the appropriate amount of cleaning agent to the dispenser according to the degree of soiling of the crockery (observe the quantities given in the "Programme overview").
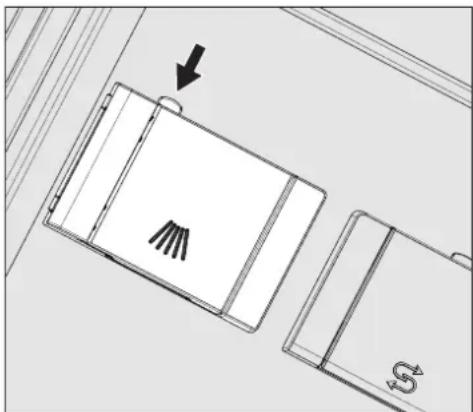
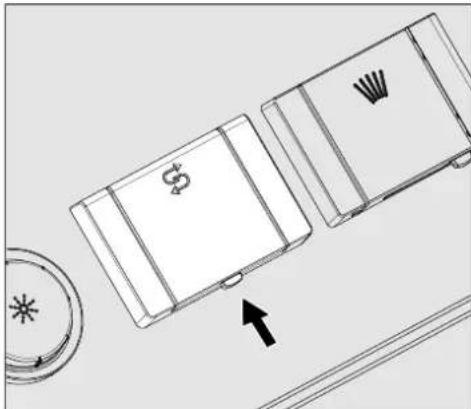
Press the open button on the dispenser in the direction of the arrow. The flap will spring open to the left.
The flap will always be open at the end of a programme.
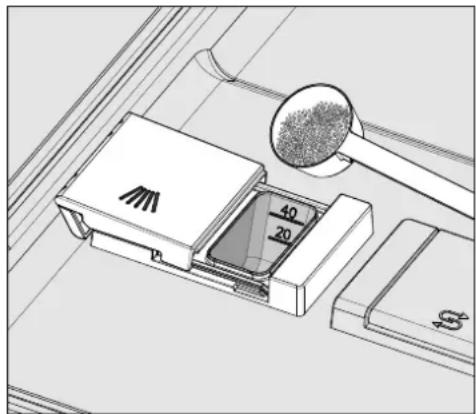
- Place the required amount of powder cleaning agent or a detergent tab in the dispenser and close the flap.
Dispensing
Always follow the dispensing recommendations of the cleaning agent manufacturer.
There are markings to assist with dispensing: 20 and 40. They indicate the fill level in millilitres when the door is open in the horizontal position. They also indicate the approximate fill level in grams for powder cleaning agents, depending on the manufacturer and the coarseness.
The dispenser holds a maximum of 60ml of cleaning agent.
Tips for the
Super short programme
With the Super short programme (depending on the model), the final rinse water is not pumped away at the end of the programme in order to achieve short programme durations in continuous use.
Cleaning agent cannot be rinsed out of the dispenser during the short programme time.
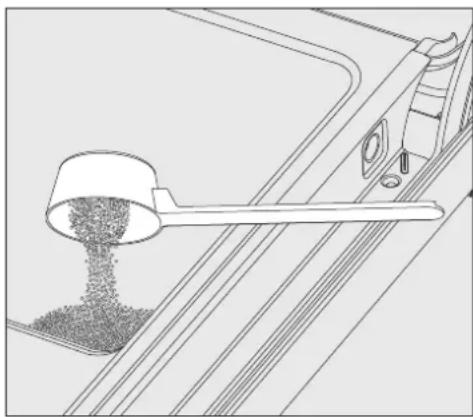
If liquid cleaning agent dispensing is not being used, add powder cleaning agent directly onto the inside of the door.
To avoid corrosion or discolouration, start the wash programme immediately after dispensing cleaning agent directly onto the inside of the door.
Dispensing module
In addition to the internal dispensing systems, up to two additional external dispensing systems (modules) DOS can be connected for dispensing liquid process chemicals.
Refilling or changing containers
The dispensing module is equipped with a level monitoring indicator which shows a message in the display when the level drops below the minimum.

As soon as the message appears in the display, refill or replace the container with a full one containing the appropriate process chemical at the end of the programme.
- Confirm the message shown with the OK button.
Replace the container in good time to prevent the dispensing system being emptied completely.
Vent an empty dispensing system before starting the next programme.
- Place the container on the open dishwasher door or on a surface which is easy to clean.
Take the lid off the canister and remove the siphon. Place the siphon on the open dishwasher door. - Fill or replace the container, fit the siphon and secure the lid. Observe the colour coding.
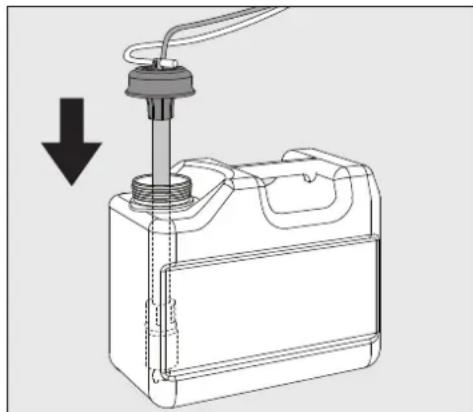
Feed the siphon into the canister until it reaches the bottom.
Wipe up any spilled process chemical thoroughly.
- Place the container on the floor beside the commercial dishwasher or in an adjacent cabinet. The container must be at the same level as the machine and not be placed on top of or above the machine.
The dispensing system must then be vented.
Switching on
- Switch on the water supply if it is off.
Press the button until the button's LED lights up. - Close the door (the LED on the o button will light up).
As soon as the commercial dishwasher is ready for operation, the display message changes to show the last selected programme,
e.g.:

Selecting a programme
Choose your programme according to the type of load and how dirty it is.
Direct-access pushbuttons
The most regularly used programmes can be selected via direct-access pushbuttons 1,2 or 3. The buttons can be freely customised to suit individual needs (see "Additional Settings").
The first three programmes from the Programme overview are allocated to the direct-access pushbuttons as the factory default.
- Select a programme using the direct-access pushbuttons.
The direct-access pushbutton's LED will light up and the Start/Stop button's LED will flash.
Programme list
Programmes which cannot be selected via the direct-access pushbuttons can be selected from the programme list.
Press the button.
The following options menu appears in the display:

- Select the programme you want using the and buttons and confirm your choice using the OK button.
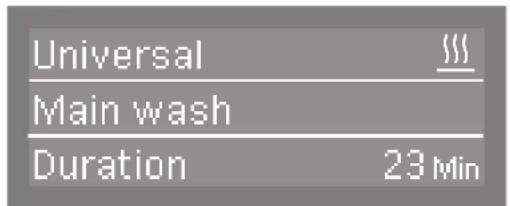
The selected programme will be shown in the display, e.g.:

The button's LED will light up and the Start/Stop button's LED will flash.
Starting the programme
Press the Start/Stop button.
The LED for the Start/Stop button will light up and the LED for the button will go out.
Programme sequence indicator
After the start of a programme, the wash phase description and, for 10 seconds, Programme running are shown in the display.
During the programme sequence, the and arrow buttons can be used to switch between the wash phase, the set temperature and the actual temperature or, in the case of appliances with the Vario TD programme, the A0 value in the second line of the display.
The time remaining is shown in the third line of the display.
End of programme
After a programme has ended normally, the Start/Stop button's LED will go out and the o button's LED will flash.
The middle line of the display alternates between the set temperature and the A0 value on a continuous loop. The message Programme finished will appear in the bottom line of the display.

In addition to this, a buzzer will sound for approx. 3 seconds (factory default setting).
If the AutoOpen function has been activated, the door will automatically open a few centimetres.
If the switch-off function is enabled, the commercial dishwasher switches itself off after a short period of time.
Press the button to switch it on again.
Switching off
Press the button until the LED in the button goes out.
| Programme Application | Cleaning agent | (if liquid cleaning agent is not dis- pensed) |
| The following dosages are based on Miele detergents.Please follow the manufacturer's in-structions. | ||
| Short | "Quick programme" for lightly soiled items with fresh, easily removed food residues. | 20-25 g or 1 tab |
| Universal | For normally soiled items. 20-25 g | or 1 tab |
| Intensive | For heavily soiled items. 20-25 g | or 1 tab |
| Utensils | Special programme for cutlery. 20-25 g | or 1 tab |
| Super short | "Quick programme" for lightly soiled items that are in continual use and that have fresh, easily removed food residues. | 20-25 g placed on the inside of the door |
| \( Σ^i \) Glasses special (depending on the model) | Special glassware programme. 20-25 g | or 1 tab |
| \( Σ^i \) Beer glasses (depending on the model) | Special programme for beer glasses.The glasses do not dry through their own heat after the programme has ended and may have to be dried by hand. | 20-25 g or 1 tab |
| Hygiene plus | For items that must be hygienically reprocessed. 20-25 g | or 1 tab |
| Vario TD (depending on the model) | For particularly hygienic reprocessing of items, e.g. for ward kitchens in isolation wards and wards for infectious diseases in hospitals. | It is advisable to dispense liquid cleaning agent (mildly alkaline) via the dispensing module Alternatively place 20-25 g or 1 tab |
| \( Σ^i \) Glasses (depending on the model) | Special glassware programme. 20-25 g | or 1 tab |
| Plastics | Special programme for plastic items and other lightweight items. 20-25 g | or 1 tab |
| Energy save | Energy-saving programme offering the most efficient combined energy and water consumption for normally soiled crockery. | 20-25 g or 1 tab |
| \( \text{G} \) Reactivation | Manual reactivation.This can be run to avoid being forced to run a reactivation programme during busy periods. | |
| Cold | Use for rinsing heavily soiled items and to prevent soiling from drying on.Also used for flushing salt residues out after refilling the salt container. | |
| Drain | For pumping away the water when, for example, the water for the Super short programme needs to be renewed or the programme has been aborted. | |
| Dishwasher model PG 8057, PG 8058, PG 8059 PG 8099 | ||
| Height 820 mm (adjustable + 60 mm) 820 mm (adjustable + 60 mm) | ||
| Height with lid 835 mm (adjustable + 60 mm) mm (adjustable + 60 mm) | ||
| Width 598 mm 598 mm | ||
| DepthDepth with door open | 600 mm1,200 mm | 580 mm1180 mm |
| Weight (net) 70 kg 75 kg | ||
| Voltage, rated load, fuse rating See data plate See data plate | ||
| Power cable Approx. 1.7 m Approx. 1.7 m | ||
| Water temperature:Cold water connectionHot water connection | Max. 20 °CMax. 65 °CMax. 1,000 kPa pressure | Max. 20 °CMax. 65 °CMax. 1,000 kPa pressure |
| Recommended flow pressure:Cold and hot water connectionDI water connectionWater connection for steam condenser | 200 kPa pressure140 kPa pressure100 kPa pressure | 200 kPa pressure140 kPa pressure- |
| Minimum flow pressure:Cold water connectionHot water connectionDI water connection | 100 kPa pressure40 kPa pressure30 kPa pressure | 40 kPa pressure40 kPa pressure30 kPa pressure |
| Delivery head | Min. 0.3 m, max. 1.0 m | Min. 0.3 m, max. 1.0 m |
| Drainage length | Max. 4.0 m Max. 4.0 m | |
| Ambient temperature | 5 °C to 40 °C | 5 °C to 40 °C |
| Relative humidityMaximumLinear decreasing to | 80 % for temperatures up to 31 °C50 % for temperatures up to 40 °C | 80 % for temperatures up to 31 °C50 % for temperatures up to 40 °C |
| Altitude above sea level | Up to 2,000 m * | Up to 2,000 m * |
| Inlet hoses | Approx. 1.7 m Approx. 1.7 m | |
| Drain hose | Approx. 1.5 m Approx. 1.5 m | |
| Safety class (according to DIN EN 60529) | IP21 | IP21 |
| Noise emission valuesSound power in LwASound pressure in LpA | Built-under dishwasher with wooden beam in front of plinth on Short pro-gramme57 dB (A)45 dB (A) | Built-under dishwasher with wooden beam in front of plinth on Short pro-gramme59 dB (A)47 dB (A) |
| Test certification | VDE, EMC radio suppressed | |
| CE mark 2006/42/EC Machinery Directive | ||
| Manufacturer address | Miele & Cie. KG, Carl-Miele-Straße 29,33332 Gütersloh, Germany | |
- If installed above 2,000 m, the boiling point of the wash water will be lower. Commercial dishwashers installed above this altitude must be modified by the Miele Customer Service Department.
Abra la puerta completeness.


- Appliance overview
- Control panel
- Full documentation
- Correct installation
- Technical safety
- Correct use
- Accessories
- Symbols used
- Disposal of your old dishwasher
- Commissioning
- Switching on
- Setting the language
- Setting the temperature unit
- Setting the date format
- Setting the date
- Setting the clock format
- Setting the time
- Setting the water hardness
- Water hardness
- Water connections
- Plumbing connections
- Commissioning completed
- Miele
- Opening the door
- Closing the door
- Filling the container for dishwasher salt
- Adding rinsing agent
- Adding cleaning agent
- Powder cleaning agent
- Dispensing
- Tips for the
- Super short programme
- Dispensing module
- Refilling or changing containers
- Selecting a programme
- Direct-access pushbuttons
- Programme list
- Starting the programme
- Programme sequence indicator
- End of programme
- Switching off
Brand : MIELE
Model : PG 8059
Category : Dishwasher