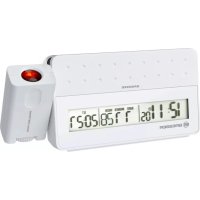
MyTime Pro - Alarm Clock BRESSER - Free user manual and instructions
Find the device manual for free MyTime Pro BRESSER in PDF.


| Product Type | Radio alarm clock with time projection |
| Brand | Bresser |
| Model | MyTime Pro |
| Reference | 80-10030 and 80-10031 |
| Mains Power | USB 5V adapter (cable included) compatible 110-240V |
| Backup Power | 2 AA batteries (not included) |
| Dimensions (approx.) | 180 x 95 x 85 mm (W x D x H) |
| Weight (approx.) | 350 g (without batteries or adapter) |
| Display | Backlit LED digital display |
| Projection | Time projected onto ceiling or wall, adjustable rotation and focus |
| Radio Reception | DCF77 (time signal) with automatic search |
| Alarms | 2 independent alarms with 4-minute snooze |
| Temperature Display | Indoor in °C or °F |
| Time Functions | 12/24h display, calendar (day/week), dual time zone |
| USB Charging Port | 5V / 1000 mA for smartphone (cable not included) |
| Controls | Touch (snooze/backlight), physical buttons (MODE, +, -, etc.) |
| Safety | Indoor use only, do not disassemble, avoid shocks, keep away from water |
| Maintenance | Clean with a dry cloth, unplug before cleaning |
| Warranty | 2 years (extensible upon online registration) |
| Delivery Contents | Alarm clock, USB power adapter, instruction manual |
Frequently Asked Questions - MyTime Pro BRESSER
User questions about MyTime Pro BRESSER
0 question about this device. Answer the ones you know or ask your own.
Ask a new question about this device
Download the instructions for your Alarm Clock in PDF format for free! Find your manual MyTime Pro - BRESSER and take your electronic device back in hand. On this page are published all the documents necessary for the use of your device. MyTime Pro by BRESSER.
USER MANUAL MyTime Pro BRESSER
GEFAHR EINES STROMSCHLAGS!
These operating instructions are to be considered a component of the device. Please read the safety instructions and the operating instructions carefully before use.
Keep these instructions for renewed use at a later date. When the device is sold or given to someone else, the instruction manual must be provided to the new owner/user of the product.
This product is intended only for private use. It was developed as an electronic medium for the use of multimedia services. The device is intended only for indoor use.
GeneralWarnings
CHOKING HAZARD!
Keep packaging material, like plastic bags and rubber bands, out of the reach of children, as these materials pose a choking hazard.

RISK OF ELECTRIC SHOCK!
This device contains electronic components that operate via a power source (power supply and batteries). Children should only use the device under adult supervision. Only use the device as described in the manual; otherwise, you run the risk of an electric shock.
Disconnect the device from the power supply by pulling the power plug when it is not used. In case of longer interruption of operation and before starting any work on maintenance and cleaning.
Position your device so that it can be disconnected from the power supply at any time. The wall socket you use should be located near the device and easily accessible, since the plug on the power cable serves as a disconnecting device for the power supply.
Always pull on the plug to separate the device from the power supply. Never pull on the cable.
Never bend, pinch or pull the power and connecting cables,
extensions and adapters. Protect the cables from sharp edges and heat.
Before operating, check the device, cables and connections for damage. Never use a damaged unit or a unit with damaged power cables. Damaged parts must be exchanged immediately by an authorised service centre.

RISK OF FIRE/EXPLOSION!
Do not expose the device to high temperatures. Use only the supplied power supply or the recommended batteries. Do not short-circuit the device or batteries or throw them into a fire! Excessive heat or improper handling could trigger a short circuit, a fire, or an explosion.

RISK of GLARE!
Never look into the (LED) illumination! There is a risk of permanent damage to your eyes!

NOTE!
Do not disassemble the device. In the event of a defect,
please contact your dealer. The dealer will contact the Service Centre and can send the device in to be repaired, if necessary.
Protect the device from severe shocks!
Always replace weak or empty batteries with a new, complete set of batteries at full capacity. Do not use batteries from different brands or with different capacities. Remove the batteries from the unit if it has not been used for a long time.
The manufacturer is not liable for voltage damage due to improperly inserted batteries or through the use of an improper power adapter!
SCOPE OF DELIVERY (Fig. 1)
Alarm clock (A), AC/DC adapter with USB power cord (B), instruction manual
2 AA type batteries are required (not included)
PARTS OVERVIEW (Fig. 2-5)
(1) Projector Lens
(2) SNOOZE/Backlight
(3) Focus wheel
(4)FLIP key
(5) + key
(6)-key
(7) MODE key
(8) ^ C / ^ F WAVE key
(9) Alarm key
(10) CONTINUE PROJECTION switch
(11) Battery compartment
(12) USB power socket
(13) USB socket
POWER SUPPLY
Battery installation
- Remove the cover from the battery compartment.
- Insert 2 pieces "AA" batteries according to the polarity
indicated in the battery compartment.
- Close the compartment with the cover.
AC Adapter installation
NOTE!
Please make sure your household voltage match with the voltage supported by the AC/DC adapter (power input: 110-240V), or it will damage your clock and adaptor
- Insert the USB-A plug of the power cord into the USB socket of the AC/DC adapter.
- Insert the USB Micro-B plug of the power cord into the USB power socket of the alarm clock.
- Plug the power connector into the wall socket.
SYMBOL EXPLANATION
| Symbol | Description | ||
| Radio signal Radio signal weakly | |||
| D | Date Repeat alarm indication | z² |
| # | Foreign time indication Month M | |
| PM | PM (12 hr display only) Summer time indication | |
| AM | AM (12 hr display only)) Degree Celsius | |
| ♂ | Alarm 1 Degree Fahrenheit | ℉ |
| ♀♀ | Alarm 2 Dual time | 0T |
TURNING ON THE DEVICE
- After the batteries are installed, the LCD will turn on. The clock will automatically search the radio signal**. It takes about 3-5 minutes to finish this process. During the search process the signal icon is blinking.
- If the radio signal is received, the date & time will be set automatically with radio control signal icon turns on.
NOTE!
Besides, you can force the clock to receive the signal by pressing WAVE/°C/°F for 3 seconds. It will take 3-5 minutes to receive the radio signal.
3. If the clock fails to receive the time signal, the radio control
signal icon turns off. Then user has to set the time manually.
** Radio controlled signal will be scheduled to receive every hour. Signal will stop to received during phone charging.
USB CHARGER FUNCTION
- Simply plug in the USB cable on the side of the unit to power up the phone (USB charging cable not included), capable 5V, and 1000mA current.
- Place phone alongside in the stand on top.
! NOTE!
AC adapter is necessary plug in for phone charger function.
SELECTING TEMPERATURE / ALARM 1 / ALARM 2 / DUAL TIME DISPLAY
- Press MODE will display the Alarm 1 (AL1) time
- Press MODE again will display the Alarm 2 (AL2) time
- Press MODE again will display the Dual Time (DT)
- Press MODE again will display the temperature (^ / ^)
MANUAL TIME SETTING
The system date and time can be set by pressing MODE for approx. 5 seconds in Time/Temperature display with the turns off.
SETTING THE DATE AND TIME
- Press MODE again: the year digits are blinking and can be set by pressing + or - key.
- Press MODE again: the month digits are blinking and can be set by pressing + or - key.
- Press MODE again: the date digits are blinking and can be set by pressing + or - key.
- Press MODE: the hour digits are blinking and can be set by pressing + or - key.
- Press MODE again: the minute digits are blinking and can be set by pressing + or - key.
- Press MODE one last time: the normal time display appears.
12/24 HOUR TIME DISPLAY
Press + key will toggle the display format between 12 and 24 hours.
NOTE!
- If no key is pressed for 30 seconds, it will exit the Manual Time Setting Mode and go back to Time/Temperature Display and the data updated.
- During any setting mode, press and hold + or - for approx. 3 seconds for fast setting
- View week of the day, press - key will toggle between the day of week and the calendar week.
CALENDAR
- To change the weekday display from one language to another language, press and hold the - key for approx. 5 seconds and the display will be scrolled as below: (1) "GE" for German (2) "FR" for French (3) "IT" for Italian (4) "ES" for Spanish (5) "EN" for English
- Releases the - key to confirm setting.
FOREIGN TIME SETTING
-
Press and hold + key for approx. 5 seconds, the icon F will turn on.
-
Press and hold MODE for approx. 5 seconds in Foreign time /Temperature. The digits for time are blinking and foreign time can be set as described above by pressing + or - key.
- Press MODE key again to confirm the setting of foreign time.
- Press and hold + key for 3 seconds to choose between local and foreign time display.
ALARM 1 SETTING
In the Alarm 1 Display [AL 1],
- Press MODE for approx. 5 seconds: the hour digits are blinking and can be set by pressing + or - key.
- Press MODE again: the minute digits are blinking and can be set by pressing + or - key.
- Press MODE again: the alarm time is set and icon will turn on.
ALARM 2 SETTING
In the Alarm 2 Display [AL 2],
-
Press MODE for approx. 5 seconds: the hour digits are blinking and can be set by pressing + or - key.
-
Press MODE again: the minute digits are blinking and can be set by pressing + or - key.
- Press MODE again: the alarm time is set and icon will turn on.
ENABLE ALARM 1 AND/OR ALARM 2
- Press alarm will enable Alarm 1 with con turn on.
- Press alarm again will enable Alarm 2 with on turn on.
- Press alarm again will enable both Alarm 1 and Alarm 2 with and cons to turn on.
- Press alarm again will disable both Alarm 1 and Alarm 2 with and cons to turn off.
STOP/DISTURB ALARM
When the Alarm 1/Alarm 2 is ringing, the relatives alarm icon
// be flashing.
- Press alarm key to turn the alarm off.
-
Touch SNOOZE/LIGHT alarm stops and the backlight will turn on for 5 seconds with deleted, the repeat alarm indicator flashing. The alarm sounds again after 4 minutes.
-
If the alarm is not turned off, it will stop automatically after 4 minutes.
LIGHT FUNCTION
Touch SNOOZE/ LIGHT Amber backlight will be activated and turned off automatically after 5 seconds.
PROJECTION LIGHT AND ITS ADJUSTMENT
- Touch SNOOZE/ LIGHT projection light will be activated and turned off automatically after 5 seconds.
- When insert adaptor and move CONTINUE PROJECTION switch to the direction of the arrow, projection light will turn on continuously until the switch is moved to opposite direction or the AC/DC adaptor is pulled off.
- Press FLIP key to rotate the projection image to 180 orientation clock wise.
- Turn the focus wheel to adjust the image manually.
TEMPERATURE FUNCTION
Press WAVE/°C/°F to select the temperature display between Celsius or Fahrenheit.
RESETTING THE UNIT
In case of malfunction or abnormal display, remove the batteries and unplug the AC/DC adapter. Then re-insert the batteries and re-plug the AC adapter again. All settings will be cleared and reset to their default values.
MAINTENANCE AND CLEANING
Before cleaning the device, disconnect it from the power supply (remove plug and remove batteries)!
Only use a dry cloth to clean the exterior of the device. To avoid damaging the electronics, do not use any cleaning fluid.
Protect the device from dust and moisture. The batteries should be removed from the unit if it has not been used for a long time.
DISPOSAL

Dispose of the packaging materials properly, according to their type, such as paper or cardboard. Contact your
local waste-disposal service or environmental authority for
information on the proper disposal.

Do not dispose of electronic devices in the household garbage!
As per Directive 2002/96/EC of the European Parliament on waste electrical and electronic equipment and its adaptation into German law, used electronic devices must be collected separately and recycled in an environmentally friendly manner
EC DECLARATION OF CONFORMITY
Bresser GmbH declares that the device (MyTime Pro/Art.No.: 80-10030 and 80-10031) is in accordance with applicable guidelines and corresponding standards of the 1999/5/EG directive.
The regular guarantee period is 2 years and begins on the day of purchase. To benefit from an extended voluntary guarantee period as stated on the gift box, registration on our website is required.
You can consult the full guarantee terms as well as information on extending the guarantee period and details of our services at www.bresser.de/warranty_terms. Would you like detailed instructions for this product in a particular language? Then visit our website via the link below (QR code) for available versions. Alternatively you can also send an email to manuals@bresser.de or leave a message on +49 (0) 28 72 - 80 74-220*. Please always state your name, precise address, a valid phone number and email address, as well as the article number and name.
*Number charged at local rates in Germany (the amount you will be charged per phone call will depend on the tariff of your phone provider); calls from abroad will involve higher costs.
FR GARANTIE ET SERVICE

- GEFAHR EINES STROMSCHLAGS!
- GeneralWarnings
- CHOKING HAZARD!
- RISK OF ELECTRIC SHOCK!
- RISK OF FIRE/EXPLOSION!
- RISK of GLARE!
- NOTE!
- SCOPE OF DELIVERY (Fig. 1)
- PARTS OVERVIEW (Fig. 2-5)
- POWER SUPPLY
- Battery installation
- AC Adapter installation
- TURNING ON THE DEVICE
- USB CHARGER FUNCTION
- SELECTING TEMPERATURE / ALARM 1 / ALARM 2 / DUAL TIME DISPLAY
- MANUAL TIME SETTING
- SETTING THE DATE AND TIME
- 12/24 HOUR TIME DISPLAY
- CALENDAR
- FOREIGN TIME SETTING
- ALARM 1 SETTING
- ALARM 2 SETTING
- ENABLE ALARM 1 AND/OR ALARM 2
- STOP/DISTURB ALARM
- LIGHT FUNCTION
- PROJECTION LIGHT AND ITS ADJUSTMENT
- TEMPERATURE FUNCTION
- RESETTING THE UNIT
- MAINTENANCE AND CLEANING
- DISPOSAL
- EC DECLARATION OF CONFORMITY
- FR GARANTIE ET SERVICE
Brand : BRESSER
Model : MyTime Pro
Category : Alarm Clock