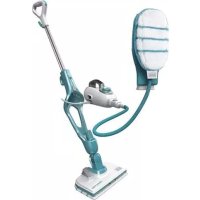
FSMH13101SM - Steam cleaner BLACK & DECKER - Free user manual and instructions
Find the device manual for free FSMH13101SM BLACK & DECKER in PDF.


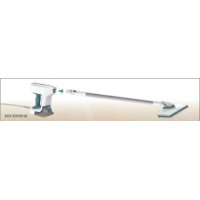
| Product type | Steam cleaner (steam mop) |
| Brand | Black & Decker |
| Model | FSMH13101SM |
| Supply voltage | 230 V ~ |
| Rated power | 1300 W |
| Water tank capacity | 500 ml |
| Weight | 2.8 kg |
| Intended use | Disinfection and cleaning of hard floors: wood, laminate, linoleum, vinyl, tile, stone, marble |
| Heating type | Quick heat-up (approx. 15 seconds) |
| Autoselect™ technology | 3 steam settings: Wood/Laminate (low), Tile/Vinyl (medium), Stone/Marble (high) |
| Steam booster | Yes (foot pedal on floor head for tough stains) |
| Steam mop function | Steam cleaning of floors |
| Portable steam cleaner function | Removable module for spot cleaning (with accessories) |
| Included accessories | Standard floor head, steam booster head, carpet accessory, cleaning pads (several types), steam nozzle, corner brush, brush, squeegee, large squeegee, SteaMitt™ with pads, etc. |
| Cleaning pad | Machine washable at 60°C, without fabric softener or bleach |
| Maintenance | Clean the appliance with a damp cloth; descale if necessary with demineralized water |
| Safety | Boiling steam – risk of burns; do not use on unsealed floors; do not direct towards people/animals/electrical appliances |
| Warranty | 24 months |
| Country of manufacture | Not specified in the manual |
| Dimensions (approx.) | Not specified – height with handle approx. 120 cm |
Frequently Asked Questions - FSMH13101SM BLACK & DECKER
User questions about FSMH13101SM BLACK & DECKER
0 question about this device. Answer the ones you know or ask your own.
Ask a new question about this device
Download the instructions for your Steam cleaner in PDF format for free! Find your manual FSMH13101SM - BLACK & DECKER and take your electronic device back in hand. On this page are published all the documents necessary for the use of your device. FSMH13101SM by BLACK & DECKER.
USER MANUAL FSMH13101SM BLACK & DECKER
FSMH1321
FSMH1351SM
FSMH13101SM
FSMH13151SM
FSMH1321J
FSMH1321JSM
FSMH1321JMD
natural_image
Illustration of a fish being held in two different positions (M and N), showing anatomical details without any text or symbols.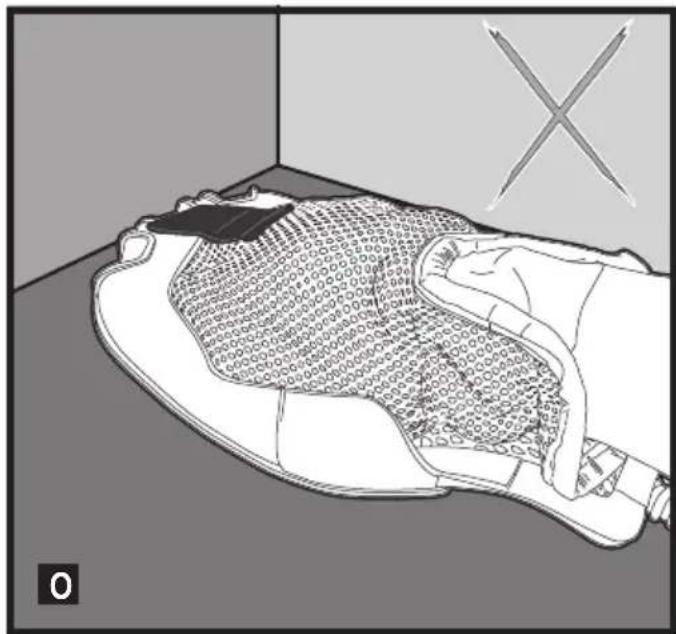
natural_image
Line drawing of a shoe with mesh pattern and a cross symbol, no text or symbols present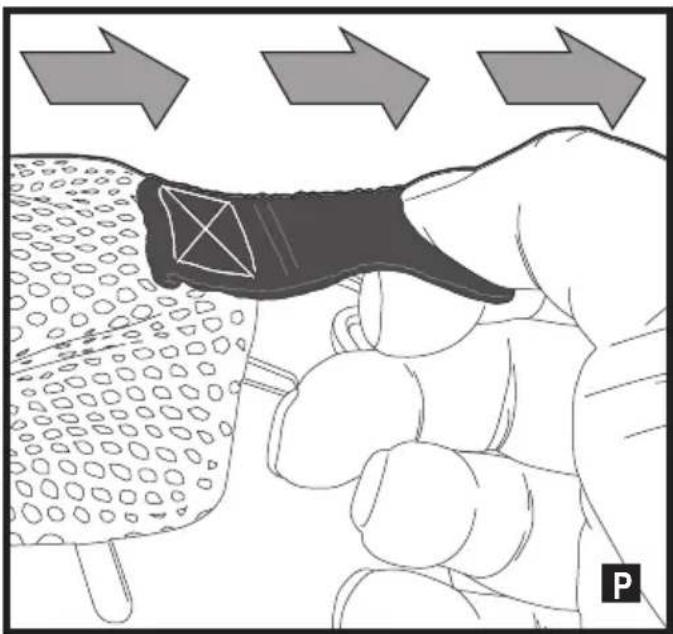
natural_image
Illustration of a hand holding a small object with patterned texture, emitting arrows (no text or symbols)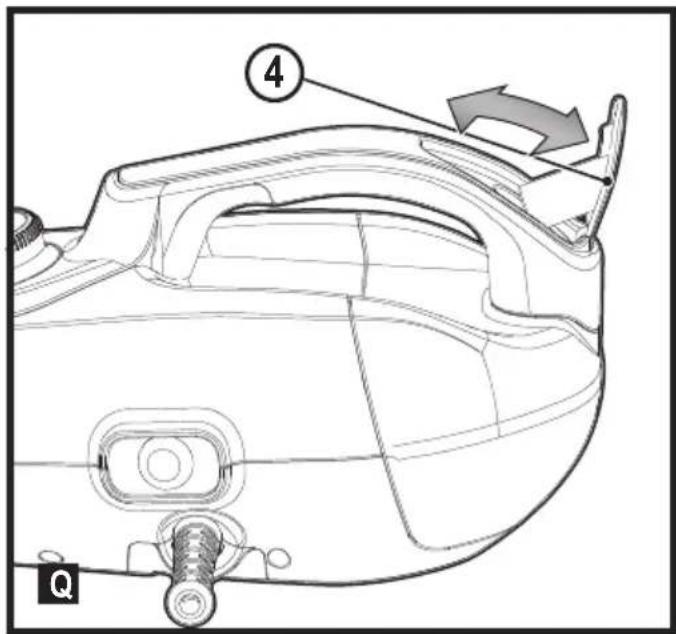
Intended use
Your BLACK+DECKER™ FSMH1321, FSMH1351SM, FSMH13101SM, FSMH13151SM, FSMH1321J, FSMH1321JSM, FSMH1321JMD steam mop has been designed for sanitising and cleaning sealed hardwood, sealed laminate, linoleum, vinyl, ceramic tile, stone and marble floors. This appliance is intended for indoor household use only.
Safety Instructions
Warning! Read all safety warnings and all instructions. Failure to follow the warnings and instructions listed below may result in electric shock, fire and/or serious injury

Warning! When using mains-powered appliances, basic safety precautions, including the following, should always be followed to reduce the risk of fire, electric shock, personal injury and material damage.
- The intended use is described in this manual.
The use of any accessory or attachment or the performance of any operation with this appliance other than those recommended in this instruction manual may present a risk of personal injury.
- Retain this manual for future reference.
Using your appliance
- Do not direct steam at people, animals, electrical appliances or electrical outlets.
- Do not expose to rain.
- Do not immerse the appliance in water.
- Do not leave the appliance unattended.
- Do not leave the appliance connected to an electrical outlet when not in use.
- Never pull the power lead to disconnect the appliance from the socket. Keep the appliance lead away from heat, oil and sharp edges.
- Do not handle steam cleaner with wet hands.
- Do not pull or carry by cord, use cord as a handle, close door on cord, pull cord around sharp corners or expose cord to heated surfaces.
- Do not use appliance in an enclosed space filled with vapour given off by oil-base paint thinner, some moth-proofing substances, flammable dust, or other explosive or toxic vapours.
- Check the type of floor with the manufacturer.
- Do not use on leather, wax polished furniture or floors, synthetic fabrics, velvet or other delicate, steam-sensitive materials.

Warning! Do not use on unsealed wood or unsealed laminate floors. On surfaces that have been treated with wax or some no wax floors, the sheen may be removed by the heat and steam action. It is always recommended to test an isolated area of the surface to be cleaned before proceeding. We also recommend that you check the use and care instructions from the floor manufacturer.
- Never put descaling, aromatic, alcoholic or detergent products into the steam cleaner, as this may damage it or make it unsafe for use.
- If the home circuit breaker activates while using the steam function, discontinue product use immediately and contact the customer support centre. (Beware of the risk of electrical shock.)
- The appliance emits very hot steam to sanitize the area of use. This means that the steam head, cleaning pads and carpet attachment get very hot during use.
Caution! Always wear suitable shoes when using your steam mop and when changing the accessories on your steam mop. Do not wear slippers or open toed footwear.
- The lid may become hot during use.
- Steam may escape from the appliance during use.
Care should be taken when using this appliance. DO NOT touch any parts which may become hot during use. - Switch the appliance off and return the handle to the upright position before removing the water tank.
- If steam is observed escaping from the body of the hand held steam cleaner, switch off and disconnect the unit from the mains supply, allow to cool. Contact your nearest authorised repair agent. Do not continue to use the appliance.
After use
- Unplug the appliance and allow to cool before cleaning.
- When not in use, the appliance should be stored in a dry place.
- Children should not have access to stored appliances.
Inspection and repairs
- Unplug the appliance and allow to cool before performing any maintenance or repairs.
- Before use, check the appliance for damaged or defective parts. Check for breakage of parts, damage to switches and any other conditions that may affect its operation.
- Regularly check the power lead for damage.
-
Do not use the appliance if any part is damaged or defective.
-
Have any damaged or defective parts repaired or replaced by an authorized repair agent.
- Never attempt to remove or replace any parts other than those specified in this manual.
Safety of others
- This appliance can be used by children aged from 8 years and above and persons with reduced physical, sensory or mental capabilities or lack of experience and knowledge if they have been given supervision or instruction concerning use of the appliance in a safe way and understand the hazards involved.
Children shall not play with the appliance. Cleaning and user maintenance shall not be made by children without supervision. - Children should be supervised to ensure that they do not play with the appliance.
Residual risks
Additional residual risks may arise when using the tool which may not be included in the enclosed safety warnings. These risks can arise from misuse, prolonged use etc.
Even with the application of the relevant safety regulations and the implementation of safety devices, certain residual risks can not be avoided. These include:
- Injuries caused by touching any moving parts.
- Injuries caused by touching any hot parts.
- Injuries caused when changing any parts or accessories.
- Injuries caused by prolonged use of the appliance. When using any appliance for prolonged periods ensure you take regular breaks.
Electrical safety

Warning! This product must be earthed. Always check that the power supply corresponds to the voltage on the rating plate.
Power plugs must match the outlet.
Never modify the plug in any way.
Unmodified plugs and matching outlets will reduce risk of electric shock.
- If the supply cord is damaged, it must be replaced by the manufacturer or an authorised BLACK+DECKER Service Centre in order to avoid a hazard.
Extension cables & Class 1 product
- A 3-core cable must be used as your appliance is earthed and of Class 1 construction.
- Up to 30m (100 ft) can be used without loss of power.
Labels on appliance
The following pictograms along with the date code are shown on the appliance.
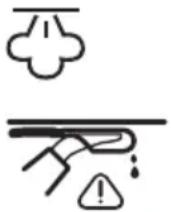
CAUTION Hot Steam. Danger of scalding.
Water dripping when used upside down
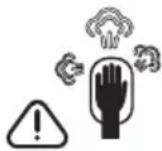
Steam escapes from all sides

Do not leave unsupervised with young children

Wash at 60°C. Do not use bleach or fabric softener
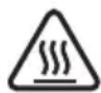
Caution! Hot surface
Features
This appliance includes some or all of the following features.
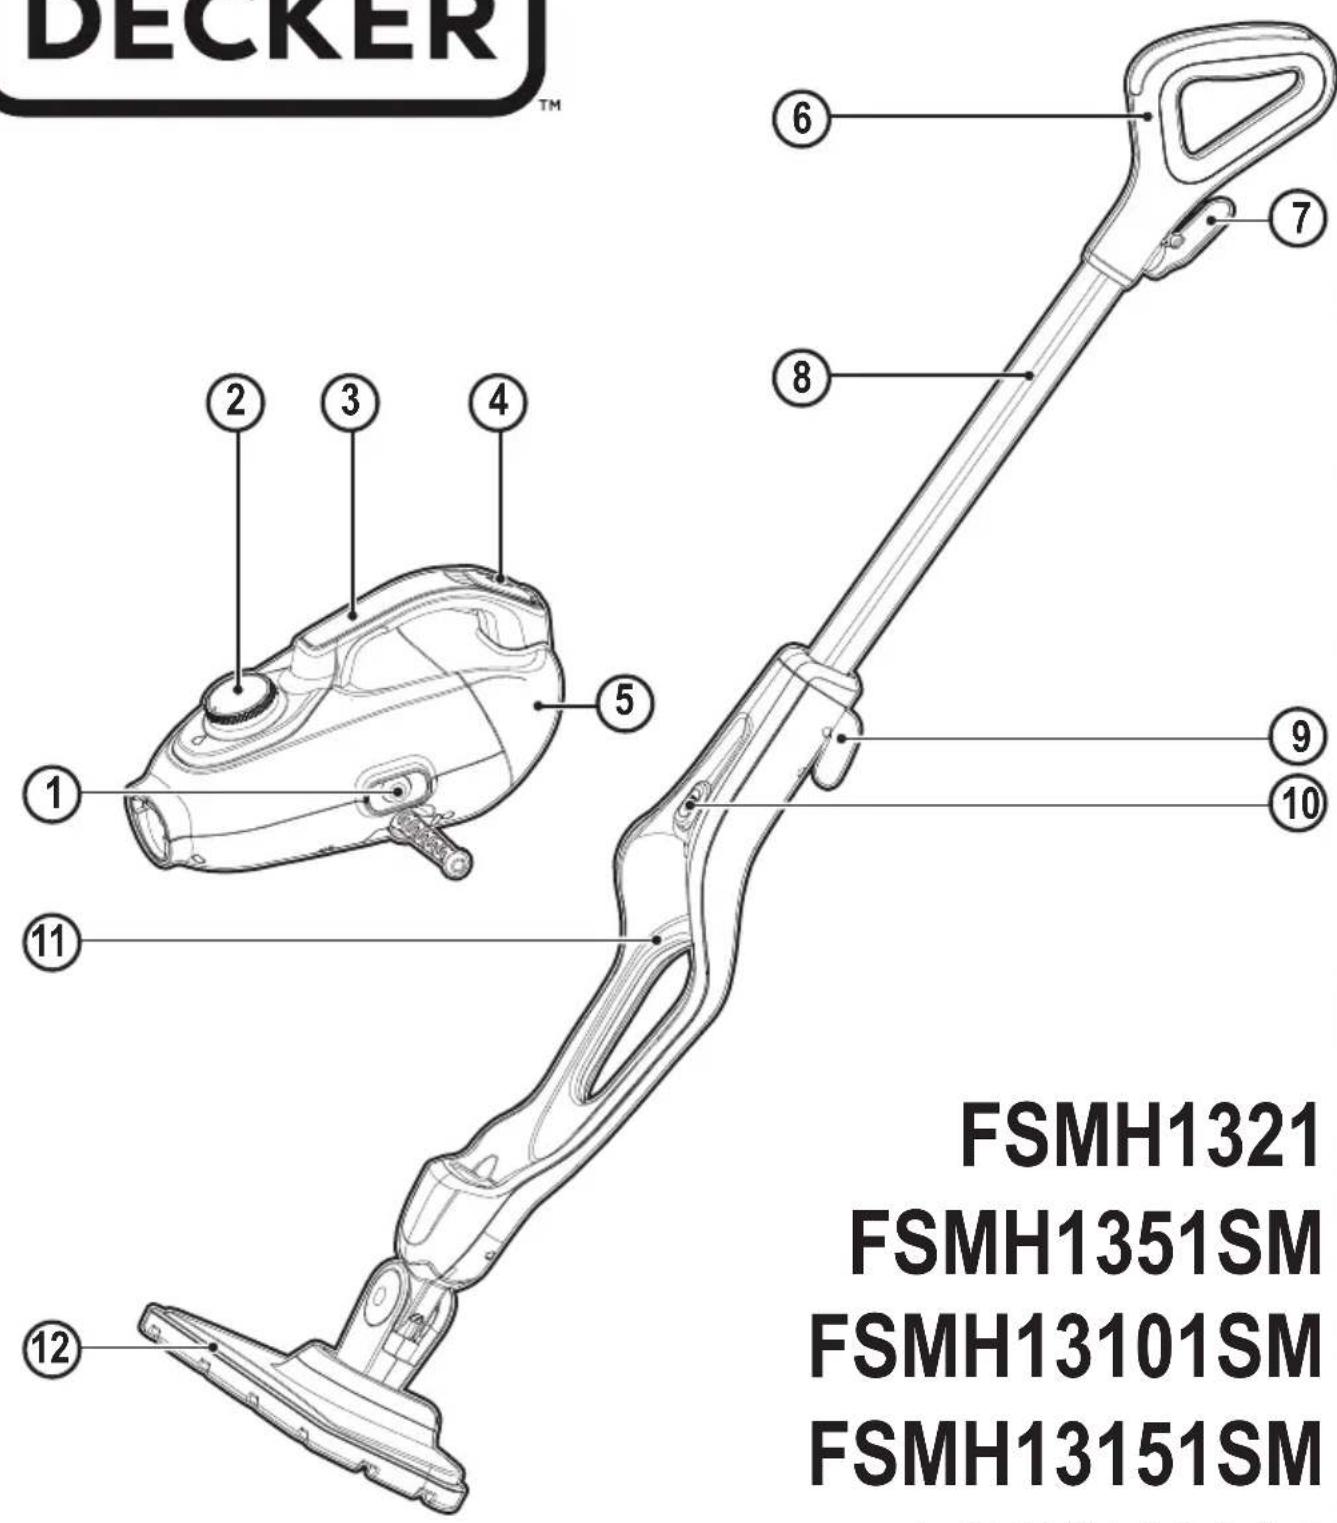
- On/off switch
- Autoselect ^TM dial
- Hand held steam unit handle
- Filler cap
- Hand held steam unit
- Hand grip
- Top cable tidy hook
- Main handle
-
Bottom cable tidy hook
-
Hand held steam unit release button
-
Main body
-
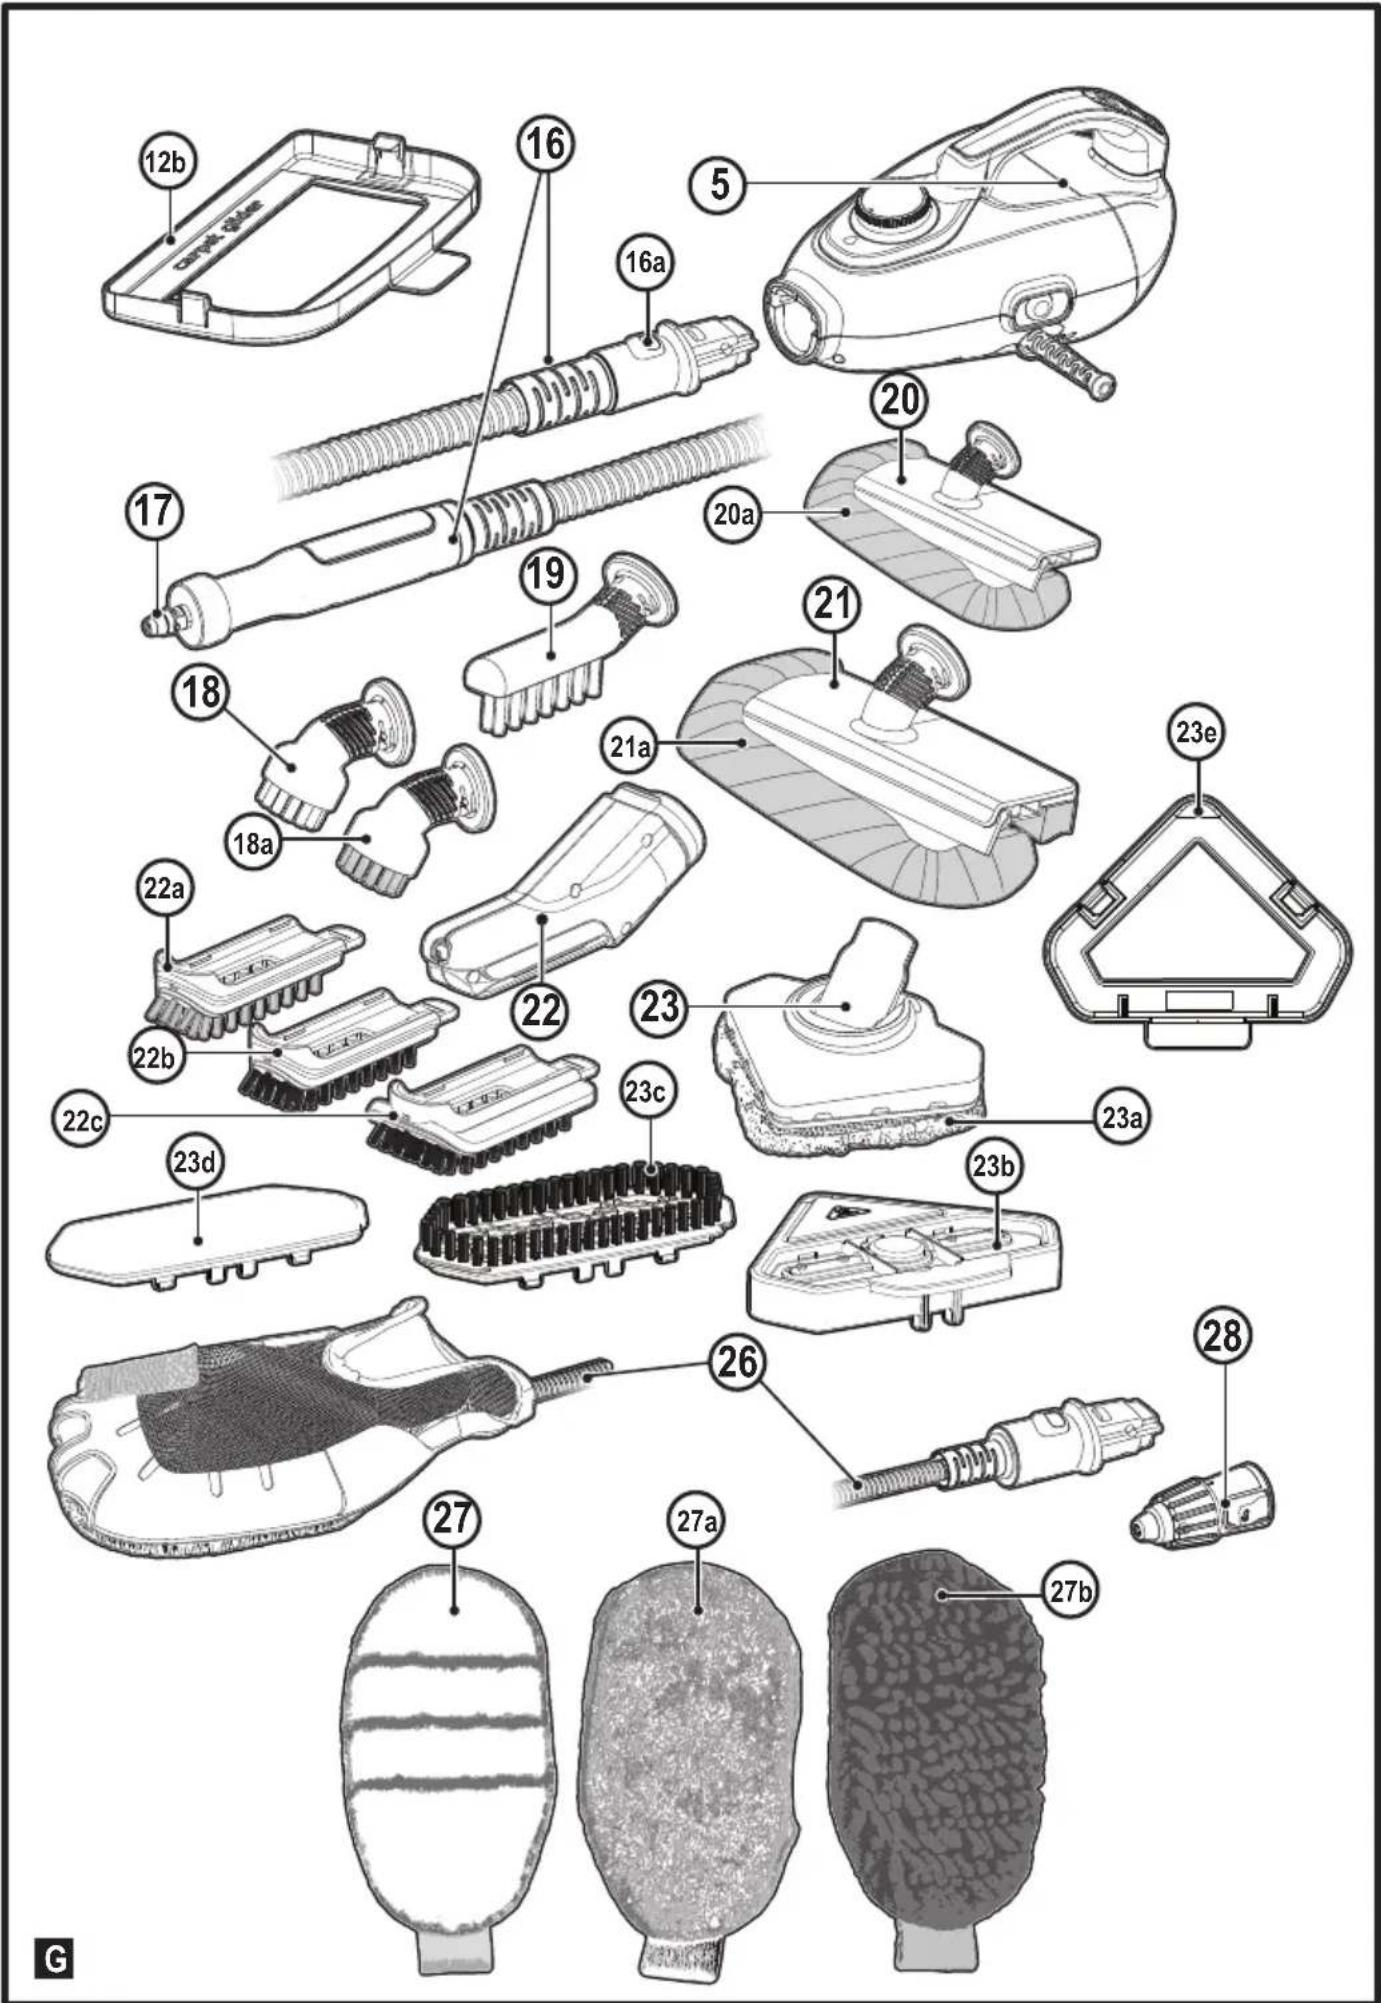
Floor cleaning head
12a. Steam burst floor cleaning head
12b. Carpet glider (for use on carpets)
-
Floor cleaning pad
-
Floor cleaning pad release tab
-
Hanging Bracket
-
Steam hose
-
Steam nozzle
-
Angle brush accessory (for use on hard to remove stains)
18a. Angle brush BBQ (wire brush)
-
Brush accessory (for use on tiles / grout)
-
Squeegee accessory (for use on shower screens / glass / mirrors / clothing / upholstery)
20a. Squeegee sock
- Large squeegee accessory (for use on shower screens / glass / mirrors / clothing / upholstery)
ENGLISH
(Original instructions)
21a. Large squeegee sock
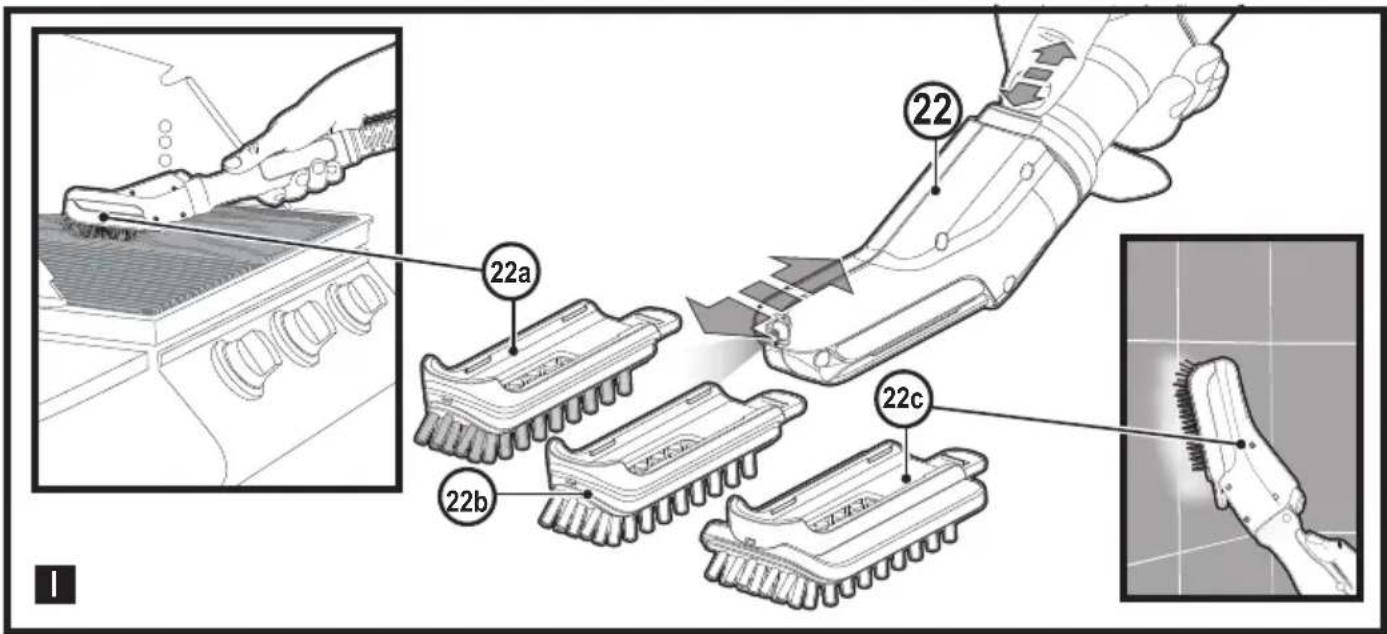
22. Steam burst brush unit
22a. Steam burst wire brush (for use on BBQ / ovens)
22b. Steam burst brush
(for use on BBQ / ovens / oven hobs / taps / grout)
22c. Steam burst wide brush
(for use on larger work surfaces)
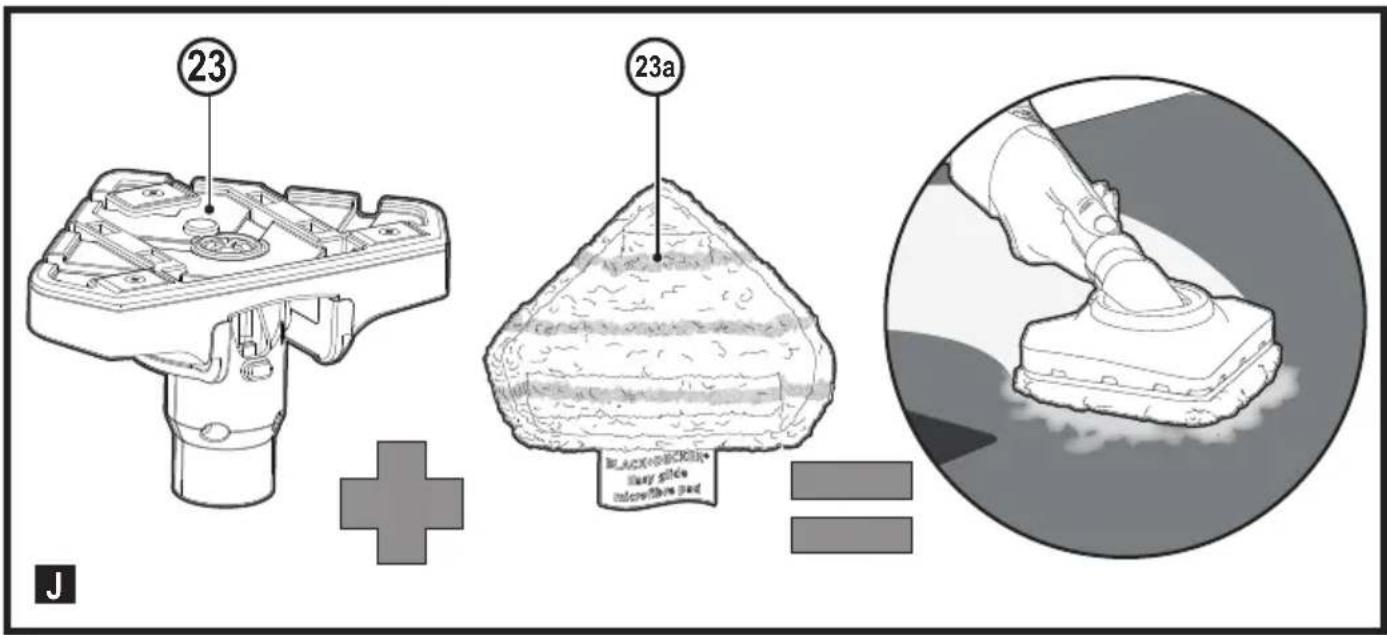
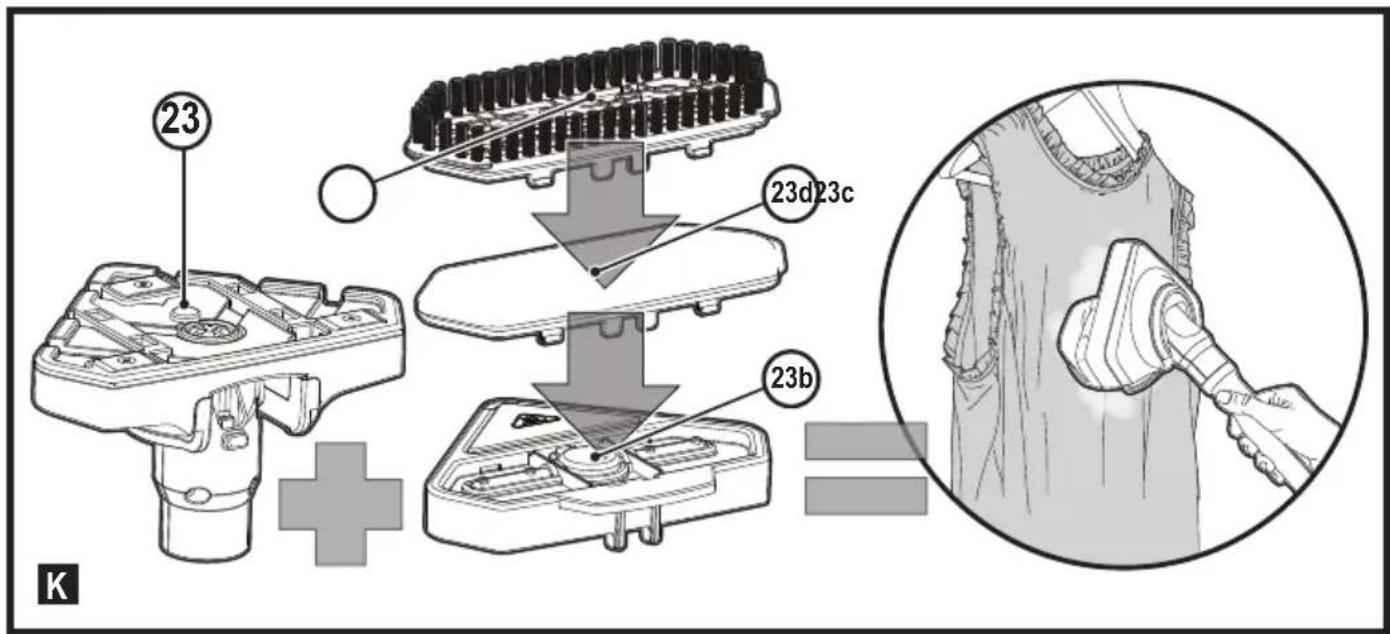
- Delta head
(for use on clothing / upholstery / larger work surfaces)
23a. Flat surface cleaning pad
23b. Garment steaming interface
(for use on clothing / upholstery)
23c. Garment steaming brush
(for use on clothing / upholstery)
23d. Garment steaming pad
(for use on clothing / upholstery)
23e. Delta head carpet glider
- SteaMitt ^TM
- SteaMitt ^TM hose
- SteaMitt ™ cleaning pad
27a. SteaMitt™ cleaning pad 2
27b. SteaMitt™ cleaning pad 3 - Adjustable nozzle
Configuration
| FSMH1321 | FSMH1351SM | FSMH13101SM | FSMH13151SM | FSMH1321J | FSMH1321JSM | FSMH1321JMD | Recommended Steam Settings | |
| 12 | √ | √ √ | √ √ | √ √ √ | All | |||
| 12a | √ √ | √ √ √ √ | All | |||||
| 12b | √ √ | √ √ | All | |||||
| 13 | √ | √ √ | √ √ | √ √ √ | All | |||
| 16 | √ | √ √ | √ √ | √ √ √ | All | |||
| 18 | √ | √ √ | √ √ | All | ||||
| 18a | √ | √ | All | |||||
| 19 | √ | √ √ | √ | All | ||||
| 20 | √ | √ √ | √ | • | ||||
| 20a | √ | √ √ | √ | • | ||||
| 21 | √ √ | √ | • | |||||
| 21a | √ √ | √ | • | |||||
| 22 | √ √ | √ | All | |||||
| 22a | √ √ | √ | All | |||||
| 22b | √ √ | √ | All | |||||
| 22c | √ √ | √ | All | |||||
| 23 | √ | All | ||||||
| 23a | √ | All | ||||||
| 23b | √ | • |
| FSMH1321 | FSMH1351SM | FSMH13101SM | FSMH13151SM | FSMH1321J | FSMH1321JSM | FSMH13221JMD | Recommended Steam Settings | |
| 23c | √ | · | ||||||
| 23d | √ | · | ||||||
| 23e | √ | · | ||||||
| 25 | √ √ | √ | √ √ | · | ||||
| 26 | √ √ | √ | √ √ | · | ||||
| 27 | √ √ | √ | √ √ | · | ||||
| 27a | √ | · | ||||||
| 27b | √ | · | ||||||
| 28 | √ √ | √ √ | All |
Assembly

Warning! Before attempting any of the following instructions, make sure that the appliance is switched off and unplugged and the appliance is cold and does not contain any water.
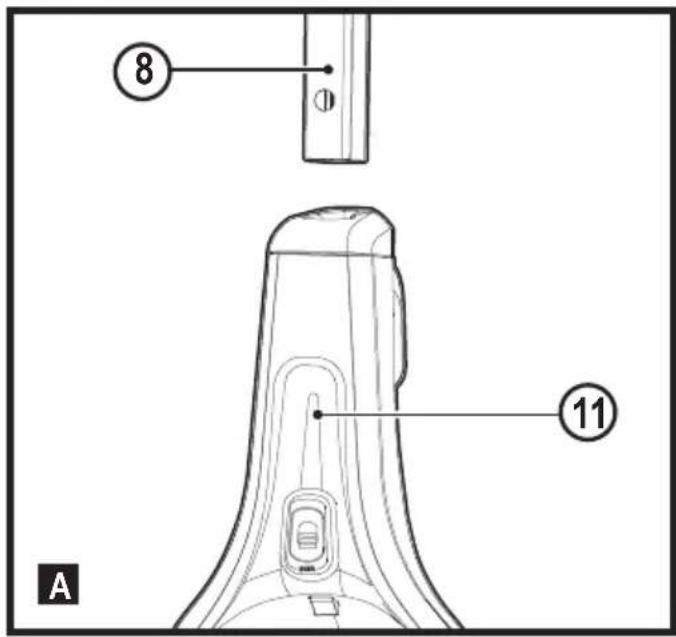
Attaching the handle (Fig. A)
◆ Slide the bottom end of the handle (8) into the top end of the steam mop body (11) until it clicks into place.
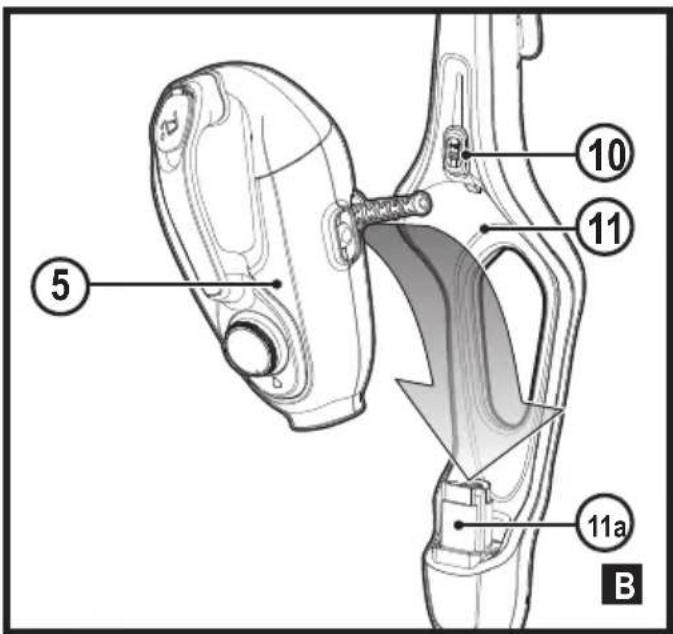
Attaching the hand held steam cleaner (Fig. B)
- Holding the back of the steam mop body (11) push the hand held steam cleaner (5) firmly into the steam mop body (11) making sure it sits correctly over the interface (11a) and clicks securely into place.
Removing the hand held steam cleaner (Fig. B)
- Push the release button (10) on the main body (11) and lift the hand held steam cleaner (5) off the interface (11a) and away from the main body (11).
Attaching a cleaning pad (Fig. C)
Replacement cleaning pads are available from your BLACK+DECKER dealer :- (cat no. FSMP20-XJ).
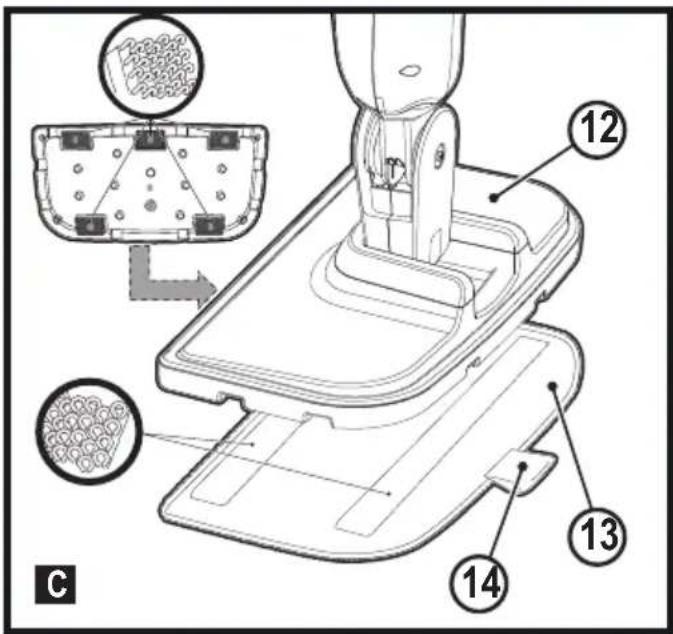
◆ Place a cleaning pad (13) on the floor with the velcro 'loop' side facing up.
◆ Lightly press the steam mop down onto the cleaning pad (13).
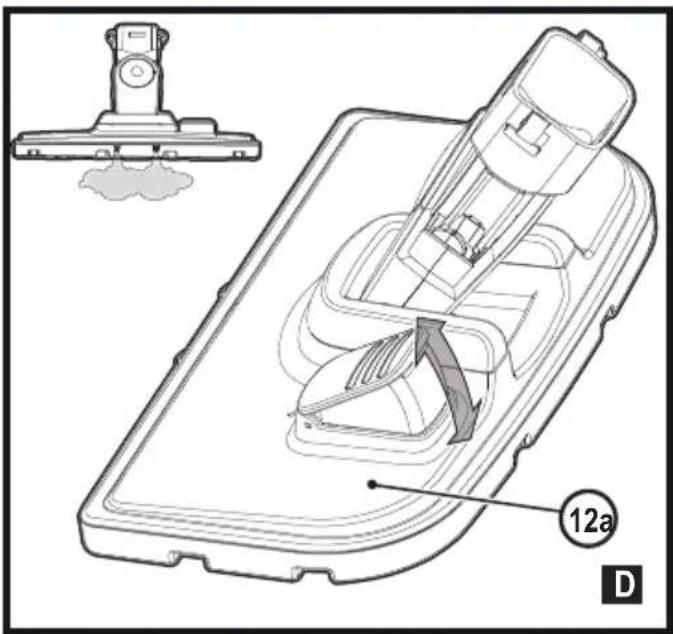
Note: This unit may be supplied with a standard floor cleaning head (12) or a steam burst cleaning head (12a). In either case use these instructions to fit a cleaning pad.
Caution! Never leave the steam mop in one spot on any surface for any period of time. Always place the steam mop with the handle (8) supported in the upright position when stationary and make sure the steam mop is turned off when
stationary and make sure the steam mop is turned off when not in use.
Removing a cleaning pad
Caution! Always wear suitable shoes when changing the cleaning pad on your steam mop.
Do not wear slippers or open toed footwear.
- Return the handle (8) to the upright position and turn the steam mop 'OFF'.
◆ Wait until the steam mop cools down (approximately 5 minutes). - Lift the steam mop away from the cleaning pad freeing it from the velcro fastening.
Caution! Never leave the steam mop in one spot on any surface for any period of time.
Always place the steam mop with the handle (8) supported in the upright position when stationary and make sure the steam mop is turned off when not in use.
Filling the water tank (Fig. Q)
Note! Fill the water tank with clean tap water (Do not use any additives or chemicals).
Note! In areas of hard water, the use of de-ionised water is recommended.
◆ Open the filler cap (4) by flipping it up.
◆ Fill the water tank with water (Do not use any additives or chemicals).
Warning! When filling, detach from main unit and maintain in a horizontal position.
Warning! Your water tank has a 0.5 litre capacity. Do not over fill the tank.
◆ Close the filler cap (4).
Note! Ensure the filler cap is firmly secured.
Attaching the carpet glider (12b) (For use on carpets only)
◆ Place the carpet glider (12b) on the floor.
◆ Attach a cleaning pad to the floor cleaning head (12)
◆ Lightly press the steam mop down onto the carpet glider (12b) until it clicks into place.
Caution! Never leave the steam mop in one spot on any surface for any period of time. Always place the steam mop with the handle (8) supported in the upright position when stationary and make sure the steam mop is turned off when not in use.
Removing the carpet glider
Caution! Always wear suitable shoes when changing the carpet glider on your steam mop. Do not wear slippers or open toed footwear.
- Return the handle (8) to the upright position and turn the steam mop 'OFF'.
◆ Wait until the steam mop cools down (approximately 5 minutes).
◆ Place the front of your shoe onto the carpet glider removal tab and press down firmly.
◆ Lift the steam mop up and off the carpet glider.
Caution! Never leave the steam mop in one spot on any surface for any period of time. Always place the steam mop with the handle (8) supported in the upright position when stationary and make sure the steam mop is turned off when not in use.
Attaching the hose and accessories to the hand held steam cleaner (Fig. G - O)
Warning! Inspect the seal between the connection point on the hand held steam cleaner (5) and the steam hose (16) before each use. If the seal malfunctions or is damaged, please contact your nearest authorised repair agent. Do not use the appliance.
Warning! The unit should be switched off before the hose is fitted.
Attaching the hose
◆ Press the steam hose release button (16a) on the steam hose (16).
- Connect the steam hose (16) to the hand held steam cleaner (5) and release the steam hose release button (16a) making sure it clicks into place.
Important! Ensure that the steam hose (16) is securely connected to the hand held steam cleaner (5). If steam escapes from the joint, the hose is incorrectly fitted. Switch off, allow the unit to cool then remove and refit the hose.
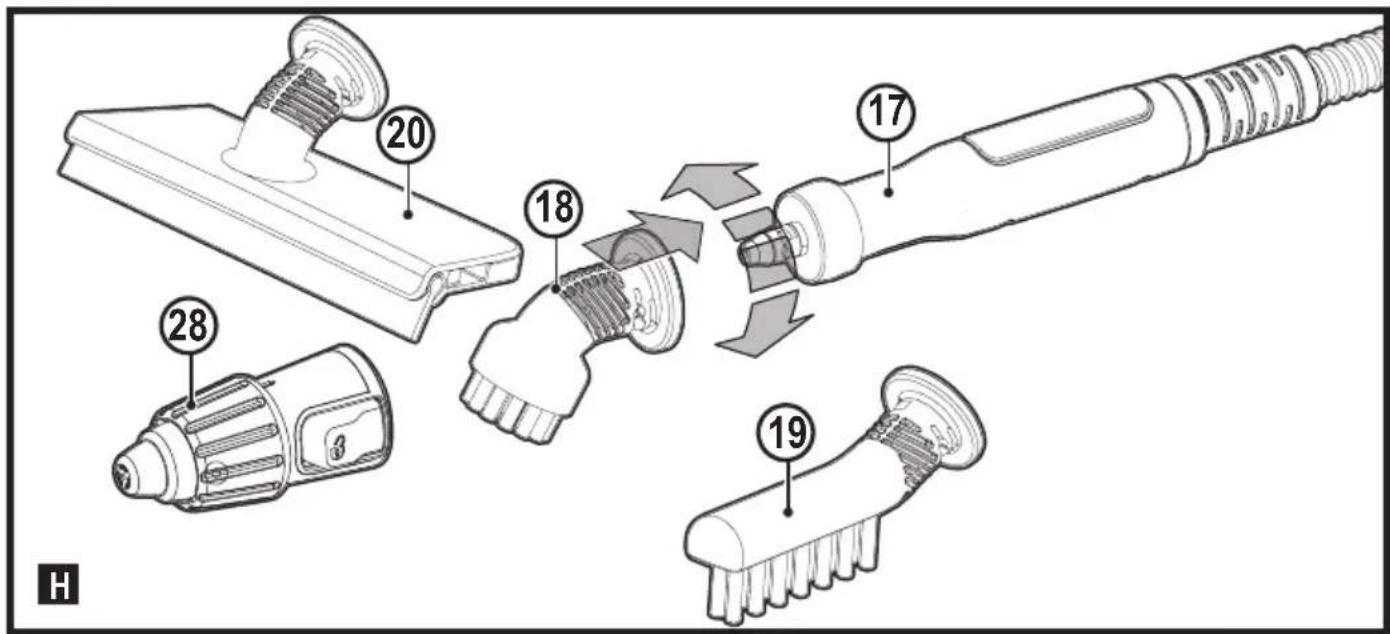
Attaching accessories (Fig H)
- Align the lugs on the steam nozzle (17) with the recesses on the accessory.
◆ Press the accessory onto the steam nozzle (17) and twist anti-clockwise until the accessory clicks into place.
Important! All accessories, apart from the SteaMitt™ (25) which has its own hose and connector (26), must be attached to the steam hose (16) for use.
Removing the hose and accessories
Warning! The steam hose (16), Steam nozzle (17) and accessories become hot during use. Allow the unit and all accessories to cool before attempting to remove.
Removing an accessory
◆ Twist the accessory clockwise then pull away from the hose (16).
Removing the hose
◆ Press the steam hose release button (16a) on the steam hose (16) and pull away from the hand held steam unit.
SteaMitt™
Your BLACK+DECKER™ SteaMitt™ has been designed for sanitising and cleaning tiles, work tops, kitchen surfaces and bathroom surfaces. This appliance is intended for indoor household use only.
Attaching the SteaMitt™ hose to the hand held steam unit
Warning! Inspect the seal on the steam nozzle and hose before each use. If the seal is missing or damaged then please contact your nearest authorised repair agent. Do not use the appliance. Inspect the seal on the SteaMitt™ and hose If the seal is missing, damaged or any steam is escaping then please contact your nearest authorised repair agent.
Do not use the appliance. Ensure there is no blockage or impedance in the SteaMitt™ hose or attachment hose. If any are detected then please contact your nearest authorised repair agent. Do not use the appliance.
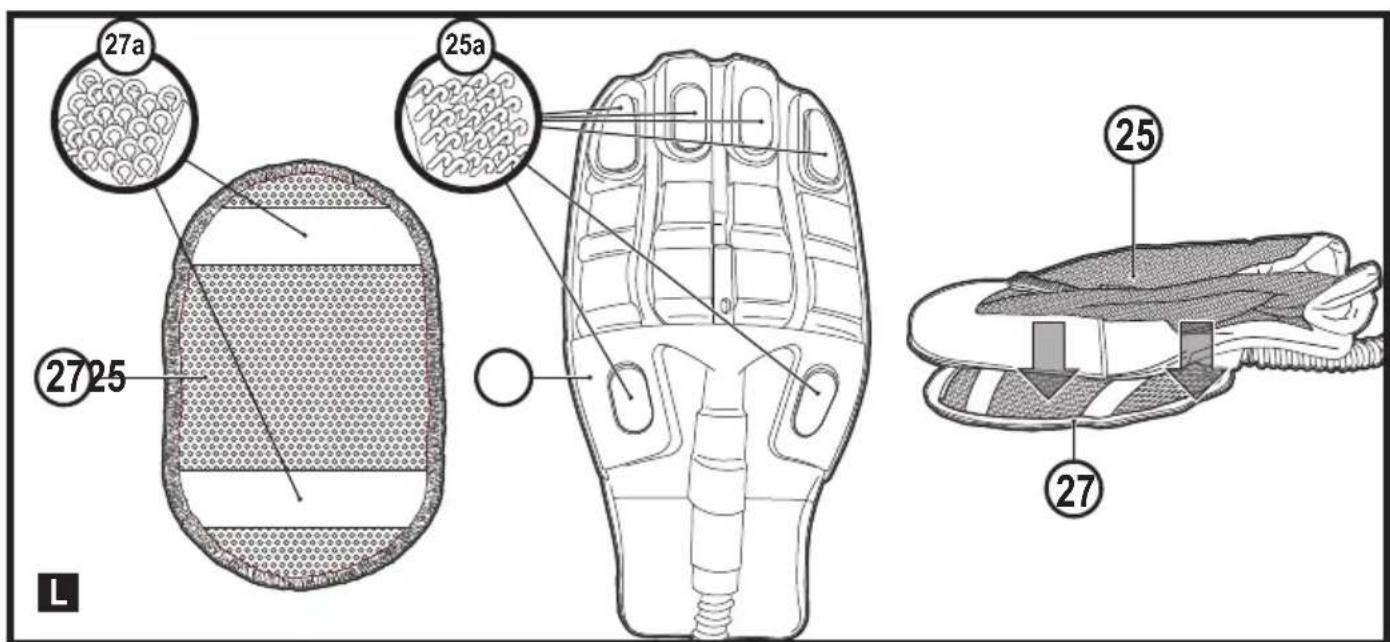
Fitting a cleaning pad to the SteaMitt™ (Fig. L)
Warning! Ensure there is no blockage or impedance in the steam release vents If any are detected then please contact your nearest authorised repair agent. Do not use the appliance.
- Fit the cleaning pad (27) to the SteaMitt™ (25) by attaching the 'loop' velcro strips (27a) on the upper side of the cleaning pad, to the 'hook' velcro pads (25a) on the underside of the SteaMitt™(4). Press down firmly.
Warning! The SteaMitt™ should not be used without fitting a cleaning pad.
Note: The SteaMitt™ accommodates 4 types of cleaning pads of varying thickness. Scouring pad (for use on tough stains and non delicate surfaces), Bathroom pad (for use on taps and other moulded bathroom surfaces), Standard pad (for use on all larger surfaces) and Polishing pad (for use on delicate surfaces).
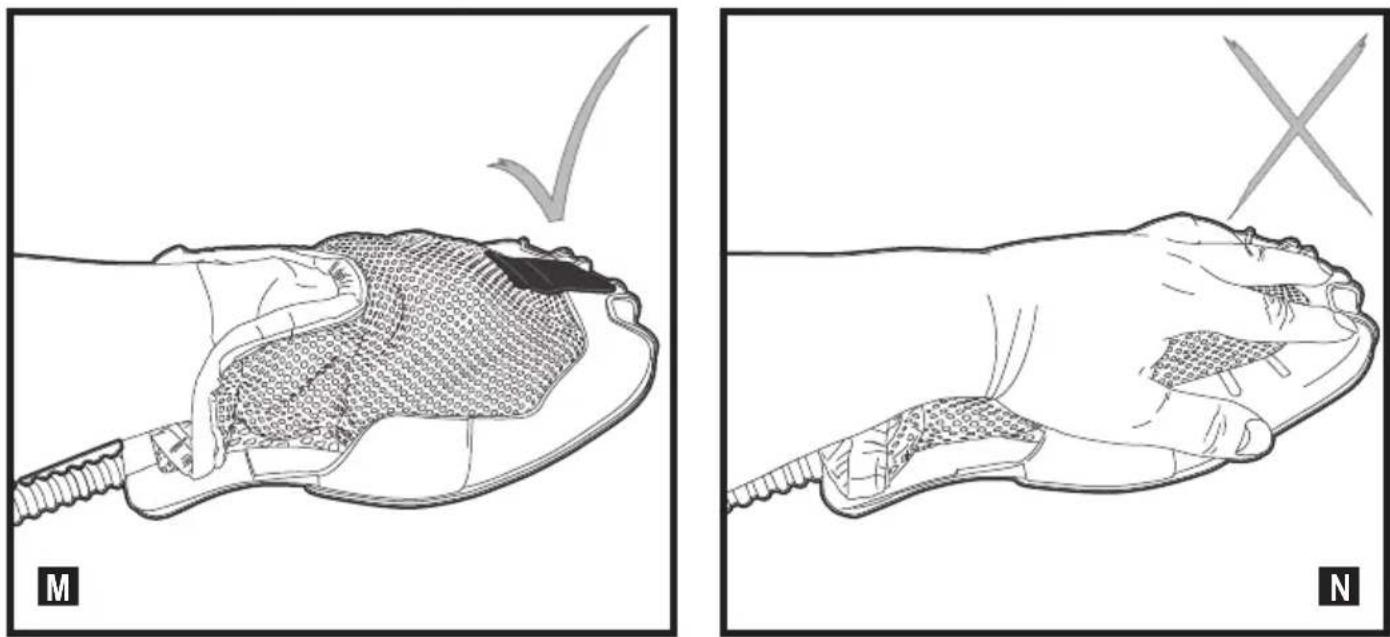
Warning! Always use the SteaMitt™ as shown in figure M, with your hand inside the protective glove.
Warning! Never attempt to use the SteaMitt™ by
⚠️ gripping it externally as shown in figure N. This will result in scalding.
Warning! Avoid using the SteaMitt™ in tight corners as shown in figure O.
Warning! Should a problem occur during use, use the quick release tab to quickly remove the SteaMitt™ from your hand as shown in figure P.
Warning! Do not use the SteaMitt™ on cold glass, such as windows as damage may be caused by the sudden change in temperature.
Warning! Never point or direct the mitt at yourself or any other person.
Note: It is recommended that the SteamMitt be used in setting 1 to avoid the pad becoming too wet.
Use
Important! This unit will kill 99.9% of bacteria and germs when used in accordance with the instructions in this manual and with the micro fibre pads fitted and a continuous run time of 90 seconds.
Switching on and off
- To switch the appliance on, press the ON/Off switch (1). It takes approximately 15 seconds for the steam mop to heat up.
◆ To switch the appliance off, press the ON/Off switch (1).
Note: always have your hand inside the SteaMitt™ before you press the steam button.
Caution! Never leave the steam mop in one spot on any surface for any period of time.
Always place the steam mop with the handle (8) supported in the upright position when stationary and make sure the steam mop is turned off when not in use.
Caution! Always empty the steam mop after use.
Note! When first filled or after running dry, it can take up to 45 seconds for steam to be produced.
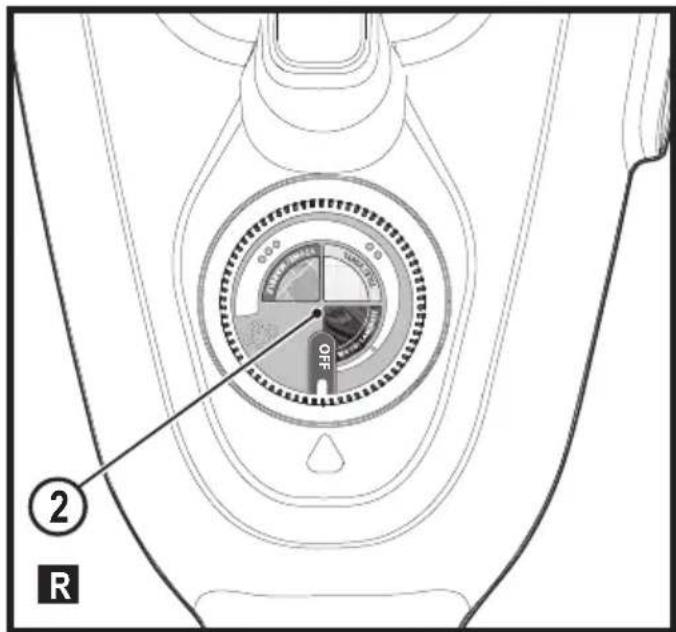
Autoselect™ Technology (Fig. R)
This steam mop is fitted with an Autoselect ^™ dial (2) which shows various cleaning applications. They are used to select the correct operating mode for your particular cleaning operation.
Using Autoselect ^™ , choose from one of the following applications by turning the Autoselect ^™ dial (2) until the required setting is selected.
| Setting Mop Hand held | ||
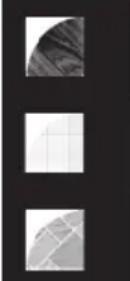 | Wood/Laminate Low steam flow | ● |
| Tiles/Vinyl | Medium steam flow● ● | |
| Stone/Marble High steam flow | ● ● ● | |
The steam mop will select the correct volume of steam required for your particular cleaning operation.
Note: Always check you are using the correct setting before using your steam mop.
Steam Burst (Fig. C1) (only available with units FSMH1310SM, FSMH13151SM, FSMH1321J, FSMH1321JMD, FSMH1321JSM)
The floor head (12a) is equipped with a steam burst pedal to aid in the removal of stubborn marks and stains.
During use, press the steam burst pedal to apply extra cleaning power.
◆ To revert back to normal setting press the pedal again.
Hints for optimum use
General
Caution: Never use the steam mop without first attaching a cleaning pad.
◆ Always vacuum or sweep the floor before using the steam mop.
- The easiest way to use the appliance is to tilt the handle to a 45° angle and clean slowly, covering a small area at a time.
◆ Use water only with no additives or chemicals with your steam mop. To remove stubborn stains from vinyl or linoleum floors, you can pre-treat with a mild detergent and some water before using the steam mop.
Steam Cleaning with the mop
◆ Fit hand held steam cleaner (5) to the steam mop body (11)
◆ Place a cleaning pad (13) on the floor with the velcro 'loop' side facing up.
◆ Lightly press the steam mop down onto the cleaning pad (13).
◆ Connect the steam mop to the mains.
◆ Press the ON/OFF button (1). It takes approximately 15 seconds for the steam mop to heat up.
- Turn the Autoselect™ dial (2) until the required setting is reached. After a few seconds steam will start to come out of the steam head.
Note! When first filled or after running dry, it can take up to 45 seconds for steam to be produced.
- It takes a few seconds for steam to enter the cleaning pad. The steam mop will now glide easily over the surface to be sanitized/cleaned.
◆ Push and pull the steam mop slowly across the surface to thoroughly steam clean each section.
When you have finished using the steam mop, return the handle (8) to the upright position, making sure that it is supported and turn it 'OFF'. Wait until the steam mop cools down (approximately five minutes).
Caution! It is important to monitor the water level in the water tank. To refill the water tank and continue to sanitize/clean stand the mop upright making sure that the handle is supported and turn the steam mop 'OFF'. Unplug the unit from the electrical wall outlet, and refill the water tank.
Caution! Never leave the steam mop in one spot on any surface for any period of time. Always place the steam mop with the handle (8) supported in the upright position when stationary and make sure the steam mop is turned off when not in use.
Carpet refreshing
◆ Place a cleaning pad (13) on the floor with the 'loop' side facing up.
◆ lightly press the steam mop down onto the cleaning pad.
◆ Place the carpet glider (12b) on the floor.
◆ Lightly press the steam mop down onto the carpet glider until it clicks into place.
◆ Connect the steam mop to the mains.
◆ Press the ON/OFF button (1). It takes approximately 15 seconds for the steam mop to heat up.
- Turn the Autoselect™ dial (2) to the Wood/Laminate setting.
◆ Push and pull the steam mop slowly across the carpet to thoroughly refresh each section.
- When you have finished using the steam mop, return the handle (8) to the upright position and turn the unit OFF. Wait until the steam mop cools down (approximately five minutes).
After use
- Turn the Autoselect™ dial (2) to the OFF position.
◆ Wait until the steam mop cools down.
◆ Unplug the steam mop from the electrical wall outlet.
◆ Empty the water tank. - remove the cleaning pad (13) and wash it ready for next use (take care to follow the wash care instructions printed on the cleaning pad).
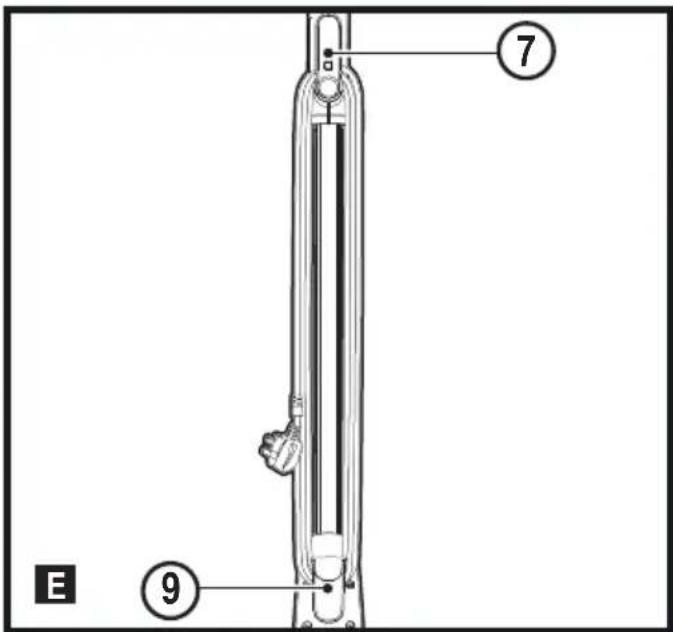
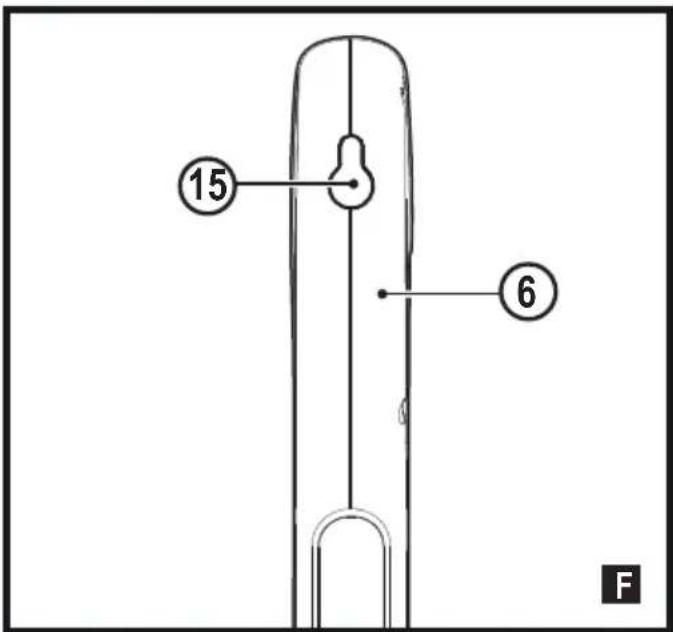
◆ Wrap the supply cable around the cable tidy hooks (7 and 9). - There is a hanging bracket (15) built into the hand grip (6) which allows your steam mop to be hung from a suitable hook on the wall. Always ensure that your wall hook is capable of supporting the weight of the steam mop safely.
Hand held steam cleaning
Warning!! Maintain the unit in a horizontal position during use.
◆ Attach the required accessory.
◆ Connect the hand held steam cleaner to the mains.
◆ Press the ON/OFF button (1). It takes approximately 15 seconds for the steam mop to heat up.
- Turn the Autoselect™ dial (2) until the required setting is reached. After a few seconds steam will start to come out of the steam head.
Note! When first filled or after running dry, it can take up to 45 seconds for steam to be produced.
When you have finished using the hand held steam cleaner turn the Autoselect™ dial (2) to the OFF position. Turn the unit OFF by pressing the ON/OFF button (1) and disconnect from the mains supply. Wait until the unit cools down before storing (approximately five minutes).
Accessories
The performance of your appliance depends on the accessory used. BLACK+DECKER accessories are engineered to high quality standards and designed to enhance the performance of your appliance. By using these accessories you will get the very best from your equipment.
Technical Data
| FSMH1321 | ||
| Voltage V | ac | 230 |
| Power W 1300 | ||
| Tank Capacity | ml 500 | |
| Weight kg 2.7 | ||
| FSMH1351SM | ||
| Voltage V | ac | 230 |
| Power W 1300 | ||
| Tank Capacity | ml 500 | |
| Weight kg 2.7 | ||
| FSMH13101SM | ||
| Voltage V | ac | 230 |
| Power W 1300 | ||
| Tank Capacity | ml 500 | |
| Weight kg 2.8 | ||
| FSMH13151SM | ||
| Voltage V | ac | 230 |
| Power W 1300 | ||
| Tank Capacity | ml 500 | |
| Weight kg 2.8 | ||
| FSMH1321J | ||
| Voltage V | ac | 230 |
| Power W 1300 | ||
| Tank Capacity | ml 500 | |
| Weight kg 2.7 | ||
| FSMH1321JSM | ||
| Voltage V | ac | 230 |
| Power W 1300 | ||
| Tank Capacity | ml 500 | |
| Weight kg 2.8 | ||
| FSMH1321JMD | ||
| Voltage V | ac | 230 |
| Power W 1300 | ||
| Tank Capacity | ml 500 | |
| Weight kg 2.8 | ||
Troubleshooting
If your appliance seems not to operate properly, follow the instructions below. If this does not solve the problem, please contact your local BLACK+DECKER repair agent.
| Problem Step Possible solution | ||
| The steam mop is not turning on | 1. Check | the unit is plugged in at the wall socket. |
| 2. Check | the unit is switched on using the ON/OFF switch (1) | |
| 3. Check | the fuse in the plug. | |
| The steam mop is not producing steam | 4. The steam mop will only produce steam if the hand held steam cleaner (5) is correctly docked into the main body (11) or the steam hose is fitted or the Autoselect^TM is turned to ON | |
| 5. Check | that the water tank is full. Note:When first filled or after running dry it can take up to 45 seconds for steam to be produced. | |
| 6. Check | steps 1, then 2, then 3 | |
| The steam mop stops producing steam during use | 7. Check | steps 4, then 5, then 3 |
| The steam mop is producing too much steam during use | 8. Turn the Autoselect ^TM dial (2)anti-clockwise to reduce the amount of steam being produced | |
| The steam mop is producing too little steam during use | 9. Turn the Autoselect ^TM dial (2) clockwise to increase the amount of steam being produced | |
| No steam is being produced from the hand held steam cleaner | 10. Check that the Autoselect ^TM dial (2) is at the ON position | |
| 11. Check steps 5, then 1, then 2, then 3 | ||
| The hand held steam cleaner is producing too little steam during use | 12. Turn the Autoselect ^TM dial (2) clockwise to increase the amount of steam being produced | |
| 13. Check step 5 | ||
| The hand held steam cleaner is producing too much steam during use | 14. Turn the Autoselect ^TM dial (2)anti-clockwise to reduce the amount of steam being produced | |
| The accessories keep falling off the unit | 15. Refer to the assembly chapter for correct fitting instructions of all parts and accessories | |
| Steam is escaping from unexpected areas of the unit | 16. Refer to the assembly chapter for correct fitting instructions of all parts and accessories | |
| Where can I get further information/ accessories | 17. www.blackanddecker.co.uk/steammopwww.blackanddecker.ie/steammop | |
Maintenance and cleaning
Your BLACK+DECKER corded appliance has been designed to operate over a long period of time with a minimum of maintenance. Continuous satisfactory operation depends upon proper appliance care and regular cleaning.
Warning! Before performing any maintenance or cleaning on corded appliances switch off and unplug the appliance.
◆ Wipe your appliance over using a soft damp cloth.
- For stubborn marks you can use a mild solution of soap and water to dampen your cloth.
ENGLISH
(Original instructions)
Care of the cleaning pads
Wash care instructions - No fabric conditioner - Allow to dry fully before re-use.
Caution! Follow the cleaning instructions printed on the label of the cleaning pad.
Mains plug replacement (U.K. & Ireland only)
If a new mains plug needs to be fitted:
◆ Safely dispose of the old plug.
- Connect the brown lead to the live terminal in the new plug.
◆ Connect the blue lead to the neutral terminal.
◆ Connect the green/yellow lead to the earth terminal.
Warning! Follow the fitting instructions supplied with good quality plugs. Recommended fuse: 13A.
Protecting the environment

Separate collection. Products and batteries marked with this symbol must not be disposed of with normal household waste.
Products and batteries contain materials that can be recovered or recycled reducing the demand for raw materials. Please recycle electrical products and batteries according to local provisions. Further information is available at www.2helpU.com
Guarantee
Black & Decker is confident of the quality of its products and offers consumers a 24 month guarantee from the date of purchase. This guarantee is in addition to and in no way prejudices your statutory rights. The guarantee is valid within the territories of the Member States of the European Union and the European Free Trade Area.
To claim on the guarantee, the claim must be in accordance with Black&Decker Terms and Conditions and you will need to submit proof of purchase to the seller or an authorised repair agent. Terms and conditions of the Black&Decker 2 year guarantee and the location of your nearest authorised repair agent can be obtained on the Internet at www.2helpU.com, or by contacting your local Black & Decker office at the address indicated in this manual.
Please visit our website www.blackanddecker.co.uk to register your new Black & Decker product and receive updates on new products and special offers.
Attention ! Surface chaude
Caractéristiques
FORSIKTIG Varm damp. Fare for skålding.
Vann drypper om du snur den opp-ned
| F | F | F | F | F | F | F | F | |
| S | S | S | S | S | S | S | S | |
| M | M | M | M | M | M | M | M | |
| H | H | H | H | H | H | H | H | |
| 1 | 1 | 1 | 1 | 1 | 1 | 1 | 1 | |
| 3 | 3 | 3 | 3 | 3 | 3 | 3 | 3 | |
| 2 | 5 | 1 | 1 | 2 | 2 | 2 | 2 | |
| 1 | 1 | 0 | 5 | 1 | 1 | 1 | 1 | |
| S | 1 | S | 1 | J | J | J | ||
| M | S | M | M | D | ||||
| 27a | ☐ | • | ||||||
| 27b | ☐ | • | ||||||
| 28 | ☐ ☐ ☐ ☐ | Alle |
Montering

HUOMIO Kuuma höyry. Palamisvaara.

- Intended use
- Safety Instructions
- Using your appliance
- After use
- Inspection and repairs
- Safety of others
- Residual risks
- Electrical safety
- Extension cables & Class 1 product
- Labels on appliance
- Features
- ENGLISH
- (Original instructions)
- Assembly
- Attaching the handle (Fig. A)
- Attaching the hand held steam cleaner (Fig. B)
- Removing the hand held steam cleaner (Fig. B)
- Attaching a cleaning pad (Fig. C)
- Removing a cleaning pad
- Filling the water tank (Fig. Q)
- Attaching the carpet glider (12b) (For use on carpets only)
- Removing the carpet glider
- Attaching the hose and accessories to the hand held steam cleaner (Fig. G - O)
- Attaching the hose
- Attaching accessories (Fig H)
- Removing the hose and accessories
- Removing an accessory
- Removing the hose
- SteaMitt™
- Attaching the SteaMitt™ hose to the hand held steam unit
- Fitting a cleaning pad to the SteaMitt™ (Fig. L)
- Use
- Switching on and off
- Autoselect™ Technology (Fig. R)
- Steam Burst (Fig. C1) (only available with units FSMH1310SM, FSMH13151SM, FSMH1321J, FSMH1321JMD, FSMH1321JSM)
- Hints for optimum use
- General
- Steam Cleaning with the mop
- Carpet refreshing
- Hand held steam cleaning
- Accessories
- Troubleshooting
- Maintenance and cleaning
- Care of the cleaning pads
- Mains plug replacement (U.K. & Ireland only)
- Protecting the environment
- Guarantee
- Caractéristiques
- Montering
Brand : BLACK & DECKER
Model : FSMH13101SM
Category : Steam cleaner