Frita+ 8 - Deep fryer FRIFRI - Free user manual and instructions
Find the device manual for free Frita+ 8 FRIFRI in PDF.
| Product type | Professional electric fryer |
| Brand | Frifri |
| Model | Frita+ 8 |
| Dimensions (W x D x H with lid) | 360 x 475 x 455 mm |
| Dimensions (W x D x H without lid) | 360 x 475 x 295 mm |
| Net weight | 14.0 kg |
| Power supply | 3N 400V, 6.9 kW, 50 Hz, 3L+N+PE |
| Power cable | H07RN-F, 2 m, without plug |
| Oil capacity (min/max) | 8.0 L / 9.5 L |
| Frying capacity | 1.0 kg (2 baskets of 0.5 kg) |
| Frozen fries output | 15.0 kg/h |
| Adjustable thermostat | Yes, adjustable, with orange indicator light |
| Safety thermostat | Yes, with manual reset |
| Drain valve | Yes |
| Heating element | Removable resistance grid |
| External material | Stainless steel |
| Cleaning | Tank and heating elements washable with warm water + mild detergent; do not immerse the control box |
| Safety | Safety thermostat, safety switch, fire protection lid |
| Daily maintenance | Oil filtration recommended at 60°C |
| Spare parts available | Baskets, lid, thermostat, valve, heating element, etc. |
| Warranty and after-sales service | Distributor after-sales service, repair by qualified personnel |
Frequently Asked Questions - Frita+ 8 FRIFRI
User questions about Frita+ 8 FRIFRI
0 question about this device. Answer the ones you know or ask your own.
Ask a new question about this device
Download the instructions for your Deep fryer in PDF format for free! Find your manual Frita+ 8 - FRIFRI and take your electronic device back in hand. On this page are published all the documents necessary for the use of your device. Frita+ 8 by FRIFRI.
USER MANUAL Frita+ 8 FRIFRI
Installation and user manual
natural_image
Exterior view of a FRITA stainless steel kitchen appliance with two mesh grilles and control panel (no visible text or symbols)Please make a note of your product details for future use:
Date Purchased: ____
Model Number: ____
Serial Number: ____
Dealer:
Lincat Ltd
Whisby Road
Lincoln
LN6 3QZ
Tel +44 (0) 1522 503250
Fax +44 (0) 1522 875530
info@frifri.co.uk
The instructions must be read by each user of the unit. They must be constantly available at the place of work.
Safety regulations:
Electrical connections must be made by a qualified electrician. The unit is approved only for operation under supervision. Do not clean the fryer with a water jet. Danger of fire if oil level does reach the lower mark!
-
Contents Page 2
-
Parts of the fryer 3
-
Models and variants 4
-
Electrical connection 5
-
Installing the machine 13
-
Starting up 13
-
Frying 13
8.Warnings 14
-
Daily maintenance 14
-
Cleaning / Maintenance 14
-
Safety thermostat 15
-
Aftersales service 15
-
Electrical Diagram 19
ITALIANO
IMPORTANTE:
4. Electrical connection
The connection and setting to work of machine must only be undertaken by a competent person. To connect the appliance, proceed as follows:
a) Check if voltage and frequency information on the rating plate correspond to power supply.
b) The unit must be connected in accordance to EN 60335-1 / IEC, resp. CEI 335-1 regulations and to local specifications, i.e.: fitting of a main plug with the correct nominal voltage to the cable, for connection to a socket. The appliance is not foreseen for a fixed connection.
c) Main supply-line quality: H07RN-F
The replacement of the fryers mains cable is only allowed by the manufacturer himself, his after sales services or a qualified person who can ensure that the installation meets the required standards.
Systems of connection :
5. Installation of the appliance
- Never place the appliance on a combustible surface or against combustible walls.
- It is not necessary to observe clearances behind or on the sides of the appliance.
- Noise emission of the fryer: <70db(A).
6. Starting up
Remove the lid of the tank and hook it up on the back of the appliance. Take the basket out of the tank. CLOSE THE DRAIN VALVE. Fill the tank with frying oil up to the MAX. level. The MIN/MAX level is visible on the insidewalls of the tank.
Note:
The appliance is not equipped with a device to melt fat. When using fat for the first time, melt it beforehand in a separate saucepan. The next time you use the fryer, proceed as follows:
- Make a few holes in the solidified fat down to the level of the heating elements.
- Turn the thermostat knob to a maximum of 100^ C, heat for one minute, then turn the knob back to 0. Repeat this operation until the fat has become liquid.
Before using the fryer for the first time: Clean the tank thoroughly.
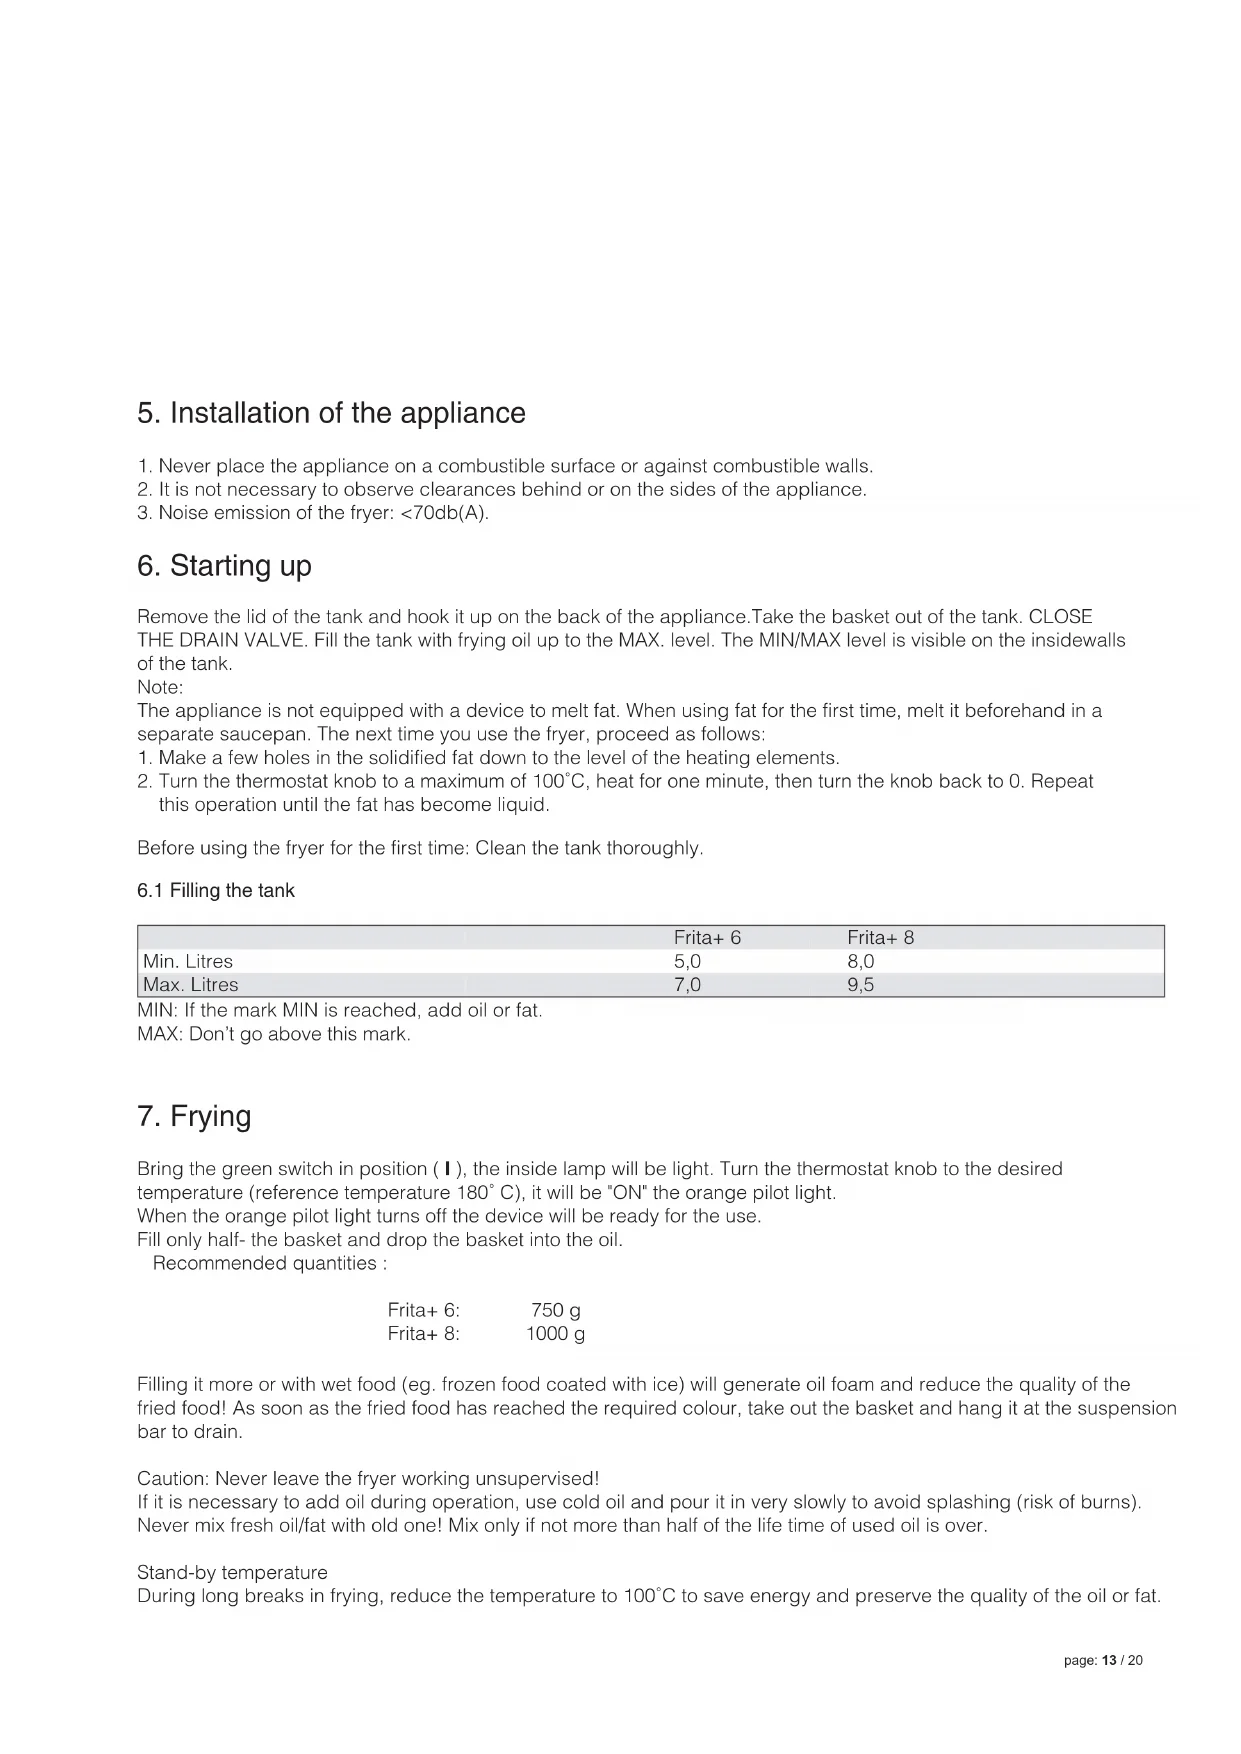
6.1 Filling the tank
MIN: If the mark MIN is reached, add oil or fat.
MAX: Don't go above this mark.
7. Frying
Bring the green switch in position (I), the inside lamp will be light. Turn the thermostat knob to the desired temperature (reference temperature 180^ C), it will be "ON" the orange pilot light.
When the orange pilot light turns off the device will be ready for the use.
Fill only half- the basket and drop the basket into the oil.
Recommended quantities :
Frita+ 6: 750 g
Frita+ 8: 1000 g
Filling it more or with wet food (eg. frozen food coated with ice) will generate oil foam and reduce the quality of the fried food! As soon as the fried food has reached the required colour, take out the basket and hang it at the suspension bar to drain.
Caution: Never leave the fryer working unsupervised!
If it is necessary to add oil during operation, use cold oil and pour it in very slowly to avoid splashing (risk of burns).
Never mix fresh oil/fat with old one! Mix only if not more than half of the life time of used oil is over.
Stand-by temperature
During long breaks in frying, reduce the temperature to 100^ C to save energy and preserve the quality of the oil or fat.
8. Warnings
The fryer should never be allowed to work empty. Should this happen by mistake, the safety thermostat will cut off the fryer. An overfilled basket or filled with products that are too wet (eg. ice crystals on frozen food) will make the oil froth and this will reduce the quality of the fried food!
If the oil catches fire, use an extinguisher blanket or an extinguisher system. Put the main switch on 0 and pull out the plug! NEVER POUR WATER ONTO BURNING OIL!
To extinguish burning oil, it is necessary to have a fire extinguisher or a fixed extinguishing system at hand.
Never move the fryer when it is hot!
Before taking out the tank to change the oil, wait for the oil cools down to a max. of 60°C.
Old and spoiled oil will more easily foam over and catch fire.
Danger of fire if oil level does reach the lower mark!
9. Daily maintenance
Before carrying out maintenance tasks, switch off the fryer and unplug it. It is advisable to wear gloves to avoid being burnt by hot oil, metal parts and handles. The oil or fat should be filtered daily as follows:
- Oil temperature at max. 60°C.
- Remove basket.
- Put the control box with the heating elements in drain position (raise the control box to the catch).
- Let the oil drain and then remove the control box.
- Drain the oil on the Frita 6&8 with the drain valve.
- Remove the container. Warning: the handles of the container will be hot! Decant the oil or fat at a temperature of max. 60^ C.
- Pour the oil or fat back into its container and, if necessary, fill up to the MAX level.
Important:
Used oil should be treated according to the local regulations and should on no account be poured down the drain.
10. Cleaning / Maintenance
Before carrying out maintenance tasks, switch off the fryer and unplug it. It is advisable to wear gloves to avoid being burnt by hot oil, metal parts and handles. Regular cleaning will make your fryer lasts longer and improves the quality of the fried food. The fryer should therefore be cleaned daily as follows:
- Remove basket and put the control box with the heating elements in.
- Drain the oil on the Frita 6 & 8 with the drain valve.
- Take out the control box with the heating elements, remove the container and empty it.
- Clean the heating elements with warm water and a mild detergent.
- The case is made of stainless steel and may also be cleaned with the same product.
Important:
Do not squirt control box with water or even drop it into water.
Clean the heating elements with a normal soft brush, do not use a metal brush to clean the heating elements.
Take care to avoid damaging the thermostat probes. Avoid banging the heating elements.
Cleaning the heating element by incandescence (running empty) is forbidden and would invalidate the guarantee. The fryer should not be washed with a water jet or high pressure jet.
11. Safety thermostat
Your fryer is fitted with a safety thermostat according to the latest regulations.
If the thermostat does not work properly or the oil leve It's not sufficient, automatically the safety thermostat intervenes to disconnect the heating elements.
If the safety thermostat stops the machine, call the nearest repair centre.
12. After-sales service
Should you have any problems with your fryer, contact your nearest service centre. Before contacting it check the following points:
-
Has the mains fuse blown?
-
Is the mains plug plugged in?
-
Is the mains cable in good condition?
-
Is the fuse of the control defective?
-
What about the safety thermostat? It can cut off for the following reasons:
- Not enough oil or fat in the container.
- The heating elements were switched on for too long during the fat melting process.
Important:
When calling your service centre, give model and serial number of your appliance. These ones are indicated on the data plate located behind the control box.
It is worthwhile filling in the type and number of your fryer below:
Type
Apparatus-No. ____
Tension
Date of installation ____
After-sales service
Telephone number ____
Subject to technical modifications.
| Frita+ 6 | Frita+ 8 | |
| Min. Litri | 5,0 | 8,0 |
| Max. Litri | 7,0 | 9,5 |
Temperatura in Stand-by