Elegance M+ - Deep fryer FRIFRI - Free user manual and instructions
Find the device manual for free Elegance M+ FRIFRI in PDF.

| Product type | Professional deep fryer |
| Brand | Frifri |
| Model | Elegance M+ |
| Category | Deep fryer |
| Dimensions (L x D x H) | Approximately 400 x 700 x 850-900 mm (depending on type) |
| Net weight | From 40 to 94 kg depending on type and configuration |
| Power supply | Three-phase 3N~ 400V 50/60Hz (other voltages available) |
| Power | From 7.5 kW to 22 kW depending on type |
| Oil capacity (min/max) | From 7.5 L to 20.5 L depending on type (per vat) |
| Number of baskets | 1 or 2 depending on type |
| Capacity per basket | 0.9 kg to 1.5 kg depending on type |
| Temperature range | 30°C to 190°C (programmable) |
| Vat material | Stainless steel |
| Main functions | Programmed cooking, fat melting cycle, oil pump, digital display, Quick Access keys, quality alarm |
| Safety devices | Main switch, safety contactor, safety thermostat, automatic shut-off |
| Maintenance and cleaning | Daily cleaning with non-corrosive products; vat, baskets and lids dishwasher safe |
| Spare parts and repairability | Original parts available; maintenance recommended by certified technician |
| General information | Professional appliance for supervised use; manual available in several languages |
| Recommended power fuse | Residual current circuit breaker 10 mA leakage current |
| Electrical connection | Must be done by a qualified electrician; cable type H07RN-F |
Frequently Asked Questions - Elegance M+ FRIFRI
User questions about Elegance M+ FRIFRI
0 question about this device. Answer the ones you know or ask your own.
Ask a new question about this device
Download the instructions for your Deep fryer in PDF format for free! Find your manual Elegance M+ - FRIFRI and take your electronic device back in hand. On this page are published all the documents necessary for the use of your device. Elegance M+ by FRIFRI.
USER MANUAL Elegance M+ FRIFRI
Vision & Elegance M+
Installation and user manual
natural_image
Exterior view of a stainless steel industrial processing unit with control panel and side-mounted fans (no visible text or symbols)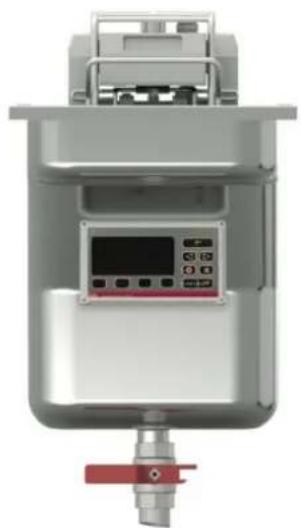
natural_image
3D rendering of a mechanical device with control panel and red valve (no visible text or symbols)Please make a note of your product details for future use:
Date Purchased: ____
Model Number: ____
Serial Number: ____
Dealer:
Lincat Ltd
Whisby Road
Lincoln
LN6 3QZ
Tel +44 (0) 1522 503250
Fax +44 (0) 1522 875530
info@frifri.co.uk
1. Beschreibung
Description
Description
Descrizione
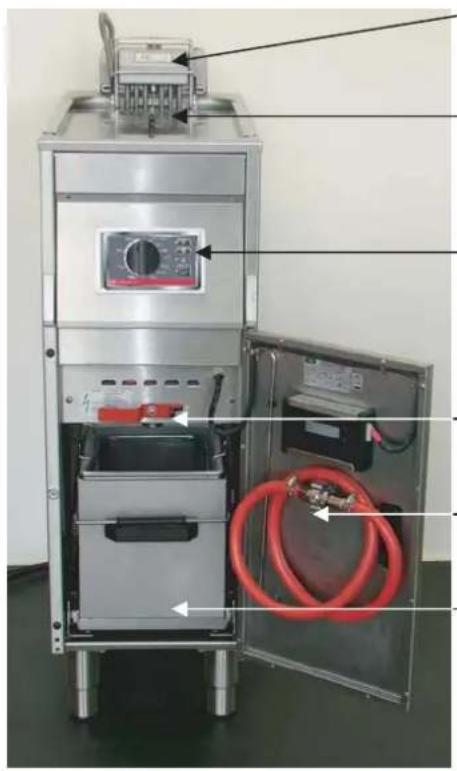
natural_image
Interior view of a stainless steel industrial machine with open door and red hose, no visible text or symbolsHeizkörperhalter
natural_image
Metal wire cage-like object with two horizontal bars, no text or symbols visibleKorbaufhängung
Support panier
Basket
natural_image
Rectangular mesh material sample on plain background (no text or symbols)Einlagegitter
Grille de fond
Grid
Griglia

natural_image
Metal grater with handle and mesh interior, placed on a plain surface (no text or symbols visible)Frittierkorb
Frying basket a Gestelle r
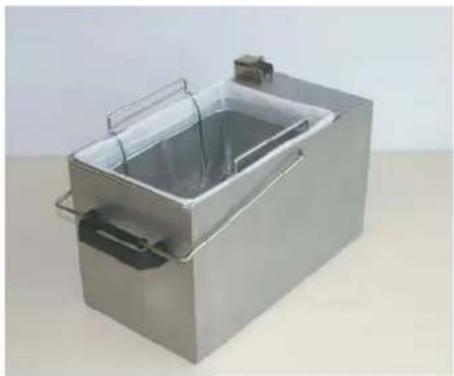
natural_image
Metallic rectangular device with a transparent lid and handle, placed on a plain surface (no text or symbols visible)Feinfilter
Korbfilter
F i l tFiltro ægranaffinè n
Filtre grEiltrera grana grossase
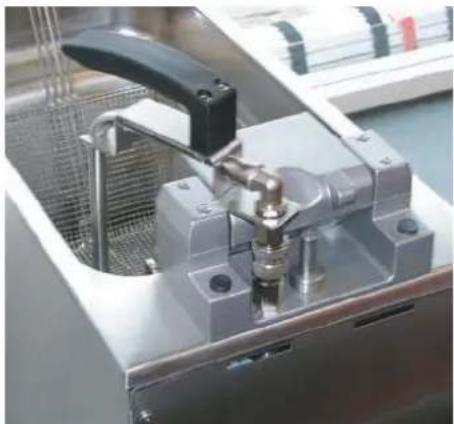
natural_image
Close-up of a metallic industrial machine component with a handle and internal structure (no visible text or symbols)Position des
Einlaufbogens
Position du
de refoulement
tube
drain
natural_image
Red flexible hose with metal fittings and a black handle, isolated on white surface (no text or symbols)Entleerungsschlauch
Mit Einlaufbogen
Tuyau de
avec
de vidange
tube
dange
dewith drain tube
natural_image
Person pouring liquid into a stainless steel mixing bowl connected via tubing, next to an industrial equipment unit (no visible text or symbols)2.3 Conditions ambiantes
2. Executions and dimensions
Floor standing fryers:
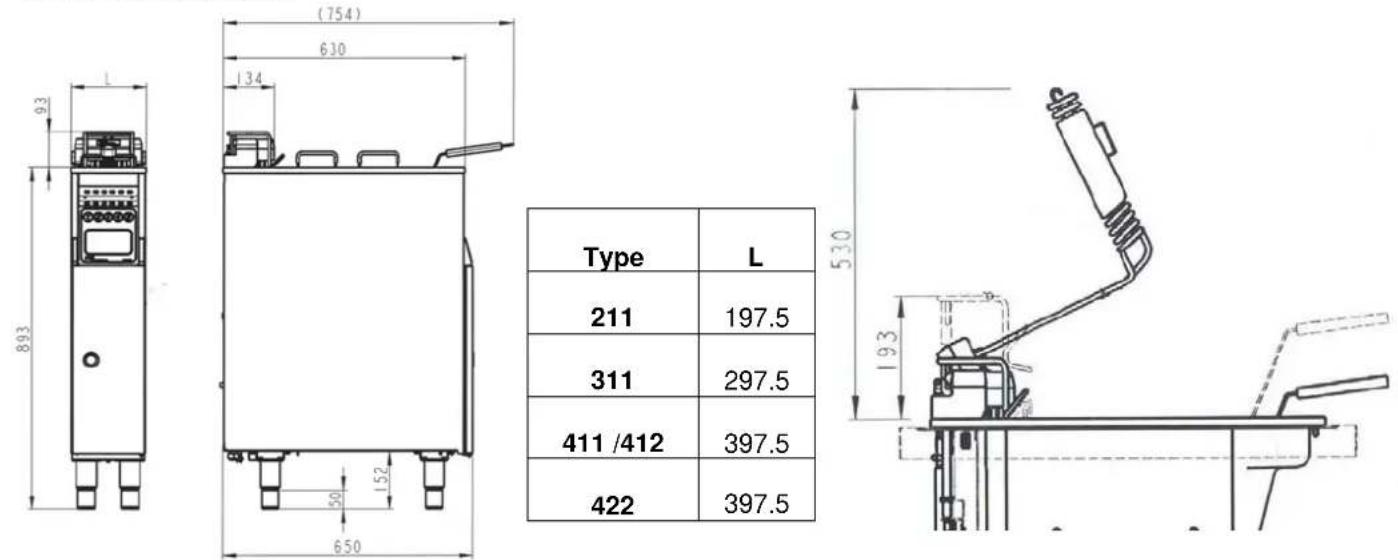
| Type | L |
| 211 | 197.5 |
| 311 | 297.5 |
| 411/412 | 397.5 |
| 422 | 397.5 |
Built-in fryers:
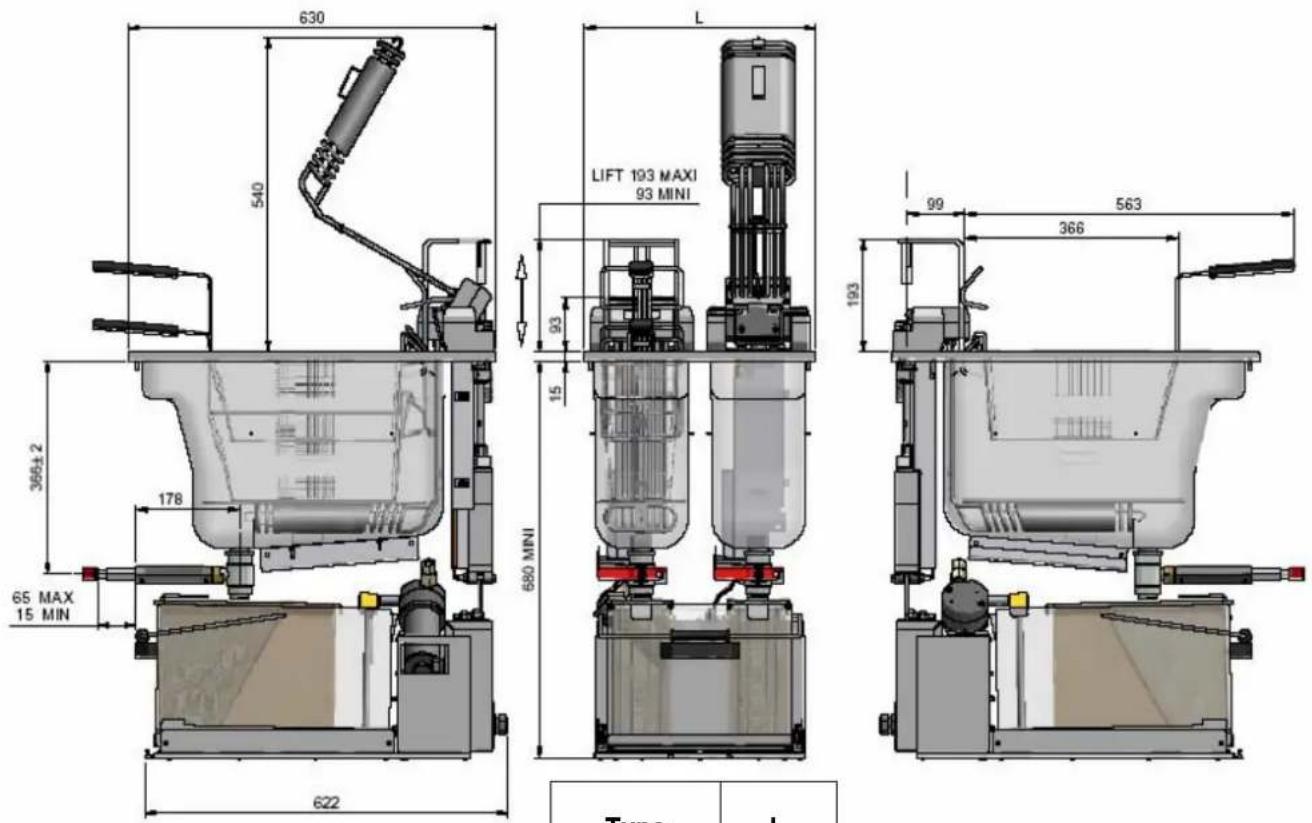
| Type | L |
| 211 | 197.5 |
| 311 | 297.5 |
| 411-412 | 397.5 |
| 422 | 397.5 |
| 522 | 495 |
| 622 | 592 |
2.1 Weights and filling data
| Type | 311 | 211 | ||||
| Net weight without options (kg) | FL 47BI 40 | FL 56BI 47 | FL 69BI 62 | FL 79BI 68 | FL --BI 87 | FL --BI 94 |
| Number of baskets 1 1 2 2 2 | 2 | |||||
| Filling qty per basket (Kg) 0.9 1.5 | 2 x 0.9 2 x 0.9 | 1 x 0.91 x 1.5 | 2 x 1.5 | |||
| Frying oil qty at minimum level (l) 7.5 | 12.5 | 17 2 x 7.5 | 1 x 7.51 x 12.5 | 2 x 12.5 | ||
| Frying oil qty at maximum level (l) | 9 | 14.5 | 20.5 | 2 x 9 | 1 x 91 x 14.5 | 2 x 14.5 |
| Production of frozen chips per hour (Kg) | 17 – 22 | 27 – 32 | 34 – 44 | 34 – 44 | 44 – 54 | 54 – 64 |
| Production of cooled chips per hour (Kg) | 20 – 25 | 30 – 35 | 40 - 50 | 40 - 50 | 50 – 60 | 60 – 70 |
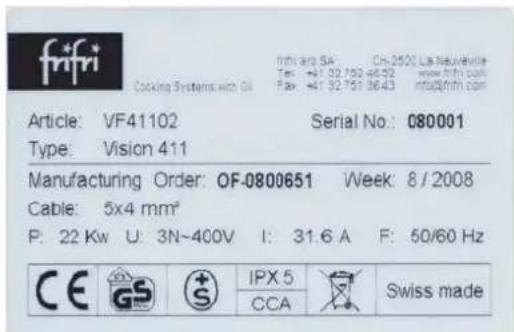
2.2 Identification of the appliance
Every deep fryer is provided with a technical identification plate. Always have this identification plate available when making enquiries to our customer services department.
2.3 Ambient conditions
| Type | 211 – 311 – 411 – 412 – 422 – 522 - 622 |
| Min Temperature. (°C) | + 5 |
| Max Temperature. (°C) | + 60 |
| Max humidity.. (%) | 60 |
2.4 Voltages, types of connection and versions
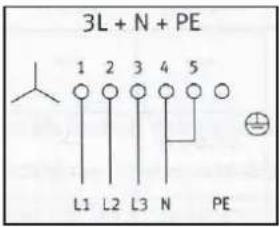 | Standard version three phase with neutral and earthVoltage three-phase 3N~400 V50/60Hz - 3L + N + PE | 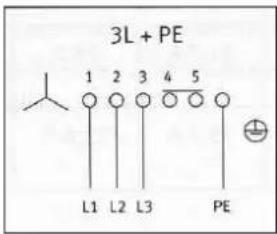 | Special version without neutralVoltage three-phase 3~ 400 V50/60Hz - 3L + PE |
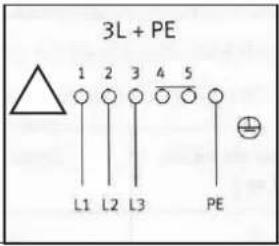 | Special version for shipsVoltage three-phase 3~440 V50/60Hz : 3L + PE | 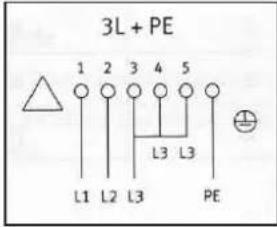 | Special version three-phase without neutralVoltage three-phase 3~ 230 V50/60Hz - 3L + PE |
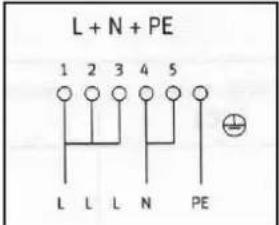 | Special single-phase versionVoltage single-phase ~ 230V50/60Hz - L + N + PE | ||
2.5 Mains fuses
| Type 211 / 422(422 with two supply cables) | 311 411 / 412 / 422 | (422 with one supply cable) | ||||||
| Power 7.5 | KW 9 KW | 11 KW 11.4 | KW 15 KW | 15 KW 18 KW | 22 KW | |||
| AC 230V | 32.6 | A | 39.1 | A | - | - | - | |
| 3AC 230V | 18.8 A 22.6 A 27.6 A | 27.6 A 37.6 | 5 A 37.65 A | - - | ||||
| 3AC 400V | 10.8 A 13 A 15.8 A 1 | 5.8 A 21.7 A | 21.7 A 26 | A 31.6 A | ||||
| 3NAC 400V | 10.8 A 13 A 15.8 A 1 | 5.8 A 21.7 A | 21.7 A 26 | A 31.6 A | ||||
| 3AC 440V | 9.9 A | 11.8 A 14.5 A 14.5 A | 19.7 A 19.7 | A 23.6 A 28.9 A | ||||
| Type | 522 (with two supply cables) | 522 (with two supply cables) | 622 (with two supply cables) | |||||
| Power | 7.5 kW+11.4 kW | 9 kW+11.4 kW | 11 kW+11.4 kW | 7.5 kW+15 kW | 9 kW+15 kW | 11 kW+15 kW | 2 x 11.4 kW | 2 x 15 kW |
| 3N ~ 400V | 10.8 A+16.5 A | 13 A+16.5 A | 15.8 A+16.5 A | 10.8 A+21.7 A | 13 A+21.7 A | 15.8 A+21.7 A | 2 x 16.5 A | 2 x 21.7 A |
2.6 Electrical connection
The electrical connection of the machine must be done by an electrician or a qualified person who can ensure that the installation meets the required standards. Proceed as follows:
a) Check if the specifications of the electrical mains correspond to those given on the rating plate. This plate is located on the control panel inside the door.
b) Connect according to IEC or CEI 335-1 standards and local regulations, i.e.: Fit a mains plug to the connection cable, corresponding to the power of the rated current. Plug into the mains socket. The plug must be accessible after installing the fryer. The manufacturer recommends to connect the fryer to a fault-current protective switch (for machines which exceeds 10mA of dispersion current). For permanent installation: connect to a main switch with all the poles isolated; minimum distance of the contacts 3 mm. The connection cable should at least be an H05RN-F type.
c)

Allows he connection of the ground (Earth connection). It is essential for your installation. Supplemented by a differential device, it protects the users when an electrical defect occurs on an appliance. The fault current runs out towards the ground and causes the release of the differential.
d) If the supply cord is damaged, it must be replaced by the manufacturer, its service agent or similarly qualified persons in order to avoid a hazard.
3. Safety regulations
The following warning symbols are fitted to the deep fryer as appropriate:
High voltage
Warning of dangerous electrical voltage Electric shocks lead to serious injury or death. Only authorized specialist personnel may carry out work on electrical installations. Follow the specific technical safety instructions! Always disconnect the deep fryer from the mains power before carrying out work on electrical installations.
Hot surfaces / hot internal components
Warning of heat which can lead to injuries. Always allow hot surfaces to cool down before carrying out work on these components; or wear heat resistant gloves.

Hot frying oil

Warning of hot frying oil which can lead to injuries. Always allow the hot frying oil to cool down before carrying out work on submerged components-or wear safety glasses.
Advice

The manufacturer has mounted warning symbols (stickers) at all the relevant positions on the deep fryer before delivery. If during operation or within the scope of cleaning work any of these warning symbols become detached the operator of the deep fryer is obliged to apply these warning symbols again immediately!
3.1 Specified use of the deep fryer
The deep fryer is exclusively intended for the frying of fresh and deep-frozen foods which during the frying process do not react to endanger people, material assets or the environment. The deep fat fryer is exclusively authorized for supervised operation. Any other use of the deep fryer is regarded as non-specified. The observance of the operating manual and the following of the maintenance and repair instructions from the manufacturer are also part of the specified use.
3.2 Specific dangers and instructions
WARNING

The deep fryer is exclusively authorized for supervised operation. If the oil receptacle pot contains hot frying oil, protective clothing, gloves and safety glasses must be worn while handling. Never hose down the deep fryer with water from a spray head, a water hose or a high-pressure cleaner. There is a danger of fire and/or the safety thermostat will switch off the deep fryer if it is started up without first filling it with fat or frying oil to the maximum oil level mark.
During operation the frying oil level must not fall below the minimum oil level mark. There is a danger of fire and/or the safety thermostat will switch off the deep fryer. During operation the frying oil level must not go above the upper oil level mark. There is a danger of overflowing or frothing over. Used, contaminated frying oil is increasingly likely to ignite and also tends to froth over. If the frying oil ignites never try to quench it with water but instead immediately put on the frying pot cover or use a fire extinguisher with a special filling (Halon) or use a quenching cover.
CAUTION

If too much deep-frozen or wet frying product is put into the hot frying oil, frothing over of the hot frying oil will occur and this will reduce the quality of the fried food. Do not move the deep fryer in the heated state. This leads to a risk of the hot oil slopping over. For safe draining or transferring the frying oil it must have cooled down to a temperature below 175 °C.
Never clean the submerged heater with a steel brush or by burning off (dry operation). Verifiable improper cleaning of the submerged heater will lead to the exclusion of all guarantee.
CAUTION

The two oil tanks have never to be drained at the same time, but one by one, otherwise the oil would overflow from the below oil collector.
3.3 Personnel safety
WARNING

If incorrectly operated, the deep fryer can cause serious or fatal injuries to personnel. The personnel who operate and maintain the deep fryer must be trained in the correct operation and handling of the appliance and must have read and understood the safety regulations in this operating manual before starting work on or with it.
Never change or remove safety devices. Do not switch off safety devices by making changes to the deep fryer. Never remove warning symbols which may have been fitted to the deep fryer (depending upon country). Immediately replace missing or defective warning symbols.
Never operate the deep fryer in a damaged condition. Report immediately any irregularities, especially those which affect safety, to your managers.
When exchanging electrical or mechanical components ensure that the deep fryer is disconnected from the mains power supply. Always check all safety functions after completing servicing work.
3.4 Safety equipment
Apart from the warning symbols applied to the deep fryer (depending upon the country) it is also fitted with the following safety equipment:
Main switch
Safety contactor
Safety thermostat
3.5 Authorized personnel
Only those personnel who have been authorized for the respective work may work on and with the deep fryer. Personnel are seen as authorized if they fulfil the minimum training and knowledge requirements as listed in this section and have been assigned a fixed area of responsibility.
"This appliance is not intended for use by persons (including children) with reduced physical, sensory or mental capabilities, or lack of experience and knowledge, unless they have been given supervision or instruction concerning use of the appliance by a person responsible for their safety. Children should be supervised to ensure that they do not play with the appliance."
3.6 Area of responsibility of personnel
3.6.1 Owner/operator
The owner/operator is the legally, higher-ranking person who is responsible for the specified use of the deep fryer and for the training as well as the tasks of the authorized personnel. He establishes the competencies and authorities to issue directives of the authorized personnel with respect to his operation.
3.6.2 Operator of the deep fryer
He is responsible for the following work:
He fills frying oil into the deep fryer.
He monitors frying quality and tops up the frying oil and carries out cleaning and filtering.
He starts up the process and monitors it.
He prepares the deep fryer for the product to fry
He loads the deep fryer with the food to be fried.
He localizes problems and organizes their rectification.
3.6.3 Maintenance personnel
He is responsible for the following work:
The cleaning, maintenance and repair of the deep fryer according to the work described in Sections “Cleaning and Maintenance”
The dismantling, storing and disposal of the deep fryer.
3.7 Minimum training and qualifications of the authorized personnel
3.7.1 Owner/operator
He is a person trained in business management (in a management function).
He has the relevant experience in assessing dangers and in personnel management.
He has read and understood the section "Safety regulations".
3.7.2 Operator of the deep fryer
This is a person who has been instructed in the operation of the deep fryer and is aware of the existing dangers.
3.7.3 Service personnel
These are people who have completed successfully the relevant occupational training, are familiar with the servicing of the deep fryer and have the necessary qualifications from their tasks. Servicing work on the electrical equipment of the deep fryer may only be carried out according to the electro technical regulations by electrical specialists or by trained personnel under the leadership and supervision of an electrician.
3.8 Duty of maintenance
The owner/operator is obliged to clean and maintain the deep fryer at regular intervals. To only operate the deep fryer in perfect and undamaged condition. To only use original consumables and original spare parts. To check the safety equipment after maintenance and repair work.
3.9 Availability of operating manual
A copy of this operating manual must be available at all times to the personnel at the installation location of the deep fat fryer.
4. Installation and starting up
4.1 Installation of the appliance
When installing the machine, please take into consideration the following points:
a) The fryer has to stand evenly and its height can be easily adapted according to user's request thanks to the four adjustable legs. The height of the fryer varies between 850mm min. and 900mm max. counted from the floor.
b) Minimal distance to respect between the back of the fryer and a wall or another device: 30 mm.
c) The fryer should not stand on an inflammable surface. Please comply with local safety and construction regulations.
d) In case the fryer is equipped with castors (2 swivel and 2 fixed castors), brakes have to be set on the two front castors. The advantage of the castors is to facilitate servicing and cleaning of the fryer.
e) It is possible to modify a fryer with standard feet and to mount castors. In this case, do not forget to use washers together with the fixing screws.

Warning:
Because of insufficient stability, the fryer models 211 and 311 cannot be left without a permanent fixation.
They have to be fixed with the two elements added to the fryer (VDE compliance).
4.2 Starting up after the installation
Remove any remains of packaging which are still around. Remove the lid of the tank. Take the basket out of the tank. Clean the deep fryer and the accessories, which accompany the delivery, with a non caustic cleaning agent, which is permitted for the food area. CLOSE THE DRAIN VALVE. Fill the tank with frying oil of the MAX. level or place the fat for frying on the heating elements. The MIN/MAX level is visible inside of the tank.

Warning:
If you are in the « fat melting cycle » (FMC), always remove the fish grill, respectively the grid over the heating elements. The fat should be in direct contact with the heating element.
5 Use of the fryer
5.1 Control panel
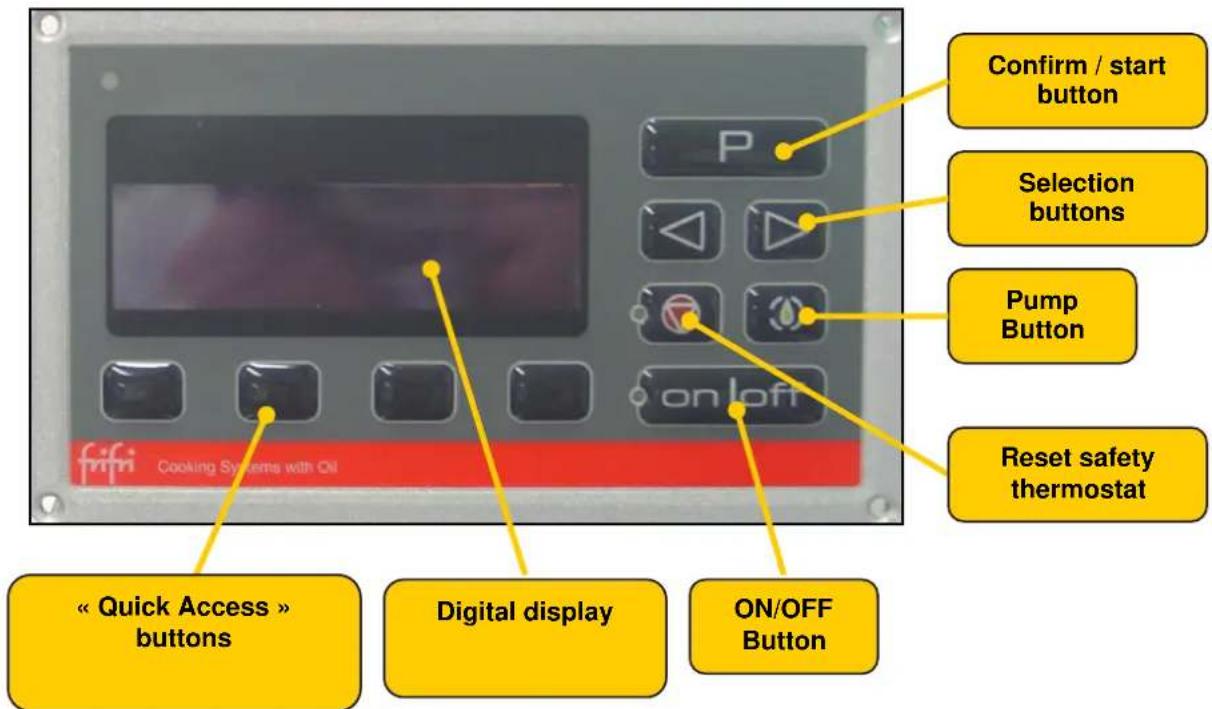
5.2 Switch on of the control panels
The „Reset“ button initialize the safety thermostat.
The red LED indicates that the safety curcuit is active.

With the „On“ button the control panel gets under tension.
The green LED indicates that the control paenl is now ready for further input.
The „Off“ button shut down completely the control panel.
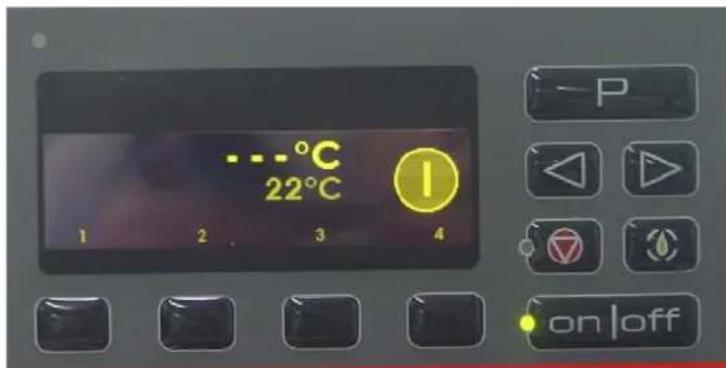
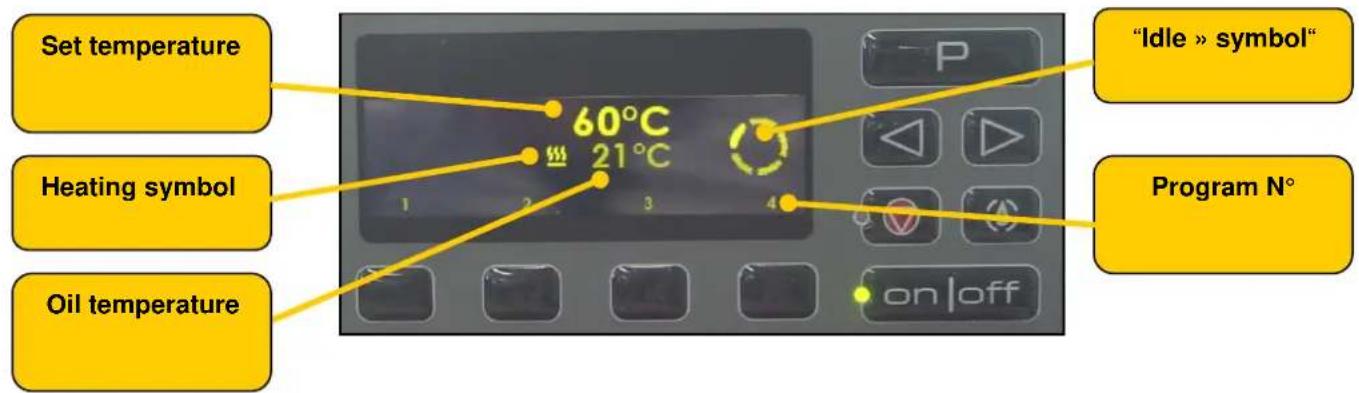
5.3 Wait for input – Idle Modus
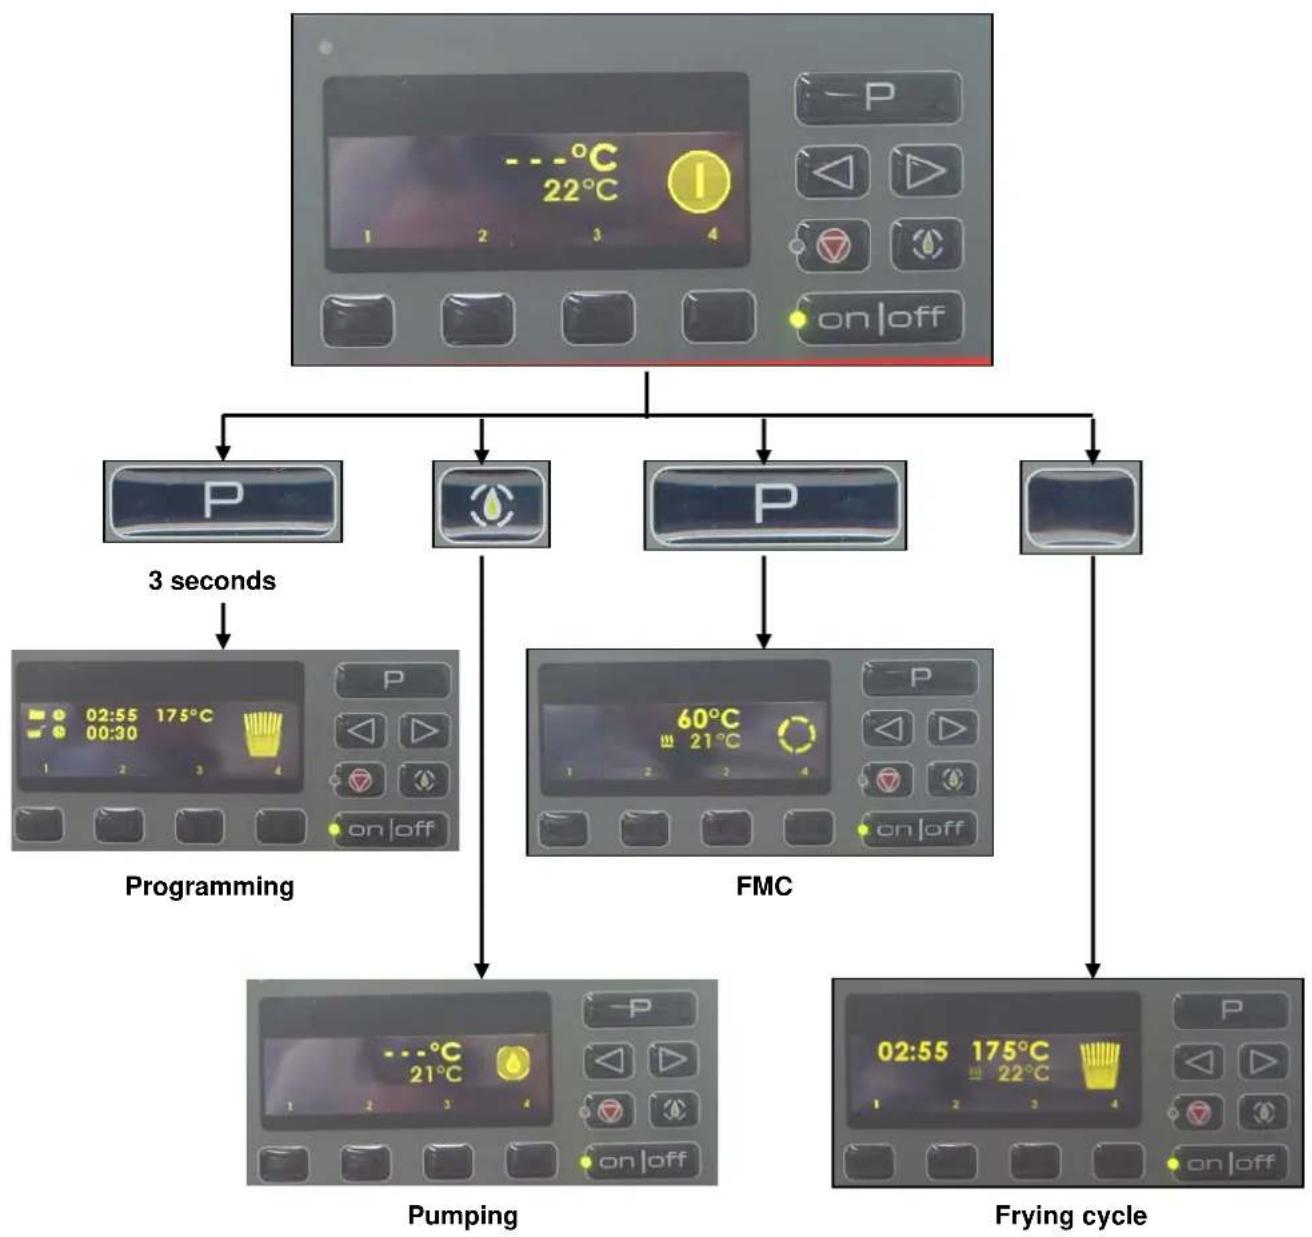
This screen indicates that the control panels is waiting for further input. From this position on you can choose:
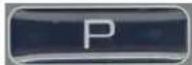
a) Selcet the programming mode
Keep the „P“ button pressed for three seconds
b) Start the optional oil pump
A touch on the „Pump“ button starts the pump process.
c) Start the fat melting cycle (FMC)
By a touch of the "P" button
d) Select a frying program
By a touch on a "Quick Access" button
Remark: Its possible to set an automatic switch into the FMC mode by setting a time frame for the "Idle" modus. See programming of the "Service Mode".
flowchart
graph TD
    A["Control Panel"] --> B["P"]
    A --> C["P"]
    A --> D["P"]
    B --> E["3 seconds"]
    C --> F["02:55 175°C 00:30"]
    C --> G["60°C 21°C"]
    D --> H["FMC"]
    E --> I["Programming"]
    F --> J["Frying cycle"]
    G --> K["Pumping"]
    H --> L["Frying cycle"]
5.4 Fat melting cycle (FMC)
The position fat melting cycle allows to melt slowly fat by heating up with breaks in between. In this way the fat is liquefied and heated up without any smoke and deterioration
It is possible to adjust the setting between 30 and 90°C in the programming mode. See chapter "Service Mode".
If you do not wish to use the function FMC, you can take off this function in the "Service Mode".
In this way the fryer will heat continuously to reach the selected frying temperature.
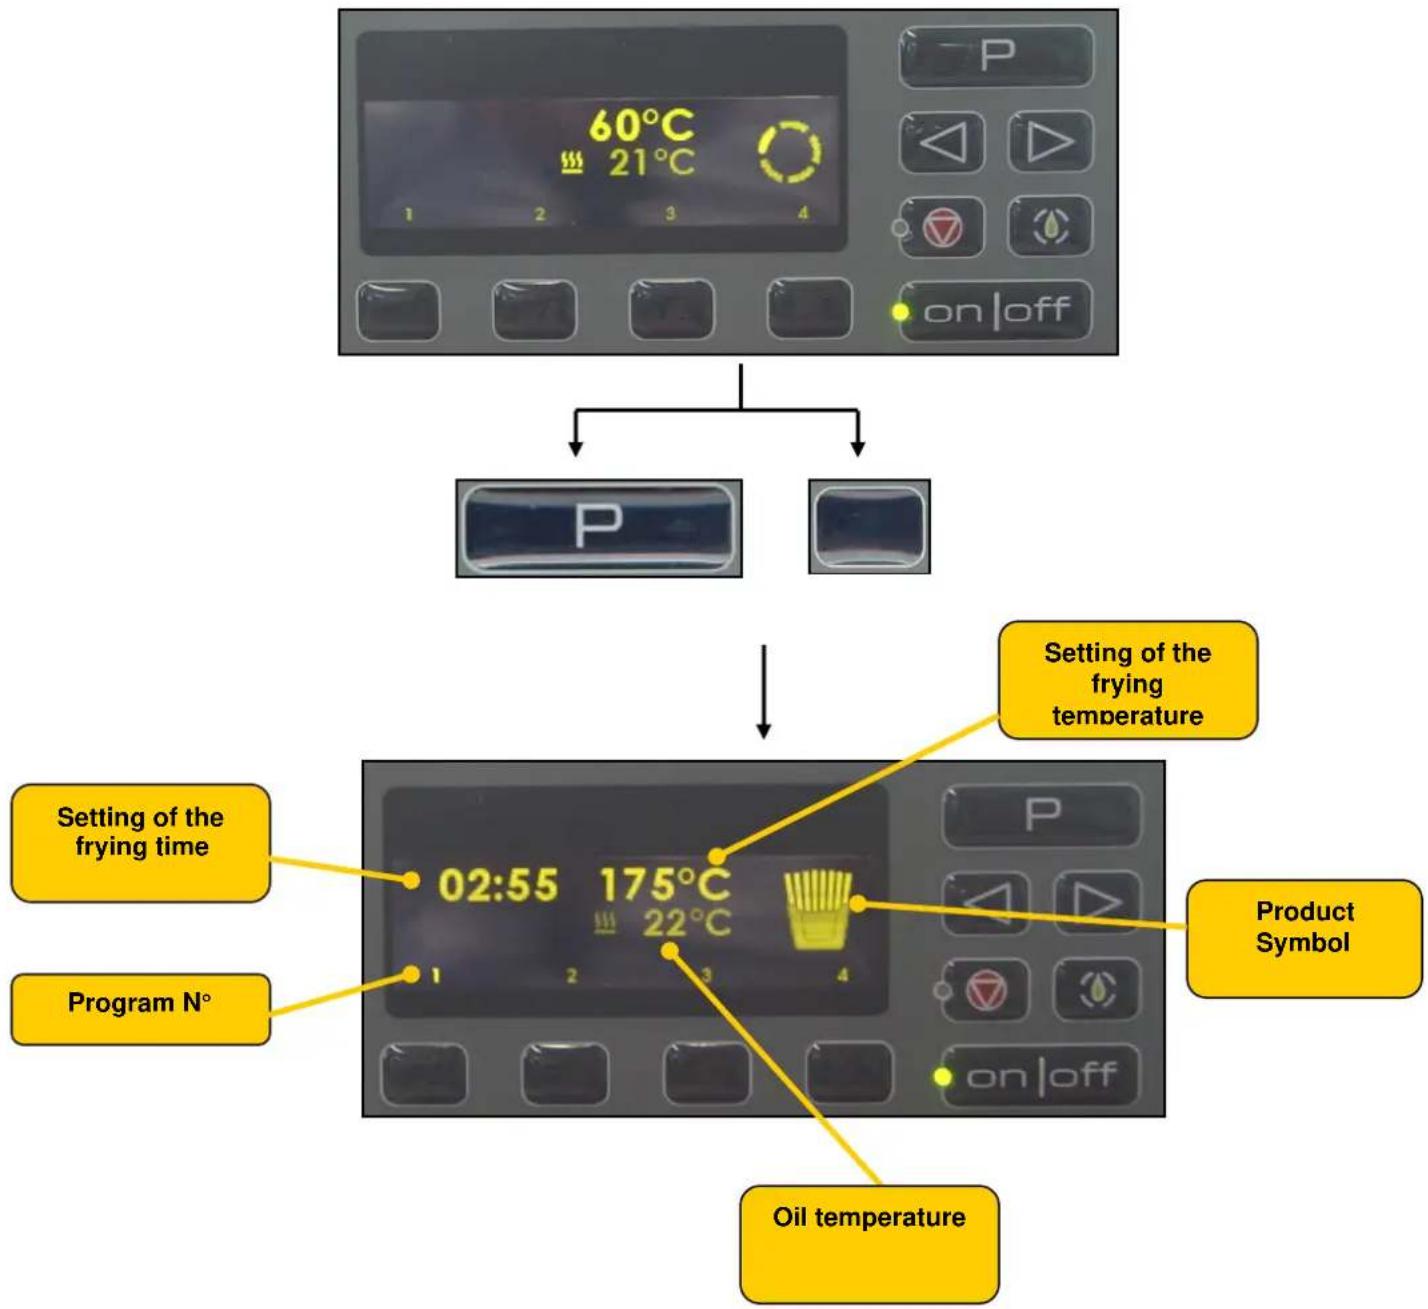
5.5 Selection of a frying program
To pass from the FMC cycle to a frying program, it is necessary to press the button "P". The display shows the setting of the last program in use.
Or choose a "Quick Access" button under the display to select the required program.
flowchart
graph TD
    A["60°C 21°C"] --> B["P"]
    A --> C["on/off"]
    B --> D["Setting of the frying temperature"]
    C --> D
    D --> E["02:55 175°C 22°C"]
    E --> F["Setting of the frying time"]
    E --> G["Program N°"]
    E --> H["Product Symbol"]
    E --> I["Oil temperature"]
Remark: The number of the selected program lights up more strongly
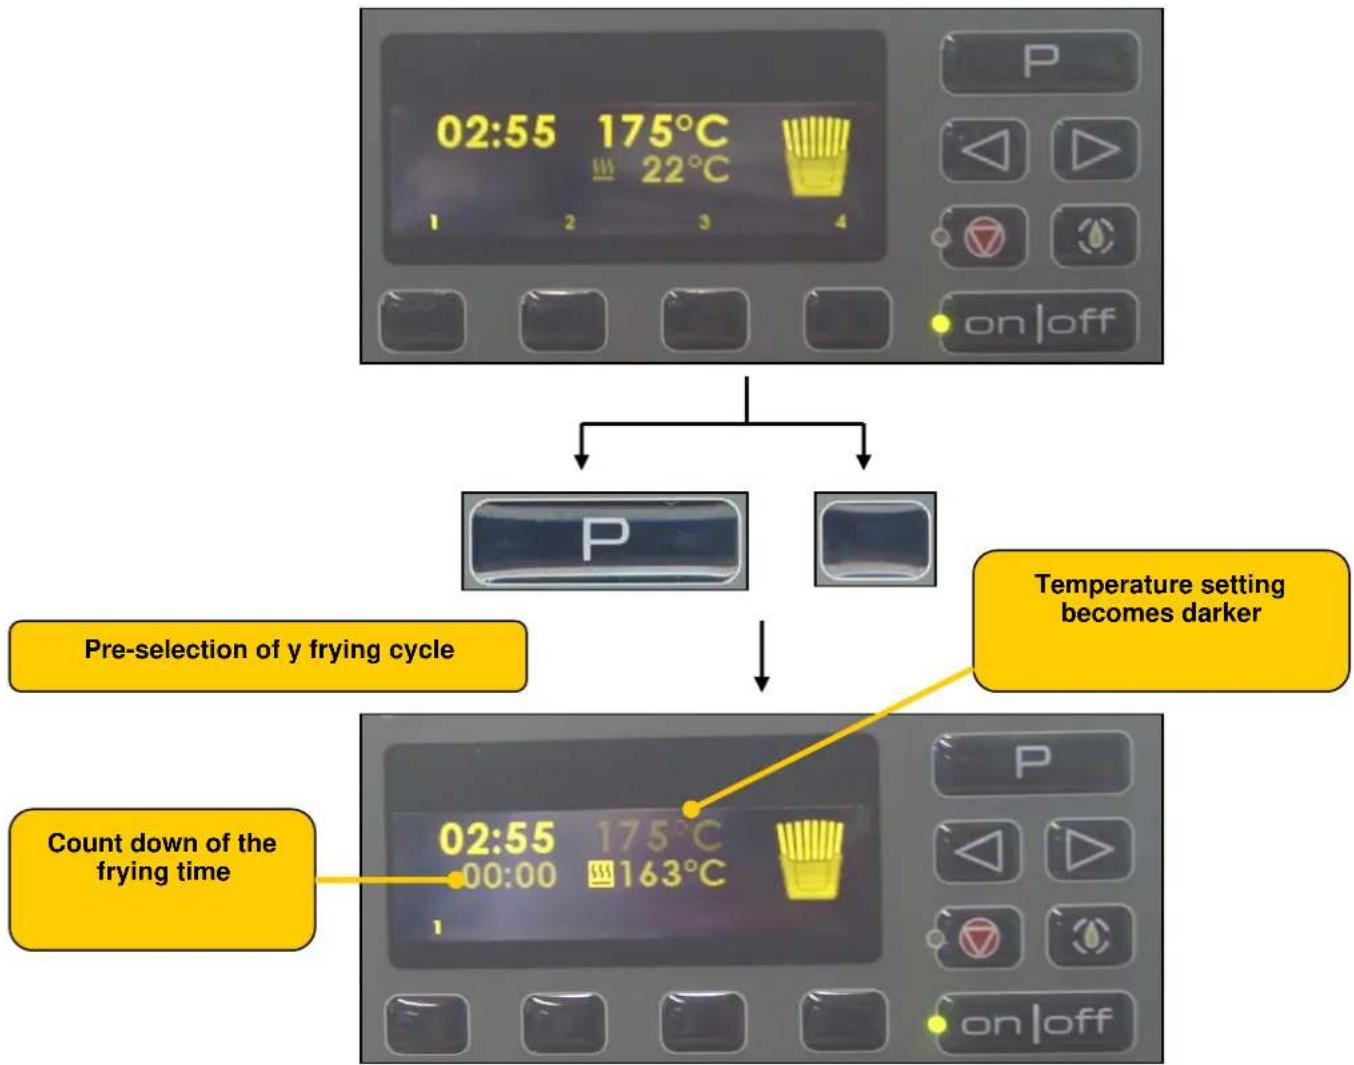
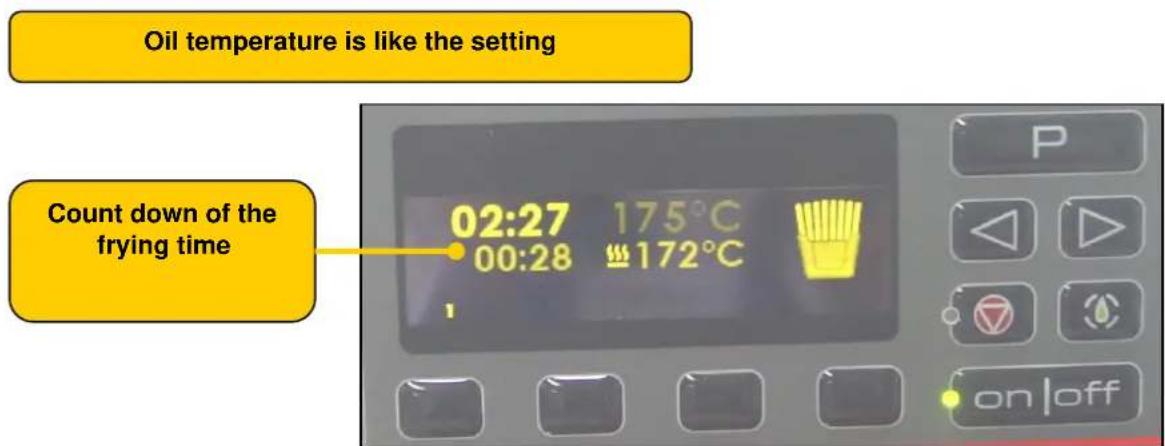
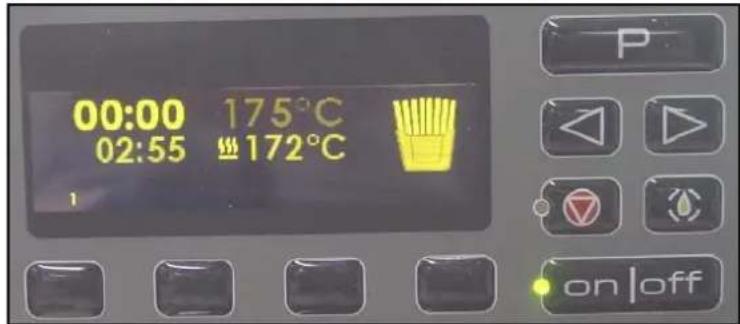
5.6 Frying cycle:

Start of a frying cycle by a simple touch on the „P“ or a „Quick Access“ button.
If the temperature of the oil is lower than the setting, the order to lower the basket lift is memorised but the basket lift will only lower once the selected frying temperature is reached. The count down of the frying time is on “O”.
flowchart
graph TD
    A["02:55 175°C 22°C"] --> B["P"]
    C["On/off"] --> B
    B --> D["Pre-selection of y frying cycle"]
    B --> E["Temperature setting becomes darker"]
    F["Count down of the frying time"] --> G["02:55 175°C 00:00 163°C"]
    G --> H["On/off"]
Remark: The order to lower the basket lift and the start of the count down of the frying time starts only if the oil temperature is at least "Setting -3C".
5.7 Shake Time:
An acoustic signal gives information to the user to shake the basket.
The "Shake time" can be set for each program.
The function and the time setting can be adjusted in the "Service Mode".
It is possible to stop the acoustic signal by pressing the button "P" or a "Quick Access" button.
5.8 End of frying cycle
The count down indication flashes „0.00“ and an acoustic signal informs the operator.
5.9 Cancel of a frying cycle
By pressing the „P“ button during three seconds, a selected frying cycle can be cancelled.
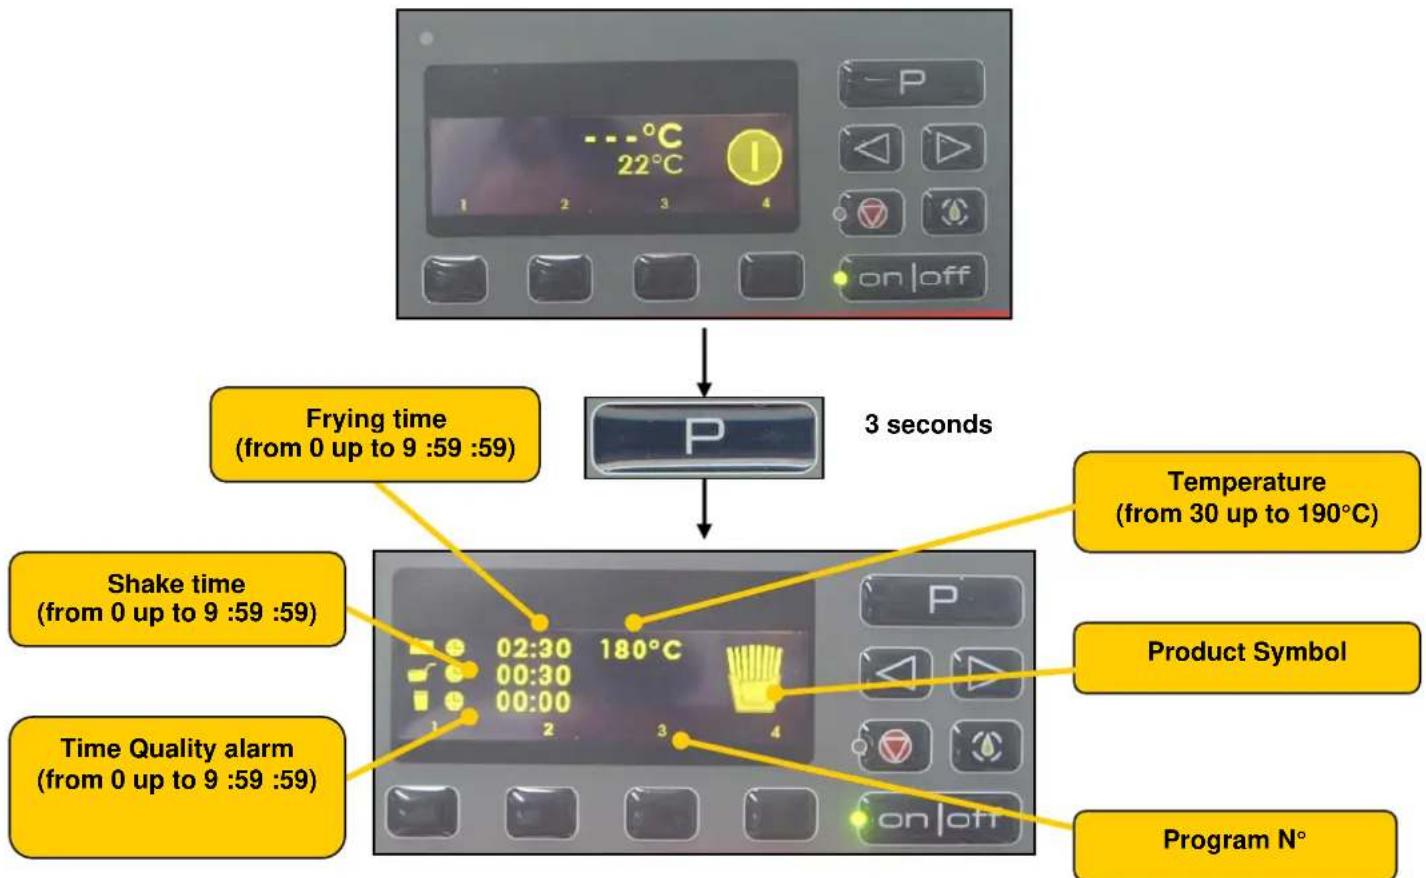
5.10 Programming
Programming can be made from the Idle mode, by pressing three seconds the „P“ button. An acoustic signal confirms programs mode. In 19 program places and the service mode adjustments can be made.
flowchart
graph TD
    A["Control Panel"] --> B["Frying Time (from 0 up to 9:59:59)"]
    B --> C["3 seconds"]
    C --> D["Shake Time (from 0 up to 9:59:59)"]
    D --> E["Time Quality alarm (from 0 up to 9:59:59)"]
    E --> F["Product Symbol"]
    F --> G["Temperature (from 30 up to 190°C)"]
    G --> H["on/off"]
    H --> I["Program N°"]
a) Selection of a program
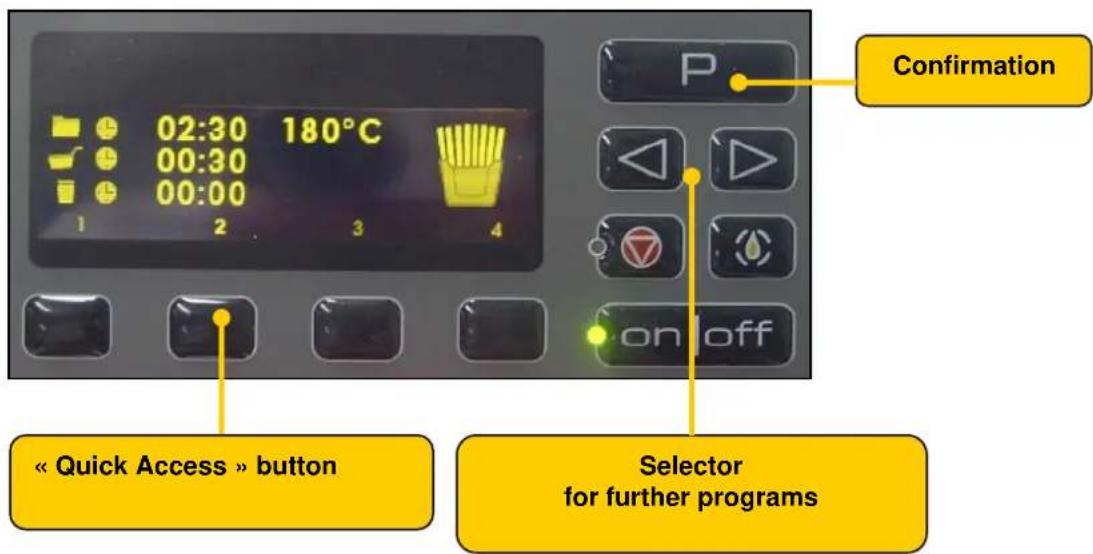
The "Quick Access" button allows to select directly a program number.
With the selector you choose further program numbers.
By the "P" button you will confirm your choice.
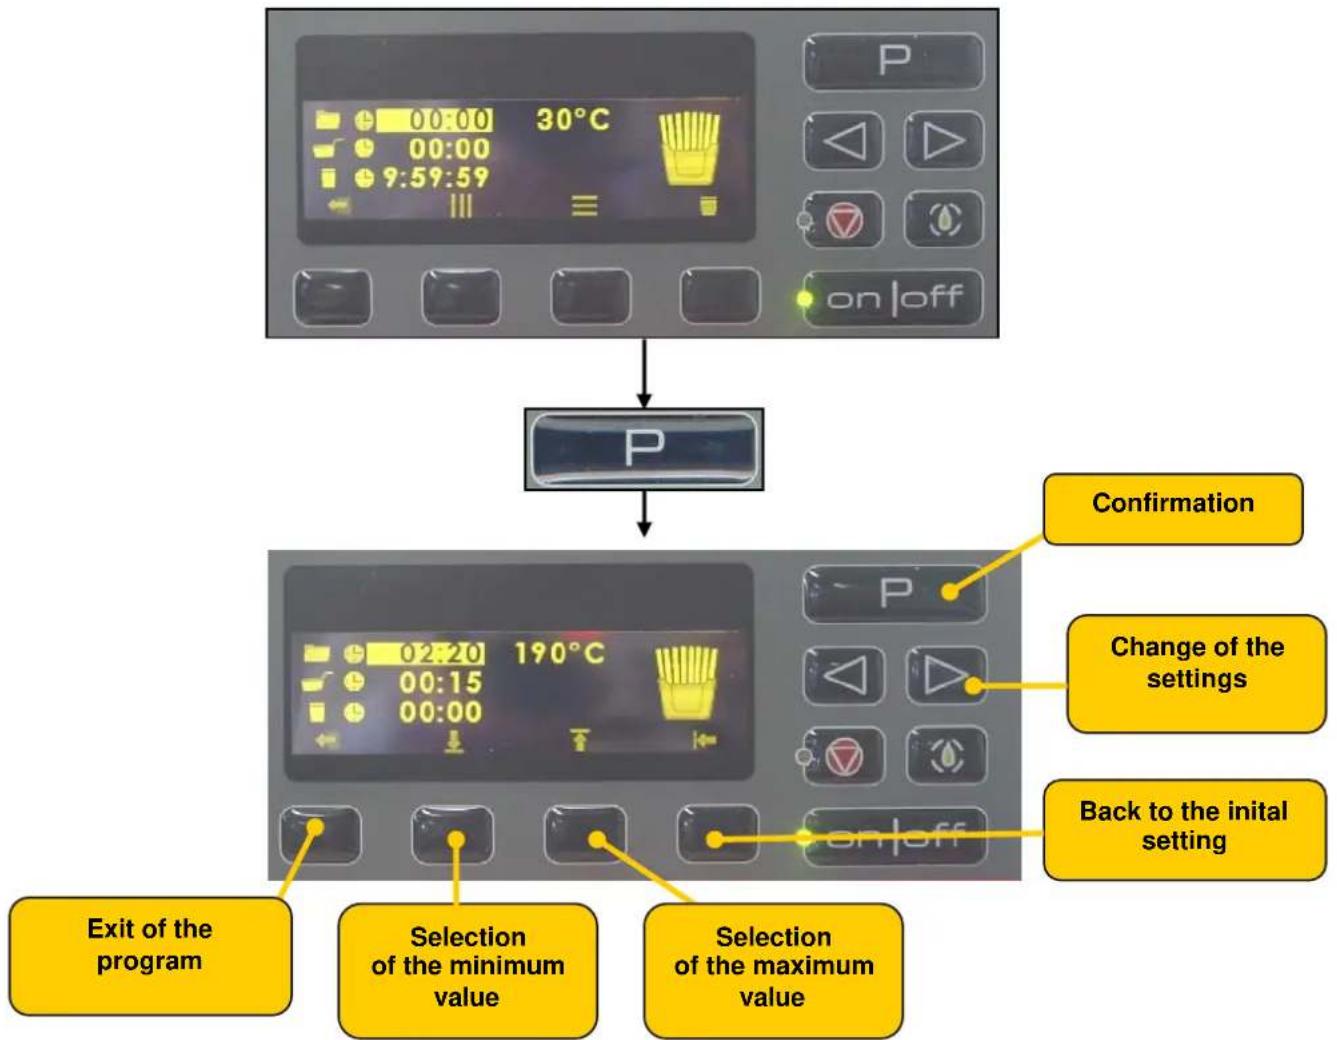
b) Modification of the parameters

flowchart
graph TD
    A["02:30 180°C"] --> B["P"]
    B --> C["Selected parameter"]
    C --> D["Exit of the program"]
    C --> E["Selection of the column"]
    C --> F["Selection of the line"]
    D --> G["00:00 30°C"]
    E --> H["00:00 9:59:59"]
    F --> I["on/off"]
    J["Confirmation"] --> K["P"]
    L["Selection of the parametre"] --> M["P"]
    N["Delete the Symbol"] --> O["on/off"]
Select the parameter who shall be modified with the left/right "Selector" buttons or a "Quick Access" button. The selected parameter lights up more strongly. Confirm the choice by pressing the "P" button.
flowchart
graph TD
    A["Start"] --> B["P"]
    B --> C{Confirmation}
    B --> D{Change of the settings}
    B --> E{Back to the initial setting}
    A --> F["Exit of the program"]
    A --> G["Selection of the minimum value"]
    A --> H["Selection of the maximum value"]
The selected parameter is flashing. Change of the setting with the left/right "Selector" or "Quick Access" buttons. Confirm the change of settings with the "P" button.
Remark: If the frying time is set to "0", the program does not appear for the operator in the "Frying mode". If the parameter "Quality Alarm" is set inactive in the "Service Mode", no adjustment can be made in the "Programming".
c) Exit of the program
Either by pressing the „Quick Access“ under the following symbol or „P“ button for three seconds.
We can now modify another program or leave the programming mode by pressing the "P" button for another three seconds.
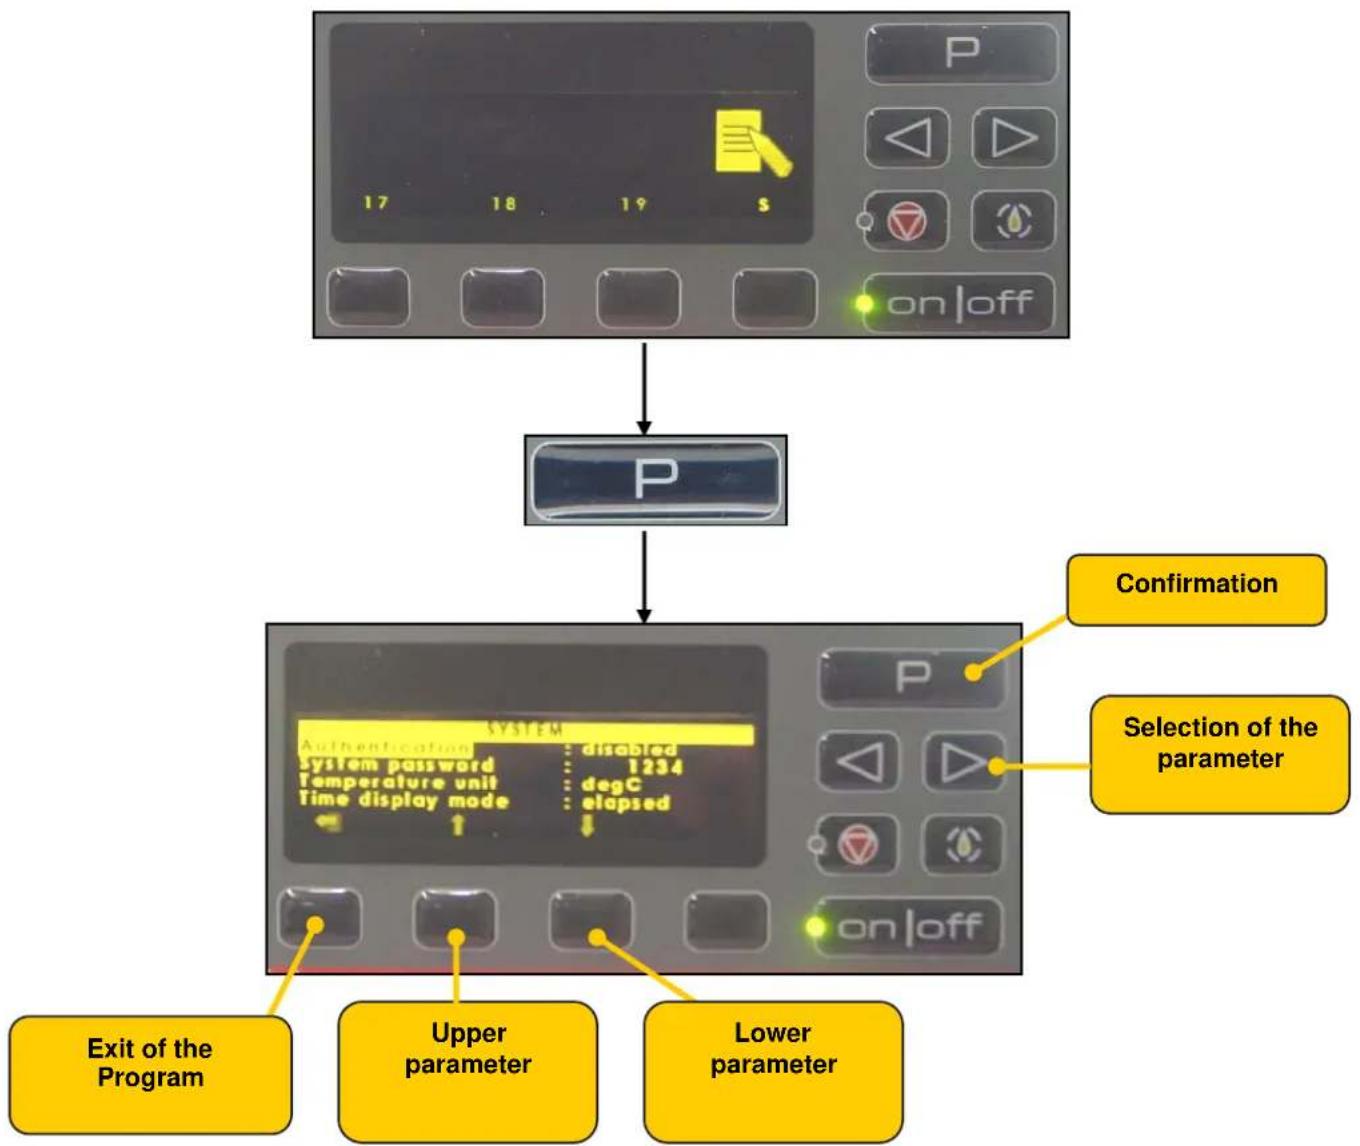
d) Service Mode
In the "Programming Mode" the program number 20 is the "Service Mode".
The "Service Mode" allows to modify different parameters of the fryer.
flowchart
graph TD
    A["Exit of the Program"] --> B["Upper parameter"]
    B --> C["Lower parameter"]
    D["Configuration: System password disabled, temperature unit degC, time display mode elapsed"] --> E["Confirmation"]
    E --> F["Selection of the parameter"]
The selected parameter lights up more strongly.
After the selection of the parameter the choice must be confirmed with the "P" button.
Change of the setting with the left/right "Selector" or "Quick Access" buttons.
Confirm the change of settings with the "P" button.
Another parameter for modification can be selected now.
Exit of the "Service Mode" by pressing the "Quick Access" button.
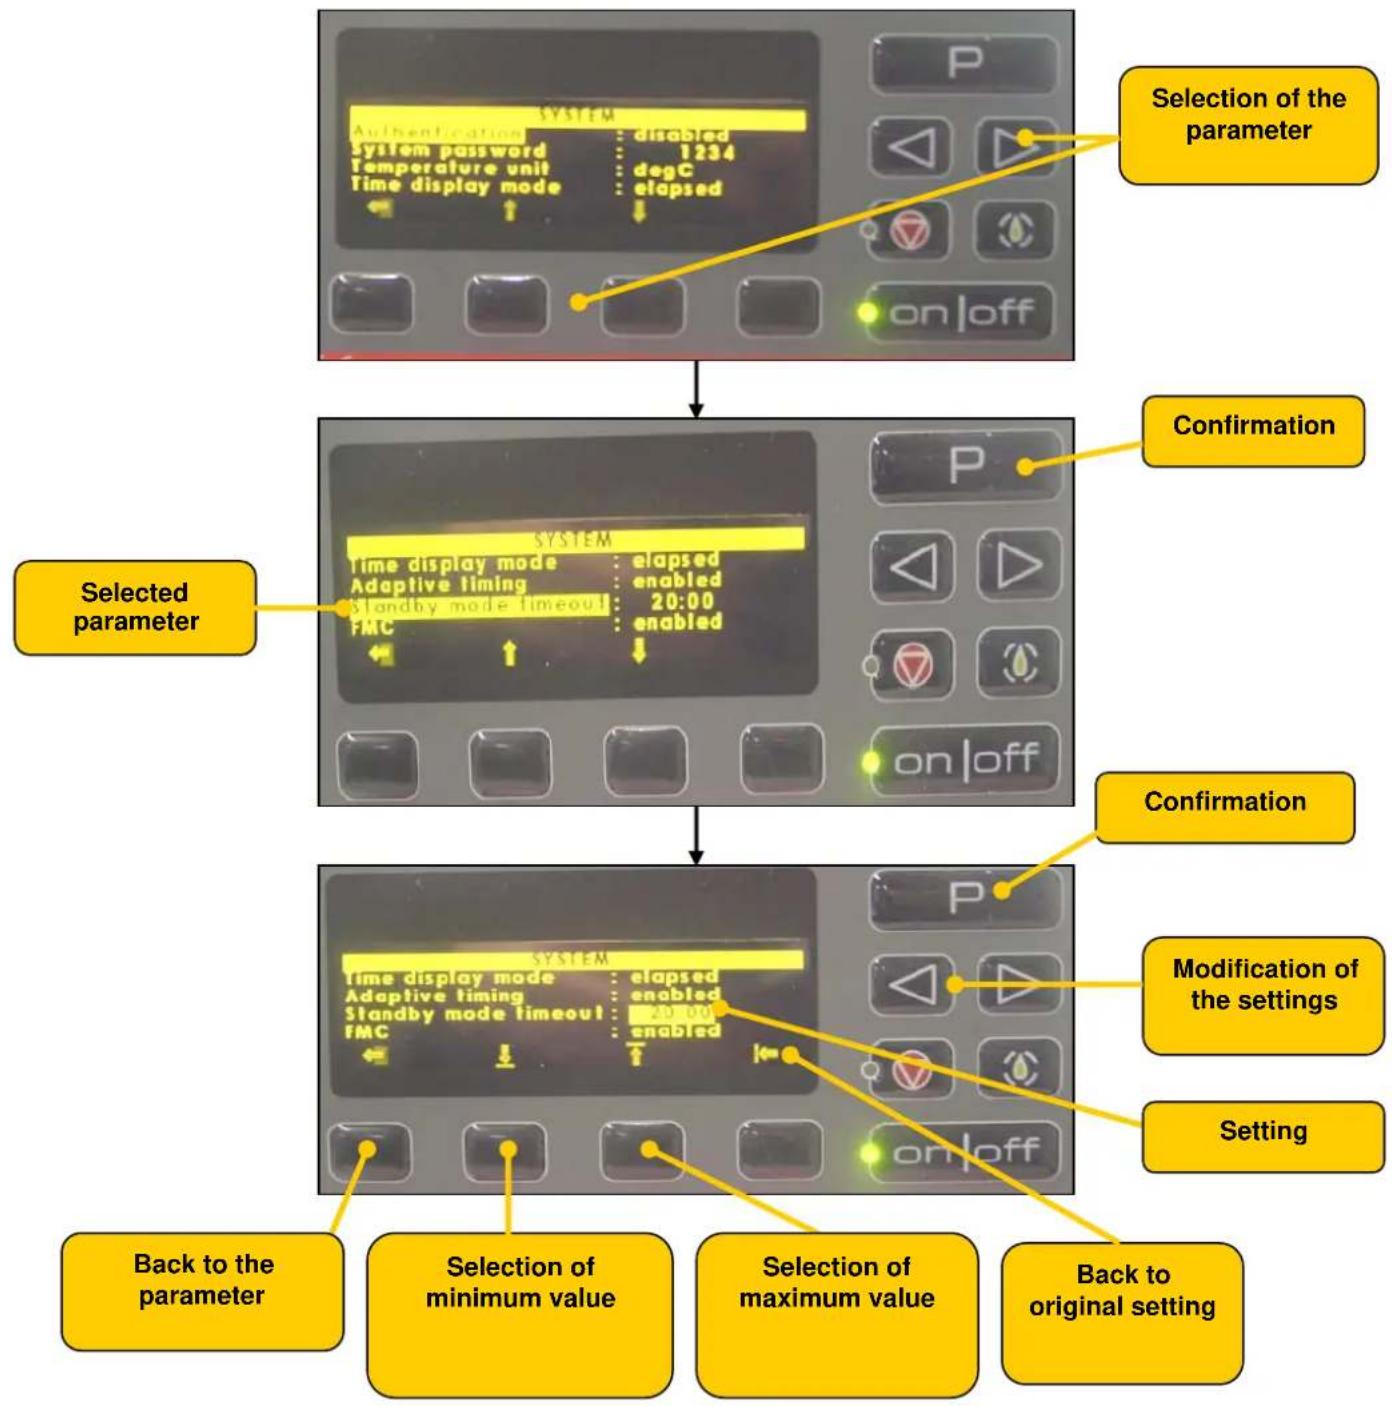
Example: Modification of the StandBy mode timeout
flowchart
graph TD
    A["Configuration"] --> B{Selection of the parameter}
    B -->|yes| C["Configuration"]
    C --> D{Confirmation}
    D -->|yes| E["Configuration"]
    E --> F{Confirmation}
    F -->|yes| G["Configuration"]
    G --> H{Modification of the settings}
    H -->|yes| I["Setting"]
    I --> J{Back to the parameter}
    J --> K["Selection of minimum value"]
    J --> L["Selection of maximum value"]
    J --> M["Back to original setting"]
e) List of changeable parameters
| Parameter | Fonction | Setting / Value |
| Authentication | Access code to programming mode | disabled : inactiveenabled : active |
| System Password | Access code | Corresponds to the Quick Access buttons( 4 digit code ) |
| Temperature unit | Temperature indication | degC : CelciusdegF : Fahrenheit |
| Time display mode | Time display | elapsed : real timeremaining : count down |
| Adaptive timing | Fry Computer | disabled : inactiveenabled : active |
| Standby mode timeout | Time for Standby | Adjustment between: 00 :00 / 4 :15 : 00If time is set to 00 :00, the Standby is inactive |
| FMC | Fat melting cycle | disabled : inactive ( continuous heating)enabled : active |
| FMC temperature | End temperature of the FMC | Adjustment between: 30 / 90°C |
| Standby temperature | Temperature setting for the Standby | Adjustment between: 30 / 120°C |
| Idle Timing | Time to switch into FMC after switching on the control panel | If time is set to 00 :00 the switch over is manual |
| Buzzer reset timer | Buzzer settings | Adjustment between: 00 :00 / 00 : 30If time is set to 00 :00 the reset is manual by the "P" or "Quick Access" button |
| Buzzer volume | Sound volume | low / medium / high |
| Quality alarm | Alarm after the last frying cycle.Survey of a chips scuttle. | disabled : Inactiveenabled : ActiveAdjustment between: 00 :00 / 9 : 59 : 59 |
| Temp meas. Trim offset | Adjustment of the measured temperature | Adjustment between: -10 / 10 °C |
| Temp meas. Trim slope | Adjustment of measure cycle | |
| Twin mode off | Synchronisation of basket lifts (Models 412) | disabled : Inactiveenabled : Active |
| Display intensity | Intensity of luminosity | Auto / low / medium / high |
| Skip temp. setting | Allow start frying cycle by pressing twice the " P" button before set temperature is reached | disabled : Inactiveenabled : Active |
| Hide spTemp. if prg.run | Display set temperature after the start of a frying cycle | disabled : Inactiveenabled : ActiveAfter start of frying cycle, the set temperature becomes darker |
| Screen saver mode | Economy mode of the display by non use of the fryer | Logo : Logo frifriOil temp : Oil temperatureState : state |
| Reset factory def | Back to factory default settings |
6. Cleaning and maintenance
6.1 Cleaning intervals, daily or according the duration of use of the appliance
CAUTION

Only use non-caustic, non-abrasive cleaner.
Only use non-abrasive cleaning cloths.
Only use cleaners which are permitted for the food area.
Always carry out cleaning work only after the frying oil and the deep fryer have cooled down to a temperature level at which no scalding can occur.
| Cleaning area Cleaning work | |
| External surfaces and covers Clean with damp cloth | |
| Control panel Clean with damp cloth | |
| Fast coupling (option pump) Cleaning agent / hot water | |
| Frying pot Dishwashing/ hot water | |
| Frying basket Dishwashing/ hot water | |
| Frying basket holder Dishwashing/ hot water | |
| Frying oil pot cover Dishwashing/ hot water | |
| Internal surfaces and covers Clean with damp cloth | |
| Connecting cables Clean with damp cloth | |
| Oil receptacle container Dishwashing/ hot water | |
| Deep fryer surrounds Clean with hard and soft brushes and damp cloths and follow special instructions if necessary | |
6.2 Frying oil exchange
| Filtration Daily or according to the intensity of use | |
| Exchange According to the saturation | |
6.3 Periodic checks
| Oil catcment container | Cleanliness, filling level |
| Frying oil quality | According to hygiene regulations |
| Frying pot Cleanliness, settled frying residues | |
| Drain pipe and fast coupling Cleanliness, function, sealing after installation | |
| Submerged heating | Surface |
6.4 Maintenance
We recommend a regular maintenance service by a after sales service company, according to the intensity of use of the equipment.
| Occasional use | Less than 8 h per day | A maintenance service per year |
| Middle use | 8 to 12 h per day | One to two maintenance service per year |
| Intensive use | More than 12 h per day | One intermediate service as well as one basis service per year |
7. After sales service
In the case of a breakdown, contact your local dealer or the nearest repair centre. However, before contacting it, check:
- that the fuses have not gone
- if the electric plug is pushed right in
- if the machine has been started correctly
- if the oil level is correct
Important!
If you call the repair centre, give the type and number of your machine. You will find these on the small plate on the panel behind the door.