Heat Safe 2500 - Frying Pan SUNTEC - Free user manual and instructions
Find the device manual for free Heat Safe 2500 SUNTEC in PDF.



| Product type | Electric oil-filled radiator with integrated air humidifier |
| Brand | Suntec |
| Model | Heat Safe 2500 |
| Power supply | 220-240 V ~ 50 Hz |
| Heating power | 2500 W (adjustable to 3 levels: I, II, III) |
| Thermostat | Adjustable thermostat control (min – max) with indicator light |
| Air humidifier | Integrated, removable water tank, automatic shut-off after 8 hours of continuous operation, On/Off switch |
| Safety | Anti-tip protection, overheat safety, do not cover |
| Mobility | Feet with guide rollers, cable winder |
| Installation | On supplied feet, easy assembly of U-brackets |
| Maintenance and cleaning | Clean with a soft damp cloth, dry with a dry cloth; do not immerse, do not use abrasive products |
| Warranty | 24 months from date of purchase, subject to proper handling and presentation of the invoice |
| Recommended use | Supplementary heating for properly insulated rooms or occasional use |
| Precautions | Do not use as main heating appliance, do not place under a socket, do not use outdoors |
Frequently Asked Questions - Heat Safe 2500 SUNTEC
User questions about Heat Safe 2500 SUNTEC
0 question about this device. Answer the ones you know or ask your own.
Ask a new question about this device
Download the instructions for your Frying Pan in PDF format for free! Find your manual Heat Safe 2500 - SUNTEC and take your electronic device back in hand. On this page are published all the documents necessary for the use of your device. Heat Safe 2500 by SUNTEC.
USER MANUAL Heat Safe 2500 SUNTEC
GB This product is not suitable as the main heater. This product is only suitable for well-insulated rooms or for occasional use.
Sicherheitshinweise
A: Lamelle
B: Griff
C: Thermostatkontrolle (min - max)
D: Indikatorleuchte
This appliance can be used by children aged from 8 years and above and persons with reduced physical, sensory and mental capabilities or lack of experience and knowledge if they have been given supervision or instruction concerning use of the appliance in a safe way and understand the hazards involved. Cleaning and user maintenance shall not be made by children without supervision. Children of less than 3 years should be kept away unless continuously supervised.
Children aged from 3 years and less than 8 years shall only switch on/off the appliance provided that it has been placed or installed in its intended normal operating position and they have been given supervision or instruction concerning use of the appliance in a safe way and understand the hazards involved. Children aged from 3 years and less than 8 years shall not plug in, regulate and clean the appliance or perform user maintenance.
- Before connecting the appliance to the power supply, check that the voltage indicated on the appliance corresponds with the voltage at your home.
- Please be careful of hot surfaces and do not touch them as they might cause burns.
- Please refrain from further usage if the power cord or power plug is damaged.
- If parts of the device are damaged, please contact your seller.
-
Do not attempt to repair, disassemble or change the appliance by yourself.
-
The heater must not be located immediately below a socket outlet.
- Do not use this heater in the immediate surroundings of a bath, shower or swimming pool.
- This heater is filled with a precise quantity of special oil. For repairs requiring the opening of the oil container, please contact your seller.
- When disposing the appliance, please also dispose the oil accordingly.
- Do not use the appliance for other than its intended use. For domestic indoor use only.
- Only operate the appliance on a flat, stable and heat-resistant surface.
- There may be a trace of odour during the first few minutes of initial use. This is normal and will disappear.
- Please refrain from using extension leads.
- Please remove the appliance from the wall socket when it is not in use, before cleaning and in case of malfunctions.
- Do not insert any objects into the appliance as this may cause electric shocks, fire or damages to the appliance.
- Do not place the heater under or near curtains, drapes and other flammable materials.
- Do not leave the appliance unattended.
- Please make sure that the ventilation parts are not blocked and free from dust or foreign objects.
- Do not use the appliance to dry towels or clothes. Risk of fire!
- Do not place the appliance on a carpet while in use.
- The use of accessory not recommended by the manufacturer, e.g. time switches, may cause harm.

Warning: In order to avoid overheating, do not cover the heater!
Installation
- Components:
• Installation of radiator feet:
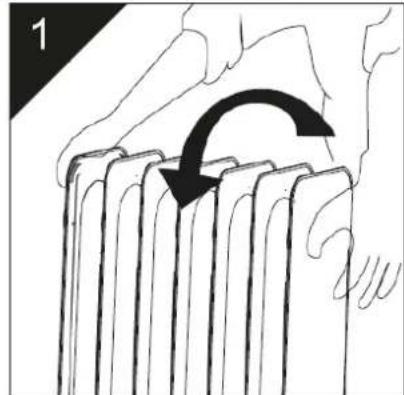
Turn the appliance upside down on a carpet or similar surface to prevent damage to the paint and your floor.
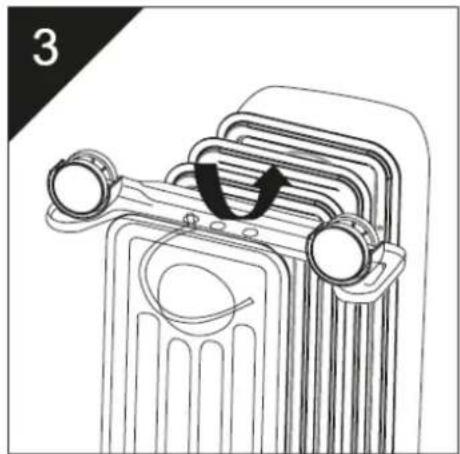
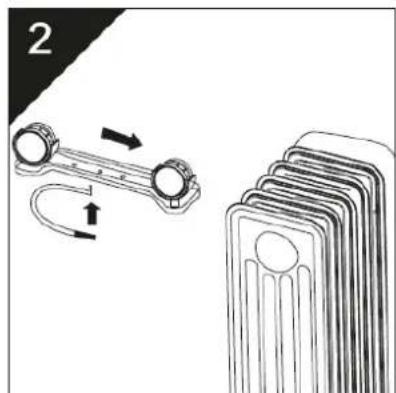
The wheel base will now be connected to the utmost radiator fin with help of the u-shaped bolt. Place the u-shaped bolt with its open end under the radiator fin. The radiator should be surrounded by the wheel base on top and by the u-shaped bolt from the bottom.
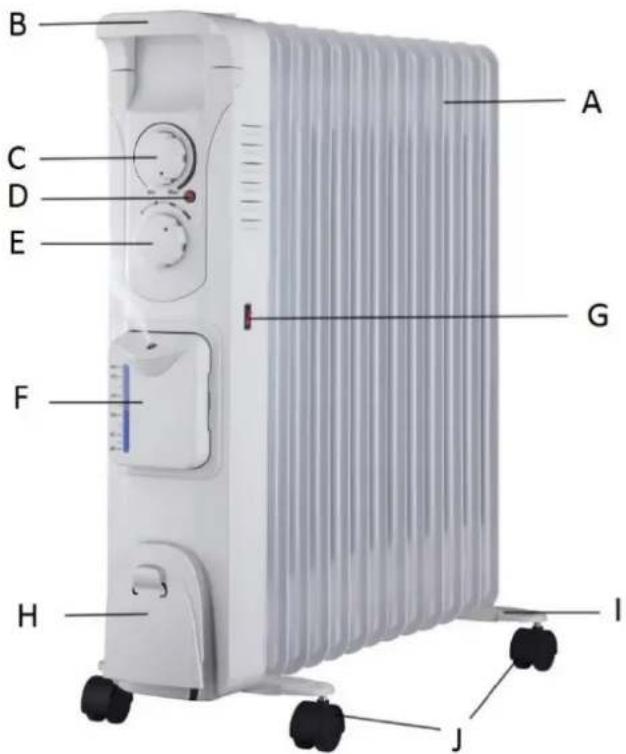
A: Radiator fin
B: Handle
C: Thermostat control (min - max)
D: Indication lamp
E: Power rotary switch
F: Humidifier
G: On-/Off-Switch for humidifier
H: Cable cord storage
I: Radiator foot
J: Wheels
Note: For the models Heat Safe 1000 and 1500 humid, the wheels must first be attached to the bolts of the radiator feet with a lot of force until they lock with a "click" sound.
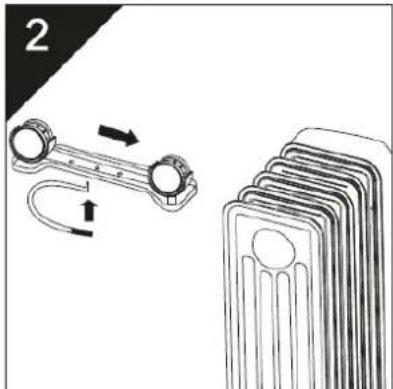
Please insert the angled end of the u-shaped bolt into the utmost left hole of the wheel base. Hold both parts tight.
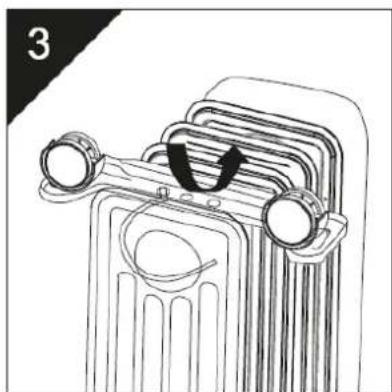
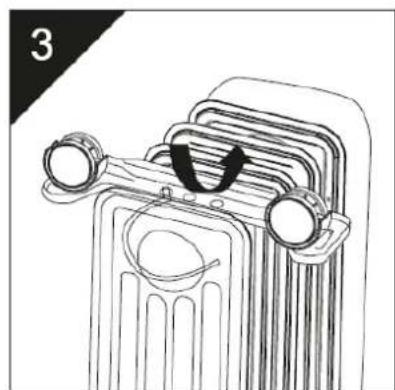
Put the open end of the u-shaped bolt through the utmost right hole of the wheel base and screw it tight from the top.
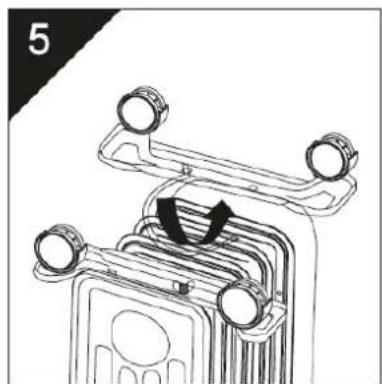
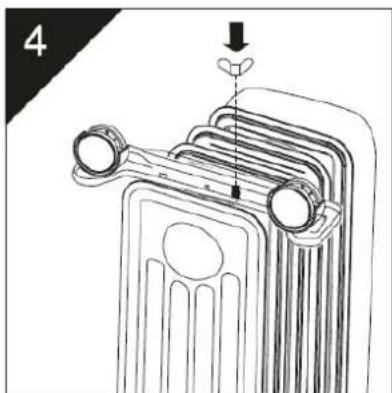
Repeat steps 2,3 and 4 for the second wheel base. Both wheel bases should be installed on the utmost radiator fins to avoid tilting.
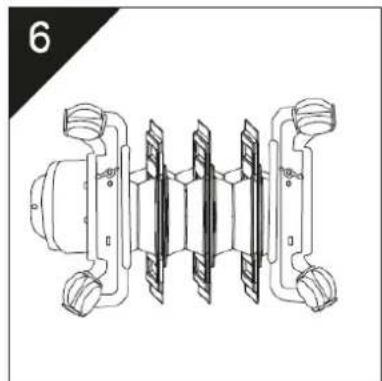
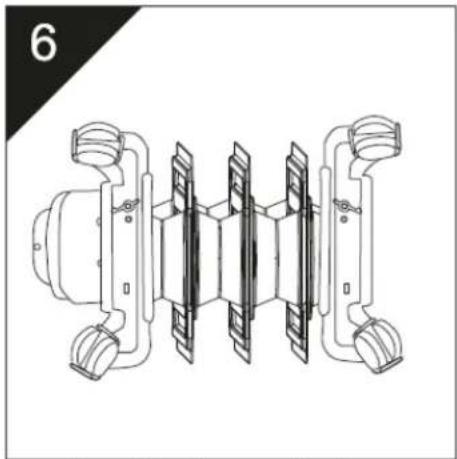
After correct installation, the appliance should look like the picture above. Now, turn the appliance back on its feet. The appliance should have a stable stand and, due to the wheels, be movable. Please remove the carpet before using the appliance.
Operation
- Operating voltage: 220-240V\~, 50Hz, 1000W (model Heat Safe 1000 humid) 1500W (model Heat Safe 1500 humid) 2000W (model Heat Safe 2000 humid) 2500W (model Heat Safe 2500 humid)
- Heating:
- Before operation, place the appliance in an upright position on a flat, stable and heat-resistant surface. Make sure no flammable objects are near in a radius of 1 meter.
- Turn the thermostat control to "min" and the power rotary switch to "0". Afterwards insert the power plug into a wall socket.
- At the power rotary switch, choose between "I" (low heating level), "II" (medium heating level) and "III" (maximum heating level).
- Please turn the thermostat control to "max". The lamp next to the thermostat control will light up. When the room has reached a comfortable room temperature, turn the thermostat control counterclockwise until the lamp goes off. If you wish to increase the temperature, turn the control clockwise. If you wish to decrease the temperature, turn the control counter-clockwise.
Please note: While turning the thermostat control, the lamp will only light up if the selected temperature is higher than the room temperature.
- To turn off the appliance, turn the power rotary switch to "0".
- Humidifier:
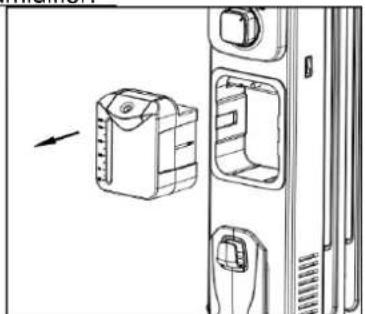
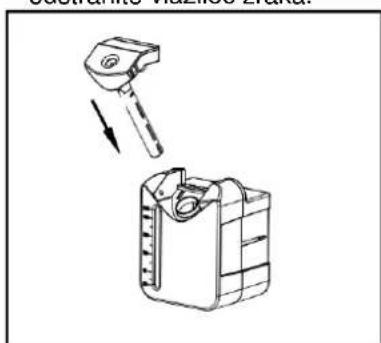
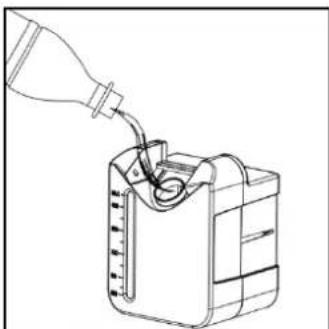
- Please turn off the appliance and pull the humidifier out.
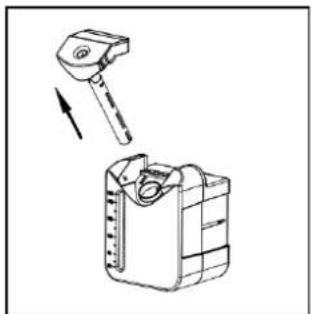
- Please take out the atomization nozzle.
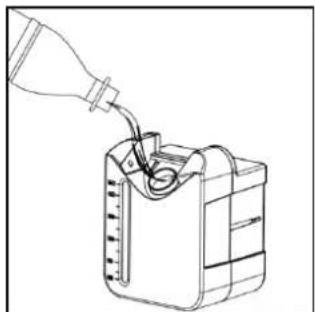
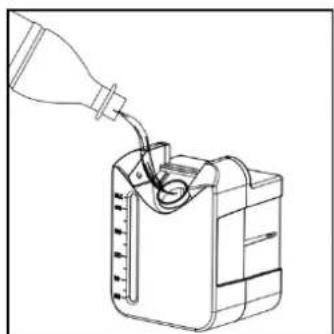
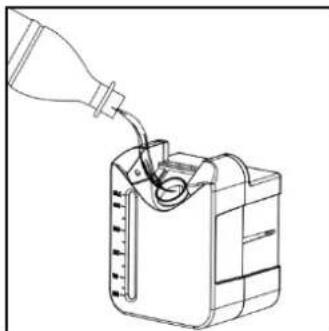
- Please fill the water tank with water.
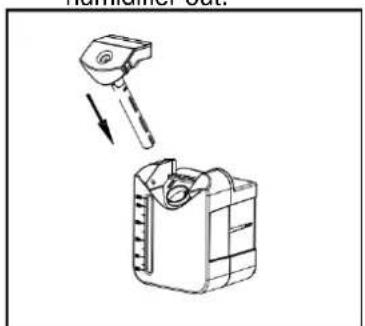
- Please insert the atomization nozzle into the water tank.
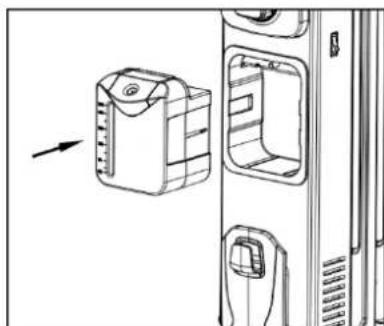
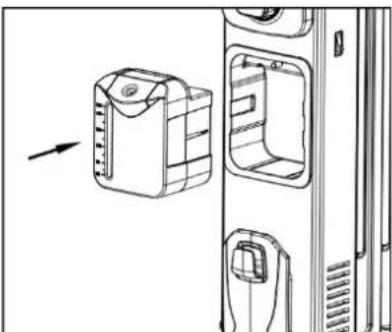
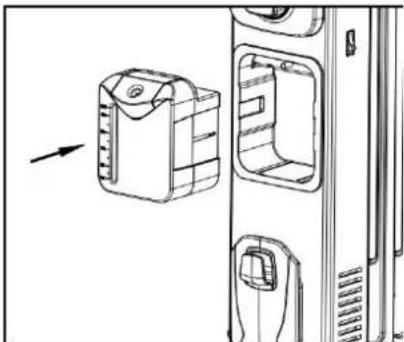
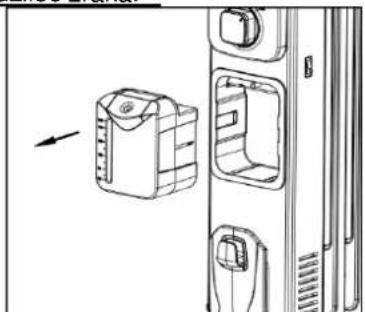
- Please turn the humidifier upside down for at least 10 seconds to let the water be absorbed and then insert it back into the appliance as shown.
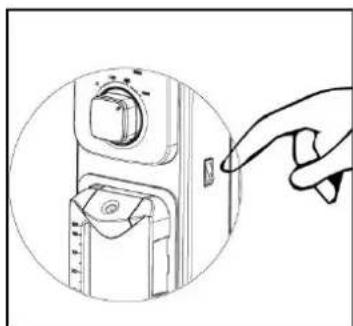
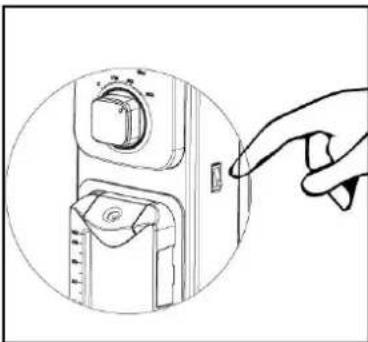
- Please press the on-/off-switch to start.
• Humidifier information:
- Do not let the humidifier work when the amount of water is lower than the minimum level.
To ensure the functionality of the humidifier, use purified water and keep the components clean. Make sure that the atomizer plate is not blocked.
The humidifier will stop working automatically after eight hours of use. If you wish to keep operating the humidifier, turn it off manually by pressing the on/off switch and then press it again to turn the humidifier on.
- Tip-over protection:
The appliance is equipped with a tip-over protection. Should the appliance tip over or stand at an excessive angle, the appliance will turn off automatically. This function helps preventing accidents. The appliance will resume its operation when the appliance is put back in an upright position.
• Overheat protection:
In case of overheating the appliance will turn off automatically due to its overheat protection. During such situation unplug the appliance from the wall socket and let it cool down for about 30 minutes. Please remove any possible cause of overheating and check the power cord and power plug for damages. Should there be damages, please contact your seller and do not use the appliance.
Cleaning
- Always disconnect the appliance from the power outlet and let it cool before cleaning. Never immerse the appliance or its electric components in water to prevent electric shocks.
- Wipe over the exterior of the appliance with a soft wet cloth and then wipe dry with a dry cloth.
- Do not use any chemicals or other abrasive cleaning solvents to clean.
In case of complaint
- You can claim the device within 24 months from date of purchase (receipt).
- A free replacement or repair will be excluded from prior improper product handling.
- Defects in wear parts, consumables, as well as cleaning, maintenance or replacement of said parts are therefore with costs.
- If you want to make a complaint, please bring the entire device in its original packaging and with proof of purchase to your dealer. For a timely and convenient service register, visit our website www.suntec-wellness.de and learn more.
• Without a proof of purchase, generally there will be no repair or replacement. - In the event that the complaint case is analogous to our terms of service, all defects of the device or its accessories due to material or manufacturing defects will be eliminated by repair or, at our discretion, replacing the unit.
- The damage of accessories does not automatically lead to a free exchange of the whole device. In these cases, please contact your dealer. Glass breakage, or breakage of plastic parts are always to charge.
- The dealer or repair service can perform the repair after the expiration of warranty against charge.
Note Concerting Protection of Environment
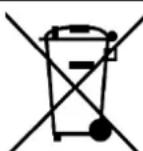
This product must not be disposed of via normal household waste after its service life, but must be taken to a collection station for the recycling of electrical and electronic devices. The symbol on the product, the operating instructions or the packaging indicates such disposal procedures.
The materials are recyclable in accordance with their respective symbols. By means of re-use, material recycling or any other form of recycling old appliances you are making an important contribution to the protection of our environment.
Please ask your local council where your nearest disposal station is located.
As part of our extended producer responsibility, this product is indicated in accordance to the
European Directive 2012/19/EU on Waste Electrical and Electronic Equipment (WEEE). The aim is to avoid, reduce, and environmentally friendly disposal of electronic waste. Please help actively to protect the environment and dispose electronic waste through local collection points. The packaging and this manual can be recycled.
EC Declaration of Conformity
The device meets the essential health and safety requirements of the European Union. The EC declaration of conformity is the basis for CE marking this unit.
With publication of this manual supersedes all previous their validity. SUNTEC, SUNTEC Wellness, KLIMATRONIC and the Sun-Logo are registered trademarks. © 2019/02 SUNTEC WELLNESS GMBH Liability is excluded for all printing errors and omissions.
A: Lámina
B: Asa
C: Regulador del termostato (min-max)
• Protection anti-basculement:
A: Lamella
B: Impugnatura
C: Controllo termostatico (min - max)
D: Spia luminosa
A: Radiatorvinnen
B: Greep
C: Thermostaatknop (min - max)
D: Controlelampje
A: Lamela
B: Pega
C: Controlo do termóstato (min - max)
D: Luz indicadora
- Remova o vaporizador.
A: lamela
B: ručka
C: kontrolni termostat (min – maks)
D: indikatorska žaruljica
Nožica radijatora pričvršćuje se pomoću U-držača na krajnju lamelu na uređaju. Zbog toga provucite U-držač s nepresavijenim krajem ispod lamele radijatora i to tako da radijator odozgora drži nožica radijatora, a odozdola U-držač.
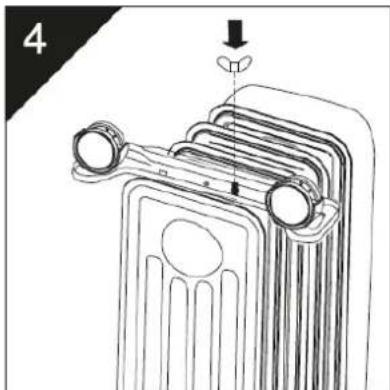
Na kraju provucite nepresavijeni kraj U-držača kroz desnu krajnju rupu na nožici radijatora i prišarafite čvrsto odozgora priloženom leptirmaticom.
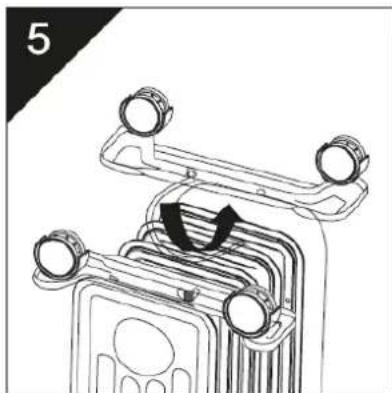
Ponovite postupke 2, 3 i 4 i za drugu nožicu radijatora. Obje nožice moraju se pričvrstiti na krajnje lamele kako ne bi došlo do prevrtanja uređaja.
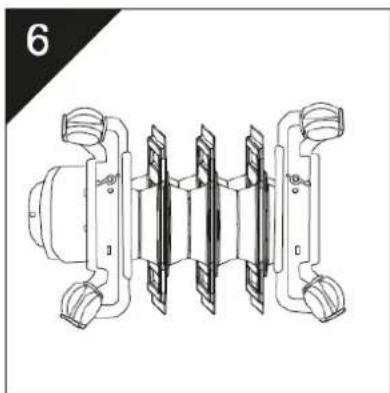
Kad su obje nožice čvrsto pričvršćene, morali biste prepoznati gornju sliku. Sada ponovo okrenite uređaj, koji bi morao stabilno stajati te ga možete micati pomoću kotačića. Svakako maknite tepih prije no što uključite uređaj.
Uključivanje i rad uređaja
- Opskrba strujom: 220-240V\~, 50Hz, 1000W (Modell Heat Safe 1000 humid)
1500W (Modell Heat Safe 1500 humid)
2000W (Modell Heat Safe 2000 humid)
2500W (Modell Heat Safe 2500 humid)
• Grijanje:
-
Prije no što uključite uređaj postavite ga u uspravni položaj na ravnu, stabilnu i na toplinu postojanu podlogu. U krugu od 1 m ne smiju se nalaziti nikakvi zapaljivi predmeti.
-
Postavite termostat na „min“, a prekidač za namještanje snage na „0“, a onda stavite utikač uređaja u utičnicu.
-
Sada možete pomoću prekidača za namještanje jačine grijanja birati između „I“ (niski stupanj grijanja), „II“ (srednji stupanj), „III“ (najviši stupanj grijanja).
-
Nakon toga okrenite termostat na „max“. Indikatorska žaruljica pokraj kontrole termostata će se upaliti. Čim je temperatura u prostoriji postala ugodna, okrećite termostat tako dugo suprotno od kazaljke na satu dok se ne ugasi indikatorska žaruljica.
- Izvadite mlaznicu raspršivača..
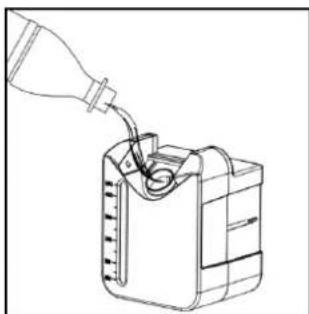
- Napunite vodom spremnik za vodu.
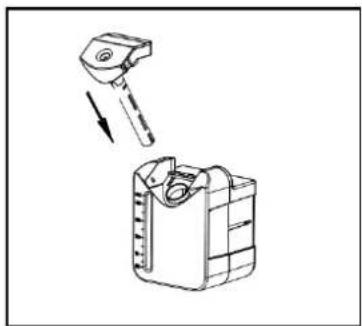
- Umetnite mlaznicu raspršivača u spremnik za vodu.
A: lamela
B: ručka
C: kontrolni termostat (min – maks)
D: indikatorska lampica
E: prekidač za podešavanje jačine
F: ovlaživač zraka
G: prekidač za uključivanje i
Uvucite savijeni kraj kuke u obliku slova U u lijevu krajnju rupu na nožici radijatora i čvrsto držite oba dijela.
Nožica radijatora pričvršćuje se pomoću U-kuke na krajnju lamelu na aparatu. Zbog toga provucite U-kuku s nepresavijenim krajem ispod lamele radijatora i to tako da radijator odozgora drži nožica radijatora, a odozdola kuka.
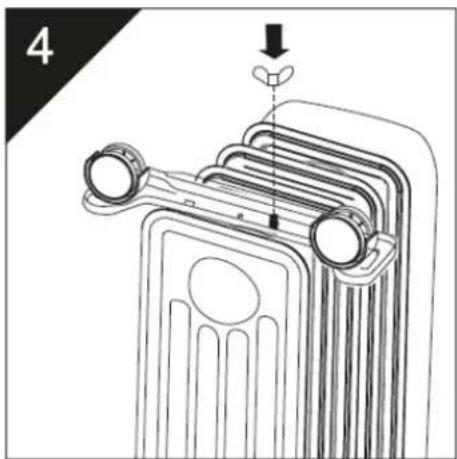
Na kraju provucite nepresavijeni kraj U-kuke kroz desnu krajnju rupu na nožici radijatora i prišarafite čvrsto odozgora priloženom leptirmaticom.
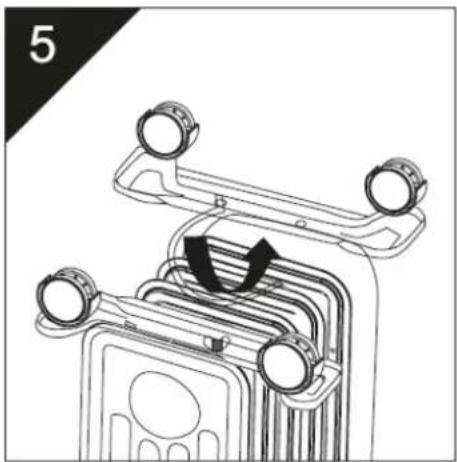
Ponovite postupke 2, 3 i 4 i za drugu nožicu radijatora. Obje nožice moraju se pričvrstiti na krajnje lamele da ne bi došlo do prevrtanja aparata.
- Izvadite mlaznicu raspršivača..
- Umetnite mlaznicu raspršivača u rezervoar za vodu.
- Okrenite ovlaživač za min. 10 sekundi, tako da voda može se apsorbuje i zatim stavite ovlaživač kao što je prikazano ponovo u uređaju.
A: lamele
B: ročaj
C: regulator termostata (min-max)
D: prikazna lučka
Napravo obrnite na glavo na preprogo ali podobno podlago, da zaščitite lak na tleh pred praskami.
Nato z U-stremenom pritrdite nogo grelnika na zunanjo lamelo naprave. V ta namen odprti konec U-stremena vstavite pod lamelo grelnika, tako da grelnik od zgoraj obdaja noga, od spodaj pa U-streme.
Streme v obliki čerke U (U-streme) z zavitim koncem vstavite v levo zunanjo luknjo na nogi grelnika in držite oba dela.
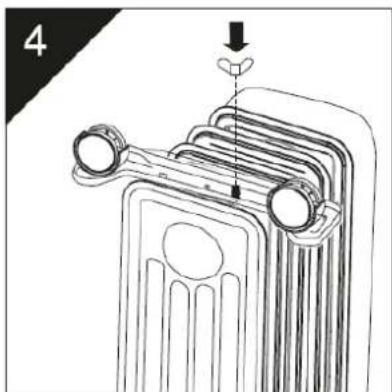
Nato odprti konec U-stremena potisnite skozi desno zunanjo luknjo na nogi grelnika in privijte spoj s priloženim vijačnim zapiralom.
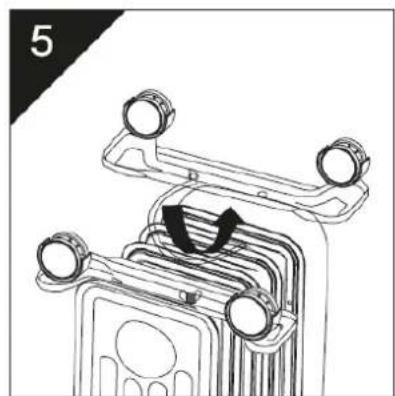
Postopek s slik 2, 3 in 4 ponovite pri drugi nogi grelnika. Obe nogi grelnika morata biti pritrjeni na skrajnih lamelah grelnika, da se naprava ne prevrne.
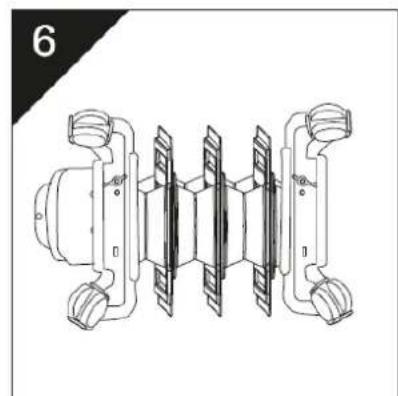
Ko sta obe nogi grelnika trdno priviti, bi moral biti pogled na grelnik tak, kot je na sliki. Obrnite napravo. Naprava bi morala biti sedaj stabilna in premična zaradi kolesc. Pred zagonom naprave odstranite preprogo.
Zagon
- Napajanje: 220–240 V\~, 50 Hz, 1000 W (model Heat Safe 1000 humid)
1500 W (model Heat Safe 1500 humid) 2000 W (model Heat Safe 2000 humid) 2500 W (model Heat Safe 2500 humid)
- Ogrevanje:
-
Napravo pred zagonom postavite pokončno na ravno in stabilno podlago, odporno proti vročini. V razdalji 1 m ne sme biti vnetljivih predmetov.
-
Regulator termostata obrnite na "min" in stikalo za nastavitev moči na "0" ter vtaknite vtič naprave v vtičnico.
-
Sedaj lahko s stikalom za nastavitev moči izbirate med stopnjami "I" (nizka stopnja ogrevnja), "II" (srednja stopnja ogrevanja) in "III" (visoka stopnja ogrevanja).
-
Nato regulator termostata obrnite na "max". Prikazna lučka poleg regulatorja termostata zasveti. Ko je temperatura v prostoru prijetna, vrtite regulator termostata v nasprotni smeri urnega kazalca, da se prikazna lučka ugasne. Če želite ponovno zvišati temperaturo, zavrtite regulator termostata v smeri urnega kazalca. Če želite znižati temperaturo, regulator termostata obrnite v nasprotni smeri urnega kazalca. Napotek: Pri obračanju regulatorja prikazna lučka zasveti šele, ko je nastavljena temperatura, ki je višja od trenutne temperture v prostoru.
-
Za izklop naprave obrnite stikalo za nastavitev moči na "0".
• Vlažilec zraka:
- Napolnite posodo za vodo z vodo.
A: lamela
B: držadlo
C: gombík termostatu (min – max)
D: kontrolka
1500W (model Heat Safe 1500 humid)
2000W (model Heat Safe 2000 humid)
2500W (model Heat Safe 2500 humid)
• Vykurovanie:
- Vytiahnite rozprašovaciu trysku.
A: lamela
B: držadlo
C: knoflík termostatu (min – max)
D: kontrolka
A: lamellák
B: fogantyú
A: Lamelki
B: Uchwyt
C: Kontrola termostatu (min. - maks.)
D: Lampka wskaźnika
1500 W (model Heat Safe 1500 humid)
2000 W (model Heat Safe 2000 humid)
2500 W (model Heat Safe 2500 humid)
- Ogrzewanie:
For this appliance we assure 24 months warranty.
During the 24 months warranty we guarantee to repair your appliance free of charge or to provide your seller the spare parts free of charge if the appliance fails to work due to production failure.
Other claims are excluded from this warranty. We will not be liable for any defects caused by acts of nature, improper use, neglection of the instruction manual, damage from continuous use and damages during transportation.
This warranty card is only applicable with the according invoice.
In case of service please bring your purchased product to your seller.
Product name:
Serial number:
Name of buyer:
Date of purchase:
Stamp and signature of seller:
Manufacturer:
Suntec Wellness GmbH
Holzstraße 2
40221 Düsseldorf
Germany
Brand : SUNTEC
Model : Heat Safe 2500
Category : Frying Pan