
Black XXL LED RR1600 - Jukebox Ricatech - Free user manual and instructions
Find the device manual for free Black XXL LED RR1600 Ricatech in PDF.

| Product type | Jukebox |
| Brand | Ricatech |
| Model | Black XXL LED RR1600 |
| Power supply | AC 230V~50Hz |
| Power consumption | 110 W |
| Speakers | 2 x 16.5 cm (dynamic) + 2 x 6.3 cm (tweeters) |
| Radio tuner | FM 87.5 - 108 MHz / AM 522 - 1620 kHz |
| FM antenna | External 300 ohms |
| AM antenna | Built-in ferrite bar |
| CD player | Audio CD and MP3 CD |
| USB port | USB 2.0 Full Speed, compatible 512 MB to 4 GB (FAT16/FAT32) |
| SD card reader | SD card up to 4 GB (MP3 files only) |
| AUX input | AUX jack (rear) |
| LED lighting | Yes, with dedicated button (LIGHT) |
| Remote control | Yes |
| Playback functions | Random, repeat (1/track/all/album), programming (64 tracks), intro, ESP anti-skip |
| Equalizer (EQ) | Several preset modes |
| BBS effect | Yes |
| Number of preset stations | 30 FM + 10 AM |
| Cleaning | Use a soft, dry cloth, without abrasive products |
| Safety | Do not expose to water, do not open the casing, unplug when not in use for extended periods |
Frequently Asked Questions - Black XXL LED RR1600 Ricatech
User questions about Black XXL LED RR1600 Ricatech
0 question about this device. Answer the ones you know or ask your own.
Ask a new question about this device
Download the instructions for your Jukebox in PDF format for free! Find your manual Black XXL LED RR1600 - Ricatech and take your electronic device back in hand. On this page are published all the documents necessary for the use of your device. Black XXL LED RR1600 by Ricatech.
USER MANUAL Black XXL LED RR1600 Ricatech
IMPORTANT SAFEGUARDS FOR AUDIO PRODUCTS
PLEASE READ CAREFULLY THE FOLLOWING IMPORTANT SAFEGUARDS THAT ARE APPLICABLE TO YOUR EQUIPMENT.
-
Read Instructions - All the safety and operating instructions should be read before the appliance is operated.
-
Retain Instructions - The safety and operating instructions should be retained for future reference.
-
HeedWarnings - All warnings on the appliance and in the operating instructions should be adhered to.
-
Follow Instructions - All operating and use instructions should be followed.
-
Water and Moisture - The appliance should not be used near water-for example, near a bathtub, washbowl, kitchen sink, laundry tub, in a wet basement, or near a swimming pool and the like.
-
Carts and Stands - The appliance should be used only with a cart or stand that is recommended by the manufacturer.
6A. An appliance and cart combination should be moved with care. Quick stops, excessive force, and uneven surfaces may cause the appliance and cart combination to overturn.
-
Wall or Ceiling Mounting - The appliance should be mounted to a wall or ceiling only as recommended by the manufacturer.
-
Ventilation - The appliance should be situated so that its location or position does not interfere with its proper ventilation. For example, the appliance should not be situated on a bed, sofa, rug, or similar surface that may block the ventilation openings; or, placed in a built-in installation, such as a bookcase or cabinet that may impede the flow of air through the ventilation openings.
-
Heat - The appliance should be situated away from heat sources such as radiators, heat registers, stoves, or other appliances (including amplifiers) that produce heat.
-
Power Sources - The appliance should be connected to a power supply only of the type described in the operating instructions or as marked on the appliance.
-
Grounding or Polarization - Precautions should be taken so that the grounding or polarization means of an appliance is not impeded.
-
Power - Cord Protection - Power-supply cords should be routed so that they are not likely to be walked on or pinched by items placed upon or against them, paying particular attention to cords at plugs, and the point where they exit from the appliance.
13.Cleaning - The appliance should be cleaned only as recommended by the manufacturer.
- This product is designed for use with the antenna attached and should not be connected to any other external antennas.
15.Non-use Periods - The power cord of the appliance should be unplugged from the outlet when left unused for a long period of time.
16.Object and Liquid Entry - Care should be taken so objects do not fall and liquids are not spilled into the enclosure through openings
17.Damage Requiring Service - The appliance should be serviced by qualified service personnel when:
A. The power-supply cord of the plug has been damaged; or
B. Objects have fallen, or liquid has been spilled into the appliance; or
C. The appliance has been exposed to rain; or
D. The appliance does not appear to operate normally or exhibits a marked change in performance; or
E. The appliance has been dropped, or the enclosure damaged.
- Servicing - The user should not attempt to service the appliance beyond that described in the operating instructions. All other servicing should be referred to qualified service personnel.

WARNING:
TO PREVENT FIRE OR SHOCK HAZARD, DO NOT EXPOSE THIS APPLIANCE TO RAIN OR MOISTURE. DO NOT REMOVE COVER. PILOT LAMPS SOLDERED IN PLACE. NO USER SERVICEABLE PARTS INSIDE. REFER SERVICING TO QUALIFIED SERVICE PERSONNEL.

The lighting flash with arrowhead symbol, within an equilateral triangle, is inten-ded to alert user to the pre-sence of uninsulated "dangerous voltage" within the product's enclosure that may be of sufficient magnitude to constitute risk of electric shock to persons.
CAUTION
RISK OF ELECTRIC SHOCK DO NOT OPEN
CAUTION: TO REDUCE THE RISK OF ELECTRIC SHOCK, DO NOT REMOVE COVER (OR BACK). NO USER - SERVICEABLE PARTS INSIDE. REFER SERVICING TO QUALIFIED SERVICE PERSONNEL.

The exclamation point within an equilateral triangle is intended to alert user to the presence of important operating and maintenance (servicing) instruction in the literature accompanying the appliance.
"Ventilation not being impeded."
"Do not exposed to dripping or splashing and that no objects filled with liquids, such as vases, shall be placed on the apparatus."
Specification
FREQUENCY
: FM 87.5 -108 MHz / AM 522 - 1620 KHz
POWER SOURCE
:AC230V\~50HZ
ANTENNA
: EXTERNAL 300 Ohm ANTENNA FOR FM Built in ferrite bar for AM
POWER CONSUMPTION : 11
:110W
SPEAKER
:16.5cm Dynamic type x2
6.3cm Tweeter type x2
USB 2.0 PORT
: Full Speed 512MB - 4GB(Support FAT16,FAT32)
*DESIGN AND SPECIFICATIONS SUBJECT TO CHANGE WITHOUT NOTICE.
GETTING STARTED
- Unwind the AC power cord at the back of the unit.
- Connect the plug to the power wall outlet.
- Press the MAIN POWER button on the back of the unit to switch the main power on.
- Press the POWER button on the front of the unit to switch the unit to Standby mode.
- Press the STAND BY button to begin the operation.
6 Press the LIGHT button to switch the LED lighting system on. - Connect the FM antenna to the ANTENNA JACK for better reception.
CD OPERATION
- To switch to CD mode by pressing FUNCTION until CD appear on the LCD display.
- Press OPEN/CLOSE to open the CD drawer.
- Place a CD on the CD drawer .
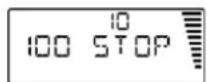
- The Total track no and Total play time of CD will show on the LCD display.
- Press PLAY to start playing the CD
- Press SKIP+ to go forward to the next track.
- Press SKIP- to go backward to the previous track.
- Press STOP to stop playing the CD
- Press PLAY/PAUSE when play a track to pause.
- Press PLAY/PAUSE again to resume playing.
- Press VOLUME UP to increase the sound volume (Maximum Value: 30)
- Press VOLUME DOWN to decrease the sound volume (Minimum Value:0)
MP3 CD OPERATION
- To Switch to CD mode by pressing FUNCTION until CD appear on the LCD display.
- Press OPEN/CLOSE to open the CD drawer.
- Place a MP3-CD on the CD drawer.
-
Press OPEN/CLOSE again to close the CD drawer. The total Album number and total play time of MP3-CD will show on the LCD display. (For e.g. 100 tracks file in 10 Albums evenly).
-
Press the PLAY/PAUSE button to play the MP3 tracks.
- Press SKIP+ to go forward to the next track.
- Press SKIP- to go backward to the previous track.
- Press PRE-UP to go forward to the next Album.
- Press PRE -DOWN to go backward to the previous Album.
- Press STOP to stop playing the MP3-CD.
- Press PLAY/PAUSE when play a track to pause.
- Press PLAY/PAUSE again to resume playing.
- Press VOLUME UP to increase the sound volume (Maximum Value: 30).
- Press VOLUME DOWN to decrease the sound volume (Minimum Value: 0).
RADIO OPERATION
- Press FUNCTION until TUNER appears on the LCD display.
- Press BAND to select the desired waveband: FM or AM.
- Press and hold SKIP + or SKIP - until a radio station with sufficient signal. strength is found. Repeat this procedure until the desired station is reached
- To tune into a weak station briefly press SKIP + or SKIP - repeatedly until the display shows the desired frequency or when the best reception has been obtained.
Note: 1. For FM Tuning, ((ST)) will show on the LCD display when stereo sound is obtained.
2. A maximum of 30 radio stations for FM and 10 for AM can be stored in the memory. When a preset radio station is selected, the preset number appears on the display.
PROGRAMMING STATIONS
- Press FUNCTION to TUNER mode.
- Press AM/FM to select the desired wave band: FM or AM.
- Press SKIP+ or SKIP- to tune to the desired frequency.
- Press "PROGRAM", the "PROGRAM" and "01" on LCD display will start flashing.
The current preset number will be displayed for selection. - If you wish to store the radio station to another preset number, press the PRE-UP or PRE-DOWN to select the desired preset number.
- Press PROGRAM on the unit again to store the radio station. Repeat steps 3 to 6 to store other preset radio stations.
Note **During program, if no button is pressed within 5 seconds, the system will exit program mode automatically.
SELECTING STATION
- Press PRE-UP or PRE-DOWN to select the desired preset number. The preset number, radio frequency, and PROGRAM will appear on the display.
- Press MO./ST. on the Remote control to switch On or Off the stereo sound effect, stereo is On when the ((ST))appears on the LCD display.
PROGRAMMING
Up to 64 tracks can be programmed for play in any desired sequence.
The track must be programmed in Stop mode.
The same track can be programmed more than once.
1. Press FUNCTION to switch to CD, or CARD-USB mode.
2. In stop mode, press the PROGRAM button. "oo" on top of LCD display starts flashing.
"Memory" and "000 P - - 01" will show on the LCD display.
3. Press SKIP + or SKIP - to select a desired Album.
4. Press the PROGRAM to store the selected album. "oX" will be shown on the display and the "000" will start flashing. (where "X" indicates the selected album)
5. Press SKIP+ or SKIP- again or using the numeric keys on the remote control select the desired track.
6. Press the PROGRAM to store the selected track. "00", "PROGRAM" and "000 P - - 02" will show on the display.
7. Repeat steps 2 - 5 to select and store other desired tracks.
8. Press PLAY/PAUSE to start programmed playing from the PROGRAM 01 track.
9. To end the programmed play, press the STOP button.
RANDOM PLAYING
You can play all the tracks in random mode.
- During playing, pause or stop mode, press RANDOM to enable random play mode.
"RANDOM" will appear on the display. - To exit RANDOM mode, press RANDOM again "RANDOM" will disappear from the display.
REPEAT PLAYING
- In stop or play mode, press the REPEAT once, "REPEAT 1" will show on the LCD display. The selected tracks will play repeatedly.
- Press the REPEAT twice, "REPEAT ALL" will show on the LCD display. All tracks will play repeatedly.
- Press the REPEAT button for the third time, "ALBUM REPEAT" will show on the LCD display, the tracks in the selected Album will play repeatedly.
- To exit the repeat mode, press the REPEAT button repeatedly until the "REPEAT" icon disappears from the LCD display.
Note: If "RANDOM" function has been selected, the repeat play mode will be disabled.
MUTE
Press the MUTE button to cut off the sound, the volume level bar on the right of the LCD display will flash.
INTRO
Press the INTRO button, "INTRO" will shown on the LCD display, the first 10 seconds of each track will play automatically.
BBS
- Press BBS once to switch ON the BBS sound effect.
- Press BBS twice to switch OFF the BBS sound effect.
EQ
Press EQ repeatedly to choose the sound field as below sequence:

SEARCH PLAY (For MP3 CD only)
Search by Track name:
- Press the FIND/ESP button once in Stop mode, on LCD display starts to flash.
- Use SKIP + or SKIP - to select the letter (A-Z) that match the first letter (A-Z) of the track's name.
-
Hold the SKIP + or SKIP - for 1-2 seconds until the on LCD stops flashing.
-
Press SKIP + or SKIP - to select the track starting with the selected letter (A-Z).
Search by Album name:
- Press FIND/ESP twice in stop mode until "ALBUM" and appears on the LCD display.
- Press SKIP+ or SKIP- repeatedly to select an Album.
- Hold the SKIP + or SKIP - for 1-2 seconds to enter the selected Album, "ALBUM" will disappear on the LCD display.
- Press SKIP + or SKIP - to select the track in the selected Album.
- Press PLAY/PAUSE to play the selected track.
**If there are files in the root directory, the display will show "Root". Hold SKIP+ or SKIP- for 1-2 seconds until "ALBUM" disappears from the LCD display. Then search the files in the root directory by pressing SKIP+ or SKIP-.
MP3 INFORMATION
- If the MP3 file has track information stored on it, such as Artist and Title, the LCD will display that information during MP3 CD playback.
- Press and hold the FIND/ESP button over 1 second - MP3 information will show on the LCD.
NOTE: If the MP3 was recorded without any track information, "UNKNOWN" or "NONE" will be displayed when the Find button is pressed.
ESP MODE
Shockproof function "ESP" can be set in CD mode only. Press the FIND/ESP button to switch the ESP function on in CD mode and "ESP" will appear on the LCD display. Press FIND/ESP again. "ESP" will disappear on the LCD display.
USB OPERATION
- Press the FUNCTION button until "USB" appears on the LCD display.
- Connect the USB device (MP3 Player or USB Flash Memory Drive with stored music files) to the USB PORT.
Note: The unit can only play MP3 files up to 4GB max. and does not play WMA files.
3. Repeat Steps 5 to 14 of MP3 CD OPERATION.
SD CARD OPERATION
- Press the FUNCTION button until "CARD" appears on the LCD display.
- Inster an SD Card with pre-recorded MP3 music (not supplied) into the card slot.
Note:The unit can only play MP3 files up to 4GB max. and does not play WMA files.
- Repeat Steps 5 to14 of MP3 CD OPERATION.
USB SPECIFICATION
Interface
- USB2.0 Full speed, HOST (USB HUB is not supported)
Corresponding Flash Memory
- USB1.1 Flash memory
- USB2.0 High speed Flash memory
- Minimum memory size: 512MByte
- Maximum memory size: 4GByte
MP3 Decoder
- Compatible with MPEG Audio 1, 2, 2.5
- Compatible with Layer 1, 2, 3
- Compatible with Sampling rate: 8k, 16k, 32k, 11.025k, 22.05k, 44.1k, 12k, 24k,48kHz
- Compatible with Bit rate: 128k ~ 320kbps
- Subfolder nest: 8
- Number of track/titles Max 999
- Support ID3 tag V2.0
IMPORTANT NOTES
The USB connector does not support connection with a USB extension cable and is not designed for direct communication with a Computer. It is not guaranteed that all USB memory devices & SD Card will work on this audio system. Do not disconnect the USB device/SD Card during USB/CARD mode, as this may damage the external device or its files. Please first switch to another Mode or power off before safely disconnecting the USB device/SD Card.
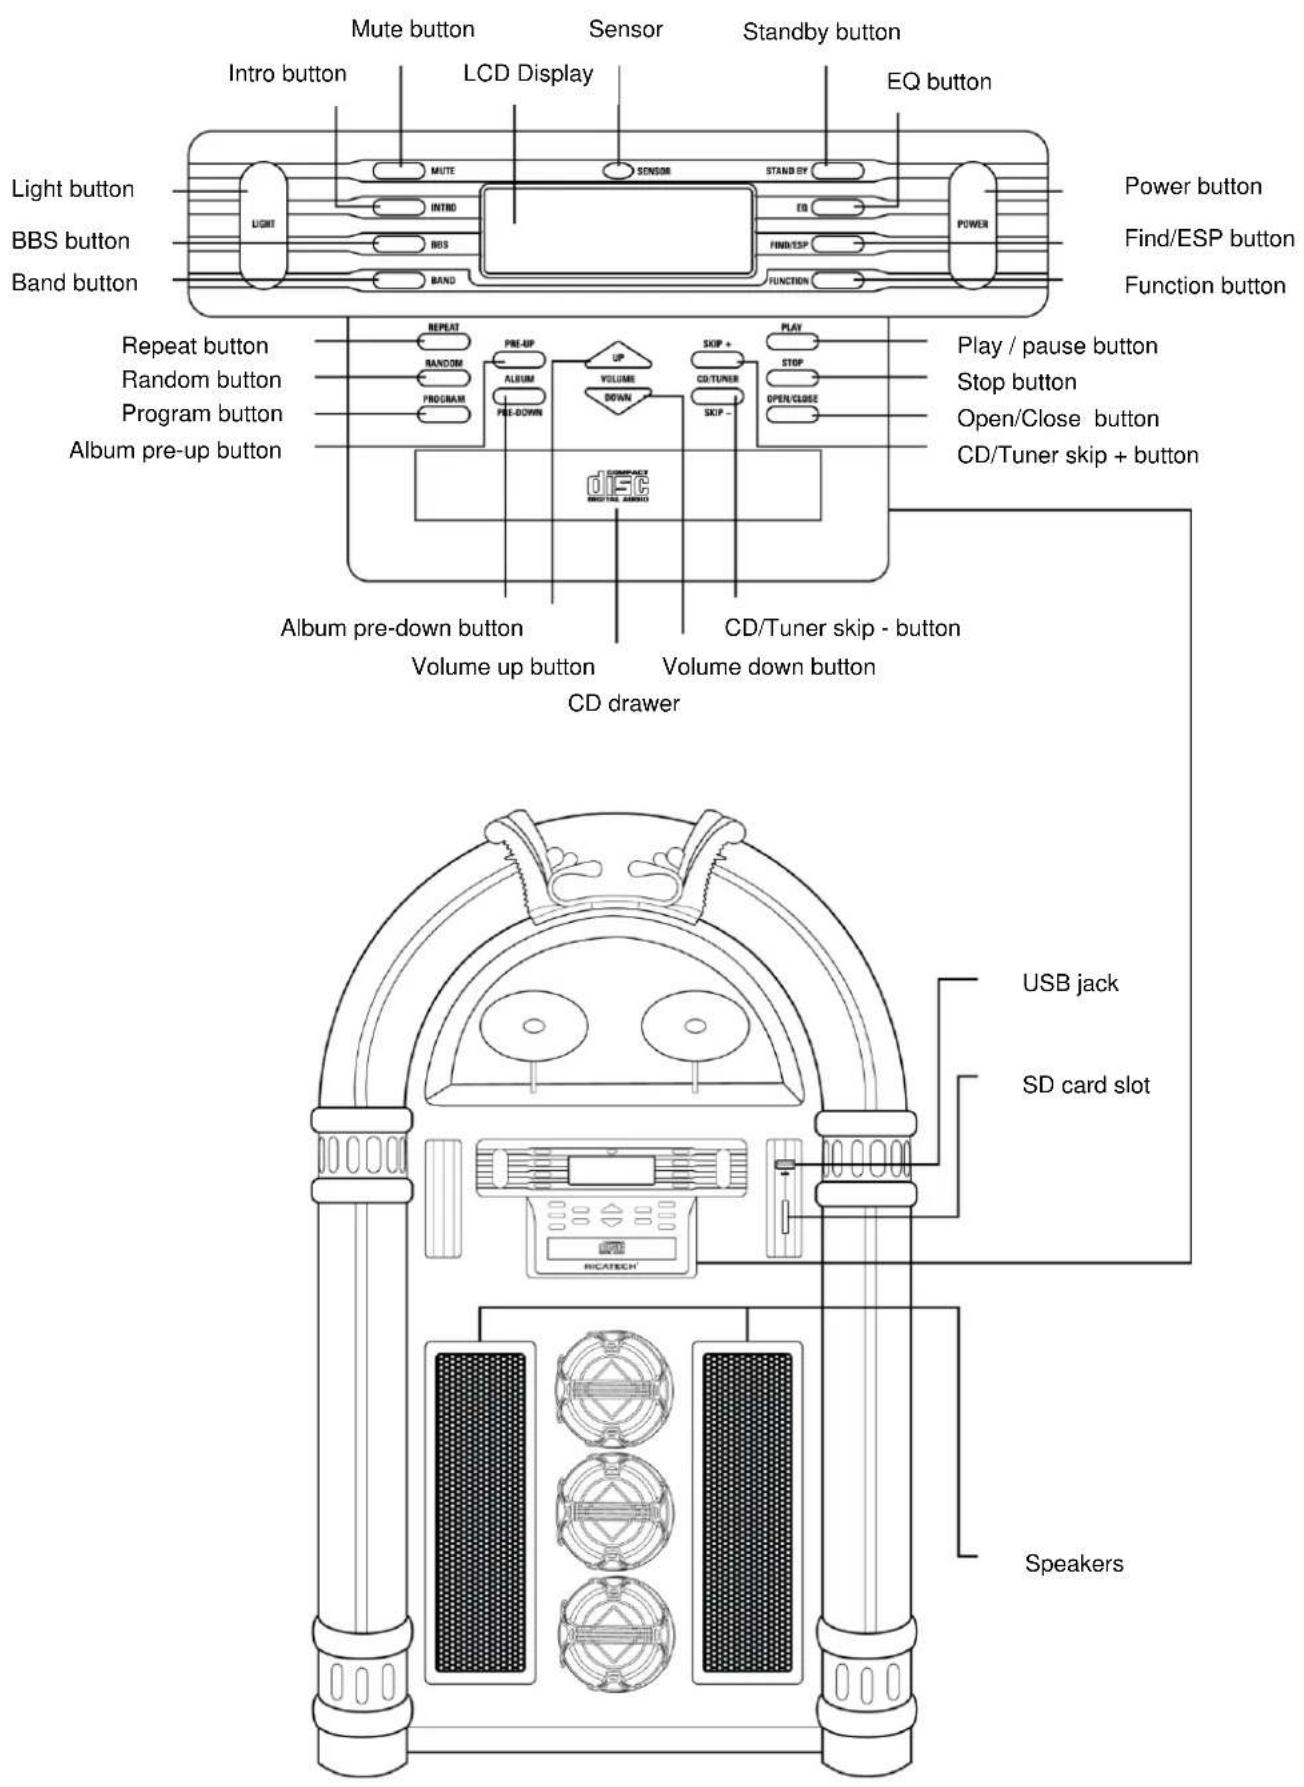
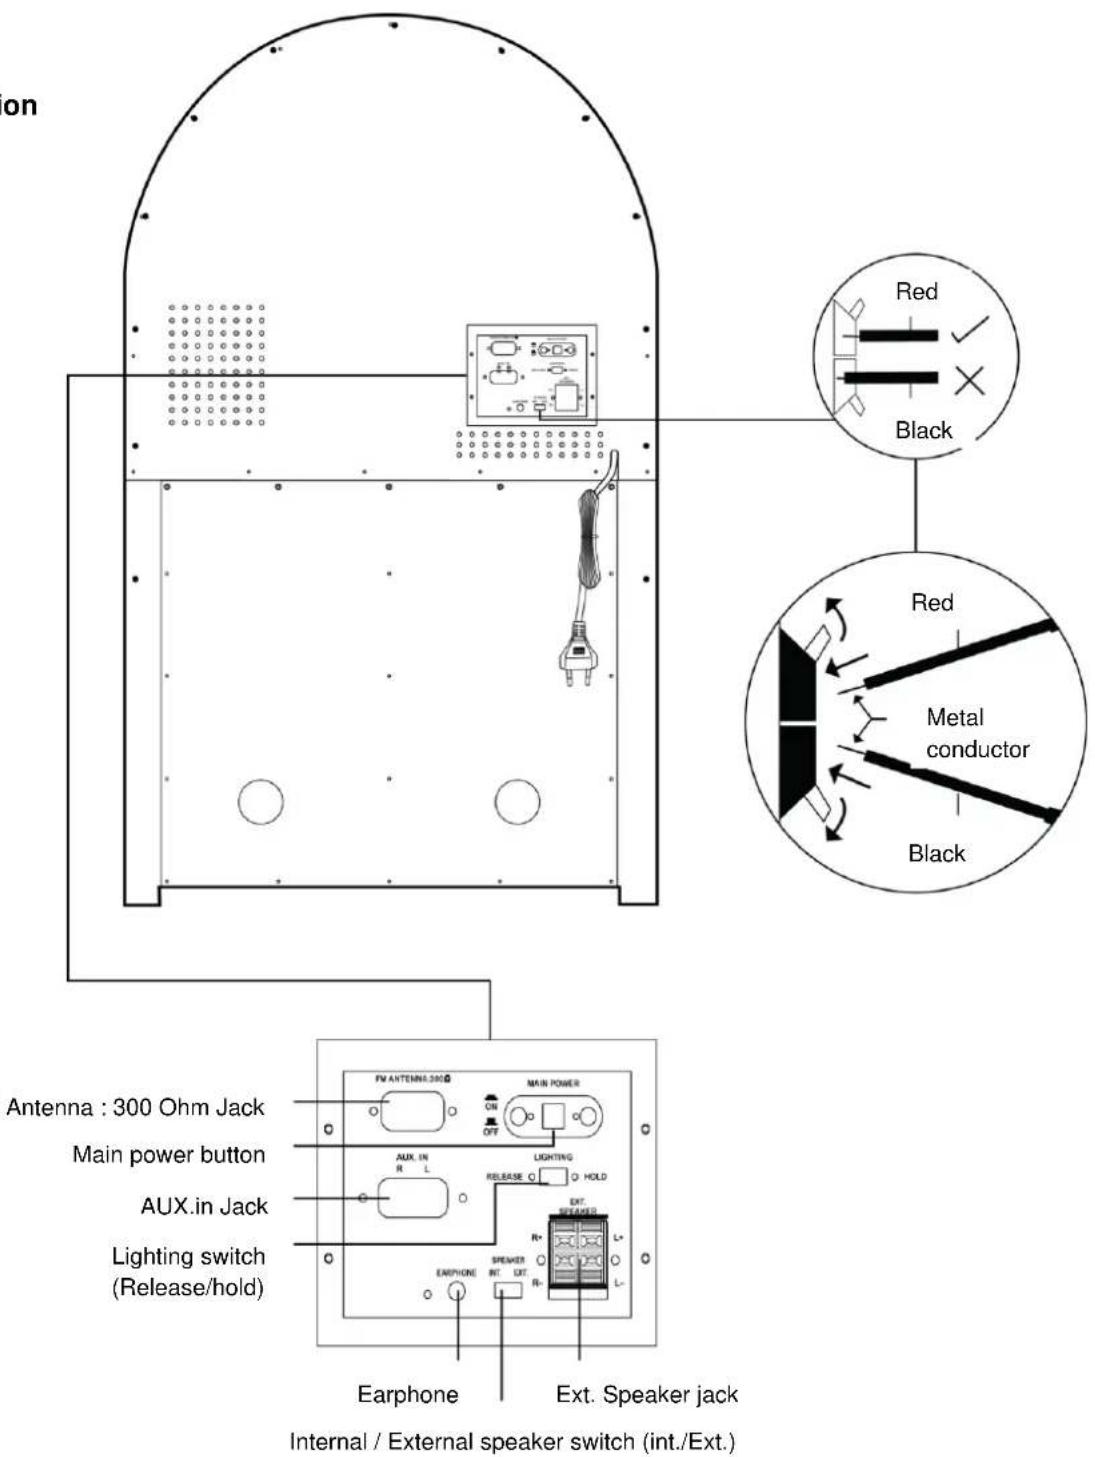
Location of parts
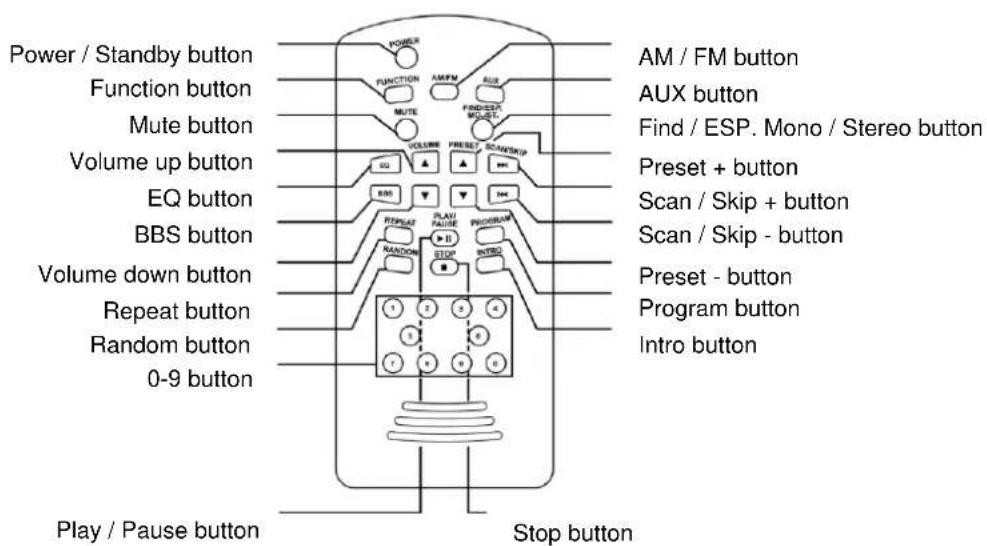
Remote location
CUSTOMER SUPPORT
You can contact the Ricatech customer service when you have a question or a problem with your Ricatech product. You can contact us by telephone and email.
For customer support by email, please sent a email to support@ricatech.com Please make sure that you mention the model number and serial number of the product, mention your name & address and describe your question or problem clearly.
Telephone
For customer support by telephone, please dial +32 3 3265694. One of our service staff will be ready to serve you.
For full procedure please visit the website of Ricatech at: www.ricatech.com