Yo 2 - Stroller COSATTO - Free user manual and instructions
Find the device manual for free Yo 2 COSATTO in PDF.
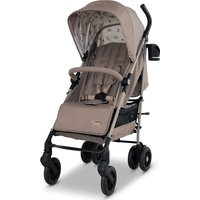
| Product type | Pushchair |
| Brand | Cosatto |
| Model | Yo 2 |
| Maximum child weight | 15 kg |
| Safety standard | BS EN 1888:2012 |
| Basket capacity | 2 kg |
| Number of wheels | 4 (2 front, 2 rear) |
| Brake | Locking pedal |
| Harness | 5-point height-adjustable |
| Backrest recline | Yes, adjustable (reclining position for newborn) |
| Canopy | With extension and visibility window |
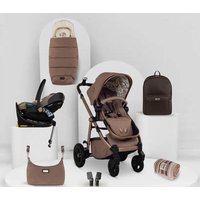
| Included accessories | Bumper bar, footmuff, rain cover, cup holder, rain cover bag |
| Spare parts available | Yes (list S1 to S18) |
| Maintenance | Clean with warm water and mild detergent; silicone lubrication for moving parts |
| Usage | From birth to 15 kg |
| Folding | Compact with automatic locking device |
Frequently Asked Questions - Yo 2 COSATTO
User questions about Yo 2 COSATTO
0 question about this device. Answer the ones you know or ask your own.
Ask a new question about this device
Download the instructions for your Stroller in PDF format for free! Find your manual Yo 2 - COSATTO and take your electronic device back in hand. On this page are published all the documents necessary for the use of your device. Yo 2 by COSATTO.
USER MANUAL Yo 2 COSATTO
baby stuff with personality®
402
PUSHCHAIR
NITTY GRITTY
EN Important: Keep these instructions for future reference.
Important safety Information
General:
- The pushchair is suitable for children from birth up to a maximum user weight of 15kg .
WARNING: Never leave your child unattended. - WARNING: Ensure that all the locking devices are engaged before use.
WARNING: To avoid injury ensure that your child is kept away when unfolding and folding this product. - WARNING: Do not let your child play with this product.
- WARNING: This product is not suitable for running or skating.
- WARNING: Always use the restraint system.
- WARNING: Always use the crotch strap in combination with the waist belt.
WARNING: To avoid risk of injury from burning, do not place hot beverage on cup holder. - Do not use replacement parts or accessories other than those approved by Cosatto.
- A basket is provided for the carriage of 2kg of goods, evenly distributed.
- Any additional load attached to the handle or on the back of the backrest or on the sides of the vehicle will affect the stability and safety of the vehicle.
- Do not use a platform with this product as it may render the product unsafe.
Always apply the brake when placing or removing a child from vehicle. - Never carry a second child on the product.
This product complies with BS EN 1888:2012. - Use the seat in the most reclined position for new born babies until they can sit up unaided.
- Ensure your child wears a correctly fitted and adjusted harness at all times. D-rings are provided for the attachment of a separate safety harness approved to BS EN 13210 should this be required.
Visual language Key:
| XX | Refer to warning XX |
| √ | Correct action |
| X | Incorrect action |
| "CLICK!" | Audible sound |
| × | Repeat action x times |
| General action arrow |
| 8 | Lock |
| 3 | Unlock |
| 6 | Press and hold |
| 10 | Check |
| Cont. XX | Continue to step XX |
| ← | Repeat on other side |
Parts
- Chassis
- Rear wheel x2
- Front wheel x2
- Hood
- Bumper bar
- Footmuff
- Raincover
- Raincover bag
- Cup holder
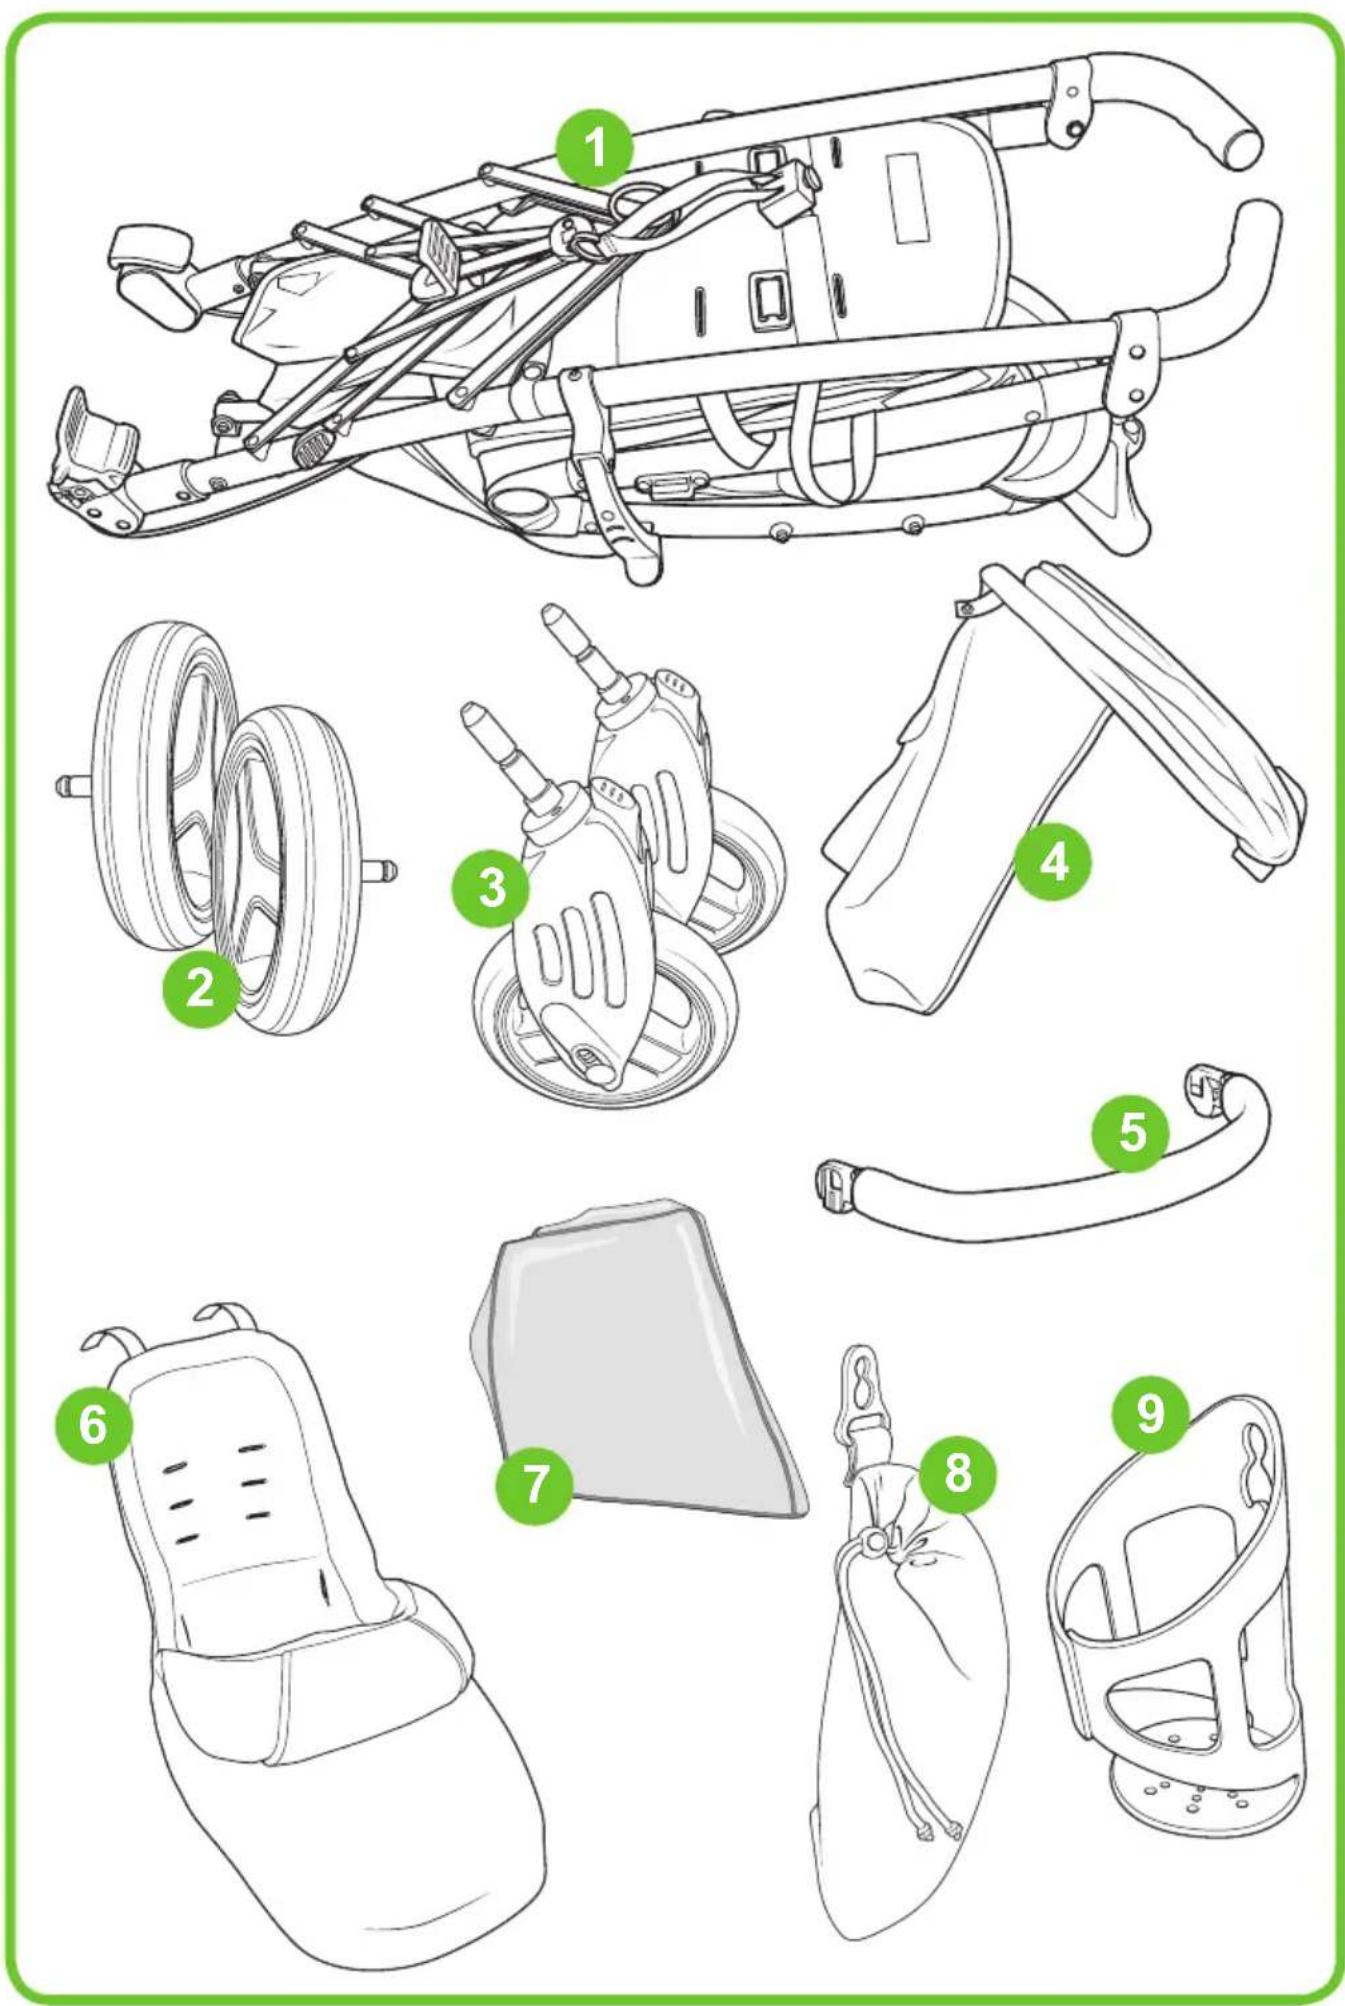
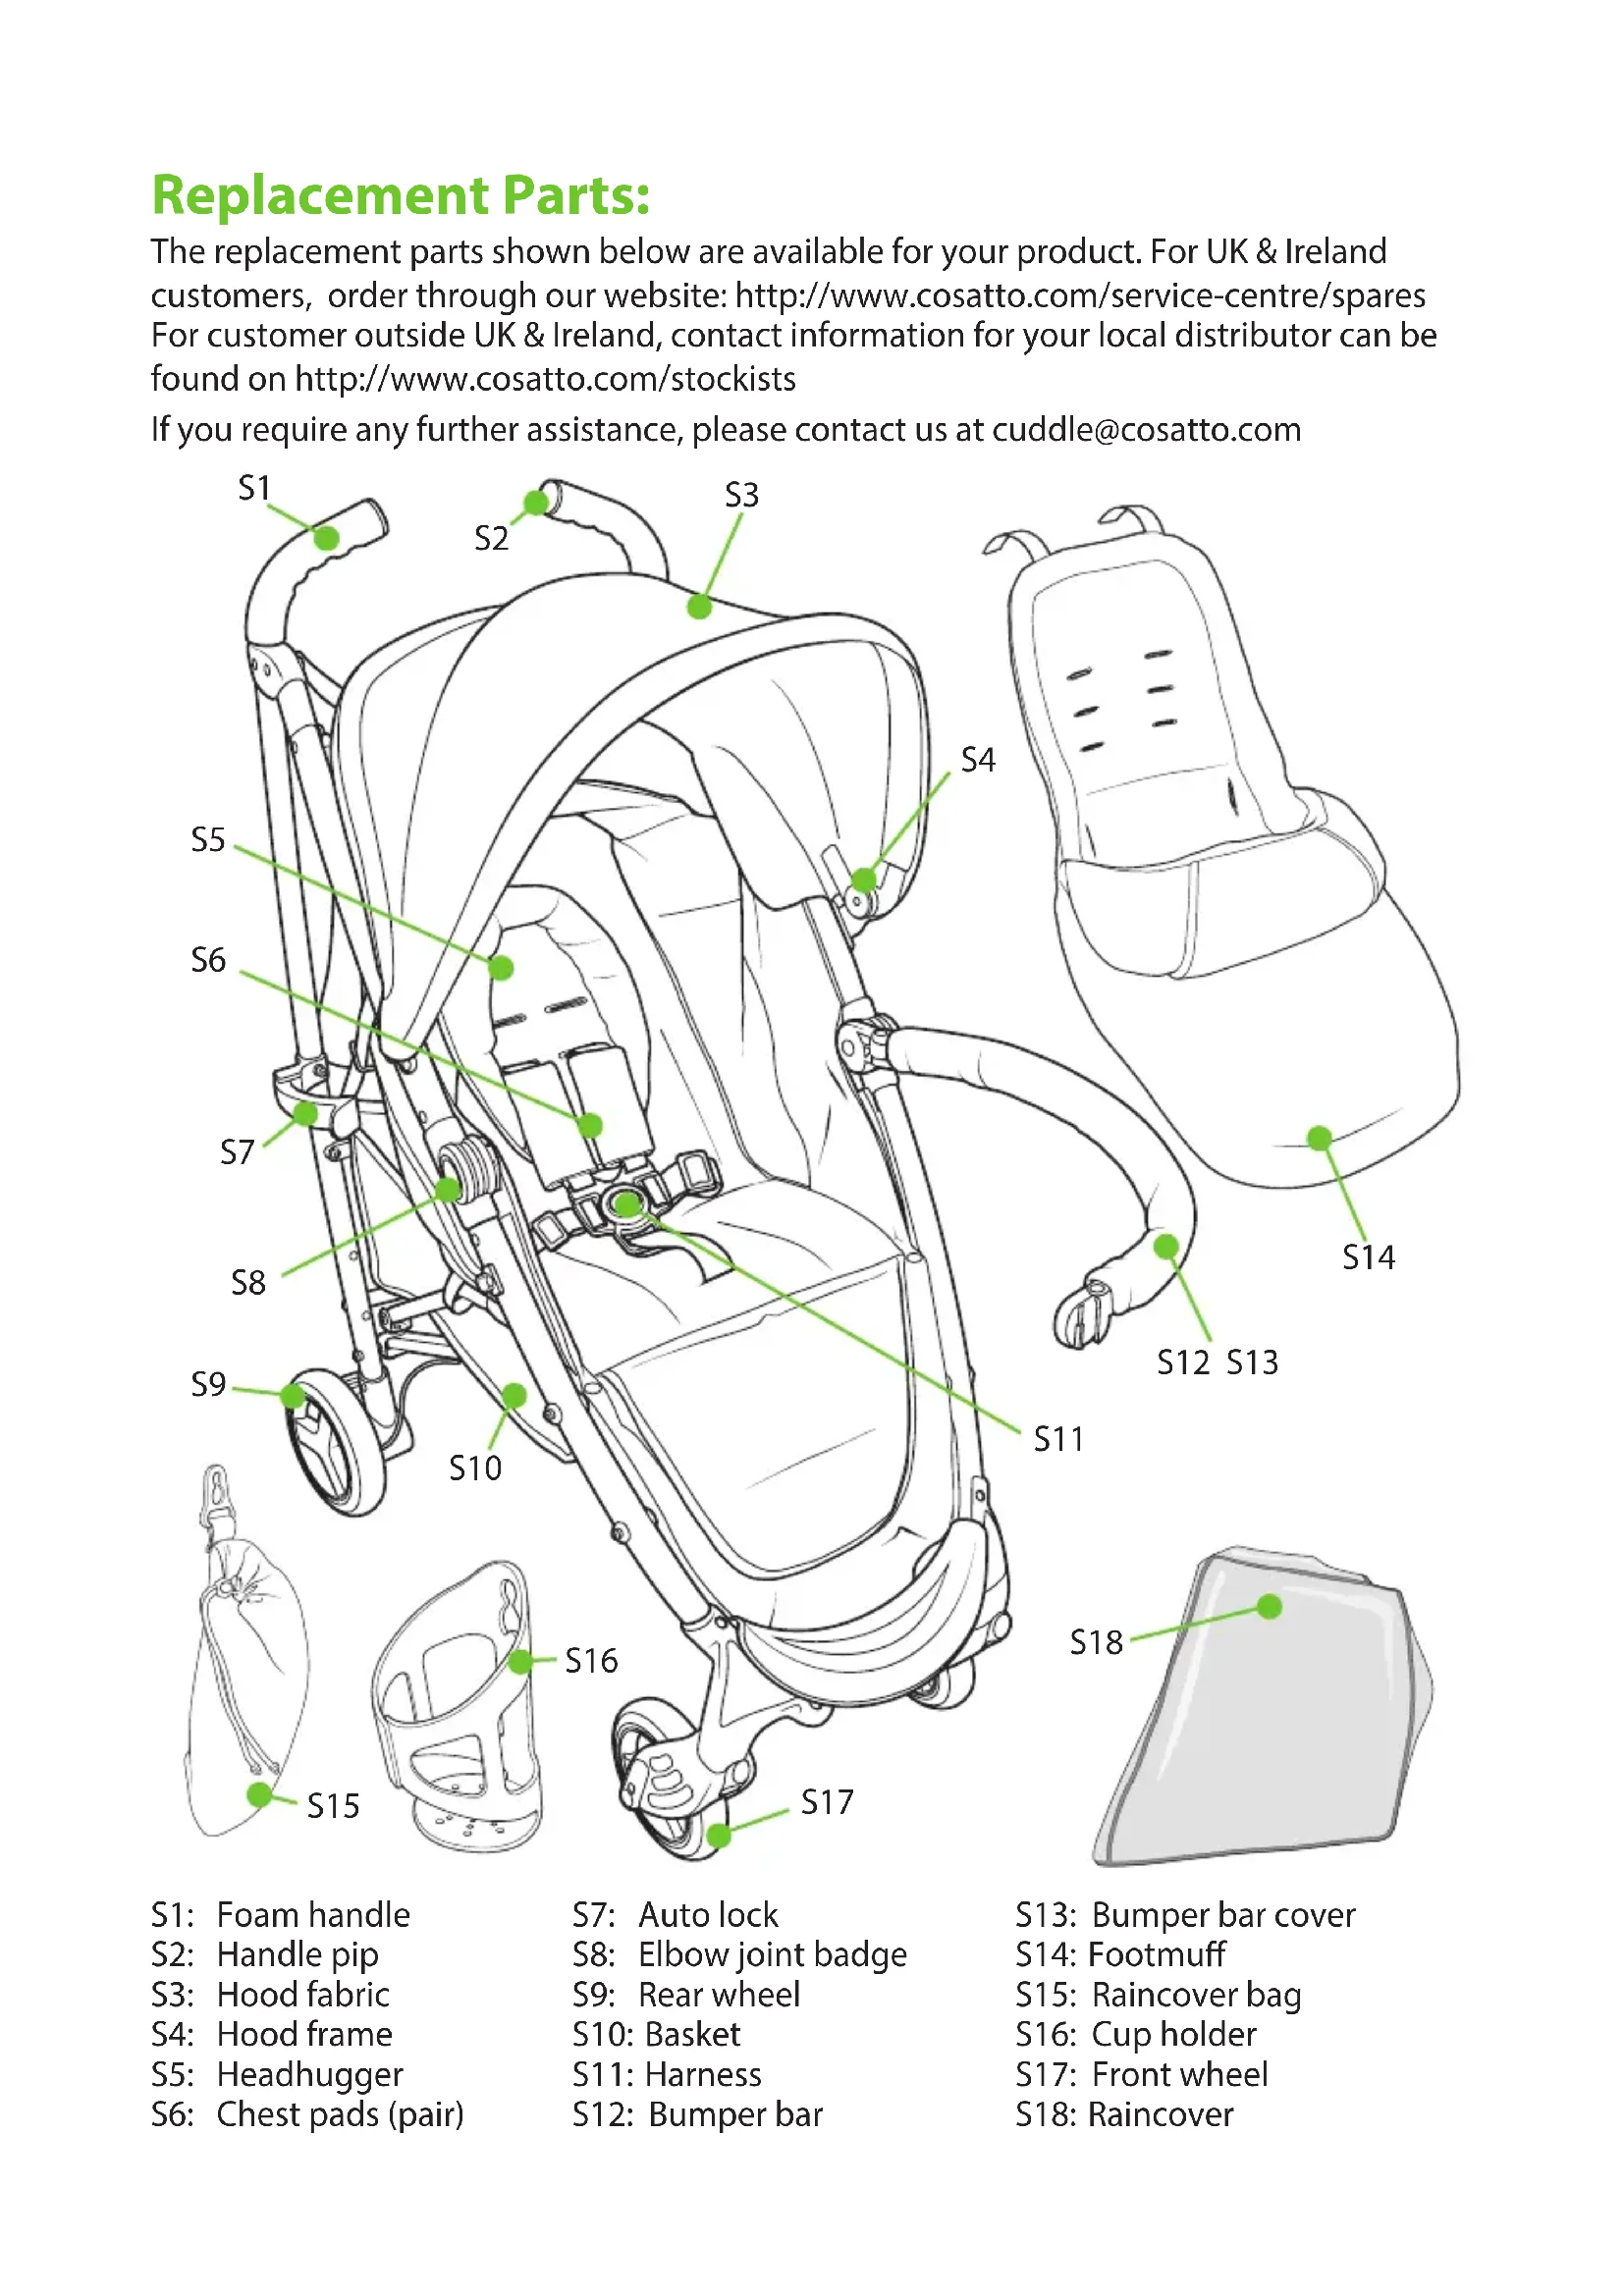
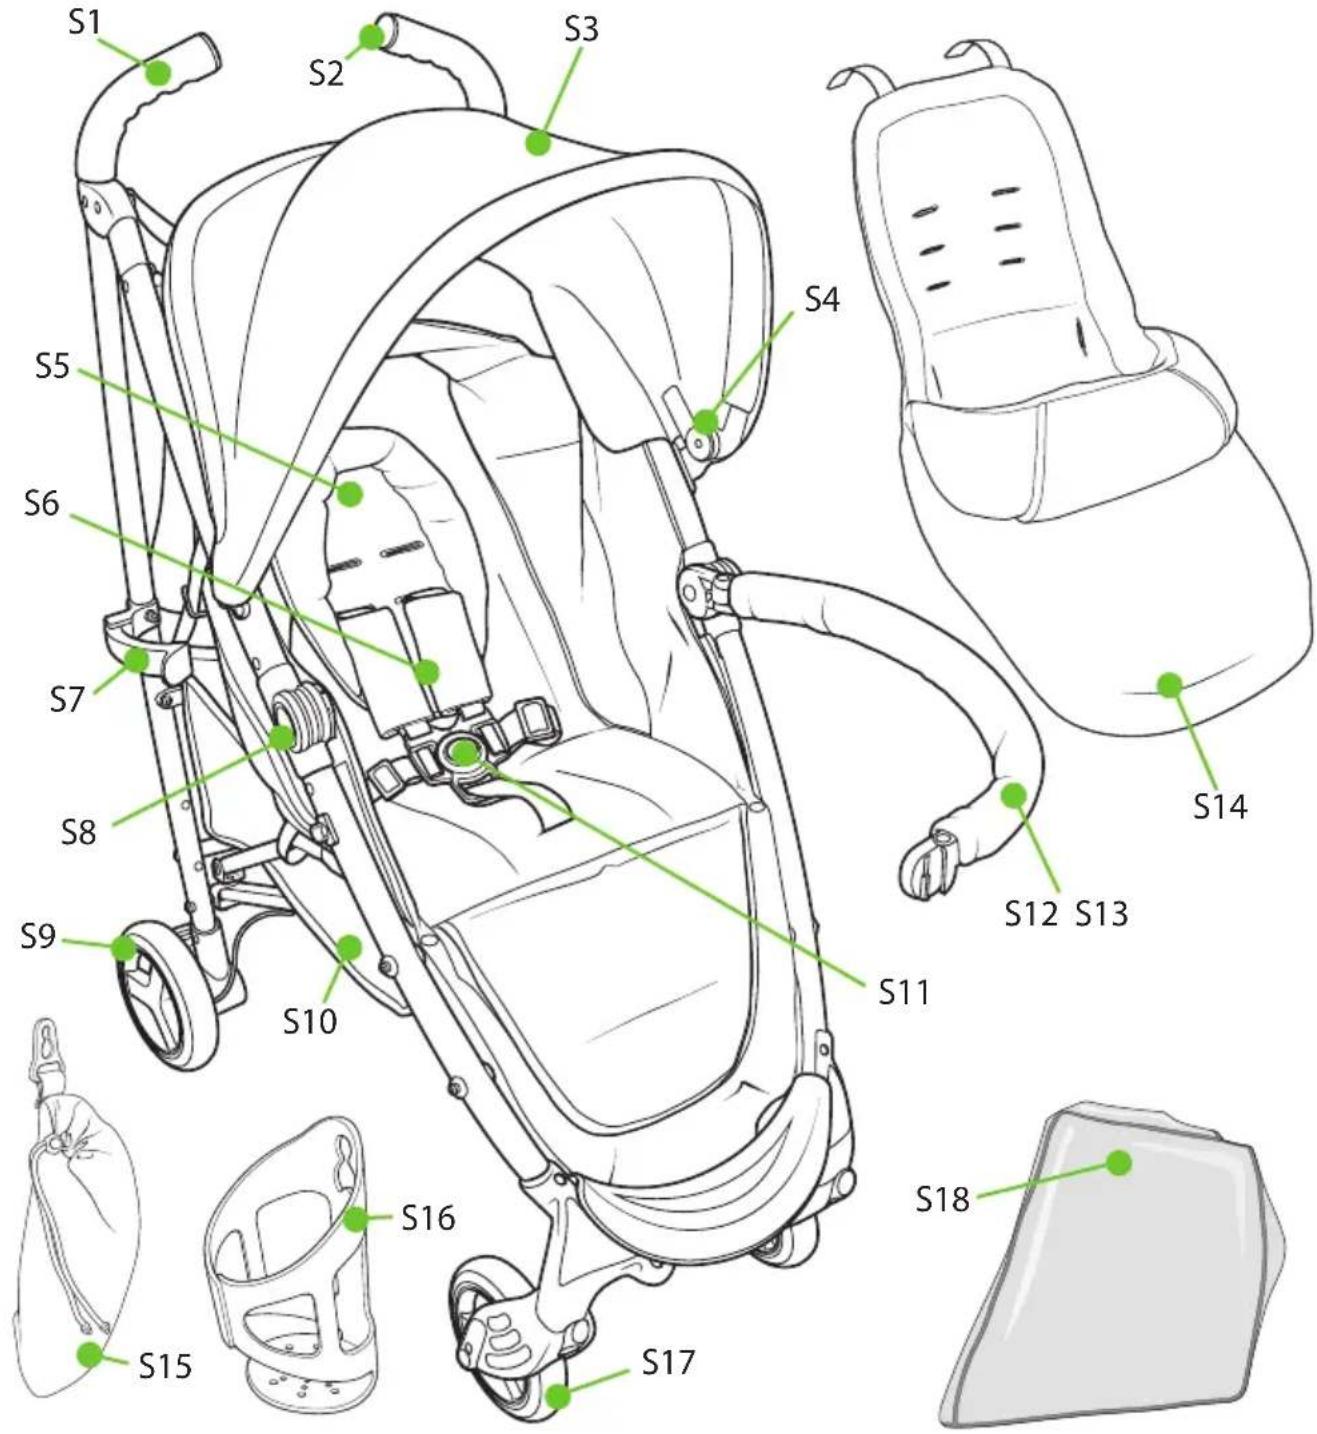
Replacement Parts:
The replacement parts shown below are available for your product. For UK & Ireland customers, order through our website: http://www.cosatto.com/service-centre/spares For customer outside UK & Ireland, contact information for your local distributor can be found on http://www.cosatto.com/stockists
If you require any further assistance, please contact us at cuddle@cosatto.com
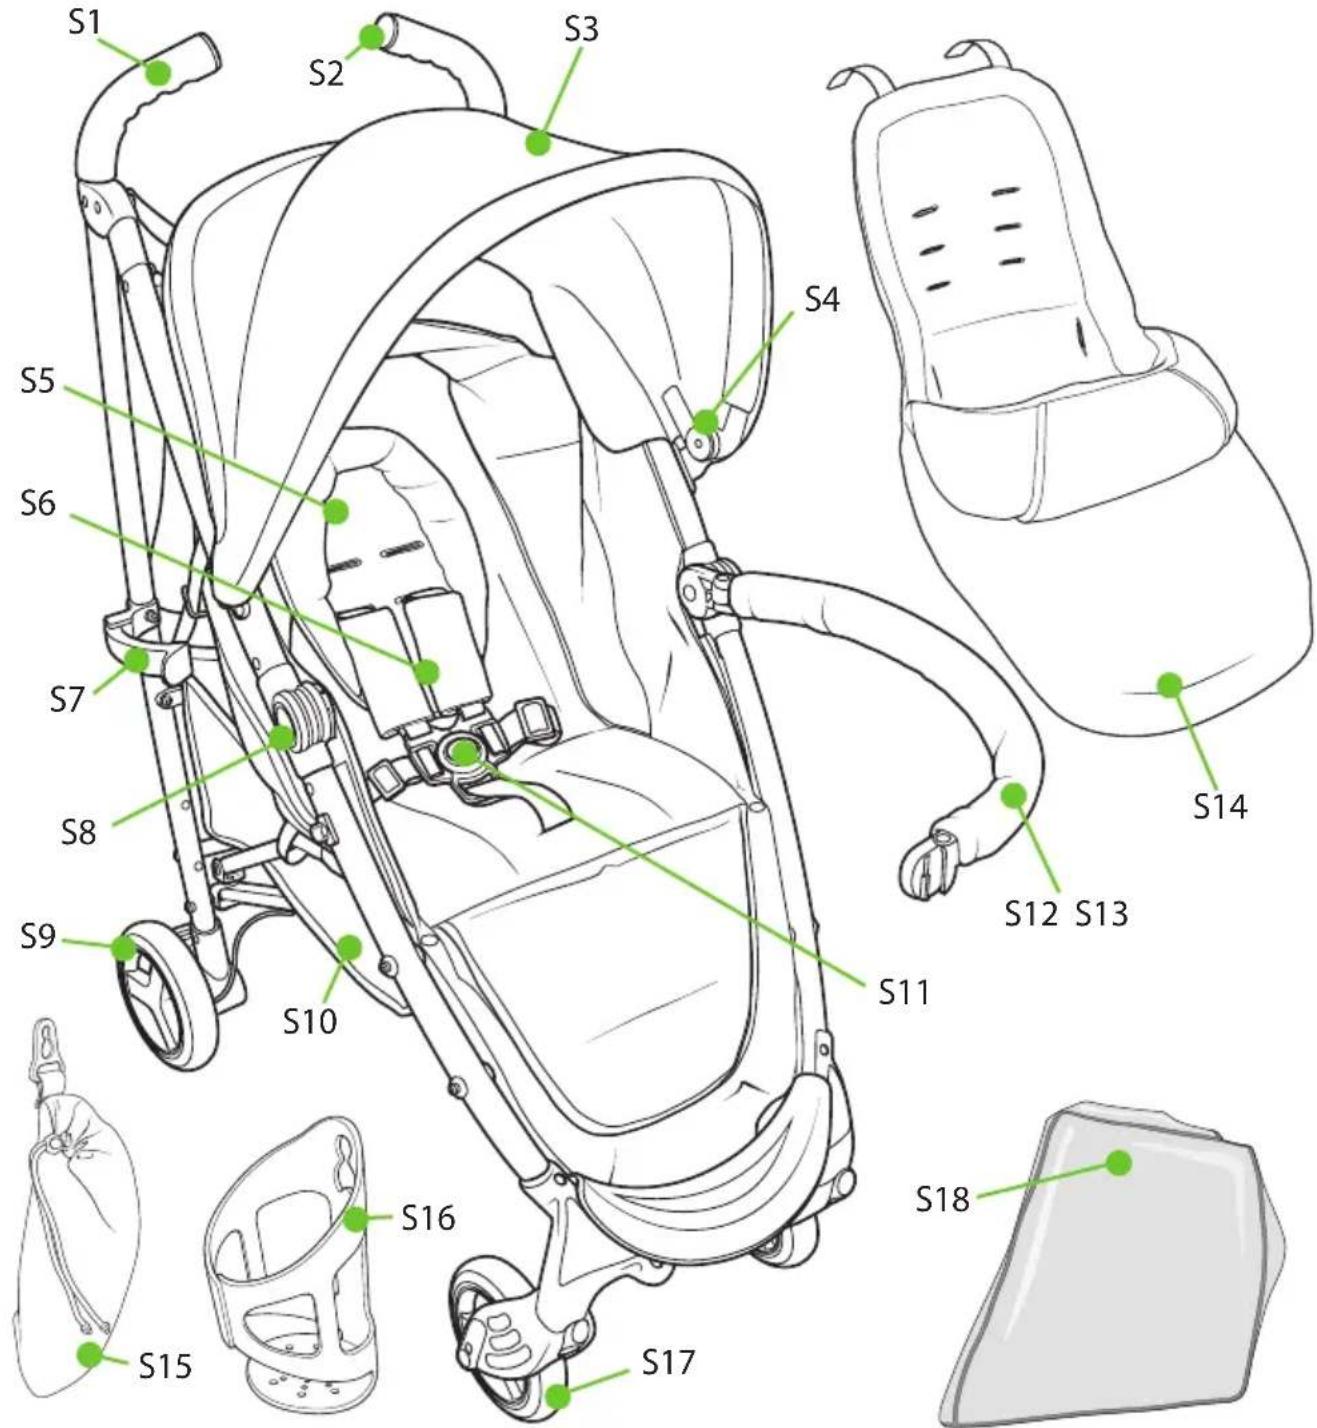
S1: Foam handle
S2: Handle pip
S3: Hood fabric
S4: Hood frame
S5: Headhugger
S6: Chest pads (pair)
S7: Auto lock
S8: Elbow joint badge
S9: Rear wheel
S10: Basket
S11: Harness
S12: Bumper bar
S13: Bumper bar cover
S14: Footmuff
S15: Raincover bag
S16: Cup holder
S17: Front wheel
S18: Raincover
Care & Maintenance:
Your pushchair has been designed to meet comprehensive safety standards, and with correct use and maintenance will give many years of trouble free performance.
The chassis is strong but will weaken should the back wheels be bumped down stairs or kerbs. Continual impact will cause damage.
If your child wears hard shoes these might damage the soft fabric.
Store your pushchair in a dry, safe place.
Storing a damp pushchair will encourage mildew to form, so after exposure to damp conditions, dry off with a soft cloth and allow to dry thoroughly before storing.
Do not leave the pushchair in sunlight for prolonged periods - some fabrics may fade.
Regularly inspect the locking devices, brakes, wheels, harness assembly, catches, seat adjusters, joints and fixtures to ensure they are secure and in full working order. They should move freely at all times.
Cosatto products are designed to operate with minimum maintenance, however regular lubrication of moving parts will extend the life of your pushchair and make opening and folding easier.
Should parts of your pushchair become stiff or difficult to operate, apply a light application of a spray lubricant e.g. silicone. Do not use oil or grease.
Wheels are subject to wear and should be replaced if necessary.
Your pushchair should be serviced and reconditioned before using it for a second baby, or after 18 months, whichever is the sooner.
Hood may be cleaned by sponging lightly using warm water and a mild detergent.
Refer to the wash care label on soft goods for cleaning instruction.
Plastic and metal parts may be sponged clean with warm water and a mild detergent.
Never clean with abrasive, ammonia based, bleach based or spirit type cleaners.
Fitting & Operation information
Please refer to the following diagrams:
Wheels
1
Fitting
2
Removing
Pushchair
3
Opening
Release auto lock (1) then pull the handles upwards (2).
Press down on the locking lever (3) until a 'Click' is heard and the release arm (4) is locked in place.
Check the chassis has locked in place.
Brake
4
Applying
5
Releasing
Front wheel swivel lock
6
Applying
7
Releasing
Harness
8
Opening
9
Closing
10
Adjusting the strap length
Slide the strap adjustor to suitable length (1, 2 & 3).
11
Adjusting the shoulder strap position
12
Removing
Push shoulder strap retainer through backrest (1).
Push crotch strap retainer through seat (2).
Rotate "C" clip to expose its opening (3) and slide waist strap out of clip (4).
Refitting is a reversal of this procedure.
Bumper bar
13
Fitting
14
Opening/Removing
Calf support
15
Opening
Hood
16
Fitting
Push the brackets onto the mounts on the chassis (1).
Attach the fabric fasteners to the inside of the seat unit (2).
Attach the fabric fasteners to the outside of the seat unit (3).
Fit the rear of the hood behind the backrest and attach the fabric fastener (4).
Attach the straps to the handle hinges (5).
17
Opening
18
Extending
19
Using the viewing window flap
20
Using the hood pocket
21
Closing
22
Removing
Removal is a reversal of step
23
Fabric removal
Using a ball point pen push in the button on the arm (1) then pull the arm out of the hinge unit (2). The buttons are on the outside on the lower arms and the inside on the upper arms. Pull the arms out of the hood fabric (3).
24
Refitting
Backrest recline
25
Lowering
26
Raising
Basket
27
Removing
Footmuff
28
Fitting
Open the harness 9 and remove chest pad & headhugger (1). Push the harness straps through the footmuff (2).
Attach the footmuff fabric fasteners to the rear of the backrest (3). Refit headhugger & chest pads then close the harness.
Raincover
29
Fitting
Drinks holder
30
Fitting
Raincover
31
Fitting
Pushchair
32
Closing
Ensure backrest is in the upright position 26. Press down on the release arm (1) then pull the ring upwards (2). Push the handles forwards (3) until the auto lock engages (4).
http://www.cosatto.com/service-centre/spares
http://www.cosatto.com/stockists
如您需要任何其它支持,请致信我们:cuddle@cosatto.com
S1: 泡沫手把
S2: 手柄帽
S3: 罩子布料
S4: 罩子架
S5: 护头枕
S6:肩套 (双)
Email: cuddle@cosatto.com
- Calls from BT landlines are free but calls from mobiles and other networks may vary
All the design and trademarks contained herein are the property of Cosatto Limited.
No part of this document may be reproduced without the permission of Cosatto Limited.