Avito - Stroller ABC DESIGN - Free user manual and instructions
Find the device manual for free Avito ABC DESIGN in PDF.
| Brand | ABC Design |
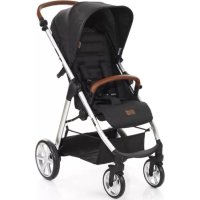
| Model | Avito |
| Product type | Stroller |
| Recommended age | From 6 months to 3 years |
| Maximum child weight | 15 kg |
| Shopping basket weight capacity | Up to 5 kg |
| Adjustable leg rest | Yes, adjustable in height |
| Swivel and lockable front wheels | Yes, with locking lever |
| Removable sun visor | Yes |
| Canopy with magnetic viewing window | Yes |
| Car seat compatibility | ABC Design Risus, Doozy ; Maxi Cosi Cabrio, Citi, Pebble ; Römer Baby-Safe plus SHR ; Cybex Aton |
| Backrest adjustment | Yes, via strap at back |
| Adjustable handlebar height | Yes, via side buttons |
| Parking brake | Yes, lever to lower/raise |
| Safety harness | Waist belt + crotch strap, adjustable |
| Folding | Yes, via unlocking rings |
| Cover maintenance | Machine washable cold or hand wash |
| Lubrication | Silicone oil or silicone spray |
| Safety standards | EN 1888 : 2012 |
| Not recommended for | Jogging, rollerblading, stairs (child must be removed) |
Frequently Asked Questions - Avito ABC DESIGN
User questions about Avito ABC DESIGN
0 question about this device. Answer the ones you know or ask your own.
Ask a new question about this device
Download the instructions for your Stroller in PDF format for free! Find your manual Avito - ABC DESIGN and take your electronic device back in hand. On this page are published all the documents necessary for the use of your device. Avito by ABC DESIGN.
USER MANUAL Avito ABC DESIGN
Instructions for use -EN (04-06)
NB: Keep these instructions for future reference!
- Adjustable leg rest
- Swivel mode and locked setting on front wheels
- Detachable sun canopy
- Hood featuring magnetic-action viewing panel
- Compatible with ABC Design "Risus" "Doozy" car seat
- Compatible with "Maxi Cosi Cabrio, Citi, Pebble" car seat
- Compatible with "Römer Baby-Safe plus SHR" car seat
- Compatible with "Cybex Aton" car seat
Care instructions
- The materials used to manufacture our products comply with the AZO requirement, EN71-2 and EN71-3, and light fastness standards for textiles. Nevertheless, we advise you not to leave the product exposed to bright sunlight for any length of time. No claims may be made for wear and tear or if the colours fade when exposed to strong sunlight. The fabric covers on this product can be washed by hand or on a cold cycle in the washing machine (mild detergent).
- An ABC Design rain canopy is available in retail stores offering complete protection against the rain.
- All the frames on our products have been tested for conformity with EN1888 : 2012 and have met the required standards. In order to maintain the safety of the product it is necessary to oil the moving parts or tighten the rivets as and when required.
NB: Please do not use any product for lubrication other than silicone oil or silicone spray lubricant.
- Regular care and upkeep have a major part to play in maintaining the safety and value of the product. Exposure to such things as salt in the air, road-gritting salt or acid rain will encourage the onset of corrosion, as will inappropriate storage of the product.
- We recommend regular maintenance of all coated parts. In serious cases of soiling please clean the surface coating immediately.
- Check for loose parts and fastenings from time to time and tighten if necessary.
Safety instructions
Read these instructions carefully before use and keep them for future reference. Failure to read these instructions may compromise the safety of your child.
NB:
- This pushchair is designed for children aged 6 months or above and weighing up to 15kg .
- The net bag can carry up to 5kg .
- This pushchair is designed to transport a child.
- Do not use any accessories other than those approved by the manufacturer.
- You are advised to take your child out of the pushchair as a matter of principle when negotiating steps or flights of stairs or if the pushchair needs to be lifted or carried.
- The parking device shall be engaged when placing and removing the child.
This model is suitable for infants from 6 months to 3 years and up to a maximum weight of 15kg
CAUTION:
- Do not leave your child unattended.
- Use a safety harness as soon as your child can sit independently.
- This seat is not suitable for babies under 6 months old.
- Loads attached to the handle affect the stability of the pushchair.
- Before use, check that the pushchair attachment or seat is correctly engaged in position.
- This product is not suitable for jogging or skating.
- Do not make any modifications to the product which compromise its safety.
- Keep this product away from fire and other sources of heat.
- To avoid injury ensure that your child is kept away when unfolding and folding this product.
- Do not let your child play with this product.
- Always use the restraint system.
Customer complaints
- No claims may be made for natural wear and tear or for damage caused by undue demands on the product or by exceeding the permissible load.
- No claims may be made for damage caused by improper use.
- No claims may be made for damage caused by incorrect assembly or operation.
- No claims may be made for damage caused by improper modifications to the product.
- Areas of rust may appear through lack of maintenance or improper care and do not constitute a fault with the product.
- Scratch marks are normal signs of wear and do not constitute a fault with the product.
- Mildew is likely to appear on textiles which are not dried out after getting wet and cannot be attributed to shortcomings in production conditions.
- The product may fade if exposed to sunlight, perspiration and detergents, or if subject to abrasion or excessive washing, therefore fading cannot be attributed to a fault with the product.
- No claims may be made for wheels which become worn out as a natural result of wear and tear.
1. Opening the pushchair
a. Release the transportation lock.
b. Pull the handle on the stroller (1) upwards until the frame clicks into place (2).
WARNING: Ensure that all the catches are engaged before use.
2. Fitting the wheels
a. Fit the rear wheels in the slots until they engage firmly.
b. In order to remove the wheels, use the lever to pull on the rear wheel fitting in order to disengage the wheel.
The wheel can then be removed from the axle.
c. Insert the front wheel in the slot until it clicks into place.
d. To remove the front wheel, push the button forwards and take the wheel off.
3. Using the brakes
Press the lever down to apply the brakes.
Press the lever up to release the brakes.
4. Adjusting the height of the pushbar
To adjust the pushbar, press the buttons in on both sides.
Then let go of the buttons again to allow the pushbar to click into place.
5. Fastening the harness
a. In order to close the harness, first insert the plastic fittings on the lap restraints in the plastic fittings on the shoulder belts on both sides.
b. Then insert the fittings into the crotch strap fastening.
Adjust the harness to a setting where the baby is held in the correct position.
6. Unfastening the harness
To open the harness, press the catches in on both sides.
CAUTION: Always use the crotch strap and the lap restraint together.
7. Attaching the hood
Fit the hood on the seat frame with the two plastic brackets.
8. Adjusting the backrest
To adjust the seat unit, pull the retainer on the rear of the backrest upwards and then adjust the height of the seat. When you have reached the required position, let go of the retainer to allow the seat to remain in that position.
9. Adjusting the leg rest
To adjust the leg rest, press in the buttons on both sides and then adjust the height. Let go of the buttons again so that the leg rest clicks into place.
10. Lock and unlock setting on swivelling wheels
Press the catch down for swivel mode and up for locked mode.
11. Fitting the guard rail
a. Fit the brackets on the pushchair frame.
12. Folding the pushchair
Press the round button (1) on the right-hand release catch in order to unlock the folding mechanism.
Then pull both release catches (2) up and lower the handle.
Note: To unfold the pushchair, follow the instructions in point 1 "Opening the pushchair".
I P E D A Y N P E X K D E H N E:
He octablan Te_pe6eHka 6e3 npncMoTpa.
- KaK TOnbKO pe6eHOK CMOXeT CaMOCToRTeJbHO CnIeTb, IcNoJIb3yIte peMeHb 6e3ONaChOCTN.
- 3TO cnideHbe He nOxOHT JnA DeTeN Do Bo3pacta B 6 MecraeB.
- 3aKpeHneHHbIe Ha pyUkax rpy3bl OTPuCaTeJIbHO BInraIOT Ha yCTOuHBOcTb KOJIaCKN.
- Npei nCnoIb3ObaHnem npOBepuTb, yTo6bl cndeHne 6blIO npaBnIbHO 3aUeJIKNHYTO.
- ΘTO ΙЗДeЛи He NOДхОДNT ДЯ 6era Tpyсои Ил e3Ды Ha cKeiTe.
He npednpHHMaTe HnKaKnx n3MeHeHn Ha n3DeHn, KOtOpbIe CTaBrt NOD BOIpoc erO HaJeXHoCTb n 6e30NaCHOCTb.
-ДерхиTe 3TO n3dJIe Ha paCCToHnO T OrHЯ nJIu Dpyrnx nCToHnKOB HaIgpeBa.
-Bo n36exkHne TpaBM He noDnyckaIte pe6eHka 6Jn3ko BO BpeMcklaDbBaHna (packlaDbBaHna) n3delen.
He pa3pewaTe pebeHKy nIpaTb c n3dJIeHem.
- Bcerda nCnoJb3yIte peMeHb 6e3ONaChocTn.
YkaaHa Na Cnya peKlaMaun
- ECTECTBENHbIe RaJIeHnI N3HaUNBaHnI (N3HOC) n NOLOMKn I3-3a Upe3MepHbIX HaRpy3OK He RaBJIOTcI npuHHoI dIpeKJaMaun.
- PONOMK N CJIeDCTBHe HEnpaBnIbHOrO IcNoJIb3OBaHn He RaBJIOTc npuHOnIpeKNaMaun.
- PONOMK N BCLJECDTBNE He npabnIbHOrO MOHTaKa IIN npBBeDeHnB B DeiCTBne He YBJIOTc npuHoiDJIpeKNaMaun.
-ПОLOМКИ BCLEДСТВЕ He npaBnIbHOrO n3MeHeHnI r 3dJIINr He rBnIOTc npuHnOДЯ peKlaMaun.
PkaBnuHa, KOtopar MOKeT BO3HnKHyTb BCJeCTBne HeIOCTaTOUHO yXoJa NIN HEnpaBnIbHOrO NCNoJIb3OBAHn, DeΦeKTOM He RaJIaTeCra. - LapaHnHbIyBnIOTc HOpMaJIbHbIMn IpoRbIeHnAmn N3Hocn He ABnIOTc DeΦeKToM.
BlaJXhIe qactn n3 TKaHIn, KOtOpbIe He 6blIN BbcUyHeHbI, MOrY T PJIecHEBeTb, YTO He RABJIeTCR CBr3aHHbIM C npOn3BODCTBOM DeEeKToM. - BCneCTBnBE BO3DeNCTBnA COJIHeuHOro CBeta, Nota, YIcTAAUx CpeDCTB, NCTpaHn IIN CINI KOM qACTOn CTIPKN HeJb3r NCKIIOuATb BblCBeTaHHe, TAKIM O6pa3OM OHO He YBJIeTcR DeΦeKToM.
- I3Hoc Konec YBnEeTcHopMaIbHbIM npoABHeHem n3Hoca N He ABnEeTcNoBODom dJa peKlaMaun.
1.OTKpbBaHne KojrCKn
a. Ocna6ntb TpaHcnpTbIb 6nokupaTop.
b. Notarynte pyuKy cnoptnbHOn KOJrCKn (1) BBepx TaK, yTo6bl paMa 3aФнксрOBaIacb (2).
IpeDyPExKDEHNE: IpeE nCnoB3OBAHNem y6eINTeCb B TOM, YTO BCE 6loKnpoBKN 3aKpbITbl.
2. MohtaЖ KoJIec
a. BCTabBte 3aHHe KOleca B HappaBnaIooIyO, yTo6bl OHn 3aΦHKCuPoBaJIncb.
b. 706bI cHrTb Koneca, noTaNHTe 3a pbYar Ha KpenJIeHN 3aHero KOleca, YTo6bl KoIeco pa36nKupOBaNoCb.
Tenepb Koneco MOxHO CHaTb C OCN.
C.Длma MOHTaxa nepeHero KOleca BCTaBbTe erO B HAnpaBnaIouyUdo UeJUka.
d. YTo6bI CHaTb nepeDHee KOleco, HaxMnte pbUar no HAnpaBLeHnIO Bnepei n CHIMITE KOleco.
3. 06paueHne c TopMo3aMn
Article for baby and child
Dr. Rudolf-Eberle Str. 29
D-79774 Albbruck
Tel. +49 (0)77539393-0
Email. info@abc-design.de
www.abc-design.de