
CC B1 - Cooker BORA - Free user manual and instructions
Find the device manual for free CC B1 BORA in PDF.


| Product type | Ceramic glass cooktop with grill zone |
| Brand | BORA |
| Model | CC B1 |
| Dimensions (H x W x D) | 40 x 340 x 515 mm |
| Grill cooking zone | 18.5 x 30.5 cm, 1.4 kW |
| Total power | 1.4 kW |
| Power supply | 220-240 V~, 50-60 Hz |
| Control type | Touch-Control sensitive keys |
| Main functions | Automatic shut-off, timer, automatic pre-cooking, keep warm, STOP function, child safety lock |
| Residual heat indicator | Yes (H symbol) |
| Operating time limitation | Yes, depending on cooking position (from 90 to 720 min) |
| Cleaning | Damp cloth and dish soap; special scraper for stubborn dirt |
| Safety | Child safety, lock, automatic shut-off, overheating detection |
| Installation | Built-in, surface or flush mounting, with sealing gasket |
| After-sales service | Contact authorized professional for repair |
Frequently Asked Questions - CC B1 BORA
User questions about CC B1 BORA
0 question about this device. Answer the ones you know or ask your own.
Ask a new question about this device
Download the instructions for your Cooker in PDF format for free! Find your manual CC B1 - BORA and take your electronic device back in hand. On this page are published all the documents necessary for the use of your device. CC B1 by BORA.
USER MANUAL CC B1 BORA
Instructions for fitting and use
Glass ceramic hob CC 21, CC B1

Disposing of the packaging
Please ensure the environmentally-friendly disposal of the packaging that came with your appliance. Recycling the packaging material saves on resources and cuts down on waste.
Disposing of old appliances
The symbol on the product or on its packaging indicates that this product may not be treated as household waste. Instead it must be handed over to the applicable collection point for the recycling of electrical and electronic equipment.
By ensuring that this product is disposed of correctly you will help to protect the environment
and human health, which could otherwise be harmed through the inappropriate disposal of this product. For more detailed information about recycling this product, please contact your local city office, your household waste disposal service or the shop where you purchased the product.
Appropriate use
The hob is to be used solely for preparing food in the home. It may not be used for any other purpose and may only be used under supervision.
The hob must be properly installed and connected!
The appliance may not be operated with an external timer or an external telecontrol system.
For your information...
Please read this manual carefully before using your appliance. It contains important information on safety and on how to use and look after your appliance so that it will provide you with many years of reliable service.
Should your appliance develop a fault, please first consult the section on "What to do if trouble occurs". You can often rectify minor problems yourself, without having to call in a service engineer.
Please keep this manual in a safe place and pass it on to new owners for their information and safety.
Contents
Safety instructions. 17
Connection and operation. 17 General information on the hob 17 For the griddle hob (Model CC B1). 17 Concerning persons 17
Appliance description. 18
Operating the hob with the sensor keys. 18
Operation 19
Operation time limit 19 Other functions 19 How to cut power consumption. 19
Power settings 19 Grilling on the griddle cooking zone 19 Operating the keys. 20 Switching on the hob and cooking zones 20 Switching off a cooking zone 20 Switching off the hob. 20 STOP function (only model CC B1) 20 Dual circuit activation (only model CC 21) 21 Child safety device / lock 21 Automatic switch-off (timer) 22 Minute minder (egg timer) 22 Automatic boost function 23 Keep-warm function 23
Cleaning and care 24
Glass ceramic hob 24 Specific soiling 24 Griddle hob 24 Using a cleaning scraper 24
What to do if trouble occurs 25
Assembly instructions 26
Safety instructions for kitchen unit fitters 26 Installation 26 Cutting out the worktop 26 Mounting the attachment 27 Flush-mounted installation of the hobs 27 Installation with a bracket 28 Gluing in the hobs 28 Electrical connection 29 Start of operation 29 Technical data 29
Safety instructions
Connection and operation
- The appliances are constructed in accordance with the relevant safety regulations.
- Connecting the appliance to the mains and repairing and servicing the appliance may only be carried out by a qualified electrician according to currently-valid safety regulations. For your own safety, do not allow anyone other than a qualified service technician to install, service or repair the product.
General information on the hob
- Do not place empty pots and pans on cooking zones which have been switched on. Avoid boiling the pots dry as there is a risk of the pots overheating!
- Take care when using simmering pans as simmering water may dry up unnoticed, resulting in damage to the pot and to the hob for which no liability will be assumed.
- Overheated fats and oils may spontaneously ignite. Always supervise the preparation of food with fats and oils. Never extinguish ignited fats and oils with water! Put the lid on the pan and switch off the cooking zone.
- The glass ceramic surface of the hob is extremely robust. You should, however, avoid dropping hard objects onto the glass ceramic hob. Sharp objects which fall onto your hob might break it.
- There is a risk of electric shocks if the glass ceramic hob develops fractures, cracks, tears or damage of any other kind. Immediately switch off the appliance. Disconnect the fuse immediately and call Customer Service.
- If the hob cannot be switched off due to a defect in the sensor control immediately disconnect your appliance and call Customer Service.
- Take care when working with home appliances! Connecting cables must not come into contact with hot cooking zones.
- The glass ceramic hob should not be used as a storage area.
- Do not put aluminium foil or plastic onto the cooking zones. Keep everything which could melt, such as plastics, foil and in particular sugar and sugary foods away from hot cooking zones. Use a special glass scraper to immediately remove any sugar from the ceramic hob (when it is still hot) in order to avoid damaging the hob.
- Do not place combustible, volatile or heat deformable objects directly underneath the hob.
- Never use the cooking zones to heat up unopened tins of food or packaging made of material compounds. The power supply may cause them to burst!
- Keep the sensor keys clean since the appliance may consider dirt to be finger contact. Never put anything (pans, tea towels, etc.) onto the sensor keys!
- If food boils over onto the sensor keys, we advise you to activate the OFF key.
- Hot pans should not cover the sensor keys, since this will cause the appliance to switch off automatically.
- Do not allow spilled food to burn repeatedly.
For the griddle hob (Model CC B1)
- Be extremely careful when operating the grilling mode. Heat from the heating element will heat up the hob and the food you are grilling, so it is advisable to use oven gloves and tongs.
- Hot fat may squirt out of food that has been pricked, such as sausages. Use tongs to prevent burns to your skin and particularly to avoid getting hot fat into your eyes. Supervise the grilling procedure at all times. Always make sure that children are kept well away!
- Never use silicone-containing cleansing agents to clean the grilling surface! Please observe the cleaning and servicing instructions.
- We would like to indicate that scratches on the griddle/hob caused by improper cleaning or cutting with knives do not have a negative influence on the operation of the device. They merely impair the appearance of the appliance.
Concerning persons
- This appliance is not intended to be used by persons (including children) with physical, mental or sensory impairments or by persons (including children) who lack the required experience or know-how, unless such persons are supervised by a person responsible for their safety or have been given instructions on how to use the appliance by a person responsible for their safety. Children should be supervised in order to ensure that they do not play with the appliance.
- Attention:
The surfaces of the heating and cooking zones become hot during use. Keep small children away at all times.
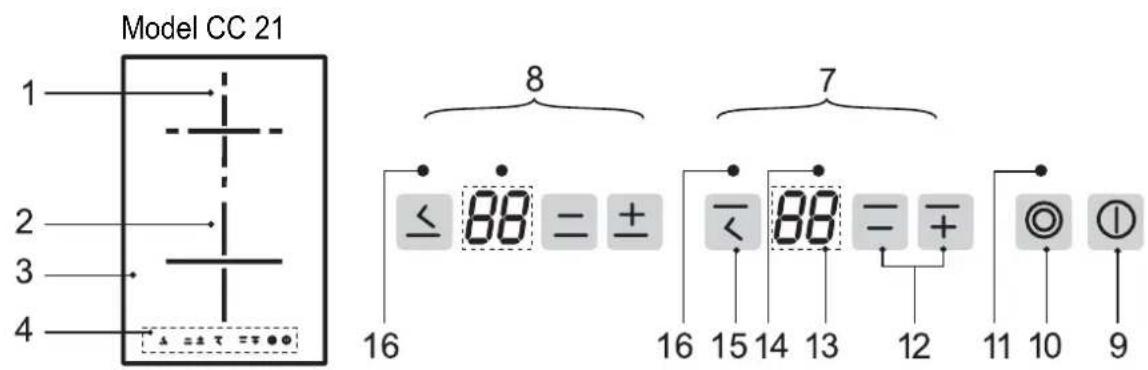
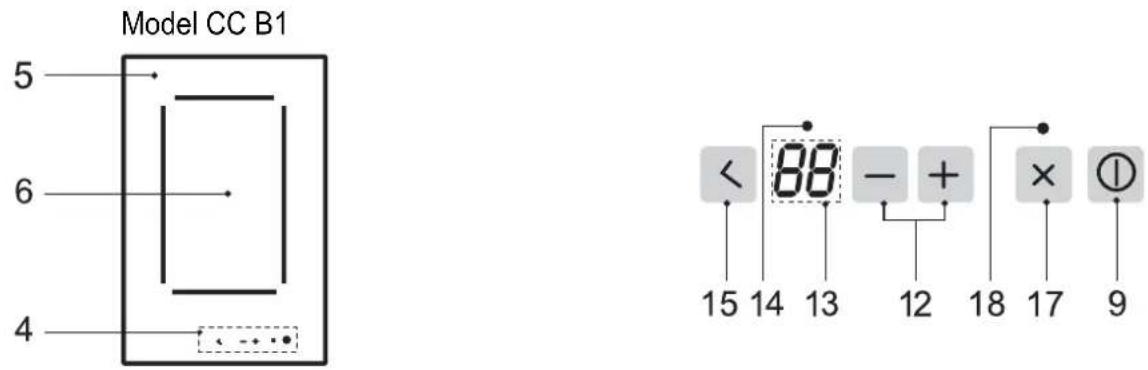
The decorative design may deviate from the illustrations.
- Back cooking zone (dual circuit cooking zone)
- Front cooking zone
- Glass ceramic hob
- Touch-control operating panel
- Griddle hob
- Grill zone
- Back cooking zone controls (symbol)
- Front cooking zone controls (symbol)
- On/Off key
- Circuit activation key (dual circuit cooking zone)
- Dual-circuit cooking zone control lamp
- Plus and minus keys
- Power setting display and timer display
- Control lamp (blinks for the timer display; lights up for the power setting display)
- Automatic switch-off (timer)
- Childproof lock control lamp
- STOP key
- Childproof lock control lamp
Operating the hob with the sensor keys
The ceramic glass hob is operated with touch control sensor keys. The sensor keys function as follows: lightly touch a symbol on the surface of the ceramic glass plate. A buzzer will indicate when the controls have been operated correctly. The touch control sensor key will then be indicated as a "key".
On/Off key (9)
This key is used to switch the entire hob on and off. The key is, as it were, the main switch.
Minus key + Plus key (12)
These keys are used to set the cooking levels, the automatic switch-off device and the minute minder. The Minus key reduces the setting and the Plus key raises it. The setting can be deleted by pressing both keys simultaneously.
Power setting display 3
The power setting display shows the power setting which has been selected, or:
H.... Residual heat
A.....Automatic boost function
STOP ......... Stop function
Keep-warm function
Error message
Circuit activation key (0) (only model CC 21)
To activate other heating circuits.
Automatic switch-off key (15)
For programming the automatic switch-off device (timer) and the minute minder.
STOP key (17) (only model CC B1)
The STOP function can be used to briefly stop the cooking/grilling process.
Operation time limit
The hob has an automatic time limit function. The duration of continuous use of each cooking zone depends on the cooking level selected (see chart),
provided that the setting of a respective cooking zone is not adjusted during use. If the operation time limit has been activated, the cooking zone will switch off, a short signal will sound and an H will appear in the display.
| Power setting | Operation time limit (minutes) |
| U | 720 |
| 1 | 520 |
| 2 | 402 |
| 3 | 318 |
| 4 | 260 |
| 5 | 212 |
| 6 | 170 |
| 7 | 139 |
| 8 | 113 |
| 9 | 90 |
Other functions
If two or more sensor keys are pressed at the same time (e.g. when a pan is mistakenly put onto a sensor key) no function will be activated.
The symbol will blink and a time-limited continuous signal will sound. After a few seconds the appliance will switch off. Please remove the item located in front of the sensor keys.
To delete the symbol press the same key or switch the hob off and on.
How to cut power consumption
The following are a few useful hints to help you cut your consumption of energy and use your new hob and the cookware efficiently.
- The base of your cooking pots should be the same size as the cooking zone.
- When buying cooking pots, note that it is frequently the diameter of the top of the pot that is indicated. This is usually larger than the base of a pot.
- Pressure cookers are particularly low on energy and time required thanks to the pressure and the fact that they are tightly closed. Short cooking times mean that vitamins are preserved.
- Always make sure that there is sufficient fluid in your pressure cooker since the cooking zone and the cooker may be damaged as a result of overheating if the pressure cooker boils dry. Always close cooking pots with a suitable lid.
- Use the right pot for the quantity of food you are cooking. A large pot which is hardly filled will use up a lot of energy.
Residual heat display
The glass ceramic hob is equipped with an H as a residual heat display.
As long as the H lights up after the cooking zone has been switched off, the residual heat can be used for melting food or for keeping food warm. The cooking zone may still be hot when the letter H no longer lights up. Risk of burns!

Power settings
The heating power of the cooking zones can be set at various power levels. In the chart you will find examples of how to use each setting.
| Setting | Suitable |
| 0 | Switching off, using remaining heat |
| U | Keep-warm function |
| 1-2 | Simmering small quantities (lowest power setting) |
| 3 | Simmering |
| 4-5 | Simmering larger quantities or roasting larger pieces of meat until they are cooked through |
| 6 | Roasting, getting juices |
| 7-8 | Roasting |
| 9 | Bringing to the boil, browning, roasting (highest power setting) |
for
A higher power setting may need to be selected for cooking pots without a lid.
| Grilling level | Suitable for |
| 0 | Switching off |
| U | Keep-warm function |
| 1-4 | Warming |
| 5-7 | Moderate grilling |
| 8-9 | Hot grilling |
Grilling on the griddle cooking zone
The glass ceramic hob is suitable for grilling food directly on a hot cooking zone. Food to be grilled, such as steaks or sausages, is placed on the hot cooking zone.
Clean the griddle with a moist cloth and some detergent before using it for the first time. Afterwards, wipe it dry with a non-fluffy cloth.
- Please do not use olive oil for grilling. Burnt-in residues of olive oil can only be removed with great difficulty.
- Preheat the barbecue immediately before grilling for approximately 5 minutes at grill level 9. Place the food directly onto the glass ceramic. Do not use aluminium foil or similar.
- Grill the meat on both sides at grill level 9 until it can be taken off from the griddle. In this way, the meat juices remain in the grilled food.
- Then switch down, if required (e.g., level 6), and grill the meat until it is done. Turn thick pieces of meat or sausages several times.
- Do not grease the griddle with oil. Lean meat can be greased with oil. When grilling very fatty foods, carefully dab away the fat using a paper kitchen towel. In the case of pickled meat, remove surplus grease and coarse spices (like onions, leaves, or thyme).
- Please keep in mind that large quantities of meat and sausages need longer grilling times than small quantities. We therefore recommend grilling several smaller quantities one after the other.
- Remove the grilling residuals with a clean scraper after every grilling procedure.
Operating the keys
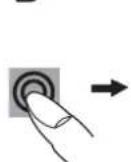
The controls described here expect the pressing of a (selection) key to be followed by the pressing of a subsequent key.
The next key will always need to be pressed within 10 seconds, otherwise the selection will be deleted.
The Plus/Minus keys can be touched individually or be permanently pressed.
- ① →
- 1
- 4a. + → 4b. 1 + 4c. ① 5.
Switching on the hob and cooking zones
- Press the On/Off key until the power setting 0 appears. A short signal will sound. The controls are ready for operation.
- Then immediately use the Plus key or Minus key to select a cooking level. The Plus key will activate power setting 1 and the Minus key power setting 9.
- The other cooking zone can be used.
Repeat items 2 and 3 in order to cook on other cooking zones at the same time.
Switching off a cooking zone
- a) Press the Minus key several times until the power setting display shows 0, or
- b) press the Minus key and the Plus key once at the same time. The cooking zone is switched off directly irrespective of the power setting, or
- c) press the On/Off key. The entire hob will be switched off (all of the cooking zones are switched off).
Switching off the hob
- Press the On/Off key. The hob will be completely switched off, irrespective of any settings.
STOP function (only model CC B1)
The cooking/grilling process can be briefly interrupted with the STOP function, e.g. if the doorbell rings. The STOP function must be released in order to continue the process at the same power level. If a timer has been set it will pause and will then continue.
This function is only available for 10 minutes for reasons of safety. The hob will then be switched off.
- Pots and pans are on the cooking zones or food is being grilled and the required power level has been set.
- Press the STOP key. The letters S-T-O-P will be shown one after another instead of the cooking level previously selected.
- The interruption is ended by firstly pressing the STOP key and then any other key (except the On/Off key). The second key must be pressed within 10 seconds as the hob will otherwise be switched off.
Operation
- 5
2.

Twin circuit cooking zone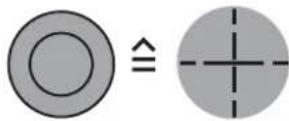
3.

1.

2.
Model CC 21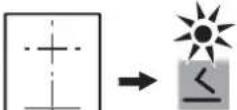

Model CC B1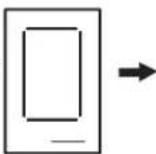

3.

4.
Dual circuit activation (only model CC 21)
(only back cooking zone)
The dual circuit activation of the respective cooking zone can only be effected after the corresponding cooking zone has been switched on.
- Select the power setting of your choice from 1-9.
- Press the circuit activation key to switch on the second heating circuit. The dual circuit control lamp will light up.
- Pressing the circuit activation key again will switch off the outer heating circuit. The dual circuit control lamp will go off.
Please note
- Manually activated heating circuits will automatically be deselected when the cooking zone is switched off.
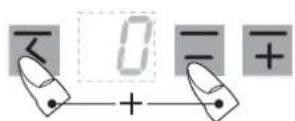
Child safety device / lock
The child safety device/ lock can be used to lock key operation and power settings. Only the On/Off key can be used to switch the hob off.
Switching on the child safety device:
- Press the On/Off key in order to switch on the hob.
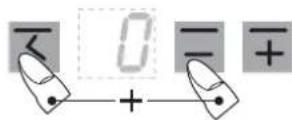
- Then immediately press the automatic switch-off key and the Minus key simultaneously to activate the function.
Model CC 21: The control lamps above the automatic switch-off keys will light up.
Model CC B1: The control lamp above the stop key will light up. The controls are locked.
Switching off the childproof lock:
- Press the On/Off key 0
- Then immediately press the automatic switch-off key and the Minus key simultaneously in order to switch off the function. The control lamp will go off.
Activating the lock (while cooking):
- Press the automatic switch-off key and the Minus key simultaneously to activate the function.
Model CC 21: The control lamp above the automatic switch-off key will light up.
Model CC B1: The control lamp above the stop key will light up. The controls are locked.
Switching off the lock:
- Press the automatic switch-off key and the Minus key simultaneously to deactivate the function. The control lamp will go off. Notes
- An activated child safety device/ lock will remain activated even if the hob is switched off. It must therefore be de-activated when cooking is recommenced.
- In the event of a power cut the childproof lock will be cancelled, i.e. deactivated.
Operation

Automatic switch-off (timer)
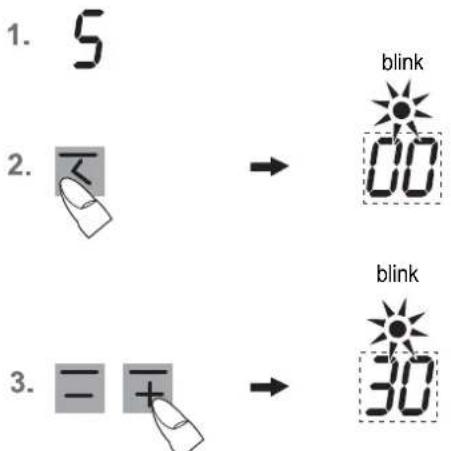
The automatic switch-off device is used to automatically switch off any cooking zone after an adjustable period of time. Cooking times ranging from 1 minute to 99 minutes can be set.
- Switch on the hob and select a power setting.
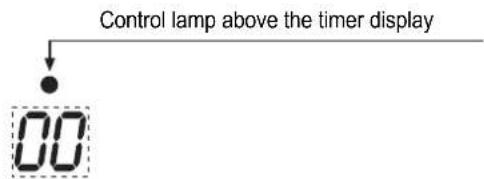
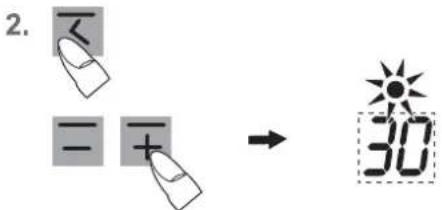
- Press the automatic-switch-off key. The control lamp above the timer display will blink.
- Then immediately use the Plus key or the Minus key to set the cooking time at between 1 and 99 minutes. With the Plus key the display will commence at 01, and with the Minus key it will commence at 30. The setting will be reset if the Plus and Minus keys are pressed simultaneously (00).
- The cooking zone will be switched off when the time has lapsed. A signal will sound for a while and can be switched off by pressing any key (except for the On/Off key).
Notes
- Repeat 2 and 3 to change the time.
- The control lamp will blink for the timer display.
- The control lamp lights up for the power setting.
Minute minder (egg timer)
- Switch on the hob.
- Press the automatic-switch-off key. Use the Plus key or the Minus key to set the time in minutes.
- Once the time has lapsed a signal will sound for a while and can be switched off by pressing any key.
Notes
- The minute minder remains in operation when the glass ceramic hob is switched off. Switch the hob off with the On/Off key to adjust the time. It is not possible to use the minute minder and a cooking zone at the same time.
Operation
1.
2.
3.

4.

| Power setting | Automatic boost function Time (min:sec) |
| 1 | 0:50 |
| 2 | 1:30 |
| 3 | 2:30 |
| 4 | 3:40 |
| 5 | 5:20 |
| 6 | 9:00 |
| 7 | 2:30 |
| 8 | 4:00 |
| 9 | - - - |
1.
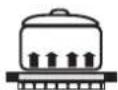
2.

3.
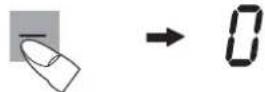
Automatic boost function R
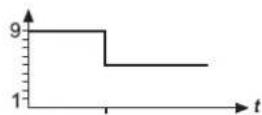
Food is parboiled at power setting 9 with the automatic boost function. After a certain time the power level will switch down automatically to a lower simmering setting (1 to 8).
When using the automatic boost function only the simmering setting with which the food is to be cooked through needs to be selected since the electronic unit switches down automatically.
The automatic boost function is suitable for dishes which are cold initially and are then heated up at high power. These dishes do not need to be constantly monitored when simmering (e.g. boiling meat for soups).
- Switch on the hob.
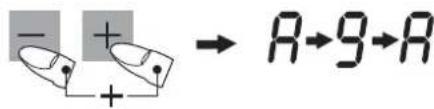
- Then immediately press the Plus key + and the simultaneously to activate the automatic boost function.
A and 9 will then blink alternately.
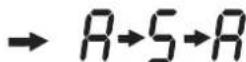
- Then immediately use the Minus key to select a lower simmering setting from 1 to 8.
- The automatic boost function will operate as programmed. After a certain time (see chart) the cooking process will be continued with the simmering setting.
Notes
- While the automatic boost function is in operation, the Plus key can be used to raise the simmering power setting. Pressing the Minus key will switch the automatic boost function off.
- If, after activating the automatic boost function, the power level is left at level 9 and no lower simmering setting is selected, the automatic boost function will be switched off automatically after 10 seconds and the cooking level will remain at 9.
Keep-warm function
With the keep-warm function you can use one of the cooking zones to keep ready-cooked food warm. The respective cooking zone is operated at a low power level.
- Cookware is placed on a cooking zone and a power level (e.g. 3) is selected.
- Keep the Minus key pressed to switch the power settings down ( ... 3, 2, 1, The setting will stop at and the warming function will have been activated.
- Press the Minus key once to switch the function off (0).
The keep-warm function is available for 120 minutes, after which the hob will be switched off.

- Switch the hob off and let it cool down before you clean it.
- Never clean the glass ceramic hob with a steam cleaner or similar appliance!
- When cleaning make sure that you only wipe lightly over the On/Off key. The hob may otherwise be accidentally switched on!
Glass ceramic hob
Important! Never use aggressive cleaning agents such as rough scouring agents, abrasive saucepan cleaners, rust and stain removers, etc.
Cleaning after use
- Always clean the entire hob when it has become soiled. It is recommended that you do so every time the hob is used. Use a damp cloth and a little washing-up liquid for cleaning. Then dry the hob with a clean dry cloth to ensure that there is no detergent left on the surface of the hob.
Weekly cleaning
- Clean the entire hob thoroughly once a week with commercial glass ceramic cleaning agents.
Please follow the manufacturer's instructions carefully.
When applied, the cleaning agent will coat the hob in a protective film which is resistant to water and dirt. All the dirt will remain on the film and can then easily be removed. Then rub the hob dry with a clean cloth. Make sure that no cleaning agent remains on the surface of the hob since this will react aggressively when the hob is heated up and will change the surface.
Specific soiling
Heavy soiling and stains (limescaling and shiny, mother-of-pearl-type stains) can best be removed when the hob is still slightly warm. Use commercial cleaning agents to clean the hob. Proceed as outlined under Item 2.
First soak food which has boiled over with a wet cloth and then remove remaining soiling with a special glass scraper for glass ceramic hobs. Then clean the hob again as described under Item 2.
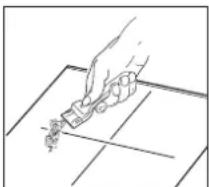
Burnt sugar and melted plastic must be removed immediately, when they are still hot, with a glass scraper. Then clean the hob again as described under Item 2.
Grains of sand which may get onto the hob when you peel potatoes or clean lettuce may scratch the surface of the hob when you move pots around. Make sure that no grains of sand are left on the hob.
Changes in the colour of the hob will not affect the function and the stability of the glass ceramic material. These colour changes are not changes in the material but food residues which were not removed and which have burnt into the surface.
Shiny spots result when the base of the cookware rubs on the surface of the hob, particularly when cookware with an aluminium base or unsuitable cleaning agents are used. They are difficult to remove with standard cleaning agents. You may need to repeat the cleaning process several times. In time, the decoration will wear off and dark stains will appear as a result of using aggressive cleaning agents and faulty pan bases.
Griddle hob
First, use a scraper to remove all food and grease splatters from the hot zone of the griddle. It is easiest if, immediately after using the griddle, any dirt is pushed from the still-hot zone onto the cold zone, since this dirt can then be easily removed after the appliance has cooled down.
The cold griddle is then freed of grease with the help of dishwater, wiped with a damp cloth, and then dried with a clean cloth or a sheet of kitchen roll.
We recommend that you rub down the griddle with half a lemon or lemon juice. Any slight dirt marks from protein, e.g., from meat, are removed and the griddle shines again.
Stubborn stains
Should there still be stubborn stains on the surface after this cleaning procedure, they may be removed with a cleaning agent suitable for hobs.
A little of the cleaning agent is rubbed onto the entire surface of the griddle with a sheet of kitchen roll until no more stains are visible. The entire griddle surface is then immediately wiped several times with a damp cloth, after which it is rubbed dry.

Never use cleansers that contain silicon. These will leave a film on the grill surface that could be absorbed by the food upon next use. The manufacturer's instructions must be followed here.
Using a cleaning scraper
- Caution! Risk of cutting! The blade of the cleaning scraper is very sharp!
- Always hold the cleaning scraper flat to the surface and push the grease away from you.
- Do not scratch the surface with the edge of the scraper.

Interference with and repairs to the appliance by unqualified persons are dangerous as they can result in an electric shock or a short circuit. Do not interfere with or try to repair the appliance; this could cause injury to persons and damage to the appliance. Always have such work done by an expert, e.g., a Customer Service technician.
Please note
If your appliance is faulty, please check whether you can rectify the problem yourself by consulting these instructions for use.
You may be able to rectify some problems yourself. They are described below.
The fuses blow regularly?
- Contact a technical customer service or an electrician!
You can't switch your hob on?
- Has the wiring system (fuse box) in the house blown a fuse?
- Has the hob been connected to the mains?
Only Model CC 21:
Are the sensor keys locked (childproof lock), i.e. are the control lamps above the stop key illuminated?
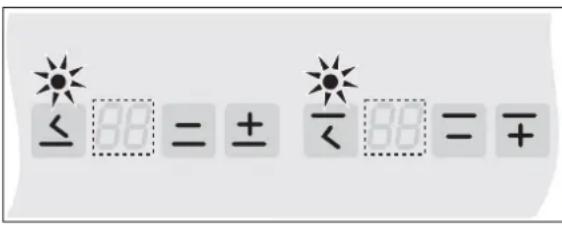
Only Model CC B1:
Are the sensor keys locked (childproof lock), i.e. is the control lamp above the stop key illuminated?
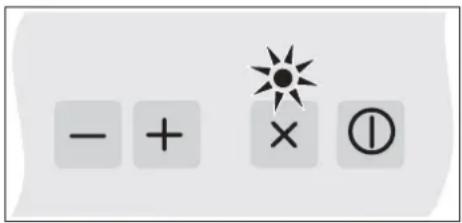
- Are the sensor keys partly covered by a damp cloth, fluid or a metallic object? Please rectify.
The symbol rj will blink and a time-limited continuous signal will sound.
Food which has boiled over, cookware or other items are causing the touch control sensor keys to be consistently operated.
Remedy: clean the surface or remove the item.
To delete the symbol press the same key or switch the hob off and on.
The hob or a cooking zone has suddenly switched off.
- Did you accidentally press the On/Off key?
- Are the sensor keys partly covered by a damp cloth, fluid or a metallic object? A buzzer will sound briefly. After a few seconds the appliance will switch off. Please remove the item located in front of the sensor keys.
- Has the safety cut-off device been activated, i.e. was a cooking setting operated unchanged beyond a specific period of time? See the section on "Operation time limit".
Cooking zone cannot be switched off.
- Faulty electronic component.
Disconnect fuse, call customer service.
Cooking zone does not heat up.
- Cooking zone defective. Call Customer Service.
- Inner circuit of a multi-circuit cooking zone defective.
Under no circumstances continue to use the outer circuit which is still working! Immediately call Customer Service.
Does the hob make noises (clicking or cracking noises) or can a buzzing sound be heard when the cooking zone is switched on?
- This is design-specific and has no influence on quality and operation.
LED display for cooking settings and residual heat display H does not come on or only partially.
- LED display defective. Call Customer Service.
Risk of burning, as the temperature warning is not guaranteed.
Does the hob have tears or cracks?
- There is a risk of electric shocks if the glass ceramic hob develops fractures, cracks, tears or damage of any other kind. Immediately switch off the appliance. Disconnect the fuse immediately and call Customer Service.
Safety instructions for kitchen unit fitters
- Veneers, adhesives and plastic surfaces of surrounding furniture must be temperature resistant (>75°C) . If the veneers and surfaces are not sufficiently heat resistant they can become deformed.
- Ensure that all live connections are safely insulated when installing the hob.
- Cover strips between the wall and the worktop behind the hob which are made of solid wood are permissible as long as minimum clearances in accordance with the installation diagrams are maintained.
- Minimum clearances of the hob cut-out towards the rear are to be maintained in accordance with the installation diagram.
- For installation directly next to a tall cupboard, a safety distance of at least 50mm must be ensured. The side surface of the tall cupboard should be fitted with heat resistant material. Due to working requirements, however, the distance should be at least 300mm .
- The packaging materials (plastic foil, polystyrene, nails etc.) must be kept out of reach of children as these parts are potentially dangerous. Small parts can be swallowed and there is a danger of plastic sheeting causing suffocation.
Installation
Important information
- If the cooking surface is located above furniture parts (side panels, drawers, etc.), then an intermediate shelf must be inserted at a minimum distance of 20mm in order to prevent accidental contact with the underside of the cooking surface. The intermediate shelf may only be removed with tools.
- To avoid danger of fire, make sure that no combustible objects which could easily catch fire or become deformed on exposure to heat are placed directly next to or above the hob.
Sealing of the hob
The hob sealing included is to be properly inserted before installation.
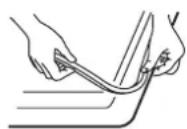
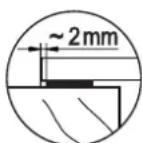
- No liquids may penetrate between the edge of the hob and the worktop or between the hob and the wall and come into contact with any electrical appliances.
- When installing a hob into an uneven worktop, e.g. with a ceramic or similar covering (tiles etc.), the seal on the hob is to be removed and the seal between the hob and worktop made with plastic sealing materials (putty).
Working surface cut-out
Cut out the worktop recess accurately with a good, straight saw blade or recessing machine. The cut edges should then be sealed so that no moisture can penetrate.
The area is cut out as illustrated.
The glass ceramic hob must have a level and flush bearing. Any distortion may lead to fracture of the glass panel. Make sure that the sealing of the hob is properly seated.
Cutting out the worktop
The cut-out is produced in two work steps.
- Making the opening for the base pan.
- Making the recess for the support of the glass ceramic hob. For this model at least one recessing machine with a guide strip is required.
Please note:
For plastic and wooden worktops it is recommendable not to mill out the groove too deeply or to mount the hobs with a slight projection in order to protect the worktop surface from having hot pots/pans unintentionally placed on it.
In order to ensure that it is exactly flush with the stone worktop, the recess may have to be modified accordingly.
Assembly instructions
Mounting the attachment
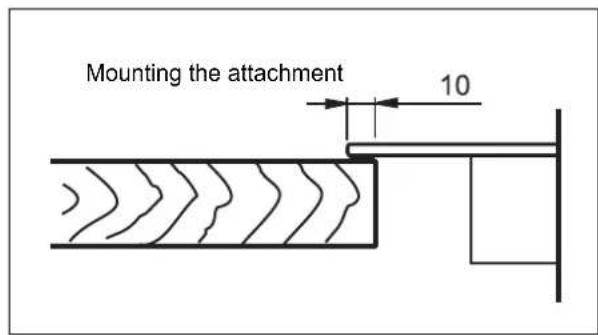
BORA Classic built-in appliances can be combined as required. Depending on the installation situation, the following dimensions result for the opening:
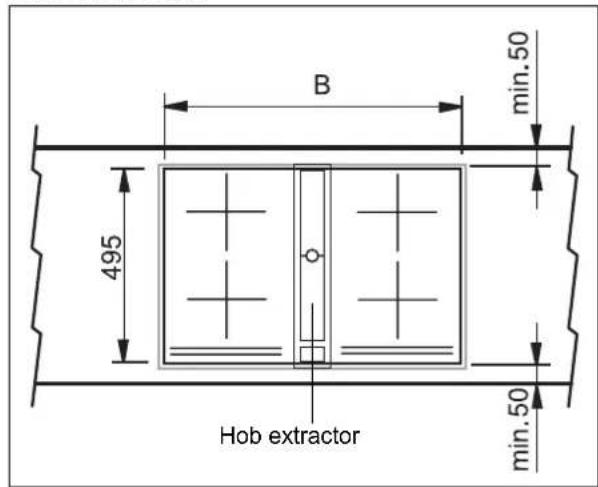
| Hobs Hob | extractor | Dimension B in mm | |
| 1-320 | |||
| 2-662 | |||
| 3-1004 | |||
| 21754 | |||
| 3 | 2 | 1 |
Please note
A gap of 2 mm must be provided between all the built-in appliances.
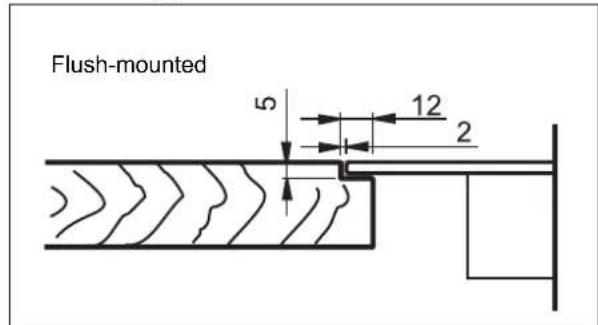
Flush-mounted installation of the hobs
When the hobs are flush-mounted, the worktop must be provided with the following groove dimensions:
BORA Classic built-in appliances can be combined as required. Depending on the installation situation, the following dimensions result for the groove and the opening:
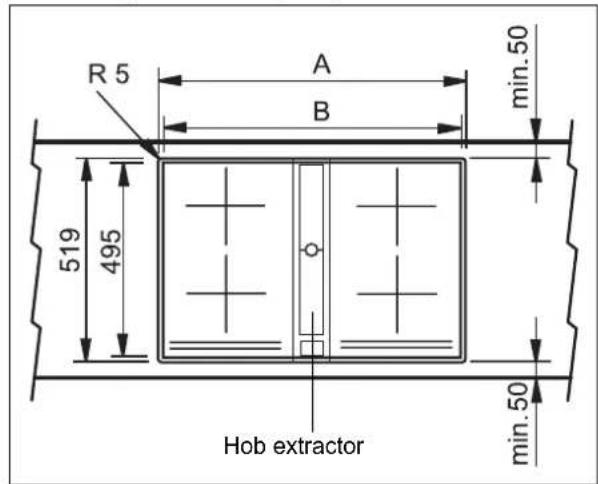
| Hobs | Hob extractor | Dimension A in mm | Dimension B in mm | |
| 1-34 | 320 | |||
| 2-68 | 662 | |||
| 3-10 | 28 | 1004 | ||
| 2 | 1 | 778 | 754 | |
| 83 | 28 | 1212 | 1188 |
Please note
A gap of 2 mm must be provided between all the built-in appliances.
Installation with a bracket
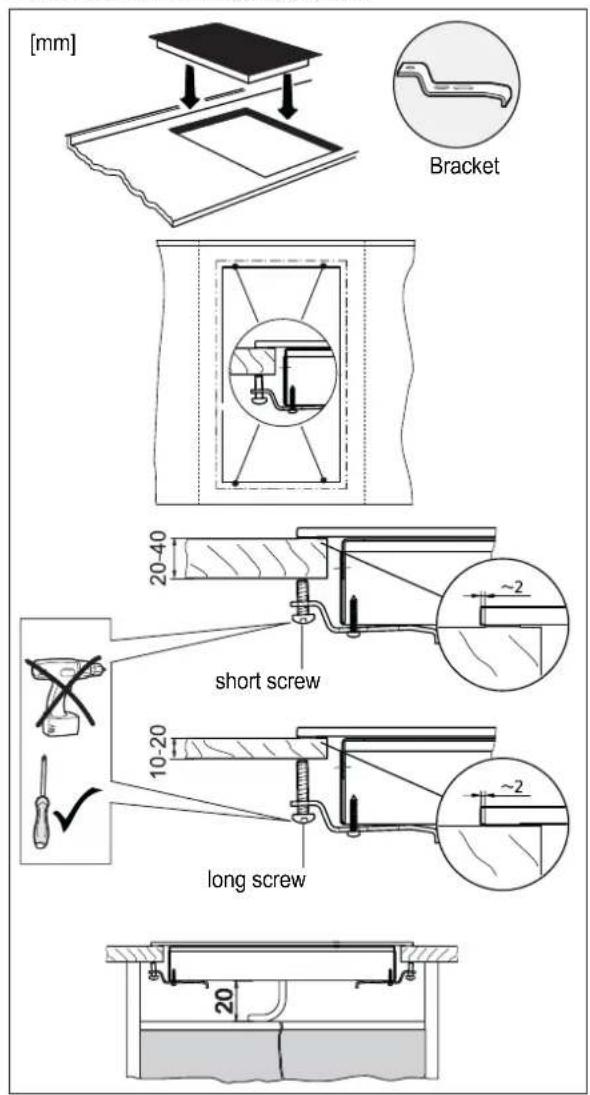
- Insert the hob and align it.
- From the bottom, insert the brackets with screws in the holes provided for fastening the brackets, align the brackets and screw them tight.
- Tighten the screws with a hand screwdriver only; do not use a battery-operated screwdriver.
- In the case of thin worktops, make sure that the brackets are correctly positioned. A metric screw must be used on the bracket to balance it.
Important:
There is a risk of breakage if the hob is canted or subjected to stress during installation!
Gluing in the hobs
Notes
- In order to avoid damage to the worktop and the hob, it is necessary to glue the system worktop/hob with a permanent seal so that it is water-proof. The parts to be glued together must be dry and free from grease.
- To glue the hob, you require the water-proof wash primer and the heat and moisture-resistant silicone adhesive (150?).
- It is absolutely necessary to observe the enclosed processing instructions for the two materials. Here you will also find a calculation formula for the hardening of the silicone adhesive. Do not operate the cooking zone before the hardening process is over as otherwise the silicone adhesive can be damaged.
Only glue the hob on its outer edges!
- With stone worktops installation is to be flush, with heat-sensitive worktops (e.g. wood) the hob must project about 1 mm.
- Never place the hob with the glass ceramic surface unprotected on the worktop or the floor. Dirt (metal chips, small pieces of stone etc.) can cause scratches on the surface of the glass ceramic hob. Please always place it on cardboard or a wool rug.
Procedure
- Glue the sealing tape onto the corner of the supporting edge of the worktop so that no silicone adhesive can be pressed under the hob. Important: Only use the sealing tape that is supplied with the hob! Should you use any other sealing there is no guarantee that the hob will not sink down after installation.
- Insert the hob without any glue into the worktop opening and check the height.
- Remove the hob again.
- Use the wash primer to pre-treat the outer edges of the hob and the side cut surfaces of the worktop where they have been glued.
Apply a thick coat of the primer with a brush on highly absorbent surfaces (e.g. chipboard). With less absorbent surfaces (e.g. marble or granite) it is sufficient to apply the primer with a felt cloth.
Important: After application, the primer must be left for about 30 minutes.
- Now insert the hob and align.
Assembly instructions

- Finally, fill the gap between the hob and the worktop with silicone ② adhesive.
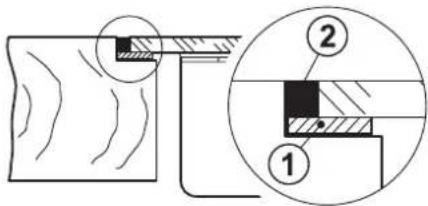
- Smooth the joint with a spatula and water containing a little washing-up liquid.
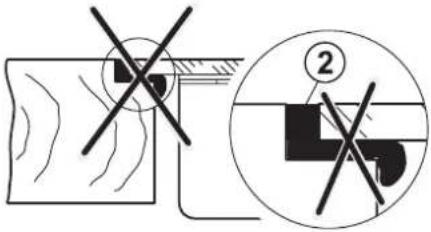
Attention: Use sealing tape! The silicone adhesive must not get under the support surface. If this occurs it will not be possible to remove the hob again at a later stage. No liability will be assumed in the case of failure to observe these instructions.
Electrical connection
Statutory regulations and the connection specifications issued by the local power supply company must be strictly observed. - When connecting the appliance it must be ensured that there is a device which makes it possible to disconnect it from the mains at all poles with a contact opening width of at least 3mm . Line-protecting switches, fuses or contactors are suitable cut-out devices. When connecting and repairing the appliance disconnect it from the electricity supply with one of these devices. - The earth wire must be sufficiently long so that if the strain relief fails, the live wires of the connecting cable are subjected to tension before the earth wire. - Any superfluous cable must be removed from the installation area beneath the appliance. - Make sure that the local mains voltage is the same as the voltage on the rating label. - The hob has been fitted with a temperature-resistant connection cable in the factory. The connection cable must be at least H05 RR-F.
- If the excess cable of this appliance is damaged, it has to be replaced by the manufacturer, the Customer Service of the manufacturer or by another qualified person to avoid danger. Full protection against accidental contact must be ensured on installation.
- Attention: Incorrect connection may result in the power electronics unit being destroyed.
Power supply
Mains voltage: 220 - 240V~, 50-60 Hz
Component rated voltage: 220 - 240V
Start of operation
Once the hob has been installed and the power supply has been provided (mains connected) an automatic test of the controls will be carried out and information for Customer Service will be indicated.
Important: No items may be on the touch control sensor keys when the appliance is being connected!
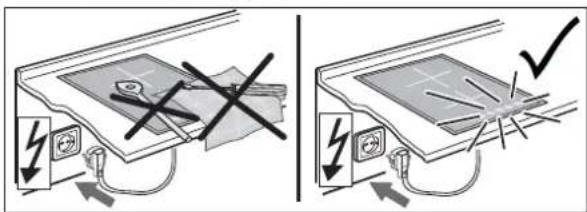
Briefly wipe over the surface of the hob with a sponge and soapy water and then dry with a clean cloth.
Technical data
| Dimensions Hob Height/ width/ depth mm Cooking zones Back Ø cm (kW) Front Ø cm (kW) Hob, total kW 2.9 | 40 x 340 x 515 18/ 12 (1.7) 14.5 (1.2) |
| Dimensions Hob Height/width/depth mm Cooking zone cm kW Hob, total kW 1.4 | 40 x 340 x 515 18.5 x 30.5 1.4 |
(rear zone only)
- LED defect. Contact service.


- DISPOSING OF THE PACKAGING
- DISPOSING OF OLD APPLIANCES
- APPROPRIATE USE
- FOR YOUR INFORMATION
- CONTENTS
- SAFETY INSTRUCTIONS
- CONNECTION AND OPERATION
- GENERAL INFORMATION ON THE HOB
- FOR THE GRIDDLE HOB (MODEL CC B1)
- CONCERNING PERSONS
- ATTENTION
- OPERATING THE HOB WITH THE SENSOR KEYS
- ON/OFF KEY (9)
- MINUS KEY + PLUS KEY (12)
- POWER SETTING DISPLAY
- CIRCUIT ACTIVATION KEY (0) (ONLY MODEL CC 21)
- AUTOMATIC SWITCH-OFF KEY (15)
- STOP KEY (17) (ONLY MODEL CC B1)
- OPERATION TIME LIMIT
- OTHER FUNCTIONS
- HOW TO CUT POWER CONSUMPTION
- RESIDUAL HEAT DISPLAY
- POWER SETTINGS
- GRILLING ON THE GRIDDLE COOKING ZONE
- OPERATING THE KEYS
- SWITCHING ON THE HOB AND COOKING ZONES
- SWITCHING OFF A COOKING ZONE
- SWITCHING OFF THE HOB
- STOP FUNCTION (ONLY MODEL CC B1)
- OPERATION
- DUAL CIRCUIT ACTIVATION (ONLY MODEL CC 21)
- PLEASE NOTE
- CHILD SAFETY DEVICE / LOCK
- SWITCHING ON THE CHILD SAFETY DEVICE
- SWITCHING OFF THE CHILDPROOF LOCK
- ACTIVATING THE LOCK (WHILE COOKING)
- SWITCHING OFF THE LOCK
- AUTOMATIC SWITCH-OFF (TIMER)
- NOTES
- MINUTE MINDER (EGG TIMER)
- AUTOMATIC BOOST FUNCTION R
- KEEP-WARM FUNCTION
- GLASS CERAMIC HOB
- CLEANING AFTER USE
- WEEKLY CLEANING
- SPECIFIC SOILING
- GRIDDLE HOB
- STUBBORN STAINS
- USING A CLEANING SCRAPER
- YOU MAY BE ABLE TO RECTIFY SOME PROBLEMS YOURSELF. THEY ARE DESCRIBED BELOW
- THE FUSES BLOW REGULARLY
- YOU CAN'T SWITCH YOUR HOB ON
- ONLY MODEL CC
- ONLY MODEL CC B
- THE HOB OR A COOKING ZONE HAS SUDDENLY SWITCHED OFF
- COOKING ZONE CANNOT BE SWITCHED OFF
- COOKING ZONE DOES NOT HEAT UP
- LED DISPLAY FOR COOKING SETTINGS AND RESIDUAL HEAT DISPLAY H DOES NOT COME ON OR ONLY PARTIALLY
- DOES THE HOB HAVE TEARS OR CRACKS
- SAFETY INSTRUCTIONS FOR KITCHEN UNIT FITTERS
- INSTALLATION
- IMPORTANT INFORMATION
- SEALING OF THE HOB
- WORKING SURFACE CUT-OUT
- CUTTING OUT THE WORKTOP
- ASSEMBLY INSTRUCTIONS
- MOUNTING THE ATTACHMENT
- FLUSH-MOUNTED INSTALLATION OF THE HOBS
- INSTALLATION WITH A BRACKET
- IMPORTANT
- GLUING IN THE HOBS
- PROCEDURE
- ELECTRICAL CONNECTION
- POWER SUPPLY
- START OF OPERATION
- TECHNICAL DATA
Brand : BORA
Model : CC B1
Category : Cooker