BM1600 - Bread maker FRITEL - Free user manual and instructions
Find the device manual for free BM1600 FRITEL in PDF.

Frequently Asked Questions - BM1600 FRITEL
User questions about BM1600 FRITEL
0 question about this device. Answer the ones you know or ask your own.
Ask a new question about this device
Download the instructions for your Bread maker in PDF format for free! Find your manual BM1600 - FRITEL and take your electronic device back in hand. On this page are published all the documents necessary for the use of your device. BM1600 by FRITEL.
USER MANUAL BM1600 FRITEL
Congratulations, you have just bought a fantastic breadmaker, a reliable and high-quality product from our FRITEL Quality range.
Read this instruction manual before you put the breadmaker into use and save it well!
***
I.PRODUCTOMSCHRLIVING
| 1 | Rapid*2 | Uitgestellderst* start *3 | Totalearend Dispenser *5 | Warm houden | ||
| 1.Basic (Basis) | 500 gr | L | ● | ● | 3:11 | ● |
| M | ● | ● | 3:13 | ● | ||
| D | ● | ● | 3:18 | ● | ||
| R | ● | ● | 2:12 | ● | ||
| 750 gr | L | ● | ● | 3:16 | ● | |
| M | ● | ● | 3:18 | ● | ||
| D | ● | ● | 3:23 | ● | ||
| R | ● | ● | 2:17 | ● | ||
| 1000 gr | L | ● | ● | 3:23 | ● | |
| M | ● | ● | 3:25 | ● | ||
| D | ● | ● | 3:30 | ● | ||
| R | ● | ● | 2:24 | ● | ||
| 2.French (Frans) | 500 gr | L | ● | ● | 3:28 | ● |
| M | ● | ● | 3:30 | ● | ||
| D | ● | ● | 3:35 | ● | ||
| R | ● | ● | 2:35 | ● | ||
| 750 gr | L | ● | ● | 3:30 | ● | |
| M | ● | ● | 3:32 | ● | ||
| D | ● | ● | 3:37 | ● | ||
| R | ● | ● | 2:37 | ● | ||
| 1000 gr | L | ● | ● | 3:33 | ● | |
| M | ● | ● | 3:35 | ● | ||
| D | ● | ● | 3:40 | ● | ||
| R | ● | ● | 2:40 | ● | ||
| 3.Whole Wheat(Volkoren/tarwe...) | 500 gr | L | ● | ● | 3:43 | ● |
| M | ● | ● | 3:45 | ● | ||
| D | ● | ● | 3:50 | ● | ||
| R | ● | ● | 2:30 | ● | ||
| 750 gr | L | ● | ● | 3:45 | ● | |
| M | ● | ● | 3:47 | ● | ||
| D | ● | ● | 3:52 | ● | ||
| R | ● | ● | 2:32 | ● | ||
| 1000 gr | L | ● | ● | 3:48 | ● | |
| M | ● | ● | 3:50 | ● | ||
| D | ● | ● | 3:55 | ● | ||
| R | ● | ● | 2:35 | ● | ||
| 4.Sweet (Zoct) | 500 gr | ● | / | ● | 3:17 | ● |
| 750 gr | ● | / | ● | 3:22 | ● | |
| 1000 gr | ● | / | ● | 3:27 | ● | |
| 5.Quick (Snel) | 1000 gr | / | / | / | 1:20 | ● |
| 6. Italian (Italiaans) | 500 gr | L M D R | / | / | 3:28 3:30 3:35 | ● ● ● | ● ● |
| 750 gr | L M D R | / | / | 3:30 3:32 3:37 | ● ● ● | ● ● | |
| 1000 gr | L M D R | / | / | 3:33 3:35 3:40 | ● ● ● | ● ● | |
| 7. Gluten free / / / 2:10 / ● | |||||||
| 8. Dough (Dccg) / / / 1:30 ● | / | ||||||
| 9. Pasta (Pasta) / / / 0:14 / / | |||||||
| 10. Bake only (Bakken) / / / 1:00 | *4 / ● |
| 1 | Rapid*2 | Départ Croûte retardé*3 | Temps Total | 1 distributeur *5 | Tenir au chaud | ||
| 1. Basic (Base) | 500 gr | L | ● | ● | 3:11 | ● | ● |
| M | ● | ● | 3:13 | ● | ● | ||
| D | ● | ● | 3:18 | ● | ● | ||
| R | ● | ● | 2:12 | ● | ● | ||
| 750 gr | L | ● | ● | 3:16 | ● | ● | |
| M | ● | ● | 3:18 | ● | ● | ||
| D | ● | ● | 3:23 | ● | ● | ||
| R | ● | ● | 2:17 | ● | ● | ||
| 1000 gr | L | ● | ● | 3:23 | ● | ● | |
| M | ● | ● | 3:25 | ● | ● | ||
| D | ● | ● | 3:30 | ● | ● | ||
| R | ● | ● | 2:24 | ● | ● | ||
| 2. French (François) | 500 gr | L | ● | ● | 3:28 | ● | ● |
| M | ● | ● | 3:30 | ● | ● | ||
| D | ● | ● | 3:35 | ● | ● | ||
| R | ● | ● | 2:35 | ● | ● | ||
| 750 gr | L | ● | ● | 3:30 | ● | ● | |
| M | ● | ● | 3:32 | ● | ● | ||
| D | ● | ● | 3:37 | ● | ● | ||
| R | ● | ● | 2:37 | ● | ● | ||
| 1000 gr | L | ● | ● | 3:33 | ● | ● | |
| M | ● | ● | 3:35 | ● | ● | ||
| D | ● | ● | 3:40 | ● | ● | ||
| R | ● | ● | 2:40 | ● | ● | ||
| 3. Whole Wheat (complet,...) | 500 gr | L | ● | ● | 3:43 | ● | ● |
| M | ● | ● | 3:45 | ● | ● | ||
| D | ● | ● | 3:50 | ● | ● | ||
| R | ● | ● | 2:30 | ● | ● | ||
| 750 gr | L | ● | ● | 3:45 | ● | ● | |
| M | ● | ● | 3:47 | ● | ● | ||
| D | ● | ● | 3:52 | ● | ● | ||
| R | ● | ● | 2:32 | ● | ● | ||
| 1000 gr | L | ● | ● | 3:48 | ● | ● | |
| M | ● | ● | 3:50 | ● | ● | ||
| D | ● | ● | 3:55 | ● | ● | ||
| R | ● | ● | 2:35 | ● | ● | ||
| 4. Sweet (sucré) | 500 gr | ● | / | ● | 3:17 | ● | ● |
| 750 gr | ● | / | ● | 3:22 | ● | ● | |
| 1000 gr | ● | / | ● | 3:27 | ● | ● | |
| 5. Quick (rapide) | 1000 gr | / | / | / | 1:20 | ● | ● |
| 6. Italian (italien) | 500 gr | L | 3:28 | ● | ● | ||
| M | / | / | 3:30 | ● | ● | ||
| D | 3:35 | ● | ● | ||||
| R | |||||||
| 750 gr | L | 3:30 | ● | ● | |||
| M | / | / | 3:32 | ● | ● | ||
| D | 3:37 | ● | ● | ||||
| R | |||||||
| 1000 gr | L | 3:33 | ● | ● | |||
| M | / | / | 3:35 | ● | ● | ||
| D | 3:40 | ● | ● | ||||
| R | |||||||
| 7. Gluten free / / / 2:10 / • | |||||||
| 8. Dough (pâtc) / / / 1:30 • | / | ||||||
| 9. Pasta (Pâtes) / / / 0:14 / / | |||||||
| 10. Bake only (cuire) / / / 1:00 | * | 4 | / |
I.PRODUCT DESCRIPTION
APPLIANCE
- Removable lid
- Control panel
- Ventilation holcs
- Viewing window
- Dispenser
- Kneading hook
- Bowl
- Measuring cup
- Measuring spoon
- Kneading hook remover

The manufacturer reserves the right to apply technical or other modifications at all times.
II. EXPLANATION ON THE CONTROL PANEL AND LCD SCREEN
- LCD SCREEN
When plugging in the appliance you will hear a signal and the LCD screen will light up.
1)Loaf size:500-750-1000 gr
2) Baking time of the selected program
3) Crust color: light-medium-dark-rapid
4) Program choice: 10 different programs
5) Current stage of the baking process:
During the different stages of the baking process, the arrow on the display shows the current stage. The different stages in the baking process are: pre-heat, knead, rest, rise, bake, warm (1h), and end. In order to know the duration of a program please go to point V.6.
- CONTROL PANEL
A. LCD screen
B. Menu
With the "Menu" button you can select one of the 10 different programs. (Program list: point III.)
C. Loaf size
For the programs 1,2,3,4 and 6 you can choose from 3 loaf sizes, namely 500gr, 750gr or 1000gr. The selected loaf size is displayed on the LCD screen, as well as the corresponding baking time.
D. Crust color
For the programs 1, 2, 3 and 6 you can choose from 3 crust colors, namely Light, Medium and Dark. The selected crust color is displayed on the LCD
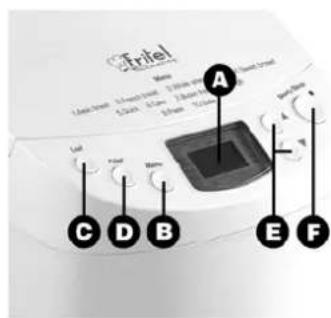
screen. You can also use this button to accelerate the baking process of programs 1, 2, 3 and 6, by means of the "Rapid" position. By selecting the "Rapid" position, the baking time is reduced by + - 1h , by shortening the yeasting process.
E. Timer delayed start
You can use this timer to delay the start of the selected program. This is possible for the programs 1, 2,3,4,5 and 6. By pressing on the arrows, you will increase or decrease the time by 10min . (See point IV.6.d)
Prolong the baking time: For the program 10 'Bake' you can prolong the baking time by means of the timer button from 1h - 1.30h .
F. Start/stop
This button starts and stops the program.
Control lamp: This lamp will turn red as soon as the bread maker is being plugged.
III.PROGRAM LIST
This appliance disposes of 10 programs:
-
Basic = Basic program for standard bread dough
-
French = program for bread made of white, protein-rich flour after French style and for light bread with a crispy crust.
-
Whole wheat = Program for bread with a high content of whole wheat, oat ... This program disposes of a 'hold' time, so that the grains can sufficiently soak. These breads are generally smaller and more compact.
-
Sweet = Program for sweet bread, with extra sugar, raisins, chocolate, ...
-
Quick = This program shortens the baking time by 1h20 by skipping a second rise- and rest time. This makes the bread slightly firmer and more compact.
-
Italian = Program for baking light, Italian style bread, mostly with olive oil and herbs like oregano and thyme.
-
Gluten free = Program especially for gluten free bread, since this kind of bread deviates strongly from a standard bread as for taste and structure. Consult your doctor first if you are making gluten free bread for your health. Follow the instructions strictly. For this program, we advise you to use the "NO GLUTEN" mix from REVOGAN. There are gluten low and gluten free mixes. Consult your doctor to see which one is most appropriate for you. The bread needs to be stored in a dry and cool place and be eaten entirely within 2 days. If you wish to keep the bread longer you can freeze it in a freezer bag. We cannot be held responsible for any damage caused as a result of using ingredients for which no permission was received from the doctor, nor for any damage as a result of non-observing the guidelines, the recipe, the storage life...
-
Dough = Program to prepare yeast dough for rolls, pastry or pizza. The dough is heated so that it can rise, but it won't be baked. After the kneading process you can bake the dough in a traditional oven.
-
Pasta = Program for making dough for pasta, waffles, cookies, pie ... without rising or baking. The dough is only being mixed and kneaded.
-
Bake only = Program for baking only. You can also use this program for bread that was not baked enough yet or for a dough that has not yet been baked. This program can be used several times in a row.
IV. BEFORE USE
1. Safety prescriptions
-
Only use the bread maker with 230 Volt alternating current
-
ALWAYS place the bread maker on a heat-proof, dry and stable surface, such as a kitchen counter or table, so that the appliance cannot tilt or slip.
-
Check that the lid and baking tin are correctly mounted.
-
NEVER place any object within 10cm from the appliance. ALWAYS place the appliance at least 10cm from the wall, other appliances, or inflammable items.
-
NEVER use the appliance outside the house, near heat sources or in rooms with a high humidity level.
-
NEVER place the appliance on or next to a stove, oven ... not even if there is a cooker hood.
-
NEVER touch the bread maker, the power cord or plug with wet hands and never immerse these parts in water (or any other liquid). Only clean these parts with a damp cloth. Should the appliance still get wet, immediately remove the plug.
-
Children and disabled persons are not always aware of the dangers that could be caused by electrical appliances.
NEVER let children or disabled persons work with the bread maker. -
NEVER leave the appliance without supervision when it is functioning and NEVER move the appliance when it is functioning.
-
During the baking process, the viewing window and baking tin get really hot. ALWAYS use oven gloves to touch the viewing window and to remove the bread from the baking tin. Also beware when removing the dough hooks from the baking tin.
-
NEVER use the baking tin for storage of ingredients.
-
Only switch on the appliance when it is filled with ingredients or dough in order to prevent overheating.
-
To avoid spilling, remove the baking tin from the appliance to fill it.
-
NEVER use accessories or parts from other appliances or other brands.
-
NEVER pull the power cord to disconnect the plug.
-
NEVER use extension cords and roll out entirely the power cord.
-
NEVER turn the power cord around the appliance when it is in use. Never bend or squeeze the power cord.
-
Never let the power cord hang over the edge of the table or counter.
-
NEVER use the appliance if it is damaged. In that case, immediately return the appliance to a registered repair service.
-
NEVER remove the baking tin from the appliance and NEVER disconnect the plug while the appliance is in use.
-
NEVER touch, block or cover the ventilation holes while the appliance is in use.
-
ALWAYS keep the baking tin and dough hook clean, so that the programs can be executed correctly.
-
The appliance is only meant for Household use.
-
Only use the appliance what it is destined for, namely making bread or dough.
-
Persons who have not read this manual cannot use this appliance.
-
Immediately switch off the appliance and disconnect the plug :
*after use or when the appliance is not in use
*if the appliance is not functioning well
*when cleaning the appliance
2. Before using the appliance
In the packaging you will find the bread maker, the baking tin, two dough hooks, a measuring cup, a measuring spoon, a dough hook remover and the user manual with recipes. Before using the appliance for the first time, we advise you to clean the baking tin, dough hooks, measuring cup and measuring spoon in warm water with detergent, without using any abrasives, in order not to damage the non-stick coating. Then place the dough hooks inside the baking tin and fix the baking tin in the appliance. To dismount the appliance, please follow these steps in reverse order.
V. USE
GENERAL: The final result depends on several factors. Make sure that the ingredients are fresh, at room temperature and always respect the prescribed quantities.
1. Ingredients
Flour: Flour is the main ingredient of bread and relces gluten, which allow the bread to rise and which gives substance to the bread. Always check the packaging to see if the flour is suited for baking bread. The flour weight varies much from type to type. So it is extremely important to weigh the correct amount on a scale.
Yeast: Yeast allows the dough to rise and makes the bread light and easy to digest. We advise to use dry yeast (ready-to-use) as this type keeps much longer and gives a better and more constant result than fresh yeast.
Salt: Salt enriches the flour and reinforces the gluten in the flour for a better rising process.
Butter/oil: Butter/oil improves the taste of the bread and makes it softer. This ingredient should be at room temperature.
Sugar: Sugar is the nutrition of the yeast and so essential for the rising process. You can use refined sugar or brown sugar, but also honey or syrup. Sugar softens the taste of the bread, enhances the nutritional value and helps the bread to keep longer.
Water: We advise to use tap water. Make sure that it is not too cold, otherwise the yeasting process will not start. Make sure that it is not too warm, otherwise the yeasting process will go too fast. (= only advised if you select the 'quick' program).
Milk: Milk and other dairy products enhance the taste, the nutritional value and produce a nice brown crust. The quantity of milk used should be deducted from the amount of water mentioned in the recipe. TIP: Do not use milk or other dairy products if you use the 'timer delayed start'. The dairy products could go bad.
Other ingredients: some recipes will add other ingredients such as, raisins, nuts, sunflower seed, dried fruit, ... First soak, then dry and then add them. Always use fresh ingredients. TIP: You can make your bread even more tasteful by adding ingredients such as eggs, wheat germs, herbs, ...
Bread mix with yeast (included): Pour the bread mix in the baking tin and add water to it. Select program 1 'Basic' and choose a loaf size according to the content of the bread mix. The bread mix does not always mention how much yeast is included so you might have to experiment a little before obtaining the best result.
Bread mix with separate yeast: First put the yeast in the baking tin, then the bread mix and then the water. Select the program according to the type of flour in your bread mix.
3. Preparing the dough
- Make sure that all ingredients are at room temperature (except when you select the 'quick' program, in that case the water may be a little warmer)
- Only use dry yeast, fresh yeast will not always lead to the desired result.
- If you are using rye flour, take into account that this dough doesn't rise much. For that reason, use at least 30% wheat flour and max. 70% rye flour.
4. Measuring ingredients
- Measure all ingredients correctly. Stick to the recommended quantities of the recipe. Use the accompanying measuring cup and measuring spoon. (do not pile up the ingredients in the measuring spoon but make sure to have a flat spoon) and use a scale to weigh flour, butter, ...
5. Order of the ingredients
First add tap water to the baking tin, and then the type(s) of flour. Make a little hole in one corner of the baking tin and add the salt. Close the hole and make another hole in the opposite corner. Add the yeast and close the hole so that salt and yeast do not mix immediately. Add the butter in small chunks. Do not forget the sugar, since this will considerably influence the rising result of the bread.
ATTENTION: Make sure not to spill any ingredients in the baking chamber.
ATTENTION: Keep the outside of the baking tin clean and make sure that the heating elements do not come into contact with the dough or ingredients.
ATTENTION: Stick to the recommended quantities and do not exceed them.
6.Use
a. Remove the baking tin from the appliance
b. Place the clean dough hooks on the axes in the baking tin.
c. Put all the ingredients in the baking tin as mentioned under point 5 "order of the ingredients". Make sure that the outside of the baking tin is clean.
d. Place the baking tin in the appliance and make sure that it is well fixed.
e. Do not spill any ingredients into the baking chamber and keep them away from the heating elements.
f. Close the lid.
g. Plug in the appliance. Your appliance will now switch on, emit a sound signal, the red control lamp will burn and the LCD screen will be activated. You are now ready to make your program selection!
7. Program selection
Each button Press will be confirmed by a sound signal.
a. Program: Use the "MENU" button to select a program (1-10 program)
b. Loaf size: use the "LOAF" button to select a loaf size (500-gr-750gr-1000gr). The selection is indicated by means of a little bar at the top of the LCD screen. This selection is available for programs 1,2,3,4 and 6.
c. Crust colour: Use the "COLOR" button to select a crust color (Light, Medium, Dark and possibly Rapid). The selection is indicated by means of a little bar at the bottom of the LCD screen. This selection is available for programs 1,2,3 and 6.
d. Timer (delayed start): If you wish the appliance to start at a later time, i.e. in a few hours, you can use the 'arrow' buttons. This selection is not available for programs 7,8,9 and 10. Procedure: Note the actual time, the time that your bread should be ready, and the baking time of the selected program. Example: it is now 20h30 and the bread should be ready at 6h00 (so within 9h30). The selected baking program is nr. 3 (1000 gr.), with light crust, and takes 3h48 h. Between 20h30 and 06h00 there are 9h30. Deduct 3h48 baking time from 9h30 = 5h48 . Set the timer at 5h40 by means of the arrows.
ATTENTION: Never use this function with ingredients such as milk, eggs, cheese,... as they could go bad.
You will find hereafter an overview of the programs, times and options.
| Rapid*Crust*Delayed start*3 | Total time Dispenser *5 | Keeping warm | |||||
| 1.Basic | 500 gr | L | ● | ● | 3:11 | ● | ● |
| M | ● | ● | 3:13 | ● | ● | ||
| D | ● | ● | 3:18 | ● | ● | ||
| R | ● | ● | 2:12 | ● | ● | ||
| 750 gr | L | ● | ● | 3:16 | ● | ● | |
| M | ● | ● | 3:18 | ● | ● | ||
| D | ● | ● | 3:23 | ● | ● | ||
| R | ● | ● | 2:17 | ● | ● | ||
| 1000 gr | L | ● | ● | 3:23 | ● | ● | |
| M | ● | ● | 3:25 | ● | ● | ||
| D | ● | ● | 3:30 | ● | ● | ||
| R | ● | ● | 2:24 | ● | ● | ||
| 2.French | 500 gr | L | ● | ● | 3:28 | ● | ● |
| M | ● | ● | 3:30 | ● | ● | ||
| D | ● | ● | 3:35 | ● | ● | ||
| R | ● | ● | 2:35 | ● | ● | ||
| 750 gr | L | ● | ● | 3:30 | ● | ● | |
| M | ● | ● | 3:32 | ● | ● | ||
| D | ● | ● | 3:37 | ● | ● | ||
| R | ● | ● | 2:37 | ● | ● | ||
| 1000 gr | L | ● | ● | 3:33 | ● | ● | |
| M | ● | ● | 3:35 | ● | ● | ||
| D | ● | ● | 3:40 | ● | ● | ||
| R | ● | ● | 2:40 | ● | ● | ||
| 3.Whole Wheat | 500 gr | L | ● | ● | 3:43 | ● | ● |
| M | ● | ● | 3:45 | ● | ● | ||
| D | ● | ● | 3:50 | ● | ● | ||
| R | ● | ● | 2:30 | ● | ● | ||
| 750 gr | L | ● | ● | 3:45 | ● | ● | |
| M | ● | ● | 3:47 | ● | ● | ||
| D | ● | ● | 3:52 | ● | ● | ||
| R | ● | ● | 2:32 | ● | ● | ||
| 1000 gr | L | ● | ● | 3:48 | ● | ● | |
| M | ● | ● | 3:50 | ● | ● | ||
| D | ● | ● | 3:55 | ● | ● | ||
| R | ● | ● | 2:35 | ● | ● | ||
| 4.Sweet | 500 gr | ● | / | ● | 3:17 | ● | ● |
| 750 gr | ● | / | ● | 3:22 | ● | ● | |
| 1000 gr | ● | / | ● | 3:27 | ● | ● | |
| 5.Quick | 1000 gr | / | / | / | 1:20 | ● | ● |
| 6.Italian | 500 gr | L | 3:28 | ● | ● | ||
| M | / | / | 3:30 | ● | ● | ||
| D | 3:35 | ● | ● | ||||
| R | |||||||
| 750 gr | L | 3:30 | ● | ● | |||
| M | / | / | 3:32 | ● | ● | ||
| D | 3:37 | ● | ● | ||||
| R | |||||||
| 1000 gr | L | 3:33 | ● | ● | |||
| M | / | / | 3:35 | ● | ● | ||
| D | 3:40 | ● | ● | ||||
| 7.Gluten free / / / 2:10 / ● | |||||||
| 8.Dough / / / / 1:30 | ● | / | |||||
| 9.Pasta / / / 0:14 | / | ||||||
| 10.Bake only / / / | 1:00 *4 / ● | ||||||
1 Crust : Light - Medium - Dark
2 Rapid: time is reduced by +/- 1 hour
3 Delayed start: do not use milk, cream, eggs, ...
4 Time can be prolonged with 1 h - 1h30
*5 Dispenser for adding automatically extra ingredients to the baking tin (see point 8 'starting a program)
8. Starting a program
- Press the "START/STOP" button to start the baking process. The timer will count down.
- Adding extra ingredients: for the programs 1,3 and 4 the appliance will emit a sound signal after +/- 20 min. to remind you to add additional ingredients such as nuts, raisins, fruit...
ATTENTION: To add ingredients, never Press STOP, because this will stop the entire baking process.
- The stage of the baking process and the selected program are memorized in case of an electricity breakdown (max.15 min.), during 'delayed start' or during the warming process. If an electricity breakdown occurs after the first kneading phase, the baking process will be stopped entirely since a good result cannot be obtained anymore.
ATTENTION: NEVER touch, block or cover the ventilation holcs. This could cause smoke development if the dough rises over the baking tin and touches the heating element. If there is smoke in the baking chamber because the dough came in contact with the heating element, keep the lid closed to avoid flames or to put out flames. Press the STOP button and pull out the plug. NEVER put out smouldering dough with water.
9. End of the baking process
At the end of the baking process you will hear different sound signals and the screen will display 0:00.
For most of the programs, the appliance will automatically start the 'keeping warm' phase, and this during about 1h . NEVER let the baked bread longer than 1h in the appliance after the end of the baking process, as the bread will lose its crustiness. After 1h the appliance will emit sound signals every 5min .
To remove bread, jam, dough from the appliance, first press the STOP button, remove the plug and open the lid. Use oven gloves to remove the baking tin from the appliance and to remove the bread from the baking tin. Let the bread cool off on a grid.
TIP: If necessary, remove the bread from the rim of the baking tin with a wooden spoon. Then turn over the baking tin and slap gently on the bottom side of the baking tin to remove the bread.
Remove the kneading hooks by using the kneading hook remover. If the kneading hooks got stuck in the bread, only try to remove them after the bread has completely cooled off. If the kneading hooks got stuck in the baking tin and you cannot remove them, place the baking tin in warm water to let it soak and try again.
ATTENTION: You can start a new program immediately after the previous one. But it is possible that the LCD screen displays E01 or E00 when you press START. This means that the appliance is still too hot (+55^) . If this occurs, IMMEDIATELY press the STOP button, remove the baking tin with ingredients and let the appliance cool off.
VI. CLEANING AND MAINTENANCE
- Switch off the appliance, pull out the plug and let the appliance and accessories completely cool off before cleaning them.
- The appliance itself can be cleaned with a damp cloth. NEVER immerse in water or any other liquid. The heating element may NEVER come into contact with water or any other liquid.
- The kneading hook, baking tin with non-stick coating can be cleaned in warm water with detergent. Do NOT use any abrasives to avoid damaging the non-stick coating. The baking tin, kneading hook, measuring spoon, measuring cup, are NOT dishwasher proof.
-NEVER use scourers, aggressive cleaning products or liquids such as alcohol, petrol, acetone, ... to clean the appliance or parts of it. - Let the appliance dry entirely before using it again.
-Store the appliance in a clean, dry and frost free place, out of reach of children. Never put heavy or hard objects on top of it.
VII. TROUBLESHOOTING
| Problem Cause => action | |
| The bread does not rise The top of the bread is not even | You are not using the right type of yeast → Use dry yeast mentioning ‘ready-to-use’. This kind of yeast does not have to pre-rise. → You are not using enough yeast or the yeast used is too old → Use the supplied measuring spoon. Check the expiry date of the yeast (keep it in the fridge). Before kneading, the yeast has come into contact with the liquid. → Check if you added the ingredients to the baking tin according to the instructions and in the right order, meaning the water and other liquids are to be added first. You used too much salt or too little sugar. → Check the recipe and measure the right quantities by using the supplied measuring spoon. → Check if the other ingredients do not already contain salt or sugar. The adhesives in the flour used are not of good quality or you did not use solid flour. The quality of adhesives can vary depending of temperature, humidity, the storage of the flour and the period it was harvested) → Try another type, brand or lot of flour The dough is too firm because you didn’t use enough liquid. Solid flour with a higher amount of proteins absorbs more water than other flour; try adding 10-20 ml |
| The bread if full of air holes | You are using too much yeast → Check the recipe and measure the right quantities by means of the supplied measuring spoon. You used too much liquid, or the liquid is too warm. → Some types of flour absorb more water than others; try using 10-20 ml less water |
| The bread has collapsed after the rising phase | Your flour is not of a good quality → Try using another brand of flour. You have used too much liquid. → Try using 10-20 ml less water. You used too little salt Check the recipe and measure the right quantities by means of the supplied measuring spoon. You used too much yeast Check the recipe and measure the right quantities by means of the supplied measuring spoon. The lid has been opened for too long during the baking process Do not let the lid open too long during the baking process. The air is too humid or it is too warm Make sure to bake in a well aired room |
| The bread has risen too much | You used too much water/yeast. Check the recipe and measure the right quantity by means of the supplied measuring spoon or measuring cup. Check if the other ingredients do not already contain water. The water used was too warm Make sure the water is not too warm You did not use enough flour. Weigh the flour precisely by using a scale You used too little salt. Check the recipe and measure the right quantity by means of the |
| supplied measuring spoon | |
| Why is the bread so light and sticky? | You are not using enough yeast or the yeast you are using is too old/expired. → Use the supplied measuring spoon. Check the expiry date of the yeast (keep in the fridge) ·There was a power breakdown → Remove the bread from the baking tin and start again with fresh ingredients. |
| The bread is too dry and too firm | You are not using enough liquid. → Some kinds of flour absorb more water than others: try using 10-20 ml more water. ·You are not using enough yeast or the yeast used is too old. → Use the supplied measuring spoon. Check the expiry date of the yeast (keep in fridge) |
| The bread is too dark | You are using too much sugar → Check the recipe and measure the right quantity by means of the supplied measuring spoon ·You chose the wrong crust colour → Choose the right colour before baking. |
| The bread is not ready yet, moist in the middle | You are using too much additional ingredients, such as nuts, butter, driced fruit, syrup, ... → Check the recipe and adjust the right quantity by means of a scale or by using the measuring cup. ·The soaked raisins are still too wet → Make sure that the soaked ingredients are sufficiently dried. |
| The bottom and the sides are covered with too much flour. | You have used too much flour or not enough liquid. → Check the recipe and measure the right quantity by using a scale or the supplied measuring cup |
| Why are the ingredients not well mixed? | You have not correctly mounted the kneading hook inside the baking tin. → Place the hook inside the baking tin before adding the ingredients ·There has been a power breakdown. → You can continue the baking process but the result might be disappointing, if the kneading has already started. |
| The bread has not risen | You selected the ‘DOUGH’-function → The ‘DOUGH’-function does not bake ·There has been a power breakdown. → If the dough is already risen you can try baking it in your over. ·You forgot to place the kneading hooks inside the baking tin. → Place the kneading hooks first |
| The bread collapsed on the sides and the bottom is moist | You left the bread for too long in the baking tin after the baking process is finished. → Remove the bread from the baking machine immediately after the baking process has ended. |
| The kneading hook rattles | Make sure the kneading hooks are well fixed inside the baking tin. |
| There is a burnt smell during the baking process There is smoke coming from the steam hole. | You might have spilled ingredients on the heating element. → During the mixing, it could happen that a small amount of flour, raisins, ... end up in the baking chamber. Remove these ingredients as soon as the machine has cooled off. |
| The kneading hook is stuck in the bread when trying to remove the bread from the | The dough is too stiff → Let the bread cool off entirely before removing the kneading hook from the bread. Some types of flour absorb more water than others: |
| baking tin try using 10-20 ml extra water next time. Crusts are piling up underneath the kneading hook. → Clean the kneading hook after every use | |
| The crust is wrinkly and gets soft when the bread cools off. | The vapor released inside the bread after the baking, could go to the crust and make it softer. → Try using 10-20 ml less water of half the sugar to reduce the amount of vapor. |
| How do I get a crusty crust? | To make your bread crustier you can use the ‘French’ function or the ‘dark’ function for the crust colour. You can bake your bread additionally for 5-10 min. at 200°C or gas position 6. |
| I cannot cut even slices | The bread was still too warm. → Let your bread cool off on a grid before slicing it |
VIII. PRACTICAL TIPS IN CASE OF MALFUNCTIONS
Do not use the appliance in case of a malfunction of when the power cord is damaged. Please address to your sales point or contact NV van RATINGEN. (contact details at the back).
THE APPLIANCE HAS BEEN DESIGNED FOR DOMESTIC USE. THE GUARANTEE CONDITIONS EXPIRE UPON PROFESSIONAL USE.
DEFECTS AND/OF DAMAGES FOLLOWING TO THE NON OBSERVANCE OF THE USER MANUAL ARE NOT COVERED BY THE GUARANTEE.
We are entitled to make technical modifications at all times.
IV. GUARANTEE CONDITIONS
Your guarantee starts on the day of purchase and is valid for 2 years and will only apply after submitting the purchasing invoice. The guarantee will expire irrevocably and immediately when the appliance is used for purposes other than domestic (i.e. professional).
Determination of the guarantee
- The guarantee covers every repair and/or replacement free of charge of the parts recognized defective by our technical department and if the damage is due to faulty manufacture, construction or material.
The guarantee does not cover the replacement of the baking tin, measuring cup and spoon, kneading hooks and kneading hook remover.
- The guarantee is only valid for the original user.
- Carriage, both ways, is for the purchaser's account.
The guarantee expires in the following cases: - Incorrect connection, e.g. electric voltages.
- Abnormal use or misuse handling.
- Lack of care.
- Modifications or repairs made to the appliance by persons not authorized by us as manufacturer.
- When reference numbers altered or removed.

X. ENVIRONMENT
Do not throw the appliance away with the normal household waste at the end of its life, but hand it in at an official collection point for recycling. By doing this you will help to preserve the environment.
XI. LIABILITIES
All liabilities, towards both consumer(s) and third parties, that could result from not observing all the safety regulations prescribed in this user manual, can under no circumstances be charged to the manufacturer. In case of non-observation of these safety regulations, the user of the deep fryer, or any other person not having observed these safety regulations, protects the manufacturer from all responsibilities that he could be charged.
XII. RECIPIES
Remark: Table spoon = flat measuring spoon (large)
Tea spoon = flat measuring spoon (small)
| White bread (1000 gr) | Whole-wheat bread (750 gr) |
| - 330 ml water | - 250 ml water |
| - 600 gr plain flour | - 300 gr plain flour |
| - 1 tea spoon salt | - 100 gr whole-wheat flour |
| - 2 tea spoons dried yeast | - 1 tea spoon salt |
| - 25 gr butter | - 1,5 tea spoon dried yeast |
| - 1 table spoon sugar | - 20 gr butter |
| - 1 table spoon sugar | |
| Whole-wheat bread (1000 gr) | Whole-wheat bread (750 gr) |
| - 330 ml water | - 310 ml water |
| - 400 gr plain flour | - 500 gr whole-wheat flour |
| - 200 gr whole-wheat flour | - 1 tea spoon salt |
| - 1 tea spoon salt | - 2 tea spoons dried yeast |
| - 2 tea spoons dried yeast | - 25 gr butter |
| - 25 gr butter | - 1 table spoon sugar |
| Italian bread (750 gr) | Italian bread with rosemary and raisins (750gr) |
| - 1 tea spoon dried yeast | - 2 medium eggs |
| - 400 gr. plain flour | - 175 ml water |
| - 260 ml water | - 1 tea spoon dried yeast |
| - 1,5 tea spoon salt | - 400 gr wheat flour |
| - 1,5 table spoon olive oil | - 1 tea spoon salt |
| - 3 table spoons dried rosemary | |
| - 1 table spoon granulated sugar | |
| - 4 table spoons extra vergine olive oil | |
| - 125 gr. raisins | |
| Brown bread (1000 gr) | Rye bread (1000 gr) |
| - 330 ml water | - 500 gr rye flour |
| - 200 gr plain flour | - 310 ml water |
| - 400 gr brown flour | - 2 tea spoons salt |
| - 1 tea spoon salt | - 1 tea spoons dried yeast |
| - 2 tea spoons dried yeast | - 15 gr butter |
| - 25 gr butter | |
| - 2 table spoons sugar | |
| 9 grain bread (750 gr) | 9 grain bread (1000 gr) |
| - 250 ml water | - 330 ml water |
| - 300 gr plain flour | - 400 gr plain flour |
| - 100 gr 9 grain flour | - 200 gr 9 grain flour |
| - 1 tea spoon salt | - 1 tea spoon salt |
| - 1,5 tea spoon dried yeast | - 2 tea spoons dried yeast |
| - 20 gr butter | - 25 gr butter |
| - 1 table spoon sugar | - 1 table spoon sugar |
| Nut bread (750 gr) | Corn bread (1000 gr) |
| - 310 ml water | - 300 ml water |
| - 500 gr 9 grain flour | - 350 gr plain flour |
| - 1 tea spoon salt | - 150 gr corn flour |
| - 2 tea spoons dried yeast | - 1 tea spoon salt |
| - 25 gr butter | - 2 tea spoons dried yeast |
| - 1 table spoon sugar | - 1 tea spoon sugar |
| - 65 gr nuts | - 2 table spoons olive oil |
| Gluten free bread (1000 gr) | Raisin bread (1000 gr) |
| - 330 ml water | - 330 ml water |
| - 450 gr No Gluten bread mix Revogan ( iron or fibres) | - 600 gr plain flour |
| - 3 tea spoons dried yeast | - 1 tea spoon salt |
| - 1 tea spoon salt | - 2 tea spoons dried yeast |
| - 1 table spoon sugar | - 25 gr butter |
| - 2 table spoon olive oil | - 2 table spoons sugar |
| - 1 egg | - 250 gr raisins |
| Chocolate bread (1000 gr) | Bacon bread (1250 gr) |
| - 250 ml milk | - 200 gr smoked bacon (baked) |
| - 400 gr plain flour | - 1 onion (slightly baked) |
| - 100 gr whole wheat flour | - 250 ml water |
| - 1 tea spoon salt | - 300 gr plain flour |
| - 2 tea spoons dried yeast | - 300 gr whole wheat flour |
| - 2 table spoons sugar | - 1 tea spoon salt |
| - 25 gr butter | - 1 table spoon sugar |
| - 1 egg | - 2 tea spoons dried yeast |
| - 100 gr dark chocolate (drop)s | |
| Panettone (1000 gr) | Italian bread (1000 gr) |
| - 175 ml milk | - 300 ml water |
| - 500 gr flour | - 500 gr flour French |
| - 1 tea spoon salt | - 2 tea spoon salt |
| - 2,5 tea spoons dried yeast | - 1 tea spoon dried yeast |
| - 1 tea spoon of aniseed (powder) | - 2 table spoons olive oil |
| - 1,5 table spoon of sugar | - 1 table spoon dried oregano |
| - 1 medium egg | |
| - 60 gr butter | |
| - 50 gr light raisins | |
| - 50 gr chopped walnuts | |
| - 50 gr dried or candied fruit | |
| Rolls (1000 gr) | Pizza |
| - 250 ml water | - 240 ml water |
| - 500 gr plain flour | - 450 gr plain flour |
| - 1 tea spoon salt | - 1 tea spoon dried yeast (5gr) |
| - 3 tea spoons dried yeast | - 1 tea spoon salt |
| - 20 gr butter in small pieces | - 2 table spoons olive oil |
| - 1 egg | * Preheat oven and bake +- 20 min. at 220° |
| - 2 table spoons sugar | |
| Strawberry jam | Pizza with tuna |
| - 500 gr strawberries | - 500 gr wheat flour |
| - 250 gr sugar | - 2,5 tea spoons dried yeast |
| - 3 table spoons lemon juice (fresh) | - 300 ml water |
| - 1 table spoon lemon juice (concentrated) | - 2 tea spoons salt |
| - 1 can of pesto | |
| - 1 tin tomatoes | |
| - 20 green olives | |
| - 1 garlic clove | |
| - Grated cheese | |
| * Preheat oven and bake +- 20 min. at 220° |
Please visit www.fritel.com for additional recipes
| 1 | Rapid*2 | AufschuldungsStart*3 | Totale Zeit Speicher | 5 | Warmhalten | ||
| 1.Basic (Basis) | 500 gr | L | ● | ● | 3:11 | ● | ● |
| M | ● | ● | 3:13 | ● | ● | ||
| D | ● | ● | 3:18 | ● | ● | ||
| R | ● | ● | 2:12 | ● | ● | ||
| 750 gr | L | ● | ● | 3:16 | ● | ● | |
| M | ● | ● | 3:18 | ● | ● | ||
| D | ● | ● | 3:23 | ● | ● | ||
| R | ● | ● | 2:17 | ● | ● | ||
| 1000 gr | L | ● | ● | 3:23 | ● | ● | |
| M | ● | ● | 3:25 | ● | ● | ||
| D | ● | ● | 3:30 | ● | ● | ||
| R | ● | ● | 2:24 | ● | ● | ||
| 2.French (Französisch) | 500 gr | L | ● | ● | 3:28 | ● | ● |
| M | ● | ● | 3:30 | ● | ● | ||
| D | ● | ● | 3:35 | ● | ● | ||
| R | ● | ● | 2:35 | ● | ● | ||
| 750 gr | L | ● | ● | 3:30 | ● | ● | |
| M | ● | ● | 3:32 | ● | ● | ||
| D | ● | ● | 3:37 | ● | ● | ||
| R | ● | ● | 2:37 | ● | ● | ||
| 1000 gr | L | ● | ● | 3:33 | ● | ● | |
| M | ● | ● | 3:35 | ● | ● | ||
| D | ● | ● | 3:40 | ● | ● | ||
| R | ● | ● | 2:40 | ● | ● | ||
| 3.Whole Wheat(Vollkorn,...) | 500 gr | L | ● | ● | 3:43 | ● | ● |
| M | ● | ● | 3:45 | ● | ● | ||
| D | ● | ● | 3:50 | ● | ● | ||
| R | ● | ● | 2:30 | ● | ● | ||
| 750 gr | L | ● | ● | 3:45 | ● | ● | |
| M | ● | ● | 3:47 | ● | ● | ||
| D | ● | ● | 3:52 | ● | ● | ||
| R | ● | ● | 2:32 | ● | ● | ||
| 1000 gr | L | ● | ● | 3:48 | ● | ● | |
| M | ● | ● | 3:50 | ● | ● | ||
| D | ● | ● | 3:55 | ● | ● | ||
| R | ● | ● | 2:35 | ● | ● | ||
| 4.Sweet (süß) | 500 gr | ● | / | ● | 3:17 | ● | ● |
| 750 gr | ● | / | ● | 3:22 | ● | ● | |
| 1000 gr | ● | / | ● | 3:27 | ● | ● | |
| 5.Quick (schnell) 1000 gr / / | 1:20 | ●● | |||||
| 6.Italian (italienisch) 500 gr L | |||||||
| M | / | / | 3:28 | ● | ● | ||
| D | 3:30 | ● | ● | ||||
| R | 3:35 | ● | ● | ||||
| 750 gr L | |||||||
| M | / | / | 3:30 | ● | ● | ||
| D | 3:32 | ● | ● | ||||
| R | 3:37 | ● | ● | ||||
| 1000 gr L | |||||||
| M | / | / | 3:33 | ● | ● | ||
| D | 3:35 | ● | ● | ||||
| R | 3:40 | ● | ● | ||||
| 7.Gluten free / / / / 2:10 / ● | |||||||
| 8.Dough (Teig) / / / 1:30 | ● | / | |||||
| 9.Pasta (Teigware) / / / 0:14 | / | / | |||||
| 10.Bake only (nur backen) | / | / | / | / | 1:00 *4 | / | ● |