DV 300 GP - Action camera ALBRECHT - Free user manual and instructions
Find the device manual for free DV 300 GP ALBRECHT in PDF.
| Product type | Sportscam with built-in GPS |
| Brand | Albrecht |
| Model | DV 300 GP |
| Power supply | Batteries (type not specified, high quality batteries recommended) |
| Memory | Micro SD card (class 6 or higher, minimum transfer speed 6 MB/s) |
| Sensor | Camera lens with built-in microphone |
| GPS | GPS receiver with blue light signal, accuracy improvable via SBAS |
| Video recording | Outdoor mode (with GPS) and indoor mode (without GPS) |
| Main functions | Video recording, geolocation, playback with Google Maps mapping, route tracking |
| Supports provided | Helmet mount (strap), bicycle handlebar mount, bolts and bearings |
| Mounting | On helmet or handlebar using supports and bearings |
| Software installation | Video player provided on CD, configuration via SD card inserted in computer |
| LED indicators | GPS (blue), recording (red), low battery (green) |
| Sound alerts | Beep for startup, GPS found, low battery or memory |
| Battery life | Varies depending on batteries, automatic shutdown if voltage < 2V |
| Warranty | 2 years from date of purchase, excluding wear parts |
| Recycling | Do not dispose of with household waste, take to WEEE collection center |
| After-sales service (Germany) | Phone 01805-012204, email alan-service@ps-tech.de |
Frequently Asked Questions - DV 300 GP ALBRECHT
User questions about DV 300 GP ALBRECHT
0 question about this device. Answer the ones you know or ask your own.
Ask a new question about this device
Download the instructions for your Action camera in PDF format for free! Find your manual DV 300 GP - ALBRECHT and take your electronic device back in hand. On this page are published all the documents necessary for the use of your device. DV 300 GP by ALBRECHT.
USER MANUAL DV 300 GP ALBRECHT
PST professional support technologies GmbH Breitscheider Weg 117a 40885 Ratingen
1 Table of Contents 2
2 Contents 3
3Mounts 3
4 Introduction 4
4.1 Installation 4
4.2 Video player information: 6
5 User Guide 7
5.1 Outdoor 7
5.2 Indoor 8
6Trouble Shooting 9
7 Warranty and Recycling Information 11
7.1 2-Year Warranty from Date of Purchase 11
7.2 WEEE and Recycling 11
7.3 Service Address And Technical Hotline (for units sold in Germany) 12
2 Contents
- GPS DV x1
- Compact Disk x1
- User Manual x1
- SD Card Adapter x1
Please insert the Micro SD card into the SD Card Adapter. Now you can insert the SD Card Adapter into a Card Reader for reading.
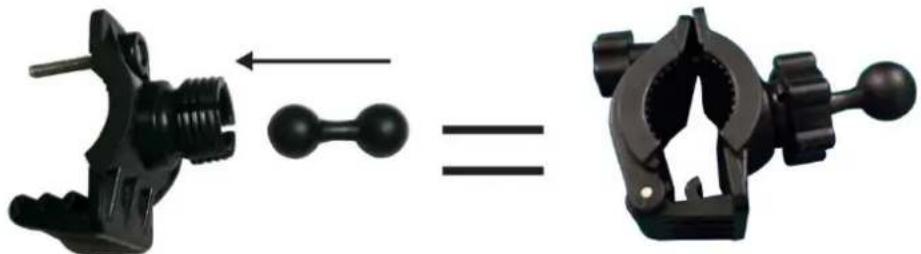
Mounts:
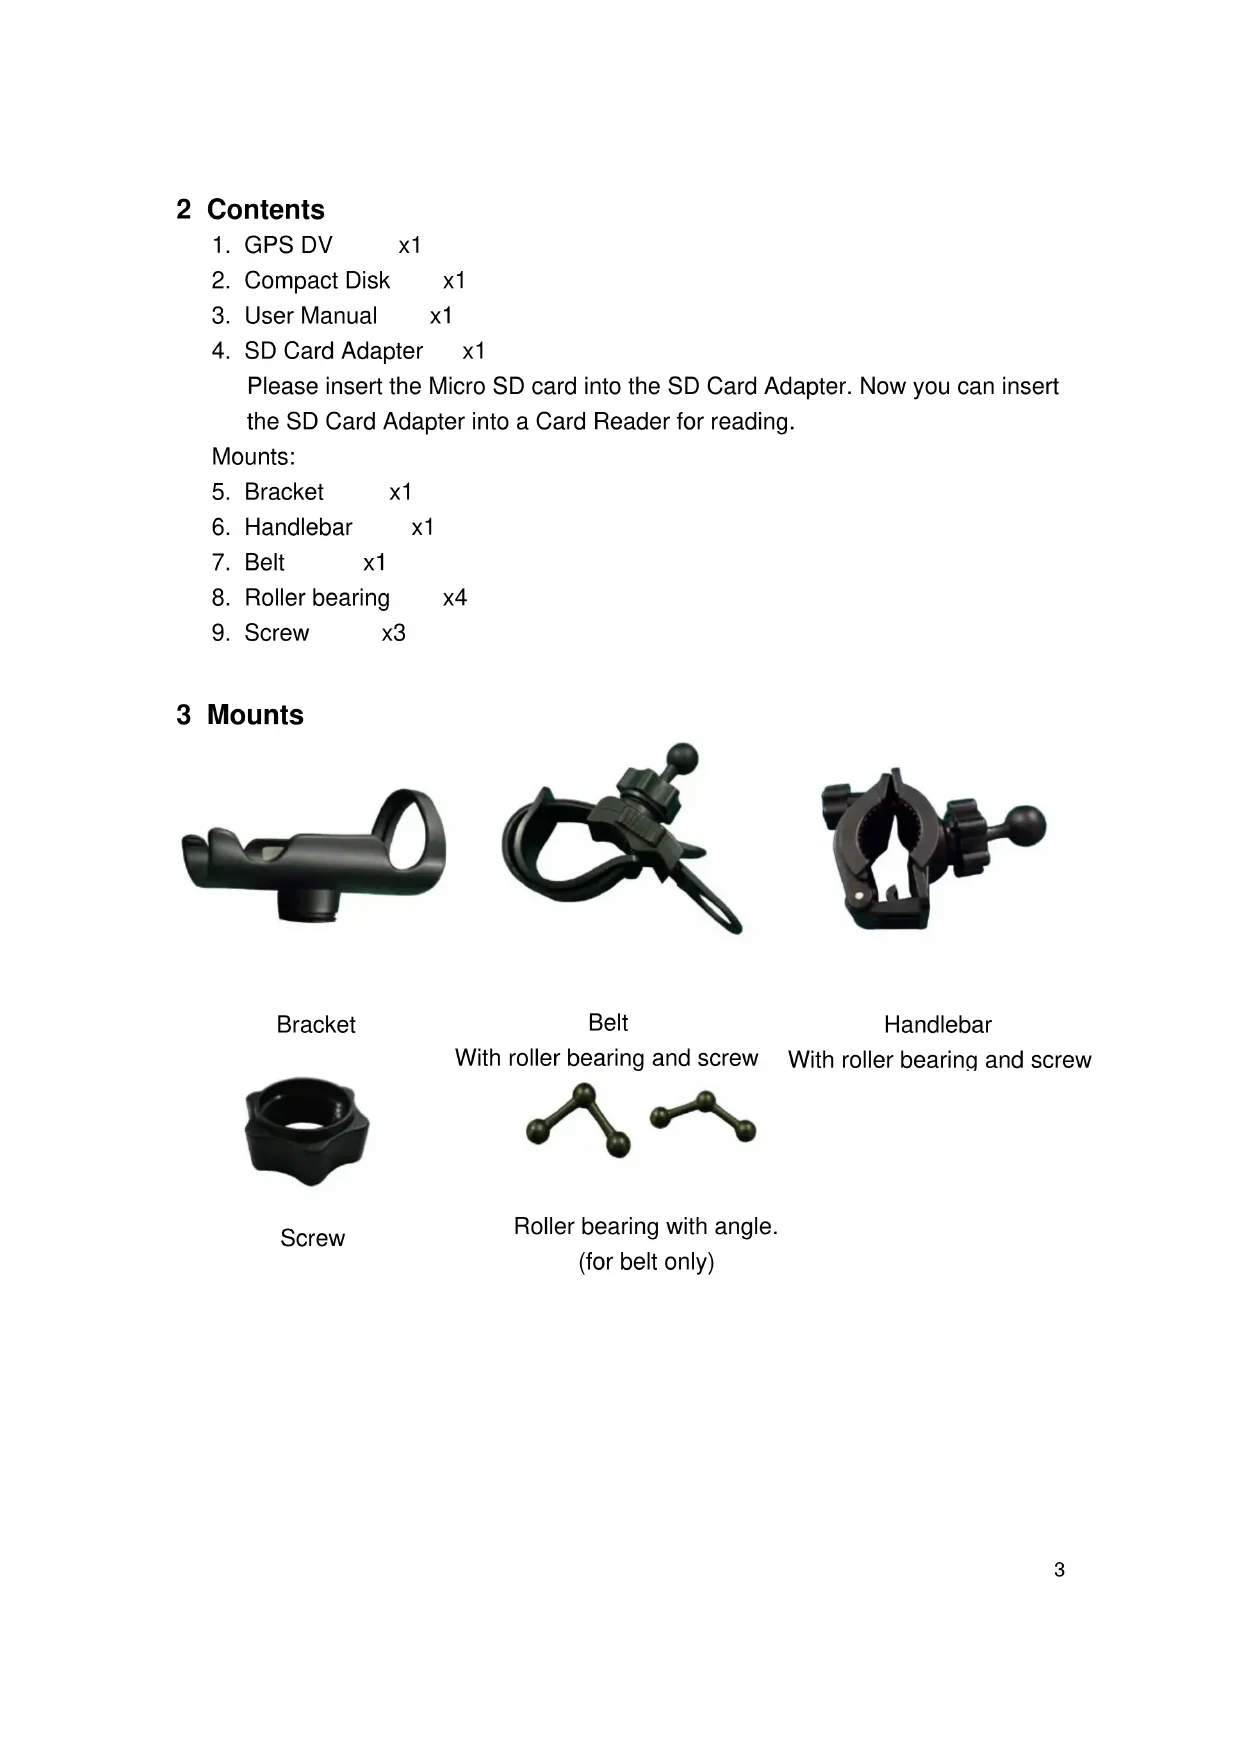
5.Bracket x1
6. Handlebar x1
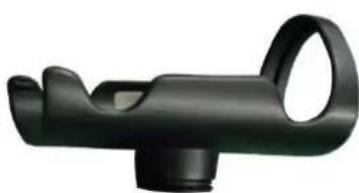
7.Belt x1
8. Roller bearing x4
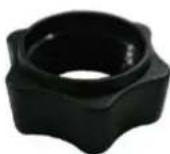
9. Screw x3
3Mounts
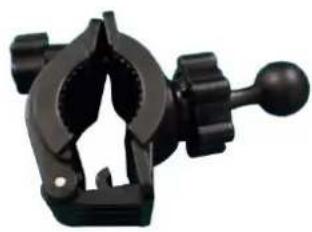
Bracket
Belt
Handlebar
With roller bearing and screw

Screw
With roller bearing and screw
Roller bearing with angle.
(for belt only)
4 Introduction
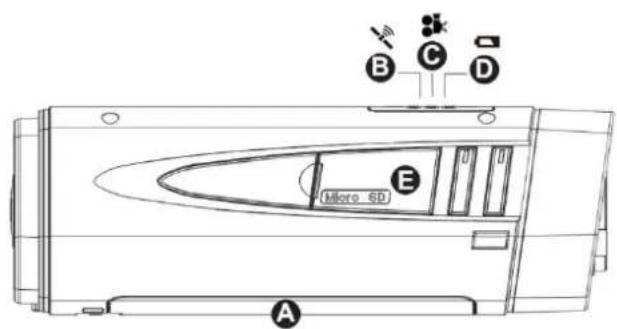
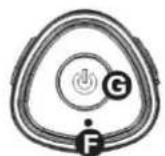
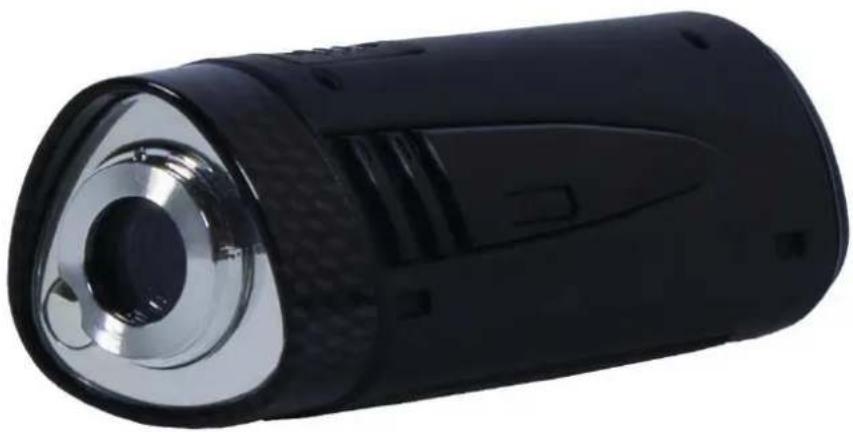
A. Battery Container
B. GPS Signal Light (Blue)
C. Video Recorder Light (Red)
D. Low Battery Light (Green)
E. Micro SD card slot. Open the cover by rotating it anticlockwise for 180^ .
F. Microphone
G. Power On / Off Button
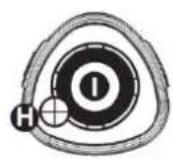
H. Mirror
I. Camera Lense
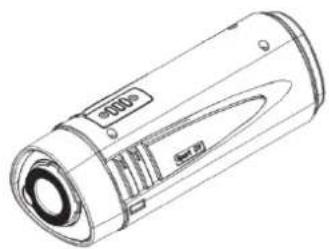
4.1 Installation
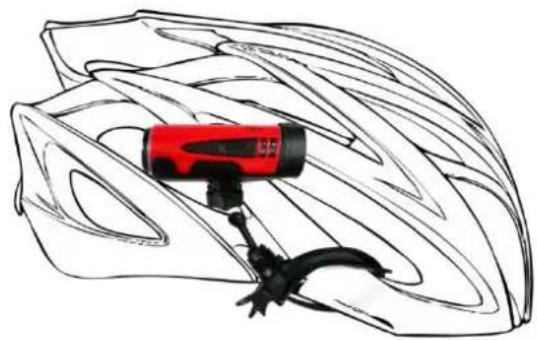
- Mount on the Helmet
Step 1: Put the GPS DV into the Bracket
Step 2: Put the screw on the top of belt. Then push the roller bearing into the bracket until it snaps in then rotate the screw clockwise to fix it into position.
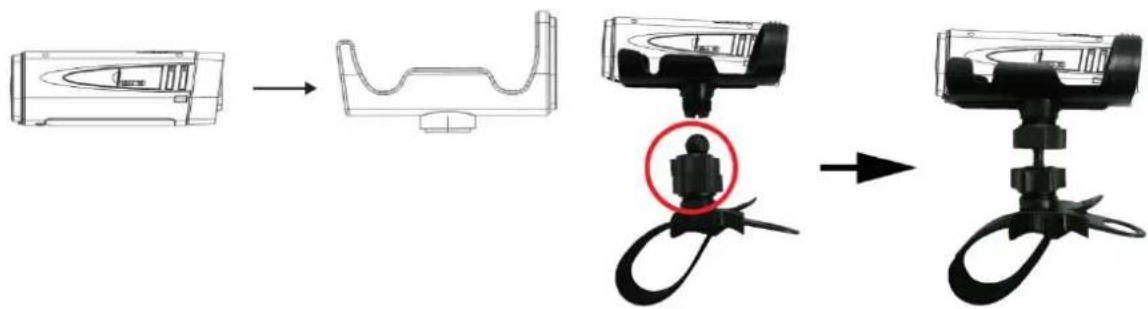
Step 3: Fasten the belt through the side of the helmet thighly.
- Mount on the Bike
Step 4: Put the roller bearing into the handlebars mount, and fix it into position with the screw.
Step 5: The other side of the roller bearing has to be put into the bracket. To do this you put the screw over the roller bearing and then you push this into the bracket. You can fix it now with the screw by turning it clockwise.
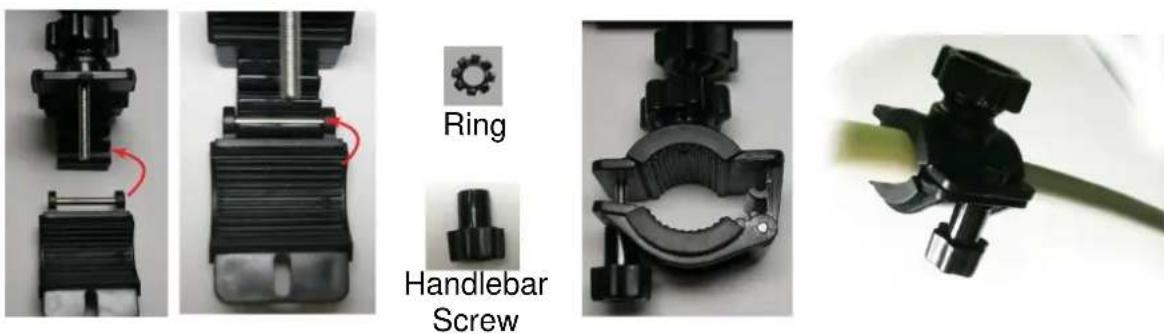
Step 6:
(1) You can change the width of the clamp by using different hooks. (See the two pictures on the left)
(2) Fix the mount on the handlebar by turning the handlebar screw clockwise.
Please use the ring to prevent the handlebar screw from loosening.
4.2 Video player information:
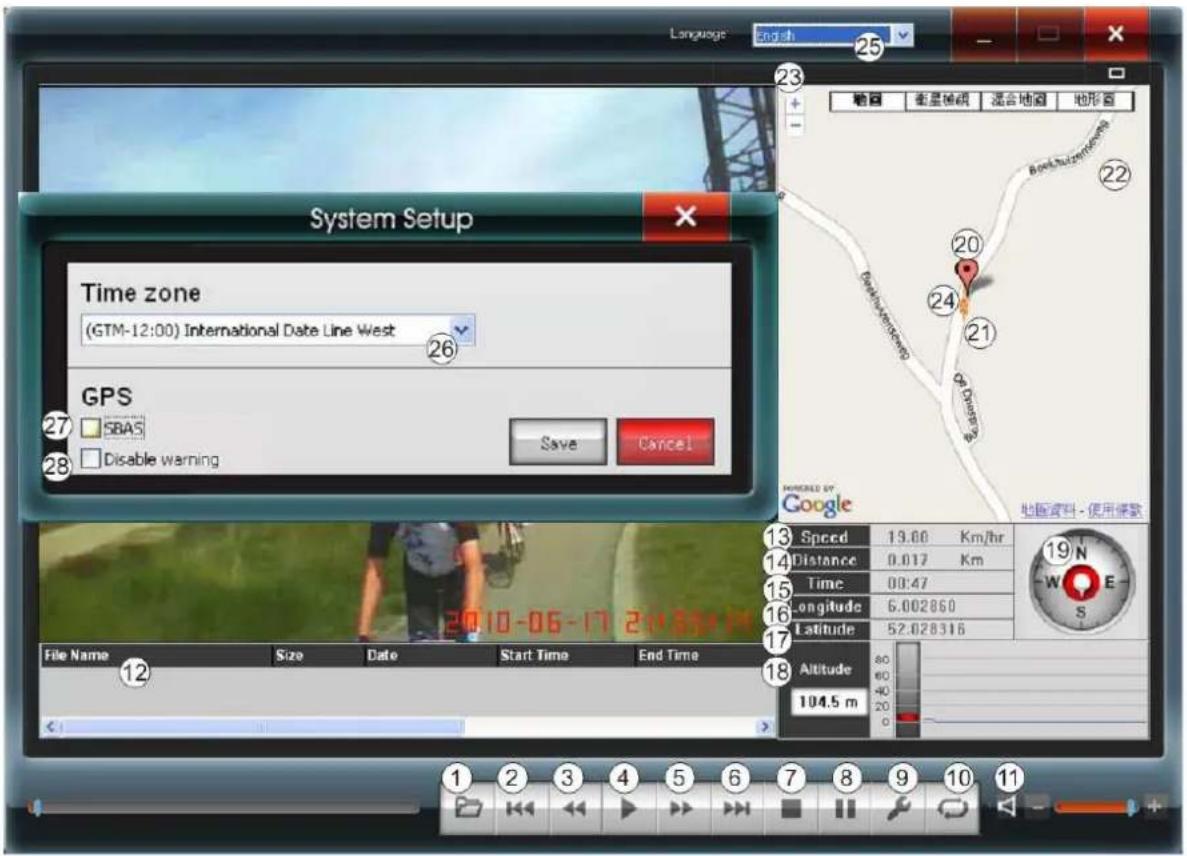
- Load video files
- Last video
- Backward
- Play
- Forward
- Next video
- Stop
- Pause
- Setup
- Repeat
- Volume
- File list
- Speed
- Distance
-
Time
-
Longitude
- Latitude
- Altitude
- Compass
- Starting point
- Biker icon
- Google map
- Zoom In / Out the map
- Route
- Multiple languages
- Time Zone
- SBAS, please see the next page for more information.
- Disable Warning
25. Multiple languages
You can select between English, Japanese and Chinese.
26-28:
These options appear when you open the setup menu (9). You have to insert the SD card which is used in the camera. The settings you make are saved to this memory card. The camera will assume these settings as soon as it is powered up with this SD card.
- Time Zone:
With this option can program the correct time zone into your camera.
- SBAS (Satellite Based Augmentation System)
These systems support the reception of the GPS signal and increase the accuracy. The standard GPS accuracy of 10-20m is increased to about 1-6m.
- Disable Warning:
With this option you disable the warnings (3 short beeps) for low power and running out of memory.
5 User Guide
Before you start using the camera for the first time you should install the supplied video player. To do this please insert the CD into your computer and start setup.exe. Then follow the instructions which will guide you through the installation. For the next step you need a microSD card with a transfer rate of 6MB/s or above and a card reader. This is achieved by memory cards with level 6 or above. Now connect your card reader to your computer and insert the memory card. You are now able to enter the setup menu in the video player. Please select the correct time zone and other options you wish to enable. These settings are saved to the memory card. Now insert the memory card into your camera. At the next startup the camera will apply all saved settings.
5.1 Outdoor
-
Insert the Micro SD card on which you saved the settings from the video player.
-
Press the Power on button for about 1 second, you will hear one short beep. (The lights will flash once in this order
-
Now the camera will start searching for a GPS signal. All LED will switch off except the GPS signal light which will flash in blue regularly (3). Once the camera finds the GPS signal you will hear two short beep tones and the camera will start recording.
The GPS light (blue ) and the record light (red ) will keep flashing.
If you start the camera for the very first time the search process can take up 3 minutes and more. If you switch the camera on after a long time it will take about 1 to 1.5 minutes for the search process to finish. And if you have recently recorded it will only take a few seconds.
- Power OFF: Keep the power button pressed for about 3 seconds. You will hear a short beep followed by a long beep and then the camera will shut down
5.2 Indoor
When you want to take a video indoors the camera won't be able to find any GPS signal and will keep on searching (Outdoor Step 3). In this case you have to shortly press the Power On/Off button again. You will hear one long beep followed by two short beeps which indicate the start of a recording.
Please Note
- If you use indoor recording the recorded video will playback but without the GPS map.
- When the product catches a GPS signal, it will switch to the GPS recording mode.
- If the memory card is almost out of memory the camera will beep shortly three times. This will be repeated every two minutes for the final 10 minutes.
- The same warning will appear for when the camera is low on battery. It will beep every two minutes until the batteries are below 2V this will shut down the camera immediately.
6 Trouble Shooting
What should I pay attention before I use this product?
- Please Note: The micro SD card has to be at least a level 6 card with a transmission rate of 6 MB/s or above. Otherwise the recorded videos will not run smoothly.
- Please insert the micro SD card into your computer and set up the correct time zone with the video player before you start recording.
- We recommend using high quality batteries this will increase the operation time of the camera.
- Check if the product has found the GPS signal when you start recording. See Chapter 5.1 for more information.
- Please do not cover the top of the camera while it is searching for a GPS signal. Since this is where the antenna is located. Please hold the camera like that:
- If you want to watch the videos on your computer make sure that your computer is linked to the internet. Otherwise the camera can't download the map information from Google Maps.
Why does the camera spend more than 1.5 min to search for the GPS signal?
- If you start the camera for the very first time it will take 3 minutes or more to find the GPS signal. The reason is that the camera has to update a lot of internal data. The following start-ups will be faster (1-1.5 min).
The memory card can't store the video.
- The memory card is already full.
- The write protection on the memory is enabled. To disable the write protection you have to open the properties of the memory card in the file explorer of your OS.
The Google map is not loaded while playing a video.
- Your computer is not connected to the internet.
- The camera did not catch the GPS signal during recording.
The camera does not power on.
- Please check the batteries. Is the batteries are low on power the camera can't work.
- Please check if the memory card is inserted. Without a memory card the camera is automatically switching off.
- The memory card is full. Please delete some old movies to create some free space.
7 Warranty and Recycling Information
We are legally obliged to include disposal and warranty information as well as EU declaration of conformity with the use instructions in different countries for every unit. Please find this information on the following pages.
7.1 2-Year Warranty from Date of Purchase
The manufacturer/retailer guarantees this product for two years from date of purchase. This warranty includes all malfunctions caused by defective components or incorrect functions within the warranty period excluding wear and tear, such as exhausted batteries, scratches on the display, defective casing, broken antenna and defects due to external effects such as corrosion, over voltage through improper external power supply or the use of unsuitable accessories. Defects due to unintended use are also excluded from the warranty.
Please contact your local dealer for warranty claims. The dealer will repair or exchange the product or forward it to an authorized service center.
You can also contact our service partner directly. Please include your proof of purchase with the product and describe the malfunction as clearly as possible.
7.2 WEEE and Recycling

The European laws do not allow any more the disposal of old or defective electric or electronic devices with the household waste. Return your product to a municipal collection point for recycling to dispose of it. This system is financed by the industry and ensures environmentally responsible disposal
and the recycling of valuable raw materials.
7.3 Service Address And Technical Hotline (for units sold in Germany)
PST professional support technologies GmbH Breitscheider Weg 117a D - 40885 Ratingen
Contact our service hotline by phone 01805-012204 (14 cent/minute from German fixed network) or e-mail at alan-service@ps-tech.de.
Before returning a product please check the chapter "Troubleshooting" for some easy steps and tests or contact our hotline.

ALBRECHT
DV 300 GP
PST professional support technologies GmbH
Alan Communications, SA