4Safety PLUS EDB5236GR - Iron ELECTROLUX - Free user manual and instructions
Find the device manual for free 4Safety PLUS EDB5236GR ELECTROLUX in PDF.
Frequently Asked Questions - 4Safety PLUS EDB5236GR ELECTROLUX
User questions about 4Safety PLUS EDB5236GR ELECTROLUX
0 question about this device. Answer the ones you know or ask your own.
Ask a new question about this device
Download the instructions for your Iron in PDF format for free! Find your manual 4Safety PLUS EDB5236GR - ELECTROLUX and take your electronic device back in hand. On this page are published all the documents necessary for the use of your device. 4Safety PLUS EDB5236GR by ELECTROLUX.
USER MANUAL 4Safety PLUS EDB5236GR ELECTROLUX
4SafetyTMPLUS EDB52XX
BG BPOUYPAC INHCTPYKLIIN CS PRIRUCKA KPOUZITI
DAVEJLEDNING
DE ANLEITUNG
EE KASUTUSJUHEND
EN INSTRUCTION BOOK
ES LIBRO DE INSTRUCCIONES
FI OHJEKIRJA
FR MODE D'EMPLOI
HR KNJIZICA S UPUTAMA
HU HASNZALATI UTMUTATO
IT ISTRUZIONI
LT INSTRUKCIJU KNYGA
LV LIETOSANAS INSTRUKCIJA
NL GEBRUKSAANWIJZING
NO BRUKSANVISNING
PL INSTRUKCJA OBSLUGI
PT MANUAL DE INSTRUÇÖES
RO MANUAL DE INSTRUCTIUNI
RU INHCTPYKLINIA
SK NAVOD NA POUZIVANIE
SL NAVODILA
SRUPUTSTVO
SV BRUKSANVISNING
TR EL KITABI
UK NOCIBHIMKOPNCTYBAHA
CONTENTS
БылгAPСКИ 4
CESTINA 7
DANSK. 10
DEUTSCH 13
EESTI. 16
ENGLISH 19
ESPANOL 22
SUOMI 25
FRANÇAIS 28
HRVATSKI 31
MAGYAR. 34
ITALIANO 37
LIETUVISKAI. 40
LATVIEŠU. 43
NEDERLANDS 46
NORSK 49
POLSKI 52
PORTUGUES 55
ROMAN 58
PYCCKN 61
SLOVENCINA 64
SLOVENSCINA 67
CPICKN 70
SVENSKA 73
TYRKCE 76
yKPAIHCbKA 79
WE'RE THINKING OF YOU
Thank you for purchasing an Electrolux appliance. You've chosen a product that brings with it decades of professional experience and innovation. Ingenious and stylish, it has been designed with you in mind. So whenever you use it, you can be safe in the knowledge that you'll get great results every time.
Welcome to Electrolux.
Visit our website to:

Get usage advice, brochures, trouble shooter, service information: www.electrolux.com

Register your product for better service: www.electrolux.com/productregistration

Buy Accessories and Consumables for your appliance: www.electrolux.com/shop
CUSTOMER CARE AND SERVICE
When contacting Service, ensure that you have the following data available. The information can be found on the rating plate. Model, PNC, Serial Number.

Warning / Caution-Safety information
General information and tips
Environmental information
Subject to change without notice.
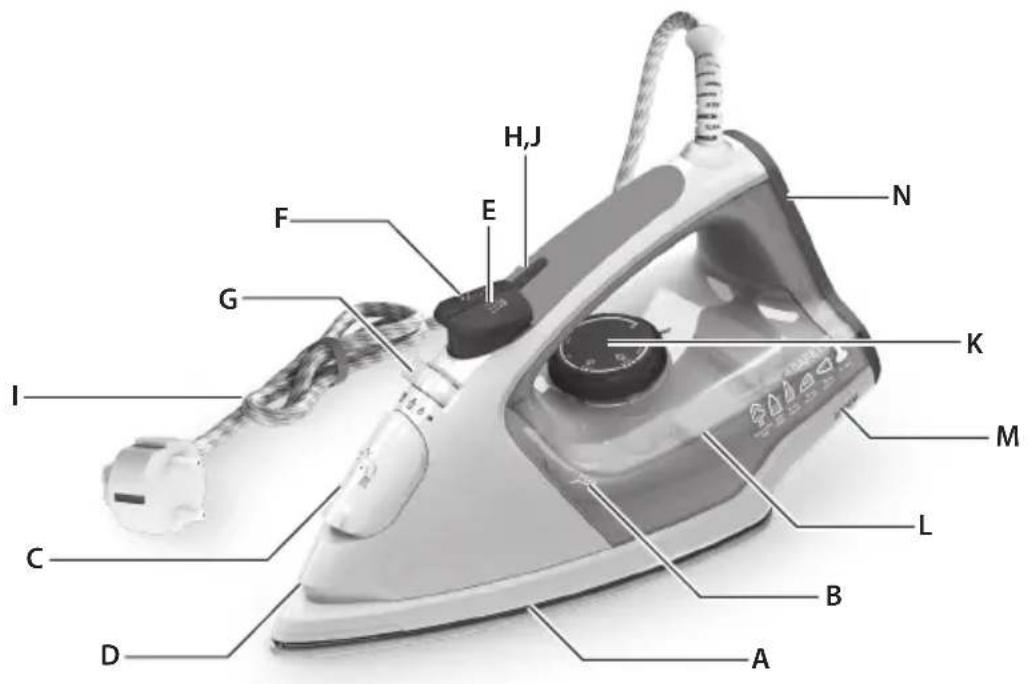
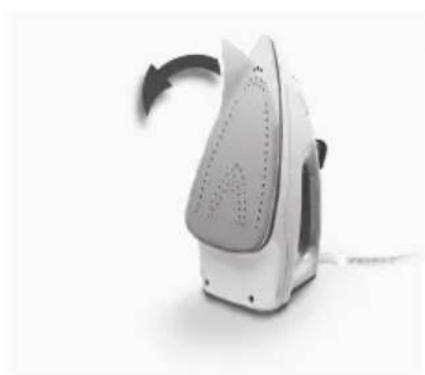
fig.1 fig.2 fig.3
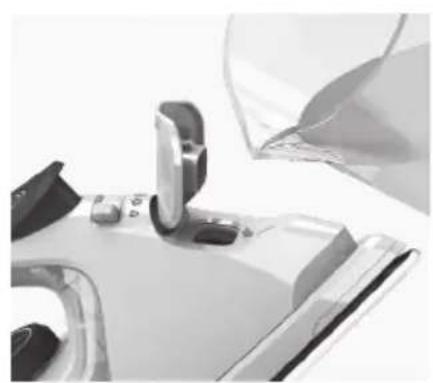
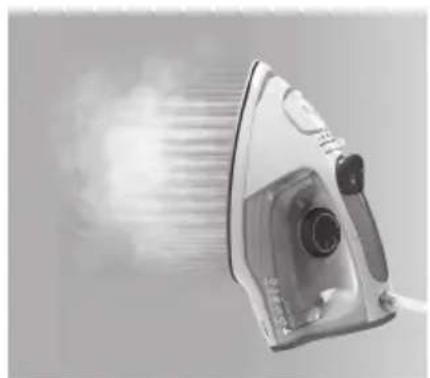
fig.5

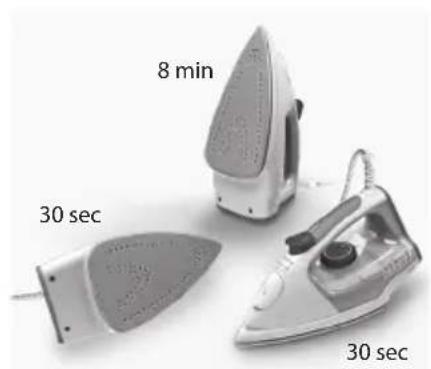
fig.6
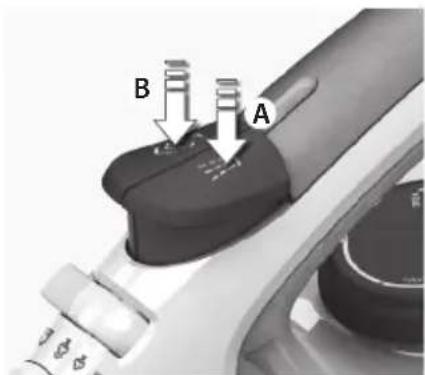
fig. 4
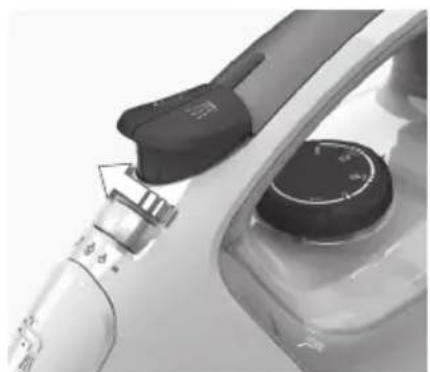
fig.8
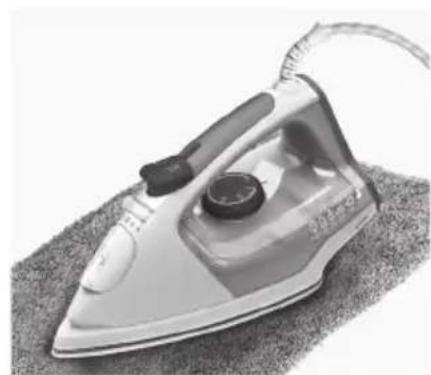
fig.9
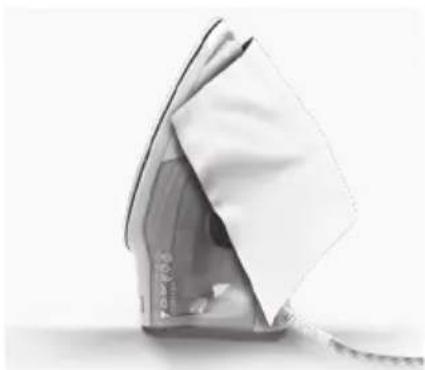
fig.7
Read the following instruction carefully before using machine for the first time.
- This appliance can be used by children aged from 8 years and above and persons with reduced physical, sensory or mental capabilities or lack of experience and knowledge if they have been given supervision or instruction concerning use of the appliance in a safe way and understand the hazards involved.
Children shall not play with the appliance. - Cleaning and user maintenance shall not be made by children without supervision.
- Keep the iron and its cord out of reach of children less than 8 years of age when it is energized or cooling down.
The surfaces are liable to get hot during use. - This product is appropriate for use with tap water. It is recommended to use distilled water or a mix of 50% distilled, 50% tap water.
- The appliance may only be connected to a power supply whose voltage and frequency comply with the specifications on the rating plate!
- The iron is not to be used if it has been dropped, if there are visible signs of damage on the iron or its cord or if it is leaking.
The appliance must only be connected to an earthed socket.
The filling aperture must not be opened during use. - If the appliance or the supply cord is damaged, it must be replaced by the manufacturer, its service agent or similarly qualified person, in order to avoid hazard.
- The iron must be used and rested on a stable surface. When placing the iron on its stand, ensure that the surface on which the stand is placed is stable.
- Never leave the appliance unattended while connected to the supply mains.
- The appliance must be switched off and the mains plug withdrawn each time after use, before cleaning and maintenance.
- The plug must be removed from the socket outlet before the water reservoir is filled with water.
- The mains cable must not come into contact with any hot parts of the appliance.
- Do not immerse the appliance in water or any other liquid.
- Do not exceed the maximum filling volume as indicated on the appliances.
- If there are limitations please define water quality / type of water that can be used with appliance.
- This appliance is intended for domestic use only. The manufacturer cannot accept any liability for possible damage caused by improper or incorrect use.
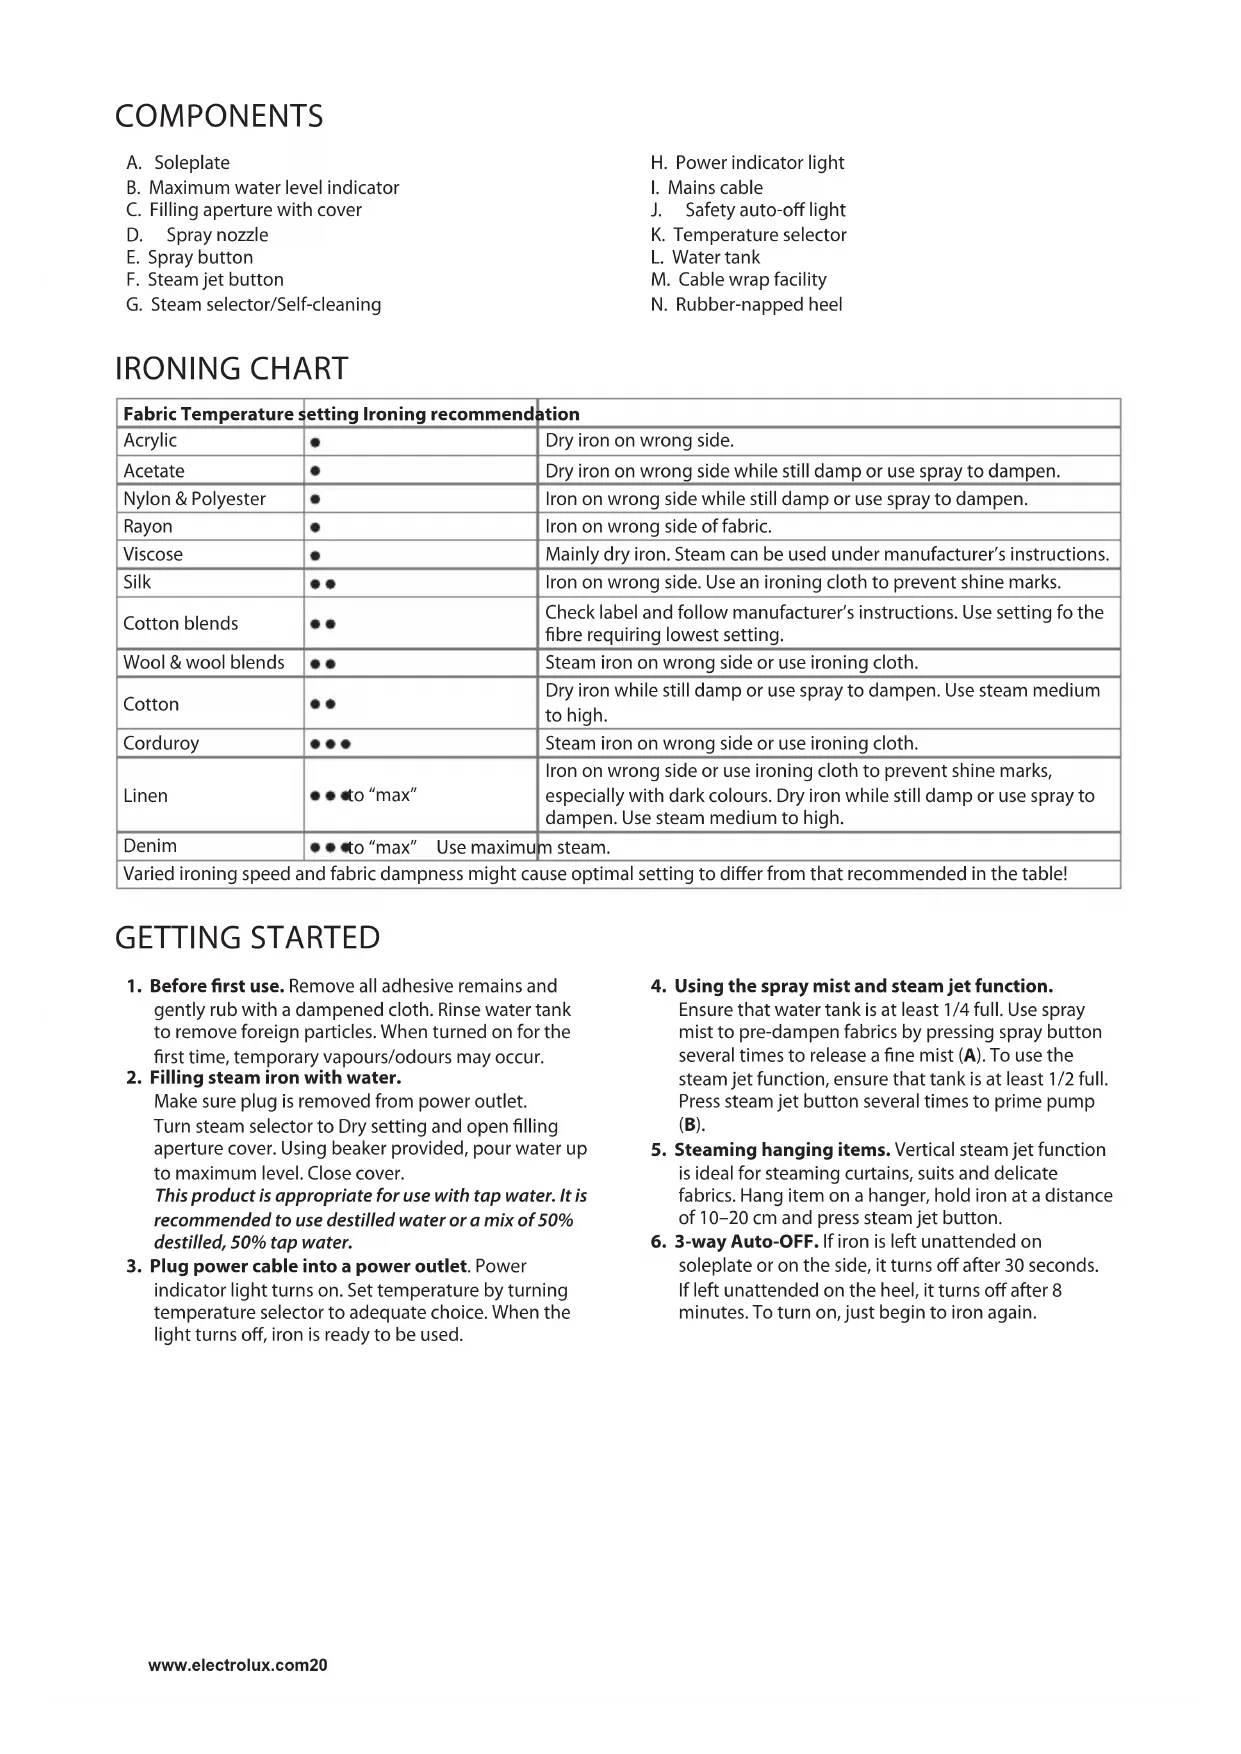
COMPONENTS
A. Soleplate
B. Maximum water level indicator
C. Filling aperture with cover
D. Spray nozzle
E. Spray button
F. Steam jet button
G. Steam selector/Self-cleaning
H. Power indicator light
I. Mains cable
J. Safety auto-off light
K. Temperature selector
L. Water tank
M. Cable wrap facility
N. Rubber-napped heel
IRONING CHART
| Fabric Temperature setting Ironing recommendation | ||
| Acrylic | ● | Dry iron on wrong side. |
| Acetate | ● | Dry iron on wrong side while still damp or use spray to dampen. |
| Nylon & Polyester | ● | Iron on wrong side while still damp or use spray to dampen. |
| Rayon | ● | Iron on wrong side of fabric. |
| Viscose | ● | Mainly dry iron. Steam can be used under manufacturer's instructions. |
| Silk | ●● | Iron on wrong side. Use an ironing cloth to prevent shine marks. |
| Cotton blends | ●● | Check label and follow manufacturer's instructions. Use setting fo the fibre requiring lowest setting. |
| Wool & wool blends | ●● | Steam iron on wrong side or use ironing cloth. |
| Cotton | ●● | Dry iron while still damp or use spray to dampen. Use steam medium to high. |
| Corduroy | ●●● | Steam iron on wrong side or use ironing cloth. |
| Linen | ●●●to "max" | Iron on wrong side or use ironing cloth to prevent shine marks, especially with dark colours. Dry iron while still damp or use spray to dampen. Use steam medium to high. |
| Denim | ●●●to "max" Use maximum steam. | |
| Varied ironing speed and fabric dampness might cause optimal setting to differ from that recommended in the table! | ||
GETTING STARTED
- Before first use. Remove all adhesive remains and gently rub with a dampened cloth. Rinse water tank to remove foreign particles. When turned on for the first time, temporary vapours/odours may occur.
- Filling steam iron with water.
Make sure plug is removed from power outlet.
Turn steam selector to Dry setting and open filling aperture cover. Using beaker provided, pour water up to maximum level. Close cover.
This product is appropriate for use with tap water. It is recommended to use distilled water or a mix of 50% distilled, 50% tap water.
-
Plug power cable into a power outlet. Power indicator light turns on. Set temperature by turning temperature selector to adequate choice. When the light turns off, iron is ready to be used.
-
Using the spray mist and steam jet function.
Ensure that water tank is at least 1/4 full. Use spray mist to pre-dampen fabrics by pressing spray button several times to release a fine mist (A). To use the steam jet function, ensure that tank is at least 1/2 full. Press steam jet button several times to prime pump (B).
5. Steaming hanging items. Vertical steam jet function is ideal for steaming curtains, suits and delicate fabrics. Hang item on a hanger, hold iron at a distance of 10 - 20cm and press steam jet button.
6. 3-way Auto-OFF. If iron is left unattended on soleplate or on the side, it turns off after 30 seconds. If left unattended on the heel, it turns off after 8 minutes. To turn on, just begin to iron again.
CLEANING (DO NOT USE ANY DETERGENT)
7. Always store iron on its heel rest.
To clean exterior surfaces, use a damp soft cloth and wipe dry. Do not use any chemical solvents, as these will damage the surface.
8. Self-cleaning function. Hold iron over a sink. Fill with water. Heat up iron. Move steam button to self-cleaning position, hold for 5 seconds to empty water from steam holes. Release button to stop self-cleaning function.
- Cleaning the soleplate. Do not use scouring pads or harsh cleaners on the soleplate as these will damage the surface. To remove burnt residue, iron over a damp cloth while iron is still hot. To clean the Glissium™ soleplate, simply wipe with soft damp cloth and wipe dry.
TROUBLESHOOTING
| Problem Possible cause Solution | ||
| Soleplate is not heating even though iron is turned on. | Connection problem Check main power supply cable, plug and outlet. | |
| Temperature control is in MIN position. Select adequate temperature. | ||
| Iron does not produce steam. Not enough water in tank. Fill water tank (see “Getting started”, no 2). | Steam control is selected in non-steam position. | Set steam control between positions of minimum steam and maximum steam (see “Ironing chart”). |
| Selected temperature is lower than that specified to use with steam. | Increase temperature to at least ●● | |
| Spray function does not work. Not enough water in tank. | Fill water tank (see “Getting started”, no 2). | |
| Steam jet and vertical steam jet function does not work. Steam jet function was used very frequently within a short period. | Put iron on horizontal position and wait before using steam jet function. | |
| temperature to steam ironing (up to ●●). Put iron in vertical position and wait until temperature indicator light turns off. | ||
| Brown streaks come out of the soleplate while ironing and stain the linen. | You have used hard water, which has caused scale flakes to develop in the water tank. | Use the self-clean function one or more times. |
| You have used chemical descaling agents. | Do not use any descaling agents. | |
| Fabric fibres have accumulated in the holes of the soleplate and are burning. | Use the self-clean function one or more times. Clean the soleplate with a damp soft cloth. | |
| Fabrics might not be properly rinsed or the garments are new and have not been washed before ironing. | Please rinse the laundry properly again. | |
DISPOSAL

Recycle the materials with the symbol Put the packaging in applicable containers to recycle it. Help protect the environment and human health and to recycle waste of electrical and electronic appliances.

Do not dispose appliances marked with the symbol with the household waste. Return the product to your local recycling facility or contact your municipal office.
MEPbI INPEIOCTOPOXHOCTN
Ipeed nepBbIM npmHeHem yctpoiCTBa BHImaTeIbHO npoTuTe cIeDuOyU NHCTpyKcNIO.
JaHbI np6Op moKeT kNpyaTnpoBaTbCra DeTbMn cTapwe 8 Iet n IuIcAmn C OrpaHnueHHbIMn fN3nueCKmN, CeHCOPhbIMn INI yMCTBeHHbIMn CNOco6HOCTaMn N C HeIOCTaTOUHbIM ONbITOM INI 3HaHnA MNI TOJbKO NOI pncmotpom INI NOcIe NOlyeHnA COOTBeTCTByOuX IHCTpyKcN, PO3BOJIAOxN IM 6e3OpaCHO EKcNpyaTnpoBaTb np6Op n DaIOxN m PpeCDTaBHeHne o6 ONaCHOCTN, COprjKeHHo erO kCNpyaTaCneN.
- DeTN He doJXHbI nrgaTb c npu6opom.
OuNTka n doctynhoe noIb3OBaTeJIo TexHnueCKoe 6cIyXnBaHne He DOJxHO npOn3BOAnTbCra DeTbMn 6e3 npNCMOtpa.
- DepeKHTe BkJIIOUeHHbI B CeTb IJIIOCTbIBaIOUcN yTHOr n erO shHyp B MeCTe, HeIOCTyINHom dIra DeTeN Do 8 JeT.
B xode pa6oTbI NOBepxHOCTn Moryr HaraeBaTbcA.
B daHHOM np6ope moKet nCNoJb3OBaTbcra BOOpOBOHaBa. PekomeHnyeTcra nCNoJb3OBaTb dNCTnJIInpOBAHHyIO N BOOpOBOdHyIO BODy B COOTHOseHnn 50% K 50%.
- UcTpoNCTBO MOxHOBKJIIOuAToB ToIbKO B PO3eTKy CeTN C HApPjaXeHNEm N YaCTOTOn, COOTBeTCTByIOUzIMN Ta6JIuYKe TexHnueCKnx DaHHbIX MoDeIi!
- YTOr He DoJxH NcNoB3OBAtbcra NocIe NaJeHn, npN BnIMbIX CTeJax NOBpeXdEHNy YTOrA nn Hhpya, nII eCIn OH TeUeT.
- UcTpoIcTBo MoXHo NODKJIIOuTaTb TOnbKO K 3a3eMneHHoN po3eTke.
- Bo Bpemr 3KcnpnyatauHn 3a npaBOUHoe OTBepCTne DOJXHO 6bITb 3aKpbITo.
B ceIax 6e30nacHocTn NOBpeJdeHHbIe yCTpoNCTBO nIIN shHyp IITaHnI DOJIxKbI 6bITb 3aMeHeHbI pON3BOIDTeJIeM, aReHTOM IO O6cIyKINBaHnIO nII IN dpyrIM KBaJInOuNpOBaHHbIM CneUaJIInCTOM.
- YTOI DIOJXeH NcNoJIb3OBA TbCn I CTaBNTbCn Ha yCToIuNBOI NOBepxHOCTn. Iomeua YTOI Ha IOnCTaBky, y6eIITecb, yTO IOBepxHOCTb, Ha KOTopoI OH CToNT, yCToIuNBa.
He octablan Te 6e3 npncmotpa yctpoiCTBO, BKIOueHHoe B cetb.
- ПераюобслужиBaHneMиЧИСТКОУбeДNTecь,чTO yCtpoIcTBO BbIKJIQUYeHO,a BnIka BblHyTa N3 CETN.
HaIINBaIte BOdy B 6aQK, TOnbKO BblHyB BNkU n3 p03eTKn.
Hyp nntaHn He doJxHe cOpnKaTaBcA C rOpYmN yCTpOInCTBa.
He norpykaTe yctpoiCTBO B BODy IIN INHyIO KNDKOCTb.
He npeBbIaIte MaKcImMaJIbHbI 3aNoJIHЯEmbI O6beM, yKa3aHHbI Ha yCTpOInCTBax.
- Пги наличи ораганчени onpeideJIte TUN И Ка ueCTBO BOДbl, KOTOPyH MoxKHO IcNoJIb3OBA Tb C yCTpoIeCTBOM.
-Данhoe yctpoiCTBO npeHa3NaueHo ДЯ ИСпОьЗOBaHЯ TOЛьКВ DOMaшнx yCIOBnIx.ИЗROTOВITeNB He HeceT OTBETCTBeHNOCTN 3a BO3MOЖHbIe NOBpeJdeHЯ n3-3a HeHaJIeJaUero npIMeHEny.
KOMNOHEHTbl
A. ネ onwardoba
B. INHINKAtop MaKcMaJIbHO rPOBnBa BObl
C. OTBepCTne Jn3aJIbKc KpbIuKoJ
D. Pa36pb3rNaTeNb
E. Khonka pa36pb3rNBateTn
F. Khonka CTpyn napa
G. Perynatop npapa/camoochnka
H. Hdukatop nHTaHn
I. Hnp nTaHn
J. INHINKAtop 3auntHOrABTOOTKIOUeHNIA
K. PerynTOp TemnepaTypbI
L. BauokДЯВОБы
M. BbIcTyn dIy IaHAmOTKn UHypa
N. 06pe3nHeHHa onopa
TAbJIuCAIJIAXEHNIA
UCYHEHHH HECPABHOCTEIN
| ПюбLEMа Можимва р�очи Ворihuшия. | ПюбLEMа підкіючени Переipte кабьжвленни,штень в розтук. | |
| Рergларовtemпегатурь встановлесу на поожени"MIN". | Установын Небхidiныtemпегатур. | |
| Прackа не ворobся napу.Нedoстату. | Бо Bodи в pezeерbyari. Hanobhittpezeерbayar BOODO (ДИВ.роздIN "Початок ровот", рунк 2). | Зрочьпber ругаллор пари mixміймальимі мадсимальимпосожени (ДИВ. роздIN "Ташицунаштуваьі рекомендацii"). |
| Вибрана temпегатура в поожю 3aВkaазану дlya виkopиссану 3 пою. | 36ьшшип Temпегатур у ршиайди до ● ● | |
| Функция розимлова нау He npашю. | Нedoстатно Bodи в pezeерbyari. Hanobhittpezeерbayar BOODO (ДИВ.роздIN "Початок ровот", рунк 2). | Зрочьпber ругаллор пари mixmіймальимі мадсимальимпосожени (ДИВ. роздIN "Ташицунаштуваьі рекомендацii"). |
| Функция паровогостуменя ТаBERTКально Відпарювannahу He npашю. | Функция паровогостуменя дуже чASTOBOPICSTOBYBAJACSA 3a kopoTKIй nepiodуquу. | Ззимитварпьну чASTINU (Тримайтбci kompoюентв в збразую CTAN),пеш nhіж habовни розерbayarBOODO qN 3acobom对于我们ВадаленяВална відповідю do inchtpykцiy 3ekplnyataцii пожукту. |
| Прackа Нedoстатно Harpinalacry. BIDperpyПочte Temпегатурduяпрасвannahу iZactocувannahу пари (do●).Постав trade paskу у verтпальппожени Ta nouekaite,doKINiHdikatop TempepaTyrnHeВIMKHeTbCЯ. | ||
| Під часпсравлия 3'являюсту Корочи ві сMuRG, які залиштоь паяни на 6iinnzhi. | Викорисовуалась щорstka вoda, sqo prinzьло do utbropenhy пlastructivihahkinyu b pezeerbyari對於 Bodи. | Запystыфункцию самоочиени один abо DeKayibka paazib. |
| Ви викорисовуалiximii zacobи дlya вidalaileну hakuyny. | He викорисовуITE zacobи дlya вidalaileну hakuyny. | |
| Волokна tkаимп наковипсь вotborax piioшвп п�адутб. | Запystыфункцию самоочиени один abо DeKayibka paazib.Очирсты пioшвп п�адуВoroiToM'яково ТканinoHO. | |
| Чeuі He 6ули наlexним чиномВиюлоскani abo reechi novi i ne 6улиВиюpani neped пасувannahm. | Ше раз rapно пpopолоціпь 6iinnzhi. |
YTNJI3ALIJA
3dabaiteHa noBtopHy nepepo6ky MaTepiAIn, no3hauehi
BIDNOIBHIMCIMBOJOM .BUNKaIte ynaKOBky BIDNOIBHI KOHTeHepn IaB TBPINHOI CUPOBHN. DOnOMOxITb 3axNCTNTn HABKONUHc CepeoBNIse Ta3DopOB'iaHux NIOe i 3a6e3neuTN BTOPNHHy nepepo6Ky eEeKtpuHnx i eNeKtpoHHx npniladib.
He BkndaIte npuaI, no3haeHb iDnOBiHM CmBONOM pa30m 3InuM domaunHc mITTAM. NobepHtB npOyKT do 3aBody i3 BtopHHoI nepeo6Ku y BauiMiCueBOCTi a6o 3BepHtBCa do MiueBHX MyHicnnaIbHnx opraHIB BnAa.

Electrolux Appliances AB
St. Goransgatan 143
S-105 45 Stockholm
Sweden
Share more of our thinking at www.electrolux.com

Printed on recycled paper