
EGS2003 - Iron ELECTROLUX - Free user manual and instructions
Find the device manual for free EGS2003 ELECTROLUX in PDF.


| Type | Garment Steamer |
| Brand | Electrolux |
| Model | EGS2003 |
| Power Supply | 220-240 V ~ 50/60 Hz (see rating plate) |
| Water Tank | Removable plastic tank; do not fill with hot water |
| Maximum Water Fill | As indicated on the appliance |
| Steam Hose | Flexible; length not specified |
| Heating Element | Metal; do not immerse in water |
| Castors | 4 castor wheels for mobility |
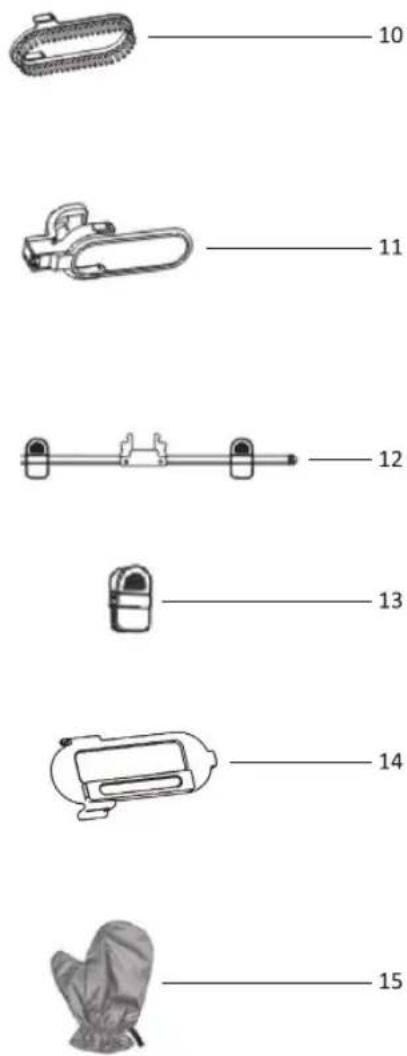
| Accessories | Brush, static brush, line clip, trousers rack, extra garment clip, protective glove |
| Clothes Rack | Adjustable height; unfold/fold mechanism with locking ring |
| Trousers Rack | Push-up along support; clips for trousers |
| Self-Cleaning | Rinsing after every 5 uses |
| Descaling | Monthly or when steam volume decreases; use descaler (e.g., MUD5F from Menalux) |
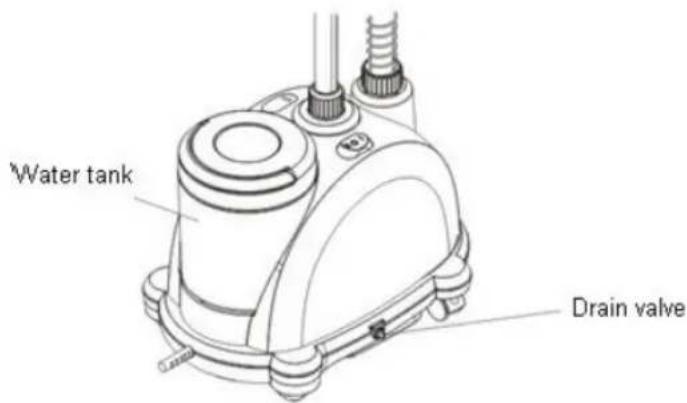
| Drain Valve | Yes, for draining surplus water from heating body |
| Safety | Automatic shut-off not specified; do not leave unattended while plugged in |
| Usage | Domestic only |
| Country of Origin | Korea (Electrolux Korea Limited) |
| Warranty | See product documentation |
| Contact | www.electrolux.com |
Frequently Asked Questions - EGS2003 ELECTROLUX
User questions about EGS2003 ELECTROLUX
0 question about this device. Answer the ones you know or ask your own.
Ask a new question about this device
Download the instructions for your Iron in PDF format for free! Find your manual EGS2003 - ELECTROLUX and take your electronic device back in hand. On this page are published all the documents necessary for the use of your device. EGS2003 by ELECTROLUX.
USER MANUAL EGS2003 ELECTROLUX
natural_image
Exterior view of a steam purifier with coiled tubing and control panel (no text or symbols visible)Garment Steamer EGS2003
EN Instruction book ..... 3-10
Before using the appliance for the first time
Read the following instruction carefully before using machine for the first time.
- This appliance can be used by children aged from 8 years and above and persons with reduced physical, sensory or mental capabilities or lack of experience and knowledge if they have been given supervision or instruction concerning use of the appliance in a safe way and understand the hazards involved. Children shall not play with the appliance. Cleaning and user maintenance shall not be made by children without supervision.
- Children should be supervised to ensure that they do not play with the appliance.
- The appliance may only be connected to a power supply whose voltage and frequency comply with the specifications on the rating plate.
- The garment steamer is not to be used if it has been dropped, if there are visible signs of damage on the product or its cord or if it is leaking.
- The appliance must only be connected to an earthed socket. If necessary an extension cable suitable for 10 A can be used.
- If the appliance or the supply cord is damaged, it must be replaced only by an authorized Electrolux service centre in order to avoid hazard.
- The garment steamer must be used and rested on a stable surface.
- Never leave the appliance unattended while connected to the supply mains.
- The appliance must be switched off and the mains plug withdrawn each time after use, before cleaning and maintenance.
- The plug must be removed from the socket outlet before the water reservoir is filled with water.
- The mains cable must not come into contact with any hot parts of the appliance.
- Do not immerse the appliance in water or any other liquid.
- Do not exceed the maximum filling volume as indicated on the appliance.
- This appliance is intended for domestic use only. The manufacturer cannot accept any liability for possible damage caused by improper or incorrect use.
- Keep the garment steamer and its cord out of reach of children less than 8 years of age when it is energized or cooling down.
- Do not bend the steam hose or block the steam outlet or else accidents may happen because of overpressure.
- Do not pull the steam hose when the product is in use.
- Do not fill hot water into the water tank or else the water tank may deform.
- To avoid hot condensate dripping from the steam nozzle, do not move the product horizontally but vertically.
Components
EN
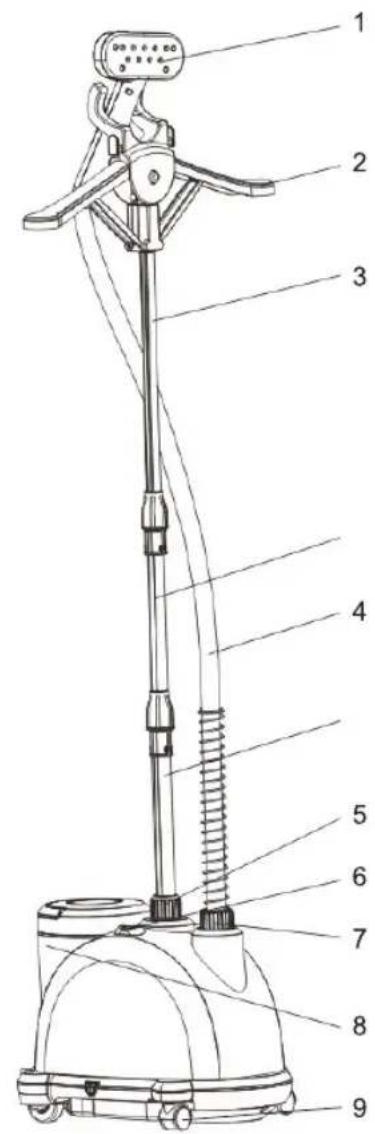
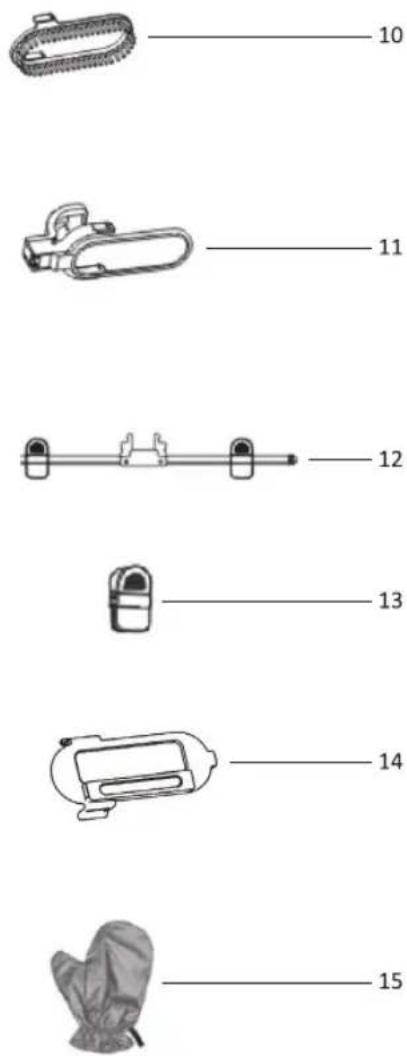
- Nozzle
- Clothes rack
- Support frame
- Steam hose
- Support locking ring
- Switch button
- Steam inlet seat
-
Water tank
-
Four castor wheel
-
Brush
-
Line clip
-
Trousers rack
-
Extra garment clip
-
Static brush
-
Protective glove
Getting started
Before first use, remove all adhesive remains and gently rub with a dampened cloth. Rinse water tank to remove foreign particles. When turned on for the first time, temporary vapors/odors may occur.
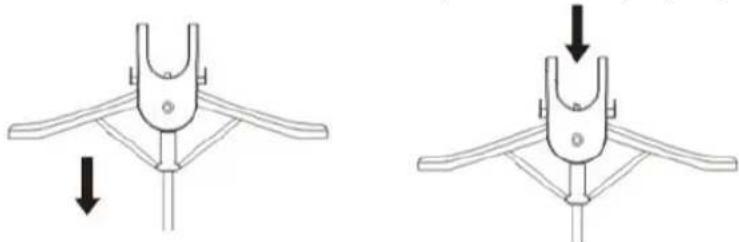
- Take out the support frame and the clothes rack, press down to install the clothes rack and lift it. If the clothes rack is stationary, it has been properly installed.
natural_image
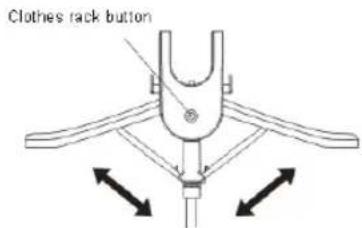
Technical line drawing of a mechanical component with two views showing internal structure and directional arrows (no text or symbols)- Press the clothes rack button, hold the clothes rack support with hands and unfold and fold the clothes rack to adjust it.
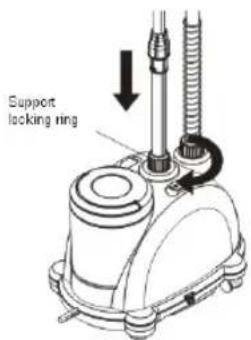
- Insert the support into the corresponding hole on the product and rotate the support locking ring to lock the support.
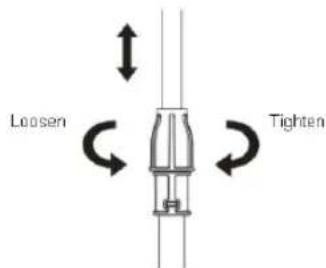
- Loosen the locking sleeves, lift the support, adjust it to the proper position and then lock the support locking sleeves.
Getting started
EN
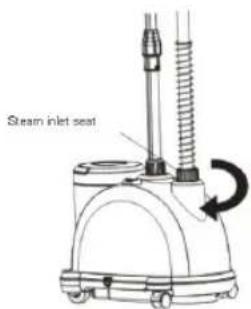
- Insert the steam inlet seat into the steam outlet along the direction in the figure and then tighten it turning clockwise.
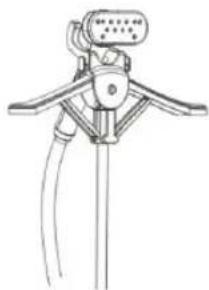
- Place the nozzle on the clothes rack hook.
natural_image
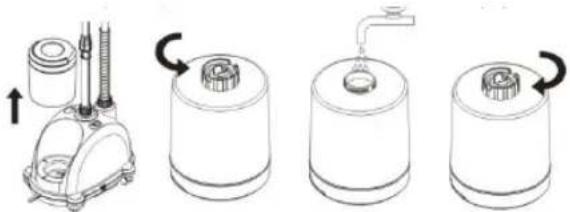
Line drawing of a mechanical device with no visible text or symbols- Take out the water tank, unscrew the knob at its bottom, fill water into it. This product is appropriate for use with tap water. It is recommended to use distilled water or a mix of 50% distilled, 50% tap water. Never put scented water, vinegar or ironing aids in the water tank. This may cause brown spitting and staining.
-
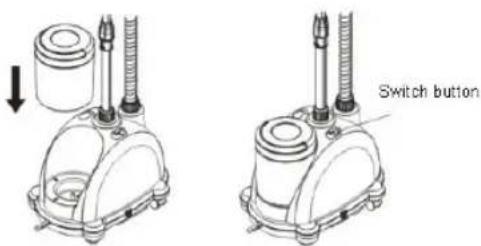
Place the water tank in the main unit. Insert the plug into the power socket and then press the switch button.
-
The power light will be on and steam will be released soon. Hang clothes on the clothes rack. Always steam the clothes from up to down.
- The steam hose becomes warm during steaming. This is normal.
NOTE: Do not release steam toward people or animals.
Accessories
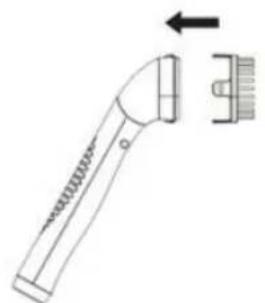
Brush: for removing fluff and hair from garments.
natural_image
Line drawing of a handheld tool with a separate gear mechanism (no text or symbols)Static Brush: remove the slight dust/fluff by the special static strip on it.
natural_image
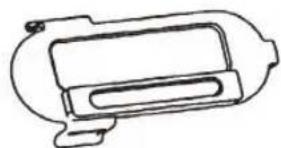
Line drawing of a mechanical component or housing (no text or symbols)Line clip: for perfect creases or crisp shirt cuffs and collars. Just clip it to the tab on the underside of the nozzle. Place the garment between the nozzle and the line clip.
natural_image
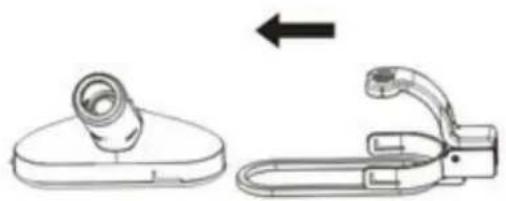
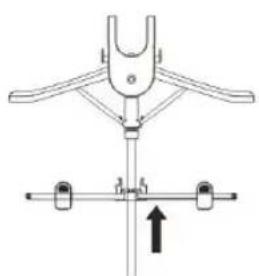
Diagram showing a mechanical component before and after assembly, with no visible text or symbolsTrousers rack: Push up the trouser rack along the support, it is properly installed after its locking knob hooks the support of the clothes rack. Evenly hang a pair of trousers in the middle of the trousers rack and firmly clip the trousers with trousers clips.
natural_image
Technical diagram of a mechanical assembly with no visible text or symbols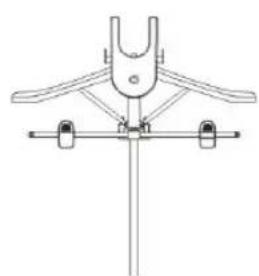
natural_image
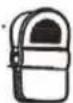
Technical line drawing of a mechanical clamp or bracket assembly (no text or symbols)Extra garment Clip: holds sleeves, dresses and other longer items in place for quick steaming.
Cleaning
- After use, turn the product off by pressing the switch button. Unplug the appliance and allow the product cool down for more than 30 minutes.
- Remove the water tank from the steamer and drain the remaining liquid from the tank and the cavity of the steamer.
- Open the drain valve to thoroughly drain the surplus water in the heating body of the main unit and then wipe the surplus water at the junction of the water tank and the main unit to avoid scaling. After water drainage, close the drain valve.
Rinsing
This process has to be done after 5 times of usage.
- Turn the product off, unplug the appliance and take both the steam hose and the support out of the main unit.
- After the product has cooled down to the room temperature, open the drain valve put the main unit under the tap.
- Open the tap, slowly fill the water into the steam inlet seat, the water should not overflow from the product, last this rinsing process for 1min.
- After water drainage, close the drain valve and wipe-dry the product.
- Reassemble the accessories to continue using it.
Descaling
This process has to be done after every month of usage or if the volume of the released steam is clearly less than before, or steam release stops soon. You can remove the scales such as calcium carbonate and mineral substances on the heating body by following the steps below.
- Turn the product off, unplug the appliance and take both the steam hose and the support out of the main unit.
- After the product has cooled down to the room temperature, take the water tank out of the main unit and drain the surplus water in the product.
- Mix a descaler agent and water at the specified ratio, prepare at least 300ml descaler mixture. (Use recommended ratio for the mixture, if there is much scaling, properly increase the proportion of descaler.) Recommended descaler for this operation is MUD5F from Menalux.
- Fill the mixture into the water tank, tighten the knob and then place the water tank in the main unit.
- Soak for one to two hours under room temperature (if there is much scaling, properly increase the soaking time; however, the soaking time should not be longer than 8 hours).
- Pour out the mixture from the water tank and the heating furnace.
- Fill in clean water via the steam hose joint and into the water tank and then thoroughly pour it. Repeat this step for several times until the scales in the product are removed and there is no longer descaler smell.
- Reassemble the accessories to continue using it.
Troubleshooting
EN
| Problem Possible cause | Solution | |
| No steam is released and the power light is off. | Connection problem. | Check main power supply cable, plug and outlet. |
| The appliance is not switched on. | Press the switch button. | |
| No steam is released but the power light is on. | The water level in the water tank is too low. | Fill water into the water tank. |
| The nozzle has water leakage. | Inspect whether the nozzle has cracked. | Change the nozzle. |
| Place the product flat in operation. | Move vertically. | |
| Joint of the steam hose has water leakage. | The joint is loose. | Tighten the joint of the steam hose. |
| Water flows out of the water tank. | The water tank has cracked or has holes. | Change the water tank. |
| Inspect whether the steam hose is seriously bent. | Straighten the steam hose. | |
| The steam hose has been bent for a long time. | Straighten the steam hose and lift the nozzle up. | |
| The water tank is deformed. | Hot water has been filled into it. | Change the water tank. |
| Some chemical reagent has been filled into it. | ||
| The steam volume is too small. | The steam hose is blocked by scales. | Remove the scales with a special cleaning agent. |
| The voltage is too low. Install a voltage stabilizer | ||
| The switch or the heating body is damaged. | Send to a professional for repair. | |
| There is a sound in the steam hose. | The nozzle is lower than the horizontal line in operation. | Straighten the steam hose and lift the nozzle. |
| The brush and the line clip cannot be tightened. | The buckles are damaged. Change the accessories. | |
natural_image
Technical line drawing of a mechanical component with two views showing internal structure and directional arrows (no text or symbols)natural_image
Line drawing of a mechanical device with no visible text or symbolsnatural_image
Diagram of a hairbrush with a separate clip and arrow indicating direction (no text or symbols)natural_image
Line drawing of a cylindrical mechanical component with no visible text or symbolsnatural_image
Diagram showing a mechanical device with a cylindrical component and a clamping tool, both without any text or symbols.natural_image
Technical diagram of a mechanical assembly with no visible text or symbols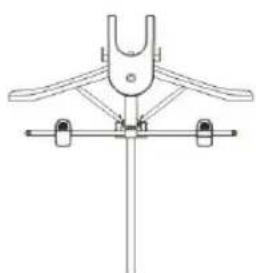
natural_image
Technical line drawing of a mechanical clamp or bracket assembly (no text or symbols)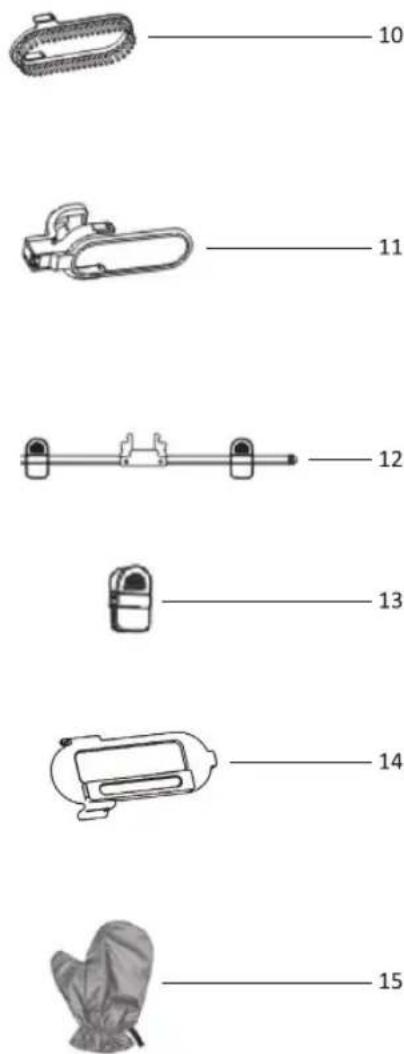
natural_image
Technical line drawing of a mechanical component with two views showing a U-shaped bracket and a central rod (no text or symbols)natural_image
Technical line drawing of a mechanical device with no visible text or symbolsnatural_image
Illustration of a mechanical device with four sequential steps showing a turning mechanism (no text or symbols)natural_image
Line drawing of a hairbrush with a separate clip and arrow indicating direction (no text or symbols)natural_image
Simple line drawing of a mechanical device with no text or symbolsnatural_image
Technical illustration of a mechanical device with a cylindrical component and a clamp-like bracket, showing an arrow indicating assembly (no text or symbols present)natural_image
Technical diagram of a mechanical assembly with no visible text or symbols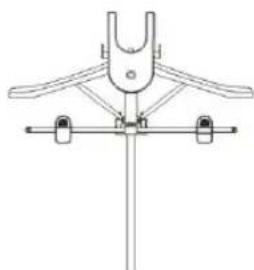
natural_image
Technical line drawing of a mechanical clamp or bracket assembly (no text or symbols)Electrolux Korea limited
East Tower 11F Signature Towers Seoul,
99 Supyo-dong, Jung-gu, Seoul, 100-230
Korea
Tel: +(82) 2 6020-2200
Fax: +(82) 2 6020-2271\~3
Customer Care Services : +(82) 1566-1238
Email: homecare@electrolux.co.kr
Website: www.electrolux.co.kr
INDONESIA
PT Electrolux Indonesia
Electrolux Philippines, Inc.
10th Floor. W5th Avenue Building
5th Avenue Corner 32nd Street
Bonifacio Global City,
Taguig Philippines 1634
Trunkline: +(63) 2 737 4756
Domestic Toll Free : 1 800 10 845 care 2273
Customer Care Services: +(63) 2 845 care 2273
Email: wecare@electrolux.com
Website: www.electrolux.com.ph
THAILAND
Electrolux Thailand Co Ltd
Electrolux Building
14th Floor 1910 New Petchburi Road
Bangkapi, Huay Kwang
Bangkok 10310
Thailand
Tel: +(66) 2 725 9100
Fax: +(66) 2 725 9299
Customer Care Services: +(66) 2 725 9000
Email: customercarethai@electrolux.com
Website: www.electrolux.co.th
VIETNAM
Electrolux Vietnam Ltd
Floor 9th, A&B Tower
76 Le Lai Street
Ben Thanh Ward - District 1
Ho Chi Minh City
Vietnam
Tel: +(84) 8 3910 5465
Fax: +(84) 8 3910 5470
Customer Care Services: 1800-58-8899
Email: vncare@electrolux.com
Website: www.electrolux.vn
MALAYSIA
Electrolux Home Appliances Sdn Bhd
Lot C6, No. 28, Jalan 15/22,
Taman Perindustrian Tiong Nam,
40200 Shah Alam, Selangor
Malaysia
Customer Care Services Tel: (+60 3) 5525 0800
Customer Care Services Fax: (+60 3) 5524 2521
Email: malaysia.customercare@electrolux.com
Website: www.electrolux.com.my
SINGAPORE
Electrolux SEA Pte Ltd
1 Fusionopolis Place, Galaxis
07-10 (West Lobby)
Singapore 138522
Customer Care Services: +(65) 6727 3699
Fax: +(65) 6727 3611
Email: customer-care.sin@electrolux.com
Website: www.electrolux.com.sg

Electrolux
Share more of our thinking at www.electrolux.com
Product specifications and colours are subject to changes and vary from country to country
APAC-EGS2003-IFU-AP-5
Brand : ELECTROLUX
Model : EGS2003
Category : Iron