
Cubo 1800 - Alarm clock radio SONORO - Free user manual and instructions
Find the device manual for free Cubo 1800 SONORO in PDF.
| Product Type | Radio Alarm Clock |
| Brand | SONORO |
| Model | Cubo 1800 |
| Radio Reception | DAB+/DAB and FM |
| CD Player | Yes (Audio CDs, CD-R, CD-RW) |
| iPod Compatibility | Via optional eDock |
| AUX Input | 3.5 mm Jack |
| Alarm Function | Two independent alarms |
| Snooze Function | Yes, adjustable |
| Remote Control | RF remote control (433.92 MHz), included |
| Display | Yes, brightness adjustable |
| Power Supply | 100-240 V ~ 50/60 Hz, Output 12V 2.5A |
| Standby Power | < 2 W |
| Antenna | DAB+/DAB/FM antenna, telescopic antenna |
| Headphone Jack | 3.5 mm |
| Line-Out | Yes |
| Cleaning | Unplug power cord, dry cloth |
| Safety | Laser Class 1, do not repair yourself |
| Manufacturer | sonoro audio GmbH, Cologne |
| Warranty | Information in the manual |
Frequently Asked Questions - Cubo 1800 SONORO
User questions about Cubo 1800 SONORO
0 question about this device. Answer the ones you know or ask your own.
Ask a new question about this device
Download the instructions for your Alarm clock radio in PDF format for free! Find your manual Cubo 1800 - SONORO and take your electronic device back in hand. On this page are published all the documents necessary for the use of your device. Cubo 1800 by SONORO.
USER MANUAL Cubo 1800 SONORO
(DAB+/DAB, FM, CD, iPod, AUX)
14, 15, 16 Radio-Stationstaten
im CD-Betrieb
The manufacturer continuously works on the further development of all types and models.
We ask for your understanding that changes of the scope of delivery in regard to form, components and technology are therefore possible at any time. The information, illustrations and descriptions in this manual therefore shall not constitute an entitlement to any claims.
Replication, copying or translation, even in parts, is not permitted without the written consent of the manufacturers.
The manufacturer explicitly reserves all rights pursuant to the law governing the copyright.
Subject to changes
iPod® is a trademark of Apple Inc., registered in the U.S. and other countries.
Apple is not responsible for the functioning of this device or its adherence to safety guidelines.
Table of contents
1. Safety Precautions 5
1.1 Never attempt to repair if yourself 5
1 2 The CD player 5
13 Cleaning and care 5
1.4 Operation 6
1.5 Battery compartment 6
1.6 Insertion and removal of disks 6
2. Getting started 7
2.1 Standby/Switching on/Switching off 7
2.2 Connecting headphones 7
2.3 Connecting an audio device 7
2.4 Connecting the antenna 7
2.5 Adjusting tone (bass/treble) 7
2.6 Pairing the remote control 7
3. Controls and Connectors 8
4. Setting Basic Functions 11
4.1 Setting the time 11
4.2 Selecting 12- or 24-hours time display 11
4.3 Setting display screen brightness 11
4.4 Muting function 11
4.5 Automatic switch off 11
5.FM Radio Operation 12
5.1 Setting the stations 12
5.2 Storing and calling up stations 12
6. DAB+/DAB Radio Operation 12
6.1 Full Scan, automatic station search (Channel 5...13) 12
6.2 Quick Scan, automatic station search (Channel 10...13) 13
6.3 Manual DAB+/DAB station search 13
6.4 Station selection 13
6.5 Station information 13
6.6 Storing and selecting stations 14
6.7 Resetting the DAB+/DAB system 14
7.CD Mode 14
7.1 Title skip function 14
7.2 Title search function 15
7.3 Repeat function 15
7.4 Random playback 15
7.5 Intro 15
7.6 Programmed playback 15
Table of contents
7.7 Muting function 16
7.8 Automatic switch off 16
8. iPod® playback (using optional eDock) 16
9. Alarm mode 17
9.1 Alarm function 17
9.2 Snooze function 17
10. Disposal 17
10.1 Packaging 17
10.2 Device 18
11. Troubleshooting 18
12. Technical Data 19
13.Warranty 21
1. Safety Precautions
Place the device on a firm, level surface.
Make sure that
the device is not covered, so as to ensure there is always adequate circulation of air; there are no direct sources of heat (e.g. radiators) affecting the product; the device is not subjected to direct sunlight;
- contact with moisture, water or spray is avoided (e.g. never place a vase of flowers on the CD radio);
- the CD radio is not in the vicinity of magnetic fields (e.g. television sets or loudspeakers);
- no naked flames (e.g. burning candles) are located either on or near the product.
Never allow children to use electrical products unsupervised. To avoid danger of suffocation, please keep the plastic packaging away from children.
Only connect the device to an easily accessible power outlet nearby, in case it is necessary to remove the CD radio from the power supply in a hurry.
1.1 Never attempt to repair it yourself
On observing that the CD radio or its power lead is damaged, you should immediately pull the plug out of the power supply socket. In no circumstances should you try to open the product, or repair it yourself. There is grave danger of electric shock. In case of a technical issue, you should refer to our Service Centre or to another suitably qualified specialist workshop.

1.2 The CD player
The CD player is a Class 1 laser product. The device is fitted with a safety system that eliminates dangerous laser emissions during normal usage. To avoid eye injury, never manipulate or damage the laser safety system of the device.
1.3 Cleaning and care
Before cleaning the CD radio, please disconnect the plug from the mains power supply. For cleaning, use a soft, dry cloth. Do not use chemical solvents and cleaners, as these are likely to damage the surface and / or the lettering. If you are not expecting to use the CD radio for some time, it is advisable to disconnect it from the mains power supply.
1.4 Operation
Connect the power supply to an easily accessible mains outlet.
1.5 Battery compartment
This cubo model has a replaceable battery (CLOCK BATTERY) to back up the clock memory. This means if the power supply is interrupted, e.g. in the event of a power failure, the alarm and clock settings are saved. The entire display lighting and the alarm functions are switched off. As soon as power returns, the correct time will be displayed and the alarm function reactivated. The battery has a plastic film cover when you purchase the unit. Remove this film to activate the backup battery.
Note: If no backup battery is inserted you will have to set the clock and alarm times after the power supply has been interrupted. If the power supply is only interrupted rarely, the service life of the battery will depend on the battery's durability. The battery should be replaced approximately every two years to avoid potential leaks. To do this, release the screws at the rear of the device (see illustration on page 9), replace the battery and then tighten the screws again. The battery is not included in the guarantee.
Batteries contain chemicals and should be disposed of properly.
Caution! Risk of explosion if the wrong battery type is used. Please replace with a battery of the same or similar type (3V lithium battery, type CR2032).
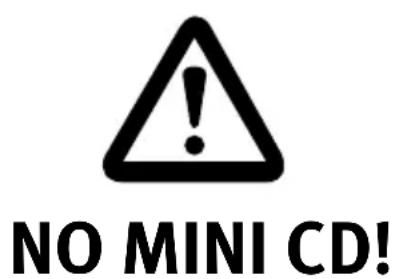
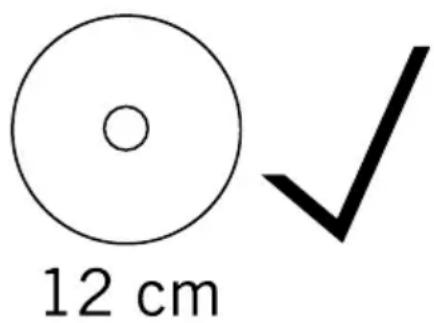
1.6 Insertion and removal of disks
Insert a CD with the label facing upwards into the CD slot. To remove the CD again, press the OPEN button.
Warning: Never insert a mini CD / MD-CD (8-cm diameter) into the CD slot.

2. Getting started
2.1 Standby/Switching on/Switching off
The device is now in standby mode. The time display lights up. To switch the device on and off, use the STANDBY button.
2.2 Connecting headphones
Headphones may be connected to the device. Connect the headphones to the headphone connector at the rear of the device.
2.3 Connecting an audio device
You can connect an external audio device, e.g. an MP3 player, iPod®, Notebook or similar device. Please use a suitable audio cable and connect the external device to the AUX-IN jack on the rear of the cubo. Select AUX mode by pressing the MODE button (AUX will appear on the display).
2.4 Connecting the antenna
Connect the supplied antenna to the antenna socket (ANTENNA). If the radio reception is not satisfactory, please try to improve the reception by adjusting the antenna. If you have a roof aerial which is customised for DAB+/DAB, you can connect it to the antenna connector on the unit. An antenna connection cable is required; this can be obtained from specialist dealers.
2.5 Adjusting tone (bass/treble)
Press the 1. MENU button.
Press 2. SKIP until Set-Tone appears on the display.
Press the 3. MENU button and set the bass level with the volume buttons.
Press 4. SKIP again to set the treble level.
Confirm your selection by pressing 5. MENU.
2.6 Pairing the remote control
Insert a lithium battery (button cell type CR2032) into the remote control with the +pole 1. facing upwards and close the sliding cover.
Press the 2. STANDBY button on the device to switch it off.
- Press and hold the REVERSE (SKIP) and VOLUME+ buttons until "Remote" appears on the display.
- Then press and hold the MODE and TUN+ buttons on the remote control to pair the remote control. When pairing has been completed successfully, "Pairing" appears on the display.
3. Controls and Connectors

cubo front:
1 Tuning Station search +
2 Tuning Station search -
3 CD slot
4 Mode Operating mode (DAB+/DAB, FM, CD, iPod, AUX)
5 Menu Settings
6 Skip Reverse Skip to previous title
7 Pause CD pause
8 Play CD playback
9 Stop Stop CD playback
10 Skip Forward Skip to next title
11 Open Eject CD
12 Standby Switch on device and switch to standby mode
13 Volume Volume control +/-
In DAB+/DAB radio mode
1 Quick Scan If pressed for more than 2 seconds
2 Full Scan If pressed for more than 2 seconds
8 Play Enter
9 Stop Info
in the iPod® operation with eDock (available as an option)
6 Skip Reverse briefly press: play previous track; press and hold: fast rewind within the track
7 Pause Pause playback
8 Play Start playback
9 Stop Select menu; press repeatedly to move to the next higher navigation level
10 Skip Forward briefly press: Play next track; press and hold: fast forward within the track
cubo top:
cubo back:
In radio mode
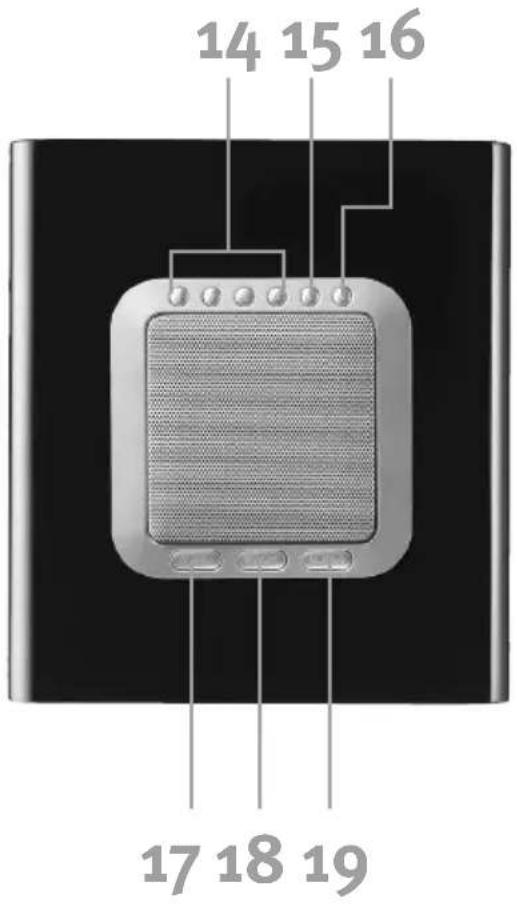
14, 15, 16 Preset radio station buttons
In CD mode
14, 15, 16 Choose titles 1-6
In MP3 CD mode
15 Skip 10 tracks back
16 Skip 10 tracks forward
1 Tuning + Next Folder / Next Album
2 Tuning - Previous Folder / Previous Album
17 Alarm 1
18 Snooze Muting
19 Alarm 2
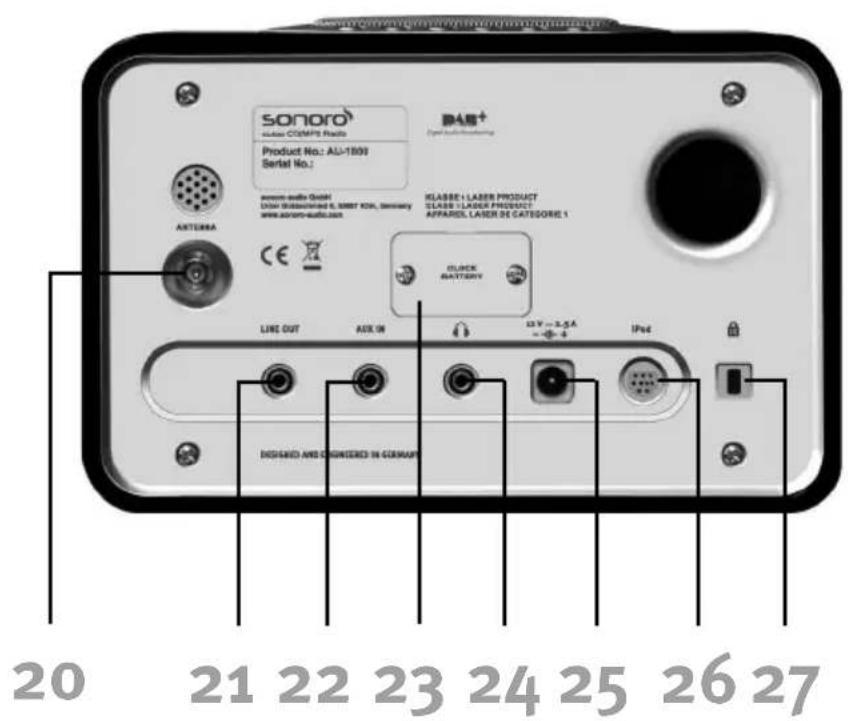
20 ANTENNA DAB+/DAB/FM Antenna
21 LINE OUT Audio output
22 AUX-IN Connection to audio input
23 CLOCK BATTERY Battery compartment
24 Headphone jack
25 Power supply jack 12 V = 2.5 A
26 iPod® eDock connector
27 Keylock connecting slot for theft protection
Remote control:
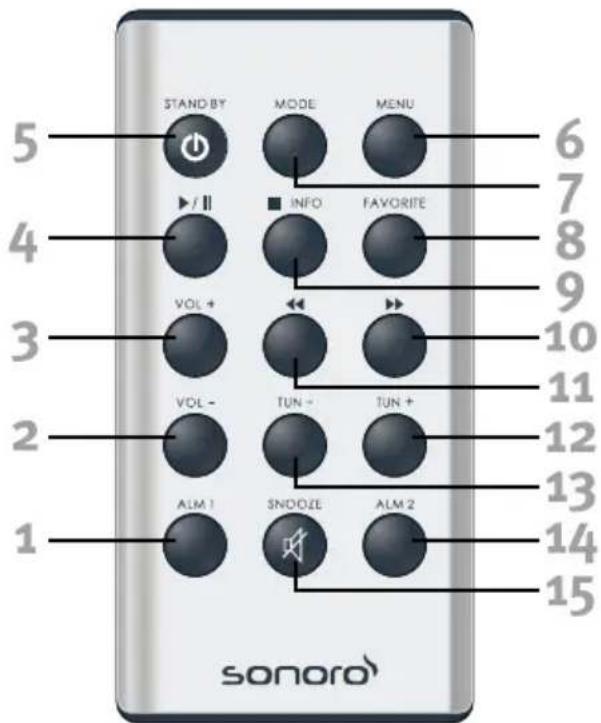
1 Alarm 1
2 Volume Volume control -
3 Volume Volume control +
4 Play CD playback / Pause CD pause
5 Standby Switch on device and switch to standby mode
6 Menu Settings
7 Mode Operating mode
8 Favorite Press repeatedly to switch between preset stations 1-6
9 Stop Stop CD playback
10 Skip Forward Skip to next title
11 Skip Reverse Skip to previous title
12 Tuning Station search +
13 Tuning Station search -
14 Alarm 2
15 Snooze Muting
In MP3 CD mode
12 Tuning + Next Folder / Next album
13 Tuning - Previous Folder / Previous album
In DAB+/DAB radio mode
12 Quick Scan If pressed for more than 2 seconds
13 Full Scan If pressed for more than 2 seconds
4 Play Enter
9 Stop Info
in the iPod® operation with eDock (available as an option)
4 Play Start playback/
Pause Pause playback
9 Stop Select menu; press repeatedly to move to the next higher navigation level
10 Skip Forward briefly press: Play previous track; iPod: press and hold: fast forward within the track
11 Skip Reverse briefly press: Play previous track; iPod Press and hold: fast rewind within the track
Information on pairing of the remote control with the device:
The remote control is a high-frequency remote control device. In its initial state, as supplied to the customer, this is paired to prevent any other devices being influenced by the cubo. Should re-pairing be necessary during servicing, proceed as described in section 2.6.
4. Setting Basic Functions
4.1 Setting the time
Switch the device to standby mode.1.
Press 2. MENU, the display will show SET-CLOCK.
Press 3. MENU again, the clock time display will fash.
Use the 4. TUNING controls to set the hour as desired.
Use the 5. VOLUME controls to set the minutes as desired.
To save, press 6. MENU again.
4.2 Selecting 12- or 24-hours time display
Switch the device to standby mode.1.
Press 2. MENU, the display will show SET-CLOCK.
Press one of the 3. SKIP buttons until SET-12/24 appears on the display.
- Press MENU again and select the desired AM/PM format with the SKIP buttons. Save the selection with 5. MENU.
4.3 Setting display screen brightness
Switch on the device.1.
Press the 2. MENU button.
Press one of the 3. SKIP buttons until you see DISPLAY on the screen.
-
Press the MENU button again, then use the VOLUME button to select the desired brightness HIGH, LOW or OFF is shown on the display.
-
Save your selection by pressing the MENU button.
4.4 Muting function
During audio playback, press the SNOOZE button to mute the sound.
Press the button again to turn the sound back on.
4.5 Automatic switch off
- While the device is on, press MENU and then SKIP as often as necessary until SLEEP appears on the display.
- After pressing the MENU button again, you can use the volume button to set the number of minutes after which the device is to switch itself off.
- The OFF setting will deactivate the function.
- Confirm the input with MENU.
5. FM Radio Operation
While the device is switched on, select radio operation with the MODE button.
The display will show „FM Ready“, then the FM radio frequency.
5.1 Setting the stations
Press the TUNING + or TUNING - button to manually search for a radio station. To automatically scan for stations, press and hold the button for two seconds until the scanning begins. If you find the radio reception unsatisfactory, you can either connect the cubo to your roof aerial which is customised for DAB+/DAB or try to improve the reception by redirecting your telescope antenna. The tuner is very sensitively adjusted and it may therefore suffice for you to alter the frequency of your desired station upwards or downwards by 0.05 MHz.
5.2 Storing and calling up stations
Find your desired station.1.
Hold one of the station buttons above the loudspeaker pressed until you hear a short 2.
"beep". The station is now stored at this position.
To select the station again, you only need to press the corresponding station button.
6. DAB+/DAB Radio Operation
Select DAB+/DAB radio operation with the MODE button (DAB+/DAB, FM, CD, iPod, AUX) while the device is turned on. The display will indicate "DAB Ready, Tuning...".
6.1 Full Scan, automatic station search (Channel 5...13)
For a full scan, press the TUNING - button for at least two seconds to start the station scan. The DAB cubo will automatically start a complete scan across the entire frequency band. The display will first show "F Scan" and then the scanning progress in %. Then the number of received services (radio stations) will be shown on the display, e.g.: 10 Serv.
The DAB cubo stores the number of available stations alphabetically and will automatically jump to the first available station.
If no reception is available (e.g. the antenna is not plugged in, interferences) the display will indicate: Sig N/A (signal not available).
If no program is being broadcast by a received station, the display will indicate: "0 Serv" (service not available).
6.2 Quick Scan, automatic station search (Channel 9...13)
For a quick station scan, press the TUNING + button for at least two seconds.
The DAB cubo will automatically start the station scan in channels 9 to 13.
The display will first show "Q Scan" and then the scanning progress in %.
Then the number of received services (radio stations) will be shown on the display, e.g.: 10 Serv.
The DAB cubo stores the number of available stations and will automatically jump to the first available station.
6.3 Manual DAB+/DAB station search
Press and hold the STOP (INFO) button for more than two seconds until the display indicates Manual. Confirm this by pressing the PLAY (ENTER) button, and then you can select a DAB channel with the TUNING + and TUNING - buttons. Confirm the selected DAB channel by pressing the PLAY (ENTER) button; then you can browse the DAB stations with the TUNING + and TUNING - buttons and confirm one by pressing the PLAY (ENTER) button.
6.4 Station selection
You can switch between the stations by using the TUNING + and TUNING - buttons to browse through the station list.
6.5 Station information
The DAB cubo displays additional information for each station. You can browse this station information by briefly pressing the STOP (INFO) button.
- Station name* (i.e. DOMRADIO)
- Current date of day (i.e. 08.07.2010)
- Multiplex/Ensemble name* (i.e. NRW K12)
- Information about the current program* (i.e. INFOS-WETTER-......)
- Signal strength indicator (i.e. Signal 85%
6.Type of station (i.e.Pop Music) - Stereo or mono reception, station's audio data rate (i.e. Mono, 64 kbps)
- Frequency (i.e. 229 MHz)
*Note: Press 'Play' to display clock time.
6.6 Storing and selecting stations
Press one of the six station buttons above the loudspeaker until you hear a short "beep".
The station is now stored at this position.
To select the station later, you only need to press the corresponding station button.
6.7 Resetting the DAB+/DAB system
By resetting the DAB system, you will restore the default factory settings. All personal settings will be erased in this process. If you press the STOP (INFO) button for more than two seconds, Manual will appear on the display. Press the STOP (INFO) button one more time and RESET will be indicated on the display. By pressing the PLAY (ENTER) button, the system will be reset to the factory settings. At the same time the stored DAB data will be erased and an automatic station scan (full scan) will be started.
7. CD Mode
When you insert a CD, the device automatically switches to CD mode and playback begins automatically. The CD player plays audio discs as well as CD-R and CD-R(W) discs. CD-ROM, CD-I, CDV, VCD, DVD or computer CDs cannot be used. The disc lead-in time can exceed 10 seconds depending on the number of songs on a disc.
"Reading" appears on the display as the CD player reads the contents of the CD. The 1. display shows the total number of tracks and total playback time (or the total number of albums and tracks for MP3 CDs).
- If you have created an MP3 CD with folders or albums, you can select the desired folder or album by pressing the 15 or 16 button.
Press one of the 3. SKIP buttons to find the desired track.
- Press PAUSE to pause playback. Press PAUSE again to resume playback.
Press 5. STOP to stop playback.
7.1 Title skip function
To select a specific track from the CD, press one of the SKIP buttons until you reach the desired track number. This can be done during playback or in STOP mode.
If you have many tracks on an MP3 CD you can press the preset radio station buttons 5 (15) and 6 (16) to skip forward or backward 10 tracks at a time.
7.2 Title search function
During playback, hold down one of the SKIP buttons, and the search will start. Let go of the button at the desired position.
7.3 Repeat function
While playing the CD, press the 1. MENU button twice.
Select REP 1 (the title currently playing will be repeated continuously) or Rep All 2. (all titles will be repeated) with the SKIP FORWARD button.
Confirm the input with 3. MENU.
- To stop the function, press MENU twice and then press SKIP FORWARD as often as necessary until the display at the lower edge of the screen disappears.
Press 5. MENU to confirm the input.
7.4 Random playback
While playing back, press the 1. MENU button twice.
Select SHUFFLE with the 2. SKIP FORWARD button.
- Confirm the input with MENU. All titles will now be played in random order.
- To stop the function, press MENU twice and then press SKIP FORWARD as often as necessary until the display at the lower edge of the screen disappears.
Press 5. MENU to confirm the input.
7.5 Intro
While playing back, press the 1. MENU button twice.
- Select INTRO with the SKIP FORWARD button.
- Confirm the input with MENU. All titles on the CD will now play for 10 seconds.
- To stop the function, press MENU twice and then press SKIP FORWARD, as often as necessary until the display at the lower edge of the screen goes out.
- Finally press MENU again, to confirm the input.
7.6 Programmed playback
- In STOP mode, press the MENU button twice.
- Select PROG with the SKIP FORWARD button.
- Confirm the input with MENU.
- Select the first title with the SKIP button.
- Press PLAY to confirm.
- Repeat the last two steps until all titles are stored.
- To start the programmed playback, press MENU again.
-
To interrupt the programmed playback, press STOP.
-
To stop the function, press MENU twice and then press SKIP FORWARD as often as necessary until the display at the lower edge of the screen disappears.
- Press MENU again to confirm the input.
7.7 Muting function
While playing back the CD, press the SNOOZE button to turn off the sound. Press the same button again to turn the sound back on. Mute will appear on the display. If the device is set to Mute, no other keys will work!
7.8 Automatic switch off
- While the device is switched on, press MENU and then SKIP as often as necessary until SLEEP appears.
- After pressing the MENU button again, you can use the volume button to set the number of minutes after which the device is to switch itself off. The OFF setting will deactivate the function. 3.
Confirm the input with 4. MENU.
8. iPod® playback (using optional eDock)
Connect the eDock to your cubo, as described in the eDock operating manual.
Whilst the device is switched on, use the MODE button to select iPod® mode. IPOD is shown on the display. If no eDock or no iPod® is connected, the display will indicate “No iPod”.
Press the PLAY button to start or stop playback (Pause). The function of the SKIP buttons is similar to that of CD playback in iPod® mode. Use the STOP button to get to the respective higher level of your iPod® (iPod® not supplied); the display will indicate MENU. In this case the Skip buttons navigate through the individual levels of the iPod®, the PLAY button confirms your selection. If no entry is made within 6 seconds, your cubo will switch back to normal iPod® mode. The eDock of course also works with the iPhone, although to do this it has to be switched to Airplane mode.
For details regarding the operation of your iPod®, please consult your iPod® operating manual.
9. Alarm mode
9.1 Alarm function
The alarm can be set to start at 2 different times.
Press and hold one of the two alarm buttons until the time display starts to flash.1.
Use the tuning controls to set the hours.2.
Use the volume controls to set the minutes.3.
Save your setting by pressing the corresponding 4. ALARM button.
- Next, use the VOLUME + / - button to select the mode to be activated by the alarm: CD, DAB, FM, AUX* or Beep. Then confirm these with the corresponding ALARM button.
- If you use DAB or FM (radio) as your alarm: press the VOLUME + / - buttons, one of the preset radio station buttons (1- 6) or the "FAVORITE" button on your remote control to select the desired radio station.
- If you use the CD as your alarm: use the VOLUME + / - buttons to select the desired track number. A shortcut to the CD track number can also be selected with the 6 preset radio station buttons (1-6) Save your setting by pressing the corresponding 8. ALARM button.
Select the desired volume using the volume control buttons.9.
Save the alarm mode by pressing the corresponding 10.
- Please ensure that a device set to playback is connected.
To switch the alarm on or off, briefly press the STANDBY or ALARM button
To interrupt the alarm, press the SNOOZE button.
9.2 Snooze function
The SNOOZE time can be adjusted. With the device switched off, press and hold down the SNOOZE button. Select the desired snooze time and save your selection by pressing the SNOOZE button.
During the alarm time you can adjust the snooze time with the VOLUME+/- buttons after pressing the SNOOZE button twice. Confirm the snooze time by pressing the SNOOZE button again.
10. Disposal
10.1 Packaging

The packaging of your designer cubo CD/DAB+/DAB radio protects it against damage during transport. The packaging consists of raw material that can be re-used or recycled.
10.2 Device
When your cubo has reached the end of its useful life, on no account should you throw the CD radio in the normal household waste. Enquire where it may be disposed of in an environmentally sound manner.
Please keep in mind that your electronic entertainment device is subject to the European Directive 2002/96/EC for the reduction of electronic waste.
You are therefore not permitted to dispose of your device in your household waste.
You can receive information regarding the disposal of old devices and appliances from your local government or municipal administration, the waste disposal administration and the store where you purchased this product.
You can drop off your device free of charge at communal collection points.
With the proper disposal of old appliances you prevent environmental damage and do not endanger your health.
11. Troubleshooting
Warning! Do not attempt to repair the device yourself, as this will invalidate any warranty claims. Do not open the casing as there is a risk of electric shock. In case of malfunction, please try the steps outlined below before bringing the device in for repair. If you are unable to resolve a failure by following these steps, please contact your dealer or our customer service department (support@sonoro-audio.com).
"NO DISC" displayed on screen
Insert a CD
Check that the CD has been inserted the right way up
Wait for any possible condensation to evaporate from the lens
Try another CD or clean the CD
Use a finalised CD-RW or MP3 disc (in the correct format)
Poor radio reception If the signal is very weak, realign the antenna or connect a customised outdoor antenna to improve reception Move the unit away from other interfering devices such as a TV or video recorder
No sound or poor playback quality Adjust the volume
Unplug the headphones
- Make sure that the MP3 CD was recorded at a bit rate of between 32 and 256 kbps, and sampled at 48 kHz, 44.1 kHz or 32 kHz.
Alarm does not work
Set the correct time.
Alarm volume too low
Activate alarm
Remote control does not work correctly or does not work at all
The remote control is too far away from the device; move the remote control closer to the device.
The battery is empty; replace the battery of the remote control.
- There is reception interference or overlay caused by other frequencies or devices. Do not use any other devices in the 433.92 MHz wave band. Move the device to a different position.
The remote control is not paired; proceed as described in section 2.6.
For our products, we only use veneers made of genuine wood, which guarantee a natural appearance and high quality. Veneer is a natural product. Irregularities in the surface structure give it a natural appearance. They have no effect on the functionality and quality of our products and will therefore not represent a cause for complaint.
12. Technical Data
Power supply: 240 ~V 50 ~Hz
Power supply adapter: Ktec, KSAFF1200250W1EU
Input: 100-240V ~ 50/60Hz 0.8A
Output: 12V = 2.5A
Power consumption during standby operation: < 2W
AUX input: 3.5mm jack
CD player: Laser Class 1
RF remote control, type : RC-3,
Operating frequency: 433.92 MHz
Battery: Lithium Battery, Type CR2032
Frequency range FM: 87,5 MHz --- 108,0 MHz
DAB: 174 MHz --- 240 MHz
Subject to technical changes.
Declaration of Conformity
Manufacturer: sonoro audio GmbH
We hereby declare that the sonoro cubo, with respect to its design
and construction, conforms to the requirements of the EMC Directive
2004/108/EC, the LVD directive 2006/95/EC and R&TTE directive
1999/5/EC, including any changes applicable at the time of this declaration.
sonoro audio GmbH
Unter Goldschmied 6
50667Koln
Germany
info@sonoro-audio.com
www.sonoro-audio.com
08/10