
SBM 06 - Blood pressure monitor SANITAS - Free user manual and instructions
Find the device manual for free SBM 06 SANITAS in PDF.
| Product type | Electronic wrist blood pressure monitor |
| Brand | Sanitas |
| Model | SBM 06 |
| Measurement method | Non-invasive oscillometric measurement at the wrist |
| Pressure measurement range | 0 to 300 mmHg |
| Pulse measurement range | 40 to 199 beats/min |
| Pressure accuracy | ± 3 mmHg |
| Pulse accuracy | ± 5% of displayed value |
| Memory | 3 x 30 measurements (users 1, 2, 3) |
| Display | LCD with date, time, systolic/diastolic pressure, pulse |
| Dimensions (L x W x H) | 72 mm x 72 mm x 29 mm |
| Weight | Approx. 140 g (without batteries) |
| Wrist size | 135 to 195 mm |
| Power supply | 2 AAA 1.5 V batteries (LR03) |
| Battery life | Approx. 250 measurements |
| Operating temperature | +10 °C to +40 °C |
| Storage temperature | -20 °C to +50 °C |
| Classification | Type BF applied part |
| Standards | EN1060-1, EN1060-3, EN60601-1-2 |
| Supplied accessories | Storage case, instruction manual, 2 AAA batteries |
| Maintenance | Clean with a damp cloth; do not use solvents; do not immerse |
| Safety | Do not open, do not repair yourself; keep out of reach of children; observe battery polarities |
| Repairability | Do not repair yourself; contact customer service |
| Disposal | Compliant with WEEE directive 2002/96/EC; batteries to be deposited at collection point |
Frequently Asked Questions - SBM 06 SANITAS
User questions about SBM 06 SANITAS
0 question about this device. Answer the ones you know or ask your own.
Ask a new question about this device
Download the instructions for your Blood pressure monitor in PDF format for free! Find your manual SBM 06 - SANITAS and take your electronic device back in hand. On this page are published all the documents necessary for the use of your device. SBM 06 by SANITAS.
USER MANUAL SBM 06 SANITAS
Adapted from JNC 2003
You can measure your blood pressure quickly and easily with the blood pressure wrist computer, save the readings – and display the progress and average of the readings. The wrist blood pressure monitor is used for non-invasive measurement and monitoring of adults' arterial blood pressure.
The computer complies with the requirements of the European Directive for Medical Products, the German Medical Product Act as well as the European
standards EN1060-1 (Non-invasive blood pressure measuring devices Part 1: General requirements) EN1060-3 (Non-invasive blood pressure measuring devices Part 3: Supplementary requirements for electromechanical blood pressure measuring systems). Regular checks on measuring accuracy are necessary according to the "Directive for users of medical products" when the computer is used for industrial or commercial purposes. For private use also, we recommend that you have the measuring accuracy checked by the manufacturer at 2-yearly intervals. Keep these operating instructions available for further use and also make them available to other users.
2. Caution - For Your Safety!
- Always measure your blood pressure at the same time of day in order to ensure comparability of the readings.
- Relax for about 3 - 5 minutes before every measurement.
- Wait 5 minutes between successive measurements.
- The measurements you make yourself are only for your information – they are no substitute for a medical examination! Discuss your readings with your doctor and on no account make your own medical decisions (e.g. drugs and their dosages).
- The wrist measurement will be less accurate if an arm suffers from restricted blood circulation resulting from chronic or acute vascular diseases (including vasoconstrictions). In this case, use a sphygmomanometer for measurements on the upper arm.
- Measuring errors can occur in diseases of the cardiovascular system, as well as with very low blood pressure, irregular blood circulation and arrhythmia and also in the case of other symptoms.
The blood pressure computer consists of precision-made electronic components. The measuring accuracy and life of the computer depend on the care with which it is treated:
- Protect the computer from shocks and be careful not to drop it,
-
Protect it against moisture, dirt, wide fluctuations in temperature and the direct rays of the sun,
-
Do not use it in areas where there are strong electromagnetic fields, i.e. keep it away from transmitters and mobile phones.
-
Do not press buttons without the cuff fitted.
- Use the computer only on persons for whose wrist size the computer is intended.
- If the computer is not used for a lengthy period of time, it is advisable to remove the batteries.
- Keep the batteries out of reach of children. Batteries do not belong in domestic waste.
- Dispose of batteries at the appropriate collection points.
- Do not open the computer. Failure to comply invalidates the warranty. You must not adjust or repair the computer yourself or its correct function will no longer be guaranteed.
- This unit is in line with European Standard EN60601-1-2 and is subject to particular precautions with regard to electromagnetic compatibility (EMC). Please note that portable and mobile HF communication systems may interfere with this unit. For more details, please contact customer service at the address indicated.
3. Table for classification of blood pressure values (unit of measurement mmHg) for adults:
| Range Systolic Diastolic Action | |
| Hypotonia lower than 105 lower than 60 Check with doctor (degraded blood pressure) | |
| Normal range between 105 and 120 between 60 and 80 Self check | |
| Pre-hypertensive between 120 and 140 between 80 and 90 Check with doctor blood pressure range* | |
| High blood pressure between 140 and 160 between 90 and 100 Consult your doctor - degree I | |
| High blood pressure higher than 160 higher than 100 Consult your doctor - degree II |
(*) Blood pressure range that might transfer to high blood pressure
Adapted from JNC 2003
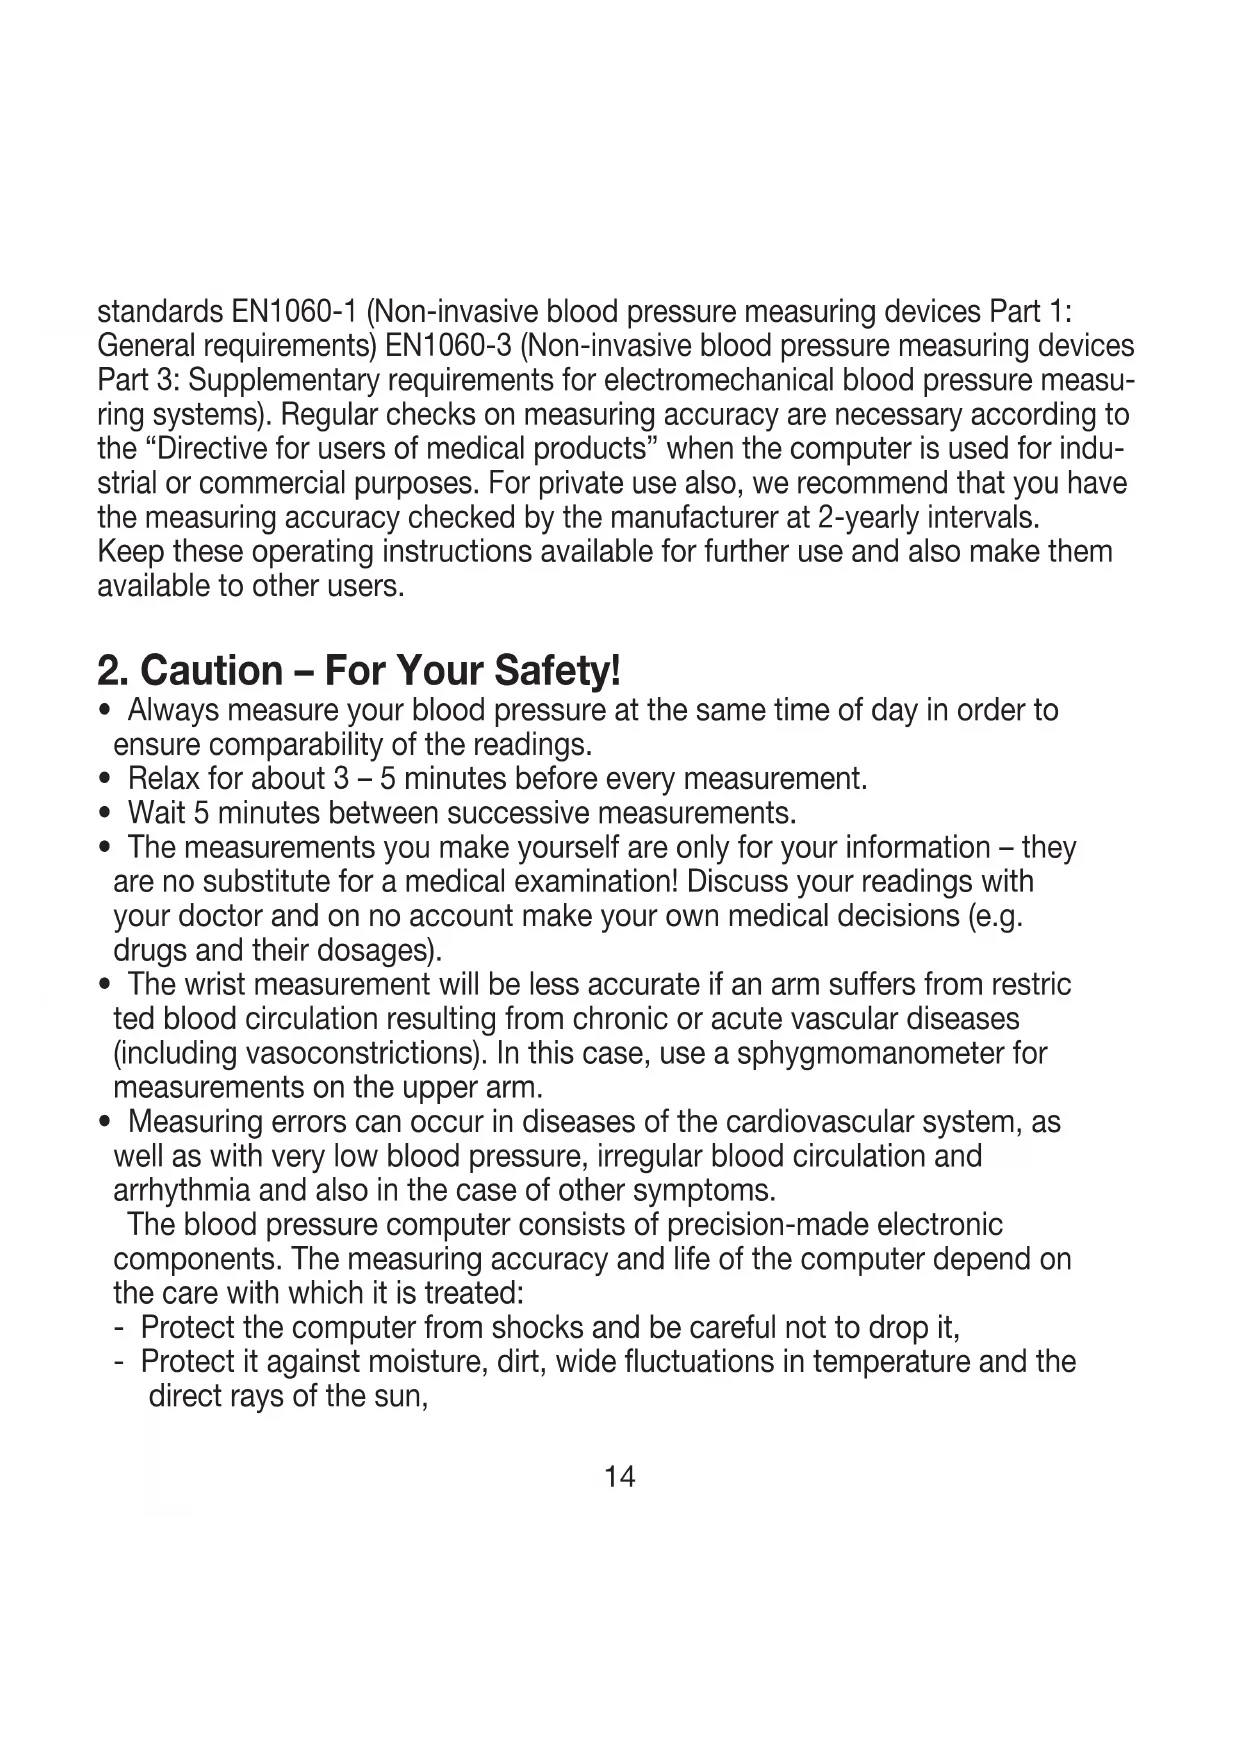
4. Device description:
A. Name of the parts
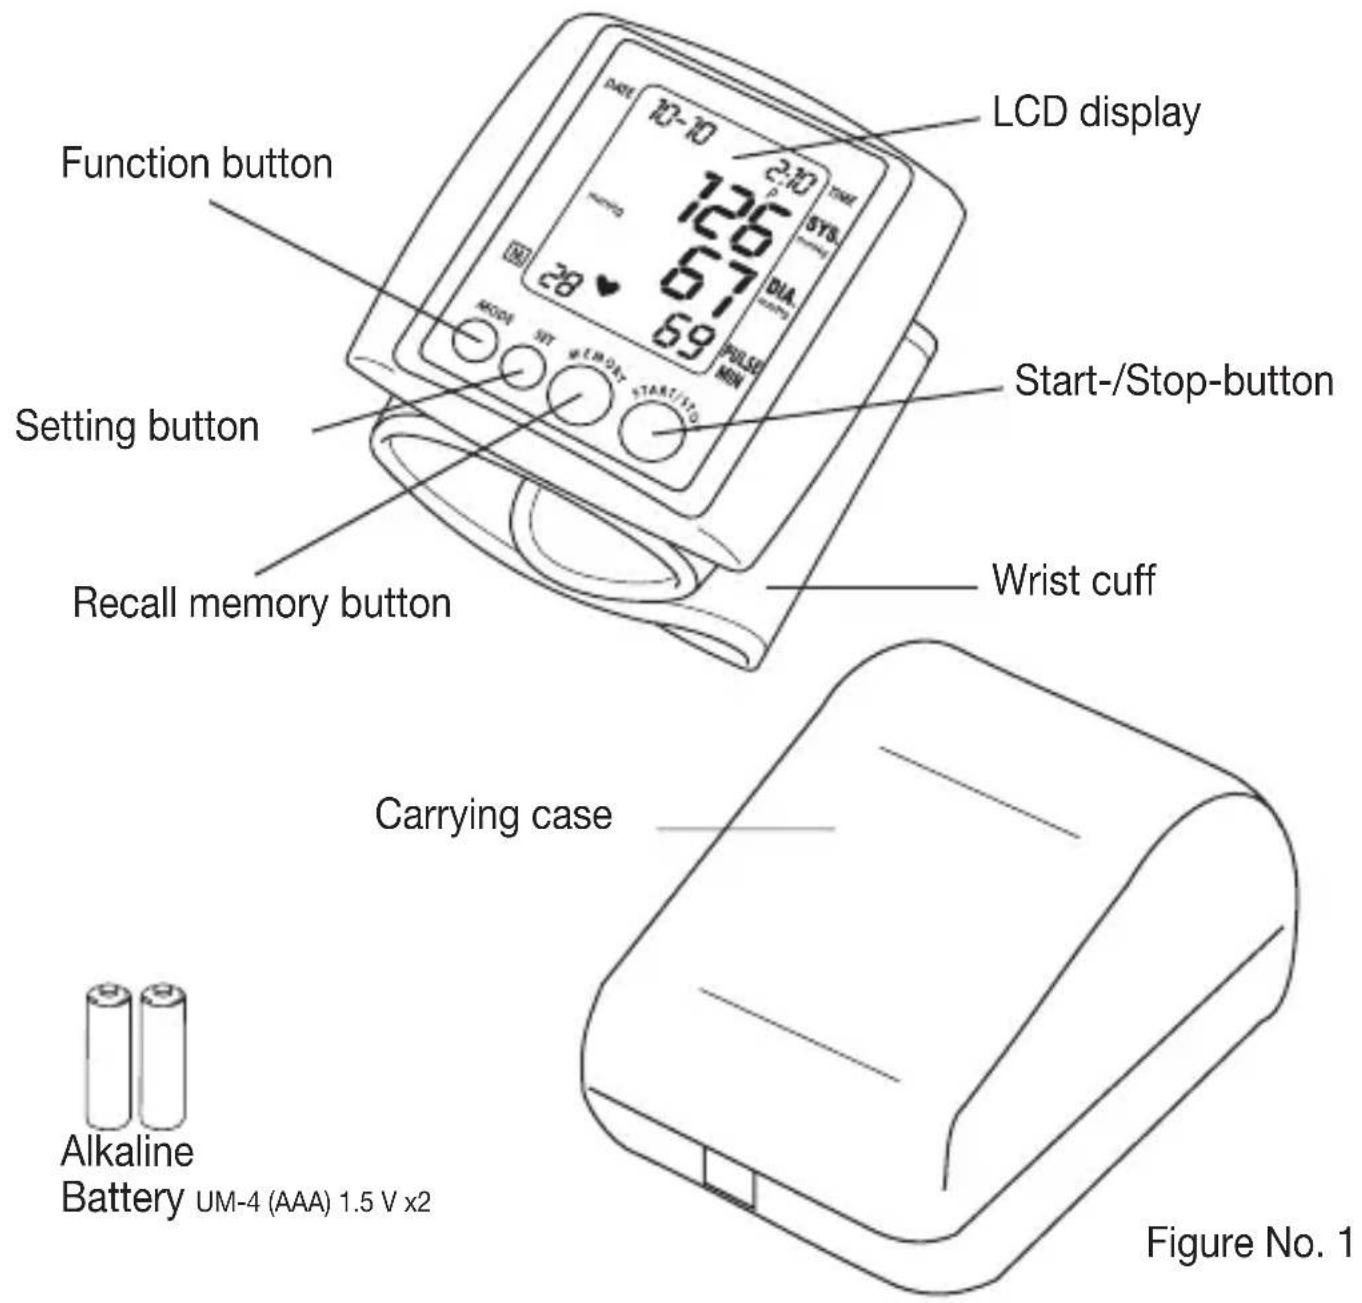
B. Description of display symbols
Figure No. 2
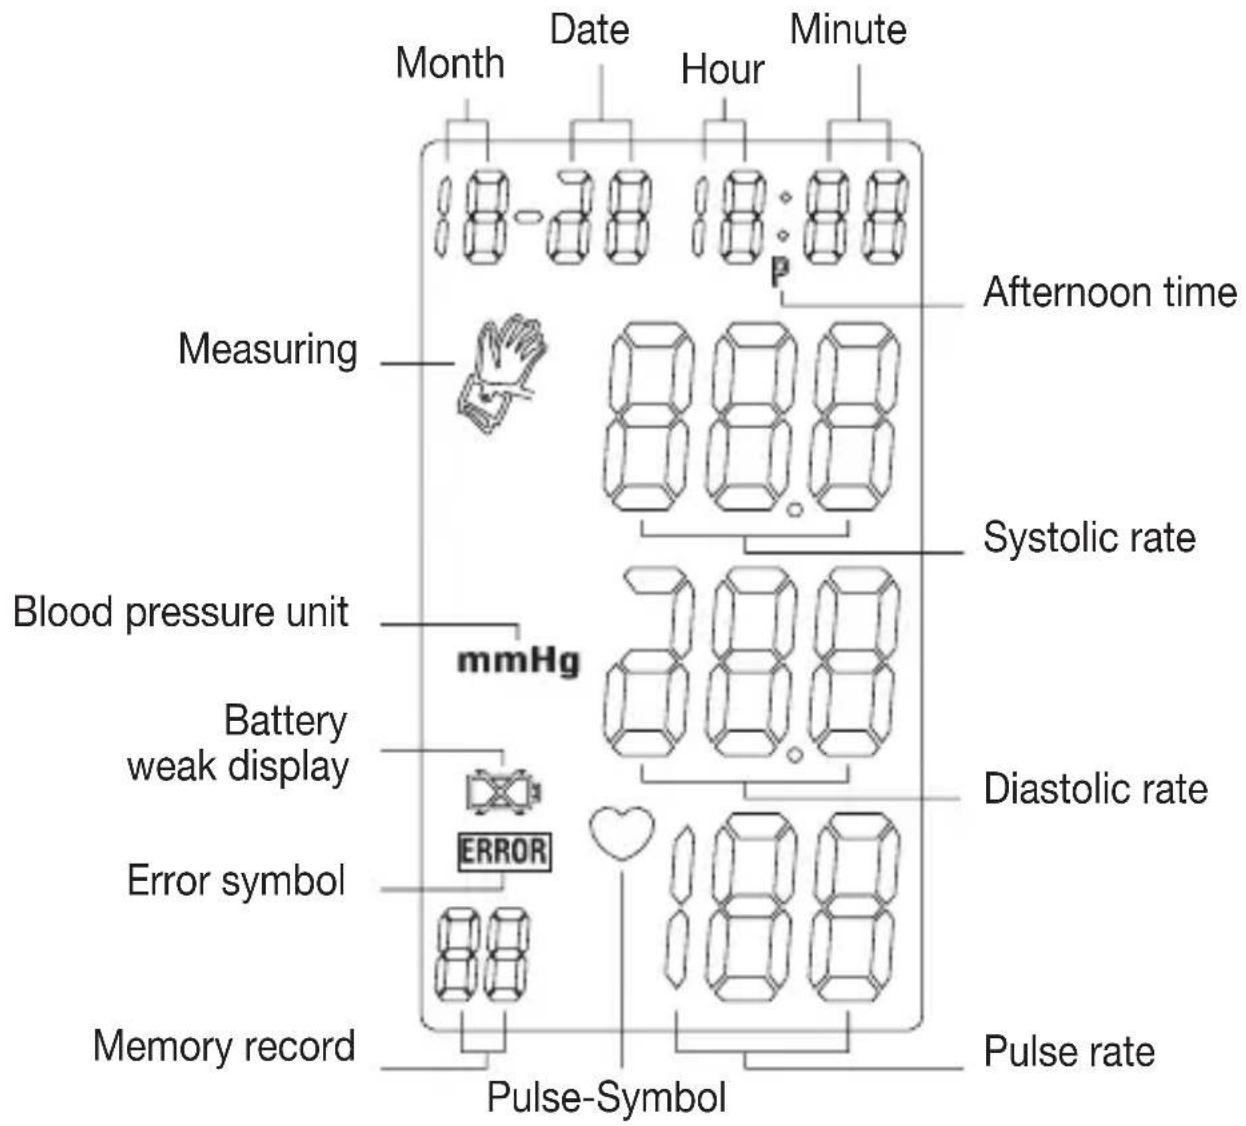
5. Changing batteries
Remove the battery cover at the lower side of the unit and insert batteries into the battery compartment as shown, taking extreme care that the polarities + and - are observed.
Figure No. 3
6. Attaching pressure cuff
A. Wrap the pressure cuff around the left wrist.
a The display of the unit should be placed on the palm side of the wrist.
b Ensure that the wrist is unclothed.
B. Fasten the pressure cuff snugly.
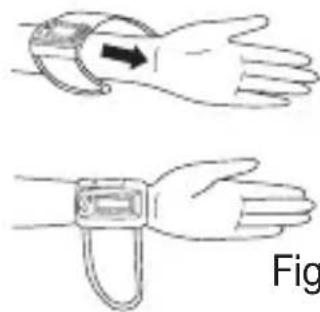
Figure No. 4
a Close the cuff with the Velcro fastener, so that the top margin of the computer is about 10mm below the ball of the thumb.
b Do not pull strongly on the pressure cuff. Do not make the pressure cuff too tight.
7. Correct measurement position
It is extremely important for the measured values, that the cuff is at the same height of the heart. Higher or deeper position will give deviations from the true value.
Measurement while sitting down:
a Place your elbow on a table or other object.
b Use the armrest to position the arm so that the pressure cuff is at the same height as the heart.
c Relax your hand with the palm facing up. Do not talking or moving during measurement.
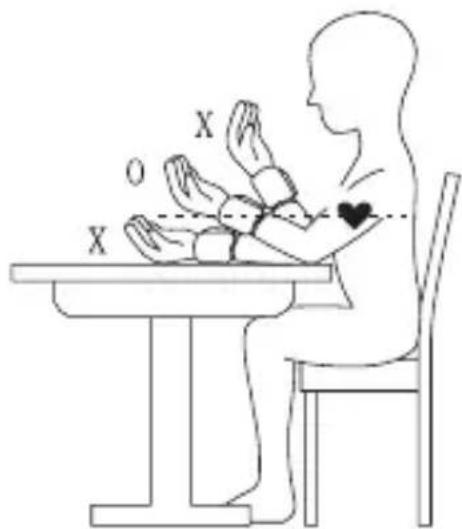
Figure No. 5
8. Description of display mark
| Display mark Co | ||
| Mark appears in the measurement condition when pulse is detected. | Measurements in progress remain quiet. | |
| Replace batteries | Appears when the battery voltage is excessively low. | Replace all two batteries by new ones. Insert the batteries at correct positions beware of the +/- directions. |
| Display mark Condition/Cause Action | ||
| Measuring error ERROR | Appears when the accurate blood pressure could not be obtained accurately. | Press “start/stop” button again and re-measure. Or check cuff if wrapped at the wrist or according to instructions. Check palm if exerting effort. Check if talking or moving during measurement. Check if posture is incorrect. |
| Measuring blood pressure symbol | Appears all the time till the measurement being completed. | |
9. How to measure
A. Inserting batteries in position:
a Open battery cover.
b Refer to the picture in positioning batteries. (Figure No. 3)
c All LCD segments appear on the display in 3 seconds.
d Display 1 month, 1 date, 12 hour, 0 minute.
B. Setting Date and Time:
a Press MODE button ("month" starts flashing).
Press SET button to set the correct month (1,2,3,... 12).
b Press MODE button again ("date" starts flashing).
Press SET button to set the correct date.
c Press MODE button again ("hour" starts flashing).
Press SET button to set the correct hour in 12-hour format.
The time is being displayed in 12-hour format, which means a time from 13:00 onwards is being displayed as 01p:00.
d Press MODE button again ("minute" starts flashing).
Press SET button to set the correct minute (0,1,2,3,... 59).
e Press MODE button again to switch to normal time.
(month, date, hour and minute appear on the display).
C. Steps to take blood pressure measurement:
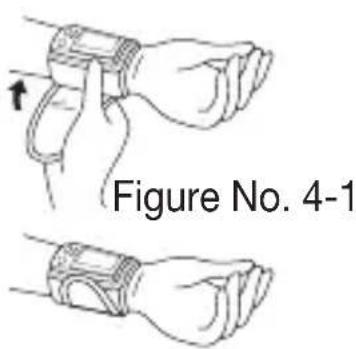
a Wrap the cuff around the wrist (Refer to Wrapping of Wrist cuff as (Figure No. 4 and 4-1).
b Sit upright on the chair to have correct posture. (Refer to Correct Posture in Taking Blood Pressure as (Figure No. 5).
c First, select the memory place (No1, No2 or No3) with the Set key. Then press the Start/Stop key. After the self-test showing the complete display, the device automatically shows the selected memory place once again and then starts the measurement automatically. The air pressure increases to 195mmHg , and if there is a tendency towards high blood pressure, the air pressure is increased automatically to the required level.
Do not move or talk during the measurement.
If you are carrying out repeat measurements, please ensure that you have always selected "your" personal user memory.
d After the cuff pressure is increased, it will slowly decreased. When the pulse rate is detected, HEART RATE symbol will start flashing.
e After taking blood pressure measurement, the Systolic rate, Diastolic rate will be lasting flash on the display for 1 minute.
f You can interrupt measurement at any time by pressing the "START/ STOP" button.
D. Storing, recalling and erasing measurement data:
a Storing data:
After every blood pressure measurement, the systolic pressure, diastolic pressure, pulse rate and the time and date of the respective measurement are stored automatically in the previously selected user memory. When more than 30 measurements are stored, the oldest ones are lost.
b Recalling data:
Press the "MEMORY" key and select the desired user memory 1, 2 or 3
with "SET". The number of stored data sets of this user memory appears below on the right. The average of all readings saved is shown by pressing the "MEMORY" key. Press "MEMORY" again and the last recorded values appear. You leave the memory mode with the Start/Stop key. The device switches off automatically after 1 minute.
c Erasing data:
(1) Take out the batteries and then refill 2 pcs batteries again.
(2) To discontinue if the data is erased. Press "RECALL" button, no data should show up on the screen.
E. To change batteries:
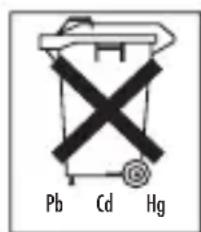
When " I show up on the display, the battery is weak. Change the batteries or it will not be possible to take blood pressure measurement. Used batteries
do not belong in the household waste. You are legally obliged to dispose of the batteries. Dispose of them via your specialist electrical supplier or local collecting point for recyclable waste. Note: Batteries containing pollutant substances are marked as follows: Pb = Battery contains lead, Cd = Battery contains cadmium, Hg = Battery contains mercury.
10. Cleaning
- Clean your blood pressure computer carefully only with a slightly moistened cloth.
- Do not use detergents or solvents.
- On no account must you immerse the computer in water, otherwise liquid can enter it and cause damage.
11. Specifications:
| Model No. SBM 06 | |
| Method of Measurement Oscillometric (non invasive blood pressure measurement at the wrist) | |
| Range of Measurement Pressure 0-300 mmHg, pulse 40-199 beats/minute | |
| Accuracy of the pressure reading systolic ±3 mmHg / diastolic: ±3 mmHg / pulse: ±5% of the displayed value | |
| Measuring uncertainty max. permissible standard deviation according to clinical testing: systolic: 8 mmHg / diastolic: 8 mmHg | |
| Sets of Memory 3 x 30-set | |
| Unit Dimension L72 x W72 x H29 mm | |
| Unit Weight Approx. 140 g | |
| Cuff Size Wrist circumference approx. 135-195 mm | |
| Operating Temperature +10 °C to +40 °C, < 85% RH | |
| Storage Temperature -20 °C to +50 °C, < 85% RH | |
| Power Supply 2 x 1,5 V Micro (Alkaline Typ LR 03) | |
| Battery Life 250 times measurement | |
| Accessories Carrying case, instruction manual, 2 pcs “AAA” battery | |
| Classification Application part Type BF | |
| Key to symbols: Application part Type BF Important! Read the operating instructions |
These specification are subject to change without notice for purpose of improvement.
12. Disposal
Please dispose of the device in accordance with the directive 2002/96/EG - WEEE (Waste Electrical and Electronic Equipment). If you have any queries, please refer to the local authorities responsible for waste disposal.


1. Présentation
Adapted from JNC 2003
A. YctaHOBka 6aTapeek:
a. Chmnte KpbIshky 6aTapeHoro otceka.
6. BCTaBbTe 6aTapeiKn B COOTBeTCTBnC paCNoJIOKeHHeM NOIUCOB B 6aTapeHOM OTceKe(pucyHok 3).
B. Bce daHHbIe IIOABJIOTcH Na dIscIIee B TeueHne 3 cekyHd.
r. Poka3aHn: Meca1, Deh b 1, Yac 12, MmhyT 0.
6. YctaHOBKa DaTbI IN BpeMeHN CYTOK :
a. Haxatb Khonky MODE (haunhaet MiraTb Meca " Monat"). Дя установки павильно меса (1,2,3,... 12) habmnte khonky SET.
6. Ecnn noBtopHO hXaTb KhONky MODE (Haunhaet MraTb „Tag" DeHb).
ДЯ уCTaHOBKN npaBnIbHOrO ДЯ habKMTe KhONky SET.
B. Haxmte KhoNky MODE (haHnaet mraTb yac „Stunde").ДЯ yctahOBKn npabnIbHoro yaca haxmte KhoNky SET.BpeMa yka3bIbAeTcB 12 yacobom fopMaTe ,TO eCTb BpeMa cyTok c 13 yacobOTobpaXaETcHa dncnlee kaK 01p:00 .
r. EcIn NOBTOPOH haxaTb KhONky MODE (haunHaet MraTb ,Minute" MNHyTa).ДЯ yCTaHOBKN npabINbHOJ MnHyTbI (1,2,3,... 59) haxMnte KhONky SET.
Д. После зтого нахмITE Кногу MODE и на диспjee повгся BCEцфрbl (Mecra, DeHb, Yac, MHyTa), To ectb BpeMa n daTa yCTaHOBJIeHbl.
NCbTaHnB COOTBeTCTBnC eBPOneCKMn):
CnCTOJIuYeCKoe DaBHeHne: 8 MM pT. cT. /
DnactoIuueckoe 8 MM pT. CT
Pamr: 3 no 30 ayeek narnr
Pa3mepbI:ДИнHa 72MM,ИриHa 72MM,BICota 29 MM
BEC: 140 rpamM
06xBat 3aIaTbIdoJXeH 6bITbB npedeJax 135 MM-195 MM
Heobxodmbie ycnoBna okpykaioe cpebl: +10°C do +40°C, maKc.OTHOCHTeNbHa BnaJXHOCTb BO3dyxa < 85%
YcnoBna XpaHEnn/TrpHcnpTnpOBKn: -20°C Do +50°C, MaKc.OTHOCHTeJIbHaB BnaXHOCTb BO3dUxa < 85%

- Caution - For Your Safety!
- Table for classification of blood pressure values (unit of measurement mmHg) for adults:
- Device description:
- Name of the parts
- Changing batteries
- Attaching pressure cuff
- Correct measurement position
- Measurement while sitting down:
- Description of display mark
- How to measure
- Inserting batteries in position:
- Setting Date and Time:
- Steps to take blood pressure measurement:
- Storing, recalling and erasing measurement data:
- c Erasing data:
- To change batteries:
- Cleaning
- Specifications:
- Disposal
- Présentation
- YctaHOBka 6aTapeek:
- YctaHOBKa DaTbI IN BpeMeHN CYTOK :
Brand : SANITAS
Model : SBM 06
Category : Blood pressure monitor