
SBM 19 - Blood pressure monitor SANITAS - Free user manual and instructions
Find the device manual for free SBM 19 SANITAS in PDF.
| Product type | Electronic upper arm blood pressure monitor |
| Brand | Sanitas |
| Model | SBM 19 |
| Measurement method | Oscillometric, non-invasive |
| Measurement range | Pressure: 0–300 mmHg, systolic: 30–280 mmHg, diastolic: 30–280 mmHg |
| Display accuracy | Pressure: ±3 mmHg, pulse: ±5% of the displayed value |
| Memory | 60 positions with date and time |
| Compatible arm circumference | 22 to 30 cm |
| Power supply | 4 AA 1.5 V batteries (alkaline LR6) |
| Battery life | Approx. 180 measurements |
| Dimensions (L × W × H) | 152 × 109 × 70 mm |
| Weight | Approx. 410 g (including batteries) |
| Operating temperature | +5 °C to +40 °C, relative humidity 40–85% |
| Storage temperature | −20 °C to +55 °C, relative humidity 10–95% |
| Main functions | Voice guidance system (adjustable 3 languages + deactivation), arrhythmia detection, WHO classification, automatic shut-off, memory |
| Care and cleaning | Clean with a damp cloth; do not use solvents; do not immerse |
| Safety | Applied part type B, compliant with EN60601-1-2 and medical directives |
| Included accessories | Cuff, protective case, 4 AA batteries, instruction manual |
| Repairability | Repairs only by customer service or authorized dealer; do not open yourself |
Frequently Asked Questions - SBM 19 SANITAS
User questions about SBM 19 SANITAS
0 question about this device. Answer the ones you know or ask your own.
Ask a new question about this device
Download the instructions for your Blood pressure monitor in PDF format for free! Find your manual SBM 19 - SANITAS and take your electronic device back in hand. On this page are published all the documents necessary for the use of your device. SBM 19 by SANITAS.
USER MANUAL SBM 19 SANITAS
Please read these instructions for use carefully and keep them for later use, be sure to make them accessible to other users and observe the information they contain.
1. Getting to know your instrument
The upper arm blood pressure monitor is used for noninvasive measurement and monitoring of adults' arterial blood pressure.
You can use it to measure your blood pressure quickly and easily, storing the results and displaying the progression of readings.
The device also has an acoustic voice output.
Keep these instructions carefully for further use and also let other users have access to them.
2. Important information

Advice on use
- Always measure your blood pressure at the same time of day, in order to ensure that values are comparable.
Relax for approx. 5 minutes before each measurement. - You should wait five minutes before measuring a second time.
-
The readings that you take may only be used for information purposes - they are not a substitute for a medical examination! Discuss your results with the doctor. Never use them to make medical decisions independently (e.g. regarding medication and dosage thereof).
-
There may be incorrect measurements where there is cardiocirculatory disease, as well as with very low blood pressure, circulatory disorders, dysrhythmia and other preexisting diseases.
- Only use the instrument on persons whose upper arm has the right circumference for the instrument.
- You may only operate the blood pressure monitor with batteries. Note that it is only possible to save data when your blood pressure monitor is receiving power. As soon as the batteries are dead, the date and time on the blood pressure monitor are lost. Any measurement results that have been stored are however retained.
- The automatic switch-off function switches off the blood pressure monitor in order to preserve the batteries, if no button is pressed within one minute.

Storage and Care
- The blood pressure monitor is made up of precision electronic components. Accuracy of readings and the instrument's service life depend on careful handling.
- You should protect the device from impact, moisture, dirt, major temperature fluctuations and direct exposure to the sun's rays.
- Never drop the device.
- Do not use near strong electromagnetic fields, i.e. keep it away from any radio systems and mobile phones.
- Only ever use the cuffs provided with the monitor or original replacement cuffs. Otherwise erroneous results will be recorded.
-
Do not press any buttons until the cuff is in position.
-
If the instrument is not used for any length of time, we recommend removing the batteries.

Advice on batteries
- Batteries can be fatal if swallowed. You should therefore store the batteries and products where they are inaccessible to small children. If a battery has been swallowed, call a doctor immediately.
- Batteries should not be charged or reactivated with any other means, nor should they be taken apart, thrown in the fire or short-circuited.
- Remove the batteries from the instrument if they are worn out or if you are not going to use the instrument for any length of time. This prevents any damage as a result of leakage. Always replace all the batteries at the same time.
- Never use different types of battery, battery brands or batteries with different capacities. You should preferably use alkaline batteries.

Repair and disposal
- Batteries do not belong in domestic refuse. Used batteries should be disposed of at the collection points provided.
- Never open the instrument. If these instructions are not heeded, the warranty will be null and void.
- Never attempt to repair the instrument or adjust it yourself. We can no longer guarantee perfect functioning if you do.
- Repairs may only be performed by Customer Service or authorized dealers. However, always check the batteries and replace them if necessary prior to making any complaint.
- The appliance should be disposed of according to Regulation 2002/96/EC-WEEE (Waste Electrical and Electronic
Equipment). In case of queries, please contact the municipal authorities responsible for waste disposal in your area.

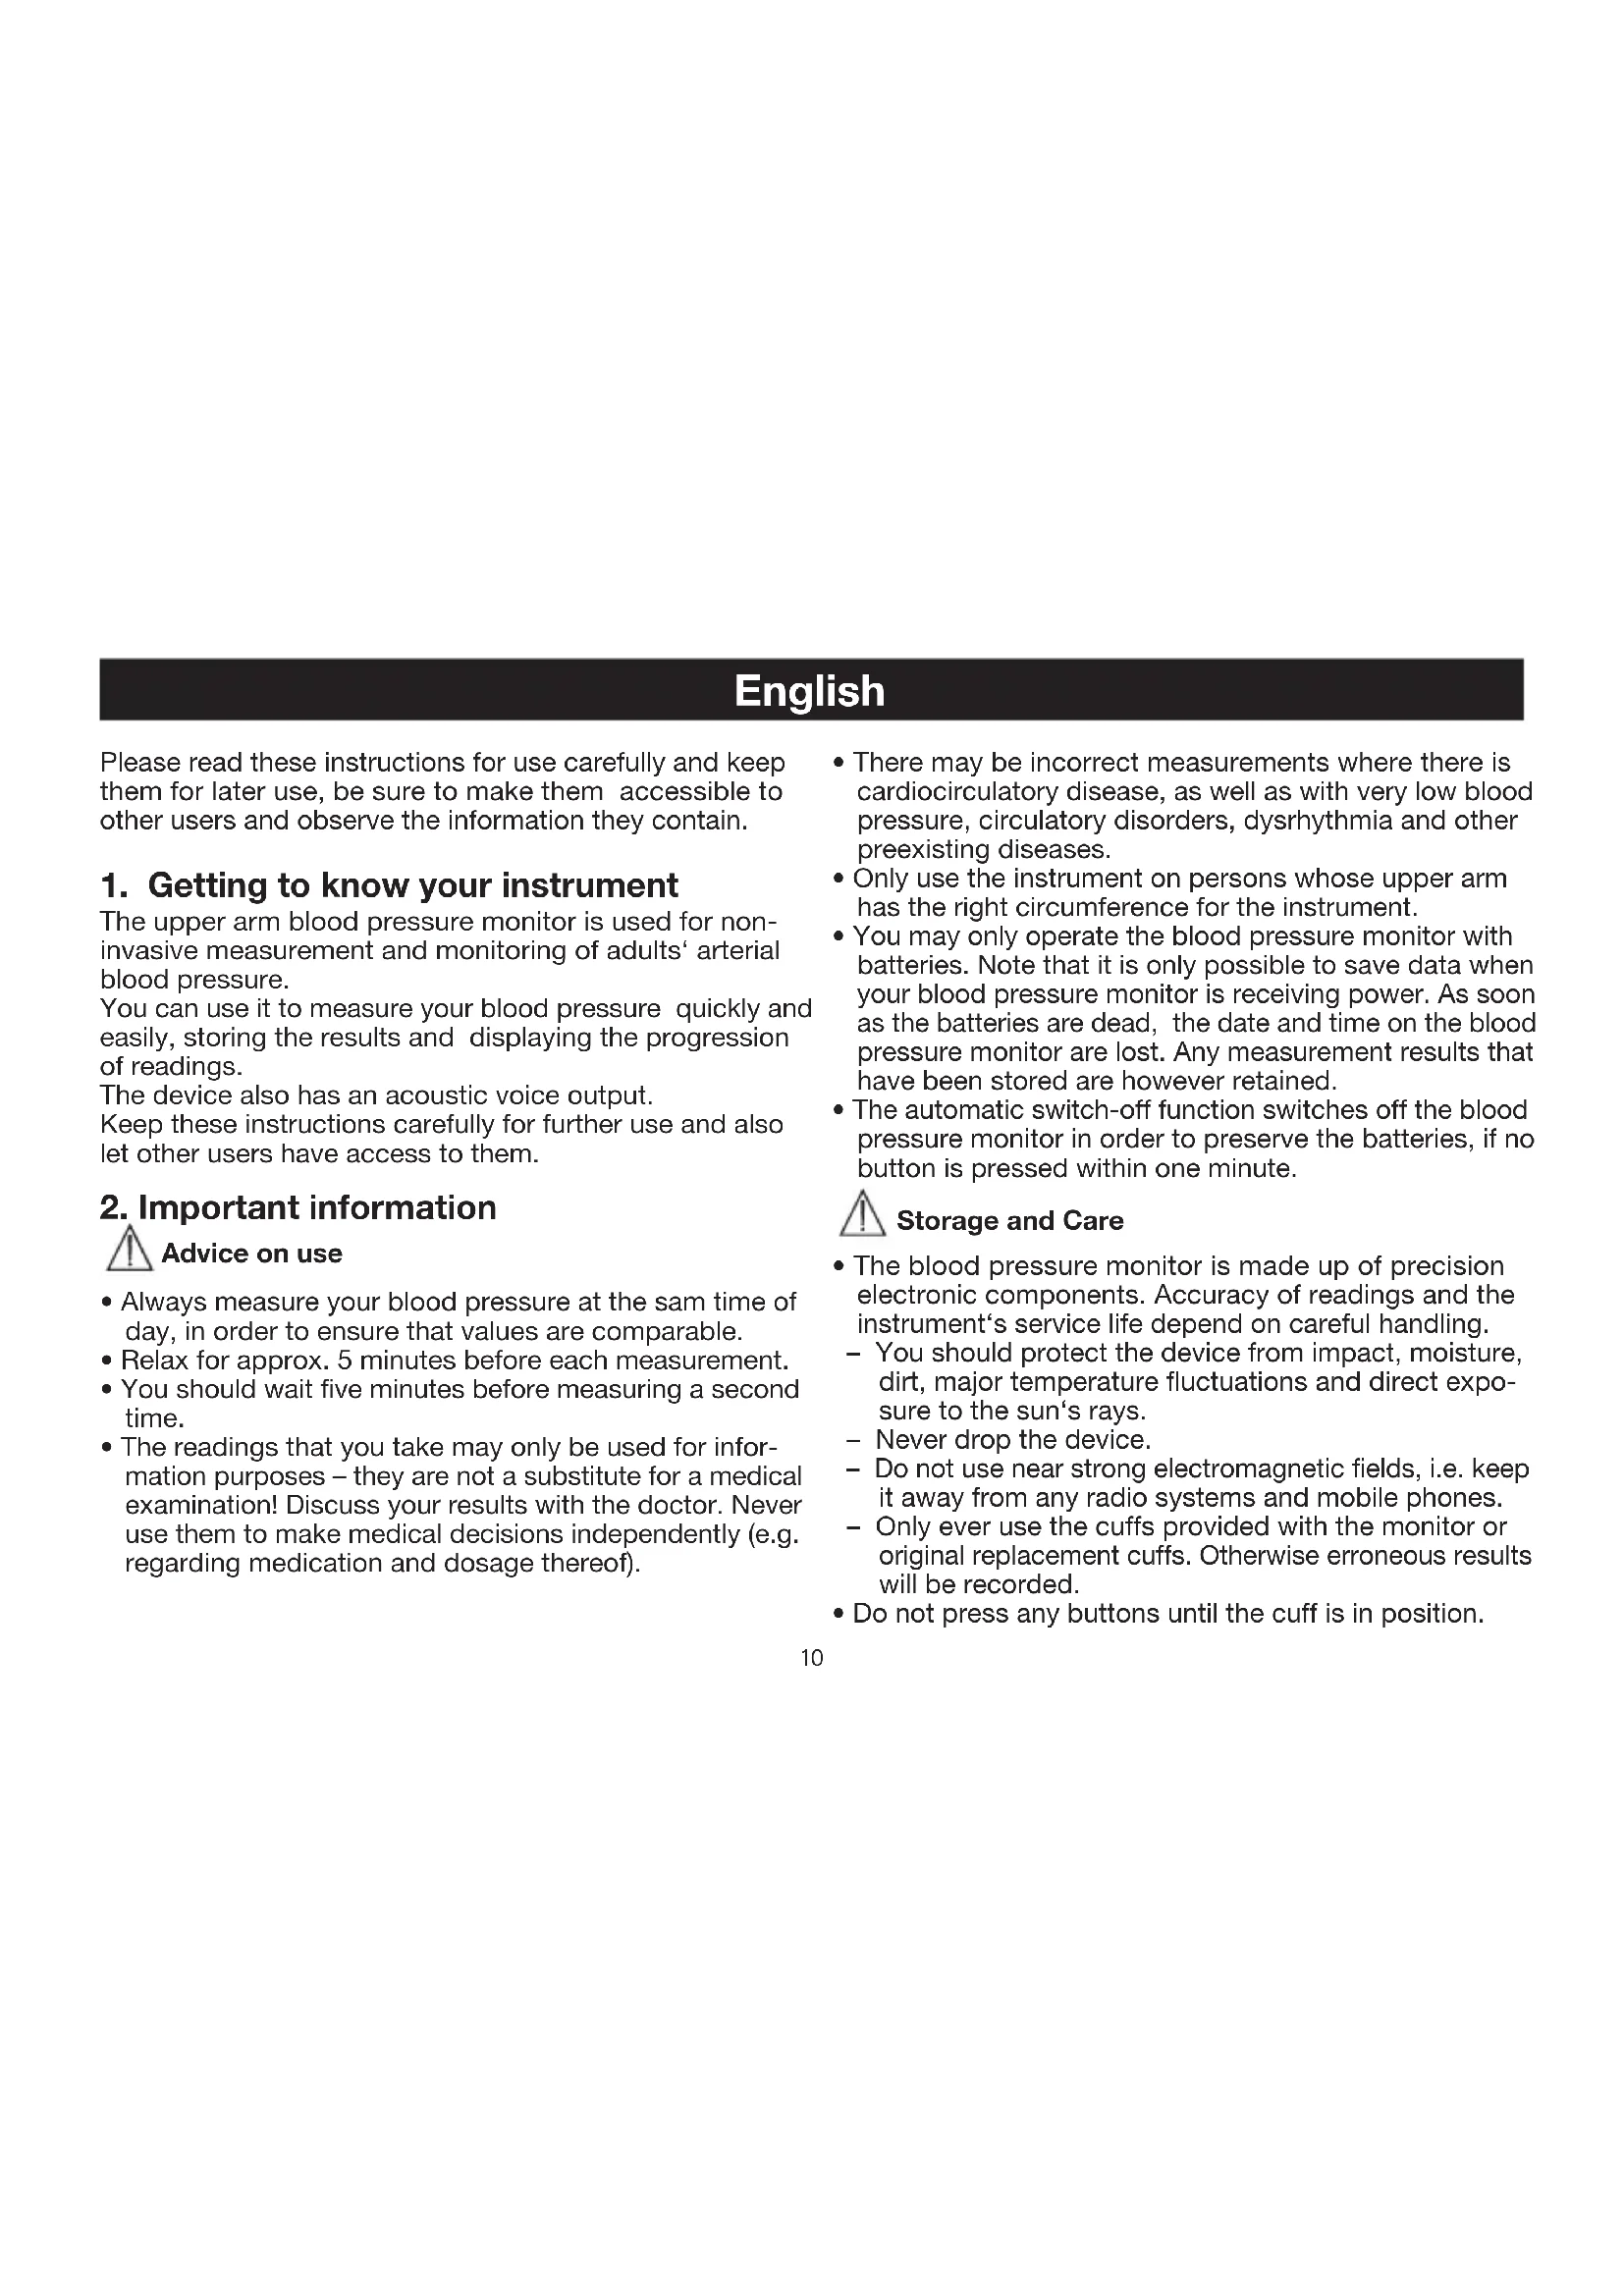
3. Unit description
- Cuff tube
2.Cuff - Cuff connector
- Cuff connector port (left side)
- Memory button MEM
- START/STOP button
- Display
-
Loudspeaker
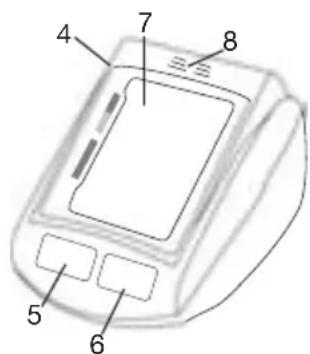
-
Time and date
- Systolic pressure
- Diastolic pressure
- mmHg unit
- Measured pulse
- Pulse icon
Icons in the display:
- Number of memory space
- Inflate/deflate arrow
- ,Change battery' icon
10.Cardiac arrhythmia icon - WHO classification

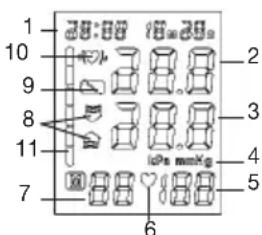
4. Prepare measurement Inserting battery
- Remove the battery cover from the back of the monitor.
- Insert four AA 1.5 V alkaline batteries. making absolutely sure that you insert them with the correct polarity as marked. Never use rechargeable batteries.
- Replace the battery cover carefully.
If the battery change "is continuously illuminated, measurement is no longer possible and you must replace all the batteries. Once batteries have been removed from the device, the time must be reset. Any measurement results that have been stored are however retained.
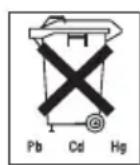
Used batteries do not belong in the household waste. You are legally obliged to dispose of the batteries. Dispose of them via your specialist electrical supplier or local collec
ting point for recyclable waste.
Note: Batteries containing pollutant substances are marked as follows: Pb = Battery contains lead, Cd = Battery contains cadmium, Hg = Battery contains mercury.
Setting date and time
It is vital to set date and time. Only in this way is it possible to save and subsequently retrieve your measured values with the right date and time.
Time is shown in 24 hour format.
Note: If you hold down ,MEM, you can set the values faster.
- Press, START/STOP and, MEM simultaneously. The month starts flashing. Using the, MEM button, set the month 1 to 12 and confirm with, START/STOP.
- Set the day, hour and minute and confirm in each case with ,START/STOP'.
Voice function
You can set the voice function in the switched off state. The device offers 3 languages (English, German, Spanish). The device is set to German on delivery. To change the language selection, press and hold down the ,MEM' button until the desired language appears in the display.
L1-English
L2-German
measurement reL3-Spanish
L0-Language off
The device changes the language automatically if you keep the ,MEM' button pressed. You are informed of the language acoustically each time it changes. Release the ,MEM' button to confirm your desired language.
Volume adjustment: After selection of the language, the bar graph of the WHO classification in the right part of the display flashes and displays the current volume. You can change the volume automatically by pressing and holding
down the ,MEM' button - the higher the bar rises, the louder the acoustic output. Press the ,MEM' button again to confirm the selected volume and to switch off.
5. Measuring blood pressure Positioning cuff
Fit the cuff round your bare left upper arm. Blood circulation in the arm should not be restricted by tight clothing or other objects.
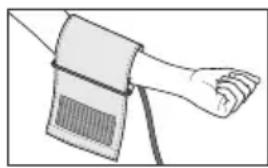
The cuff should be placed on the upper arm so that the lower edge is 2 to 3cm above the bend of the elbow and above the artery. The tube should be in line with the centre of the palm.
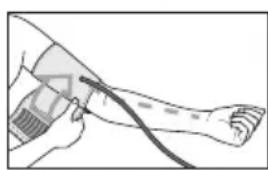
Now place the free end of the cuff snugly, but not too tightly, around the arm, and fix it with the Velcro fastener. The cuff should be fitted tight enough to allow just two fingers to fit beneath the cuff. Insert the cuff tubing into the socket for the cuff attachment.

Important: The instrument should only be operated with the original cuff. The cuff is suitable for an arm circumference of 22 to 30~cm

Correct posture
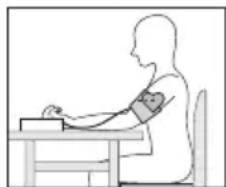
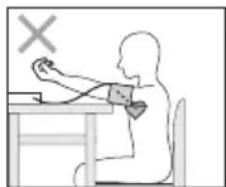
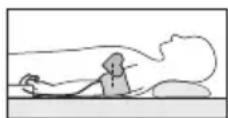
- Rest for approx. 5 minutes before each measurement. Otherwise there may be divergences.
- You can perform the measurement either sitting or lying down. Always make sure that the cuff is on a level with your heart.
- In order not to distort the result, it is important to keep still during the measurement and not talk.
Measuring blood pressure
- Switch on the blood pressure monitor with the ,START/ STOP' button.
- Before the measurement, the last saved test result is briefly displayed. If there is no measurement in the memory, the instrument always displays the value 0^ .
- The measurement starts after a brief announcement.
- The cuff is pumped up to 180mmHg . Cuff air pressure is released slowly. If a tendency towards high blood pressure is already detectable, the cuff is pumped up again and cuff pressure increased further. As soon as a heart rate is detected, the heart rate symbol is displayed.
- The measurement results - systolic pressure, diastolic pressure and pulse - are shown on the display and are acoustically output and evaluated.
- You can interrupt measurement at any time by pressing
the,START/STOP' button.
- ,EE' appears if it has not been possible to perform the measurement properly. Observe the section in these instructions on error messages/troubleshooting and repeat the measurement.
- The test result is saved automatically.
- To switch off and release the pressure, press the ,START/ STOP' button again. If you forget to switch off the device, it switches off automatically after approx. 1 minute.
Wait at least 5 minutes before taking another measurement!
Evaluating results
Cardiac arrhythmia:
This instrument can identify possible cardiac arrhythmia disorders during measurement and if necessary indicates the measurement with the flashing icon. This may be an indicator for arrhythmia. Arrhythmia is a condition where the heart rhythm is abnormal as a result of defects in the bioelectrical system controlling the heart beat. The symptoms (omitted or premature heart beats, slow or excessively fast heart rate) may be caused, among other things, by heart disease, age, physical predisposition, excessive use of stimulants, stress or lack of sleep. Arrhythmia can only be ascertained through examination by your doctor.
Repeat the measurement if the flashing icon is displayed after the measurement. Please note that you should rest for 5 minutes between measurements and not talk or move during the measurement. If the icon appears often, please contact your doctor. Any self-diagnosis and treat
ment based on the test results may be dangerous. It is vital to follow your doctor's instructions.
WHO classification:
According to WHO Guidelines/Definitions and the latest findings, the test results can be classified and evaluated according to the following chart:
| Range of blood pressure values (in mmHg) (in mmHg) | Systolic Diastolic | Measure | |
| Grade 3: Severe hypertension >=180 >=110 | 180 >=110 | Seek medical advice | |
| Grade 2: Moderate hypertension | 160-179 | 100-109 | Seek medical advice |
| Grade 1: Mild hypertension | 140-159 | 90-99 | Have it checked regularly by doctor |
| High-normal | 130-139 | 85-89 | Have it checked regularly by doctor |
| Normal | 120-129 | 80-84 | Check it yourself |
| Optimal | <120 | <80 | Check it yourself |
Source: WHO, 1999
The bar graph in the display and the scale on the unit indicate the range of the blood pressure which has been recorded. An acoustic evaluation of your measurement also follows.
If the values for systolic and diastolic pressure are in two different WHO ranges (e.g. systolic in the high-normal range and diastolic pressure in the normal range) the graphic WHO classification on the unit indicates the higher range (high-normal in the example described).
6. Saving, retrieving and deleting results
- The results of each successful measurement are stored together with date and time. With more than 60 items of measured data, the earliest items of data measured are lost.
-
In order to retrieve measurement results again, press the memory button, MEM'. The instrument first displays the number of memory spaces occupied and then automatically switches to the last saved test result. All the stored measured values are also acoustically output.
-
Pressing the memory button, MEM^c again outputs the further measurement values with date and time.
- You can clear the memory by holding down the memory button, MEM for 3 seconds.
7. Error messages/troubleshooting
In case of faults, the ,EE' message appears in the display.
Error messages can occur when
- inflation pressure is higher than 300mmHg
- blood pressure is unusually high or low,
- you move or talk during the measurement,
- the cuff tube is not inserted properly,
- the cuff is inflated for longer than 30 seconds.
In the above cases, you must repeat the measure ment. Make sure that the cuff tube is properly inserted and that you do not move or talk. Re-insert the batteries if necessary, or else replace them.
8. Cleaning and storing the instrument
- Clean your blood pressure computer carefully only with a slightly moistened cloth.
- Do not use detergents or solvents.
- On no account must you immerse the computer in water, otherwise liquid can enter it and cause demage.
- When storing the device, make sure that no heavy objects are placed on top of it. Remove the batteries. The cuff tube should not have any sharp kinks.
9. Specifications
Model No. SBM 19
| Method of Measurement | Oscillometric, non-invasive blood pressure measurement on the upper arm |
Range of Measurement
Pressure 0 -300 mmHg, systolic 30 -280 mmHg, diastolic 30 -280 mmHg, pulse 40-180 beats/minute
Accuracy of the systolic ± 3mmHg /diastolic
pressure reading ± 3mmHg / pulse± 5% of the d isplayed value
Measuring uncertainty max. permissible standard deviation according to clinical testing: systolic: 8 mmHg/diastolic: 8 mmHg
Sets of Memory 1 x 60 memory places
Unit Dimension L152 x W109 x H70 mm
Unit Weight Approximately 410g with batteries
Cuff Size
Wrist circumference approx. 22-30 cm
Operating Temperature
+5°C to +40°C, 40-85% RH
Storage-Temperature
-20°C to +55°C, 10-95% RH
Power Supply
4× 1,5V AA batteries (alkaline type LR6)
Battery Life
For approx. 180 measurements, depending on blood pressure level or inflation pressure
Accessories
With storage pouch, instruction manu al, 4 pcs "AA" battery
Classification
Application part Type B
Key to symbols:
Important! Read the operating instruction!

Application part Type B

These specification are subject to change without notice for purpose of improvement.
- This unit is in line with European Standard EN60601-1-2 and is subject to particular precautions with regard to electromagnetic compatibility (EMC). Please note that portable and mobile HF communication systems may interfere with this instrument. For more details, please contact customer service at the address indicated.
- The instrument is in line with the EU Medical Products Directive 93/42/EC, the German medical products act and European standards EN1060-1 (non-invasive blood pressure monitors, Part 1: general requirements) and EN1060-3 (non-invasive blood pressure monitors, Part 3: Supplementary Requirements for Electromechanical Blood Pressure Measurement Systems).
- If you are using the instrument for commercial or economic purposes, you must check measurement precision regularly in accordance with the Operators' Ordinance on Medical Products'. Even in the case of private use, we recommend checking measurement precision every two years at the manufacturers.
Français
Pouls:40 -180 pulsations/minute
Cologne先进技术, including the use of a 3D printer, has been developed in Brazil. The technology is used to produce 3D printed objects that can be used for manufacturing and testing applications.
6. CoxpaheHne, BbI3OB u ydaJeHne pe3yIbTaTOB n3MepeHnA
- Pe3yNbTaTb KaKdOrO ycNeuHoro n3MepeHn coXpaHOTcB NaMRTN BmecTe C daToi N BpemeHem. Ppi 60nee yem 60 pe3yNbTaTax Cambl CTapbl pe3yNbTaTydAnreTCR.
-ДИВIbI3OBApe3yIbTaTObI3MpeHnHaXmITe KHOITky BBOJaB nAMrTB,MEM".Прбop BHaayane yKa3bIbaeT YNCNo 3aHrTbIXAyeek nAmrTn, a 3aTeM aBTOMaTHueCKn nepExoDNT K NocneHemy
coxpaenHOMy pe3yNbTaTy n3MepeHn. Kpome toro, BCE coxpaenHHbE B namrTpe3yNbTaTbI n3MepeHn COo6aJOTc rOLOCOM
- Pπn dαnbHeHnx HαkaTnx KhONKn BBOda B nAmrTb ,MEM" NOKa3bBAIOTCa CneDyUOuNe pe3yJbTaTbI N3MpeHn C daToi n BpemeHem.
BbMOKTe CtepeTb NAMrTb, HaxaB KhoNky ,MEM" u ydepXnBaee 3 cekyHdbI.
7. Coo6ueHnO HeNCpPaBHOCTaX/YcTpaHeHne HeNCpPaBHOCTeI
Pn HncnpabHocTnx Ha nncnnee NOBnAeTCa COo6uHeNe "EE CoooHnO HeNCnpabHocTAX MOrTy NOrBnATbc,ecnn
1.ДаВлесни НакayиВань певышет 300 MM pt. ct.,
2. 3NaueHHe apTepeHaJIbHO RaBHeHn Heo6bIuHO BbICOKoe Hn3KOE,
3. BO Bpemn H3mepenBbI DnBaTeEc bnn pa3roBapnBaTe,
4. WJNAH MaXKeTbI He BCTaBnE HONKbIM O6pa3OM,
5. HakaHbAHne DnITc8 60Jee 30 cekyHd.
B 3Tnx CnyaaynoBTOPnTe N3MepeHne. CneJeTe 3a TeM, YTO6bl
IJIaHI MaXKeTbI 6bl I npAunBHO BCTaBHeN UTO6bl Bbl He DnIRaJIncB
H He pa3ROBaPnBAJI. PpH HeOe6xOJIMOCtN, 3aHOBO yCTaHOBnTE
6bTaapeKn nn 3aMeHnTe cTapbe.
8. OuicTkα n xpaHHeHne npnbopa
- Pnp6op IJI IN3MepeHn KpOBAHO RaBHeHn CneDyET NCTNTb OCTopoXHO pIIN NOMOUI CNERKCA CMoeyHHO TKAHN.
3anpeetaetcaHcnoIb3oBaHne HCTaIcx CpeIcTB mI npactBopnten.
He donyckaiTe nonaJaHne np6opBa B Ody, T.K. B pe3yltate B Hero MOKeT npOHKnHyTB KJIKKoCTb NIOBpeDnTb np6Op. - Pn xpaheHnn annapaTa Ha Hero HeIb3a CTaBnTB TAnKeBle npeMeTb. 3anpeaaetc CnBHO nepern6aTb CoeHNHTeBHyTO Tpy6ky MaHKeTb.
9. TexHnueckne daHHbIe
MoDemb No SBM 19
MeToDbI n3MepEnHg OcunJIIOMeTpueeCKoe HnHBa3NBHOe n3MepEHne apTePnaIbHorO daBHeHHaHa npEaNeue
ДиаэзнИЗмереняДаBJHHe 0-300 MM pT. CT., CnCTOJIuYeCKoe:30-280 MM pT. CT.,ДиactoJIuYeCKoe 30-280 MM pT. CT.,pyIbC 40 -180 yJapOB B MmHyTy
ToHocb HnIkaun CnCTOJIueeCKoe ± 3 MM pT. CT./
DaBHeHn DaactOJIueeCKoe ± 3 MM pT. CT. /
pybc ± 5 % INHdIuPyembIX 3HaueHn
IorpeHocb MaKC. DOnyctHMoe CTAHaDapTHoe OTKIOHeHne
N3MepeHn COrLaCHO KJIINHueCKM NcBtAHNAm:
CnCTOInueeCKoe DaBHeHne 8 MM pt. CT./
DnactoInueeCKoe DaBHeHne 8 MM pt. CT.
3aHOMHaOueyctpoCTBO 1x60raeeKnarnTIN
Pa3Mepbl 152(nHa)x109(nHa)x70(Bicota)
macca Pn6n3ntbHo410rc6aTaepKaMn
pa3Mep MaXKeTbMaXKeTa DnA OkpyKHOCTn pyKn OT 22do 30cm
Дуустуmar paobчан OT+5℃do+40℃,40-85% Tempeatypa OTHOCHTeBHaB BIAJXHOCTb
Донуctимая Temnéратура OT-20°Cdo+55°C,10-95%храеня OTHOCHTENbHAЯВlaЖHOCTьЗлектpondипсу 4 „AA" -6aразейк NR 6
Cpok cnyk6bl 6atapekn PnpMepno dIa 180 n3mepeHn, B 3abncIMoCTN OT BeMNHHb apTePnaNbHO DaBHeHn I, COOTBeTCTBEHNO, DOCTnraEMORO B MaXKeTe DaBHeHn
BcnoMoraTeNbHoe CymkaInXpaHeHnpykoBOCTBO 06opydoBaHne no3Kcnnyataun4A-AA-6aTapeuKN LR 6
KlaaccnphiKaun Pa3dJeI no npImeHEnIO, TIN B
Приимechанe: pa3deJI npIMeHnA TnB BHNMaHHe: IpoHTaITe INHCTpyKcNIO no npIMeHnIO
BueJy ycoBepseHCTBOBaHN Mbl coXpaHReM 3a cO6oI npaBO Ha n3MeHeHn TExHHuecknx DaHHbIX 6e3 ONoBeUeHn.
Даньиnp60coBtCTByeEBPoneckomy cAndapTy EN60601-1-2
И АВЛHETcIпeДМETOM OCObIX МерпeДОCTOPOXHOCTN B OTHOWEHIN
ЗЕКТРOMaHRTHOH COBMECTMOCTN.ПИЗ TOM YCHTbIBAITe,ЧTO
пЕХСыИ MOBINbHbIe CpeDcTBa Bc-Y-CB3n MOrY BInrTb Ha
Даньи np60p. ToHyIO INHΦOpMaUHbI BoI MoKTe ПOnyHTb B
CEPBICbIX CEHTpax.
- AnnapaT cooTBcTByET Tpe6oBaHnM eBponeckoro HopMaTHBHOrO aKTA NO MeuunHckm N3deHnM, 93/42/EC 3aKaHO a MeuunHcknx N3deHnNx, a TaXke eBponecknx cTaHapToB EN1060-1 («HeuHa3NbHbIe annapaTbI dJIur n3MepeHHK KpoBraHORo daBJeHHRA), qactb 1: «Obue Tepe6oBaHnR») n EN1060-3 («HeuHa3NbHbIe annapaTbI dJIur n3MepeHHa KpoBraHORo daBJeHHRA), qactb 3: «DOnoJInTeJbHbIe Tpe6oBaHnR K 3JeKtpomexAHueckm CnCTeMaM dJIur n3MepeHHa KpoBraHORo daBJeHHRA).
- Ecnn Bbl nCnOlb3yeTe annapat B KOMMpeccknx ceIax, Bbl dOnkHbI - cornacho «PpabnE kCnnyataun MeDnUHcknx n3deHn" peylnrpo IPOBOINTb METPOIORNUeCKN KOHTPOB. DaXe npu IIMHOM IcNoIb3OBAHN Mbl peKOMeHdyem KaXdble DBa rOda nepeDaBaTb annapat B cepBnchHyO cnYk6by dner MetPOIOrNUeCKoro KOHTPOJ.
10. rapaHTnA
Mbl npedoctabJIeRrapaHTHOHaIepeKtbl MaTePnAIOB IN3ROTOBJIeHn 3TOro np6opa Ha cpoK 24 Meca ca CO DnI npOdaJN YpeE3 p03HnHyIO Cetb.

TapaHTnHe pacnpoctpaHaeTc:
- Ha cnyuanyuep6a, Bbl3BaHHORH He npbaBnBbIM NCIOJIb3OBAHNEM
- Ha 6bictpon3HaunBaiouueceyactn(6aTapeKmHKeTa)
- Ha DepeKtbl, O KOTOpbIX NOKyNaTeJIb 3HaJI B MOMENT NOKyKNI
- Ha cnyuanyu co6cTBeHHo BNbI nOKyNaTeJIa.
ToBaP ceTnDmnpoBaH.
Cpok kcnnyataunn n3dennr: ot 3 do 5 net
ΦnpuMa n3rOToBnteIb: BoIpep Γm6x, CoCpHnHrep wTpacce 218, 89077-YM, FepMaHnI dIa IpnMbI XaHc DnHcIaRe JTTd 88524 YTTeHbainep, FepMaHnI
CepBnchbI ueHTp: 109451 r. MockBa, yI.IpepeBa, 62, Kopn.2
Teπ(φakc) 495-658 54 90

- Getting to know your instrument
- Important information
- Advice on use
- Storage and Care
- Advice on batteries
- Repair and disposal
- Prepare measurement Inserting battery
- Setting date and time
- Voice function
- Measuring blood pressure Positioning cuff
- Correct posture
- Measuring blood pressure
- Evaluating results
- Cardiac arrhythmia:
- WHO classification:
- Saving, retrieving and deleting results
- Error messages/troubleshooting
- Cleaning and storing the instrument
- Specifications
- Français
- CoxpaheHne, BbI3OB u ydaJeHne pe3yIbTaTOB n3MepeHnA
- Coo6ueHnO HeNCpPaBHOCTaX/YcTpaHeHne HeNCpPaBHOCTeI
- OuicTkα n xpaHHeHne npnbopa
- TexHnueckne daHHbIe
- rapaHTnA
Brand : SANITAS
Model : SBM 19
Category : Blood pressure monitor