
SBM 29 - Blood pressure monitor SANITAS - Free user manual and instructions
Find the device manual for free SBM 29 SANITAS in PDF.

| Product type | Electronic upper arm blood pressure monitor |
| Brand | Sanitas |
| Model | SBM 29 |
| Measurement method | Oscillometric, non-invasive |
| Pressure measurement range | 0 – 295 mmHg |
| Systolic measurement range | 30 – 280 mmHg |
| Diastolic measurement range | 30 – 280 mmHg |
| Pulse measurement range | 40 – 180 beats/min |
| Pressure accuracy | ± 3 mmHg |
| Pulse accuracy | ± 5% of the displayed value |
| Memory | 1 x 60 readings |
| Dimensions (L x W x H) | 137 x 97 x 55 mm |
| Weight | Approx. 260 g (batteries included) |
| Power supply | 4 AA 1.5 V batteries (LR6) |
| Battery life | Approx. 180 measurements |
| Compatible arm circumference | 22 – 30 cm |
| Display | LCD with date, time, pressure, pulse, arrhythmia symbol, WHO classification |
| Functions | Arrhythmia detection, WHO classification, auto shut-off, memory |
| Operating temperature | +5 °C to +40 °C |
| Operating humidity | 40 – 80 % RH |
| Storage temperature | -20 °C to +55 °C |
| Storage humidity | 10 – 95 % RH |
| Care | Clean with a damp cloth, do not use solvents, do not immerse |
| Safety | Compliant with standards EN60601-1-2, EN1060-1/3, type B applied part |
| Repairability | Repairs only by customer service, use original cuff |
Frequently Asked Questions - SBM 29 SANITAS
User questions about SBM 29 SANITAS
0 question about this device. Answer the ones you know or ask your own.
Ask a new question about this device
Download the instructions for your Blood pressure monitor in PDF format for free! Find your manual SBM 29 - SANITAS and take your electronic device back in hand. On this page are published all the documents necessary for the use of your device. SBM 29 by SANITAS.
USER MANUAL SBM 29 SANITAS
Please read these instructions for use carefully and keep them for later use, be sure to make them accessible to other users and observe the information they contain.
1. Getting to know your instrument
The upper arm blood pressure monitor is used for non-invasive measurement and monitoring of adults' arterial blood pressure.
You can use it to measure your blood pressure quickly and easily, storing the results and displaying the progression of readings.
A warning is issued for anyone suffering from cardiac arrhythmia.
The values determined are classified and graphically evaluated according to WHO guidelines.
Keep these instructions carefully for further use and also let other users have access to them.
2. Important information

Advice on use
- Always measure your blood pressure at the same time of day, in order to ensure that values are comparable.
Relax for approx. 5 minutes before each measurement. - You should wait five minutes before measuring a second time.
- The readings that you take may only be used for information purposes - they are not a substitute for a medical
examination! Discuss your results with the doctor. Never use them to make medical decisions independently (e.g. regarding medication and dosage thereof).
- There may be incorrect measurements where there is cardiocirculatory disease, as well as with very low blood pressure, circulatory disorders, dysrhythmia and other preexisting diseases.
- Only use the instrument on persons whose upper arm has the right circumference for the instrument.
- You may only operate the blood pressure monitor with batteries. Note that it is only possible to save data when your blood pressure monitor is receiving power. As soon as the batteries are dead, the date and time on the blood pressure monitor are lost. Any measurement results that have been stored are however retained.
- The automatic switch-off function switches off the blood pressure monitor in order to preserve the batteries, if no button is pressed within one minute.

Storage and Care
-
The blood pressure monitor is made up of precision electronic components. Accuracy of readings and the instrument's service life depend on careful handling.
-
You should protect the device from impact, moisture, dirt, major temperature fluctuations and direct exposure to the sun's rays.
-
Never drop the device.
-
Do not use near strong electromagnetic fields, i.e. keep it away from any radio systems and mobile phones.
- Only ever use the cuffs provided with the monitor or original replacement cuffs. Otherwise erroneous results will be recorded.
- Do not press any buttons until the cuff is in position.
- If the instrument is not used for any length of time, we recommend removing the batteries.

Advice on batteries
- Batteries can be fatal if swallowed. You should therefore store the batteries and products where they are inaccessible to small children. If a battery has been swallowed, call a doctor immediately.
- Batteries should not be charged or reactivated with any other means, nor should they be taken apart, thrown in the fire or short-circuited.
- Remove the batteries from the instrument if they are worn out or if you are not going to use the instrument for any length of time. This prevents any damage as a result of leakage. Always replace all the batteries at the same time.
- Never use different types of battery, battery brands or batteries with different capacities. You should preferably use alkaline batteries.

Repair and disposal
- Batteries do not belong in domestic refuse. Used batteries should be disposed of at the collection points provided.
-
Never open the instrument. If these instructions are not heeded, the warranty will be null and void.
-
Never attempt to repair the instrument or adjust it yourself. We can no longer guarantee perfect functioning if you do.
- Repairs may only be performed by Customer Service or authorized dealers. However, always check the batteries and replace them if necessary prior to making any complaint.
- The appliance should be disposed of according to Regulation 2002/96/EC-WEEE (Waste Electrical and Electronic Equipment). In case of queries, please contact the municipal authorities responsible for waste disposal in your area.
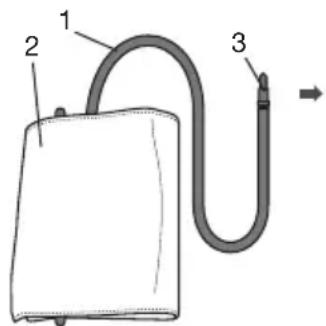
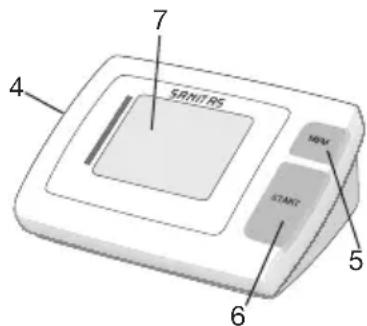
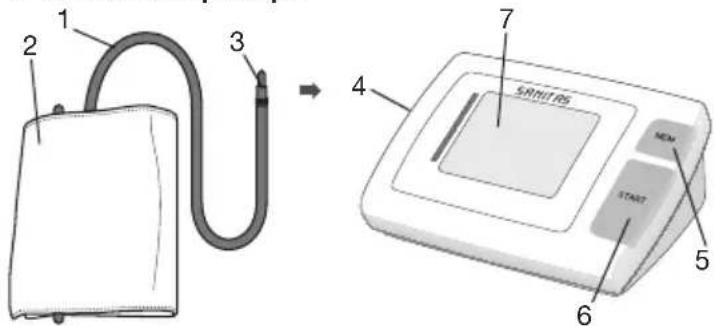
3. Unit description
- Cuff tube
- Cuff
- Cuff connector
- Cuff connector port (left side)
- Memory button MEM
- START/STOP button
- Display
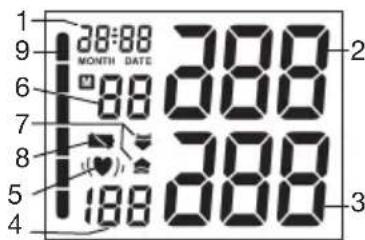
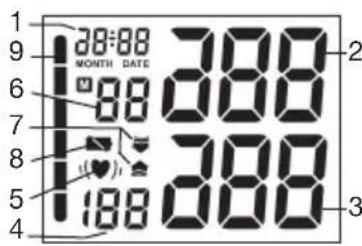
Icons in the display:
- Time and date
- Systolic pressure
- Diastolic pressure
- Measured pulse
- Pulse icon
Cardiac arrhythmia icon
- Number of memory space
- Inflate/deflate arrow
- Change battery' icon
9.WHO classification
4. Prepare measurement
Inserting battery
- Remove the battery cover from the back of the monitor.
- Insert four AA 1.5 V alkaline batteries.
Making absolutely sure that you insert them with the correct polarity as marked. Never use rechargeable batteries.
- Replace the battery cover carefully.
If the battery change, is continuously illuminated, measurement is no longer possible and you must replace all the batteries. Once batteries have been removed from the device, the time must be reset. Any measurement results that have been stored are however retained.
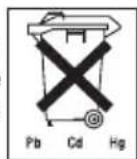
Used batteries do not belong in the household waste. You are legally obliged to dispose of the batteries. Dispose of them via your specialist electrical supplier or local collect ting point for recyclable waste.
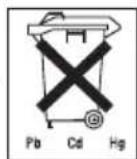
Note: Batteries containing pollutant substances are marked as follows: Pb = Battery contains lead, Cd = Battery contains cadmium, Hg = Battery contains mercury.
Setting date and time
It is vital to set date and time. Only in this way is it possible to save and subsequently retrieve your measured values with the right date and time.
Time is shown in 24 hour format.
Note: If you hold down ,MEM, you can set the values faster.
- Press, START/STOP and, MEM simultaneously. The year starts flashing. Set the year with, MEM and confirm with, START/STOP.
- Set the month, day, hour and minute and confirm in each case with ,START/STOP.
5. Measuring blood pressure
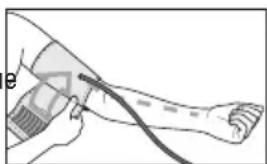
Positioning cuff
Fit the cuff round your bare left upper arm. Blood circulation in the arm should not be restricted by tight clothing or other objects.
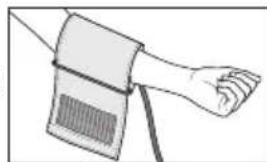
The cuff should be placed on the upper arm so that the lower edge is 2 to 3cm above the bend of the elbow and above the artery. The tube should be in line with the centre of the palm.
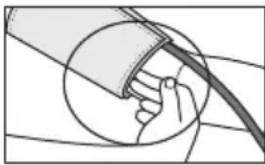
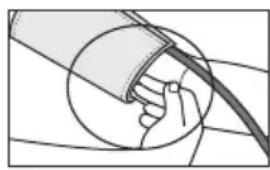
Now place the free end of the cuff snugly, but not too tightly, around the arm, and fix it with the Velcro fastener. The cuff should be fitted tight enough to allow just two fingers to fit beneath the cuff.
Insert the cuff tubing into the socket for the cuff attachment.
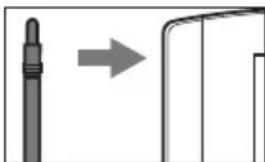
Important: The instrument should only be operated with the original cuff. The cuff is suitable for an arm circumference of 22 to 30~cm
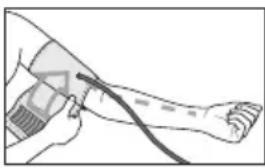
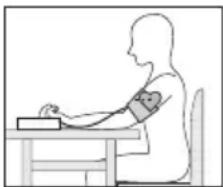
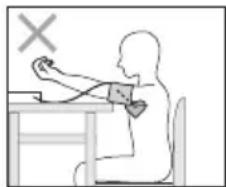
Correct posture
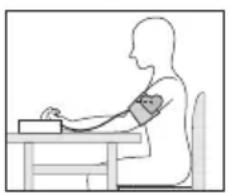
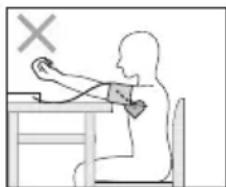
-
Rest for approx. 5 minutes before each measurement. Otherwise there may be divergences.
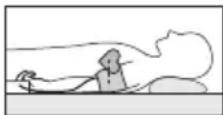
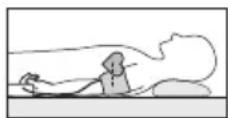
-
You can perform the measurement either sitting or lying down. Always make sure that the cuff is on a level with your heart.
- In order not to distort the result, it is important to keep still during the measurement and not talk.
Measuring blood pressure
- Switch on the blood pressure monitor with the ,START/ STOP' button.
- Before the measurement, the last saved test result is briefly displayed. If there is no measurement in the memory, the instrument always displays the value 0^ .
- The cuff is pumped up to 180mmHg . Cuff air pressure is released slowly. If a tendency towards high blood pressure is already detectable, the cuff is pumped up again and cuff pressure increased further. As soon as a heart rate is detected, the heart rate symbol is displayed.
- Heart rate, systolic and diastolic blood pressure are displayed.
- You can interrupt measurement at any time by pressing the .START/STOP' button.
- ,Er^ appears if it has not been possible to perform the measurement properly. Observe the section in these instructions on error messages/troubleshooting and repeat the measurement.
- The test result is saved automatically.
- To switch off and release the pressure, press the ,START/ STOP' button again. If you forget to switch off the device, it switches off automatically after approx. 1 minute.
Wait at least 5 minutes before taking another measurement!
Evaluating results
Cardiac arrhythmia:
This instrument can identify possible cardiac arrhythmia disorders during measurement and if necessary indicates the measurement with the flashing icon
This may be an indicator for arrhythmia. Arrhythmia is a condition where the heart rhythm is abnormal as a result of defects in the bioelectrical system controlling the heart beat.
The symptoms (omitted or premature heart beats, slow or excessively fast heart rate) may be caused, among other things, by heart disease, age, physical predisposition, excessive use of stimulants, stress or lack of sleep. Arrhythmia can only be ascertained through examination by your doctor.
Repeat the measurement if the flashing icon displayed after the measurement. Please note that you should rest for 5 minutes between measurements and not talk or move during the measurement. If the icon appears often, please contact your doctor. Any self-diagnosis and treatment based on the test results may be dangerous. It is vital to follow your doctor's instructions.
WHO classification:
According to WHO Guidelines/Definitions and the latest findings, the test results can be classified and evaluated according to the following chart:
| Range of blood pressure values Systolic (in mmHg) | Diastolic (in mmHg) | Measure |
| Grade 3: Severe hypertension >= 180 >= 110 Seek medical advice | ||
| Grade 2: Moderate hypertension 160 - 179 100 - 109 Seek medical advice | ||
| Grade 1: Mild hypertension 140 - 159 90 - 99 Have it checked regularly by doctor | ||
| High-normal 130 - 139 85 - 89 Have it checked regularly by doctor | ||
| Normal 120 - 129 80 - 84 Check it yourself | ||
| Optimal < 120 < 80 | Check it yourself |
Source: WHO, 1999
The bar graph in the display and the scale on the unit indicate the range of the blood pressure which has been recorded. If the values for systolic and diastolic pressure are in two different WHO ranges (e.g. systolic in the high-normal range
and diastolic pressure in the normal range) the graphic WHO classification on the unit indicates the higher range (high-normal in the example described).
6. Saving, retrieving and deleting results
- The results of each successful measurement are stored together with date and time. With more than 60 items of measured data, the earliest items of data measured are lost.
- In order to retrieve measurement results again, press the memory button, MEM'. The instrument first displays the number of memory spaces occupied and then automatically switches to the last saved test result.
- Pressing the memory button, MEM again outputs the further measurement values with date and time.
- You can clear the memory by holding down the memory button, MEM^ for 3 seconds.
7. Error messages/troubleshooting
In case of faults, the Er^ message appears in the display. Error messages can occur when
- inflation takes longer than 3 minutes (Er6 appears in the display),
- the cuff is too tight or too loose (Er3 or Er4 appears in the display),
- the blood-pressure values are unusually high or low (Er1 or Er2 appears in the display),
- the inflation pressure is higher than 300mmHg (Er5 appears in the display),
- there is a system or device error (Er0, Er7, Er8, Er9, ErA or ErB appears in the display),
- the batteries are almost flat; the batteries must be replaced.
In the above cases, you must repeat the measurement. Make sure that the cuff tube is properly inserted and that you do not move or talk. Re-insert the batteries if necessary, or else replace them.
8. Cleaning and storing the instrument
- Clean your blood pressure computer carefully only with a slightly moistened cloth.
- Do not use detergents or solvents.
- On no account must you immerse the computer in water, otherwise liquid can enter it and cause demage.
- When storing the device, make sure that no heavy objects are placed on top of it. Remove the batteries. The cuff tube should not have any sharp kinks.
9. Specifications
Model No. SBM 29
Method of Measurement Oscillometric, non-invasive blood pressure measurement on the upper arm
Range of Measurement Pressure 0 -295 mmHg, systolic 30 -280 mmHg, diastolic 30 -280 mmHg, pulse 40 -180 beats/minute
Accuracy of the systolic ± 3mmHg /diastolic pressure reading ± 3mmHg pulse ± 5% of the d isplayed value
Measuring uncertainty max. permissible standard deviation according to clinical testing: systolic: 8 mmHg/ diastolic: 8 mmHg
Sets of Memory 1 x 60 memory places
Unit Dimension L137 x W97 x H55 mm
Unit Weight Approximately 260 g with batteries
Cuff Size cuff for upper arm circumference of 22 - 30 cm
Operating Temperature +5^ to +40^ 40-80% RH
Storage-Temperature -20°C to +55°C, 10-95% RH
Power Supply 4 x 1,5 V AA batteries (alkaline type LR6)
Battery Life For approx. 180 measurements, depending on blood pressure level or inflation pressure
Accessories Instruction manu al, 4 pcs "AA" battery
Classification Application part Type B
Key to symbols: Important! Read the operating instruction! Application part Type B
These specification are subject to change without notice for purpose of improvement.
- This unit is in line with European Standard EN60601-1-2 and is subject to particular precautions with regard to electromagnetic compatibility (EMC). Please note that portable and mobile HF communication systems may interfere with this instrument. For more details, please contact customer service at the address indicated.
- The instrument is in line with the EU Medical Products Directive 93/42/EC, the German medical products act and European standards EN1060-1 (non-invasive blood pressure monitors, Part 1: general requirements) and EN1060-3 (non-invasive blood pressure monitors, Part 3: Supplementary Requirements for Electromechanical Blood Pressure Measurement Systems).
- If you are using the instrument for commercial or economic purposes, you must check measurement precision regularly in accordance with the Operators' Ordinance on Medical Products'. Even in the case of private use, we recommend checking measurement precision every two years at the manufacturers.
FRANÇAIS
Yka3aHnB OTHoWeHm 6aTaapeek
- PpOrnTaBHaHne 6aTapeek MoKet npNBOuNTb K ONaCHOCTn IJRA Xn3Hn. Po3ToMx xpaHnte 6aTapeKn n3DeJIIN B HeIOCTyHOM DnIeTe MeCte. B cnyae npOrnTaBHaHna 6aTapeKn He3aMeDInTeBHo 6paTntEc b K bpay.
3anpeaetc3apaxbHnpeakTb6aTapeKn HbIMNCnoc06amn,pa3bnpaTBnx,6pocTaB OROh Nn 3aMbikTaHaKOPOTKO. - BbItaunTe 6batapeiKn n3 annapapa, ecn OHn pa3pXeHbl nIn ecn Bbl dInTeIbHoe Bpemr He nonb3yeTecb npu6opom. TaKIM 6pa30m Bbl ppeoTbpaaaete yueep6, KOtOpBm MoXet 6bl T bI3BaH BblNBImMC3neKTPoNITOM. BcERda 3aMeHnTe BCE 6batapeiKn OndOBpemeHHO.
He nCnoB3yIe 6aTapeKn pa3JNUHbIX TINOB, MapOK nJN 6bapeKn c pa3JNUH0E MKOcTBIO. IpenMyueCTBeHHO nCNoB3yIe 7eJOnHbIe 6bapeKn.

Yka3aHnnopeMOHTyuyTIN3aun
- Baataeken 3anpeaetaTc BbIbpaCbIBaTb B 6bIbOBo Mycop. YtunImnupyTe nCNoJIb3OBaHHbIe 6baTaepKuYepe3 COOTBETCTByIOUmN NYHKT C6opa OTXoDOb.
He otKpbBaIe np6op. HecobJIOJeHne BeTe K noTepe rapaHTM.
3aPpeaaetcramoCTeIbHPOMeHTnpoBaTbnnpeytnpoBaTbp6op.B 3OM cnyae 60JIbwe He rapaHTnpyeTc 6e3ynpeHocTbpa60Tb. - Pemont pa3peaetc BbINOJHrTb TOJbKO cepBnchOH cnyk6e cnPMBI NIN ABTOpN3npoBaHHbIM cepBnCHbIM OpraHn3aunM. Ho neped IIO6bIMn peKlamaunm Bhaue npoBepTe 6aTapeuKn N, pRn Heo6xOJIUMOCTn 3ameHte ux.
- Ytun3npyu Te np6op cornacho Tpe6oBaHnAM IonoXeHH O6 ytni3aun 3neKtpueckoro n 3neKtpoHHoro o6OpyOBAHn 2002/96/EC - WEEE (Waste Electrical and Electronic Equipment").Ito Bcem BOnpocam no ytun3aun 6paauTecb COOTBETCTByUoukyo KOMMyHaJIbHyIO cnJx6y.
3. Onncanne npnbopa
- WnahMaHKeTbI
- Manxeta
-
WTeKep MaHKeTbI
-
The3do nIra WTeKepa MaHKeTbI (JIeBaA CTOpOHa)
- Khonka BbOa B namTb MEM
- Khonka START/STOP
7.Диспел
HdkaHa dncnnee:
1.BpemnndaT
2.Cnctonuueckoe daBJIeHne
3.ДиactonuyeckoeДавлелпe
4.ДиactOnIueckoeДаьлeнe
5.ПИKTOrpMaM«IyIbC>ПИKTOrpMaHApUSeHnI pITMa cepua
6. Homep JHeyKn NamrTn
7.ИЗмepeHHoe 3HaueHne YacToTbI nylbaCa
8.ПИKTOrpaMMAЗamHeB6aTapeeK
9. KlaaccnФикади BO3
4. Podrotobka k paboTe
UcTaHOBka 6aTapeKu
CHIMMTE KpbIiKy c 6aTapeHOro OTceKa Ha 3aHHe CTeHKe annapata.
YCTaHOBnTe4 anKaHIOHBbIX 6aTapeKu Tnna AA 1,5 B. CneIte 3a Tem, YTObI 6aTapeKu 6bln BCTaBHeHbIC CO6JIOpEHNEM NOnApHocTN. 3apXaEMbIe aKKyMylrTophIe 6aTapeN
- AkkypaTHO 3akpoIte KpbIshky 6aTapeHoro OTOceKa.
Ecnno nocToHHo CBETnTcH INDnKaun 3aMeHbI 6aTaapeek , npOBeHeHne n3MepeHn 60nbue HeBO3MoXHo, N Bbl DOnKhbI 3aMeHnTB BCE 6aTaapeKn. Ho coxpaHeHHbI B naMrtu pe3yNbTaTbI n3MepeHn OCTaOTcH.
IcnoIb3OBAHHie, noHocTbIO pa3pRKeHHie 6aTaapeKn n aKKymyIaTOpbl DOJXHbl yTNIN3NPOBaTbCS NOMEeHHeM B CneuaJIbHO Oo3HaueHHbe KOHTeHepbl, NYKtBc6opa CneuaJIbHbIX OTXODOB INI YpeE3 TOPROBcEB 3NeKTPOTOBapAMN.
BbI 63aHbI no 3aKOHy yTnIm3npoBaTb 6aTapeiKn.
HnΦopMaun: Θn O6o3NaueHn CTaBnTc Ha 6bataeKax, coepKaux BpeHbIe MaTePmaIbI: Pb = B bataeKe coepKntc CBnHeu, Cd = B bataeKe coepKntc KaMn, Hg = B bataeKe coepKntc pTyTb.
HactpoKa BpeMeH N daTbI
Bb63aTeIbHO doJIxHbI HAcTpoNTb Bpemn DaTy. TOnbKO npn 3Tom
BbMOKeTe IpaBnIbHO BBOINb B NaMrtb pe3yIbTaTbN3MEpeHn
CBpemeHm n daToN n O3dHee Bbl3bBaTb Nx.
Bpema Noka3bBaETcB 24-ycobom opMaTe.
PpmeHHe: EcnBbI ydepXnBaTe KhoNky ,MEM" haxaToi, Bbl MoXeTe HAcTpoNTb 3NaueHn8 6bictpee.
- Haxmnte OndHobpemehno KhoNkn ,START/STOP" n ,MEM". Hndkaunr oda haunhaet mraTb. KhonkoN ,MEM" hactpoiTe 3haeHne roda n noTbePnte HaxaTneM ,START/STOP".
- HactpoIte Mecau, DeHb, Yac mMHyTu, KaKdbi pa3 noTBepxkDaBb6op KhoNkoi „START/STOP".
5.Измерени apTepeinaIbHoro daBneHnA
HaIOXnTb MaHxkTeY
HaHeHbTe MaHKeTy Ha 6hAHexHoe neBoe npednneYe. PpIMTe Mepbl, TTo6bl CIniKOM TeChbIe 3JeMeHTbl OJExDbI INI YTO-JIbO HHO He HApUaLo HopMaJIbHOe KpOBoo6paueHne Ha pyke.
MaHxeta DOnxHa 6bTb NOMEeHa Ha npEaIneYbe TaK, YTO6bl HxHraee KpOMKa 6bIa Ha 2-3 cm BbluNOKTeBOrO cr6a n pacNojaranacb HaApTepeHn. CoeHNHTbHaar Tpy6kaDOnxHa NOKa3bIbTaB HAnpaBHeHnCepeDuHbI NaDoHn.

3aBepHnTe CBO6OdHbI KOHeu MaHKeTb I NIOTHO, HO He CIniKOM, BOKpy pyKn H 3aXmNte 3AMOK Ha JINnykax. MaHXeTa DOJnxHa npIneratb K pyKe HAcToIbKO NIOTHO, YTO6bI NOJ Hee MOxHO 6blIO npOeTb He 60nbwe DByx NaIbueB. HAdenbTe Tenepb CoeDHNtEnbHyTO Tpy6ky MaHXeTb Ha 7Tuyepe MaHXeTb.

BHMaHHe! 3KcNpyatau npnbopa donyckaetc TOnbKO c opunHaJIbHO mAHKeTo. DaHHa MaHKeTa pnpOHa dna pyKn C OKpyxHoCTbIO OT 22 do 30 cm.
PpHb npabnBHOe noJoxehne
- Ipeep KaKdbim N3MepeHnem paccna6nItecb B TeueHne OKoNo 5 MInHyT! B npOTNBOM clyyae BO3HnKaHOt HeTOUHOCTN N3MepEHnI.
-Измереня мохно пювдь в поожени сада ил в поожени leka.Cnéдпгпгпгпгпгпгпгпгпгпгпгпгпгпгпгпгпгпгпгпгпгпгпгпгпгпгпгпгпгпгпгпгпгпgсрда. - TTo6bI He NcKa3nTb pe3yNbTaTbI 3MpeHnA, CneJeYET BcTn Ce6B BO Bpemr n3MepeHnCnOKoHNO Hpe pa3roBaPnBaTb.
BbINOHNHTb N3MepeHne apTePnaJIbHOrO daJIeHn
BknHouHte annapat haxaTneM KhoNKn ,START/STOP
- Ipeepn3mepenem Ha KOPOTKoe Bpemr NOBJIeTcN OcneHn coxpaehHHb pe3yIbTa n3mepeHn. EcnB namrHe coxpaehhbln3mepeHH, np6op noka3bBaet BeHNHy ^ 0^
MaHKeTa HakaunBaETcI Do daBHeHn 180 MM pT. CT. 3aTeM daBHeHne BO3dyxa B MaHKeTe MeDneHNO CTPaBnBaETcR. Pn yXe pacNo3HaHHo TeHDeHcN K BbICOKOMy KPOBHOmy daBHeHIO Ipon3BOIDTCN NOBTOHoe HakaunBaHne N daBHeHne B MaHKeTe eEe pa3 NoBbIaETcR. KaK TOnbKO paCno3HaETcR nybc, NORBnEETcNIKTORpAMMa
- Pe3yIbTaT n3MepeHnA BtOMaTuYeCKn CoXpaHaTeCBA NaMaTI.
- Bы може в Любов мочent перваь Измеренье нахатуем конки „START/STOP".
-ПИКТORPAMMA „Er" NOBJIARETcA, ecn IN3MpeHne He MoKet 6bITb BbINOJIHeHO DoJNXHbIM O6pa3OM. Почтnte rIaNaby «CoO6UeHnO HeNCnpaBHOCtAx/YcTpAnHeHne HeNCnpaBHocTe»ВДaHHoINHCTpyKUnN IOBTOpNTe IN3MpeHne.
- Pe3yIbTaT n3MepeHnA BtOMaTHueCKu CoXpaHaETcB nAmrTu.
- OTKJIIOUeHn IN CTpaBbINBaHn IaBJIeHn IOBTOPO HaXMITE KHOKy START/STOP".Ecn Bbl 3abbl N BbIKIOHTb aIcapaT, OH ABOTMaTHueCKN OKIIIOHTc npIMePHO Yepe3 1 MNHyTy.
Ipeep npoBeHnem HOBOrO n3MepeHnA CJeNyET BbIXdaTb He MeHee 5 MInHyT!
OueHka pe3yIbTaTOB
HapyeHnA cepdHoro pHTMa:
AnHHb annapaT MOKeT BO BpeM n3MepeHn NdeHTnCupoBaTB BO3MOxHbIe HApUeHn cepJeHOro pNTMa n B IIOOBHom Clyuae Yka3bIbAet Ha 3TO NIKTORpAMMO
3TO MOKET Cnykntb INHnKaTOpOM apTNMn. ApTNMn - 3TO 3abOJIeBAHHe, pIn KOtOpOM cepDeHbI pNTM HApUaETCa n3-3a NopOKOB B 6nO3JIeKTPnueCKo CNCTeMe, KOTOPaY npaBJIeT cepDeHbIMC cOKpaJeuHmN. CImNTombl (npOnyueHHbI eIN npExdEBPemEHhIE cepDeHbIe cOKpaJeuHn, MeDJIeHHbI ININ CNIuKOM 6bICTpbI yNbC) MOrYT Bbl3bIBaTBcA, cpeIN IpOyeO, 3abOJIeBaHnHM cepDua, BO3pactOM, fN3IOJorNueCKo npedpacNoJooKeHHocTbIO, Ype3MEpHBIM yNOTpe6JIeHnEM TOHN3UPyIOxN IN BO36yXdaIOxN pOdoYKTOB, CTpeCCOM IN HeDOcbIaHnEM. ApTNMn MOKET 6bITb OShapYKeHa TOnbKO npi 0bcJeDobAHm Brayom.
Iobtopne n3mepeHne,ecn nnKtorpammaBnAeTcHa
Dncnnee noce n3mepeHna.YuTte,YTO nepei n3mepeHnEM Bbl
DOJXHbI 5 MNHT OTdoxHyTB,a BO Bpemn n3mepeHnHe DOJXHbI
ROBOpNT bINrATbcra.Ecnnn KTKorpaMMA10RBAETc
yacto,obpatnteck BPaay.CamOnnarHocTNKa n camoneueHne
Ha oCHOBAHn pe3yNbTaTOB n3mepeHn MOrTy 6bITb OnaChbIMN.
O6raTeJIbHO BbInONHnTE yka3aHnBpaa.
KnaccnФkaB3:
Cornacho DnpekTbAm/onpeDeeneHnB CemnpHoi opraHn3aun 3dpabooxpanen (BO3) nHOBeIIM mccneIOBaHnM pe3yIbTaTbI N3MepeHn MoXHo KNaCCnOuPObA Tb N OeHNt, KaK yKa3aHO B HIXecNeDyUoSe TaBnue.
6. CoxpaheHne, Bbl3OB n ydaJIeHne pe3yIbTaTOB m3MepeHnI
- Pe3yNbTaTbI KaXdOrO yCNeuHOrO n3MepeHnA CoXpaHrOTcB NAMrN BmecTe C DaToN u BpemHeM. Pn6oJee Yem pe3yNbTaTAX CaMbI CTapbI pe3yNbTaT ydaJIaHTcR.
-ДЯ BBIOBA pe3yIbTaTOB n3MpeHnHaXmTe KHOKNy BBOda B NaMaTb ,MEM" .Прбор bHauane yKa3bIbAe TcNTo 3aHrTbIX
Yueek namrtn, a 3aTeM aBtOMaTnueckn nepexoNT K IocneHemy COxpaHeHHomy pe3yIbTaTy h3MepeHna.
- Пи дальншх Нжатик Kногн Bвда в памгт b „MEM" noka3ыВаIOТС следуюшпpe3yЛьТыИЗмеренсд atomи ВрemeHem.
Bb mokeTe ctepeTb namTb , Haxab KhoNky ,MEM" u ydepKnbAae 3 cekyHdbI.
7. Coo6eHnO HeuCnpaBHOCTaX / UcTpaHeHne HeuCnpaBHOCTeI
Pn HncnpabHocTnx Ha nCnnee NOBnEeTcAo6uHne,Er CoO6uEHNO HncnpabHocTnx MOry T NoBnTbcA,ecnn
60* HakaunbaHne ⅡNTc8 6OJee 3 MNHyT (Ha DnCJIeE NOABJIeTcER6),
MaHKeTa HaIOXeHa CnIKOM CnIbHO nIN CnIKOM Cna6O (Ha nCnIee NoBnErc Er3 nIN Er4),
3haueHne apTePnabHoro DaBHeHna Ype3BbHaNo BbICOKoe nn Hpe3BbHaHno Hn3Koe (Ha dncnnee norBnAeTc Er1 nn Er2),
-Давлиейноаe Er5),
- NMEETCA HENCnPaBHOCTcNCTeMbI ININ PnIBOpa (Ha DnCnEe NOBnErcr Er0, Er7, Er8, Er9, ErA nnErB),
- 6aTapeiKNIOHTNIOJHOCTBIOpa3pXeHbI,6aTapeiKNHeo6xOIM03aMeHtB.
B 3TNX Cnyyax NOBTopuTe N3MepenHe. CJeDInTe 3a Tem, YTO6bl
JUHaH MaHXeTbI 6bl npabNlbHO BCTaBJIeH YTO6bl Bbl He
Dniranbc Hpe pa3roBapNBaII.
Pn Heo6xOuMoCTn, 3aHOBO yCTaHOBnte 6aTapeKn nn 3ameHnte CTapbIe.
8. OuNTka u xpaHenne npn6opa
- Pnp6op nIIN3MpeHnKpOBHHOrO daBHeHn CneDyET HcCTNtB OCTOPOXHO pni NMOUcn CnerKa CMOeHHo TKaHn.
- 3anpeaaetcra nCnoIb3ObaHne YnCTaunx CpeDCTB nnPactbopntenei.
He donyckaTe nonaDaHne npnbopa B BOy, T.K. B pe3yIbTaTe B HERO MOKeT npOHnKHyTb XnDKOcTb N IOBpeDnTb np6Op. - Pn xpaHeHn annapata Ha Hero HeIb3a CTaBntb TaJxKeIbIe npEdmTbl. 3aIpeuaTeCnIbHo IpeRn6aTb CoeINHITeJIbHyIO Tpy6ky MaHxTebl.
9. TexHnueckne daHHbIe
MoeBb No SBM 29
MeToDbI n3MepeHn
OcuiIIOMeTpueeCKoe HeINHb3NHBHOe H3MepeHne apTeepnaIbHOro daBJIeHnHa npedIIeYbe

- Getting to know your instrument
- Important information
- Advice on use
- Storage and Care
- Advice on batteries
- Repair and disposal
- Icons in the display:
- Prepare measurement
- Inserting battery
- Setting date and time
- Measuring blood pressure
- Positioning cuff
- Correct posture
- Measuring blood pressure
- Evaluating results
- Cardiac arrhythmia:
- WHO classification:
- Saving, retrieving and deleting results
- Error messages/troubleshooting
- Cleaning and storing the instrument
- Specifications
- FRANÇAIS
- Yka3aHnB OTHoWeHm 6aTaapeek
- Yka3aHnnopeMOHTyuyTIN3aun
- Onncanne npnbopa
- HdkaHa dncnnee:
- Podrotobka k paboTe
- UcTaHOBka 6aTapeKu
- HactpoKa BpeMeH N daTbI
- 5.Измерени apTepeinaIbHoro daBneHnA
- HaIOXnTb MaHxkTeY
- PpHb npabnBHOe noJoxehne
- BbINOHNHTb N3MepeHne apTePnaJIbHOrO daJIeHn
- OueHka pe3yIbTaTOB
- HapyeHnA cepdHoro pHTMa:
- KnaccnФkaB3:
- CoxpaheHne, Bbl3OB n ydaJIeHne pe3yIbTaTOB m3MepeHnI
- Coo6eHnO HeuCnpaBHOCTaX / UcTpaHeHne HeuCnpaBHOCTeI
- OuNTka u xpaHenne npn6opa
- TexHnueckne daHHbIe
Brand : SANITAS
Model : SBM 29
Category : Blood pressure monitor