
SBM 30 - Blood pressure monitor SANITAS - Free user manual and instructions
Find the device manual for free SBM 30 SANITAS in PDF.

| Product type | Automatic arm blood pressure monitor |
| Brand | Sanitas |
| Model | SBM 30 |
| Measurement method | Oscillometric, non-invasive |
| Pressure measurement range | Systolic: 40‑280 mmHg, Diastolic: 40‑280 mmHg |
| Pulse measurement range | 40‑199 beats/minute |
| Pressure accuracy | ±3 mmHg |
| Pulse accuracy | ±5% of displayed value |
| Memory | 2 x 60 slots (user 1 and 2) |
| Cuff size | 23 to 33 cm arm circumference |
| Power supply | 4 AAA alkaline batteries (LR03) 1.5 V |
| Battery life | Approximately 250 measurements |
| Dimensions (L x W x H) | 135 x 105 x 53 mm |
| Weight | Approximately 170 g (without batteries) |
| Operating temperature | +10 °C to +40 °C |
| Storage temperature | ‑20 °C to +70 °C |
| Admissible humidity | ≤85% RH |
| Main functions | Arrhythmia detection, WHO classification, day/night memory, average calculation |
| Maintenance and cleaning | Clean with a slightly damp cloth; do not use solvents |
| Repairability | Repairs exclusively by authorized service center |
| Safety | Type BF applied part, electromagnetic compatibility according to EN60601‑1‑2 |
| Included accessories | Cuff, storage case, instruction manual, 4 AAA batteries |
Frequently Asked Questions - SBM 30 SANITAS
User questions about SBM 30 SANITAS
0 question about this device. Answer the ones you know or ask your own.
Ask a new question about this device
Download the instructions for your Blood pressure monitor in PDF format for free! Find your manual SBM 30 - SANITAS and take your electronic device back in hand. On this page are published all the documents necessary for the use of your device. SBM 30 by SANITAS.
USER MANUAL SBM 30 SANITAS
Please read these instructions for use carefully and keep them for later use, be sure to make them accessible to other users and observe the information they contain.
1. Getting to know your instrument
The upper arm blood pressure monitor is used for non-invasive measurement and monitoring of adults' arterial blood pressure. You can use it to measure your blood pressure quickly and easily, storing the results and displaying the progression of readings together with the average.
A warning is issued for anyone suffering from cardiac arrhythmia. The values determined are classified and graphically evaluated according to WHO guidelines.
Keep these instructions carefully for further use and also let other users have access to them.
2. Important information

Advice on use
- Always measure your blood pressure at the same time of day, in order to ensure that values are comparable.
Relax for approx. 5 minutes before each measurement. - You should wait five minutes before measuring a second time.
-
The readings that you take may only be used for information purposes - they are not a substitute for a medical examination! Discuss your results with the doctor. Never use them to make medical decisions independently (e.g. regarding medication and dosage thereof).
-
There may be incorrect measurements where there is cardiocirculatory disease, as well as with very low blood pressure, circulatory disorders, dysrhythmia and other preexisting diseases.
- Only use the instrument on persons whose upper arm has the right circumference for the instrument.
- You can operate the blood pressure monitor with batteries. Note that it is only possible to save data when your blood pressure monitor is receiving power. As soon as the batteries are dead, the date and time on the blood pressure monitor are lost.
- The automatic switch-off function switches off the blood pressure monitor in order to preserve the batteries, if no button is pressed within one minute.

Storage and Care
-
The blood pressure monitor is made up of precision electronic components. Accuracy of readings and the instrument's service life depend on careful handling.
-
You should protect the device from impact, moisture, dirt, major temperature fluctuations and direct exposure to the sun's rays.
- Never drop the device.
- Do not use near strong electromagnetic fields, i.e. keep it away from any radio systems and mobile phones.
-
Only ever use the cuffs provided with the monitor or original replacement cuffs. Otherwise erroneous results will be recorded.
-
Do not press any buttons until the cuff is in position.
- If the instrument is not used for any length of time, we recommend removing the batteries.

Advice on batteries
- Batteries can be fatal if swallowed. You should therefore store the batteries and products where they are inaccessible to small children. If a battery has been swallowed, call a doctor immediately.
- Batteries should not be charged or reactivated with any other means, nor should they be taken apart, thrown in the fire or short-circuited.
- Remove the batteries from the instrument if they are worn out or if you are not going to use the instrument for any length of time. This prevents any damage as a result of leakage. Always replace all the batteries at the same time.
- Never use different types of battery, battery brands or batteries with different capacities. You should preferably use alkaline batteries.

Repair and disposal
- Batteries do not belong in domestic refuse. Used batteries should be disposed of at the collection points provided.
- Never open the instrument. If these instructions are not heeded, the warranty will be null and void.
- Never attempt to repair the instrument or adjust it yourself. We can no longer guarantee perfect functioning if you do.
-
Repairs may only be performed by Customer Service or authorized dealers. However, always check the batteries and replace them if necessary prior to making any complaint.
-
The appliance should be disposed of according to Regulation 2002/96/EC-WEEE (Waste Electrical and Electronic Equipment). In case of queries, please contact the municipal authorities responsible for waste disposal in your area.

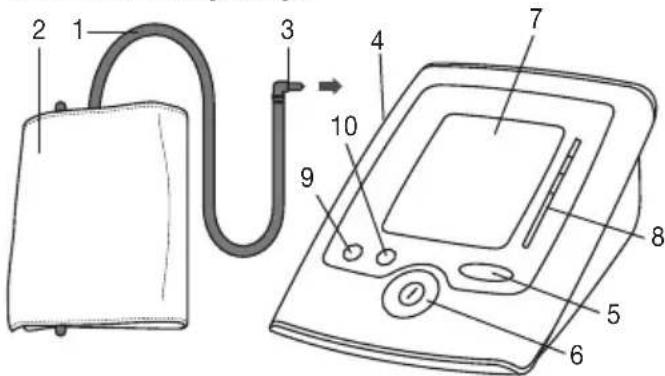
3. Unit description

- Cuff tube
2.Cuff - Cuff connector
- Cuff connector port (left side)
- Memory button MEM
- ON/OFF button ①
- Display
8.WHO - Function key
- Adjustment button _n + ^n
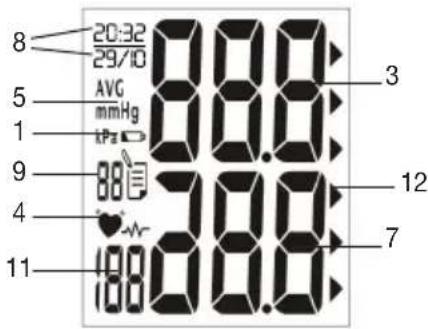
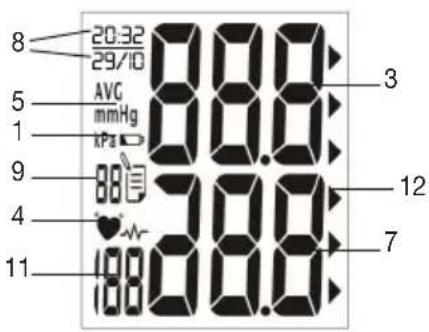
Icons in the display:
- Change battery icon
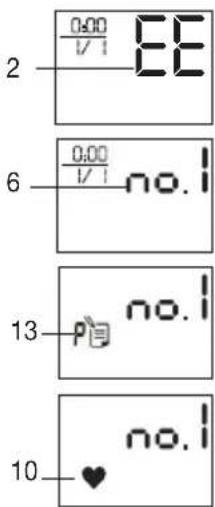
- Error icon EE
- Systolic pressure
4.Cardiac arrhythmia icon - mmHg unit
- Icon for users 1, 2
- Diastolic pressure
- Time and date
- Number of memory space
- Pulse icon
- Measured pulse
- WHO-classification
- Memory display day/night (A, P: AM, PM)
4. Prepare measurement
Inserting battery
- Remove the battery cover from the back of the monitor.
- Insert four AAA 1.5 V alkaline batteries. making absolutely sure that you insert them with the correct polarity as marked. Never use rechargeable batteries.
- Replace the battery cover carefully.
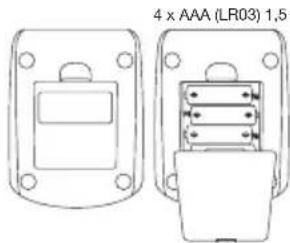
If the battery change is continuously illuminated, measure ment is no longer possible and you must replace all the batteries. Once batteries have been removed from the device, the time must be reset.
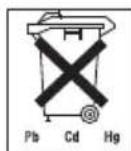
Used batteries do not belong in the household waste. You are legally obliged to dispose of the batteries. Dispose of them via your specialist electrical supplier or local collect ting point for recyclable waste.
Note: Batteries containing pollutant substances are marked as follows: Pb = Battery contains lead, Cd = Battery contains cadmium, Hg = Battery contains mercury.
Setting date and time
It is vital to set the date and time. This is the only way that measurements can be saved and recalled with the correct date and time.
The time is shown in 24 hour format.
Proceed as follows to set the date and time:
- Switch on the blood pressure monitor with the button.
- Press the function key for over 5 seconds
- The month starts flashing. Using the "+" function key, set the month 1 to 12 and confirm with the function key 0
- Set the day, hour and minute and confirm in each case with the function key
- Confirm your selection with the function key
5. Measuring blood pressure
Positioning cuff
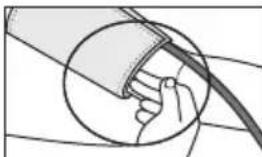
Fit the cuff round your bare left upper arm. Blood circulation in the arm should not be restricted by tight clothing or other objects.
The cuff should be placed on the upper arm so that the lower edge is 2 to 3cm above the bend of the elbow and above the artery. The tube should be in line with the centre of the palm. Now place the free end of the cuff snugly, but not too tightly, around the arm, and fix it with the Velcro fastener. The cuff should be fitted tight enough to allow just two fingers to fit beneath the cuff.

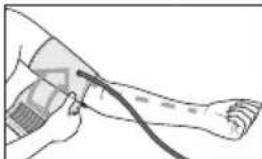
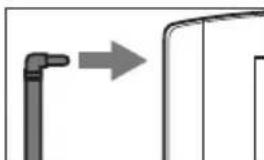
Insert the cuff tubing into the socket for the cuff attachment.
Important: The instrument should only be operated with the original cuff. The cuff is suitable for an arm circumference of 23 to 33~cm
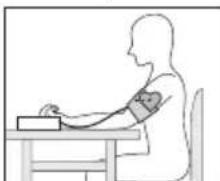
Correct posture
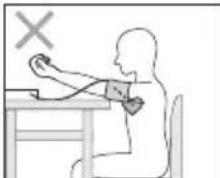

- Rest for approx. 5 minutes before each measurement. Otherwise there may be divergences.
- You can perform the measurement either sitting or lying down. Always make sure that the cuff is on a level with your heart.
- In order not to distort the result, it is important to keep still during the measurement and not talk.
Select memory
Switch on the blood pressure monitor with the button. Select the required memory space by pressing the function key "+" . You have two memories (60 memory spaces each) in order to save the test results of 2 different people separately, or else save measurements in the morning and evening separately.
Measuring blood pressure
- Put on the cuff as described previously and assume the position in which you want to carry out the measurement.
- Start the measurement process by pressing ON/OFF button ① After checking the display with all digits lighting up, the monitor will automatically inflate. Following the self-test, during which all display elements briefly appear, the measurement begins. During inflation the device already determines measured values used to estimate the required inflation pressure. If this pressure is insufficient, the device automatically inflates by another.
- Then the pressure in the cuff is slowly released and the pulse is measured.
- When the measurement has been completed, the remain ing air pressure is released very quickly. The pulse, the systolic and the diastolic blood pressure are displayed.
- You can interrupt measurement at any time by pressing the ON/OFF button ①
- The E_ icon appears if it has not been possible to perform the measurement properly. Observe the section in these instructions on error messages/troubleshooting and repeat the measurement.
- The device switches off automatically after 1 minute.
Wait at least 5 minutes before taking another measurement!
Evaluating results
Cardiac arrhythmia:
This instrument can identify possible cardiac arrhythmia disorders during measurement and if necessary indicates the measurement with the flashing icon
This may be an indicator for arrhythmia. Arrhythmia is a condition where the heart rhythm is abnormal as a result of defects in the bioelectrical system controlling the heart beat. The symptoms (omitted or premature heart beats, slow or excessively fast heart rate) may be caused, among other things, by heart disease, age, physical predisposition, excessive use of stimulants, stress or lack of sleep. Arrhythmia can only be ascertained through examination by your doctor.
Repeat the measurement if the flashing icon is displayed after the measurement. Please note that you should rest for 5 minutes between measurements and not talk or move during the measurement. If the icon appears often, please contact your doctor. Any self-diagnosis and treatment based on the test results may be dangerous. It is vital to follow your doctor's instructions.
WHO classification:
According to WHO Guidelines/Definitions and the latest findings, the test results can be classified and evaluated according to the following chart:
| Range of blood pressure values | Systolic (in mmHg) | Diastolic (in mmHg) | Measure |
| Grade 3: Severe hypertension > = 180 | 0 > = 110 | advice | |
| Grade 2: Moderate hypertension 160 | - 179 | medical advice | |
| Grade 1: Mild hypertension 140 – 159 | 90 – 99 | medical advice | |
| High-normal 130 – 139 85 – 89 Have | it checked regularly by doctor | ||
| Normal 120–129 80–84 Check it yourself | |||
| Optimal | <120 | <80 | Check it yourself |
Source: WHO, 1999
The bar graph in the display and the scale on the unit indicate the range of the blood pressure which has been recorded. If the values for systolic and diastolic pressure are in two different WHO ranges (e.g. systolic in the high-normal range and diastolic pressure in the normal range) the graphic WHO classification on the unit indicates the higher range (high-normal in the example described).
6. Saving, retrieving and deleting results
- The results of each successful measurement are stored together with date and time. With more than 60 items of measured data, the earliest items of data measured are lost.
-
Select the desired user memory by pressing the MEM button and then the + button. Press the MEM button again to display the average of all saved measurements in the user memory. Press the MEM button again to display the average day measurement for the last 7 days. (day: 5.00 a.m. - 9.00 a.m., display A). Press the MEM button again to display the average night measurement for the last 7 days (night: 5.00 p.m. - 9.00 p.m., display P). If you continue pressing the MEM button, the latest individual results are displayed with date and time.
-
To clear the memory, press the MEM button, then the display shows no. 1. Press the "+" button to select the user memory and confirm by pressing MEM again. Press and hold the "+" and keys simultaneously for 5 seconds (the display will show CLA).
- If you wish to change the user memory, see "Select memory".
7. Cleaning and storing the instrument
- Clean your device and cuff carefully only with a slightly moistened cloth.
- Do not use detergents or solvents.
- On no account must you immerse the computer in water, otherwise liquid can enter it and cause demage.
- When storing the device, make sure that no heavy objects are placed on top of it. Remove the batteries. The cuff tube should not have any sharp kinks.
8. Error messages/troubleshooting
In case of faults, the E message appears in the display.
Error messages can occur when
- inflation pressure is higher than 300mmHg E2,
- blood pressure is unusually high or low E3,
- you move or talk during the measurement (in addition to E_, the cardiac arrhythmia icon "♥ appears in the display E3),
- the cuff tube is not inserted properly E1,
- the cuff is inflated for longer than 25 seconds E1. In the above cases, you must repeat the measurement. Make sure that the cuff tube is properly inserted and that you do not move or talk. Re-insert the batteries if necessary, or else replace them.
9. Specifications
Model No. SBM 30
| Method of Measurement | Oscillometric, non-invasive blood pressure measurement on the upper arm |
| Range of Measurement | systolic40–280mmHg, diastolic40–280mmHg, pulse40–199beats/minute |
| Accuracy of the systolic ± 3 mmHg / | |
| pressure reading | diastolic±3mmHg/ pulse ± 5 % of the displayed value |
| Measuring uncertainty | max. permissible standard deviation according to clinical testing: systolic: 8 mmHg /diastolic: 8 mmHg |
| Sets of Memory 2 x 60 memory places | |
| Unit Dimension | L135 x W105 x H53 mm |
| Unit Weight | Approx. 170 gr. |
| Cuff Size | Cuff for upper arm circumference of 23 to 33 cm |
| Operating Temperature | +10°C to +40°C, ≤85% RH |
| Storage-and transporttemperature | -20°C to +70°C, ≤85% RH |
| Power Supply | 4 x 1,5 V AAA batteries (alkaline type LR03) |
| Battery Life | For approx. 250 measurements, depending on blood pressure level or inflation pressure |
| Accessories | With storage pouch, instruction manu al, 4 pcs AAA battery |
| Classification | Application part Type BF |
| Protection class | internal power supply, IPXO, no AP or APG, continuous operation |
| Key to symbols | Application part Type BF Important! Read the operating instruction! |
These specification are subject to change without notice for purpose of improvement.
-
This unit is in line with European Standard EN60601-1-2 and is subject to particular precautions with regard to electromagnetic compatibility (EMC). Please note that portable and mobile HF communication systems may interfere with this instrument. For more details, please contact customer service at the address indicated.
-
The instrument is in line with the EU Medical Products Directive 93/42/EC, the German medical products act and European standards EN1060-1 (non-invasive blood pressure monitors, Part 1: general requirements) and EN1060-3 (non-invasive blood pressure monitors, Part 3: Supplementary Requirements for Electromechanical Blood Pressure Measurement Systems).
- If you are using the instrument for commercial or economic purposes, you must check measurement precision regularly in accordance with the "Operators' Ordinance on Medical Products". Even in the case of private use, we recommend checking measurement precision every two years at the manufacturers.
FRANÇAIS
Yka3aHnB OTHoWeHm 6aTaapeek
- PpOrIaTbIbAHne 6aTaapeek MoXeT pInBOJITb K ONaCHOCTn DJI KxN3H. IOnToM y XpaHnte 6aTaapeKn N IN3dEINr B HeIOCTyHOM DJI dTee MeCTe. B Cnyae IpnIaTbIbAHnI 6aTaapeKn He3aMeDInTeBHO 6paTNTecb K BpaHy.
3anpeaetc3apjkaTb nIin peakTbnpoBaTb 6aTapeKn HbIMCnOc0amn,pa3bnpaTb nx,6pocatB OOrhNIN 3aMbikTaHakopoTKO.
BbIaHTe 6bapeKn n3 aannapata, ecnn OHn pa3prKeHb IINnc Bbl dnttehoe Bpemr He noIb3yeTecb np6opom. TaKIMobpa3OM Bbl ppeTbpauaete yuep6, KOTOpb moKet 6bITb Bbl3BaH BblNBWHMCr 3JIeKtpoNTom. BceRda 3aMeHraTe BCE 6bataeKn OndHOBpeMeHHO.
He nCnoNb3yIte 6aTapeeKn pa3JIuHbIX TUNOB,MapOK nn 6aTapeeKn C pa3JIuHNOE MKOcTBIO.PpeMMyIecTBeHHO nCnoNb3yIte IeNoCHbIe 6aTapeeKn.

Yka3aHnnopeMOHTyuyTtln3aun
- BaTapeKn 3aIpeUaETCB bIb6paCbIBaTB B 6bITOBO Mycop. YtININ3NpyTe NcNOJb3OBAHhbIE 6TaapeKn Chepe3 COOTBeCTByIOuN IyHKT c60pa OTXoIDob.
He otKpbBaIte npnbop. HecobJIOJeHne BeTe K noTepe rapaHTn.
3anpeaetcamaocToTeJbHo pemOHnpoBaTn nppeyInpoBaT np6Op. B 3tOM cnUyae 60nbue He rapaHTnpuyETc 6e3ynpeHOCTB pa60Tbl. - Pemont pa3pewaeTcBbINOJHrTb TOnbKO CnyK6e TEXHueCKoRO oecneueHnI npMbI NIN ABTOpN3npOBaHHbIM cepBnCHbIM opraHn3aunM. Ho nepei IIObIM peKJIamaqnn BhaJaI npOBepBe 6atapeKn n, pni HeOxOJIMOCTn,3ameHnte ux.
- yTnIIN3npyIe np6op corlaCHO tpe6OBaHnM IIOJoxehn 6 oyTnIIN3aunm 3JeKtpnueckoro n 3JeKtpoHHoro 6OpUdOBAHn 2002/96/EC-WEEE .Waste Electrical and Electronic Equipment").Ito Bcem BOpocam no yTnIIN3aunm 6paauTeCb B COOTBeTCTByuOuYOMKMyHaJIbHyIO cnyx6y.
3.Опсане пибopa
1.卍naHMaHKeTbI
2. Manxeta
3. LITeKep MaHKeTbI
4.ГнздлгштЕрmaHkeTbI(JIeBaA cToPoHa)
5. KhoNka BBOda B namrMbEM
6.KhonkaBk/Nbikn ①
7.Дисгел
8.WHO
9.Функционьня Khonka
10. Khonka hacptponKn ,+
Hdkkaunna Ha ducnnee:
1.ПИКТORpAMMa 3aMeHbI 6aTapeeK
2.ПИKTOrpamma HENCnPaBHOCTN EE
3.CnCTOnJIneCKoe DaBJIeHHe
4.ПИKTOrpammaHapyuSeHnpytMa cepda
5. EinnHua n3MepeHn; MM pT. CT.
6.ПИKTOrpmaMa noJIb3OBaTeTЯ1,2
7.ДиactOnuYeCKoeДаВлЕнe
8.BpemnndaTa
9. Homep JueeKn namrtn
10.ПИKTOrpMaMn Пульс
11.ИзмерehhoeЗаченичастыпьса
12. KnaccnФkaua BO3
13. INHdkaTop Deh/Houb (A, P: AM, PM)

Φnma n3rOToBnTeIb: BoJpep Γm6x, CoΦJIuHrep uTpacc 218,
89077-ym,RepaHn
InHcnareT
88524 YTTeHbainep, TepMaHn
CepBnchbIeHTp: 109451 r. MockBa, yI.IpepeBa, 62, Kopn.2
TeN(φaκc) 495-658 54 90
Data npodaJx
Iopnnbc npoaaba
LITamnMara3nHa
Ponncb nokynatena

- Getting to know your instrument
- Important information
- Advice on use
- Storage and Care
- Advice on batteries
- Repair and disposal
- Unit description
- Icons in the display:
- Prepare measurement
- Inserting battery
- Setting date and time
- Measuring blood pressure
- Positioning cuff
- Select memory
- Measuring blood pressure
- Evaluating results
- Cardiac arrhythmia:
- WHO classification:
- Saving, retrieving and deleting results
- Cleaning and storing the instrument
- Error messages/troubleshooting
- Specifications
- FRANÇAIS
- Yka3aHnB OTHoWeHm 6aTaapeek
- Yka3aHnnopeMOHTyuyTtln3aun
- 3.Опсане пибopa
- Hdkkaunna Ha ducnnee:
Brand : SANITAS
Model : SBM 30
Category : Blood pressure monitor