Montana 1120 - Saw GARLAND - Free user manual and instructions
Find the device manual for free Montana 1120 GARLAND in PDF.

Frequently Asked Questions - Montana 1120 GARLAND
User questions about Montana 1120 GARLAND
0 question about this device. Answer the ones you know or ask your own.
Ask a new question about this device
Download the instructions for your Saw in PDF format for free! Find your manual Montana 1120 - GARLAND and take your electronic device back in hand. On this page are published all the documents necessary for the use of your device. Montana 1120 by GARLAND.
USER MANUAL Montana 1120 GARLAND
natural_image
White Garland 20-inch chain saw with black metal chains and a circular label (no text-heavy elements)
EN Instruction manual
ES Manual de instrucciones
FR Manuel d'instructions
IT Libretto d'instruzioni
PT Manual do operador
GR ΕΓΧΕΙΡΙΔΙΟ ΧΕΙΡΙΣΜΟΕ
ÍNDICE
text_image
Technical diagram of a chain drive with numbered parts and an inset close-up view highlighting specific components.natural_image
Line drawing of a chain-linking gear with tools and chains (no text or symbols)natural_image
Line drawing of a mechanical device with a rotating arrow indicating motion (no text or symbols)text_image
Diagram of a hairpin with labeled parts and directional indicatorstext_image
Technical diagram of a chain-linking device with numbered components labeled 3, 4, 5, and 6
text_image
Technical diagram of a mechanical device with labeled parts 1, 2, and a warning symbolnatural_image
Diagram of a mechanical device with rotating arm and base (no text or symbols)natural_image
Illustration of a person using a saw to cut a tree stump with a downward arrow indicating force (no text or symbols)natural_image
Line drawing of hands adjusting a seatbelt with arrows indicating movement (no text or symbols)natural_image
Mechanical component diagram showing a lever and gear assembly (no text or labels)natural_image
Line drawing of a chain saw with motion lines indicating speed (no text or symbols)text_image
Technical diagram showing a mechanical device with labeled parts and directional arrows indicating motion or movement.natural_image
Line drawing of a person using a power tool to cut a chain (no text or symbols)text_image
Diagram showing two cylindrical objects with labeled parts and directional arrows indicating movement or forcetext_image
Diagram showing two cylindrical objects with labeled parts, likely illustrating a mechanical or electrical assembly.7.5. CORTE DE LAS RAMAS DE UN ÁRBOL ABATIDO
natural_image
Technical line drawing of a mechanical component with no visible text or symbolsnatural_image
Line drawing of a car interior component with labeled parts (no text or symbols)natural_image
Hand holding a grid-patterned object with a screwdriver inserted, no text or symbols visiblenatural_image
Technical line drawing of a mechanical component with labeled parts (no text or symbols present)natural_image
Anatomical line drawing of a skull and jawbone structure (no text or labels)natural_image
Illustration of a hand holding a pen, writing on layered paper (no text or symbols visible)text_image
Diagram showing a hand holding a tool with labeled parts 1 and 2, likely illustrating a measurement or labeling process.- Introduction 26
- Security measures 27
- Warning symbols 29
- Machine symbols 29
- Machine description 30
- Start up instructions 32
- Using the machine 37
- Maintenance and service 41
- Trouble shooting 44
-
Declaration of conformity 48
-
Transport 46
-
Storage 46
-
Recycling or disposal of your machine 46
-
Warranty conditions 47
1. INTRODUCTION
Thank you for purchasing a Garland machine. We hope you enjoy using it and that you are satisfied with its performance and easy use.
! SECURITY FIRST
The instructions in this manual marked with a symbol ⚠️ concern critical points which must be taken into consideration to prevent serious bodily harm, and for this reason, we ask that you carefully read all instructions and follow them without fail.

This tool must only be used for cutting wood. If this tool is used for cutting any other material, this will be done at the risk of the user, since it could be dangerous.

Before using the machine for the first time, please carefully read the information below about the techniques for a safe and correct operation and keep the manual for future reference.
The manufacturer is not responsible for any damage that is caused by the inappropriate or incorrect use of the tool.
TRANSLATION OF THE ORIGINAL INSTRUCTIONS
Ref.:GMSMONTANA1120M1014V1
DATE OF PUBLICATION: 14/10/2014
DATE OF REVISION: 14/10/2014
2. SECURITY MEASURES
In order to reduce risk of injury, please observe the safety precautions which figure below. Read this manual carefully. Familiarize yourself with the controls and learn how to use the tool correctly.
Never allow children, or people who do not understand the instructions in the manual, to use this tool.
Prolonged use of this machine exposes the user to vibrations which may cause the disease of “white fingers” (Raynaud’s phenomenon). This disease reduces the sense of touch of the hands and the ability to regulate temperature, creating numbness in the fingers and a burning sensation. It can cause nerve and circulation problems and even necrosis in the hands.
High vibration levels and long periods of exposure are the factors that contribute to white finger disease. To reduce the risk of white finger disease need to consider these recommendations:
• Always wear gloves
• Worrying that you always have your hands hot
• Make sure the chain is always sharp
• Make frequent breaks
• Always firmly hold the machine by the handles
If you find some of the symptoms of white finger disease see your doctor immediately.
Do not forget to give this book if you sell or lend this machine.
2.1. UNEXPECTED REACTION FORCES WHILE WORKING WITH THE CHAINSAW
2.1.1. KICKBACK

When the tip of the chain bar comes into contact with an object, kickback can occur. When the tip touches the object, this can cause the bar to quickly move upwards and backwards in the opposite direction, towards the user. This reaction may cause losing control of the tool, causing serious injury to the body.
2.1.2. PULL-FORWARD
There may be a “pull forward” when the chain stops abruptly and get caught in the cutting area by a foreign body that is in the wood or because user is not cutting properly. The chain, when stops, pushing forward the chainsaw that if the chainsaw is not properly held against the branch or tree by claw, produces an unexpected pull that can cause the user to lose control of the saw, to fall forward and cause severe injury.
To avoid this “pull-forward” to start the cut at full throttle and always maintain machine at top speed for cutting and support the grip of the chainsaw against the wood to be cut.
2.1.3. PULL-BACK
If the top part of the chain and blade become imprisoned in the wood, it can cause a back pull and the blade could rebound backwards towards the user. The chain when imprisoned or at a standstill and if the machine is not properly fixed to the wood by the claw can cause loss of control of the machine and severe damage to the user.
Any of these reactions can cause a loss of control of the saw and could cause severe corporal damage.
Do not only rely on the security measures of the machine. As user of the machine, take the necessary measures to eliminate the risk of accident and/or personal injury when cutting with the machine.
These forces occur are due to an improper use of the machine and/or because of the incorrect interpretation of the instruction manual and can be avoided by following these simple instructions:
- Always firmly hold the machine with the two hands by the handles.
- Always be aware of where the tip of the chain bar is.
- Take care that the tip of the bar does not touch any object.
- Never cut with the tip of the chain bar.
- Make sure that there are not nails or pieces of metal in the cutting area and pay particular attention to nails or pieces of iron that may be around the cutting area. Also be careful when cutting hardwoods where the chain can be hooked the chain causing it to crash and produce the kickback.
- Do not cut above shoulder height
- Start the cut at full throttle and always maintain top speed machine while cutting.
- Cut only one branch or a single piece of wood each time.
- Be extremely careful when you enter the chain of the chainsaw in a started cut to continue.
- Don't cut with the chainsaw until you are familiar with the cutting technique.
- Don't cut in branches or pieces of wood that can change position during the cutting or may close the cut as it is practiced.
2.2. WORKING GARMENTS

Use eye and ear protection when you use the machine.

The noise from this machine can damage your ears. Use ear protectors. If you work regularly with this machine, see your doctor to check your hearing.
Hearing protection when working with you should be more careful to visual cues because the hearing will be weaker.
When you are using the machine, do not wear loose clothes, jewellery, shorts or sandals and do not go barefoot.
Do not wear any garment or element that could get caught up with any moving part of the tool.
2.3. WORKING PLACE
The following items must be carried:
- Tools.
- Signaling tape for marking the working area
- Mobile phone (to be used in case of emergency)
- Fuel and oil correctly stored in homologated containers.
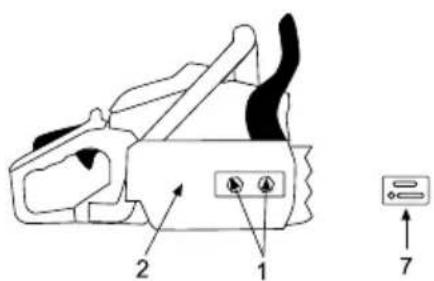
3. WARNING SYMBOLS 4. MACHINE
The warning labels which figure below accompany the important information about the product or the instructions for use.

The warning labels which figure below accompany the important information about the product or the instructions for use.

This mark indicates instructions that must be followed to prevent mechanical problems, broken or damaged.

This mark indicates helpful tips or guidelines for the use of this machine.

You must read this manual carefully before using this machine.

Use eye and ear protection at all times.

Do not use this tool with one hand only.

Use this tool with both hands.

Danger of kickback.

Warning and caution.
MBOLS
To ensure safe operating and maintenance, the symbols are embossed on the tool.

Fuel tank. Located on the tank cap. MIX 2.5% (PETROL 40: OIL 1).
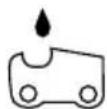
Chain oil tank. Located on the tank cap.
Positions of the ignition switch. Located on the left side of the machine.
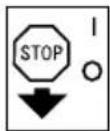
“O” = ignition off (the tool will not operate)
“I” = ignition on (the tool can operate).
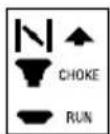
Choke lever positions::
Pull the Choke to close the air passage.
Push the Choke to open the airway.
Located on the right side of the machine.
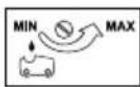
Chain oil flow adjustment.
Chain oil flow adjustment:

“H” = High revolution adjustment screw.

“L”= Low revolution adjustment screw.

“T” = Idle adjust nut.
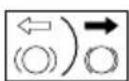
Chain brake position.
White Arrow = Brake not activated (Normal operating position)
Black Arrow = Brake activated

Direction of installing the cutting chain Indicator.
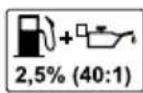
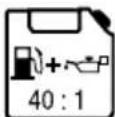
¡Never use only petrol or petrol in a bad condition!. Use new lead free 95° petrol and 100% synthetic oil for two stroke engines.
Engine fuel: mix (petrol 40: oil 1) 2,5%.
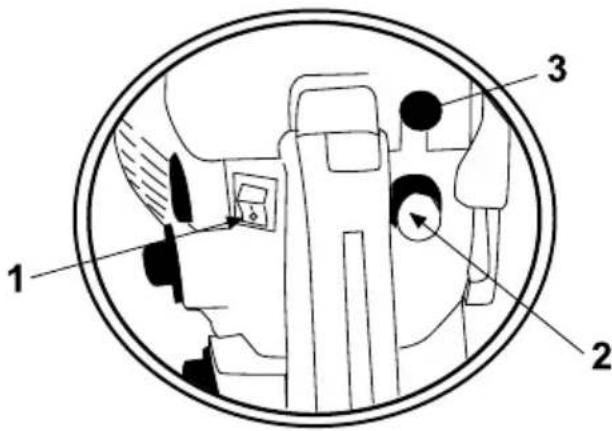
5. MACHINE DESCRIPTION
5.1. USAGE CONDITIONS
This machine is for domestic use and is designed to cut branches and trunks. We recommend to use this machine in temperature conditions from +5°C y 45°C and with humidity levels below 50%.
5.2. DETAILED DESCRIPTION OF THE PRODUCT
- Front guard and chain brake
- Starting rope
- Air filter cap
- Choke
- Safety lever
- Back handle
- Throttle lever
- Ignition switch
- Fuel tank
- Chain oil tank
- Front handle
- Cutting chain
- Bar chain
- Primer
- Claw

text_image
Technical diagram of a chain drive with numbered parts and an inset close-up view highlighting the component.The diagrams and pictograms herewith enclosed in this manual are a guide but not necessarily an exact copy of the actual machine.
5.3. TECHNICAL CHARACTERISTICS
| Description Petrol chainsaw | |
| Brand Garland | |
| Model Montana 1120 | |
| Engine designation 2 stroke | |
| Displacement (cm3) 54,5 | |
| Maximum power (kW) (ISO 7293) 2,2 | |
| Engine idle (min-1) 3.200 | |
| Maximum recommended revolutions per minute (min-1) 12.000 | |
| Fuel used Fuel 40: oil 1=2,5% | |
| Fuel consumption at maximum power (g/kWh) 560 | |
| Type of carburetor Diaphragm | |
| Oil supply system Automatic | |
| Fuel tank capacity (cm3) | 550 |
| Oil deposit capacity (cm3) | 260 |
| Guide bar length (/cm) | 20/50 |
| Cutting length (cm) | 48 |
| Chain pitch (“) | 3/8 |
| Chain thickness (“) | 0.058 |
| Guide bar type | Pinion on the top |
| Level of measured sound power LwA dB(A) (ISO 22868) | 112,76 |
| Level of guaranteed sound power level LwA dB(A) (ISO 22868) | 116 |
| Level of average sound pressure level LpA dB(A) (ISO 22868) | 97,71 |
| Vibration level of front handle (m/s2) (ISO 22867) | 5,160 |
| Vibration level of back handle (m/s2) (ISO 22867) | 6,924 |
| Dry weight (kg) | 5,35 |
The technical characteristics can be changed without prior warning.
6. START UP INSTRUCTIONS
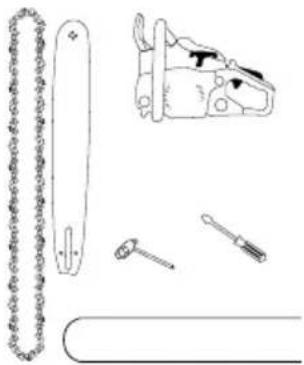
6.1. LIST OF MATERIALS
This machine includes the following elements that you will find inside the box:
- Engine.
- Bar cover
- Bar chain.
- Chain.
- Mounting key.
- Screwdriver
- Instruction manual.
natural_image
Line drawing of a chain-linking gear with tools and components (no text or symbols)6.2. BAR AND CHAIN INSTALLATION

The chain of the chainsaw has very sharp edges.
Use protective gloves to avoid being cut.
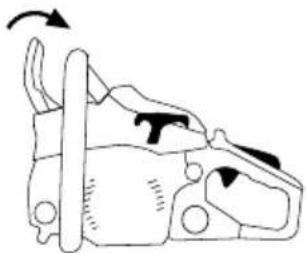
- Check the chain brake is not activated, by pulling the brake lever backwards.
natural_image
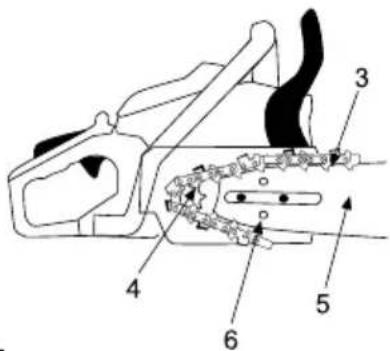
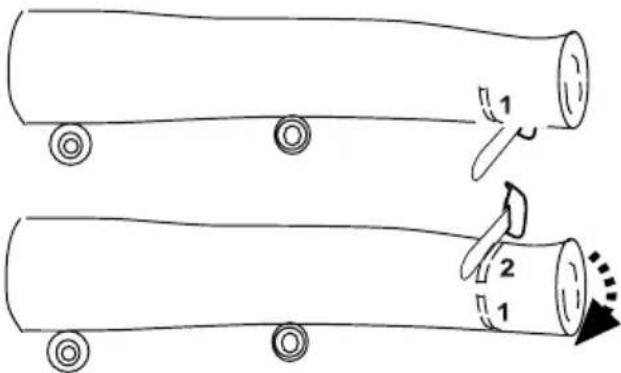
Line drawing of a mechanical component with an arrow indicating rotation (no text or symbols)- Loosen the bolts (1) and remove the chain guard (2). Once you take off the cover, take off the adjustment protector (7) too.
text_image
Diagram of a hairpin with labeled parts and directional indicators- Slip the chain (3) around the sprocket (4) while you adjust the chain (3) around the bar (5) and assemble the bar (5) onto the tool. Adjust the chain tensor, ensuring the pivot of the tensing nut (6) coincides with the hole on the bar (5).
text_image
Technical diagram of a chain-linking device with numbered components labeled 3, 4, 5, and 6.
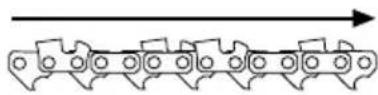
Pay attention to the correct position of the chain. The chain must be placed in the direction which is shown in the figure below:

- Place the chain guard (2) and tighten the nuts slightly (1).

text_image
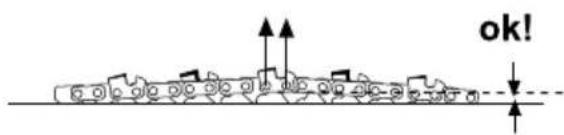
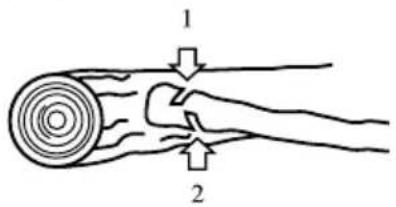
Technical diagram of a mechanical device with labeled parts 1, 2, and a control symbol- Tighten the chain. The tension is correct when the chain can be pulled upwards at the centre of the bar to its maximum position possible and the tip of the guiding link does not come away.
text_image
ok!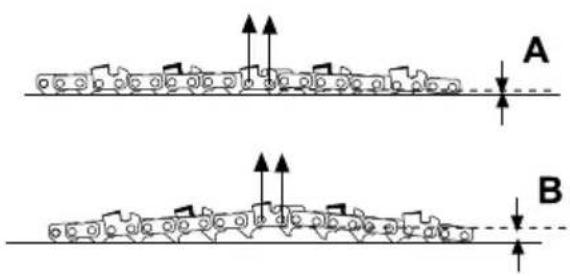
text_image
A BExample (A) corresponds to a chain that is too tight.
Example (B) corresponds to a chain that is too loose.
- Tighten the bolts (1) with a strength of (12-15 Nm) then check that the chain slides smoothly round the bar, maintaining the appropriate tightness when it is moved by hand. If necessary, adjust the tension again.

New chains have the tendency to dilate when they are used for the first time. Check and adjust the tension with frequency.

A loose chain can easily come away and this will cause both the chain and the chain bar to wear out quickly.
6.3. POINTS TO CHECK BEFORE OPERATING
Check the whole machine for any loose parts (nuts, bolts, screws, etc.) or damage. Repair or replace the parts that are necessary before using the machine.
Check that there are no fuel leaks.
Do not use the machine if it is damaged or incorrectly adjusted.
Before commencing a task, it is necessary to plan the path where the tree will fall, to have a clear escape route and to ensure feet are safely supported.
Inspect the working area and remove all obstacles. Do not commence work until the working area is clear.
Check the working area and the direction in which the branches and/or trees will fall.
Check that the air filter is not dirty. If necessary, clean it thoroughly before operating.
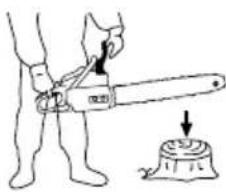
6.3.1. CHECKING THE SAFETY BRAKE
When kickback occurs, the tip of the chain bar rises brusquely, the chainsaw changes its angle and, as this movement is so quick, the user does not have time to change the position of his left arm, which bangs against the protective guard and activates the safety brake.
The safety brake can be activated whenever desired, by moving the safety guard forwards.
To release the safety brake, pull the safety protector backwards until a "click" can be heard.

natural_image
Line drawing of a mechanical device with a lever and handle, showing motion direction (no text or symbols)Remember to check the brake every day the chainsaw is used:
-
Switch off the engine.
-
Activate the safety brake by moving the lever forward until a "click" can be heard.
-
Hold the chainsaw horizontally with the tip about 40 cms over a piece of wood, take your hand off the front handle allowing the chainsaw to rotate on your right hand and hit the wood.
natural_image
Illustration of a person using a saw to cut a tree stump with a downward arrow indicating force (no text or symbols)If the brake is operating correctly, the chain should not move when it comes into contact with the wood. If the brake does not work correctly
take the tool to the customer service.
Do not start the chainsaw with the safety brake activated. If the motor is running and the chain is blocked by the brake, the clutch will overheat and this could cause damage. If the brake is activated with the tool running, remove your fingers from the throttle trigger and leave the tool idling. Check why the safety brake has been activated later.
6.3.2. FUEL AND OIL MIX
IMPORTANT: The engine fuel is highly inflammable. If the fuel or tool catch fire, please extinguish it using a dry powder fire extinguisher.
Always avoid contact of gasoline or oil in your eyes. If gas or oil in contact with eyes rinse immediately with clean water. If your eyes feel irritated then immediately consult a doctor.
Use new lead free 95° petrol and 100% synthetic oil for two stroke engines.
Engine fuel: mix (petrol 40: oil 1) 2,5%.
Do not smoke when filling the fuel tank.
Do not smoke and keep the fuel away from a naked flames or sparks.
Do not remove the fuel tank cap while the engine is running.
Never add fuel while the engine is running or still hot. If petrol is spilt during the filling process, make sure it is completely
eliminated by using cloths to absorb it.
Do not add fuel near a naked flame or in a closed or badly ventilated area.
Always keep the fuel in a properly labeled container whose use has been approved by the local codes and regulations.
Mix gasoline and oil in a container approved CE.

Do not use fuel which has been stored for more than two months. Fuel which has been stored for a long time makes it difficult to start the engine and it will produce an unsatisfactory performance from the engine. If the fuel has been stored for more than two months, it must be substituted for new fuel.

Filling the tank with fuel:
-
Fill the tank in an open area.
-
Shake the container which holds the mix.
-
Remove the lid from the tank and pour the mix inside.
-
Close the lid of the tank firmly and remove any spilt fuel with a cloth.
WARNING:
Always stop the engine before adding fuel to the tool.
Do not carry out this operation in a badly ventilated closed area.
Before starting the engine, move at least 3 meters away from the place where the fuel was added.
Only special lubricating oil for chain saws must be used.
Do not use used oil as this could damage the oil pump.

Chain oil must be introduced into the chain oil reservoir.
You can recognize this deposit by the pictogram (indicated in Chapter 4, "Symbols on the machine).
6.4. OPERATING
Before starting the engine, ensure no moving parts of the tool are in contact with anything.
Once the engine has started, make sure the chain stops when the throttle trigger is released.
Hold the tool firmly with both hands, strongly gripping the hangles when the engine is running.
It is necessary to pay attention to the possible loosening or overheating of the parts. If any abnormalities are detected in the machine, stop working immediately and inspect the machine carefully. If necessary, take the machine to an authorized distributor to be repaired. Under no circumstance must the work continue, if the tool is not operating correctly.
Do not use the machine if it is damaged or incorrectly adjusted.
Keep the handles clean, dry and free from oil or fuel.
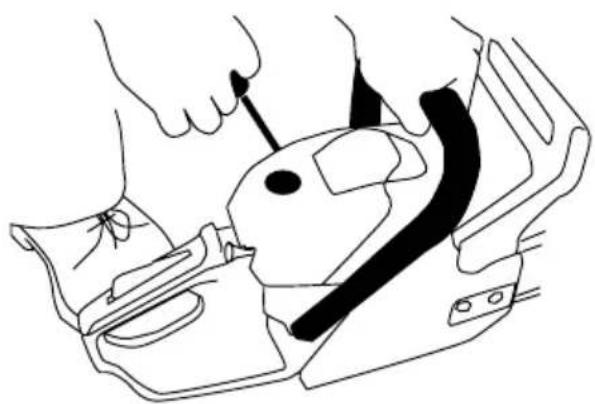
6.4.1. STARTING UP WITH THE ENGINE COLD
-
Move the ignition switch to the START position (1).
-
Press the engine primer repeatedly (7-10 times) until the fuel reaches the primer.
-
Pull the choke lever (3).
text_image
1 2 3-
When the tool is placed on the ground, it must be put in a horizontal and stable place.
-
Hold the tool firmly with the left hand on the front handle and a foot placed through the back handle.
natural_image
Line drawing of a mechanical device with hands operating it, no text or symbols present-
Pull the start up rope until the engine starts or it makes one explosion.
-
Push the choke lever downwards. (Normal operating position).
-
If the tool has not started, pull the starting rope again (6) until it starts.
-
Leave the engine to warm up for a few minutes before using the machine
6.4.2. STARTING UP WITH THE ENGINE WARM
If the machine is hot, put the switch (I), make sure the choke is stuck and pull the starter rope until engine starts. If after a few attempts the machine will not start follow the steps starting with a cold engine.
6.4.3. STOPPING THE ENGINE
Release the throttle lever and leave the engine running idle for thirty seconds.
text_image
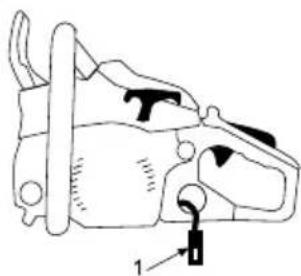
1Stop the engine by moving the ignition switch (1) to the STOP position (0).
6.4.4. CHECKING THE CLUTCH

After starting up and the engine is hot, the chain must not be moved if the engine is idle
If the chain turns with the engine running and without accelerating, it will be necessary to regulate the idling regime of the engine. To do this, turn the carburetor nut "T" until the engine stops. If you are unable to regulate the idling regime to stop the chain, because the engine stalls, please contact the customer service for help.

The regulation of the screws (H) and (L) must only be carried out by an official technical service.
6.4.5. CHECKING THE OIL SUPPLY
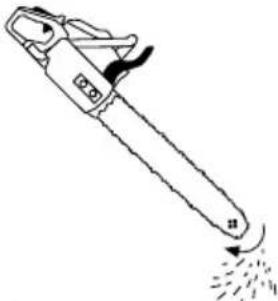
natural_image
Line drawing of a chain-linker with motion arrows indicating speed (no text or symbols)After starting the engine, accelerate in order to move the chain at an average speed and check that the oil is dispersed as shown in the diagram.

text_image
Technical diagram showing mechanical assembly with numbered components and directional arrows indicating motion or movement.The chain oil flow can be regulated by using the oil regulation nut (1). This is to be found next to the clutch under the machine.
In order to regulate the oil flow use a screwdriver and turn the screw either left or right to increase the flow "MAX" or diminish it "MIN". The words "MAX" and "MIN" are to be found under the tool.
Ensure the oil reservoir is topped up every time fuel is added.
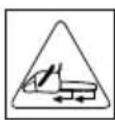
6.4.6. PROTECTION AGAINST KICKBACK
Kickback is the most important danger of these tools.
This tool is equipped with an automatic brake which stops the chain turning if there is kickback while the work is being carried out.
Put the engine at full power during 1-2 seconds and push the brake lever forwards. The chain should immediately stop while the engine is still running.
If the chain delays in stopping or it does not stop, please see the customer service.
Check the chain brake before each use and make sure it is sharp.
There is a greater risk of personal injury if the safety devices are not used, maintenance is inadequate or the bar or chain are not placed in the correct position.
7. USING THE MACHINE

The machine must only be used for the purpose for which it has been designed. Any other purpose could be dangerous, causing
damage to the machine.
Keep body away from the chain of the chainsaw when the engine is running.
In you slip or fall onto the ground or into a hole, immediately let go of the throttle lever.
Do not solely rely on the safety devices that are integrated on this tool.

Do not use the machine if you are feeling tired, unwell or under the effects of medication, intoxicating substances or alcohol.
It is necessary to pay special attention to the precautions if the machine is used during or just after rain, since the ground could be slippery.
Do not cut above shoulder height
This product must never be used at night, in foggy conditions or when visibility is limited and it is difficult to see the working area clearly.
Lack of sleep, fatigue or physical tiredness can cause accidents and harm.
Do not use the tool for longer than 10 minutes at a time and rest for 10-20 minutes between sessions.
Never leave the machine running without surveillance.
Do not allow anyone to enter the area in which you are working. This work perimeter is 15 meters and is a danger zone.
Never start or operate the engine in a closed room or building. The exhaust gases contain dangerous carbon monoxide.

If the concentration of gases produced by inadequate ventilation, remove from the work area everything that impedes the flow
of clean air for better ventilation and do not return to work in the area unless you have properly ventilated the area and be sure that ventilation is enough that it does not happen again.
A firm grip will help to reduce kickback and will help to keep the tool under control.
Take extreme care when cutting branches or young trees, small splinters could get caught in the chain and then be sent flying in the air, hitting or unbalancing you.
When cutting a branch which is under tension, pay special attention to the possibility of the branch bouncing back, in order to avoid being hit by the branch when the tension is freed.
Check the tree to ensure there are no dead branches that can fall whilst you are working.
To avoid possible accidents, make sure the cutting area is kept clear of obstacles at all times.
When using the chainsaw, do not allow the tip of the bar to touch any other tree trunk or obstacle that may be found near the area where the cutting is being carried out.
Cutting with the engine at high revolutions.
Keep the chain sharpened by following the instructions contained in this manual.

Never touch parts which reach high temperatures during the starting up or the operating of the engine such as, for
example, the exhaust silencer, the high voltage cable or the spark plug.
Always carry out adjustments with the machine on a flat and clear surface.
Do not use any accessory with the machine, apart from those recommended by our company, as this could result in serious injury to both the operator of the machine and the people near. It could also damage the machine.
It is necessary to take care not to drop the machine or allow it to bang against any obstacle.
7.1. FIXING THE MACHINE AND GUIDANCE
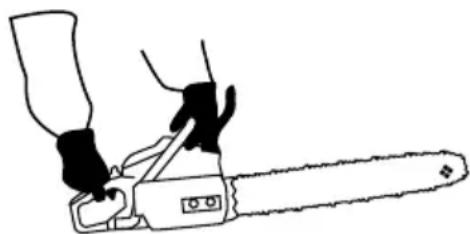
While working always hold the saw firmly with both hands on the handles. Hold the front handle with left hand and right hand rear as a right-handed or left-handed.
natural_image
Line drawing of a person using a power tool to cut a chain (no text or symbols)ATTENTION!
To reduce the risk of loss of control and damage (including death) to the user or people nearby, never use the saw with one hand.
7.2. CUTTING WITH THE CHAINSAW
In order to acquire experience, we recommend you practice in a comfortable position with small logs before embarking on important tasks.
Follow the safety regulations that are indicated in the manual.
This tool must only be used for cutting wood Cutting other types of material is forbidden.
This tool must not be used as a lever to lift, move or split objects.
Do not force the tool while cutting. Apply only slight pressure downwards while the tool is running at full power.
The weight of the tool is enough to be able to make the cut.
When the chain gets stuck in the cut, do not try to pull the chainsaw out while it is still running. Stop the chainsaw, by putting the ignition switch at the "O" position and use a lever to free the tool.
7.3. FELLING A TREE
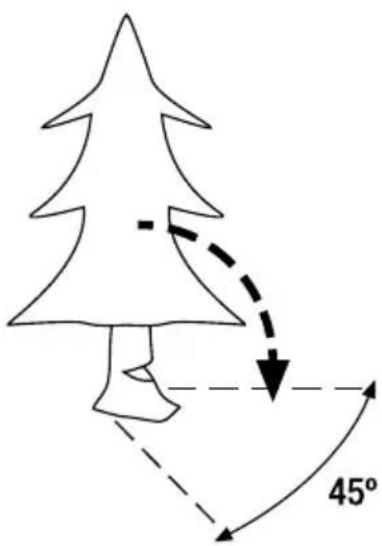
The felling of trees is a dangerous task due to the danger of the tree or any of its branches falling onto you and causing injury. Before embarking on any felling operation, please follow these steps:
- Decide in which direction the tree is going to fall (A). Take into account the wind direction, the
inclination of the tree, its width and its branches, as this could affect the direction in which the tree falls.
- Check there are no other trees, branches or obstacles which could be in the way of the tree when it falls.
- Check the position in which the tree will be once it has fallen, in order to be able to embark on the cutting tasks.
text_image
45°- Clear the area around the tree. Make sure you are going to work in a stable position and establish an easy and clear escape which allows you to run away if the tree falls in an unexpected direction.
The safety distance must be equivalent to at least two lengths of the tree.
- Remove the first branches. Firstly remove the lower branches which make the task more difficult. Remember that you must never cut the branches that are above shoulder height. Remember to never stand directly behind the tool.
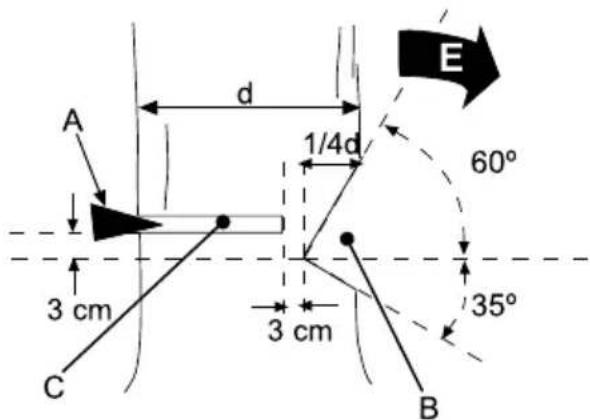
- Make a guiding cut (B) in the shape of a wedge, the size of a quarter of the width of the tree (1/4d) on the side on where you want the tree to fall (E). To do this, make a top cut of 60^ and a bottom cut of 35^ . This will ensure the two cuts will form an angle of 90^ , it is important that the two cuts make a perfect joint, so they can act as a hinge in the appropriate direction of the fall.
text_image
A 3 cm C d 1/4d 3 cm B E 60° 35°Suggestion: Before going on to the next step add fuel and chain oil, in order to ensure the tool does not stop unexpectedly during the tasks that follow.
- Start the felling cut (C) from the opposite side to the guiding cut and at a slightly higher level (3cm) than the bottom of the guiding cut (B).
- When you have cut a quarter of the tree, stop the tool and introduce a felling wedge (A) in order to avoid the tree leaning backwards and trapping the tool or causing the tree to fall in an unwanted direction.
- Continue with the felling cut (C) until you are within 3 cm of the guiding cut. This part of the wood is left uncut, so it can act as a hinge and direct the trunk towards the desired place.
- The tree will fall in the direction of the guiding cut "E".
If it does not fall, use the wedge in order to force the tree to fall.
As soon as the tree starts to fall, back away diagonally from the tree, in order to be at a safe distance when the tree touches the ground. It is important to keep away because when it touches the ground, you could be hurt by branches and splinters flying around or by roots from the ground.
When you fell a tree, make sure you warn everyone who is near the danger. Watch out the trunk does not roll away when it falls.
Ensure your feet are firmly stabilised. Do not stand on the trunk which is being cut.
Especially when working on a slope, stand on the highest part of the slope to ensure the trunk will never roll towards you.

Follow the instructions in the safety instructions in order to avoid the possible kickback of the tool.
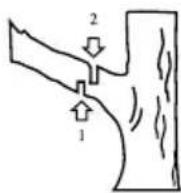
7.4. CUTTING A TRUNK WHICH IS SUPPORTED ON THE GROUND
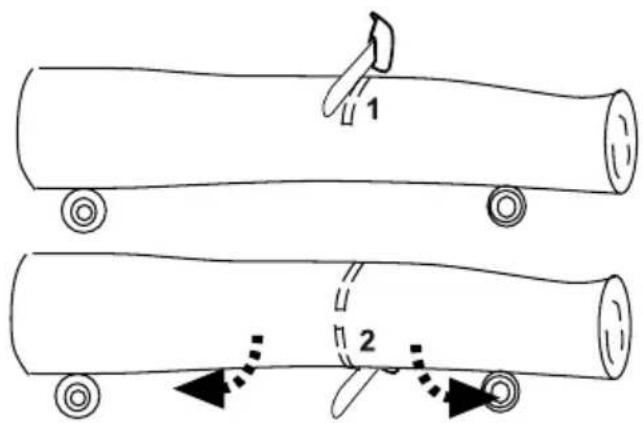
When the tree trunk is totally supported on the ground, saw downwards until you get halfway then roll the trunk round and cut from the opposite side.
If the tree trunk we are going to cut is supported at each end (saw the drawing) we should first make a cut on the top third of the trunk (1) and then cut the rest of the trunk from underneath (2).
text_image
Diagram illustrating two stages of a mechanical or electrical component with labeled parts 1 and 2, showing motion paths.This way, we will avoid the internal tension blocking the chain and the chain bar.
If we are going to make a cut on a tree trunk that is supported at one end with the other end in the air (Section B of the drawing) we should proceed in the opposite way. We will cut a third from underneath (1) and we will then finish the cut from above (2).
text_image
Diagram showing two cylindrical objects with labeled parts, likely illustrating a mechanical or electrical assembly.7.5. CUTTING THE BRANCHES OFF A FALLEN TREE
It is important to check whether the branch is bent and under tension or if it is in the air. A bent branch will have internal tension and it could spring up when you cut it.
To cut a bent branch, make a cut through a 14 of the branch towards the direction where it is bent and then cut the part that remains from the other side. This way, you will avoid the tension closing the cut and blocking the chain.
text_image
1 27.6. CUTTING A BRANCH OFF A TREE
To cut one that is not touching the ground or that is on a vertical tree always proceed by first cutting a 14 of the width of the branch from below (1) and then the remaining 34 from above (2).
This way will ease the opening of the cut for the tool and it will avoid the branch tearing and harming the tree.
8. MAINTENANCE AND SERVICE
8.1. CARE AND MAINTENANCE AFTER USE
Carry out the following operations when you have finished the cutting procedure to ensure that the machine is kept in a perfect condition.
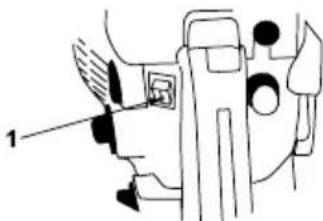
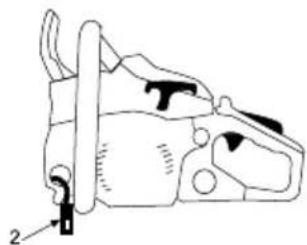
8.1.1. CHAIN OIL LUBRICATION HOLE
Unassembled the guide bar and check that the oil hole (1) is not blocked.
natural_image
Technical line drawing of a mechanical component with no visible text or symbols8.1.2. SHARPENING OF THE CHAIN TEETH
WARNING! : An improperly sharpened chain increases the risk of rebound and vibrations increasing the risk of injury!
To ensure a smooth and safe cut keep the teeth on the chain sharpened. The cutting teeth need to be sharpened when:
• On cutting, sawdust appears instead of splinters.
- When sawing, extra effort is necessary.
• The cutting path is not straight.
• Vibration increases
• There is an increase in fuel consumption.

When you sharpen the teeth, make sure you are wearing heavy duty gloves. Make sure the tool chain is safely attached.
Make sure the engine is stopped.

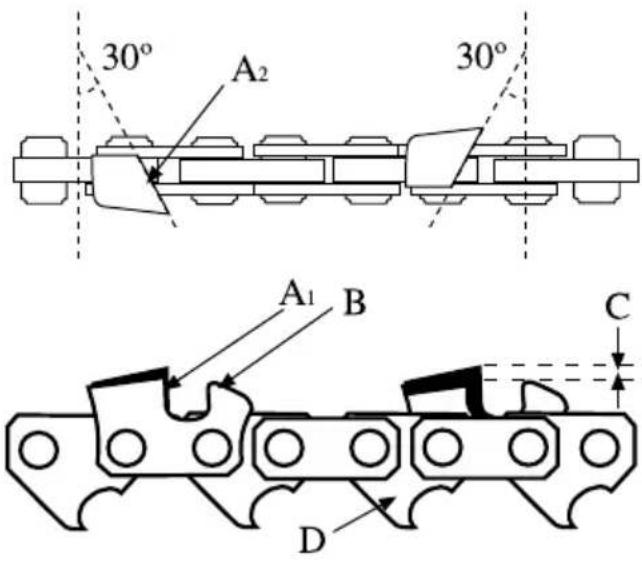
Use a special rounded chainsaw file of the correct size for the chain.
Place the file on the cutting tooth between the cutting edge (A) and the depth gauge (B); and apply light pressure forwards keeping an angle of 30^ filing the cutting edge of the tooth.
text_image
30° A₂ 30° A₁ B C DFirst file the teeth on one side, always using outward movements and maintaining the 30^ angle, and then file teeth on the other side.
Check the height of the safety gauge (C), which should be around 0.6 mm. If the height of "C" is too low, it will mean the chain will not cut well and if it is too high, it will mean the chain will "bite" the wood too much, causing the engine to overwork.
Check the length of the cutting teeth. All the teeth must be of the same length. If necessary, file the long teeth until they are all of the same length.
8.2. OTHERS

Carry out periodical inspections with the aim of ensuring a safe and efficient performance from the tool. For a complete inspection of the tool, please contact your distributor.
Keep the machine clean, especially the areas near the gas tank and air filter.
Before adjusting or repairing the machine, make sure the engine is stopped and the cover of the spark plug has been removed.
Use the appropriate parts in order to obtain a safe and adequate performance from the product. These parts can be obtained from your distributor.

The use of other accessories could can cause potential risks, injuries to the operator or damage to the machine.
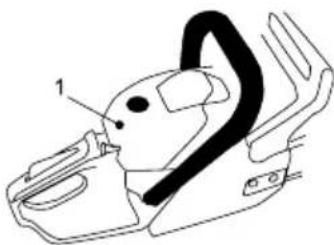
8.2.1. AIR FILTER
The obstruction of the air filter will cause the performance of the engine to decrease. If necessary, inspect and clean this element. If any damage or alteration is observed, replace it with a new one.
To clean the dirt on the filter open the cover unscrew the lid and remove the filter.
natural_image
Line drawing of a mechanical component with labeled parts (no text or symbols)The dust on the surface of the filter can be removed by hitting a corner of the filter against a hard surface.
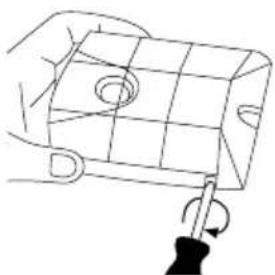
To clean the dirt inside, separate both parts of the filter by using a screwdriver, as shown in the drawing, and brush them with petrol. If compressed air is used always blow from the inside, to ensure better cleaning.
natural_image
Hand holding a grid-based object with a screwdriver inserted, no text or symbols visibleTo assemble the two halves of the cleaner, place one part against the other and press the edges until they click.
8.2.2. ADJUSTMENT OF THE CARBURETOR

Carburetor regulation is complicated and we recommend it is done by a person with experience or by the customer service.
Do not adjust the carburetor unless it is necessary. If any problems with the carburetor are observed, see your distributor.
The incorrect adjustment of the element could damage the engine, as well as causing the warranty to be cancelled.
8.2.3. FUEL FILTER
The fuel tank is provided with a filter (1). This element is located at the extreme end of the fuel hose and it can be removed fuel opening with the help of a piece of wire bent into a hook or similar device.
Inspect the fuel filter periodically. Do not allow dust to enter the fuel tank. The obstruction of the filter will make it difficult to start the engine or it will produce abnormalities in the performance of the engine.
natural_image
Technical line drawing of a mechanical device with labeled parts (no text or symbols present)Inspect the fuel filter and if it is dirty, replace it with a new one.
If the inside of the fuel tank is dirty, it can be cleaned by rinsing out with petrol.
8.2.4. OIL FILTER
The oil tank is provided with a filter (2). This element is located at the extreme end of the oil hose and it can be removed oil opening with the help of a piece of wire bent into a hook or similar device.
Inspect the oil filter periodically. Do not allow dust to enter the oil tank. The obstruction of the filter will make it difficult to start the engine or it will produce abnormalities in the performance of the eng
natural_image
Anatomical line drawing of a skull and jawbone structure (no text or labels)Inspect the oil filter and if it is dirty, replace it with a new one.
If the inside of the oil tank is dirty, it can be cleaned by rinsing out with petrol.
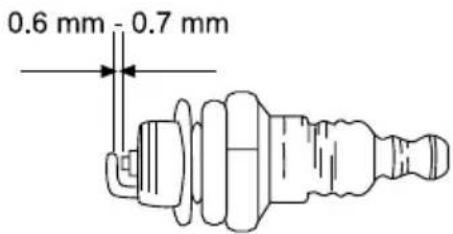
8.2.5. CHECKING THE SPARK PLUG
Starting up or ignition failures are frequently caused by a dirty spark plug. Clean the spark plug and check that the spark plug light is within the correct interval. (0.6-0.7mm).
text_image
0.6 mm - 0.7 mm8.2.6. CLEANING THE CYLINDER REFRIGERATION VENTS

natural_image
Illustration of a hand holding a pen, writing on a stack of papers (no text or symbols visible)The cylinder refrigeration vents are responsible for cooling the piston and the cylinder by means of the entry of air.
The vents must always be kept clean, free from material that could block air from entering. Dirty vents mean that the engine will overheat, causing it to seize. Check and clean the cylinder vents periodically.
8.2.7. BAR CHAIN MAINTENANCE
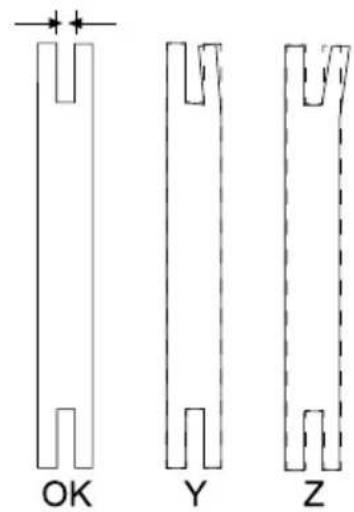
Invert the bar periodically, in order to avoid it wearing out unevenly. The edges of the bar rail must always be kept square.
Check the wear and the shape of the edges. If you observe that the edges have lost their shape, or a side wing is deformed, replace the bar.
When unassembling the chain bar, remove the sawdust from the bar (2) and the oil hole (1). Oil the chain sprocket.
text_image
OK Y Z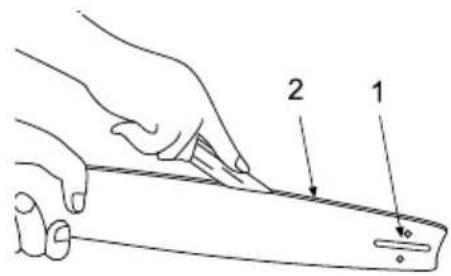
text_image
Diagram showing a hand holding a tool with labeled parts 1 and 2, likely illustrating a measurement or labeling process.9. TROUBLE SHOOTING
If the engine does not start, check the engine compression and whether the spark plug gives sparks. Depending on the symptoms, we provide you with a series of probable causes and the solutions:
| Compression pressure is normal | The spark from the spark plug is normal | Probable cause | Corrective action |
| Yes | Yes | There is no fuel in the tank | Put fuel in the tank |
| Fuel filter obstructed, lack of fuel | Clean the fuel filter | ||
| There is water in the fuel | Replace the fuel | ||
| The fuel is unsuitable octane | Use petrol with the suitable octane | ||
| The carburetor is dirty | Take the tool to the customer service | ||
| Yes | NO | Switch is OFF | Poner el interruptor en “I” |
| The spark plug is dirty | Clean the spark plug | ||
| The ignition coil is not connected | Connect it | ||
| Lack of compression pressure | SI | Weakness from the spark plug | Tighten it |
| Worn out piston, junk ring and cylinder | Take the tool to the customer service | ||
| The cylinder is scratched | Take the tool to the customer service | ||
| The engine stops | The engine has seized up | Take the tool to the customer service |
If the engine does not work well (lack of power, low revolutions, unstable idling, etc.) we provide a series of symptoms, the probable cause and the solution:
| Symptom | Probable cause | Corrective action |
| The engine makes a rattling noise | Worn out piston, junk ring, cylinder | Take the tool to the customer service |
| Worn out piston pin, piston | Take the tool to the customer service | |
| Holgura de cigüeñal | Take the tool to the customer service | |
| The clutch is loose | Take the tool to the customer service | |
| The engine overheats | Excess of continuous use | Avoid using the machine during prolonged periods of times, at high speed or with a heavy load |
| Dirty exhaust | Take the tool to the customer service | |
| The fuel is unsuitable | Use petrol with the suitable octane | |
| The engine takes time to increase the revolutions | The carburetor is dirty | Take the tool to the customer service |
| The air filter is dirty | Clean the filter | |
| Fuel filter obstructed, lack of fuel | Clean the filter | |
| The engine stops and cannot be left idling | The throttle regulating screw is badly adjusted | Take the tool to the customer service |
10. TRANSPORT
It is necessary to disconnect the engine when moving the machine between different working areas.
Stop the engine and leave it to cool for five minutes before transporting or putting the tool away.
Always transport the tool with the engine switched off, the chain bar covered by the guard and the exhaust away from the body.
11. STORING
Stop the engine and leave it to cool for five minutes before transporting or putting the tool away.
Keep the tool away from children.
Always cover the bar with the protector when you store the machine.
Never store the tool with fuel in the tank, inside a building in which the vapors from the fuel could enter into contact with a flame, a spark or an intense source of heat.
If the machine is not going to be used and will be stored for a prolonged period of time, empty the fuel and the carburetor tanks, clean the parts, take the machine to a safe place and make sure the engine has cooled.
The exhaust silencer will still be hot even after the engine has stopped. Do not place the machine in places where inflammable material (dry grass, etc.) gases or inflammable liquids can be found.
12. RECYCLING OR DISPOSAL OF YOUR MACHINE
Protect the Environment. Recycle used oil by this machine and take it to a recycling or follow local recommendations. Do not empty into drains, soil, rivers, lakes or seas.
Dispose of your machine in an ecological manner. We should not get rid of the machine with our domestic rubbish. Its plastic and metal components can be reclassified and can be recycled
13. WARRANTY CONDITIONS
13.1. WARRANTY PERIOD
- According to the following described terms (1999/44 CE) the warranty period is 2 years from the purchase date, and it will cover faulty pieces owing to an incorrect manufacture.
13.2. EXCLUSIONS
Garland warranty will not cover:
- Pieces worn out due to wear and tear.
- Bad use, negligence, lack of maintenance.
- Failures that turn out because of an incorrect use of the product, Garland will not be responsible if the replaced parts of the machine are not from Garland and if the machine has been modified in any way.
13.3. TERRITORY
- Garland warranty covers the country.
13.4. IN CASE OF INCIDENCE
- The warranty should be correctly filled in with all the information requested, and the invoice or the purchase ticket should be attached.
WARNING!
TO GUARANTEE THE CORRECT FUNCTIONING OF THE MACHINE AND MAXIMUM SECURITY, WE ASK YOU TO READ THE INSTRUCTION MANUAL FULLY AND CAREFULLY PRIOR TO USING THE MACHINE.
DECLARATION OF CONFORMITY (CE)
Who has signed below, Lisardo Carballal, authorised by Productos McLand S.L., , with the following address C/ La Fragua 22, 28932, Móstoles, España , declares that the products brand Garland models MONTANA 1120 (YD5558), with serial number of year 2014 on (the year of manufacture is clearly indicated on the tool identification plate, followed the serial number) and whose function is “A powered machine appropriate to clear lawns, paths, ways, streets, etc. of leaves and other material by means of a high velocity air flow.”, comply with all the requirements stated by the Directive 2006/42/EC of the European Parliament and of the Council of 17 May 2006 on machinery, and amending Directive 95/16/EC.
These tools also comply with the requirements of the following community directives:
- Directive 2000/14/EC of the European Parliament and of the Council of 8 May 2000 on the approximation of the laws of the Member States relating to the noise emission in the environment by equipment for use outdoors.
- Directive 2004/108/EC of the European Parliament and of the Council of 15 December 2004 on the approximation of the laws of the Member States relating to electromagnetic compatibility and repealing Directive 89/336/EEC.
The examinations of the European Community Directives have been carried out by the following notified bodies whose Certificate numbers figure below:
• 2006/42/EC, , Certificate number: BM50279286 0002.
• TÜV Rheiland.
• Harmonized Standard: EN ISO 11681-1:2011.
| Power (kW) ISO 7293 2,2 | |
| A-weighted sound power level LwA (dB(A)) ISO 22868 112.76 | |
| Guaranteed sound power level dB(A) (K=K=2.5) 116 |

Lisardo Carballal
Product Manager
Móstoles 14-10-2014
NOTAS
TABLE DE MATIERES
text_image
Technical diagram of a chain drive with numbered parts and an inset close-up view highlighting key components.6. INDICATIONS POUR LA MISE EN SERVICE
6.1. DESASEMBLAGE Y LISTE DE MATERIELS
natural_image
Line drawing of a chain-linking gear with tools and chains (no text or symbols)6.2. INSTALATION DU GUIDE ET DE LA CHAINE
natural_image
Line drawing of a mechanical device with a rotating arrow indicating rotation (no text or symbols)text_image
Diagram of a hairpin with labeled parts and directional arrows indicating motion or movementtext_image
Technical diagram of a chain-linking device with numbered components labeled 3, 4, 5, and 6.
text_image
Diagram of a mechanical device with labeled parts 1, 2, and directional arrows indicating movement or force.natural_image
Diagram of a mechanical device with rotating arm and clamping mechanism (no text or symbols)natural_image
Illustration of a person using a saw to cut a tree stump with a downward arrow indicating force (no text or symbols)natural_image
Line drawing of a person using a tool to adjust or install a mechanical component (no text or symbols present)natural_image
Mechanical assembly diagram showing a component with labeled parts (no readable text or symbols)natural_image
Line drawing of a chain saw with motion arrows indicating speed (no text or symbols)text_image
Technical diagram showing a mechanical assembly with numbered components and directional arrows indicating motion or movement.natural_image
Line drawing of a person using a power tool to cut a chain (no text or symbols)text_image
Diagram showing two cylindrical objects with labeled parts and directional arrows indicating movement or forcetext_image
Diagram showing two cylindrical objects with labeled parts, likely illustrating a mechanical or electrical assembly.7.5. COUPE DES BRANCHES D'UN ARBRE ABATTU
natural_image
Technical line drawing of a mechanical component with labeled parts (no text or symbols)8.1.2. AFFUTAGE DES DENTS DE COUPE DE LA CHAINE
natural_image
Line drawing of a car interior component with labeled parts (no text or symbols)natural_image
Hand holding a grid-based object with a screwdriver inserted, no text or symbols visiblenatural_image
Anatomical line drawing of a mechanical device with labeled parts (no text or symbols present)natural_image
Technical line drawing of a mechanical component with labeled parts (no text or symbols)8.2.4. FILTRE A HUILE
natural_image
Illustration of a hand holding a pen, writing on layered paper (no text or symbols visible)text_image
Technical diagram of a chain drive with numbered parts and an inset close-up view highlighting the component.natural_image
Illustration of a chain drive with gear, tools, and a pulley (no text or symbols)natural_image
Line drawing of a mechanical device with a rotating arrow indicating rotation (no text or symbols)text_image
Diagram of a chainsaw with labeled parts and directional indicatorstext_image
Technical diagram of a chain-linking device with numbered components labeled 3, 4, 5, and 6.
text_image
Technical diagram of a mechanical device with labeled parts 1, 2, and a control knobnatural_image
Line drawing of a mechanical device with a rotating arrow indicating motion (no text or symbols)natural_image
Illustration of a person using a saw to cut a tree stump with an arrow indicating force (no text or symbols)text_image
Diagram of a vehicle interior with numbered components, likely for safety or maintenance instructions.natural_image
Line drawing of a car seatbelt with hands adjusting the seat (no text or symbols)natural_image
Technical diagram of a mechanical assembly with labeled component (no readable text or symbols)natural_image
Line drawing of a chain-linker with motion arrows indicating speed (no text or symbols)text_image
Technical diagram showing a mechanical assembly with labeled parts 1, 2, and 3, including directional arrows and a magnified inset.natural_image
Line drawing of a person using a power tool to cut a chain (no text or symbols)text_image
Diagram showing two cylindrical objects with labeled parts and directional arrows indicating motion or movement.text_image
Diagram showing two cylindrical objects with labeled parts and directional arrows indicating movement or force7.5. TAGLIO DEI RAMI DI UN ALBERO CADUTO
natural_image
Line drawing of a car interior component with labeled parts (no text or symbols present)natural_image
Hand holding a grid-based object with a tool inserted, no visible text or symbolsnatural_image
Line drawing of a mechanical component with labeled parts (no text or symbols)natural_image
Diagram of a mechanical component with labeled parts (no readable text or symbols)natural_image
Illustration of a hand holding a pen, writing on paper (no text or symbols present)text_image
Diagram showing a hand holding a tool with labeled parts 1 and 2, indicating a step or procedure.text_image
Technical diagram of a chain-linking device with numbered parts and an inset close-up view highlighting specific components.natural_image
Illustration of mechanical tools including chains, a saw, and a chain (no text or symbols)natural_image
Line drawing of a mechanical component with an arrow indicating rotation (no text or symbols)- Alivie as porcas (1) e retire a tampa da corrente (2).

text_image
Diagram of a mechanical device with labeled parts and directional indicatorstext_image
Technical diagram of a chain-linking device with numbered components labeled 3, 4, 5, and 6.
text_image
Technical diagram of a mechanical device with labeled parts 1, 2, and a warning symbolnatural_image
Diagram of a mechanical device with a rotating arrow indicating rotation (no text or symbols)text_image
Diagram showing a person using a saw to cut a tree stump, with an arrow indicating the process.natural_image
Line drawing of a mechanical device with hands operating it (no text or symbols)natural_image
Technical line drawing of a mechanical component with no visible text or symbolsnatural_image
Line drawing of a manual chain saw with motion arrow indicating speed (no text or symbols)text_image
Technical diagram showing mechanical assembly with labeled parts and directional arrows indicating motion or movementnatural_image
Line drawing of a person using a power tool to cut a chain (no text or symbols)text_image
Diagram showing two cylindrical objects with labeled parts and directional arrows indicating motion or movement.text_image
Diagram showing two cylindrical objects with labeled parts and directional arrows indicating movement or force7.5. CORTE DOS RAMOS DE UMA ÁRVORE CAÍDA
natural_image
Diagram of a car interior showing steering wheel and dashboard (no text or labels)8.1.2. AFIAR OS DENTES DA CORRENTE
natural_image
Line drawing of a car interior component with labeled parts (no text or symbols)natural_image
Hand holding a grid-based object with a screwdriver inserted, no text or symbols visiblenatural_image
Technical line drawing of a mechanical component with labeled parts (no text or symbols present)natural_image
Anatomical line drawing of a skull and jawbone structure (no text or labels)natural_image
Illustration of a hand using a tool to lift a stack of papers (no text or symbols visible)text_image
Diagram showing a hand holding a tool with labeled parts 1 and 2, likely illustrating a measurement or labeling process.text_image
Technical diagram of a chain drive with numbered parts and an inset close-up view highlighting specific components.natural_image
Line drawing of a chain-linking gear with chains, tools, and a bracket (no text or symbols)natural_image
Line drawing of a mechanical device with a rotating arrow indicating rotation (no text or symbols)text_image
Diagram of a chainsaw with labeled parts and directional indicatorstext_image
Technical diagram of a chain-linking device with numbered components labeled 3, 4, 5, and 6
text_image
Technical diagram of a mechanical device with labeled parts 1 and 2, showing internal components and directional arrows.natural_image
Diagram of a mechanical device with rotating arm and base (no text or symbols)natural_image
Line drawing of a person using a chainsaw to cut a small object (no text or symbols present)text_image
Technical diagram of a mechanical component with numbered parts labeled 1, 2, and 3natural_image
Line drawing of a person adjusting a seatbelt device (no text or symbols)natural_image
Simple line drawing of a chain saw cutting down a pile of material (no text or symbols)text_image
Technical diagram of a mechanical device with labeled parts and directional arrows indicating motion or assembly.natural_image
Line drawing of a person using a power tool to cut a chain (no text or symbols)text_image
Diagram showing two mechanical components labeled 1 and 2 with directional arrows indicating movement or force direction.text_image
Diagram showing two cylindrical objects with labeled parts and directional arrows indicating movement or forcenatural_image
Technical line drawing of a mechanical component with no visible text or symbolsnatural_image
Technical line drawing of a mechanical component with labeled parts (no text or symbols present)natural_image
Line drawing of a hand using a screwdriver to adjust a grid-patterned object (no text or symbols)natural_image
Technical line drawing of a mechanical component with labeled parts (no text or symbols present)natural_image
Technical line drawing of a mechanical component with labeled parts (no text or symbols present)natural_image
Illustration of a hand using a tool to press or inspect a stack of layered materials (no text or symbols visible)text_image
Diagram showing a hand holding a tool with labeled parts 1 and 2, indicating a step or procedure.Is this your first toll of this type?
SEE YOUR SERVICE MANUAL
FOR FULL WARRANTY DETAILS
PARA INFORMAÇÕES DETALHADAS SOBRE GARANTIAS
É FAVOR CONSULTAR O MANUAL QUE ACOMPANHA A MÁQUINA
LIRE LA NOTICE POUR LES DÉTAILS
SUR LA GARANTIE
TIPO DE MÁQUINA
TYPE OF MACHINE
TYPO DE MAQUINA
TYPE DE MACHINE
MODELO
MODEL
MODELO
MODÈLE
FECHA DE COMPRA
DATE OF PURCHASE
DATA DE COMPRA
DATE D'ACHAT
DISTRIBUIDOR
DEALER
REVENDEDOR
DISTRIBUTEUR