
OBH 26322 - Cooker OK - Free user manual and instructions
Find the device manual for free OBH 26322 OK in PDF.

| Brand | OK |
| Model | OBH 26322 |
| Product type | Built-in radiant hob |
| Number of cooking zones | 4 heating plates |
| Dimensions (W x D x H) | 590 x 520 x 55 mm |
| Cutout (W x D) | 564 x 494 mm |
| Plate diameters | Plate A: 20 cm (1800 W), Plate B: 16.5 cm (1200 W), Plate C: 20 cm (1800 W), Plate I: 16.5 cm (1200 W) |
| Power supply | 220-240 V~, 50/60 Hz or 400 V 3N~, 50/60 Hz |
| Maximum power | 5500 - 6600 W |
| Protection class | I |
| Power cord | H07RN-F 5G1.5 mm² |
| Controls | Touch controls with +/- buttons, child lock, timer |
| Timer function | Kitchen timer (alarm) or automatic plate shut-off timer (up to 99 min) |
| Automatic safety shut-off | Yes, depending on power level (from 2 to 8 hours) |
| Residual heat indicator | Yes, displays "K" |
| Key lock | Yes, child safety |
| Surface material | Ceramic glass |
| Cleaning | Damp cloth, special vitroceramic cleaner |
| Repairability | Repairs by an authorized technician only |
| Energy consumption | 190.9 Wh/kg (ECelectric hob) |
Frequently Asked Questions - OBH 26322 OK
User questions about OBH 26322 OK
0 question about this device. Answer the ones you know or ask your own.
Ask a new question about this device
Download the instructions for your Cooker in PDF format for free! Find your manual OBH 26322 - OK and take your electronic device back in hand. On this page are published all the documents necessary for the use of your device. OBH 26322 by OK.
USER MANUAL OBH 26322 OK
IH_OEH2632L_141126_V08
www.ac.jp/room
CE Inure-Grb1 Service services 2 C-850-43 ingoblasti www.intracn.

ok.
OBH 26321
60 CM AUTARK KOCHFELD // 60 CM CERAMIC HOB //
PLACA VITROCERÁMICA DE 60 CM // PLAQUE CÉRAMIQUE 60 CM
natural_image
Four white circles arranged in a 2x2 grid on a dark background, with no text or symbols visible.HERZLICHEN GLÜCKWUNSCH!
Thanks for your purchase of an ok. product. Please read this manual carefully and keep it for future reference.
IMPORTANT SAFETY INSTRUCTIONS. READ CAREFULLY AND KEEP FOR FUTURE REFERENCE.
1.
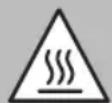
Risk of burning! Do not touch the product's hot surfaces. Heat rises from the product during use. Caution! Hot surface!
-
WARNING: The product and its accessible parts become hot during use. Care should be taken to avoid touching heating elements. Children less than 8 years of age shall be kept away unless continuously supervised.
-
This product can be used by children aged from 8 years and above if they have been given supervision or instruction concerning use of the product in a safe way and if they understand the hazards involved.
-
Cleaning and user maintenance shall not be made by children unless they are older than 8 and supervised.
-
Keep the product and its cord out of reach of children aged less than 8 years.
-
Children shall not play with the product.
-
A damaged power cord may only be replaced by the authorised service agent in order to avoid hazards.
-
WARNING: Unattended cooking on a hob with fat or oil can be dangerous and may result in fire. NEVER try to extinguish a fire with water, but switch off the appliance and then cover flame e.g. with a lid or a fire blanket.
-
WARNING - Danger of fire: Do not store items on the cooking surfaces.
-
WARNING: If the surface is cracked, switch off the product to avoid the possibility of electric shock.
-
Metallic objects such as knives, forks, spoons and lids should not be placed on the hob surface since they can get hot.
-
The product is not intended to be operated by means of an external timer or separate remote-control system
-
Means for disconnection must be incorporated in the fixed wiring in accordance with the wiring rules.
EN
- WARNING: Use only the hob guards designed by the manufacturer of the cooking appliance or indicated by the manufacturer of the appliance in the instructions for use as suitable or hob guard incorporated in the appliance. The use of inappropriate guard can cause accidents.
- Do not use steam cleaner for cleaning!
-
Follow the instructions in the chapter Cleaning and care.
-
Read this user manual thoroughly before first use and pass it on with the product. Pay attention to the warnings on the product and in this user manual. It contains important information for your safety as well as for the use and maintenance of the equipment.
-
Use the product only for its intended purpose and with recommended accessories and components. Improper use or wrong operation may lead to hazards.
-
Never leave the product unsupervised while it is switched on.
-
Do not place heavy objects on top of the product.
-
Never immerse electrical parts of the product in water during cleaning or operation. Never hold the product under running water.
-
Do not under any circumstances attempt (e.g. damage in power cord, product is dropped, etc.) to repair the product yourself. For servicing and repairs, please consult an authorised service agent.
-
The mains voltage must match the information on the rating label of the product.
-
Only unplug from the power socket can separate the product completely from the mains. Please be sure that the power plug is in operable condition.
-
Avoid damages to the power cord that may be caused by kinks or contact with sharp corners.
-
Keep this product including power cord and power plug away from all heat sources like for example, ovens, hot plates and other heat-producing products/objects.
-
Only unplug from the power socket by the plug itself. Do not pull on the cord.
-
Unplug the product ...
-
when the product is not being used,
- in case of malfunctions,
- before attaching / detaching accessories and
-
before cleaning the product.
-
Use this product in dry indoor areas only and never outdoors.
-
Never use, expose or put the product near to:
- direct sunlight and dust;
- fire (fireplace, grill, candles), water (water splashes, vases, ponds, bath tube) or heavy moisture.
- This product is not intended for commercial use. It is designed for household use only.
INTENDED USE
This product is designed for heating and cooking foods in suitable pans or pots. Any other use may result in damage to product or injuries.
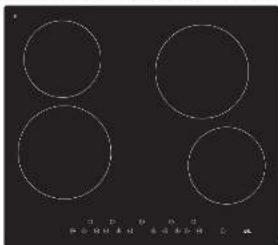
COMPONENTS
A. Hotplate 1800 W
G. Timer
B. Hotplate 1200 W
H. Hob ON/OFF
C. Hotplate 1800 W
I. Hotplate 1200 W
D. Lock
J. Screws
E. Power setting +/-
K. Brackets
F. Timer +/-
L. Power cable
BEFORE FIRST USE
- Remove the product and accessories from the original packaging carefully. For disposal of the original packaging, follow applicable legal requirements. If you have questions about correct disposal, contact your local authority.
- Check the package contents for completeness and damage. If the package content is incomplete or damages can be found, contact your place of purchase immediately.
• After unpacking clean the product, see chapter Cleaning and care.
INSTALLATION
1 For installation pay attention to all dimensions. Prepare a cutout A x B mm into the work plate.
| L (mm) W (mm) H (mm) D (mm) A (mm) B (mm) X - (mm) | ||||||
| 590 520 55 | 51 564 494 | 50 (for rear side and for | only one side (left or right) | |||
WARNING! Pay attention to the safety clearances to the side and rear. When installing a hob higher cabinets or room walls are only allowed with a 60 mm distance from the rear and 55 mm distance from only one side (right or left). There shall be no higher cabinet or wall to the other side (right or left).
2 Consider the minimum clearances for air circulation inside the kitchen cabinet.
| A (mm) B (mm) | C (mm) | D | E | |
| min. 760 | min. 50 | min. 20 | Air inlet | Air outlet min. 5 mm |
WARNING! If a hood is placed over the hob, the safety distance specified by the manufacturer must be observed.
If no manufacturer's instructions are available or combustible materials (e.g. a wall unit) mounted above the hob, the safety distance A must be at least 760 mm.
3 If possible connect the hob to the mains before installing the hob to the work plate.
WARNING! Before connecting, all poles of the corresponding circuit must be disconnected from mains supply. Use suitable measurement equipment to make sure the circuit is disconnected from mains supply.
The corresponding circuit shall be secured against unintentional reconnection.
The electrical connection must be done by an appropriately trained professional.
- Pay attention to the connection diagram and connect L1, L2, N1, N2 and ground to the terminal accordingly. Make sure that all cables are firmly fixed.
EN
4 Place the cooktop centered into the cutout of working plate. The sealing strip is already adhered to the underside of the cooktop field. The edge of the working plate must be smooth and flat, so that the hob seats solidly and the sealing strip provides sufficient seal between cooktop and working plate.
If the working plate is not smooth, e.g. tiled you need to fill the gaps or joints in the support area of the seal.
WARNING! Make sure the power cord is not kinked, squeezed or laid over sharp edges. The cable must be guided to the connection so that it does not touch hot parts of the hob or oven.
5 Mount the four brackets with the screws (4 x brackets and 4 x screws included) from the bottom. The brackets must be turned into correct position according to the thickness of the board.
Note:
TIPS FOR SELECTION OF POTS / PANS
6 • Only use pots/pans with flat bottoms, to avoid damaging the hot plate.
- Only use pots/pans, with same or similar size as hotplate to prevent heat loss.
• Always lift pots or pans before moving on the cooktop in order to avoid scratches on the glass.
- Only use pots/pans, with same or similar size as hotplate to prevent heat loss. - Always lift pots or pans before moving on the cooktop in order to avoid scratches on the glass.
OPERATION
Conventional use
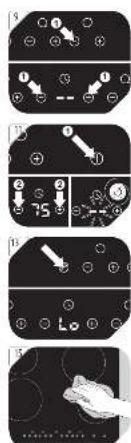
7 Turn on cooktop by pushing ON/OFF switch ①. The displays for power level show --.
8 Put the pot with food on the desired hob.
Note: The pot must be clean and dry outside. Do not turn on the product if there is no pot/pan placed on the hob.
Push + or - of the desired hotplate to adjust the power level. Follow the symbols / / above the power level displays in order to operate the correct hotplate.
Note:
• Default setting is power level 5
- If no settings are done at the hotplates are done within one minute after switching ON the cooktop the product will turn OFF.
- Power level settings can be changed at any time during cooking by using buttons +/-
9 When the cooking process is finished, turn off the respective hotplates by touching the – button until “--” is shown in display or by touching + and – at once.
10 To switch OFF the cooktop completely touching the switch①.
Note: The cooktop is provided with automatic power off function. This will automatically switch off hotplates when they are switched ON without changes about several hours. The power OFF times are shown in following table:
| Power level 1 2 3 4 | 5 6 7 8 9 | |||||||
| Power off time (h) | 8 8 8 4 4 | 4 2 2 2 |
Note: The cooktop is provided with a temperature sensor and overheat protection in order to switch OFF hotplates in case of overheating.
TIMER
The timer can be used as a kitchen timer with alarm function or as a timer. The max. adjustable time is 99 minutes.
With a single tap of the +/- button the value changes by 1 minute. Keep the +/- button pressed, the value changes with 10-minutes increments.
11 Using the timer as kitchen timer
Note: The kitchen timer function can be used with hotplates off, i.e. without cooking.
- Turn on the glass ceramic cooktop with the switch ①.
-
Use the Timer +/- buttons to set the desired time. The value has been set, the display will flash for 5 seconds and then the time starts to count down.
-
To reset the timer to – push the + and – buttons at once.
- If time is over, the display shows "--" and you will hear a beep sound for 30 seconds. Press any button to turn off the beep.
12 Timer function for switching off hotplates
Note: In this mode, a hotplate will automatically turn off after a preset time elapsed. When using several hotplates simultaneously, the timer function applies to the last selected hob.
- Turn on the glass ceramic cooktop with the switch ①.
- Set the power level of the relevant hotplate.
- Thereafter and within a few seconds when the power level flashes on the display set the timer to the desired time.
- Once the value has been set, the display will flash for 5 seconds and the time count down starts.
Note: The timer controlled hotplate is indicated by a red dot at the bottom of the corresponding power level display.
- If the time is over – is shown in display and the corresponding hotplate is switched off.
- Note: Once the timer is activated, the time cannot be changed without reset. Reset the timer to -- by pushing both + and - timer buttons. Thereafter the timer can be set again.
13 Key Lock
The cooktop can be locked against unintentional use (e.g. as child protection). If the lock is activated all control buttons except ① are locked.
- Press the lock button ⏻. The display shows L0 and the controls are locked.
- Press the lock button ^2 for several seconds to unlock the controls.
14 Residual heat indicator
All hotplates have a residual heat indicator. If the hotplate is off but still hot, H is shown in each power level display.
The display turns off when the hotplate cooled down to a safe temperature.
EN
20
CLEANING AND CARE
Warning! When cleaning, never use solvents or abrasive materials, hard brushes, metallic or sharp objects. Solvents are harmful to human health and can attack plastic parts, while abrasive cleaning mechanisms and tools may scratch the surfaces.
Warning! Turn off the product and let the cooktop cool down completely before cleaning.
15 Clean the product's exterior surfaces with a slightly damp cloth and then dry them thoroughly. Make sure that no water enters the product interior (for example, through the switch).
Note:
You can also use special cleaner for glass ceramic cooktops. Follow the instructions on the packaging. Clean and dry the hob thoroughly afterwards.
Please be sure to dismantle the related components according to the user manual for non-destructive maintenance purposes. Protect the parts to make the re-installed work can be favoring and avoid damage.
ENERGY SAVING
- In order to reduce total environmental impact (e.g. energy use) of the cooking process, please be sure your product is installed according to the user manual, keep the operation place ventilated.
- For product with manual operation mode, we suggest switch off within 10 minutes after finishing the cooking process.
SPECIFICATIONS
| Model OBH 26321 | |
| Type of hob Built in hob | |
| No. of cooking zones 4 | |
| Heating technologies Radiant cooking zone | |
| Diameter of each cooking plates (∅) | A = 20 cm B = 16.5 cmC = 20 cm I = 16.5 cm |
| Energy consumption/ plates ( EC_electric cooking ) | A = 180.7Wh/kg B = 192.9Wh/kgC = 180.7Wh/kg I = 209.1Wh/kg |
| Energy consumption hob ( EC_electric hob ) 190.9 Wh/kg | |
| Rated voltage | 220 - 240 V~, 50/60 Hz400 V 3N~ 50/60 Hz 6000 W |
| Rated Power max. 5500 - 6600 W | |
| Protection class I | |
| Cord H07RN-F 5G1.5mm | ^2 |
| Dimensions (mm) | 590 x 520 x 55 mm |
• This is a built-in hob.
• Erp-testing was done according to EN 60350-2:2013 & EN 50564:2011.
• See website below for detailed technical information or ask your vendor for specification sheet.
www.ok-online.com.
DISPOSAL
The crossed-out wheeled bin logo requires the separate collection of waste electric and electronic equipment (WEEE). Electric and electronic equipment may contain dangerous and hazardous substances. Do not dispose of this appliance as unsorted municipal waste. Return it to a designated collection point for the recycling of WEEE. By doing so, you will help to conserve resources and protect the environment. Contact your retailer or local authorities for more information.
ENHORABUENA
B. Isitici Tabla 1200 W