
K6C51R - Cooker INDESIT - Free user manual and instructions
Find the device manual for free K6C51R INDESIT in PDF.

Frequently Asked Questions - K6C51R INDESIT
User questions about K6C51R INDESIT
0 question about this device. Answer the ones you know or ask your own.
Ask a new question about this device
Download the instructions for your Cooker in PDF format for free! Find your manual K6C51R - INDESIT and take your electronic device back in hand. On this page are published all the documents necessary for the use of your device. K6C51R by INDESIT.
USER MANUAL K6C51R INDESIT
Installation and use
Kyxohna pnta
YCTaHOBka N NOJIb3OBAHne
Cuisinière
Installation etemploi
Fornuis
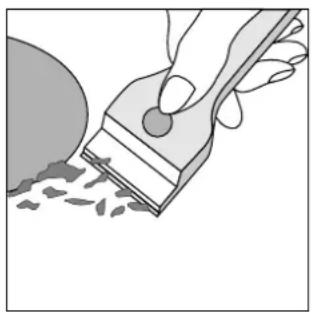
Cleaning the hob surface
Prior to cooking, the hob surface should always be cleaned using a damp cloth to remove any dust or stray food particles. The hob surface should be regularly cleaned with a lukewarm solution of water and a mild detergent. Periodically it may be necessary to use a proprietary ceramic hob cleaner. First remove all spilt food and fat with a window scrape, preferably the razor blade type CERA (not supplied) or, failing that, the fixed blade razor edge type (see Fig. A). Then clean the hob while it is still warm to the touch with a suitable cleaner and paper towel.
Then rinse it and wipe it dry with a clean cloth. If aluminium foil or plastic items are accidentally allowed to melt on the hob surface they should be immediately removed from the hot cooking area with a scraper. This will avoid any possible damage to the surface. This also applies to sugar or any food with a high sugar content.
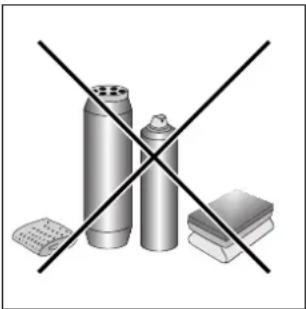
Do not use abrasive sponges or scourers of any type. Corrosive cleaners such as oven sprays and stain removers should also not be used (see Fig.B).
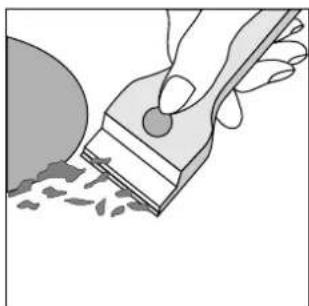
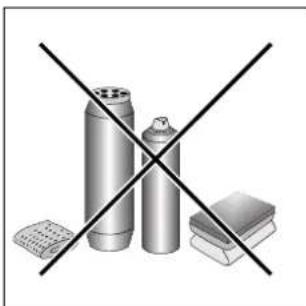
Fig.A Fig.B
To maintain the EFFICIENCY and SAFETY of this appliance, we recommend:
- call only the Service Centers authorized by the manufacturer
- always use original Spare Parts
1 This appliance is intended for non-professional use within the home.
2 Before using the appliance, carefully read the instructions contained in this manual, as they provide important information for ensuring safe installation, use and maintenance. Keep this manual as a reference guide.
3 Remove the packing and make sure the appliance hasn't been damaged during transport. If you have any doubts, don't use the appliance. Call a qualified technician for assistance. For safety, keep packing materials (plastic bags, polystyrene foam, tacks, etc.) away from children.
4 The appliance must be installed by a qualified technician in accordance with the manufacturer's instructions. No liability for injury or damage to persons, animals or property will be accepted by the manufacturer arising from failure to follow these instructions.
5 The electrical safety of this appliance is ensured only if it is correctly connected to an efficiently earthed system in accordance with electrical safety regulations. Make sure this basic safety requirement has been complied with. If in doubt, have it checked by a qualified technician. No liability for damage will be accepted by the manufacturer because of defective earthing.
6 Before connecting the appliance, make sure the specifications on the rating plate correspond with those of your power supply.
7 Check that your supply and sockets are sufficient for the total load taken by your appliance which is stated on the rating plate. If you have any doubts, contact a qualified technician for service.
8 A multipole circuit breaker with a space between contacts of 3 mm or more must be fitted for installation
9 If the socket and cooker plug are not compatible, have the socket replaced with a suitable model by a qualified technician who should also check that the cross-section of the socket cable is suited to the power absorbed by the appliance. The use of adaptors, multiple sockets and/or extensions, is not recommended. If their use can not be avoided, remember to use only single or multiple adapters and extensions which comply with current safety regulations. In these cases, never exceed the maximum current capacity indicated on the single adaptor or extension and the maximum power indicated on the multiple adapter.
10 Do not leave the appliance plugged in if it is not necessary. Switch off the main switch and gas cock when you are not using the cooker.
11 The openings and slots used for ventilation and dispersion of heat must never be closed or plugged.
12 The user must not replace the supply cable of this appliance. Always call an after-sales servicing centre authorised by the manufacturer in the case of cable damage or replacement.
13 This appliance must be used for the purpose for which it was expressly designed.
Any other use (e.g. heating rooms) is considered to be improper and consequently dangerous.
The manufacturer declines all responsibility for damage resulting from improper and irresponsible use.
14 A number of fundamental rules must be followed when using electrical appliances. The following are of particular importance:
- do not touch the appliance when your hands or feet are wet
- do not use the appliance barefooted
- do not use extensions, but if these are necessary caution must be exercised.
- never pull the power supply cable or the appliance to unplug the appliance plug from the mains.
- never leave the appliance exposed to atmospheric agents (rain, sun etc.)
- do not allow children or persons who are not familiar with the appliance to use it, without supervision.
15 Always unplug the hob from the mains or switch off the main switch before cleaning or carrying out maintenance operations.
16 If the surface of the glass breaks, disconnect the appliance immediately. For repairs call only an authorised after-sales servicing centre and request the use of original spare parts only. Failure to comply with the above may compromise the safety of the appliance.
17 If you are no longer using the appliance, remember to make it unserviceable by unplugging the appliance from the mains and cutting the supply cable. Also make all potentially dangerous parts of the appliance, safe, above all for children who could play with the appliance.
18 The vitreous china hob is resistant to temperature fluctuations and shockproof. Remember however that sharp kitchen tools or cutters may break the surface of the hob. If this happens, unplug the cooker immediately from the mains and call your local servicing centre.
19 Remember that the cooking surface remains hot for at least half an hour after you switch off the surface. Do not place containers or other objects on the hot surface.
20 Avoid setting anything on the glass surface of the cooktop.
21 Do not turn on the cooking surfaces if there are sheets of aluminium foil or plastic on the hob.
22 Keep away from the hot surfaces.
23 When using small electrical household appliances close to the hob, ensure that the power cable does not rest on the hot surfaces
24 Keep pot handles turned inwards to avoid knocking the pot off the hob.
25 When you turn on the cooking surface always place a pot on the surface immediately as it will otherwise overheat very quickly and possibly damage the heating elements.
26 Preliminary instructions. The glass sealant utilised may leave traces of grease on the glass. Remember to wipe these away with a normal non abrasive detergent before you turn on the appliance. During the first few hours of use there may be a smell of rubber which will disappear very quickly.
27 When the appliance is in use, the heating elements and some parts of the oven door become extremely hot. Make sure you don't touch them and keep children well away.
28 Make sure the knobs are in the "·"/"o" position when the appliance is not in use.
29 If the cooker is placed on a pedestal, take the necessary precautions to prevent the same from sliding off the pedestal itself.
The following instructions should be read by a qualified technician to ensure that the appliance is installed, regulated and technically serviced correctly in compliance with current regulations.
Important: The power supply to the appliance must be cut off before any adjustments or maintenance work is done on it.
Positioning
The cooker is manufactured with type X degree protection against overheating.
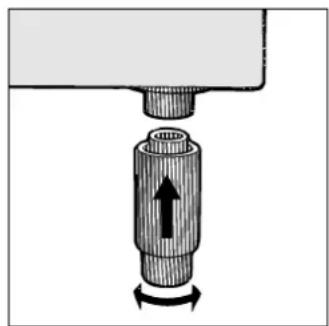
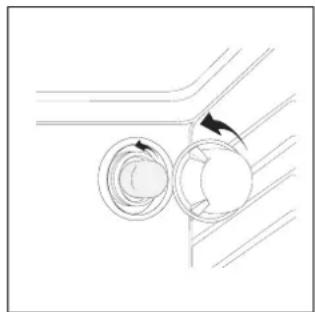
Levelling Your Appliance (only on certain models)
4 support feet which are adjusted using screws are located in the lower part of the cooker. These level off the oven when necessary. It is essential that the cooker be standing level.

Mounting the legs (only on certain models)
Press-fit legs are supplied which fit under the base of your cooker.
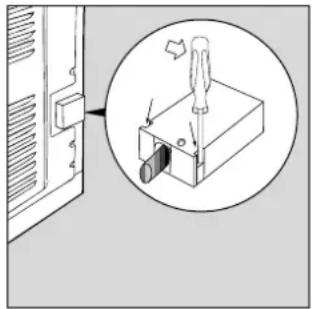
Fitting on a Power Supply Cable
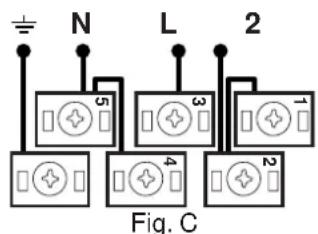
Opening the terminal board:
- Using a screwdriver,prise on the side tabs of the terminal board cover;
- Pull open the cover of the terminal board.
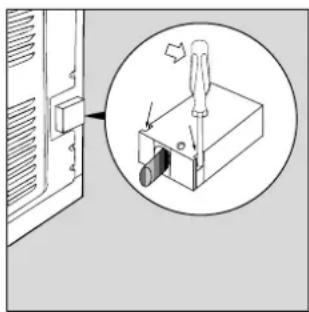
To install the cable, proceed as follows:
- unscrew the wire clamp screw and the contact screws
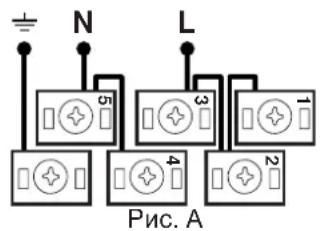
Note: the jumpers are factory-set for a single-phase 230V connection (Fig. A).
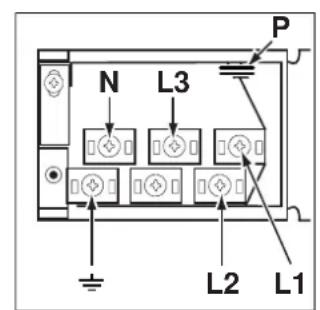
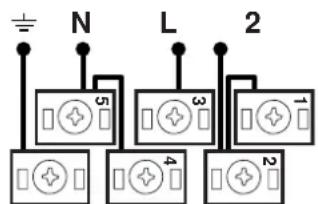
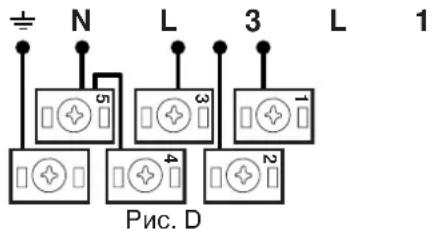
to make the electrical connections illustrated in fig. C and fig. D, use the two jumpers housed in the box (fig. B - reference "P") - fasten the supply cable in place with the clamp and close the cover of the terminal board.

230V 1N~ H07RN-F 3x4 CEI-UNEL 35364
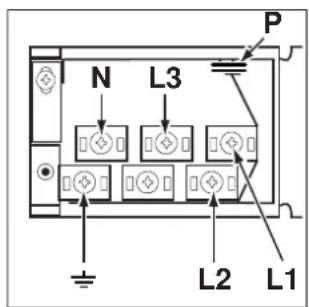
Fig.B
400V 2N~ H05RR-F 4x2.5 CEI-UNEL 35363
L 1

400V 3N~ H05RR-F 5x2.5 CEI-UNEL 35363
L 1
Connecting the supply cable to the mains
Install a standardised plug corresponding to the load indicated on the data plate. When connecting the cable directly to the mains, install an omnipolar circuit-breaker with a minimum contact opening of 3mm between the appliance and the mains. The omnipolar circuit breaker should be sized according to the load and should comply with current regulations (the green-yellow earth wire should not be interrupted by the circuit breaker). The supply cable should be positioned so that it does not reach a tempera
ture of more than 50^ with respect to the room temperature, anywhere along its length.
Before making the connection, check that:
-
the limiter valve and the home system can support the appliance load (see data plate);
-
the mains are properly earthed in compliance with current directives and regulations;
- there is easy access to the socket and omnipolar circuit breaker, once the hob has been installed.
Technical Characteristics
Oven
Dimensions (HxWxD): 32x40x43.5 cm
Volume: 56 Litres
Max. Oven Power Absorption: 2250 W
Innder dimensions of the plate plate warmer:
Width: 46 cm
Depth: 42 cm
Height: 8.5cm
Ceramic Hob
Back Right: 2100 W
Front Right: 1200 W
Front Left: 1700 W
Back Left: 1200 W
Hob Ceramic absorption Max: 6200 W
Voltage and Frequency
230V/400V 3N~50/60 Hz
ENERGY LABEL
Energy consumption for Forced convection
heating mode: Fan assisted
Declared energy consumption for Natural convection Class
heating mode: Convection

This appliance conforms with the following European Economic Community directives:
- 73/23/EEC of 19/02/73 (Low Voltage) and subsequent modifications;
- 89/336/EEC of 03/05/89 (Electromagnetic Compatibility) and subsequent modifications;
- 93/68/EEC of 22/07/93 and subsequent modifications.
Cooker description
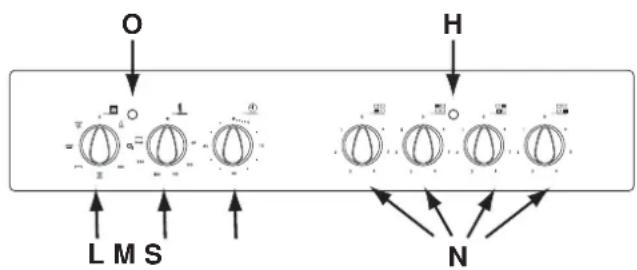
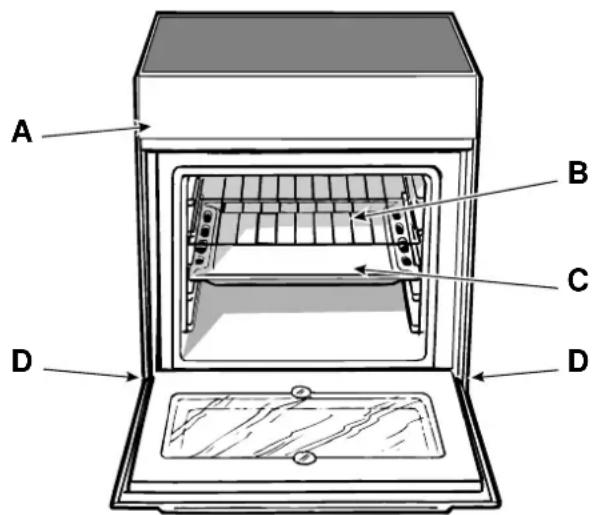
A Control Panel
B Oven Rack
C Dripping Pan or Baking Sheet
D Adjustable Feet
H Electric hotplate indicator light
L Selector Knob
M Thermostat Knob
N Electric hotplate control knobs
O Thermostat Light
S Timer knob
How To Use Your Appliance
The various features of cooker are controlled through the knobs and buttons located on the control panel.
Attention: The first time you use the oven we recommend that you set the thermostat on the highest setting and leave the oven on for about a half of an hour with nothing in it. Then, open the oven door and let the room air. The odour that is often detected during this initial use is due to the evaporation of substances used to protect the oven during storage and until it is installed.
Attention: Only use the bottom shelf of the oven when using the rotisserie to cook (where present). For all other types of cooking, never use the bottom shelf and never place anything on the bottom of the oven when it is in operation because this could damage the enamel. Always place your cookware (dishes, aluminium foil, etc. etc.) on the grate provided with the appliance inserted especially along the oven guides.
The Oven Control Knobs
This multi-function oven combines the advantages of traditional convection ovens with those of the more modern fan assisted models in a single appliance.
It is an extremely versatile appliance that allows you to choose easily and safely between 5 different cooking modes. The various features offered by the oven are selected by means of selector knob "L" and thermostat "M" situated on the control panel.
"Defrosting" Mode
Position of thermostat knob "M": any
The fan located on the bottom of the oven makes the air circulate at room temperature around the food. This is recommended for the defrosting of all types of food, but in particular for delicate types of food which do not require heat, such as for example: ice cream cakes, cream or custard desserts, fruit cakes. By using the fan, the defrosting time is approximately halved. In the case of meat, fish and bread, it is possible to accelerate the process using the "multi-cooking" mode and setting the temperature to 80^ - 100^ .
Convection Mode
Position of thermostat knob "M": between 60^ and Max. On this setting, the top and bottom heating elements come on. This is the classic, traditional type of oven which has been perfected, with exceptional heat distribution and reduced energy consumption. The convection oven is still unequalled when it comes to cooking dishes made up of several ingredients, e.g. cabbage with ribs, Spanish style cod, Ancona style stockfish, tender veal strips with rice, etc. Excellent results are achieved when preparing veal or beef-based dishes as well (braised meats, stew, goulash, wild game, ham etc.) which need to cook slowly and require basting or the addition of liquid. It nonetheless remains the best system for baking cakes as well as fruit and cooking using covered casserole dishes for oven baking. When cooking in convection mode, only use one dripping pan or cooking rack at a time, otherwise the heat
distribution will be uneven. Using the different rack heights available, you can balance the amount of heat between the top and the bottom of the oven. Select from among the various rack heights based on whether the dish needs more or less heat from the top.
Fan Assisted Mode
Position of thermostat knob "M": Between 60^ and Max. The heating elements, as well as the fan, will come on. Since the heat remains constant and uniform throughout the oven, the air cooks and browns food uniformly over its entire surface. With this mode, you can also cook various dishes at the same time, as long as their respective cooking temperatures are the same. A maximum of 2 racks can be used at the same time, following the instructions in the section entitled: "Cooking On More Than One Rack". This fan assisted mode is particularly recommended for dishes requiring a gratin finish or for those requiring considerably prolonged cooking times, such as for example: lasagne, pasta bakes, roast chicken and potatoes, etc... Moreover, the excellent heat distribution makes it possible to use lower temperatures when cooking roasts. This results in less loss of juices, meat which is more tender and a decrease in the loss of weight for the roast. The fan assisted mode is especially suited for cooking fish, which can be prepared with the addition of a limited amount of condiments, thus maintaining their flavour and appearance.
Desserts: the fan assisted mode is also perfect for baking leavened cakes.
Moreover, this mode can also be used to thaw quickly white or red meat and bread by setting the temperature to 80^ . To thaw more delicate foods, set the thermostat to 60^ or use only the cold air circulation feature by setting the thermostat to 0^ .
"Top" oven|
Position of thermostat knob "M": Between 60^ and Max. The top heating element comes on.
This mode can be used to brown food at the end of cooking.
Grill
Position of thermostat knob "M": Max
The top heating element and the turnspit come on.
The extremely high and direct temperature of the grill makes it possible to brown the surface of meats and roasts while locking in the juices to keep them tender. The grill is also highly recommended for dishes that require a high temperature on the surface: such as beef steaks, veal, rib steak, filets, hamburgers etc...
Always leave the oven door ajar during cooking, except when using the turnspit.
Some grilling examples are included in the "Practical Cooking Advice" paragraph.
Fan Assisted Grill
Position of thermostat knob "M": between 60^ and 200^ . The top central heating element and the fan come on. This combination of features increases the effectiveness of the unidirectional thermal radiation of the heating elements through forced circulation of the air throughout the oven. This helps prevent food from burning on the surface, al
lowing the heat to penetrate right into the food. Excellent results are achieved with kebabs made with meats and vegetables, sausages, ribs, lamb chops, chicken in a spicy sauce, quail, pork chops, etc.
All "gratin" cooking must be done with the oven door shut. This mode is also ideal for cooking fish steaks, like swordfish, tuna, grouper, stuffed cuttlefish etc.
The turnspit
To start the turnspit, proceed as follows:
a) place the oven tray on the 1st rack;
b) insert the special turnspit support on the 3rd rack and position the spit by inserting it through the special hole into the turnspit at the back of the oven;
c) start the turnspit using knob "L" to select setting
The oven light
Set knob "L" to the symbol to turn it on. It lights the oven and stays on when any of the electrical heating elements in the oven come on.
Thermostat Light (O)
This light indicates that the oven is heating. When it turns off, the temperature inside the oven has reached the setting made with the thermostat knob. At this point, the light will turn on and off as the oven maintains the temperature at a constant level.
Timer Knob (S)
In order to use the timer, it must be wound by turning the "S" knob almost one complete turn in the clockwise direction . Then, turning it back set the desired time by lining up the number for the minutes with the mark on the control panel.
The oven offers a wide range of alternatives which allow you to cook any type of food in the best possible way. With time you will learn to make the best use of this versatile cooking appliance and the following directions are only a guideline which may be varied according to your own personal experience.
Preheating
If the oven must be preheated (this is generally the case when cooking leavened foods), the "fan assisted" mode
can be used to reach the desired temperature as quickly as possible in order to save on energy.
Once the food has been placed in the oven, the most appropriate cooking mode can then be selected.
Cooking on More Than One Rack
If you have to cook on more than one rack at the same time, use only the "fan assisted mode" ± which is the only one that is appropriate for this type of cooking.
- The oven is fitted with 5 racks. During fan assisted cooking, use two of the three central racks; the lowest and highest racks receive the hot air directly and therefore delicate foodstuffs could be burnt on these racks.
- As a general rule, use the 2nd and 4th rack from the bottom, placing the foodstuffs that require greater heat on the 2nd rack from the bottom. For example, when cooking meat roasts together with other food, place the roast on the 2nd rack from the bottom and the more delicate food on the 4th rack from the bottom.
- When cooking foodstuffs that require differing times and temperatures, set a temperature that is somewhere between the two temperatures required, place the more delicate food on the 4th rack from the bottom and take the food requiring less time out of the oven first.
- Use the dripping pan on the lower rack and the grid on the upper;
Using the Grill
This multi-function oven offers you 2 different grilling modes.
Use the "grill" mode with the oven door ajar, placing the food under the centre of the grill (situated on the 3rd or 4th rack from the bottom).
To catch any fat and/or grease that may drip from the rack, place the dripping pan provided on the first rack from the bottom.
When using this mode, we recommend you set the energy level to the highest setting, even though lower levels can be set, simply by adjusting the thermostat knob to the desired level.
In models fitted with a rotisserie, you can use the spit kit provided when using the "grill" mode. In this case, cook with the oven door shut, placing the spit kit on the third oven rack from the bottom and the dripping pan on the bottom rack to collect any sauce and/or dripping fat.
Setting "fan assisted grill",only with the oven door shut, is extremely useful for grilling foods rapidly, as the distribution of heat makes it possible not only to brown the surface, but also to cook the bottom part.
Moreover, it can also be used for browning foods at the end of the cooking process, such as adding that gratin finish to pasta bakes, for example.
When using this mode, place the grid on the 2nd or 3rd oven rack from the bottom (see cooking table) then, to prevent fat and grease from dripping onto the bottom of the oven and thus smoke from forming, place a dripping pan on the 1st rack from the bottom.
Important: always use the grill with the oven door shut. This will allow you both to obtain excellent results and to save on energy (approximately 10% ).
When using this mode, we advise you to set the thermostat to 200^ , as it is the most efficient way to use the grill, which is based on the use of infrared rays. However, this does not mean you cannot use lower temperatures, simply by adjusting the thermostat knob to the desired temperature.
Therefore the best results when using the grill modes are obtained by placing the grid on the lower racks (see cooking table) then, to prevent fat and grease from dripping onto the bottom of the oven and smoke from forming, place a dripping-pan on the 1st oven rack from the bottom.
Baking Cakes
When baking cakes, always place them in a preheated oven. Make sure you wait until the oven has been preheated thoroughly (the red light "O" will turn off). Do not open the oven door during baking to prevent the cake from dropping. In general:
Pastry is too dry
Increase the temperature by 10^ and reduce the cooking time.
Pastry dropped
Use less liquid or lower the temperature by 10^
Pastry is too dark on top
Place it on a lower rack, lower the temperature, and increase the cooking time.
Cooked well on the inside but sticky on the outside
Use less liquid, lower the temperature, and increase the cooking time.
The pastry sticks to the pan
Grease the pan well and sprinkle it with a dusting of flour or use greaseproof paper.
I used more than one level (in the function "ventilated oven") and they are not all at the same cooking point
Use a lower temperature setting. It is not necessary to remove the food from all the racks at the same time.
Cooking Pizza
For best results when cooking pizza, use the "fan assisted" mode:
- Preheat the oven for at least 10 minutes;
- Use a light aluminium pizza pan, placing it on the grid supplied with the oven. If the dripping pan is used, this will extend the cooking time, making it difficult to get a crispy crust;
- Do not open the oven door frequently while the pizza is cooking;
- If the pizza has a lot of toppings (three of four), we recommend you add the mozzarella cheese on top halfway through the cooking process.
- When cooking pizza on two racks, use the 2nd and 4th with a temperature of 220^ and place the pizzas in the oven after having preheated it for at least 10 minutes.
Cooking Fish and Meat
When cooking white meat, fowl and fish, use temperature settings from 180^ to 200^ .
For red meat that should be well done on the outside while tender and juicy in the inside, it is a good idea to start with a high temperature setting (200^ - 220^) for a short time, then turn the oven down afterwards.
In general, the larger the roast, the lower the temperature setting. Place the meat on the centre of the grid and place the dripping pan beneath it to catch the fat.
Make sure that the grid is inserted so that it is in the centre of the oven. If you would like to increase the amount of heat from below, use the low rack heights. For savoury roasts (especially duck and wild game), dress the meat with lard or bacon on the top.
Practical advice for using the electric plates
The control knobs for the hob electric hotplates (N)
The cookers can be fitted with normal and rapid electric hotplates in a variety of combinations (the rapid hotplates can be distinguished from the rest by the red boss in the centre of the same). To avoid any heat loss and damage to the hotplates, we advise you to use pans with a flat bottom, with a diameter which matches that of the hotplate itself. The table contains the different settings indicated on the knobs and the use for which the hotplates are recommended.
| Setting | Normal or Fast Plate |
| 0 | Off |
| 1 Cooking vegetables, fish | |
| 2 | Cooking potatoes (using steam) soups, chickpeas, beans. |
| 3 | Continuing the cooking of large quantities of food, minestrone |
| 4 Forasting (average) | |
| 5 Forasting (above average) | |
| 6 | For browning and reaching a boil in a short time. |
Electric hotplate indicator light (H)
This light comes on when any of the electrical hotplates on a hob which features electric hotplates have been turned on.
User's instructions the ceramic hob
Description
The hobs have been provided with radiant electric heaters. These heaters are incorporated under the surface of the hob as zones which redden while they are in use.
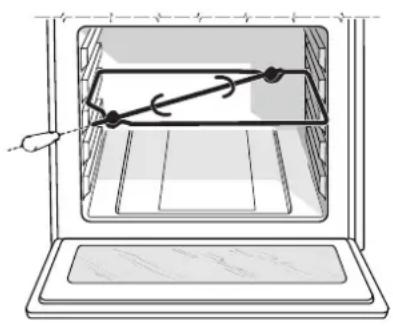
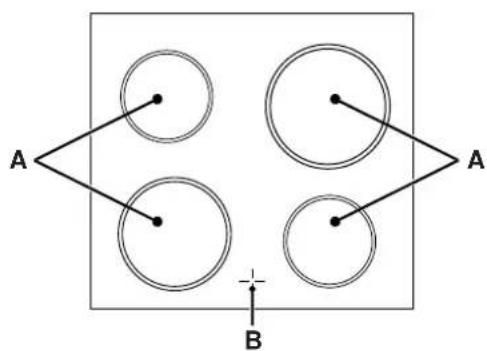
A. Cooking area (A).
B. A lights which indicate whether the corresponding heaters are at a temperature in excess of 60^ ; even if the hob/zone has been switched off.
Description of the heating elements
The radiant heating elements are composed of circular heating elements. They only become red after being turned on for 10-20 seconds.
Instructions for using the pyroceram top
To obtain the best results from your hob, there are some basic rules to follow when cooking or preparing food.
- All types of pots and pans may be used on the ceramic glass cooktop. However, the bottom surface must be perfectly flat (see Fig. A). Naturally, the thicker the bottom of the pot or pan, the more uniformly the heat is distributed.
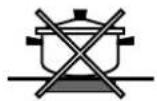
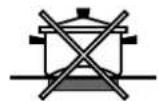
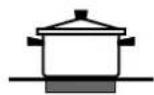
Fig. A
Make sure that the base of the pan completely covers the cooking ring, so as to make full use of the heat produced (Fig. B)
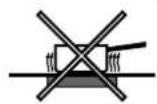
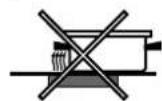
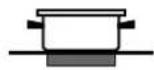
Fig.B
Always make sure that the pan base is always dry and clean so as to guarantee proper contact as well as longer-lasting pans and the long life-span of the hob.
- Do not use the same pans which are used for cooking on gas burners. The heat strength of gas burners may deform the pan base and will not give the same results if it is subsequently used on a glazed ceramic hob.
| Selector knob setting | Food to be cooked | Weight (in kg) | Cooking rack position from bottom | Preheating time (minutes) | Thermostat knob setting | Cooking time (minutes) |
| Defrosting | All frozen food | |||||
| Convection | Duck | 1 | 3 | 15 | 200 | 65-75 |
| Roast veal or beef | 1 | 3 | 15 | 200 | 70-75 | |
| Pork roast | 1 | 3 | 15 | 200 | 70-80 | |
| Biscuits (short pastry) | - | 3 | 15 | 180 | 15-20 | |
| Tarts | 1 | 3 | 15 | 180 | 30-35 | |
| Fan assisted | Pizza (on 2 racks) | 1 | 2-4 | 15 | 220 | 15-20 |
| Lasagne | 1 | 3 | 10 | 200 | 30-35 | |
| Lamb | 1 | 2 | 10 | 180 | 50-60 | |
| Roast chicken + potatoes | 1 | 2-4 | 10 | 180 | 60-75 | |
| Mackerel | 1 | 2 | 10 | 180 | 30-35 | |
| Plum-cake | 1 | 2 | 10 | 170 | 40-50 | |
| Cream puffs (on 2 racks) | 0.5 | 2-4 | 10 | 190 | 20-25 | |
| Biscuits (on 2 racks) | 0.5 | 2-4 | 10 | 180 | 10-15 | |
| Sponge cake (on 1 rack) | 0.5 | 2 | 10 | 170 | 15-20 | |
| Sponge cake (on 2 racks) | 1.0 | 2-4 | 10 | 170 | 20-25 | |
| Savoury pies | 1.5 | 3 | 15 | 200 | 25-30 | |
| Top Oven | Browning food to perfect cooking | -3/4 | 15 220 - | |||
| Grill | Soles and cuttlefish | 1 | 4 | 5 | Max | 8-10 |
| Squid and prawn kebabs | 1 | 4 | 5 | Max | 6-8 | |
| Cod filet | 1 | 4 | 5 | Max | 10 | |
| Grilled vegetables | 1 | 3/4 | 5 | Max | 10-15 | |
| Veal steak | 1 | 4 | 5 | Max | 15-20 | |
| Cutlets | 1 | 4 | 5 | Max | 15-20 | |
| Hamburgers | 1 | 4 | 5 | Max | 7-10 | |
| Mackerels | 1 | 4 | 5 | Max | 15-20 | |
| Toasted sandwiches | n.° 4 | 4 | 5 | Max | 2-3 | |
| Fan assisted grill | Grilled chicken | 1.5 | 3 | 5 | 200 | 55-60 |
| Cuttlefish | 1.5 | 3 | 5 | 200 | 30-35 |
NB: cooking times are approximate and may vary according to personal taste. When cooking using the grill or fan assisted grill, the dripping pan must always be placed on the 1st oven rack from the bottom.
Disconnect the oven from the source of electricity before performing any maintenance or cleaning. To ensure a long life for your oven, clean it frequently and carefully, keeping in mind that:
-
Do not use steam equipment to clean the appliance.
-
the enamelled parts and the self-cleaning panels should be washed with warm water without the addition of abrasive powders or corrosive substances which could damage the finish;
- stainless steel may become marked if it comes into contact with very hard water or harsh detergents (containing phosphorous) for long periods of time. After cleaning, it is advisable to rinse thoroughly and dry. It is also recommended to dry any water drops;
- avoid dirt and grease accumulating on the control panel by cleaning it frequently. Use non-abrasive sponges or soft cloths to avoid scratching enamelled or shiny steel parts.
Cleaning the hob surface
Prior to cooking, the hob surface should always be cleaned using a damp cloth to remove any dust or stray food particles. The hob surface should be regularly cleaned with a lukewarm solution of water and a mild detergent. Periodically it may be necessary to use a proprietary ceramic hob cleaner. First remove all spilt food and fat with a window scrape, preferably the razor blade type CERA (not supplied) or, failing that, the fixed blade razor edge type (see Fig. A). Then clean the hob while it is still warm to the touch with a suitable cleaner and paper towel.
Then rinse it and wipe it dry with a clean cloth. If aluminium foil or plastic items are accidentally allowed to melt on the hob surface they should be immediately removed from the hot cooking area with a scraper. This will avoid any possible damage to the surface. This also applies to sugar or any food with a high sugar content.
Do not use abrasive sponges or scourers of any type. Corrosive cleaners such as oven sprays and stain removers should also not be used (see Fig. B).
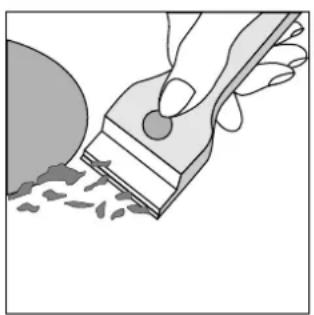
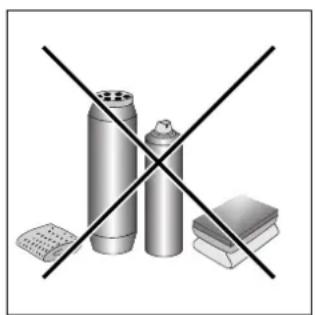
Fig.A Fig.B
| Glass ceramic hob cleaners | Available from |
| Window scraper Razor blade scrapers | DIY Stores |
| Replacement blades DIY Stores | supermarkets,chemists |
| COLLO lunetaHOB BRITEHob CleanSWISSCLEANER | Boots, Co-op stores,department stores, Regional Electricity Company shops,supermarkets |
Replacing the Oven Lamp
- Disconnect the oven from the power supply by means of the omnipolar switch used to connect the appliance to the electrical mains; or disconnect the plug if it is accessible.
- Remove the glass cover of the lamp-holder.
- Remove the lamp and replace it with a lamp resistant to high temperatures (300^) with the following specifications:
-Voltage:230V
-Wattage:25W
- Socket: E14
- Replace the glass cover and connect the oven to the mains.
IIO6eCneHn 3ofoekTNBHOCTn 6e3OanCHOCTn DaHHOrO n3dJIINr:
- ośpaañTecb Tólbko B ynoJHOMOeHHbIe ΚeHTpbI TexHnueckoro 06cnykBaHnA
- Bcernde Tpe6yIte yctAHOBky opnHnHaNbHbIX 3anaChbIX YacTei
1 DAnHoe H3dEne npEHa3NaeTc dIg HenpopeccnHaBHorO nCNoJIb3OBaHH BDOMaUHX yCNOBHX.
2 Npeed HauJOM 3KcNpyataun DaHHoro n3dennpekomeHdyetc BHNMaTeIbHO npOHTaB NHCTpykuu, codepkaueecr B daHHOM pyKOBoDCTBE, ppeoCTabJIHOuue Baxhble peKomeHdaun no 6e3OnacHomy ocUeCTBneHIOMOHTXa, 3KcNpyataun INTexHnueckoro 06CnyJxBAHNA. BepexHo coxpaHnte daHHoe pyKOBoDCTBO dnn erO KOHCynbTaun B 6dyuem.
3 Nocne Toro, KaK Bb ocBodOte MaunHy OT ynakOBKn, Y6eHntEcB TOM, CTO MaunHa He nobpeXdeHa. Br cyae comHeHn He nol3yTeCb H3dIeHmN ObaTteCk KBAaHnFUnIOPOBaHOMy TexHky. ActnyynakOBKn (PiactMacCOBBie MeuK, BCNEHeHHb IONiCTnPoJ, TBO3n I T.D.) He dOKhHi NonaDabT B pykn DeTak KaK 3TN MaTePnaJIb PnpctTabnhot COoB IOTEHUNAbHyHOAnchOCTb.
4YctaHObKa DoJXHa 6bTb BbIOnHeHa KBaIINΦuNpObaHHbIM NepcoHaNOM B COOTBeTCTBm C IHCTpyKUmaM NPOUN3BOIDTeJI. HenpaBnBHa YcTaHObKa MoKe T npUHnHTb yUepe5 IIOdM, XIBOTHbIM INI MMyIecTBy, 3a KOtOpbl PON3BOIDTeJIb He Hecet HNKAKO OTBETCTBEHNCTO.
53neKtpueckra 63onacHocT daHORIO n3dEINRA rapaHTnpyetc TOnbKO, ECNI OHO npABINbHO NOCDoeINHEO K HADeKHO CnCTeMe 3a3emLeHnB B COOTBeTCTBmC D EIECTBYUoIMM npABINAMN 3JeKTPueckco 63onacHocT He06xOIMMO pOBepNT Co6NIODeHne 3TOBOaxHO Tpe6oBAHnI IO 63onacHocT N B CnYae COMHeHn IOpuyntb TtateNBHyIO pOBepKy CnTeMb KBaINΦuIPoBAHHomy nepCOHaY. PpON3BOITeJIb HE Hecet OTBEcTBHeHHOCn 3a Bo3MOXhB yuepe6, BB3BaHHbO TcYcTbEM 3a3emHeHn 3JeKTPueckoro n3dEINRA
6 Penei nOIOeOIHeHMe 3NEKTPnueckoro N3dEInna IPOBepbTe, YTO6bl DaHHbIe, yKa3aHHbIe Ha 3aBOcKO Ta6nUKe, COOTBeTCTBOBaNn XapakTEpNCtIKAMn CETn 3NEKTPoNTaHnR.
7IPOBepntb, cy6bI NOTpe6JIeHHe 3eKtpo3Heprnn 3eKtpuueckoro H3JENIA H3JEKNTPUeCKNX PO3eTOK COOTBeTCTBOAJO MAKCMmaHBHO MOIOCTN H3dEINRA, yka3aHHo HA 3aOBDCKo TAbnue. B Cnyuae comHEHIO6paTNTecb K KBaINΦnUPOBAHOMy CneuaHNTcy.
8IpnMOHTaKe HeJeHNe HcO6xOJIMo YcTaHOBnTB MHorOnOJIrpHbip pa3beINHITeJB C pacCToHHeM MeKdy KOHTaKTAMpaBHbIM NIN 60nbwe 3 MM.
9Bcnyae HecoBmecTImOcTN 3eKTPop03eTKI 3eKTPoBNIKI 13eHnnpyHbT 3ameHy p03eTKI hApyTu, npiroDhyko, kaaHnHnPOBaHOMy nepcoHany. B cactHOCTN 3eKTPNK DIOJKeH nPobeprTB, Tc6bI cceHeH npOBOD 3eKTPop03eTKI COBTBcTcBOBAI NOIIOaEMoM OMOHOCn 3eKTPnHECkOHO 13eHnne. Ka npabilo HpeKoMeHdyETcNtONb3OBaTB npexoHNKn, TpOHHKn uINu yDNNHITeIN. Ppi Heo6xOIMOCnB INCNOLb3OBAHn BblEkyKa3aHHbIX yCTpoiCTB CNEyEt NcNOB3OBaTB ToNbKO npocTbe IIN MHOKeCTBeHHbIe NpeXoDHNIu YdNNHHTeIN, COOTBEcTByOuUe JeNCTByOuMM HopmatnBAM No 6e3OaNCHOTn. Ppi 3Tom BaxHo He pBeBHuaTb PpeEn paXoda No 3HaueHIO TOKA yKa3aHHbI Hn pOCTOM NpeXoDHNIke NIn yDNNHITeJI, MAKCMaNbHyIO MOUHOCbY, yKa3aHHyo HA MHOKeCTBeHHOM nepoxDHNIke.
10B nepno npocto n3deJn oTcoeHnHte ero ot cetn 3neKtponntaHn. BbIKIOHTe rnaHBn pa3beHNHTenb 3neKtpueckoro n3deJn, kOrda OHO He nCNoJIb3yETcR.
11 He 3akpbIbaiTe BeHTnlaOnHHbIe OTBepCTn IIN peWetKn paccenBaHn Tennla;
12 PJIb3OBaTeIb He dONKeH cAmocToIeJIbHO 3aMeHrTb npoBOD 3JNEKTPoINITAHmDAHHORIO n3DeNn. B cnYae NOpeXeHnI npOBOda 3NeKTPoINITAHm HIN IIN IER eO 3aMeHbI OpaAaIteCb TOnIbKO B CEHTp TEXHNecKOrO ObcnykBaHn, yONHMOHeHbI pOn3BDoNTeMe N3DeNn.
13 DaHHoe N3dEne DoNkHO IcNOb3ObaTcBcra NckIOHHTeBHO B cIeX, dIa KOTOpbIX OHO 6bILO CnpoEKtupoBaHO. IIOBOe Dpyroe erO IcNoB3OBAHHe (HanpIMep, OTONNEHnne NOMEUeHN) CHITAErCe HEHaNDKExAumIM nCIEoBOATEbHO ONaChbIM. POni3BOIDTeB He HecetOTBETCTBEHHOCTHa BO3MOxHBy Uyep6, Bb3BaHbHnHe HaNDKexAumm, HnpeBaINbHbIM HEPa3YMHbIM NcNOB3OBAHMeM N3dEInr.
14Pn nCnoJb3OBAHnIHO6oTo 3NeKTpnpn6opa Heo6xoJMo co6JIIOaTb HEKOtOpBle OCHOBHbIe npabHa. B qactHOCTn:
- He npKacaiTecb K 3JneKTponpnpOpy MOKpbIMN ININ BnaXHbIMN pykAMN ININ C MOKpbIMN HOrAMN.
-He nonb3yITecb 3JekTpnpn6opom C 6ocbIMHOrAM
-нсплььтугудунштейн Тольк В слуае Крайн Heo6хоюмoctn
He TAHITE 3a npoBOD 3NeKtpoNHTaHnIg 3NeKtpoPnp6opa HIN 3a cam 3NeKtpoPnp6op DnE rO tCOeHNHeHr O T3NeKtpoP03ETKn.
He noDBepraTe 3neKTPonpnp6Op BO3eNCTBnIO aTMocΦepHbIX OcaIKOB (IOxDb, COJIHnce I T.D.)
He pa3pewaite Detam HJIN Heeecnoc6bHIM IucaM NOlb30BaTbC3nEKTponpnp6opom 6e3 npncmOTpa
15 NpeoocyueceBHeHemcTknNInTexHnueckoroobCnykBaHnna 3eKTPponpnpopa OTOcoeMHNTeeroOTcETn 3JeKTPponHTaHnB, BbHyB BNIKY n3 pO3eTKn INI pni NOMOUs ObEero BbKIOHouTeJIa.
16 Nel caso in cui si rompa la superficie del vetro, scollegare immediatamente l'apparechio. Per l'eventuale riparazione rivolgersi solamente ad un centro di assistenza tecnia autorizzato e richiedere l'utilizzo di ricambi originali. Il mancato rispetto di quando sopra put compromettere la sicurezza dell'apparechio.
17No 3aBepWeHm cpoKa cnYk6bl DaHHorO n3dennpeKOMeHyTeTc BbIECTn erO n3 CTPOR,OBpeaAB PPOBOD 3NEKTPONITAHN,BbHYB NepeD 3TNM BNIKy n3 PO3eTKn.KPOME TORO peKOMeHyTeC O63BpeDnTB NOTeHuaNBHO ONaChIe YacTn n3dennB OC06eHHocTn DnTeTn KOTOpBe MOrT NcONb3oBaTb BBiBeDeHHb N3 CTPOR 3NEKTPOnpnpOp DnI rIPbI.
16 B cnyuae pa36nBaHnra cTeKnHnO nobepxHocTn He3aMeDnTebHO OTcoeHNHe NTbOpOTcTn 3NeKTPoNTaHn. JIra BbIOJIHeHnpeMOHTbIX paobT o6paAaTecB TOnkBO yyONHOmeHHbIy CEHTP TexHueckoro 06cnYknBaHnI N Tpe6yIte YCTAHOBKn OPINHAnbHbIX 3aNaChbIX qacte. HecobNIODeHne BblweyKa3aHHbIX peKomeHaaun MoKeT CKOMnpometupoBaT 630nacHoe FyHKUHOHPOBaHn H3dEInr.
18 Tbepa CTeKIOkepAMUecka BapOHaA NaHeIb AINrEcTa yToHBO K cAukam TempeaTypb IN K yDapam. Tem He MeHee CnEyET NOMHTb, YTO Ne3Bn INN OCTPbe KxyOHhble PnpBOpbMOTy NOBpeNTb NobepXHOCTb BApOHOH naHEIN. Bcnyae NobpeXDeHnIOBepXHOCTB BApOHOH naHEIN He3aMeIITneBHO BbHbTe BNKy KxOHHOII NTb IN3 PO3ETKN I O6PaTntecb B MecTHbI CEHTp TexHueCKORO 06CNYKBAHn.
19 CnEnyET NOMHNTb, YTO NOBepxHOCTb BapOCHN NaHEIN OCTaETcR ropeH B TeEHNE npIMepHNO NOnyACA NoCne ee BBKIOUeHNA. He CTABTe XpyNKyIO NocdyN H E KNaIITe DpyMe IpeDMtBHa rOpAHyo NOBepxHOCTb.
20 He cneyet CTaBnTB KaKne-Jin6o npEmdTeb Ha cTeKJIaHHyIO NOBepxHOCT BApOCHN NaHeJN.
21 He BkIIOUaHTe KOHOpKn BApOuHOI NaHeJI, ecJn Ha He NExKaT IInCTbI 0JIbR INI INAACTMaccOBBe IpeMeTbI.
22 Depxntecb Ha 6e3oNaChom paCCTOAHN OT TOpRnX NOBepxHOCTe.
23 Pn INCIOJIb3OBAHmMeIINX 6bITOBbIX 3JIeKTPoPnB6OpOB pRDOM C KxOHHOIIHTOJ O6paAaIte BHNMaHHe, YTObI XN IPOBOH He KACANCR RopuHX YacteI NITbl.
24 NOBOPaYBaIe pyKoRtKn KAcTpJIoN bCKOBOpOd TaK, YTo6bI cLyauHHO He 3aJeTb INx IN He ONpOKMHyTb C BapOCHNO NaHeJI.
25 BkIOuINB NOBepXHOCbB BapOHHo NaHEIN, BcERda cpa3y JKe CTaBBte Ha Hee ONDy KAcTPOJIO BO N36ExAHne 6bICTPoro nepepeBa BapOHHo NaHEIN IN NOBpeKdEHnHarpeBaTeHBx 3JeMeHTOB.
26 Npeep nepbBIM BkHoueHnem BapOuHOI naHei. Ha cTeKne MoryT OCTaTbCnEbl repMeTIka, MCNoJIb3OBaHHOrO dIra repMeTn3aUNI BApOuHOI naHEi. He 3a6yDbTe ydaNtB ocTaKN repMeTnKa o6bHbIM Hea6pa3NBbIM MOUIM BeueCTBOM nepeH aHaONM 3KcNpyaTAUNI H3dINIA. B nepbBle cacpobTo I BapOuHOI naHei Bbl MoKeTe NOUYcTBoBaTb 3anax XxHeH pe3HbI. 3TO HopMaJIbHOe RaBHeHne, KOTOpoe 6bICTpo nponaadaet.
27 B npoecce cyhkuohnohpobanra pnnn nn dyxOBKn Docynhbie detann nyxoboro wkaΦa Moryt cnblho harpetbc. He pa3pewaTe deTm np6bnkataBc K dyxOBomy kaФy.
28 Bcerda npoBepnTe, yTo6bI pyKoTkn HaxOunncb B nNoKeHm 一 ^ / 0"Korda n3dene He nCNOb3yETc;
29 Ecn Kyxohna TnTa YcTaHaBnBaTeCra Ha Bo3BbIeHne, Heo6xoImo 3aФнксрOBaTb e HAnEkaUIM O6pa3OM.
PnBBeHHe Hnke nHCTpyKuIN ppeHa3NaYeHbI dNkBAInΦnIpOBaHHOrO yCTaHOBUsIkA dNpOCyUeCTBJIeHnYcTahOBKn, HaJaKn I TexHnueCKOrO 6CnyKuBaHNnPINTbI NaJnxKaUM o6pa3OM C cO6LIODeHneM DeiCTByUoux HOpMaTINBOB.
Baxho: IIO6a onepaunr no peryraun, texnueckomy 06cnykBaHIO n.T.D. DOJXHa npOn3BOoNTbCRA TObko nocne oTOcoeHNHeHHN 3NeKtponpnp6opa ot cetn 3NeKtpoNTaHn.
PacnoJoxeHne
Kyxohna Pnnta Ochaueta CnCTeMo3aunTbO Tpye3mepHoro neperpeBa KnaCca X, noTOMy prdom CkyxOHNoI ToM MoKHO CTaBt Me6bHbIe 3neMeHTbl, Blicota KOToBix He npeBbIaet ypoBeHb BapOCHn NaHeJI.
HnBEnipOBka (NMeETcT OJIbKO B HeKOTOpbIX MOeJIaX)
B HnKHe yactn KxohHNo PntbI pacnoJoxHebl 4 OOnOpHbIE HOKKN CpeRyInpyeMbIM BNHTaMn, KOToPbIE np Heo6xoDMOCTn PO3BOJRAOT ONTUMn3npOBaTb BblpaHBnBaHne KxohHNO PntbI. OueHb BaXHo, YTO6bl KxOHNa PNTa 6blJa yCTaHOBJeHa pOBHO.

YCTaHOBka HOKeK (IMeETcTTOJIbKO B HEKOTOpbIX MOdEJIAX)
KkyxohHOn nnTe npunaraTcHoxKn, BCTabIReMbIe BOCHOBaHHe KxyOHHO nnITbl.

IopcoeHHeHne Ka6eJIa 3NeKtpoNTaHnA
TopaOKOTKpbBaHn3aXmHOn Kopo6Kn:
- Pn NOMOUI OTBeRtK INPUNODHrTb 60KOBbIe WIOHKn KpbIuKN 3aXIMHOJ Kopo6Kn;
-NotaryHbNOTKpbItb KpbIiKy 3axmmHoi Kopo6Kn.
IJIIOIDCOeINHeHnKa6EJI3JIeKTPoNTaHnBbINOJHnTb CJeDyUOuNE Onerpaun:
OTBnHTNTB BNTKabeJIbHOrO 3aXIMMa INBHTbI KOHTAKTOB Pnpmeahne: pa6pnuHag ycTaHOBka nepembyek COOTBeTCTByET MOHOpa3HOMy CoeINHeHIO 230 B (pnc.A).
-ДяocушecTBHeHnAneKeTpueecknx CoeHHeHn, nokaahbixHa pnc.CnD,ncnoIb3oBaTb DBe nepeMbyKn, paonoloxeHHbIe BHyTpN coeHNHTelbHOJ Kopo6Kn (pnc. B-CcblnkA“P”)
3aФИКСИРОВАТь Ka6eJIb 3JIeKTpOПИТаHЯ B CNEUHAльHOM Ka6eJIbHOM 3aXIMe 3aKpbIb KpbIshky.
230V 1N~ H07RN-F 3x4 CEI-UNEL 35364
Pnc.B
400V 2N~ H05RR-F 4x2.5 CEI-UNEL 35363
Pnc.C
400V 3N~ H05RR-F 5x2.5 CEI-UNEL 35363
IopcoeHHeHne npoB0a 3Jektpponp6opa K cetn 3JektponntAHN
NoCoEHNHTe K npoBOy cTahdapTHy 3JeKtpnueckyU BnIky, pacuNTaHHyU Ha Harpy3Ky, yka3aHHyU Ha 3aBODCKoTabNHyKe C daHbIM. B clyuae npraMOro NoCDoeHNHeHry K CETn 3JeKTPoNtAHnR HeO6XoDnMo UcTaHOBnTB MeJdy 3JeKTPoNpNbOpom N cetbU MHOrOIOLOCHbI BblKnIOUaTeJIb C MNHmAlbHbIM paCCTOHnEM MeJdy KOHTaTM 3 MM, pacuNTaHHbI Ha Harpy3Ky I COOTBeTCTByIOUIN DeiCTByIOUIm HopMaTnBAM (KeJTo-3eJIeHbI pPOBD 3a3EmJHnR He DOnJxH npepbBaTbcRA BblKnIOUaTeJIem). PPOBD 3JeKTPoNtAHnR DoJxHnPacnoJaraTbcra TAKIM O6pa3OM, YTO6bI HN B KaKoi ToUke OH He NODBepraNC hArpeBaHnU, ppeBbIaOIoMeMy Temnepatypu nomeHnra Ha 50^
Ipeod ocyuectBHeHnem 3JeKtpnueckoro IOoCoEINHeHn Heo6xoDnmo npOBepntb CneDyUooee:
L & o r p a h u n i t e l b h b i y k n a n a h N D o m a w h r a y C N C T e m a D O N K H b i & 6 2 3 b p a c h i t a h b i h a H a r p y 3 k y I I N T b i (C M O T p e T b 3 a B O D C K Y O & T a b l u v k y C T E X H u e c k I M M D a H H b i M N);
- Cetb 3neKtpoNTaHnI DOJXHa 6bItb OChuEHa HAdeXhBIM 3a3emJIeHnEM COJIacHO HopMaTINBaM U Yka3aHnA M 3akoHODaTeNbCTBa;
3NeKtpnuecka po3eTka nn MHORONIOHCHbI BbIKJIouateNBdoJXHb6bITbJeKOIOCTynHb6e3 Heo6xoDmOCTn pa3bnpaTb 3NeKtponp6op.
DyxoBOn uKaΦ
T6apnTHbpepa3mepbl(BxLxΓ)32x40x43,5cm
Pa6o7a:56nItpoB
MaKc. noIIOuHaemar MOUHocTb dYXOBOrO uKaΦa: 2250 BT
Pa6oynpepa3mepbIyauNkA dIpa3orpeBaHnIu:
UmpnHa cm.46
Iy6Ha cM.42
BbICota CM. 8.5
3neKtpnuecka BapoHnaHeIb
C3aDn cnpaba:2100B
Cnpeeni cnpaba:1200BT
Cnepei ciVeBa:1700 Bt
C3aDn CneBa:1200 Bt
MaKc. norgloaemamouoHoctb 3neKtpueeckO
TABJIYKA C TEXHNUECKMIM DAHHBIMN
PacxOJ 3nEeKtpo3Heprnn npnpHynteHbHOKOBBeKUIN
Функцин HarpeBaHnЯ: 正 BeHTnIupoBaHnOe
DecepT:OTINHbIepe3yIbTaTbIOJNYaHTcnpN BbIneKc KOHNTEPCKNX N3JeINN 13 Tecta,3aMeUHaHHoro Ha INBbIX NN XIMnHeCKNX DpOxxkax.
Функця «ВERTINIPOBaHHbI» MoKET TAKKe NcNoJIb3OBAtbcraДЯ 6bICTpoi pa3MOp03Kn 6eNOro n KpacHoro Mca, Xne6a, yCTaHOBnB Tempepaty 80^ . IЯ pa3MOp03Kn 6OJee DeJIHKaTHbIX npOdyKTob YcTaHOBnTB Tempepaty 60^ INN BKNIOuHTb TOJbKO UnpKyIaIciIO xOJOdHoro BO3dYxa, yCTaHOBnB pyKoTky TepMoCTata Ha 0^
Harpeb cbepxy
KoHdntepcka BbineyKa
Pn BbIeueKoHdntepcknx N3deJnBcerda CneJyET
nomeataB IN B pa3orpeTyO dYxOBky, DOXaBwncb
OKOHuaHnnpedBaNTebHoHarpeBa,
CnHaIN3npyEmoRO BbIKIOUeHnEM KpaCHO lamNoChn "O".
He OTKpbBaTe DBepy dYxOBKn B npOceCE BbIeChk BO
n36exAHne ocEahnN n3deJnN. O6uine peKomeHdaun:
Ecnn npor xopo0o nponeueh chapxu, a BHytpn cbipoi
CokpaTnTe KOJIuYeCTBO XnIaKoCTn npn 3aMeUHbAHn TecTa, yMeHbUHTe TempeaTypy yBeJIuYbTe Bpemr npnroTOBJeHna.
BbIneYka He BbHmaeTcra n3 cOpmbi
OboIbHO npOTpuTe fOpMy MacnOM, a TaKke CnerKa nocbIbTe ee MyKoI nnCnOJb3yIe neprameHTHyO 6ymary dna dyXOBKn
Ecnnpor cJnukom cyxoi
B cIeIyUoIu pa3 noBbIcIte TeMnepaTpy Ha 10°C n cokpaTne BpeM npnroTOBJeHn.
Ecn npor cnilskom cbipoi
B cIeNyUoHn pa3 nobbIcIte TempeaTy pHa 10°C nIN cOKpaTHe KOJIneCTBO XnIDKOCTn npN 3aMeWIBaHn TECTa.
EcnnoBopxHoctbNporaCNIuKOM TEMHA
PomeCTne fOpMy C nporom Ha 6oJee Hn3kn yPOBeHb, yMeHbWInTe TEMpepatypu yBEnuYbTe Bpemr nprirotOBJIeHn.
PnOJHOBpeMeHHOM NcNoJIb3OBAHnn HeCKoJIbKnx yPoBHeN dYxOBKn (BpeXmE "BeHTUNpOBAHbI") pa3MeueHHble Ha Hx npOdyKtby IMeNi pa3HyIO CTeneHb rOTOBHOCTn.
Bb6paTb 60onee Hn3kyIO Tempepatpy. IpOtnBeH, NOMeUeHHbIe B dyXOBky BOHO I TO JKe B peM, MOryT 6bITb BblHyTb B pa3Hoe EpeM.
Bbineyka nucbi
IINr ONTNMaNbHOB BblneUKN NnCUpbl CNeNyET nCNOJb3OBA TbФyHKuHIO “BEHTNJNpOBaHHoe”
- Pa3orpeTb dYxOBky no KpaHne Mepe B TeueHne 10 MmhyT.
- IcnoIb3yIte npOTnBeHb n3 NERKOro aHOMnHn, yctaHaBnBaerho Ha npInaraUOyUocr peWetky. PpN cNoIb3OBaHm INpOTnBEHb BpEmyBbIeKn yDnHReTcR, YTO 3aTpudHreT nonuYeHne XpyCTauei nnucbl.
He cneIyetyacto OTKpbIBaTb dYXOBky B npouecce BBIneukn.
Bcnyae BbIeKn NsucbI c 6bnbHoi HaunHKo (kAnpnuO3a, YtebIpe ce3OHa) peKOMeHNdyETcNIOJXtB Ha Nsucy cbIp MoUaepenBa CpeDInHe BblneKn. - PnBbIeueKe NcUcBi Ha DByx yPoBHX CneDeyETNcIOJIb3OBAtB 2-0n 4-bi yPoBHN CTempePaTypo 220°C IN NOMeCTNTb NcUcCy B DxyOBky, pa3oRpeB ee neped 3TmIM npIMepHO B TeueHHe 10 MNHyT.
PnroToBJeHne pb6bI mca
Benoe mco, nTuCy u pbl6y cneJyET 3aneKaTb npu TemnepaType oT 180^ do 200^
Дя npirotoBHeHЯ KpacHO rMaCa, XopoWo npoxapeHHoro ChapyKи COHoro BHyTpN, CneJyET BaHauane yctahOBnTb BBICOKyIO TeMpepaTyPy (200^ - 220^) B TeueHne KOpOTKOro BpemeHn, 3aTeM noHN3NTb TempepaTyP.
O6bHNO, yem KpynHee KycOK 3aneKaemOro Mra, TeM DOnbWe 6yDet erO npiroTOBJeHne npn Hn3KoI TemNepaType. IomeCTnte KycOK Mca B ceHTp peWetKn U yctahOBInTe NOd peWetKy IpOTNBeHb dJn c6Opa Jnpa. YcTaHOBInTe peWetKy TAKIM O6pa3OM, YTO6bl MRCO HaxOuINOcB U CEHTpe DxyOBKn. EcnT pTe6ByTcNoJyUHTb 60JIbWiHarpeB CHN3y, YcTaHOBInTe peWetKy Ha HnXHHe HAnpabJIOUe. JnI npiroTOBJeHnApomATHoro 3aneueHoro Mca (BOCoBeHHocTnyTKn iDnu) CneJyET 6bNOxNtB KycOK Mca KycOuKaMn Cana Nn KopeKn n paCnoJIOXNtB eRrHa BepxHem yPoBHe DxyOBKn.
IpaKTHueckne peKOMeHdaaunno nO nCnOJb3OBaHNo CTeKIOKepaMnuecko BapOuHOI naHeJIi
PYKOKTN YNPABLHEHNA 3NEKTPNUECKNM KOHΦOPKAMN (N)
ПлNTы мOrут 6ьТБ obOpуДOBaHbI OБьИнБIM,бьICToHарЕВaIOUIMMCNи ABTomaTnueCKMn 3JIeKTPuYeCKMn KOHΦopKaMN B pa3NHybIX KOM6nHaunx(6bICToHaPepBaOuIeCer KOHΦopKN MOxHO OTINuHTb NO KpaCHOMy KpyKkY B ueHTpe, abTomaTnueCKne -no aJIbOMHHeBOMy ncky B ueHTpe).
YTo6bI N36ExKaTb NoTeB TeNn I npCuN nocyDi, peKOMeHnyEm HcNoJIb3OBAbTb NocUyD C NIOCKM DHom, DnAmETp KOTOPOr He npEeBbIaet DnAmETp KOHOpKn.
Ta6nua noka3bBAeT COOTBETCTBne MeKdy no3nuey pykortKN uceIbO, dna KOTopoO OHa nCnONb3yeTcR.
CnnpaBbIe HarpBeBaTeBbIe 3neMeHtBi COCTOTn3 Kpyrblx conpoTnBHeH, KOToPbE packaJIyOTcdo KpacHa 3a 10-20 cekyHn nocne INx BKnIOueHn.
HnctpyKunno 3Knnyatau nCTeKnOkepaMneckoBapouHOHaHei
Для ONTNIMaHbHorO nCNoJIb3OBAHnA BapOyoi nAHeIIN Heo6xOdmo CNeIOBaTb HEKOTOpbIM OCHOBhIM npaBnAm no pa3deJKe IIN NO npriROTOBJeHnIO npOdyKTOB.
Ha cTeKnOkepAMnueckne BapOuHbIe naHeN MoXHO CTaBnTB BCE BnDbI KAcTpOJb I CKOBOpO. TeM He MeHee dHnUe IcNoJIb3yEmoI NocUdbI BCerIa DoJIxHo 6bIT bIeAaJIbHO nIOCKIM. Pa3yMeETCr, YTO yEM ToJIue DHO KAcTpOJbIuN CCKOBOpOdbI, TeM 60JeE OdHopODo H npOnCxOaNT paCnpedeJeHne TEnJa.

PpOBepbTe, 4TO6bIO OCHOBaHHe NOCyDbI NOJNHOCTbIO 3aKpbIBaNO KOHΦOpKy: 3TO IO3BOJNT Bam ONTImaJIbHO NCNoJIb3OBAb BBdEJIReMOe TENNO

PpOBepeTe,TO6bI DHO NocydbI 6blIO BcERda CyXM IN YnCTbIM:3TO He TOJbKO CnOCOBCTByET ONTImaJIbHOMY KOHTAKTy C KOHOpKo, HO TaKke PpOJaBaEe TcPOK cNyKbI BaWei NocydbI N BapOHH naHeIN.
He nCnoB3yIe Ty Jx e NocSy, KOtopoB Bbl NOJb3yETec bI npiroTOBJIeHn Ha ra3OBbIX KOHΦopKax, TAK KaK CnJa TepJa Ra3OBbIX KOHΦopOK MoKet DeΦopMnPoBaTb DHO NocdyI Hr rapaHTnpYET Te Xe pe3yNbTaTbI, ecnn 3ta Nocya Notom 6ydet NCNoJb3OBAbCra Ha CTekNIOKePaMnueeCKoB BapOuHoI NaHeJI.
Ipeed qnctkoi nnnnno6bimn onepaunma no yxody 3a ntoon ocoeHNHTe ee ot 3neKtpnuecko cetn. InpoDnHn npoka cnjXkbblobopydOBAHn Heo6xo-dIMO TuaTeJIbHO n peryIpyHO erO uCTNTb, IMeB BnDy, YTO:
-ДЯчNTКHe HcNOnb3OBaTb NapOBoIe arperaTbI.
3MaIInpoBaHHbIe qactn I camooUaIOUnece IOBepxHocTN MoTe TEnIOB ODoI 6e3 npIMHeHN a6pa3INBbIX IN pa3beJaIOuNX CpeIcTB, KOtOpbie MOryT NCnOpTNTb INX.
3NeKTpueckne KOHOpKn HUxHO OUYaTb BJaXHOI TKAHbO, a 3aTeM nPoTepeTb C He6oJIbUIIM KOnNUeCTBOM MaCna, POKa OH eEte TEnJIble.
- Hépkaeioa CtaIb MoKet IOTepaTc BcON CBOIcTBa PnDINTEbHOM KOHTaKTe C JECTKoB ODoI INArpeccNBbIMN YNCTaUIMN CpeCDTBAMN (CoepkaUIMNΦocfop). PeKOMeHdyETcKOMNoHEtBi N3 Hépkaeioe CTaIN IpomblBaTb BOIOI NBITnPaTb HAcYxo, He OCTaBIAJPOdTekOB.
YnCTKa NOBepxHOCTN BapOCH NoHeJI
Ipeq nauanom npirotoBnHn Bcerda cneDyet npotnpatb nobepxhoctb BapouHO naneHN BnaXHO TpAKnO dny ydaene Hnblnn nnn octaTKOB nnu. CneDyET perynpHO mbITb nobepxhoCTb BapouHO naneHN pactBOPOM TeNIOB OBOc HneTpaNbHbIM MOUUMCpeDCTBOM.BPemOT BpemeHMOXeT NOHaO6ntbcn npImHeHne CneunabHO ruchTcero CpeDCTBa dner CTekNOkepaMueckn BapouHbIX naHenei. PpeXde BCero Heo6xmoMo ydaNtB BCE OCTaTK NnUI n Xnpa Ipn NOMOuCKpe6ka dner CTekNa, IO BO3MOXHOCTn C TOHKIM ne3BnEM CERAL (He npnilaraetc) nIN B erO oTCYCTBNE, cToHKm qnknpoBaHHbIM ne3BNEM (CM.Pnc.A). IpotnpaTe BapouHyIO naneJIb, noka OHa eue Tenlaay, 6ymaxHO n canpEKOIN npiroDHBIM MOUUM CpeDCTBOM.
3aTe ydaIte octatkn MOUe r CpeCTBa N BbITpTe Hacyxo uCTo TpRko. 3aTe ydaIte octatkn MOUe r CpeCTBa N BbITpTe Hacyxo uCTo TpRko. Ecn K BaWe BapOHO nAHeN cnyauH O npBapuNc KycOK PnactMaCCbI nn AnOMmHneBO FOnbRn, He3ameDHTbHO ydaIte nx C ropaen BapOHO 30Hb Ipn NMOU cnKpe6Ka BO n36ExAHne NOBpeXDeHN NOBepxHocTn BbIOHNTe Te xe onepaun, ecnn Bbl npocbnann caxap nn Dpyrne npOdyKTbC BbICOKM coedePxAHnem caxapa.
He nCnoJb3yIte HnKaKnx a6pa3nHBbIX r60k nn MeTaNuecknx MoaIOnK. He cNe dyET TaKxe NcNoJIb3OBAtB dIy YnCTKn BapOuHoi NaHEn Koppo3nHbIe MOUe CpeDCTBa TAKne Ka Cnpai DnA YnCTKN DxYOBbIX WkaΦOB NN PAnTHOBbIBODHTeN (CMOTpn pnc.B).
Pnc.A Pnc.B
230V/400V 3N AC 50-60 Hz

Four "Décongélation"
Position du bouton thermostat "M":quelconque
Links ache ter 1200 W
230V/400V 3N AC 50-60 Hz
