
ME 910 - Oven CATA - Free user manual and instructions
Find the device manual for free ME 910 CATA in PDF.
| Product type | Built-in electric oven |
| Brand | CATA |
| Model | ME 910 |
| Interior volume | 105 liters |
| Power supply voltage | 220-240 V ~ 50/60 Hz |
| Maximum power | 3166 - 3660 W (depending on mode) |
| Number of functions | 10 |
| Cooking modes | Convection, Rapid cooking, Multi-cooking, Pizza, Delicate cooking, Upper oven, Grill, Grill with fan, Baking, Defrosting |
| Temperature range | 60 °C to 250 °C |
| Power supply type | Single-phase, cable 3 x 1.5 mm² type H07RN-F |
| Interior lighting | Bulb 15-25 W, 300 °C, socket E-14 |
| Accessories included | Grill grid, drip tray, screws and fixing covers |
| Safety | Timer with auto shut-off, program end stop |
| Cleaning | Manual cleaning, removable door for easy access |
| Insulation class | Class I (earthing required) |
Frequently Asked Questions - ME 910 CATA
User questions about ME 910 CATA
0 question about this device. Answer the ones you know or ask your own.
Ask a new question about this device
Download the instructions for your Oven in PDF format for free! Find your manual ME 910 - CATA and take your electronic device back in hand. On this page are published all the documents necessary for the use of your device. ME 910 by CATA.
USER MANUAL ME 910 CATA
natural_image
Simple line drawing of a rectangular structure with internal grid pattern and a central arch (no text or symbols)ES
Operating and maintenance instructions for built-in ovens
FR
CONEXIÓN ELÉCTRICA
natural_image
Technical line drawing of a mechanical component with mounting holes and internal structure (no text or symbols)DATOS TÉCNICOS
DIMENSIONES INTERIORES
Anchura 65,7 cm
Profundidad 43,5 cm
Altura 35,1 cm
LIGAÇÃO ELÉCTRICA
natural_image
Technical line drawing of a mechanical assembly with no visible text or symbolsDADOS TÉCNICOS DIMENSÕES INTERIORES
Largura 65,7cm
Profundidade 43,5cm
Altura 35,1cm
Thank you for choosing one of our products. We hope this household appliance provides you with the best service. Therefore, we suggest you read the instructions and suggestions contained in this manual carefully in order to use our products correctly.
The specifications plate for this oven is available on this appliance. This plate, visible by opening the door, displays all the necessary identification information for this appliance for ordering replacement parts.
GENERAL INFORMATION
Please read this manual carefully before using the appliance. It is important that all the control functions are understood before beginning to cook with this appliance.
Heed the advice and warnings included under the title "IMPORTANT – Safety advice and instructions".
- This appliance has been designed for private domestic use and can be integrated into standard kitchen furnishings or similar.
- In order to use in caravan-type vehicles, the suitable indications included in the Installation Instructions should be borne in mind.
- Use of this appliance for any other purpose or in any other environment without the manufacturer's express agreement will invalidate any guarantee or liability.
- This new appliance is guaranteed against electrical or mechanical defects, subject to certain exclusions indicated in the Manufacturer's Terms and Conditions of the Guarantee.
- The above does not affect your statutory rights.
Ensure that all protective packaging and covering has been removed before using this appliance.
To collaborate in protecting the environment, separate the packaging materials into the different types and dispose of them according to local waste disposal regulations.
The packaging is designed so as not to harm the environment; it can be recovered or recycled as it is an ecological product. By recycling the packaging, you will contribute to saving raw materials and reducing the volume of industrial and domestic waste.
Any additional information on waste disposal may be requested from your local environmental agency.
When used for the first time, a slight smell from the protective covering or damp may be noticeable, which will disappear after a short time.

The symbol — on the product or its packaging indicates that this product cannot be treated as normal household waste. This product must be handed over to an electric and electronic equipment collection point for recycling. On ensuring that this product is disposed of correctly, you will help to avoid possible negative consequences for the environment and public health, which could occur if this product is not handled correctly. To receive more detailed information about recycling this product, contact your local government, domestic waste disposal services or the outlet where the product was bought.
This appliance has been built and distributed in compliance with the essential requirements of the following EEC EUROPEAN LAWS AND DIRECTIVES:
EC Symbol - 93/68 Low voltage - 73/23 CEM-89/336 Safety Rules - EN 60 335-1, EN 60 335 - 2 - 6.
This appliance respects laws of the suppression of radio-interference.
As the Manufacturer has a policy of continuous product improvement, it reserves the right to adapt and carry out any modification considered necessary without prior warning.
IMPORTANT NOTICE
SAFETY INSTRUCTIONS AND WARNING
- This appliance complies with all current European safety legislation, however, the Manufacturer must emphasise that this compliance does not prevent the surfaces of the appliance from heating up during use and remaining hot during its operation.
- Therefore, the Manufacturer highly recommends that this appliance is kept out of the reach of babies and small children.
- If children cannot be kept out of the kitchen, they must be watched at all times.
- We also recommend that great care is taken during use and cleaning. Read the cleaning and maintenance sections for this appliance carefully.
- Do not place heavy objects on this oven or lean on the door when opening it, as this may damage the hinges.
- Do not leave hot oil or fats unattended as they may catch light.
- Do not place oven dishes or trays of the lower part of the oven or cover it in aluminium foil.
- Never store flammable objects inside the oven as they may catch light.
- Do not allow the accessories or electric cables to touch the hot parts of the appliance.
- Do not use the appliance for special heating or drying clothes.
- Do not install the appliance near curtains or upholstered furniture.
- Do not try to lift or move kitchen appliances by pulling any door or handle as this may cause damage.
- If the oven join is very dirty, the door will not close properly when the oven is working. The fronts of neighbouring furniture may be damaged. Keep the oven join clean.
-
During operation the appliance will heat up. Care must be taken to avoid touching heating elements inside the oven.
-
Open the oven carefully. Steam may escape and burn anyone nearby.
- Do not pour water inside a very hot oven. The enamel may be damaged.
- This appliance must be installed correctly by a suitably qualified person, strictly following the manufacturer's instructions.
• The Manufacturer declines all liability for personal or ma-
terial damage as a result of misuse or incorrect installation of this appliance.
- Heat, vapour and humidity are produced during use, avoid all kinds of personal damage and ensure that the room is suitably ventilated. If used for a prolonged period of time, additional ventilation may be necessary – consult a qualified installer if you have any doubts about the necessary volume.
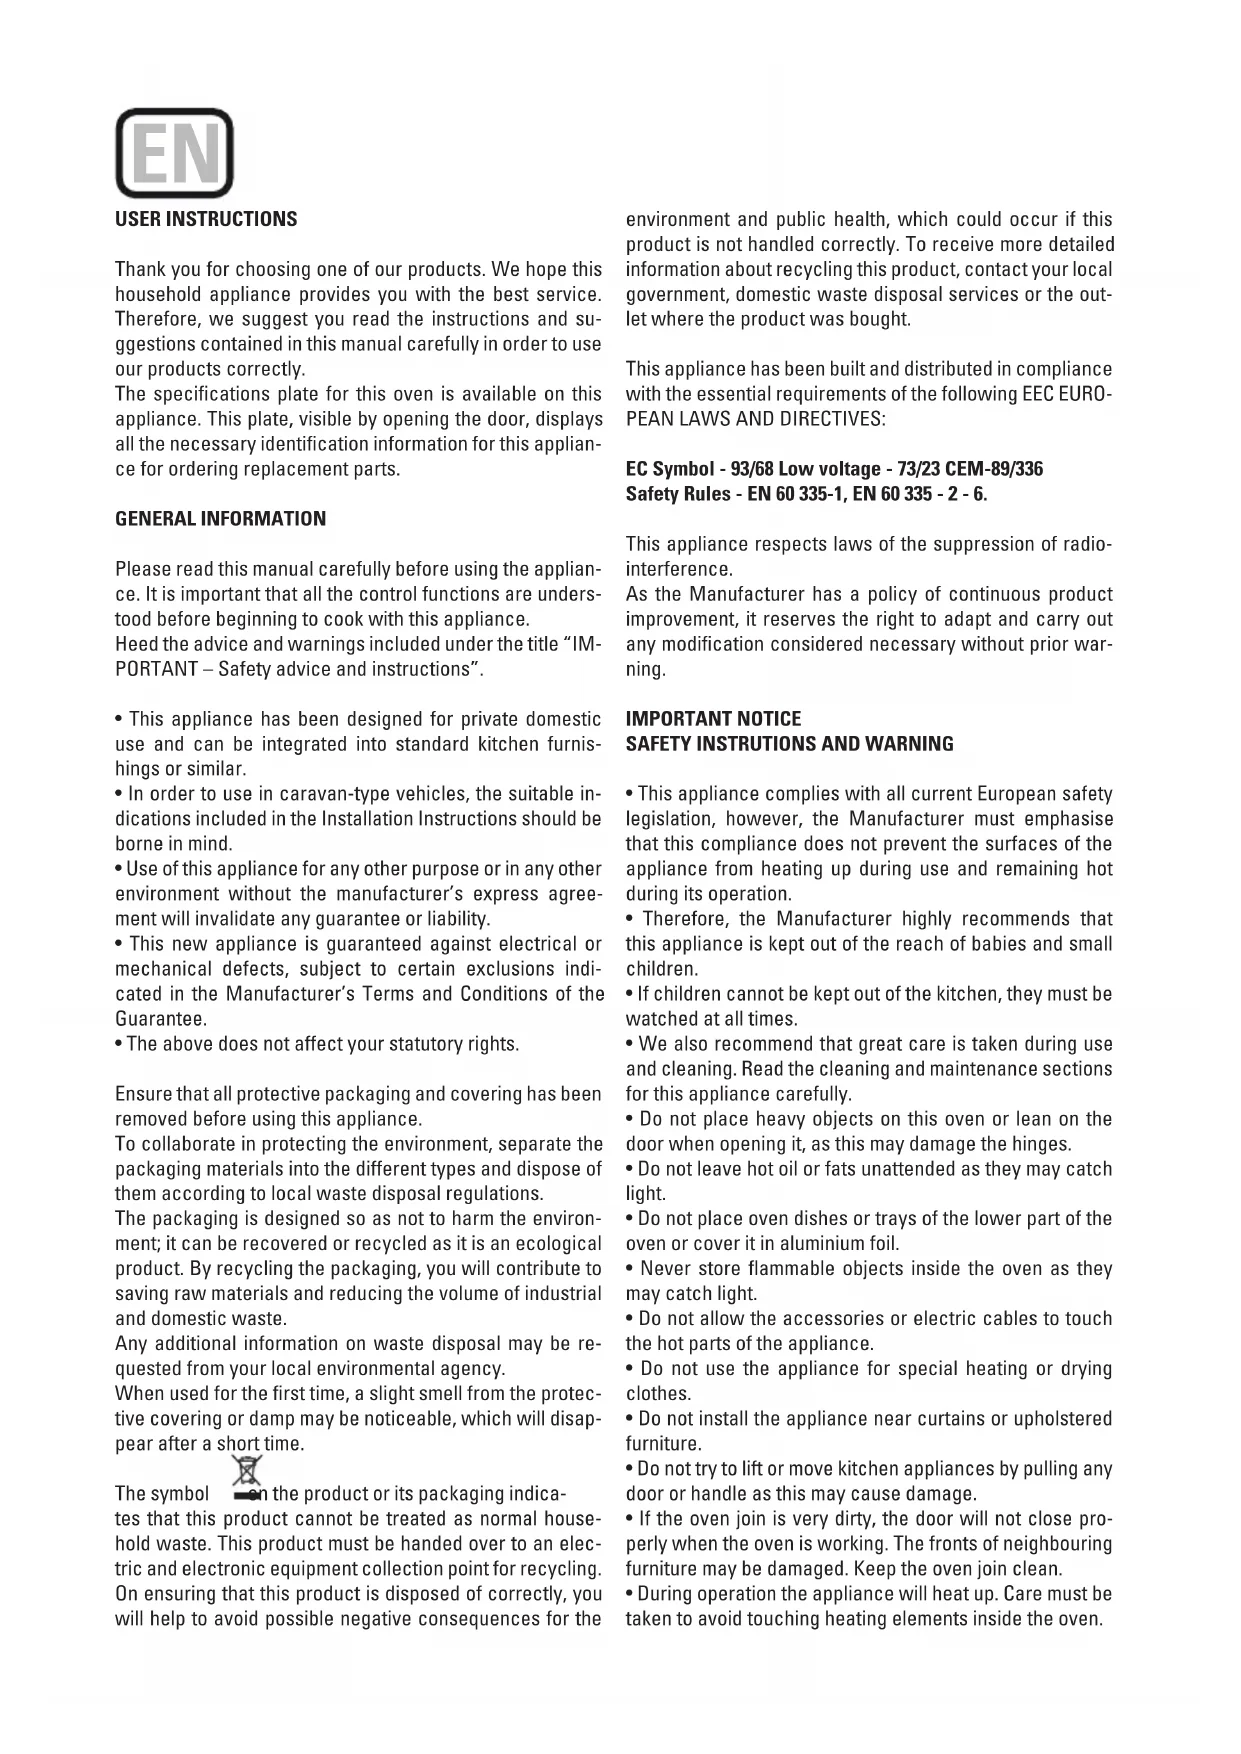
5-FUNCTION MODEL 6-FUNCTION MODEL
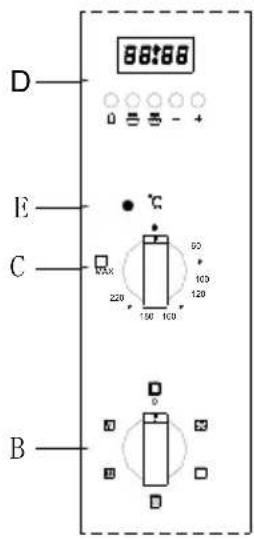
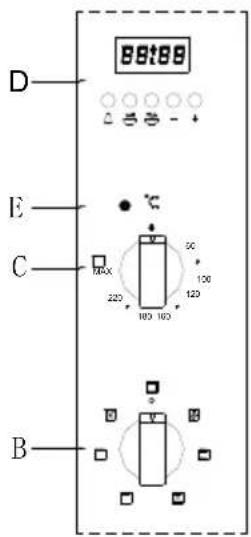
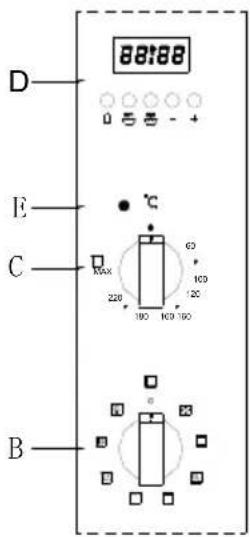
10-FUNCTION MODEL 85-FUNCTION MODEL
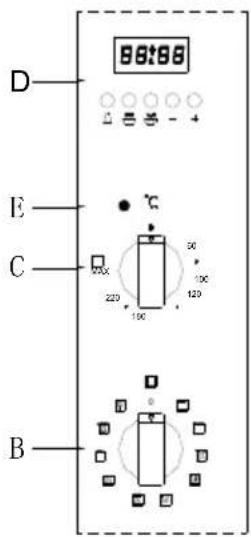
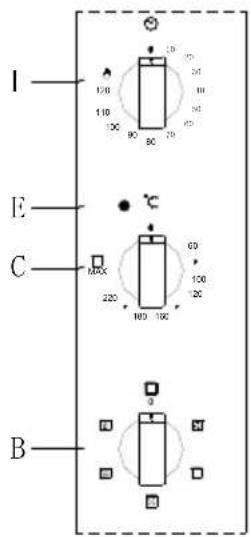
6-FUNCTION MODEL 8-FUNCTION MODEL 10-FUNCTION MODEL
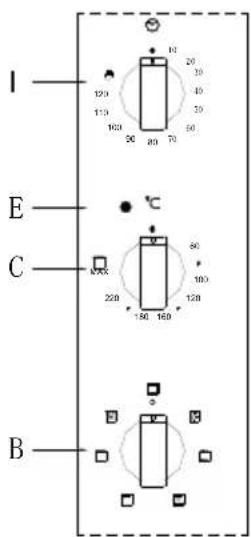
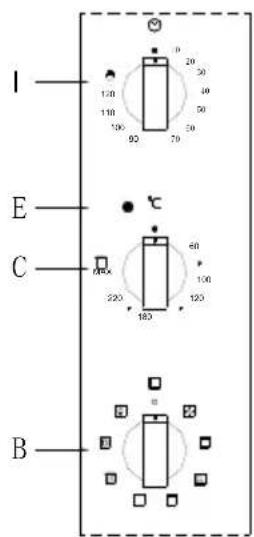
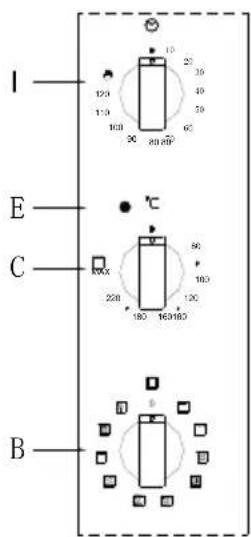
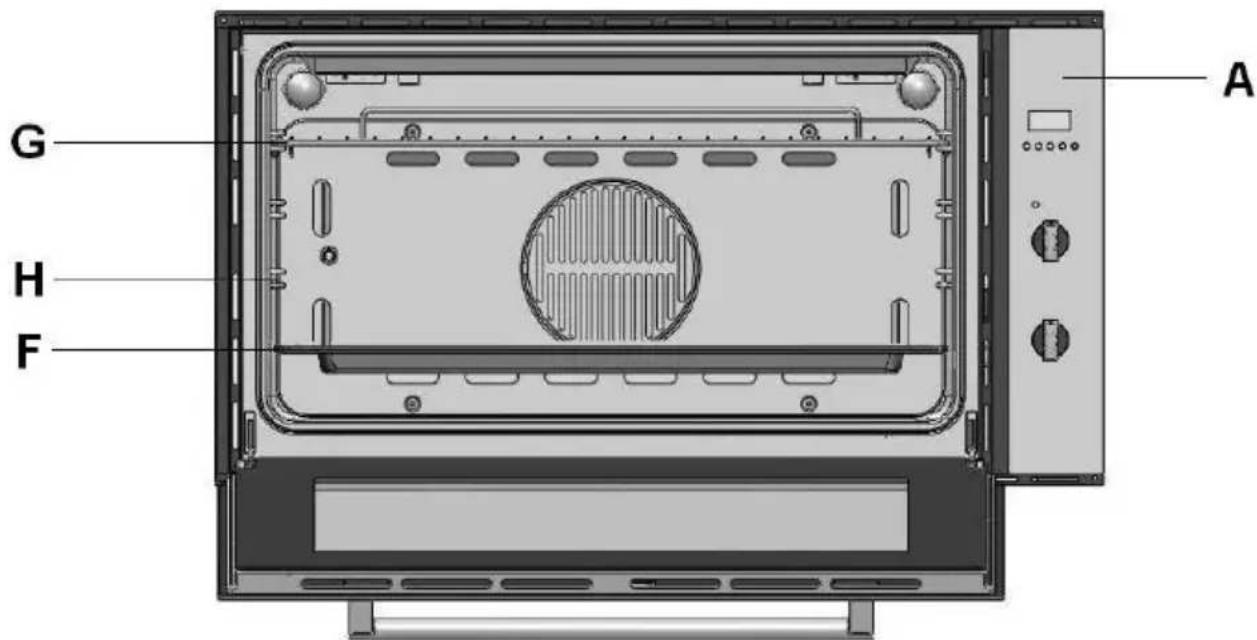
A. Control Panel
B. Cooking mode selection knob
C. Cooking temperature selection knob
D. Electronic programmer-Allows you to programme the desired cooking times by selecting the cooking duration and the end cooking time. It can also be used as a timer (only available on certain models)
E. Oven indication light (only available on certain models) -When lit, it indicates the oven is heating up to the set temperature or the heat plate is heating according to the heating model set.
F. Dripping Pan or Baking Sheet
G. Oven Rack
H. Guides for sliding the racks or dripping in and out
I. End Cooking Time Knob
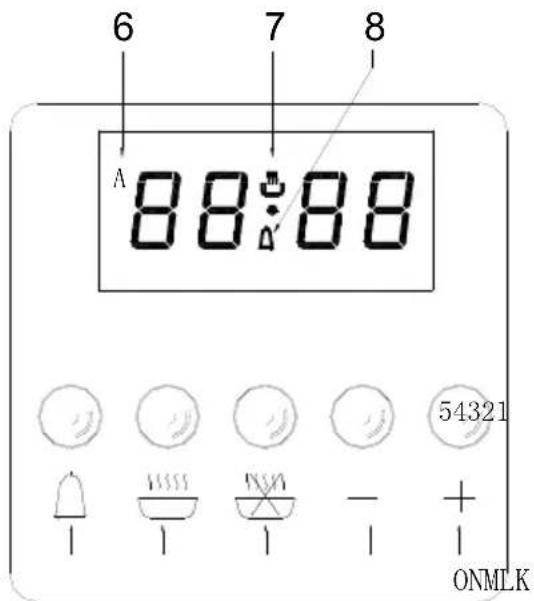
K. Timer
L. Cooking Duration time with automatic operation
M. End of cooking time
N. Carrying backward button
0. Carrying forward button
6. Automatic program
7. Duration and manual mode
8. Minute control
How to use your oven
This multifunction oven combines the advantages of traditional convection oven with those of the more modern fan assisted models in a single appliance.
It is an extremely versatile appliance that allows you to choose easily and safely between different cooking modes. The various features offered by the oven are selected by means of selector knob "B" and thermostat "C" situated on the control panel.
Notice: The first time you use your appliance, we recommend that you set the thermostat to the highest setting and leave the oven on for about half an hour with nothing in it, with the oven
door shut. Then, open the oven door and let the room air in. The odor that is often detected during this initial use is due to the evaporation of substances used to protect the oven during storage and until it is installed.
Notice: Place the dripping pan provided on the bottom shelf of the oven to prevent any sauce and/or grease from dripping onto the bottom of the oven only when grilling food or when using the rotisserie (only available on certain models). For all other types of cooking, never use the bottom shelf and never place anything on the bottom of the oven during operation as this could damage the enamel finishing. Place your cookware (dishes, aluminum foil, etc.) On the grid provided with the appliance inserted especially along the oven guides.
Notice: to use the oven in manual mode (not using the end cooking time programmer); the symbol must be aligned with the reference mark on the control panel.
Convection mode 2540-2988W
Position the thermostat knob "C" between 60 and Max on this setting, The top and bottom heating elements come on. This is the classic, traditional type of oven which has been perfected for efficient heat distribution and reduced energy consumption. The convection oven is still unequalled when it comes to cooking dishes such as cabbage with ribs, Spanish style cod, Ancona style stockfish, tender veal strips with rice, etc. Excellent results are achieved when preparing veal or beef-based dishes as well (braised meats, stew, goulash, wild game, ham etc.) which need to be cooked slowly and basting or the addition of liquid. It is the best system for baking cakes as well as fruit and cooking using covered casserole dishes for oven baking. When cooking in convection mode, only use one dripping pan or cooking rack at a time for even heat distribution. Use the different rack heights available to balance the amount of heat between the top and the bottom of the oven. Select from among the various rack heights based on whether the dish needs more or less heat from the top.
"Fast cooking" Mode 2561-3005W
Position the thermostat knob "C": Between 60 and Max. The top and bottom heating elements, as well as the fan, will come on, guaranteeing constant heat distributed uniformly throughout the oven.
This mode is especially recommended for cooking pre-packed food quickly (as pre-heating is not necessary), for instance, frozen or pre-cooked food) as well as for a few "home-made" dishes.
The best results for cooking using the "Fast cooking" mode are obtained if you use one cooking only (the second from the bottom), please see the table entitled "Practical Cooking Advice".
Multi-Cooking Mode 2733-3278W
Position the thermostat knob "C": Between 60 and Max. The top circle and bottom heating elements, as well as the fan ,will come on alternately .Since the heat remains constant and uniform throughout the oven ,the air cooks and browns food uniformly over its entire surface. This model also allows you cook various simultaneously as long as their respective cooking temperatures are the same. A maximum of 2 racks can be used at the same time. Please follow the instructions in the "Cooking on More Than One Rack" section.
This cooking mode is particularly recommended for dishes requiring a gratin finish or for those requiring considerably prolonged cooking times, for instance: lasagna, pasta backs, roast chicken and potatoes, etc. Moreover the excellent heat distribution makes it possible to use lower temperatures when cooking roasts. This results in less loss of juices, meat which is more tender and less weight loss for the roast. The Multi-cooking mode is especially suited for cooking fish, which can be prepared with limited amounts of condiments, thus maintaining their flavor and appearance. Excellent results can be obtained when cooking vegetable-based side dishes like courgettes, aubergines, peppers, etc.
Desserts: this mode is also perfect for baking leavened cakes. This mode can also be used to thaw quickly white or red meat and bread by setting the temperature to 80. To thaw more delicate foods, set the thermostat to 60 or use only the cold air circulation feature by setting the thermostat to 0.
Pizza Mode 3166-3660W
Position of thermostat knob "C": Between 60 and 25. The bottom and circle heating elements, as well as the fan, will come on. This combination rapidly heats the oven due to the large amounts of power used by the appliance, which results in considerable heat coming prevalently from the bottom.
The pizza mode is ideal for foods requiring high temperatures to cook, like pizzas and large roasts. Only use one oven tray or rack at a time. However, if more than one is used, these must be switched halfway through the cooking process.
Delicate cooking 4367-1570W
Position of thermostat knob "C": Between 60 and 250. The bottom heating element and the fan come on. Ideal for pastries, cakes and non-dry sweets in baking tins or moulds. Excellent results are also obtained in cooking requiring above all heat from the bottom.
You are advised to put the pan on a lower level.
"Top" oven 1330-1523W
Position of thermostat knob "C": Between 60 and Max. The top heating elements comes on .This mode can be used to brown food at the end of the cooking duration.
Grill 2928-3375W
Position of thermostat knob "C": Max. The top central heating elements comes on .The extremely high and direct temperature of the grill makes it possible to brown the surface of meats and roasts while locking the juices in to keep them tender. The grill is also highly recommended for dishes that require a high temperature on the surface: beef steaks, veal, rib steak, filets, hamburgers etc.
Some grilling examples are included in the "Practical Cooking Advice" paragraph.
Fan Assisted Grill 2953-3400W
Position of thermostat knob "C": Between 60 and 200. The top central heating elements and the fan come on. This combination of features increases the effectiveness of the heating elements unidirectional thermal radiation through forced circulation of the air throughout the oven. This helps prevent food from burning on the surface, allowing the heat to penetrate right into the food. Excellent results are achieved with kebabs made with meats and vegetables, sausages, ribs lamb chops, chicken in a spicy sauce, quail, pork chops, etc.
Cooking in "fan assisted grill mode" with the oven door shut.
This mode is also ideal for cooking fish steaks, like swordfish, stuffed cuttlefish etc.
Baking Mode 1950-2276W
Position of thermostat knob "C": Between 60 and 250. The rears heating element and the fan come on, guaranteeing delicate heat distribution uniformly throughout the oven.
This mode is ideal for baking and cooking delicate foods-especially cakes that need to rise, and for the preparation of certain tartlets on 3 shelves at the same time. Here are a few examples: cream puffs, sweet and savory biscuits, savoury puffs, Swiss rolls and small portions of vegetables au gratin, etc. ....
"Defrosting" Mode 70-87W
Position of thermostat knob "C": Any
The fan located on the bottom of the oven makes the air circulate at room temperature around the food. This is recommended for the defrosting of all types of food, but in particular for delicate types of food which do not require heat, such as for example: ice cream cakes, cream or custard desserts, fruit cakes. By using the fan, the defrosting time is approximately halved. In the case of meat, fish and bread, it is possible to accelerate the process using the "Baking" mode and setting the temperature to 80^ - 100^ .
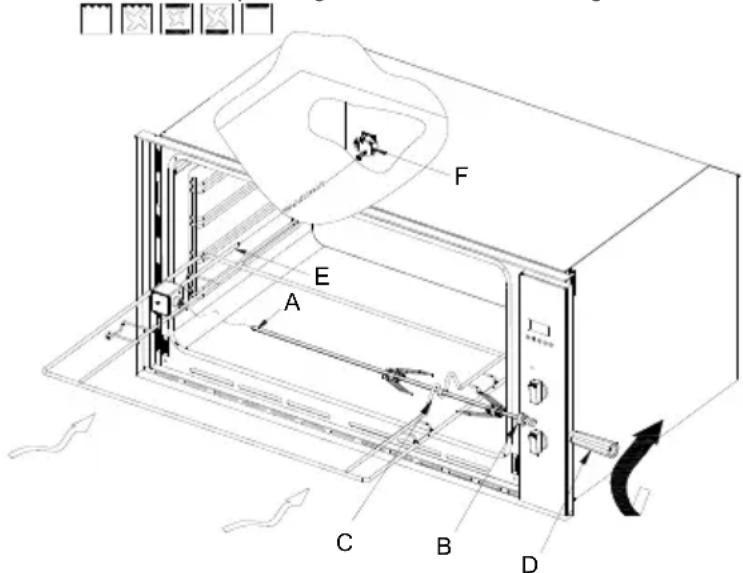
The turnspit (only available on certain models)
To start the turnspit, proceed as follows:
- Insert the rotisserie rod"A" into the drive unit and groove "B" into bend"C";
- Turn the plastiv handle "D" anti clockwise and slide the rack into the oven runners ensuring that the rod "E" slots into the hole "F";
- The rotisserie rack must always be fitted in the middle of the oven (second position from bottom);
- start the turnspit using knob "B" to select setting.
End Cooking Time Knob (I) (only available on certain models) This model is equipped with a timer to control when the oven shuts off during cooking. Position of timer knob "I": Between 10 minutes and 120 minutes.
At the end of the programmed length of time, the timer will sound and automatically turn off the oven.
5-keys timer procedure baking mode (only available on certain models)
Settings
After pressing a function button, the required time can be set via the +/- keys. For quicker regulation, keep the required key pressed. By pressing the function key and then releasing it, the pre-selected function appears on the display and remains for 5 seconds during the time the setting can be performed (with one hand). Five seconds after releasing the function key or finishing the setting, the display returns to the clock. Any program set will start immediately. Program selection is accompanied by the surrounding of a buzzer.
Setting the time(clock)
Select the clock function by simultaneously pressing the Duration(2) and End of Cooking (3) time keys and adjust the clock by means of the +/- 4+5 keys. All the Programs set will be cancelled and relay will switch off.
Manual operation
Simultaneously press the Duration (2) and End of cooking (3) time keys (the auto symbol will be cancelled): the saucepan symbol will light up. Any program set will be cancelled.
Semi automatic operation and cooking duration
Press the Cooking duration (2) key and set the duration by means of the +/- (4+5) keys. The saucepan symbol will appear. The relay output will be activated.
If clock=end of the cooking time, the relay and saucepan symbol will be off. The buzzer will sound and symbol A will blink.
Semi automatic operation and end of cooking time
Press the end of cooking time key (3) and set the required time by means of the +/- (4+5) keys. The symbol A and the symbol of the saucepan will light up. The relay output will be activated.
If clock=end of the cooking time, the relay and saucepan symbol will switch off. The buzzer will sound and the symbol A will blink.
Completely automatic operation
Press the duration key (2) and set the required time by means of the +/- keys(4+5). The symbol A will appear. The relay will come on the saucepan symbol will appear. Select the End of cooking time function (3)- the minimum setting time will appear. Set the required time by means of the +/- keys (4+5).
The relay and the saucepan symbol. The saucepan symbol will reappear when the clock time=the calculated switch on time. After setting the automatic program the symbol A will blink. The buzzer will sound and the saucepan symbol and relay will switch off.
Minute control
Press the Minute control key (1) and set the required time by means of the +/- keys (4+5). While the set time runs, the bell symbol will appear.
When the set time elapses, the buzzer will sound.
Buzzer
The buzzer remains active for 7 minutes after the minute control cycle or the cooking program has finished press any function key to stop the buzzer.
Program start-up and check
A set program is run when the required time has also been set. The remaining timers can be checked at any time by selecting the relevant function.
Setting error
The setting is not correct if the clock time is between the beginning of the cooking time and the end of the cooking time.
The error is indicated via sounding of a buzzer and blinking of the Auto symbol.
An incorrect setting can be corrected by re-setting either the beginning or end of cooking time.
Cancelling a program
A program can be cancelled by selecting the manual function.
A set program is automatically cancelled when it reaches the end of its cycle.
The oven light
Set knob "B" to the symbol to turn it on. It lights the oven and stays on when any of the electrical heating elements in the oven come on.
Cooling ventilation
In order to cool down the exterior of the appliance, this model is equipped with a cooling fan, which comes on automatically when the oven is hot.
When the fan is on, a normal flow of air can be heard exiting between the oven door and the control panel.
Note: When cooking is done, the fan stays on until the oven cools down sufficiently.
Practical Cooking Advice
The oven offers a wide range of alternatives which allow you to cook any type of food in the best possible way. With time you will learn to make the best use of this versatile cooking appliance and the following directions are only a guideline which may be varied according to your own personal experience.
Preheating
If the oven must be preheated (this is generally the case when cooking leavened foods), the "Multi-Cooking" mode and the "Fast cooking" mode can be used to reach the desired temperature as quickly as possible in order to save on energy.
Once the food has been placed in the oven, the most appropriate cooking mode can then be selected.
Cooking on More Than One Rack
If you have to cook food using several racks, use either the "baking" mode or the "Multi-Cooking" mode, as these are the only modes that allow you to do so.
When cooking delicate food on more than one rack, use the "baking" mode, which allows you to cook on 2 racks at the same time (the 2nd and 3rd from the bottom). Some examples are included in the "Practical Cooking Advice" table.
When cooking other food on several racks, use the "Multi-Cooking" mode keeping the following suggestions in mind:
- The oven is fitted with 4 racks. During fan assisted cooking, use the two central racks; the lowest and highest racks receive the hot air directly and therefore delicate foodstuffs could be burnt on these racks.
- As a general rule, use the 2nd and 3rd rack from the bottom, placing the foodstuffs that require greater heat on the 2nd rack from the bottom. For example, when cooking meat roasts together with other food, place the roast on the 2nd rack from the bottom and the more delicate food on the 3rd rack from the bottom.
- When cooking foodstuffs that require differing times and temperatures, set a temperature that is somewhere between the two temperatures required, place the more delicate food on the 4th rack from the bottom and take the food requiring less time out of the oven first.
- Use the dripping pan on the lower rack and the grid on the upper;
Using the "Fast Cooking" Mode
Functional, fast and practical for those of you who use pre-packed products (such as for example: frozen or pre-cooked food) along with other food items. You will find useful suggestions in the "Practical Cooking Advice" table.
Using the Grill
This multi-function oven offers you 2 different grilling modes.
Use the "grill" mode [ , placing the food under the center of the grill (situated on the 3rd or 4th rack form the bottom ) because only the central part of the top heating element is turned on . Use the bottom rack (1st from the bottom), placing the dripping pan provided to collect any sauce and /or grease and prevent the same from dripping onto the oven bottom. When using this mode, we recommend you set the thermostat to the highest setting. However, this does not mean you cannot use lower temperatures, simply by adjusting the thermostat knob to the desired temperature.
Setting "fan assisted grill", is extremely useful for grilling foods rapidly, as the distribution of heat makes it possible not only to brown the surface, but also to cook the bottom part.
Moreover, it can also be used for browning foods at the end of the cooking process, such as adding that gratin finish to pasta bakes, for example.
When using this mode, place the grid on the 2nd or 3rd oven rack from the bottom (see cooking table) then, to prevent fat and grease from dripping onto the bottom of the oven and thus smoke from forming, place a dripping-pan on the 1st rack from the bottom.
When using this mode, we advise you to set the thermostat to 200, as it is the most efficient way to use the grill, which is based on the use of infrared rays. However, this does not mean you cannot use lower temperatures, simply by adjusting the thermostat knob to the desired temperature.
Therefore the best results when using the grill modes are obtained by placing the grid on the lower racks (see cooking table) then, to prevent fat and grease from dripping onto the bottom of the oven and smoke from forming, place a dripping pan on the 1st oven rack from the bottom.
Baking Cakes
When baking cakes, always place them in a preheated oven. Make sure you wait until the oven has been preheated thoroughly (the end light "E" will turn off). Do not open the oven door during baking to prevent the cake from dropping. In general:
Pastry is too dry
Increase the temperature by 10 and reduce the cooking time.
Pastry dropped
Use less liquid or lower the temperature by 10.
Pastry is too dark on top
Place it on a lower rack, lower the temperature, and increase the cooking time.
Cooked well on the inside but sticky on the outside
Use less liquid, lower the temperature, and increase the cooking time.
The Pastry sticks to the pan
Grease the pan well and sprinkle it with a dusting of flour or use greaseproof paper.
I used more than one level (in the function "ventilated oven") and they are not all at the same cooking point
Use a lower temperature setting. It is not necessary to remove the food from all the racks at the same time.
Cooking Pizza
For best results when cooking pizza, use the "Pizza Mode"
- Preheat the oven for at least 10 minutes;
- Use a light aluminum pizza pan, placing it on the grid supplied with the oven. If the dripping pan is used, this will extend the cooking time, making it difficult to get a crispy crust;
- Do not open the oven door frequently while the pizza is cooking;
- If the pizza has a lot of toppings (three of four), we recommend you add the mozzarella cheese on top halfway through the cooking process.
- When cooking pizza on two racks, use the 2nd and 4th with a temperature of 220^ and place the pizzas in the oven after having preheated it for at least 10 minutes.
Cooking Fish and Meat
When cooking white meat, fowl and fish, use temperature setting from 180^ to 200^ .
For red meat that should be well done on the outside while tender and juicy in the inside, it is a good idea to start with a high temperature setting (200°-220°) for a short time, then turn the oven down afterwards.
In general, the larger the roast, the lower the temperature setting. Place the meat on the center of the grid and place the dripping pan beneath it to catch the fat.
Make sure that the grid is inserted so that it is in the center of the oven. If you would like to increase the amount of heat from below, use the low rack heights. For savory roasts (especially duck and wild game), dress the meat with lard or bacon on the top.
NB: cooking times are approximate and may vary according to personal taste. When cooking using the grill or fan assisted grill the dripping pan must always be placed on the 1st oven rack from the bottom.
| Selector knob setting | Food to be cooked | Weight (in kg) | Cooking rack position from bottom | Preheating time (Minutes) | Thermostat knob setting | Cooking time (Minutes) |
| 1 Convection— | Duck | 1 | 3 | 15 | 200 | 65-75 |
| Roast veal or beef | 1 | 3 | 15 | 200 | 70-75 | |
| Pork roast | 1 | 3 | 15 | 200 | 70-80 | |
| Biscuits (short pastry) | - | 3 | 15 | 180 | 15-20 | |
| Tarts | 1 | 3 | 15 | 180 | 30-35 | |
| 2Multi-Cooking---- | Pizza (on 2 racks) | 1 | 2-3 | 15 | 220 | 15-20 |
| Lasagna | 1 | 3 | 10 | 200 | 30-35 | |
| Lamb | 1 | 2 | 10 | 180 | 50-60 | |
| Roast chicken +potatoes | 1 | 2-3 | 10 | 180 | 60-75 | |
| Mackerel | 1 | 2 | 10 | 180 | 30-35 | |
| Plum-cake | 1 | 2 | 10 | 170 | 40-50 | |
| Cream puffs (on 2 racks) | 0.5 | 2-3 | 10 | 190 | 20-25 | |
| Biscuits (on 2 racks) | 0.5 | 2-3 | 10 | 180 | 10-15 | |
| Sponge cake (on 1 cake) | 0.5 | 2 | 10 | 170 | 15-20 | |
| Sponge cake (on 2 cakes) | 1.0 | 2-3 | 10 | 170 | 20-25 | |
| Savory pies | 1.5 | 3 | 15 | 200 | 25-30 | |
| 3 Top Oven— | Browning food to perfect Cooking | - | 3 | 15 | 220 | - |
| 4 Defrosting— | All frozen food | |||||
| 5 Grill---- | Soles and cuttlefish | 1 | 3 | 5 | Max | 8-10 |
| Squid and prawn kebabs | 1 | 3 | 5 | Max | 6-8 | |
| Cod filet | 1 | 3 | 5 | Max | 10 | |
| Grilled vegetables | 1 | 3 | 5 | Max | 10-15 | |
| Veal steal | 1 | 3 | 5 | Max | 15-20 | |
| Cutlets | 1 | 3 | 5 | Max | 15-20 | |
| Hamburgers | 1 | 3 | 5 | Max | 7-10 | |
| Mackerels | 1 | 3 | 5 | Max | 15-20 | |
| Toasted sandwiches | - | 3 | 5 | Max | 2-3 | |
| With rotisserie (where prevent) | ||||||
| Veal on the spit | ||||||
| Chicken on the spit | 1.0 | - | 5 | Max | 80-90 | |
| Lamb on the spit | 1.5 | - | 5 | Max | 70-80 | |
| 1.0 | - | 5 | Max | 70-80 | ||
| 6 Fan Assisted Grill | Grilled chicken Cuttlefish | 1.5 1.5 | 3 3 | 5 5 | 200 200 | 55-60 30-35 |
| With rotisserie (where prevent) Veal on the spit Chicken on the spit Chicken (on the spit)+potatoes (roasted) Lamb on the spit | 1.5 2.0 1.5 - 1.5 | - - - 2 - | 5 5 5 5 5 | 200 200 200 200 200 | 70-80 70-80 70-75 70-75 70-80 | |
| 7 Baking | Tarts Fruit cakes Fruitcake Sponge cake Stuffed pancakes) on 2 racks) Small cakes (On 2 rakes) Cheese puffs (On2 cakes) Cream puffs (on 3 cakes) Biscuits (On 3 racks) Meringues (On 3 racks) | 0.5 1 0.7 0.5 1.2 0.6 0.4 0.7 0.7 0.5 | 3 2/3 3 3 2-3 2-3 2-3 1-4 1-4 1-4 | 15 15 15 15 15 15 15 15 | 180 180 180 160 200 190 210 180 180 90 | 20-30 40-45 40-50 25-30 30-35 20-25 15-20 20-25 20-25 180 |
| 8 Fast cooking | Frozen food Pizza Courgette and prawn pie Country style spinach pie Turnovers Lasagne Golden Rolls Chicken morseis | 0.3 0.4 0.5 0.3 0.5 0.4 0.4 | 2 2 2 2 2 2 2 | - - - - - - - - - - | 250 200 220 200 200 180 220 | 12 20 30-35 25 35 25-30 15-20 |
| Pre-cooked food Golden chicken wings | 0.4 | 2 | - | 200 | 20-25 | |
| Fresh Food Biscuits(short pastry) Fruitcake Cheese puffs | 0.3 0.6 0.2 | 2 2 2 | - - - - - | 200 180 210 | 15-18 45 10-12 | |
| 9 Pizza | Pizza Roast veal or beef Chicken | 0.5 1 1 | 3 2 2/3 | 15 10 10 | 220 220 180 | 15-20 25-30 60-70 |
CLEANING THE APPLIANCE
IMPORTANT
As a safety precaution, before beginning to clean the oven always unplug it from the power supply or remove the appliance power lead.
Cleaning an oven that does not self-cleaning panels must be done after use, when it is switched off but still warm, not hot, so that the film of grease produced by the cooking vapours on the walls is still easy to remove, as well as the drips and splashes of fat that are not yet hard and dry.
Remove the chrome-plated wire side supports; pull the front part upwards to unattach them from the wall and remove them from the rear orifices. Clean the oven with a soft cloth soaked in a diluted ammoniac solution; rinse and dry. If there are still stains and splashes, place a damp cloth soaked in ammoniac at the back, close the door and, after a few hours, wash the oven with warm water and liquid detergent, rinse and dry ca-
refully. To clean the shiny metal outside doors, use a soft cloth with soap and water; do not use any powdered products that contain abrasive substances.
Also avoid the use of acid or alkaline substances (lemon juice, vinegar, salt, tomatoes, etc.). Avoid using products containing chlorine, acid or abrasive substances specially for cleaning the varnished walls. Do not use thick steel wool or hard utensils, as they can damage the surface finishes.
Do not use high pressure cleaners or steam appliances for cleaning the oven.
Normally, wiping with a damp soft cloth and warm detergent is enough, but for stubborn stains the following is recommended:
VITRIFIED ENAMELLED PARTS
Only use a recommended cleaner for this type of material – avoid chloride-based products such as bleach.
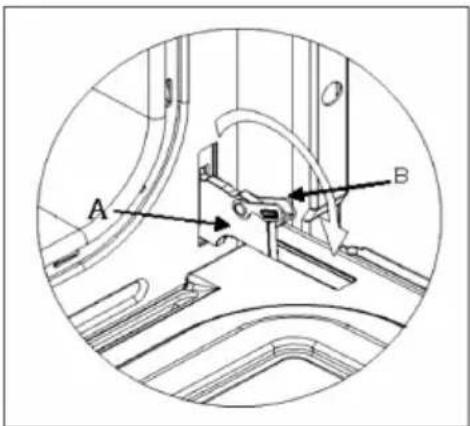
REMOVING THE DOOR FROM THE OVEN
To simplify cleaning the interior of the oven, the door can be removed. The process of removing the door for the three types is shown below:
Door type A / B2
The hinges "A" have two moving bolts "B".
When the bolt "B" is lifted, the hinge comes out of its housing. Then close the door to the half-way position.
Next, lift the door upwards and remove it, sliding it outwards; hold the door by the sides close to the hinges when doing this. To replace the door, first slide the hinges into their grooves and open the door completely.
Remember to turn the two moving bolts "B" used to engage the two hinges before closing the door (Fig. 3).
WARNING
• Take care not to remove the hinge locking system when taking off the door, as the hinge mechanism can spring back suddenly.
- Never submerge the door in water for any reason.
INSTRUCTIONS FOR INSTALLATION
This appliance must be installed by a competent person, in accordance with the current version of the UK Safety Rules and Regulations or their European equivalent:
Urban development regulations (published by the Department of Environment).
Urban development laws (published by the Scottish Executive Development Department).
IEE wiring regulations.
Electricity in labour regulations.
PRIOR START-UP OF THE APPLIANCE
When it is unpacked, check that the following parts are with the oven:
- Instructions and Installation Manual
- oven grid
• 1 tray
- Screws and stoppers for fitting the appliance in the housing
FITTING THE APPLIANCE (see Fig. 5)
These appliances are classified as Class I.
The earth is obligatory as provided for by law. The manufacturer declines all liability in the event that the accident prevention rules have not been followed.
IMPORTANT
The adjacent piece or furniture or cupboard and all the materials used in the installation must resist a minimum temperature increase of 85 °C above the ambient temperature during use of the appliance.
Certain types of vinyl or laminated kitchen furniture are particularly susceptible to damage due to decolouration at temperatures below those indicated.
If the appliance is installed without paying attention to this temperature limit or if it is placed less than 4 mm from the adjacent cupboards, liability will belong to the owner.
INSTALLATION NOTES
-
The oven has to be installed in a standard gap of 900mm, as indicated in Fig. 5, whether under a hob or in a column.
-
On inserting the oven in a column, it is essential in order to ensure there is enough ventilation, to remove the rear panel of the furniture and have an opening of at least 85-90mm as indicated in Fig. 5.
-
Check that the oven has been fixed securely in the housing. Fixing the oven into the cupboard is done using 4 screws "A" Fig.5. One in each corner of the oven door frame.
Fig. 5: Installation distanced for simple electric ovens of 90 cms wide (the shape of the upper casing may vary) and attachment to the cupboard.

Fig. 7: Ventilation and gap requirements for the installation of e simple electric oven in a standard cooking unit.
Minimum ventilation requirements for upper, base and support shelves for the rear part of the unit.
A. The support runner must be removed
B. Spacing of 75-90 mm between the wall and the rear part of the support shelf and the base of the cupboard
C. Base
D. False box front to be assembled
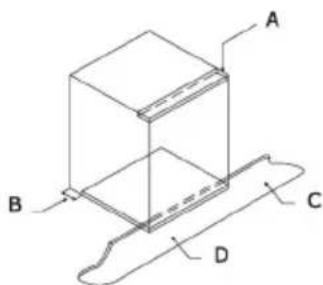
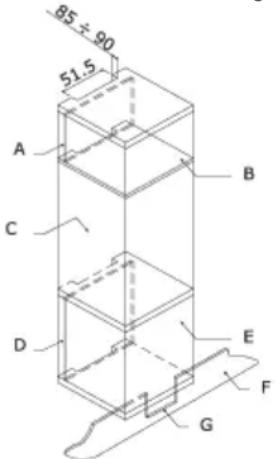
Fig. 8: Ventilation and gap requirements for the installation of a simple electric oven in an upper cupboard.
A. Rear panel
B. Storage space
C. Remove the rear part of this section
D. Real panel
E. Storage space
F. Base
G. Minimum ventilation gap 80 cm2
ELECTRICAL CONNECTION
Those ovens equipped with a three-pole power supply cable are designed to operate with an alternating current. The wire for earthling the appliance is yellow-green in color.
Fitting on a Power Supply Cable
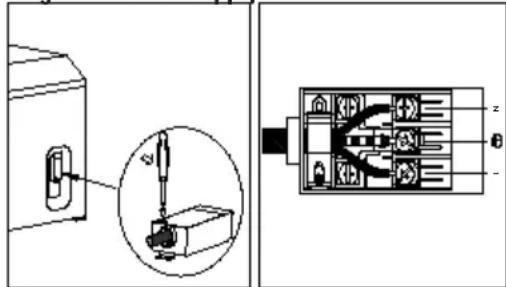
Opening the terminal board:
- Using a screwdriver,prize the bolt on the side tabs of the terminal board cover;
- Unscrew the bolt, pull open the cover of the terminal board. To install the cable, proceed as follows:
- Remove the wire clamp screw and the three contact screws
L-N-
- Fasten the wires beneath the screw heads using the following color scheme: Blue (N) Brown (L) Yellow-Green
- Fasten the supply cable in place with the clamp and close the cover of the terminal board.
Connecting the supply cable to the mains
Install a standardized plug corresponding to the load indicated on the data plate. When connecting the cable directly to the mains, install an omni polar circuit breaker with a minimum contact opening of 3 mm between the appliance and the mains. The omni polar circuit breaker should be sized according to the load and should comply with current regulations (the earth wire should not be interrupted by the circuit breaker).
The supply cable should be positioned so that it does not reach a temperature of more than 50 with respect to the room temperature, anywhere along its length, or protected by insulation sleeping having an appropriate rating.
Before making the connection, check that:
- The electrical safety of this appliance can only be guaranteed if the cooker is correctly and efficiently earthed, in compliance with regulations on electrical safety. Always ensure that the earthling is efficient; if you have any doubts call in a qualified technician to check the system. The manufacturer declines all responsibility for damage resulting from a system which has not been earthed.
- Before plugging the appliance into the mains, check that the specifications indicated on the date plate (on the appliance and /or packaging) correspond to those of the electrical mains system of your home.
- Check that the electrical capacity of the system and sockets will support the maximum power of the appliance, as indicated on the data plate. If you have any doubts, call in a qualified technician.
- If the socket and appliance plug are not compatible, have the socket replaced with a suitable model by a qualified technician. The latter, in particular, will also have to ensure that the cross section of the socket cables are suitable for the power absorbed by the appliance. The use of adapters, multiple sockets and /or extensions, is not recommended. If their use cannot be avoided, remember to use only single or multiple adapters and extensions which comply with current safety regulations. In these cases, never exceed the maximum current capacity indicated on the single adapter or extension and the maximum power indicated on the multiple adapter. The plug and socket must be easily accessible.
MAINTENANCE
Before carrying out maintenance, disconnect the appliance from the power supply.
During the guarantee period, if necessary all services should be commissioned to the Manufacturer's Technical Assistance Service Department. Bear in mind that intervention or repair by unauthorised personnel will invalidate this guarantee.
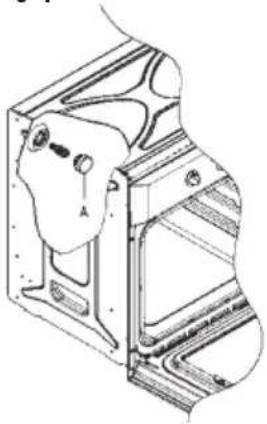
REPLACEMENT OF THE OVEN LIGHTBULB
(Not covered by the appliance guarantee.)
The oven has a light with the following characteristics: 15 W or 25 W, 300 °C and type E-14
WARNING: Disconnect the appliance from the electricity supply, remove the oven door (as described above), as well as the oven shelves.
Remove the glass cover that protects the light bulb by turning it anti-clockwise. Fig. 9 (A)
Unscrew the old light bulb and dispose of it safely and ecologically, change it for one as specified in the Specifications and replace the cover.
NOTE – The glass cover may be tight and, therefore, may need a grip to release it.
natural_image
Technical line drawing of a mechanical component with mounting holes and internal channels (no text or symbols)SPECIFICATIONS
INTERIOR DIMENSIONS
Width 65.7cm
Depth 43.5cm
Height 35.1cm
Inner Volume of the oven 105 liters
ELECTRICAL INFORMATION
Nominal voltage:
220-240V \~50/60Hz or 50H
Power connection: 13A (automatic bipolar switch with protected socket, with 3mm separation between contacts)
POWER ABSORPTION

2540-2988W

2928-3375W

2953-3400W

3166-3660W

1950-2276W

2561-3005W

1367-1570W

1330-1523W

2733-3278W

70-87W
Network power cable:
3 x 1.5 mm2 type H07RN-F
Oven light bulb:
15 W - 25 W / 300 °C screw type E-14
The Manufacturer declines all liability for damage caused to persons and objects due to incorrect or improper installation of the appliance.
The Manufacturer reserves the right to make any modification it believes necessary and useful to the products, without prior warning.
INSTRUCTIONS POUR L'UTILISATEUR
Mode convection 2540-2988 W
RACCORDEMENT ÉLECTRIQUE
Ouvrir le bornier :
natural_image
Technical line drawing of a mechanical assembly with no visible text or symbolsINFORMATIONS TECHNIQUES DIMENSIONS INTÉRIEURES
Largeur 65,7 cm
Profondeur 43,5 cm
Hauteur 35,1 cm
ВНИМАНИЕ
natural_image
Technical line drawing of a mechanical component with no visible text or symbolsохлаждения
natural_image
Technical line drawing of a mechanical bracket or housing component (no text or symbols)
- CONEXIÓN ELÉCTRICA
- DATOS TÉCNICOS
- DIMENSIONES INTERIORES
- LIGAÇÃO ELÉCTRICA
- DADOS TÉCNICOS DIMENSÕES INTERIORES
- GENERAL INFORMATION
- EC Symbol - 93/68 Low voltage - 73/23 CEM-89/336 Safety Rules - EN 60 335-1, EN 60 335 - 2 - 6.
- IMPORTANT NOTICE
- SAFETY INSTRUCTIONS AND WARNING
- How to use your oven
- Convection mode 2540-2988W
- "Fast cooking" Mode 2561-3005W
- Multi-Cooking Mode 2733-3278W
- Pizza Mode 3166-3660W
- Delicate cooking 4367-1570W
- "Top" oven 1330-1523W
- Grill 2928-3375W
- Fan Assisted Grill 2953-3400W
- Baking Mode 1950-2276W
- "Defrosting" Mode 70-87W
- The turnspit (only available on certain models)
- Settings
- Setting the time(clock)
- Manual operation
- Semi automatic operation and cooking duration
- Semi automatic operation and end of cooking time
- Completely automatic operation
- Minute control
- Buzzer
- Program start-up and check
- Setting error
- The oven light
- Cooling ventilation
- Practical Cooking Advice
- Preheating
- Cooking on More Than One Rack
- Using the "Fast Cooking" Mode
- Using the Grill
- Baking Cakes
- Pastry is too dry
- Pastry dropped
- Pastry is too dark on top
- Cooked well on the inside but sticky on the outside
- The Pastry sticks to the pan
- I used more than one level (in the function "ventilated oven") and they are not all at the same cooking point
- Cooking Pizza
- Cooking Fish and Meat
- CLEANING THE APPLIANCE
- IMPORTANT
- VITRIFIED ENAMELLED PARTS
- REMOVING THE DOOR FROM THE OVEN
- Door type A / B2
- WARNING
- INSTRUCTIONS FOR INSTALLATION
- PRIOR START-UP OF THE APPLIANCE
- FITTING THE APPLIANCE (see Fig. 5)
- INSTALLATION NOTES
- ELECTRICAL CONNECTION
- Connecting the supply cable to the mains
- MAINTENANCE
- REPLACEMENT OF THE OVEN LIGHTBULB
- SPECIFICATIONS
- INTERIOR DIMENSIONS
- ELECTRICAL INFORMATION
- POWER ABSORPTION
- INSTRUCTIONS POUR L'UTILISATEUR
- Mode convection 2540-2988 W
- RACCORDEMENT ÉLECTRIQUE
- Ouvrir le bornier :
- ВНИМАНИЕ
Brand : CATA
Model : ME 910
Category : Oven