
New Classics Kitchen Scale 492954 - Kitchen scales PRINCESS - Free user manual and instructions
Find the device manual for free New Classics Kitchen Scale 492954 PRINCESS in PDF.
| Product type | Electronic kitchen scale |
| Maximum capacity | 5000 g / 176 oz |
| Measurement units | Grams (g) or ounces (oz) |
| Power supply | 4 x 1.5V batteries (LR6/AA) |
| Material | Chrome steel |
| Display | LCD |
| Built-in timer | Yes, up to 90 minutes |
| Functions | Weighing with tare, unit selection, timer with alarm |
| Auto shut-off | After 1 minute of inactivity |
| Box contents | Scale, tray, lid, bulk container, microfiber cloth |
| Maintenance | Clean with dry microfiber cloth |
| Safety | Household use only, do not immerse, do not use outdoors |
| Repairability | User-replaceable batteries; repairs by qualified technician |
| General information | New Classics line, battery charge indicator, auto shut-off |
Frequently Asked Questions - New Classics Kitchen Scale 492954 PRINCESS
User questions about New Classics Kitchen Scale 492954 PRINCESS
0 question about this device. Answer the ones you know or ask your own.
Ask a new question about this device
Download the instructions for your Kitchen scales in PDF format for free! Find your manual New Classics Kitchen Scale 492954 - PRINCESS and take your electronic device back in hand. On this page are published all the documents necessary for the use of your device. New Classics Kitchen Scale 492954 by PRINCESS.
USER MANUAL New Classics Kitchen Scale 492954 PRINCESS
New Classics Kitchen Scale Article 2954
Nederlands 1
English 4
Français 7
Deutsch 10
Espanol 13
Italiano 17
Svenska 21
Dansk 24
Norsk 27
Suomi 30
Portugues 33
36
- Gebruksaanwijzing - User's instructions - Mode d'emploi
- Bedienungsanleitung - Instruetiones de uso - Istruzione per l'uso
- Bruksanvising - Brugsanvising - Bruksanvising
- Kayttöhje - Instruções de uso
C

0
2
3

Algemeen
This attractive Princess New Classics Kitchen Scale is one of the products in our New Classics range, all of which are finished in sturdy chrome-plated steel. You can use your Kitchen Scale to weigh products to 5000 g/176 oz. It also includes a handy kitchen timer.

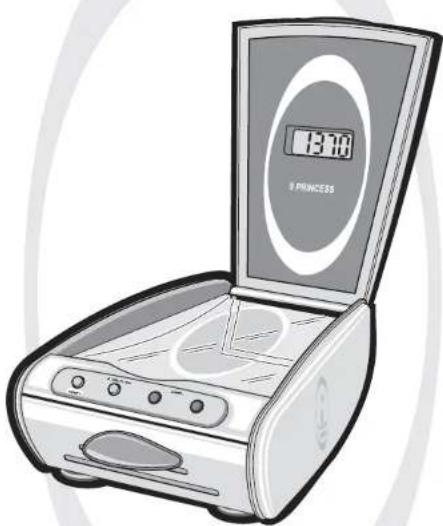
Operation and controls
See Figure 1.
The appliance is equipped with the following features:
1 On/off and reset button
2 g/oz and start/stop button
3 T i m e r -
4 T i m e r +
5 Weighing platform
6 Cover
7 LCD display
8 Cover for four 1.5 V batteries
9 Container for loose products.
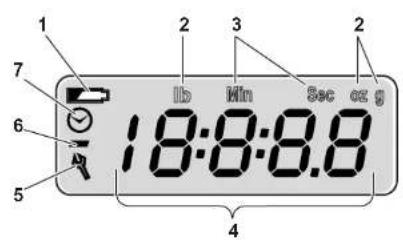
See Figure 2.
The LCD display has the following functionalities:
1 Battery indicator
2 Units of weight (g or oz)
3 Units of time (min and sec)
4 Display of weight or time
5 Spanner (in the event of malfunction)
6 Minus sign (for negative weight)
7 Indicator for timer mode.
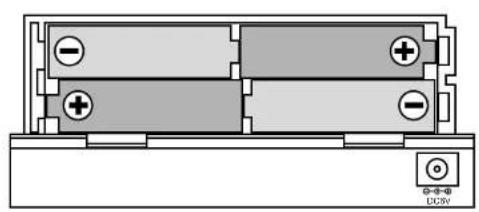
Before use for the first time
See Figure 3.
1 Remove the packaging.
2 Remove the battery cover at the rear of the appliance.
3 Fit four 1.5 V batteries as indicated on the appliance.
4 Fit the cover to the battery compartment.
Use
- Place the appliance on a hard and level surface, as free from vibration as possible.
- Put the appliance in a place where it cannot fall off the worktop.
Weighing products
1 Open the cover.
2 Press the on/off and reset button to switch on the appliance. '888' will be shown on the display, and '0g' will then be shown after 1 second (default display).
3 Press the g/oz and start/stop button to switch between g and oz. The selected unti is shown at the top of the display. You can change units at any time you wish.
4 To weigh loose products such as rice, slide the container out of the front of the appliance and put it on the weighing platform.
5 Reset the appliance by briefly pressing the on/off and reset button. This sets the weight to '0'. You can use this button at any time you wish.
6 Put the product on the weighing platform or in the container (where relevant). On weighing product with a weight of more than (5000g / 176oz) 'EEEE' will be shown in the display. Reset the appliance by pressing the on/off and reset button. The default display will be shown. You can now weigh a new product using the above procedure.
7 Read the weight.
8 Remove the product (where relevant, with the container) from the appliance. The appliance may display a negative weight. A '-' sign will then be shown at the left of the display.
9 Press the on/off and reset button for 1 second to switch off the appliance. The appliance will also switch off automatically when it is not used for 1 minute.
Setting the timer
You can set the timer whenever you wish.
1 Open the cover.
2 Press the on/off and reset button to switch on the appliance. '888' will be shown on the display, and '0g' will ten be shown after 1 second (default display).
3 Press either 'timer -' or 'timer +' to switch on the timer. A clock (②) will be shown at the left of the display. 'min' and 'sec' are shown at the top of the display. '00:00' is shown in the middle of the display.
4 Press 'timer +' to increase the time in intervals of 30 seconds. The maximum time is 90 minutes.
5 Press 'timer -' to decrease the set time in intervals of 30 seconds (you cannot set a negative time). Keeping 'timer +' or 'timer -' pressed in will increase the speed at which the time is increased or decreased.
6 Press the g/oz and start/stop button to switch on the timer. You can interrupt the timer by pressing the g/oz and start/stop button. Press the button again to restart the timer.
7 The timer counts back to '0'. When there are 5 seconds left the timer emits a brief beep every 0.5 second. When the timer reaches 0, then '00:00' will flash on the display for 10 seconds. Press any button to stop the beep.
8 Press the on/off and reset button to return to the default display of the
weighing mode. You can also do this while the timer is running; however, this will stop the timer. You will then need to set the timer again.
9 Press the on/off and reset button to switch off the appliance. The appliance will also switch off automatically when it is not used for 1 minute.

Maintenance and cleaning
Replacing the batteries
Replace the batteries immediately if the battery indicator at the top left of the display begins to flash.
1 Switch off the appliance.
2 Remove the battery cover.
3 Replace the batteries.
4 Fit the cover to the battery compartment.

Cleaning the Kitchen Scale
- Do not immerse the appliance in water, or in other liquids. If this happens do not use the appliance any more; dispose of the appliance.
- Never use corrosive or scouring cleaning agents.
1 Clean the control panel solely with the special microfibre cloth supplied with the appliance. Do not moisten the cloth.
Troubleshooting
A spanner is shown at the bottom left of the display (Fig. 2; 5) in the event of a specific malfunction. Rectify this malfunction using the following procedure:
1 Switch off the appliance by pressing the on/off and reset button for 1 s.
2 Remove the batteries, and then fit them correctly in the battery compartment (see 'Replacing batteries').
3 Switch the appliance on again.

Safety
General
- Please read these instructions carefully and retain them for reference.
- Use this appliance only in accordance with the instructions.
- This appliance is intended solely for domestic use.
- Keep the appliance out of the reach of children, and of persons who may not be able to operate it safely.
- Have the appliance repaired only by a qualified electrician. Never try to repair the appliance yourself.
Electricity and heat
- Make sure that the appliance does not come in contact with sources of heat, such as a hot hob or naked flame.
- Make sure that the appliance does not come in contact with water.
During use
- Never use the appliance outdoors.
- Place the appliance on a hard and level surface, as free from vibration as possible.
- Put the appliance in a place where it cannot fall off the worktop.
- Make sure that your hands are dry before touching the appliance.
-
Never use the appliance in a humid room.
-
Switch off the appliance in the event of a malfunction during use, and before cleaning the appliance or storing it after use.
- Never move the appliance whilst it is switched on. Always switch off the appliance first.

The Environment
Dispose of packaging material, such as plastic and boxes, in the appropriate waste containers.

When it reaches the end of its useful life the appliance must be disposed of in a responsible manner. Contact your municipal council or refuse-disposal agency for disposal instructions. You can also hand in the appliance to the retailer.

Généralités
Jg
JgJ reset on/off jh
. g g . A L 1
. (A J I) O dI
J start/stop g/oZ j
L f a J
. z J
. Z J
Jg J
Jg J
Jg J
Jg J
Jg J
Jg J
Jg J
Jg J
Jg J
Jg J
Jg J
Jg J
Jg J
Jg J
Jg J
Jg J
Jg J
Jg J
Jg J
Jg J
Jg J
Jg J
Jg J
Jg J
Jg J
J g J
Jg J
Jg J
Jg J
Jg J
Jg J
Jg J
Jg J
Jg J
Jg J
Jg J
Jg J
aiJ reset on/off jI
1 2 3 4 5
L
1 1
lg2x = 1x ( 0 < x < 1 )
aolllgjLILwIgJgJgJg
a
JcI sLgX reset on/off jJI Ie
Laljol jol jol jol jol
.0>1g 4a 0d pssu
ag11 bu
· = 0
[ \Leftrightarrow \frac{a - b}{b - c} = \frac{c - d}{d - c}]
oLg on/off aegjI / Jie jll jj
AAA jglj J reset hJ
a>1g aji 2 gjg j
(a)
.ogj+timerg-timer
jbj. aWuJ J Lw y acLwJ jbj
gj 10 sec g min
L 1
LjJ 1jJ+ timer
a1 = 2,a2 = - 4
logial - timer
1234567890
JLW
g+timer 15
gJ 1 J 1 J 1 - timer
L_2 = 90^ . L : y
J start/stop g/oz j1
jJl hiei: iogll aeblo jSc.igll
sJ 0jJ. start/stopg/oz
Lg1
Lioic . 1jlii o8gll
a1 = 2,an + 1 = n1 + n2 - _n1
JgI JLoic .Lg
1 1 1 1 1 1 1 1 1 1
a1 = 2,an + 1 = 12( an + an + 1) > 0
Jd reset on/off 1
Jsc LoS.0gJg J aL
aegjw jJg JooJI slji JJJ 1
aagll bua ic gagg
.5
oLg on/off aegil / Jie jie jie jie jie 9
Lo5:Jg1 Joc slg reset hnnn
j 121 Lla JaoJI jgJ
a2 = 12,a3 = 2

aolw

PLc

aol31 a laaJy Jaa 05xil a>gl b; 1
JSL
aLl 10 100000000000000000000000000000000000000000000000

J5 1gS, p Lbll C
S1 = 12 · O1O_2 = 12 × 2t .
L
puiw 1
.
gimog uo zhaow lc jlgdi
jzjjz21 00 Lg
15 < x2 < x1
ai = bi = x
J 1 J
lg = ^2 + 1
a.b. a.b.c g jlg 1 puiuui x
1 1
auij jgl aaii jg 1LQ
S OBC = S COD + S_ BOC
Ai = ( 1,12,14,0) ,Bj = ( 0,14,14,14)
j_a

a1 = 2,an + 1 = n1 + n2 - _n3
.aaalll lalil 1sulldg .dlaJg
1
a3 = 12,b3 = 13,c_4 = 16
JLSg g J LJI JLJI JIJI JIJI
Jg 1
= Lwii Jsc Lss Val J_ii
J! j