
CDXG1201U - Car radio SONY - Free user manual and instructions
Find the device manual for free CDXG1201U SONY in PDF.
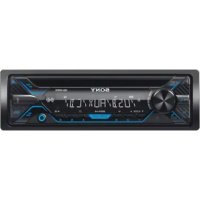


| Product type | Car radio |
| Brand | Sony |
| Model | CDXG1201U |
| Dimensions (W × H × D) | 178 × 50 × 177 mm |
| Weight | 1.2 kg |
| Power supply | 12 V DC (negative ground) |
| Nominal current consumption | 10 A |
| Maximum output power | 55 W × 4 (at 4 Ω) |
| Speaker impedance | 4 Ω - 8 Ω |
| FM radio tuner | 87.5 - 108.0 MHz (Europe) / FM1/FM2: 87.5 - 108.0 MHz, FM3: 65 - 74 MHz (Russia) |
| MW radio receiver | 531 - 1602 kHz |
| LW radio receiver | 153 - 279 kHz |
| CD player | CD, CD-R, CD-RW |
| Compatible audio formats | MP3, WMA, FLAC |
| USB port | USB full speed, 500 mA (compatible with AOA 2.0, MSC, MTP) |
| AUX input | Stereo mini jack |
| Steering wheel control | Yes (wired, programmable) |
| RDS system | AF, TA, PTY, CT, REGIONAL |
| Equalizer | 10 bands presets + custom |
| Display | Adjustable brightness (10 levels), dimmer function |
| Detachable front panel | Yes, with anti-theft alarm |
| Demonstration mode | Can be disabled via menu |
| Maintenance | Clean the connectors with a cotton swab |
| Fuse | 10 A (check the value on the unit) |
| Included accessories | Mounting sleeve, trim ring, release keys, cables |
Frequently Asked Questions - CDXG1201U SONY
User questions about CDXG1201U SONY
0 question about this device. Answer the ones you know or ask your own.
Ask a new question about this device
Download the instructions for your Car radio in PDF format for free! Find your manual CDXG1201U - SONY and take your electronic device back in hand. On this page are published all the documents necessary for the use of your device. CDXG1201U by SONY.
USER MANUAL CDXG1201U SONY
FM/MW/LW Compact Disc Player
CD player with built-in FM/MW/LW tuner
FM/MW/LW programmable compact disc player
To cancel the demonstration (DEMO) display, see page 10.
For the connection/installation, see page 20.
Operating Instructions GB
For safety, be sure to install this unit in the dashboard of the car as the rear side of the unit becomes hot during use. For details, see "Connection/Installation" (page 20).
Made in Thailand
Laser Diode Properties
- Emission Duration: Continuous
- Laser Output: Less than 53.3 μW
(This output is the value measurement at a distance of 200 mm from the objective lens surface on the Optical Pick-up Block with 7 mm aperture.)
The nameplate indicating operating voltage, etc., is located on the bottom of the chassis.
CE
Hereby, Sony Corporation declares that this equipment is in compliance with Directive 2014/53/EU.
The full text of the EU declaration of conformity is available at the following internet address:
http://www.compliance.sony.de/
This equipment is intended to be used with the approved version(s) of software that are indicated in the EU Declaration of Conformity.
The software loaded on this equipment is verified to comply with the essential requirements of the Directive 2014/53/EU. Software version: 1_
The software version can be checked in the firmware setup item of the general setup menu.
Notice for customers: the following information is only applicable to equipment sold in countries applying EU Directives
Manufacturer: Sony Corporation, 1-7-1 Konan Minato-ku Tokyo, 108-0075 Japan For EU product compliance: Sony Belgium, bijkantoor van Sony Europe Limited, Da Vincilaan 7-D1, 1935 Zaventem, Belgium
Disposal of waste batteries and electrical and electronic equipment (applicable in the European Union and other European countries
with separate collection systems)
This symbol on the product, the battery or on the packaging indicates that the product and the battery shall not be treated as household waste. On certain batteries this symbol might be used in combination with a chemical symbol. The chemical symbols for mercury (Hg) or lead (Pb) are added if the battery contains more than 0.0005% mercury or 0.004% lead.
By ensuring these products and batteries are disposed of correctly, you will help prevent potentially negative consequences for the environment and human health which could otherwise be caused by inappropriate waste handling. The recycling of the materials will help to conserve natural resources.
In case of products that for safety, performance or data integrity reasons require a permanent connection with an incorporated battery, this battery should be replaced by qualified service staff only.
To ensure that the battery and the electrical and electronic equipment will be treated properly, hand over these products at end-of-life to the applicable collection point for the recycling of electrical and electronic equipment.
For all other batteries, please view the section on how to remove the battery from the product safely. Hand the battery over to the applicable collection point for the recycling of waste batteries.
For more detailed information about recycling of this product or battery, please contact your local Civic Office, your household waste disposal service or the shop where you purchased the product or battery.
Warning if your car's ignition has no ACC position
Be sure to set the AUTO OFF function (page 10). The unit will shut off completely and automatically in the set time after the unit is turned off, which prevents battery drain. If you do not set the AUTO OFF function, press and hold OFF until the display disappears each time you turn the ignition off.
Disclaimer regarding services offered by third parties
Services offered by third parties may be changed, suspended, or terminated without prior notice. Sony does not bear any responsibility in these sorts of situations.
Table of Contents
Guide to Parts and Controls 4
Getting Started
Detaching the Front Panel. 5
Resetting the Unit 5
Setting the Clock 6
Connecting a USB Device 6
Connecting Other Portable Audio Device 6
Listening to the Radio
Listening to the Radio 7
Using Radio Data System (RDS) 7
Playback
Playing a Disc 8
Playing a USB Device 8
- Searching and Playing Tracks 9
Settings
Canceling the DEMO Mode 10
Basic Setting Operation. 10
General Setup (GENERAL) 10
Sound Setup (SOUND) 11
Display Setup (DISPLAY) 12
Additional Information
Updating the Firmware 13
Precautions. 13
Maintenance. 14
Specifications 14
Troubleshooting 16
Messages 18
Connection/Installation
Cautions 20
Parts List for Installation 20
Connection 21
Installation 23
Guide to Parts and Controls
Main unit
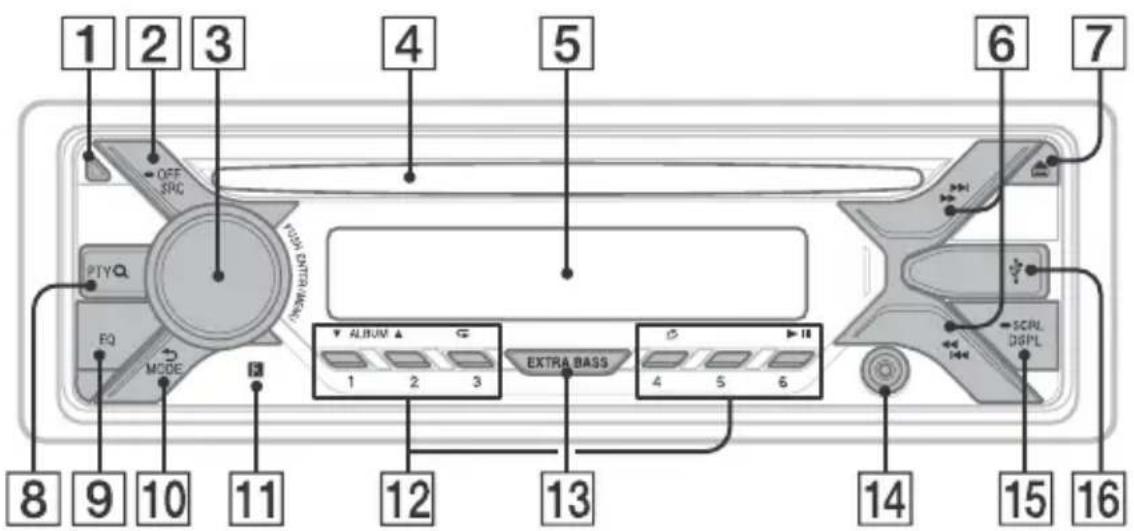
1 Front panel release button 2 SRC (source)
Turn on the power.
Change the source.
OFF
Press and hold for 1 second to turn the source off and display the clock.
Press and hold for more than 2 seconds to turn off the power and the display.
3 Control dial
Rotate to adjust the volume.
PUSH ENTER
Enter the selected item.
MENU
Open the setup menu.
4 Disc slot 5 Display window 6 S E E K - / + )
Tune in radio stations automatically.
Press and hold to tune manually.
I/prev/next)
(fast-reverse/fast-forward)
7 (disc eject)
8 PTY (program type)
Select PTY in RDS.
Q (browse) (page 9)
Enter the browse mode during playback.
Not available when a USB device in
Android mode is connected.)
EQ (equalizer)
Select an equalizer curve.
10 (back)
Return to the previous display.
MODE (page 7)
11 Receptor for the remote commander
12 Number buttons (1 to 6)
Receive stored radio stations. Press and hold to store stations.
ALBUM ∇/△
Skip an album for audio device. Press and hold to skip albums continuously.
(Not available when a USB device in
Android mode is connected.)
(repeat)
(Not available when a USB device in
Android mode is connected.)
(shuffle)
(Not available when a USB device in
Android mode is connected.)
II (play/pause)
13 EXTRA BASS
Reinforces bass sound in synchronization with the volume level. Press to change the EXTRA BASS setting: [1], [2], [OFF].
14 AUX input jack
15 DSPL(display)
Change display items.
SCRL (scroll)
Press and hold to scroll a display item.
16 USB port
Getting Started
Detaching the Front Panel
You can detach the front panel of this unit to prevent theft.
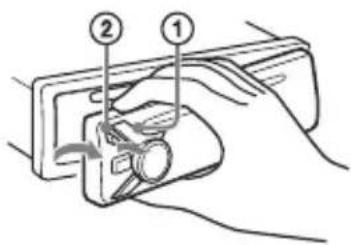
1 Press and hold OFF ① until the unit turns off, press the front panel release button ②, then pull the panel towards you to remove.
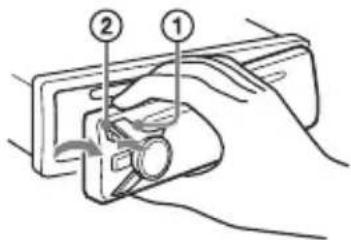
Caution alarm
If you turn the ignition switch to the OFF position without detaching the front panel, the caution alarm will sound for a few seconds. The alarm will only sound if the built-in amplifier is used.
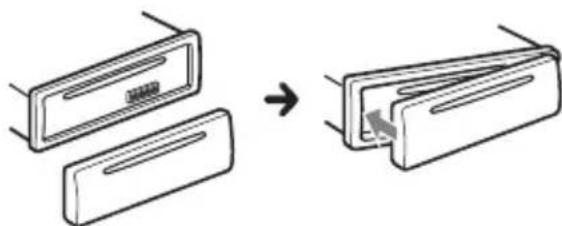
Attaching the front panel
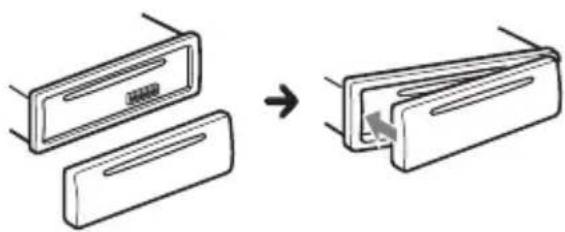
Resetting the Unit
Before operating the unit for the first time, or after replacing the car battery or changing connections, you must reset the unit.
1 Press DSPL and (back)/MODE for more than 2 seconds.
Note
Resetting the unit will erase the clock setting and some stored contents.
Setting the area/region
After resetting the unit, the area/region setting display appears.
1 Press ENTER while [SET AREA] is displayed.
The area/region currently set appears.
2 Rotate the control dial to select [EUROPE] or [RUSSIA], then press it. 3 Rotate the control dial to select [YES] or [NO], then press it. If the setting area/region is changed, the unit is reset, then the clock is displayed.
This setting can be configured in the general setup menu (page 10).
Setting the Clock
1 Press MENU, rotate the control dial to select [GENERAL], then press it. 2 Rotate the control dial to select [SET CLOCK-ADJ], then press it. The hour indication flashes. 3 Rotate the control dial to set the hour and minute. To move the digital indication, press SEEK + / -. 4 After setting the minute, press MENU. The setup is complete and the clock starts.
To display the clock, press DSPL.
Connecting a USB Device
1 Turn down the volume on the unit. 2 Connect the USB device to the unit.
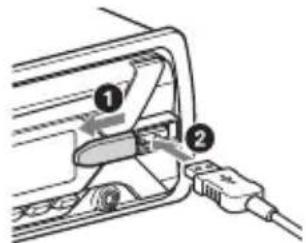
Connecting Other Portable Audio Device
1 Turn off the portable audio device. 2 Turn down the volume on the unit. 3 Connect the portable audio device to the AUX input jack (stereo mini jack) on the unit with a connecting cord (not supplied)*.
- Be sure to use a straight type plug.
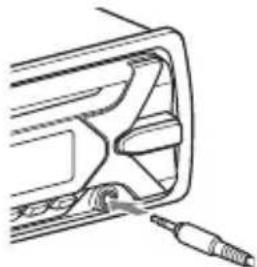
4 Press SRC to select [AUX].
To match the volume level of the connected device to other sources
Start playback of the portable audio device at a moderate volume, and set your usual listening volume on the unit. Press MENU, then select [SOUND] → SET AUX VOL.
Listening to the Radio
Listening to the Radio
To listen to the radio, press SRC to select [TUNER].
Storing automatically (BTM)
1 Press MODE to change the band (FM1, FM2, FM3, MW or LW). 2 Press MENU, rotate the control dial to select [GENERAL], then press it. 3 Rotate the control dial to select [SET BTM], then press it.
The unit stores stations in order of frequency on the number buttons.
Tuning
1 Press MODE to change the band (FM1, FM2, FM3, MW or LW). 2 Perform tuning.
To tune manually
Press and hold SEEK + / - to locate the approximate frequency, then press SEEK + / - repeatedly to fine adjust to the desired frequency.
To tune automatically
Press SEEK + / -
Scanning stops when the unit receives a station.
Storing manually
1 While receiving the station that you want to store, press and hold a number button (1 to 6) until [MEM] appears.
Receiving the stored stations
1 Select the band, then press a number button (1 to 6).
Using Radio Data System (RDS)
Setting alternative frequencies (AF) and traffic announcement (TA)
AF continuously retunes the station to the strongest signal in a network, and TA provides current traffic information or traffic programs (TP) if received.
1 Press MENU, rotate the control dial to select [GENERAL], then press it. 2 Rotate the control dial to select [SET AF/TA], then press it. 3 Rotate the control dial to select [SET AF-ON], [SET TA-ON], [SET AF/TA-ON] or [SET AF/TA-OFF], then press it.
To store RDS stations with the AF and TA setting
You can preset RDS stations along with an AF/TA setting. Set AF/TA, then store the station with BTM or manually. If you preset manually, you can also preset non-RDS stations.
To receive emergency announcements
With AF or TA on, emergency announcements will automatically interrupt the currently selected source.
To adjust the volume level during a traffic announcement
Level will be stored into memory for subsequent traffic announcements, independently from the regular volume level.
To stay with one regional program (REGIONAL)
When the AF and REGIONAL functions are on, you will not be switched to another regional station with a stronger frequency. If you leave this regional program's reception area, set [SET REG-OFF] in [GENERAL] during FM reception (page 11).
This function does not work in the UK and some other areas.
Local Link function (UK only)
This function enables you to select other local stations in the area, even if they are not stored on your number buttons. During FM reception, press a number button (1 to 6) on which a local station is stored. Within 5 seconds, press again a number button of the local station. Repeat this procedure until the local station is received.
Selecting program types (PTY)
1 Press PTY during FM reception. 2 Rotate the control dial until the desired program type appears, then press it. The unit starts to search for a station broadcasting the selected program type.
Type of programs
NEWS (News), AFFAIRS (Current Affairs), INFO (Information), SPORT (Sports), EDUCATE (Education), DRAMA (Drama), CULTURE (Culture), SCIENCE (Science), VARIORED (Varied), POP M (Pop Music), ROCK M (Rock Music), EASY M (M.O.R. Music), LIGHT M (Light classical), CLASSICS (Serious classical), OTHER M (Other Music), WEATHER (Weather), FINANCE (Finance), CHILDREN (Children's program), SOCIAL A (Social Affairs), RELIGION (Religion), PHONE IN (Phone In), TRAVEL (Travel), LEISURE (Leisure), JAZZ (Jazz Music), COUNTRY (Country Music), NATION M (National Music), OLDIES (Oldies Music), FOLK M (Folk Music), DOCUMENT (Documentary)
Setting clock time (CT)
The CT data from the RDS transmission sets the clock.
1 Set [SET CT-ON] in [GENERAL] (page 11).
Playback
Playing a Disc
1 Insert the disc (label side up).
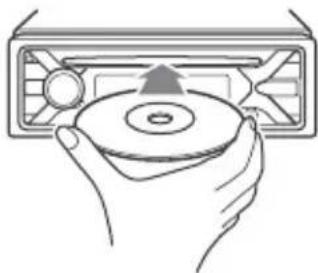
Playback starts automatically.
Playing a USB Device
AOA (Android Open Accessory) 2.0, MSC (Mass Storage Class) and MTP (Media Transfer Protocol) type USB devices* compliant with the USB standard can be used. Depending on the USB device, the Android mode or MSC/MTP mode can be selected on the unit. Some digital media players or Android smartphones may require setting to MTP mode.
- e.g., a USB flash drive, digital media player, Android smartphone
Notes
- For details on the compatibility of your USB device, visit the support site on the back cover.
- Smartphones with Android OS 4.1 or higher installed support Android Open Accessory 2.0 (AOA 2.0). However, some smartphones may not fully support AOA 2.0 even if Android OS 4.1 or higher is installed. For details on the compatibility of your Android smartphone, visit the support site on the back cover.
- Playback of the following files is not supported. MP3/WMA/FLAC: copyright-protected files
- DRM (Digital Rights Management) files
- Multi-channel audio files MP3/WMA:
- lossless compression files
Before making a connection, select the USB mode (Android mode or MSC/MTP mode) depending on the USB device (page 11).
1 Connect a USB device to the USB port (page 6).
Playback starts.
If a device is already connected, to start playback, press SRC to select [USB].
2 Adjust the volume on this unit.
To stop playback
Press and hold OFF for 1 second.
To remove the device
Stop playback, then remove the device.
Searching and Playing Tracks
Repeat play and shuffle play
Not available when a USB device in Android mode is connected.
1 During playback, press (repeat) or (shuffle) repeatedly to select the desired play mode.
Playback in the selected play mode may take time to start.
Available play modes differ depending on the selected sound source.
Searching a track by name (QuickBrowZerTM)
Not available when a USB device in Android mode is connected.
1 During CD or USB playback, press (browse)* to display the list of search categories.
When the track list appears, press (back) repeatedly to display the desired search category.
- During USB playback, press (browse) for more than 2 seconds to directly return to the beginning of the category list.
2 Rotate the control dial to select the desired search category, then press it to confirm.
3 Repeat step 2 to search the desired track.
Playback starts.
To exit the Quick-BrowZer mode
Press (browse).
Searching by skipping items (Jump mode)
Not available when a USB device in Android mode is connected.
1. Press Q (browse). 2. Press SEEK+. 3. Rotate the control dial to select the item.
The list is jumped in steps of 10% of the total number of items.
4. Press ENTER to return to the Quick-BrowZer mode.
The selected item appears.
5. Rotate the control dial to select the desired item, then press it.
Playback starts.
Settings
Canceling the DEMO Mode
You can cancel the demonstration display which appears when the source is off and the clock is displayed.
1. Press MENU, rotate the control dial to select [GENERAL], then press it. 2. Rotate the control dial to select [SET DEMO], then press it. 3. Rotate the control dial to select [SET DEMO-OFF], then press it. The setting is complete. 4. Press (back) twice.
The display returns to normal reception/play mode.
Basic Setting Operation
You can set items in the following setup categories: General setup (GENERAL), Sound setup (SOUND), Display setup (DISPLAY)
1 Press MENU. 2 Rotate the control dial to select the setup category, then press it. The items that can be set differ depending on the source and settings. 3 Rotate the control dial to select the options, then press it.
To return to the previous display
Press (back).
General Setup (GENERAL)
AREA
Specifies the area/region to use this unit: [EUROPE], [RUSSIA].
If the area/region currently set is changed, this unit is reset, then the clock is displayed.
(Available only while the source is off and the clock is displayed.)
DEMO (demonstration)
Activates the demonstration: [ON], [OFF].
CLOCK-ADJ (clock adjust) (page 6)
CAUT ALM (caution alarm)
Activates the caution alarm: [ON], [OFF] (page 5).
(Available only while the source is off and the clock is displayed.)
BEEP
Activates the beep sound: [ON], [OFF].
AUTO OFF
Shuts off automatically after a desired time when the unit is turned off: [ON] (30 minutes), [OFF].
STEERING
Registers/resets the setting of the steering wheel remote control.
(Available when connected with the connection cable (not supplied).)
(Available only while the source is off and the clock is displayed.)
STR CONTROL (steering control)
Selects the input mode of the connected remote control. To prevent a malfunction, be sure to match the input mode with the connected remote control before use.
CUSTOM
Input mode for the steering wheel remote control
PRESET
Input mode for the wired remote control excluding the steering wheel remote control (automatically selected when [RESET CUSTOM] is performed.)
EDIT CUSTOM
Registers the functions (SOURCE, ATT, VOL +/-, SEEK +/-) to the steering wheel remote control:
1 Rotate the control dial to select the function you want to assign to the steering wheel remote control, then press it. 2 While [REGISTER] is blinking, press and hold the button on the steering wheel remote control you want to assign the function to. When registration is complete, [REGISTERED] is displayed. 3 To register other functions, repeat steps 1 and 2.
(Available only when [STR CONTROL] is set to [CUSTOM].)
RESET CUSTOM
Resets the setting of the steering wheel remote control: [YES], [NO].
(Available only when [STR CONTROL] is set to [CUSTOM].)
Notes
- While making settings, only button operation on the unit is available. For safety, park your car before making this setting. If an error occurs while registering, all the previously-registered information remains. Restart registration from the function where the error occurred.
- This function may not be available on some vehicles. For details on the compatibility of your vehicle, visit the support site on the back cover.
USB MODE
Changes the USB mode: [ANDROID], [MSC/MTP].
(Available only when the USB source is selected.)
CT (clock time)
Activates the CT function: [ON], [OFF].
AF/TA (alternative frequencies/traffic announcement)
Selects the alternative frequencies (AF) and traffic announcement (TA) setting: [AF-ON], [TA-ON], [AF/TA-ON], [AF/TA-OFF].
REGIONAL
Restricts reception to a specific region: [ON], [OFF].
(Available only when FM is received.)
BTM (best tuning memory) (page 7) (Available only when the tuner is selected.)
FIRMWARE
(Available only while the source is off and the clock is displayed.)
Checks/updates the firmware version. For details, visit the support site on the back cover.
FW VERSION (firmware version)
Displays current firmware version.
FW UPDATE (firmware update)
Enters firmware update process: [YES], [NO].
Updating the firmware takes a few minutes to complete. During the update, do not turn the ignition to the OFF position, nor remove the USB device.
Sound Setup (SOUND)
EQ10 PRESET
Selects an equalizer curve from 10 equalizer curves or off:
[OFF], [R&B], [ROCK], [POP], [HIP-HOP], [ELECTRONICA], [JAZZ], [SOUL],
[COUNTRY], [KARAOKE]*, [CUSTOM].
The equalizer curve setting can be memorized for each source.
- [KARAOKE] reduces the vocal sound but cannot be fully removed during playback. Also, using a microphone is not supported.
EQ10 CUSTOM
Sets [CUSTOM] of EQ10.
Setting the equalizer curve: [BAND1] 32 Hz, [BAND2] 63 Hz, [BAND3] 125 Hz,
[BAND4] 250 Hz, [BAND5] 500 Hz, [BAND6] 1 kHz, [BAND7] 2 kHz, [BAND8] 4
kHz, [BAND9] 8 kHz, [BAND10] 16 kHz.
The volume level is adjustable in 1 dB steps, from -6 dB to +6 dB.
BALANCE
Adjusts the sound balance: [RIGHT-15] - [CENTER] - [LEFT-15].
FADER
Adjusts the relative level: [FRONT-15] - [CENTER] - [REAR-15].
([ATT] is displayed at the lowest setting.)
Selects the subwoofer phase: [NORM], [REV].
LPF FREQ (low pass filter frequency)
Selects the subwoofer cut-off frequency:
[80Hz], [100Hz], [120Hz].
HPF FREQ (high pass filter frequency)
Selects the front/rear speaker cut-off
frequency: [OFF], [80Hz], [100Hz], [120Hz].
AUX VOL (AUX volume level)
Adjusts the volume level for each
connected auxiliary device: [+18 dB]
[0 dB] - [-8 dB].
This setting negates the need to adjust
the volume level between sources.
(Available only when the AUX is selected.)
Display Setup (DISPLAY)
DIMMER
Changes the display brightness: [ON], [OFF], [CLK].
To set this function to be active only during a fixed period, select [CLK], then set the start and end times.
- To set the brightness when the dimmer function is activated:
Set [DIMMER] to [ON], then adjust [BRIGHTNESS].
- To set the brightness when the dimmer function is deactivated:
Set [DIMMER] to [OFF], then adjust [BRIGHTNESS].
The brightness setting is stored and applied when the dimmer function is activated or deactivated.
BRIGHTNESS
Adjusts the display brightness. The brightness level is adjustable: [1] - [10].
SND SYNC (sound synchronization)
Activates the synchronization of the illumination with the sound: [ON], [OFF].
AUTO SCR (auto scroll)
Scrolls long items automatically: [ON], [OFF].
Not available when the AUX or tuner is selected.
Additional Information
Updating the Firmware
To update the firmware, visit the support site on the back cover, then follow the online instructions.
Notes
- Using a USB device (not supplied) is required for updating the firmware. Store the updater in the USB device, and connect the device to the USB port, then perform the update operation.
- Updating the firmware takes a few minutes to complete. During the update, do not turn the ignition to the OFF position, nor remove the USB device.
Precautions
Cool off the unit beforehand if your car has been parked in direct sunlight. - Do not leave the front panel or audio devices brought in inside the car, or it may cause malfunction due to high temperature in direct sunlight. - Power antenna (aerial) extends automatically.
Moisture condensation
Should moisture condensation occur inside the unit, remove the disc and wait for about an hour for it to dry out; otherwise the unit will not operate properly.
To maintain high sound quality
Do not splash liquid onto the unit or discs.
Notes on discs
- Do not expose discs to direct sunlight or heat sources such as hot air ducts, nor leave it in a car parked in direct sunlight.
- Before playing, wipe the discs with a cleaning cloth from the center out. Do not use solvents such as benzine, thinner, commercially available cleaners.
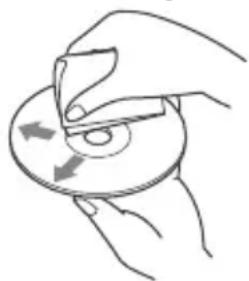
- This unit is designed to play discs that conform to the Compact Disc (CD) standard. DualDiscs and some of the music discs encoded with copyright protection technologies do not conform to the Compact Disc (CD) standard, therefore, these discs may not be playable by this unit.
- Discs that this unit CANNOT play
- Discs with labels, stickers, or sticky tape or paper attached. Doing so may cause a malfunction, or may ruin the disc.
- Discs with non-standard shapes (e.g., heart, square, star). Attempting to do so may damage the unit.
- 8 cm (1/4 in) discs.
Notes on CD-R/CD-RW discs
- If the multi-session disc begins with a CD-DA session, it is recognized as a CD-DA disc, and other sessions are not played.
- Discs that this unit CANNOT play
- CD-R/CD-RW of poor recording quality.
- CD-R/CD-RW recorded with an incompatible recording device.
- CD-R/CD-RW which is finalized incorrectly.
- CD-R/CD-RW other than those recorded in music CD format or MP3 format conforming to ISO9660 Level 1/Level 2, Joliet/Romeo or multi-session.
Playback order of audio files
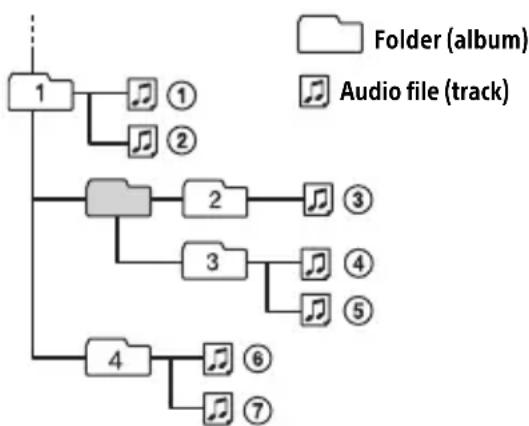
If you have any questions or problems concerning your unit that are not covered in this manual, consult your nearest Sony dealer.
Maintenance
Cleaning the connectors
The unit may not function properly if the connectors between the unit and the front panel are not clean. In order to prevent this, detach the front panel (page 5) and clean the connectors with a cotton swab. Do not apply too much force. Otherwise, the connectors may be damaged.
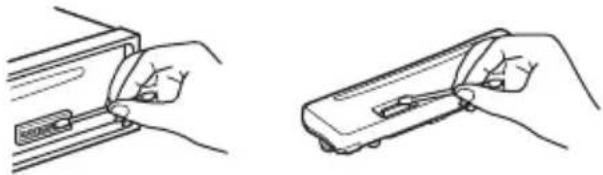
Notes
- For safety, turn off the ignition before cleaning the connectors, and remove the key from the ignition switch.
- Never touch the connectors directly with your fingers or with any metal device.
Specifications
Tuner section
FM
Tuning range: When [AREA] is set to [EUROPE]: 87.5 MHz - 108.0 MHz When [AREA] is set to [RUSSIA]: FM1/FM2: 87.5 MHz - 108.0 MHz (at 50 kHz step) FM3: 65 MHz - 74 MHz (at 30 kHz step) Antenna (aerial) terminal: External antenna (aerial) connector Intermediate frequency: When [AREA] is set to [EUROPE]: FM CCIR: -1,956.5 kHz to -487.3 kHz and +500.0 kHz to +2,095.4 kHz When [AREA] is set to [RUSSIA]: FM CCIR: -1,956.5 kHz to -487.3 kHz and +500.0 kHz to +2,095.4 kHz FM OIRT: -1,815.6 kHz to -943.7 kHz and +996.6 kHz to +1,776.6 kHz Usable sensitivity: 7 dBf Selectivity: 75 dB at 400 kHz Signal-to-noise ratio: 73 dB Separation: 50 dB at 1 kHz Frequency response: 20 Hz - 15,000 Hz MW/LW Tuning range: MW: 531 kHz - 1,602 kHz LW: 153 kHz - 279 kHz Antenna (aerial) terminal: External antenna (aerial) connector Sensitivity: MW: 26 μV, LW: 50 μV
CD Player section
Signal-to-noise ratio: 95 dB
Frequency response: 10 Hz - 20,000 Hz
Wow and flutter: Below measurable limit
The maximum number of: (CD-R/CD-RW only)
- folders (albums): 150 (including root folder)
- files (tracks) and folders: 300 (may be less than 300 if folder/file names contain many characters) displayable characters for a folder/file name: 32 (Joliet)/64 (Romeo) Corresponding codec: MP3 (.mp3) and WMA (.wma)
USB Player section
Interface: USB (Full-speed) Maximum current: 500 mA The maximum number of recognizable tracks: - folders (albums): 256 - files (tracks) per folder: 256 Compatible Android Open Accessory protocol (AOA): 2.0 Corresponding codec: MP3 (.mp3)
Bit rate: 8 kbps - 320 kbps (Supports VBR (Variable Bit Rate))
Sampling rate: 16 kHz - 48 kHz
WMA (.wma)
Bit rate: 32 kbps - 192 kbps (Supports VBR (Variable Bit Rate))
Sampling rate: 32 kHz, 44.1 kHz, 48 kHz
FLAC (.flac)
Bit depth: 16 bit, 24 bit
Sampling rate: 44.1 kHz, 48 kHz
Power amplifier section
Output: Speaker outputs
Speaker impedance: 4 Ω - 8 Ω
Maximum power output: 55 W × 4 (at 4 Ω)
General
Outputs:
Audio outputs terminal (REAR, SUB)
Power antenna (aerial)/Power amplifier control terminal (REM OUT)
Inputs:
Remote controller input terminal
Antenna (aerial) input terminal
Power requirements: 12 V DC car battery (negative ground (earth))
Rated current consumption: 10 A
Dimensions:
Approx. 178 mm × 50 mm × 177 mm
(7 1/8 in × 2 in × 7 in) (w/h/d)
Mounting dimensions:
Approx. 182 mm × 53 mm × 160 mm
(7 1/4 in × 2 1/8 in × 6 5/16 in) (w/h/d)
Mass: Approx. 1.2 kg (2 lb 11 oz)
Package contents:
Main unit (1)
Parts for installation and connections (1 set)
Your dealer may not handle some of the above listed accessories. Please ask the dealer for detailed information.
Design and specifications are subject to change without notice.
Copyrights
Windows Media is either a registered trademark or trademark of Microsoft Corporation in the United States and/or other countries.
This product is protected by certain intellectual property rights of Microsoft Corporation. Use or distribution of such technology outside of this product is prohibited without a license from Microsoft or an authorized Microsoft subsidiary.
MPEG Layer-3 audio coding technology and patents licensed from Fraunhofer IIS and Thomson.
Android is a trademark of Google Inc.
libFLAC
Copyright (C) 2000-2009 Josh Coalson Copyright (C) 2011-2013 Xiph.Org Foundation
Redistribution and use in source and binary forms, with or without modification, are permitted provided that the following conditions are met:
- Redistributions of source code must retain the above copyright notice, this list of conditions and the following disclaimer.
- Redistributions in binary form must reproduce the above copyright notice, this list of conditions and the following disclaimer in the documentation and/or other materials provided with the distribution.
- Neither the name of the Xiph.org Foundation nor the names of its contributors may be used to endorse or promote products derived from this software without specific prior written permission.
THIS SOFTWARE IS PROVIDED BY THE COPYRIGHT HOLDERS AND CONTRIBUTORS "AS IS" AND ANY EXPRESS OR IMPLIED WARRANTIES, INCLUDING, BUT NOT LIMITED TO, THE IMPLIED WARRANTIES OF MERCHANTABILITY AND FITNESS FOR A PARTICULAR PURPOSE ARE DISCLAIMED. IN NO EVENT SHALL THE FOUNDATION OR CONTRIBUTORS BE LIABLE FOR ANY DIRECT, INDIRECT, INCIDENTAL, SPECIAL, EXEMPLARY, OR CONSEQUENTIAL DAMAGES (INCLUDING, BUT NOT LIMITED TO, PROCUREMENT OF SUBSTITUTE GOODS OR SERVICES; LOSS OF USE, DATA, OR PROFITS; OR BUSINESS INTERRUPTION) HOWEVER CAUSED AND ON ANY THEORY OF LIABILITY, WHETHER IN CONTRACT, STRICT LIABILITY, OR TORT (INCLUDING NEGLIGENCE OR OTHERWISE) ARISING IN ANY WAY OUT OF THE USE OF THIS SOFTWARE, EVEN IF ADVISED OF THE POSSIBILITY OF SUCH DAMAGE.
Troubleshooting
The following checklist will help you remedy problems you may encounter with your unit. Before going through the checklist below, check the connection and operating procedures.
For details on using the fuse and removing the unit from the dashboard, see "Connection/Installation" (page 20). If the problem is not solved, visit the support site on the back cover.
General
No sound or the sound is very low.
The position of the fader control [FADER] is not set for a 2-speaker system. The volume of the unit and/or connected device is very low. - Increase the volume of the unit and connected device.
No beep sound.
An optional power amplifier is connected and you are not using the built-in amplifier.
The contents of the memory have been erased.
The power supply lead or battery has been disconnected or not connected properly.
Stored stations and correct time are erased.
The fuse has blown. Makes a noise when the position of the ignition is switched.
The leads are not matched correctly with the car's accessory power connector.
During playback or reception, the demonstration mode starts.
If no operation is performed for 5 minutes with [DEMO-ON] set, the demonstration mode starts.
- Set [DEMO-OFF] (page 10).
The display disappears from/does not appear in the display window.
The dimmer is set to [DIM-ON] (page 12). The display disappears if you press and hold OFF.
- Press OFF on the unit until the display appears.
The connectors are dirty (page 14).
The display/illumination flashes.
The power supply is not sufficient.
- Check that the car battery supplies enough power to the unit. (The power requirement is 12 VDC.)
The operation buttons do not function. The disc will not eject.
→ Press DSPL and (back)/MODE for more than 2 seconds to reset the unit.
The contents stored in memory are erased.
For your safety, do not reset the unit while you are driving.
Radio reception
Stations cannot be received. The sound is hampered by noises.
The connection is not correct.
- Check the connection of the car antenna (aerial).
- If the auto antenna (aerial) will not extend, check the connection of the power antenna (aerial) control lead.
Preset tuning is not possible.
The broadcast signal is too weak.
65 MHz to 74 MHz in FM3 cannot be tuned in.
-> [AREA] is set to [EUROPE].
- Set [AREA] to [RUSSIA] (page 10).
RDS
RDS services cannot be received (when [AREA] is set to [RUSSIA]).
-> FM3 is selected. - Select FM1 or FM2. -> RDS services are unavailable in the current region.
The SEEK starts after a few seconds of listening.
The station is non-TP or has weak signal. - Deactivate TA (page 7).
No traffic announcements.
Activate TA (page 7). The station does not broadcast any traffic announcements despite being TP.
- Tune in another station.
PTY displays [- - - - - - - -]
The current station is not an RDS station. RDS data has not been received. The station does not specify the program type.
Program service name flashes.
There is no alternative frequency for the current station.
- Press SEEK +/- while the program service name is flashing. [PI SEEK] appears and the unit starts searching for another frequency with the same PI (program identification) data.
CD playback
The disc does not play.
Defective or dirty disc. The CD-R/CD-RW is not for audio use (page 13).
MP3/WMA files cannot be played.
The disc is incompatible with the MP3/WMA format and version. For details on playable discs and formats, visit the support site on the back cover.
MP3/WMA files take longer to play than others.
The following discs take a longer time to start playback.
- A disc recorded with a complicated tree structure.
- A disc recorded in Multi Session.
- A disc to which data can be added.
The sound skips.
Defective or dirty disc.
USB device playback
You cannot play items via a USB hub.
This unit cannot recognize USB devices via a USB hub.
A USB device takes longer to play.
The USB device contains files with a complicated tree structure.
The sound is intermittent.
The sound may be intermittent at a high-bit-rate. DRM (Digital Rights Management) files may not be playable in some cases.
Audio file cannot be played.
USB devices formatted with file systems other than FAT16 or FAT32 are unsupported. This unit supports FAT16 and FAT32, but some USB devices may not support all of these FAT formats. For details, refer to the operating instructions of each USB device or contact the manufacturer.
Operations for skipping an album, skipping items (Jump mode), and searching a track by name (QuickBrowZer) cannot be performed.
These operations cannot be performed when a USB device in Android mode is connected. Set [USB MODE] to [MSC/MTP] (page 11). The USB mode of the device is not set to the appropriate mode. Make sure that the USB mode of the device is set to MSC/MTP mode.
The sound cannot be output during playback in Android mode.
While the unit is in Android mode, the sound outputs only from the Android smartphone.
- Check the status of the audio playback application on the Android smartphone.
- Playback may not perform properly depending on the Android smartphone.
Messages
The following messages may appear or flash during operation.
CD ERROR: The disc cannot be played. The disc will be ejected automatically. Clean or insert the disc correctly, or make sure the disc is not blank or defective.
CD NO MUSIC: There is no playable file. The disc will be ejected automatically.
Insert a disc containing playable files (page 15).
CD PUSH EJT: The disc could not be ejected properly. Press the eject button.
HUB NO SUPRT: USB hubs are not supported.
INVALID
The selected operation could be invalid. NO AF: No alternative frequencies. Press SEEK + / - while the program service name is flashing. The unit starts searching for another frequency with the same PI (program identification) data ([PI SEEK] appears).
NO TP: No traffic programs. The unit will continue searching for available TP stations.
NOT SUPPORT - Android MODE
A USB device not supporting AOA (Android Open Accessory) 2.0 is connected to the unit while [USB MODE] is set to [ANDROID]. Set [USB MODE] to [MSC/MTP] (page 11).
OVERLOAD: The USB device is overloaded.
Disconnect the USB device, then press SRC to select another source. The USB device has a fault, or an unsupported device is connected.
READ: Now reading information.
Wait until reading is complete and playback starts automatically. This may take some time depending on the file organization.
USB ERROR: The USB device cannot be played.
Connect the USB device again.
USB NO DEV: A USB device is not connected or recognized.
Make sure the USB device or USB cable is securely connected.
USB NO MUSIC: There is no playable file.
Connect a USB device containing playable files (page 15).
USB NO SUPRT: The USB device is not supported.
For details on the compatibility of your USB device, visit the support site on the back cover.
L L L or : The beginning or the end of the disc has been reached.
(underscore): The character cannot be displayed.
For steering wheel remote control operation:
ERROR: An error occurred during the function registration.
Register again from the function where the error occurred (page 11).
TIMEOUT: The function registration failed due to a timeout.
Try completing the registration while [REGISTER] is blinking (about 6 seconds) (page 11).
If these solutions do not help improve the situation, consult your nearest Sony dealer. If you take the unit to be repaired because of CD playback trouble, bring the disc that was used at the time the problem began.
Connection/Installation
Cautions
- Run all ground (earth) leads to a common ground (earth) point.
- Do not get the leads trapped under a screw, or caught in moving parts (e.g., seat railing).
- Before making connections, turn the car ignition off to avoid short circuits.
- Connect the power supply lead ⑥ to the unit and speakers before connecting it to the auxiliary power connector.
- Be sure to insulate any loose unconnected leads with electrical tape for safety.
Precautions
- Choose the installation location carefully so that the unit will not interfere with normal driving operations.
- Avoid installing the unit in areas subject to dust, dirt, excessive vibration, or high temperature, such as in direct sunlight or near heater ducts.
- Use only the supplied mounting hardware for a safe and secure installation.
Note on the power supply lead (yellow)
When connecting this unit in combination with other stereo components, the amperage rating of the car circuit to which the unit is connected must be higher than the sum of each component's fuse amperage rating.
Mounting angle adjustment
Adjust the mounting angle to less than 45°.
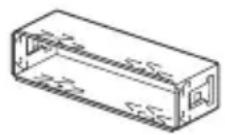
Parts List for Installation
①
(2)
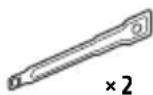
(3)
(4)
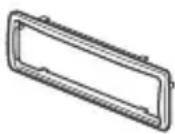
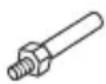
(5)
6

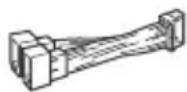
- This parts list does not include all the package contents.
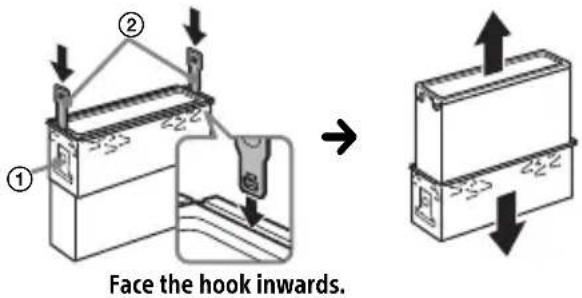
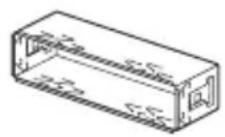
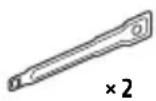
- The bracket ① and the protection collar ③ are attached to the unit before shipping. Before mounting the unit, use the release keys ② to remove the bracket ① from the unit. For details, see "Removing the protection collar and the bracket" (page 23).
- Keep the release keys ② for future use as they are also necessary if you remove the unit from your car.
Connection
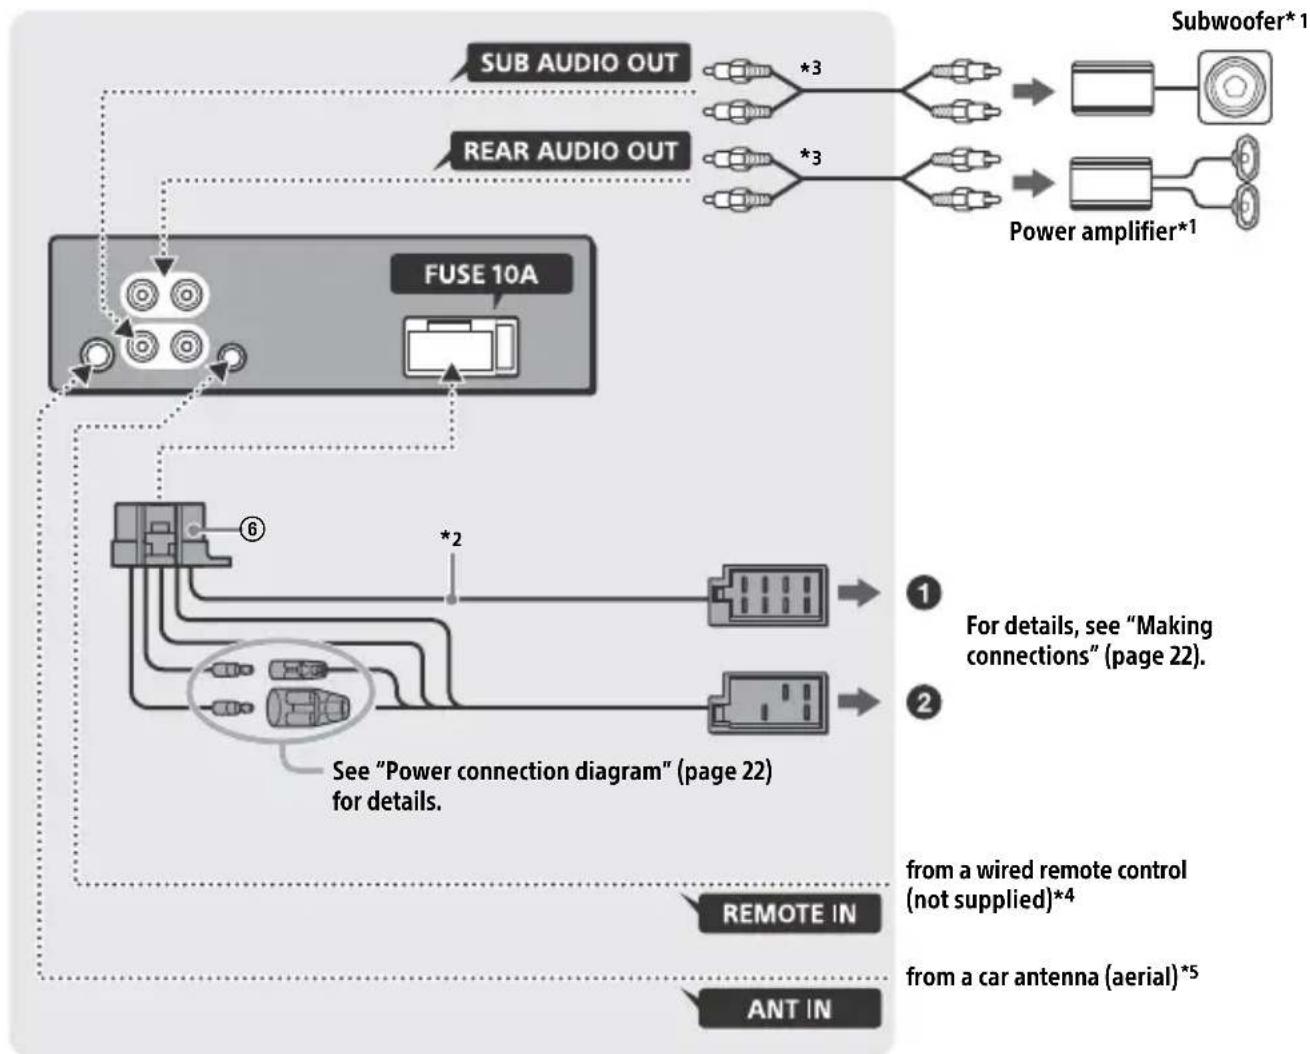
1 Not supplied 2 Speaker impedance: 4Ω - 8Ω × 4 3 RCA pin cord (not supplied) 4 Depending on the type of car, use an adaptor for a wired remote control (not supplied). For details on using the wired remote control, see "Using the wired remote control" (page 23). *5 Depending on the type of car, use an adaptor (not supplied) if the antenna connector does not fit.
Making connections
If you have a power antenna (aerial) without a relay box, connecting this unit with the supplied power supply lead ⑥ may damage the antenna (aerial).
To the car's speaker connector
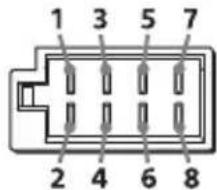
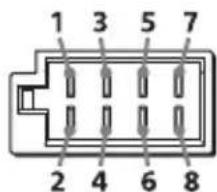
| 1 | Rear speaker (right) | ⊕ | Purple |
| 2 | Purple/black striped | ||
| 3 | Front speaker (right) | ⊕ | Gray |
| 4 | Gray/black striped | ||
| 5 | Front speaker (left) | ⊕ | White |
| 6 | White/black striped | ||
| 7 | Rear speaker (left) | ⊕ | Green |
| 8 | Green/black striped |
To the car's power connector
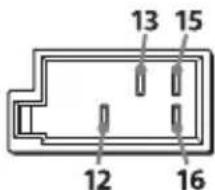
| 12 | continuous power supply | Yellow |
| 13 | power antenna (aerial) /power amplifier control (REM OUT) | Blue/white striped |
| 15 | switched power supply | Red |
| 16 | ground (earth) Black |
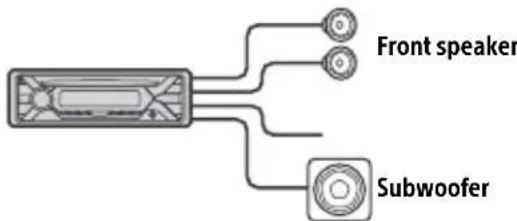
Subwoofer Easy Connection
You can use a subwoofer without a power amplifier when it is connected to a rear speaker cord.
Notes
- Preparation of the rear speaker cords is required.
- Use a subwoofer with an impedance of 4Ω to 8Ω, and with adequate power handling capacities to avoid damage.
Memory hold connection
When the yellow power supply lead is connected, power will always be supplied to the memory circuit even when the ignition switch is turned off.
Speaker connection
Before connecting the speakers, turn the unit off. Use speakers with an impedance of 4Ω to 8Ω, and with adequate power handling capacities to avoid damage.
Power connection diagram
Make sure your car's auxiliary power connector matches the connections of cords correctly depending on the car.
Auxiliary power connector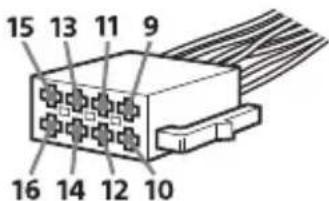
Common connection
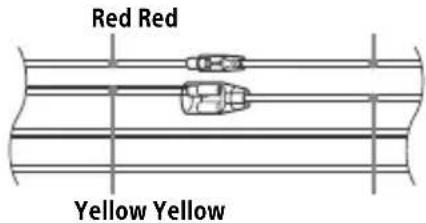
| 12 | continuous power supply | Yellow |
| 15 | switched power supply Red |
When the positions of the red and yellow leads are inverted
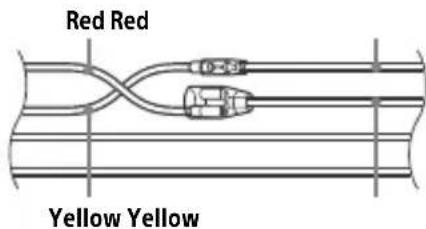
| 12 | switched power supply Yellow | |
| 15 | continuous power supply | Red |
When the car without ACC position
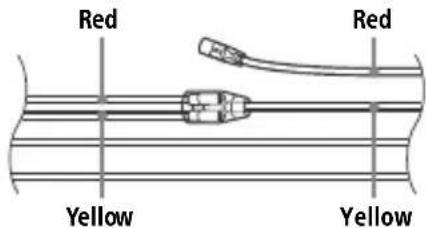
After matching the connections and switching power supply leads correctly, connect the unit to the car's power supply. If you have any questions and problems connecting your unit that are not covered in this manual, consult the car dealer.
Using the wired remote control
1 To enable the wired remote control, set [STR CONTROL] in [SET STEERING] to [PRESET] (page 10).
Installation
Removing the protection collar and the bracket
Before installing the unit, remove the protection collar ③ and the bracket ① from the unit.
1 Pinch both edges of the protection collar ③ then pull it out.
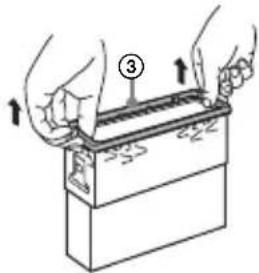
2 Insert both release keys ② until they click, and pull down the bracket ①, then pull up the unit to separate.
Mounting the unit in the dashboard
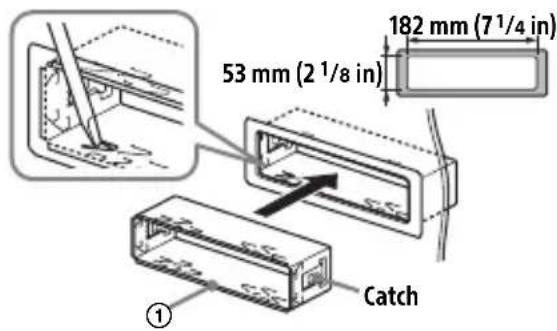
Before installing, make sure the catches on both sides of the bracket ① are bent inwards 2mm (3/32 in).
1 Position the bracket ① inside the dashboard, then bend the claws outward for a tight fit.
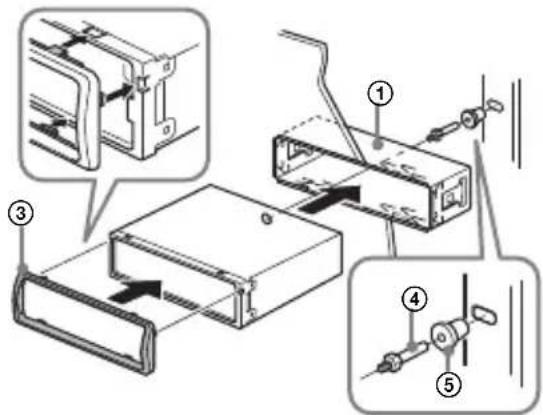
2 Mount the unit onto the bracket ①, then attach the protection collar ③.
Notes
- If the catches are straight or bent outwards, the unit will not be installed securely and may spring out. Make sure the 4 catches on the protection collar are properly engaged in the slots of the unit.
Detaching and attaching the front panel
For details, see "Detaching the Front Panel" (page 5).
Resetting the unit
For details, see "Resetting the Unit" (page 5).
Fuse replacement
When replacing the fuse, be sure to use one
matching the amperage rating stated on the
original fuse. If the fuse blows, check the power
connection and replace the
fuse. If the fuse blows again after
replacement, there may be an internal malfunction. In such a case, consult your nearest Sony dealer.
Fuse (10 A)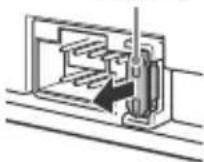
FW VERSION (Firmware version)
[BAND6] 1 kHz, [BAND7] 2 kHz, [BAND8]
4 kHz, [BAND9] 8 kHz, [BAND10] 16 kHz.
87.5 MHz - 108.0 MHz
Sampling rate: 16 kHz - 48 kHz
WMA (.wma)
Bitrate: 32 Kbps - 192 Kbps
Sampling rate: 32 kHz, 44.1 kHz, 48 kHz
FLAC (.flac)
Connection/Installation
Caution. 24
Reading starts.
Reading starts.
DEMO (demonstration)
Allows activation of the demonstration: [ON], [OFF].
Compatible AOA (Android Open Accessory) protocol: 2.0
Corresponding codec: MP3 (.mp3)
Bit rate: 8 kbits/s - 320 kbits/s (supports VBR (Variable Bit Rate))
Main unit (1)
Connection/Installation
Caution
250 Hz, [BAND5] 500 Hz, [BAND6] 1 kHz, [BAND7] 2 kHz, [BAND8] 4 kHz, [BAND9] 8 kHz, [BAND10] 16 kHz.
Interface: USB (Full speed)
Folders (albums): 256
-file(brani)percartella:256
Android Open Accessory (AOA) compatible protocol: 2.0
Corresponding codecs: MP3 (.mp3)
Produced in Thailand
Laser diode properties
Manufacturer: Sony Corporation, 1-7-1 Konan
Minato-ku Tokyo, 108-0075 Japan
Select PTY in RDS.
250 Hz, [BAND5] 500 Hz, [BAND6] 1 kHz, [BAND7] 2 kHz, [BAND8] 4 kHz, [BAND9]
8 kHz, [BAND10] 16 kHz.
Interface: USB (Full-speed)
Maximum current: 500 mA
- mappings (albums): 256
files (tracks) per folder: 256
Android Open Accessory Protocol (AOA) compatible: 2.0
Corresponding codec: MP3 (.mp3)
Bitrate: 8 kbps - 320 kbps (Supports VBR (Variable Bit Rate))
Sampling frequency: 16 kHz - 48 kHz
WMA (.wma)
Bitrate: 32 kbps - 192 kbps
(Supports VBR (Variable Bit Rate))
Sampling frequency: 32 kHz, 44.1 kHz, 48 kHz
FLAC (.flac)
Bit depth: 16 bit, 24 bit
Sampling frequency: 44.1 kHz - 48 kHz
Power amplifier
- Radiation output: Continuous
- Laser output power: Less than 53.3 mW
(Value obtained at a distance of 200 mm from the surface of the objective lens of the optical reading unit with an aperture of 7 mm.)
The plate with the indication of the operating voltage and other characteristics is located on the lower panel of the housing.
The date of manufacture is indicated on the product, as well as on the packaging in the format:
MM.YYYY, where MM is the month and YYYY is the year of manufacture.
Information for consumers in Ukraine

Authorized representative in Ukraine on compliance with technical regulations: LLC "Sony Ukraine", 8 Ilyinskaya St., Kyiv, 04070, Ukraine.
The equipment complies with the requirements of the technical regulation on the restriction of the use of certain hazardous substances in electrical and electronic equipment (Resolution of the CMU dated 03.12.2008 No. 1057).
Storage conditions
The product should be stored in its original packaging in dark, dry, clean, well-ventilated rooms, isolated from places where acids and alkalis are stored.
Storage temperature: from -20 to +60 °C. Relative storage humidity: 80%. Operating temperature: from 0 to 40 °C. Operating relative humidity: 40-60%.
Disposal of used power elements and electronic equipment
(Directive applies in EU countries and other European countries where separate waste collection systems are in effect)
Warning for cases when the battery is not in the correct position in the compartment
The AUTO OFF function is set (p. 12). After turning off the device, its power will be automatically disconnected after the set time, which prevents battery discharge. If the AUTO OFF function is not set, then at each shutdown, press and hold the OFF button until the display goes out.
Disclaimer of liability for services provided by third-party suppliers
Services provided by third-party suppliers may be changed, suspended, or canceled without prior notice. Sony Corporation is not responsible for situations of this kind.
Contents
Guide to parts and controls 4
Getting started
Power supply 5
Resetting the device 6
Setting the clock 6
Connecting the device via USB 6
Connecting another portable audio device 7
Listening to the radio
Listening to the radio 7
Radio data systems (RDS) 8
Playback
Playback of disc 9
Playback of USB device. 9
Q (overview) (pp. 10, 11)
Switching the overview during playback.
(Unavailable if the USB device is disconnected during Android mode.)
EQ (equalizer) Select the equalizer curve. 10 (Back) Return to the previous screen. MODE (p. 7) 11 Remote control signal receiver
12 Number buttons (1-6)
Receive stations saved in memory. Press and hold to save stations.
ALBUM▼/▲
Skip albums on the audio device. Press and hold for continuous skipping of albums.
(Unavailable if the USB device is disconnected during Android mode.)
(repeat)
(Unavailable if the USB device is disconnected during Android mode.)
(random play)
(Unavailable if the USB device is disconnected during Android mode.)
II (Playback/Pause)
13 EXTRA BASS
Enhances the bass sound in sync with the volume level. Press to change the EXTRA BASS setting: [1], [2], [OFF].
14 AUX input jack
15 DSPL (display)
Changes the display.
SCRL (scroll)
Press and hold for scrolling the display.
16 USB port
Getting started
Removing the front panel
To prevent theft, you can remove the front panel.
1 Press and hold the OFF button ① until the unit turns off. Press the release button for the front panel ②, then pull the panel toward you and remove it.
Warning tone
If the front panel is not removed within a few seconds after turning the unit off, a warning tone will sound. The warning tone will sound only if the built-in amplifier is used.
Setting the front panel
Device reset
Before first use of the device, after replacing the car battery or after reconnecting the cable, it is necessary to reset the device.
1 Press and hold the DSPL (back)/MODE button for more than 2 seconds.
Note
Resetting the device will delete the clock settings and some saved content elements.
Setting the country/region
After resetting the device, the country/region setting menu will open.
1 When [SET AREA] is displayed, press the ENTER button. The current country will be displayed. 2 Turn the rotary knob to select [EUROPE] or [RUSSIA], then press the rotary knob. 3 Turn the rotary knob to select [YES] or [NO], then press the rotary knob.
When you change the region or country, the device will reset, and after that the clock will be displayed on the screen.
This parameter can be set in the parameter menu (page 12).
Setting the clock
1 Press the MENU button, turn the rotary knob to select [GENERAL], then press the rotary knob. 2 Turn the rotary knob to select [SET CLOCK-ADJ], then press the rotary knob. The hour indicator will start flashing. 3 Turn the rotary knob to set the hour and minute values.
To change the indicator, press the SEEK + / - button.
4 After setting the minutes, press the MENU button.
Setup complete, after which the time countdown will start.
Press the DSPL button.
Connecting a USB device
1. Reduce the volume on the device. 2. Connect the USB device to the device.
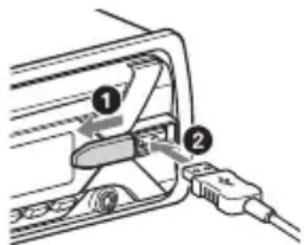
Setting the clock (CT)
To stop playback
Press and hold the OFF button for 1 second.
Stop playback, then remove the device.
Search and playback of compositions
Repeat playback and playback in random order
Not available if a USB device is connected to an Android device.
To select the playback mode, during playback press the C button (repeat or random order) several times.
Playback in the selected mode may not start immediately.
Available playback modes depend on the selected audio source.
SEARCHING FOR COMPOSITION BY NAME (Quick-BrowZer™)
Unavailable if the USB device is disconnected from Android.
1 During CD or USB playback, press (BROWSE) to display the list of search categories.
When the composition list appears, press (BACK) until the desired search category is displayed.
*During USB device playback, press and hold (BROWSE) for more than 2 seconds to return directly to the beginning of the category list.
2 Turn the rotary dial to select the desired search category, then press the rotary dial to confirm. 3 Repeat steps 1 and 2 to search for the desired composition.
Playback starts.
CLOCK-ADJ (clock setting) (page 6)
CAUT ALM (caution alarm sound)
Turning on the caution alarm sound: [ON], [OFF] (page 5).
(Available only when the power is off and the clock is displayed.)
BEEP
Activation of the beep sound: [ON], [OFF].
AUTO OFF
Automatic shutdown after a preset time if the device is turned on: [ON] (30 minutes), [OFF].
STEERING
Setting the functions of the remote control steering wheel.
(Available when the connecting cable is connected (not included in the supply set).) (Available only when the ignition is on, when the clock is displayed.)
STR CONTROL (remote control steering wheel)
Selecting the input mode of the connected remote control steering wheel. To avoid malfunctions, select the
appropriate input mode for the connected remote control
steering wheel.
CUSTOM
Input mode of the remote control steering wheel and other.
PRESET
Input mode for the wired remote control steering wheel except for the remote control steering wheel (selected automatically when [RESET CUSTOM] is performed).
EDIT CUSTOM
Registering the functions (SOURCE, ATT, VOL + / - , SEEK + / - ) of the remote control steering wheel
1 Turn the volume knob to select the function to be assigned to the remote control steering wheel, then press the volume knob. 2 While [REGISTER] is displayed, press and hold the button on the remote control steering wheel to which the function is to be assigned. When registration is completed, [REGISTERED] is displayed. 3 To register other functions, repeat steps 1 and 2.
(Available only when the [STR CONTROL] parameter is set to [CUSTOM].)
RESET CUSTOM
Change the settings of the steering wheel control unit: [YES], [NO].
(Available only if the [STR CONTROL] parameter is set to [CUSTOM].)
Note
- While changing settings, only button control is available on this device. For safety reasons, stop the vehicle before changing these settings.
- If an error occurs during registration, all previously registered information will be saved. Repeat the registration procedure from the beginning, starting from the function where the error occurred. This function may not be available on some vehicles. For detailed information about the compatibility of your vehicle, visit the website indicated on the back cover.
USB MODE
Change the USB mode: [ANDROID], [MSC/MTP].
Display the current firmware version.
FW UPDATE (Firmware update)
Start the firmware update: [YES], [NO].
The firmware update takes a few minutes. During the update, do not turn the ignition switch to the OFF position and do not disconnect the USB device being used.
Sound settings (SOUND)
EQ10 PRESET
Select an equalizer curve from 10 equalizer curves or turn off the equalizer:
[OFF], [R&B], [ROCK], [POP], [HIP-HOP], [ELECTRONICA], [JAZZ], [SOUL], [COUNTRY], [KARAOKE]*, [CUSTOM].
The selected equalizer curve for each sound source can be stored in memory.
*When [KARAOKE] is selected, the voice sound during playback is attenuated, but not completely eliminated. Microphone use is not hindered.
EQ10 CUSTOM
Selecting the [CUSTOM] option for EQ10. Adjusting the equalizer curve: [BAND1]32Hz, [BAND2]63Hz, [BAND3]125Hz, [BAND4]250Hz, [BAND5]500Hz, [BAND6]1kHz, [BAND7]2kHz, [BAND8]4kHz, [BAND9]8kHz, [BAND10]16kHz. The volume level is adjustable in the range from -6dB to +6dB in 1dB steps.
BALANCE
Adjusting the sound balance: [RIGHT-15] - [CENTER] - [LEFT-15].
FADER
Adjusting the relative level: [FRONT-15] - [CENTER] - [REAR-15].
S.WOOFER (subwoofer)
SW LEVEL (subwoofer level)
Adjusting the subwoofer volume level: [+6 dB] - [0 dB] - [-6 dB].
([ATT] is displayed when the minimum value is set.)
SW PHASE (subwoofer phase)
Selecting the subwoofer phase: [NORM], [REV].
LPF FREQ (low-pass filter frequency)
Subwoofer cutoff frequency selection:
[80Hz], [100Hz], [120Hz].
HPF FREQ (high-pass filter frequency)
Selection of the cutoff frequency value for the front/rear speakers: [OFF], [80Hz], [100Hz], [120Hz].
AUX VOL (AUX volume level)
Adjustment of the volume level for each connected auxiliary device: [+18dB] -[0 dB]-[-8 dB].
This adjustment eliminates the need to adjust the volume for different sources.
AUTO SCR (auto scroll)
Automatic scrolling of long text elements: [ON], [OFF].
(Not available if the AUX or TUNER source is selected.)
Do not spill liquid on the device or discs.
Handling of discs
-Do not expose discs to direct sunlight or heat sources such as hot air ducts. Do not leave discs in a car parked in a sunny place.
-To remove discs from their cases, press the center of the case and lift the disc out by its edges. Do not use solvents such as benzene, thinner, or record cleaners.
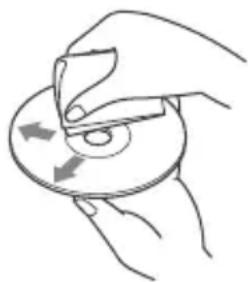
This device is designed for playback of discs that meet the Compact Disc (CD) standard. DualDiscs and some music discs encoded with copyright protection technology do not conform to the Compact Disc (CD) standard and therefore may not play on this device. -Discs that this device cannot play:
-Discs with stickers, labels, or adhesive tape attached, as well as those with peeling stickers. Using such discs may cause malfunctions or damage to the disc. -Discs of non-standard shapes (for example, heart, square, star shapes). Otherwise, this may lead to damage to the device. -8 cm discs.
Sensitivity: MW: 26 mV, LW:
50 mV
CD disc player
Signal-to-noise ratio: 95 dB
Resolution: 16 bit, 24 bit
Sampling frequency: 44.1 kHz, 48 kHz
Power amplifier
Output: Speaker outputs
Nominal impedance
Speakers: 4 Ω - 8 Ω
Maximum output power: 55 W
x4 (at 4 Ω impedance)
Information
Outputs:
Thermal outputs (REAR, SUB)
Word antenna/terminal
Controlled by the remote control (REMOTE)
Inputs:
Input terminal of the remote control panel
Remote control
Antenna input connector
AUX input jack (mini
stereo jack)
USB port
Power supply requirements:
Car battery 12 V
Direct current (negative
grounded)
Rated current: 10 A
Dimensions:
Mounting dimensions:
The presence of some of the accessories
listed above. Please
Microsoft Corporation. History of Microsoft Corporation.
distribution of technology
Except as in this product, without
No sound signal is heard.
→ An additional power amplifier is connected, and the built-in one is not used.
Data has been deleted from memory.
→ The power cord is correctly connected, or the battery is discharged.
The programmed radio stations and time setting have been deleted from memory.
The fuse is blown. It has already blown when the ignition key was turned.
→ The speakers are not correctly connected to the electrical connector of the auxiliary equipment of the vehicle.
The demonstration starts when the device is turned on.
If, with the demonstration mode [DEMO-ON] enabled, no operations are performed for 5 minutes, the demonstration starts. - Set the value [DEMO-OFF] (p.12).
The display does not show anything in the window.
→The value [DIM-ON] is set (p.14). →The display turns off if the OFF button is pressed and held. - Press the OFF button on the device and hold it pressed until the display turns on. →The contacts are dirty (p.16).
The display/backlight is dim.
Insufficient power supply.
- Make sure that the device receives enough power from the car battery. (Power supply requirement: 12 V DC.)
The control buttons do not work. The card is not ejected.
Press and hold the DSPL and (BACK)/MODE buttons for more than 2 seconds to restart the device. The memory contents will be deleted. For safety reasons, do not restart while driving.
Radio reception
Cannot tune in radio stations. Sound is accompanied by interference.
→Incorrect connection.
-Check the connection of the car antenna. - If the automatic antenna does not extend, check the connection of the antenna control wire with the electric drive.
Cannot perform the initial setup.
→The radio signal is weak.
It is not possible to tune frequencies 65 MHz - 74 MHz.
→For [AREA] selected [EUROPE]. -Set for [AREA] value [RUSSIA] (p.12).
RDS
It is not possible to receive RDS services (when the [AREA] parameter is set to [RUSSIA]).
→Select FM3 range. -Select FM1 or FM2. → RDS services are not available in this region.
After a few seconds of listening, the SEEK function is activated.
→The station does not transmit TP data or transmits a too weak signal. -Turn off TA (p.8).
Traffic announcements are not transmitted.
→Turn on TA (p.8). → The station does not transmit traffic announcements, although it is of TP type. -Tune to another station.
When the PTY function is enabled, the indicator [---] is displayed.
→The received station does not transmit RDS data. → RDS data is not received. → The station does not indicate the program type.
The program service name is flashing.
→For the selected station at the moment, the alternative frequency is not used.
- Press the SEEK +/- button until the program service name flashes. [PI SEEK] appears, and the device searches for another frequency with the same PI data (program identification).
Playback of CD discs
Cannot be reproduced.
→Disc is scratched or damaged. →CD-R/CD-RW discs are not intended for audio playback (p.16).
MP3/WMA files cannot be played.
→Disc is not compatible with the format or version of MP3/WMA. For detailed information about playable discs and formats, visit the website whose address is indicated on the rear cover.
CD ERROR: Cannot play the disc. The disc will be ejected automatically.
→Insert the disc correctly, or make sure the disc is not empty or damaged. CD NO MUSIC: No audio file for playback. The disc will be ejected automatically. →Insert a disc with playable files (p.17).
CD PUSH EJT: Failed to eject the disc properly.
→Press the (eject) button.
HUB NO SUPRT: USB hubs are not supported.
INVALID
→The selected operation may not be supported. NO AF: No alternative frequencies. →Press the SEEK +/- button while the service name is flashing. The unit starts searching for another frequency with the same PI (Program Identification) (the PI SEEK indicator appears).
NO TP: No traffic information on the current station. →The unit continues searching for stations that broadcast TP (Traffic Program).
NOT SUPPORT -ANDROID MODE
→A USB device that does not support the AOA (Android Open Accessory) protocol 2.0 is connected when the [USB MODE] parameter is set to [ANDROID]. -Set the [USB MODE] parameter to [MSC/MTP] (p.13).
OVERLOAD: The USB device is overloaded.
→ Turn off the USB device, then press the button to select another source. → The USB device is damaged, or an unsupported device is connected.
READ: Reading error. → Wait for reading to complete. Playback will start automatically. This may take some time depending on the file structure.
USB ERROR: Cannot play USB device. Reconnect the USB device.
USB NO DEV: USB device is not connected or not recognized.
→ Make sure the USB device or USB cable is securely connected.
USB NO MUSIC: No playable files.
→ Connect a USB device containing playable files (p. 17).
USB NO SUPRT: USB device is not supported.
→ For details on USB device compatibility, visit the support website indicated on the back cover.
The beginning or end of the disc has been reached.
(Underline symbol): Unable to display symbol.
Precautions
Carefully choose the installation location to avoid interfering with driving. Do not install the device where it will be exposed to dust, dirt, excessive vibration, or high temperatures, such as in places exposed to direct sunlight or near heater vents. To ensure safe and secure installation, use the included mounting parts.
Note on the power cord (fuse)
When connecting this device together with other stereo components, the nominal current value in the power circuit must not exceed the total current value indicated on the fuses of all components.
Installation kit
Adjust the installation angle so that it is less than 45°
Parts list for installation
①
②
(3)
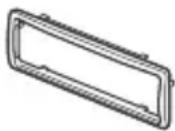
(4)
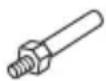
⑤

(6)
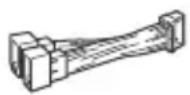
This list does not include all contents of the delivery kit. -Remove the protective cap ① from the mounting bracket ③ of the device. Before installing the device, use the disassembly keys ② to disconnect the protective cap ① from the device. For detailed information, see the section "Disconnecting the protective cap from the mounting bracket" (p. 27). -Keep the disassembly keys ② for future use, as they will also be needed when removing the device from the vehicle.
Connection
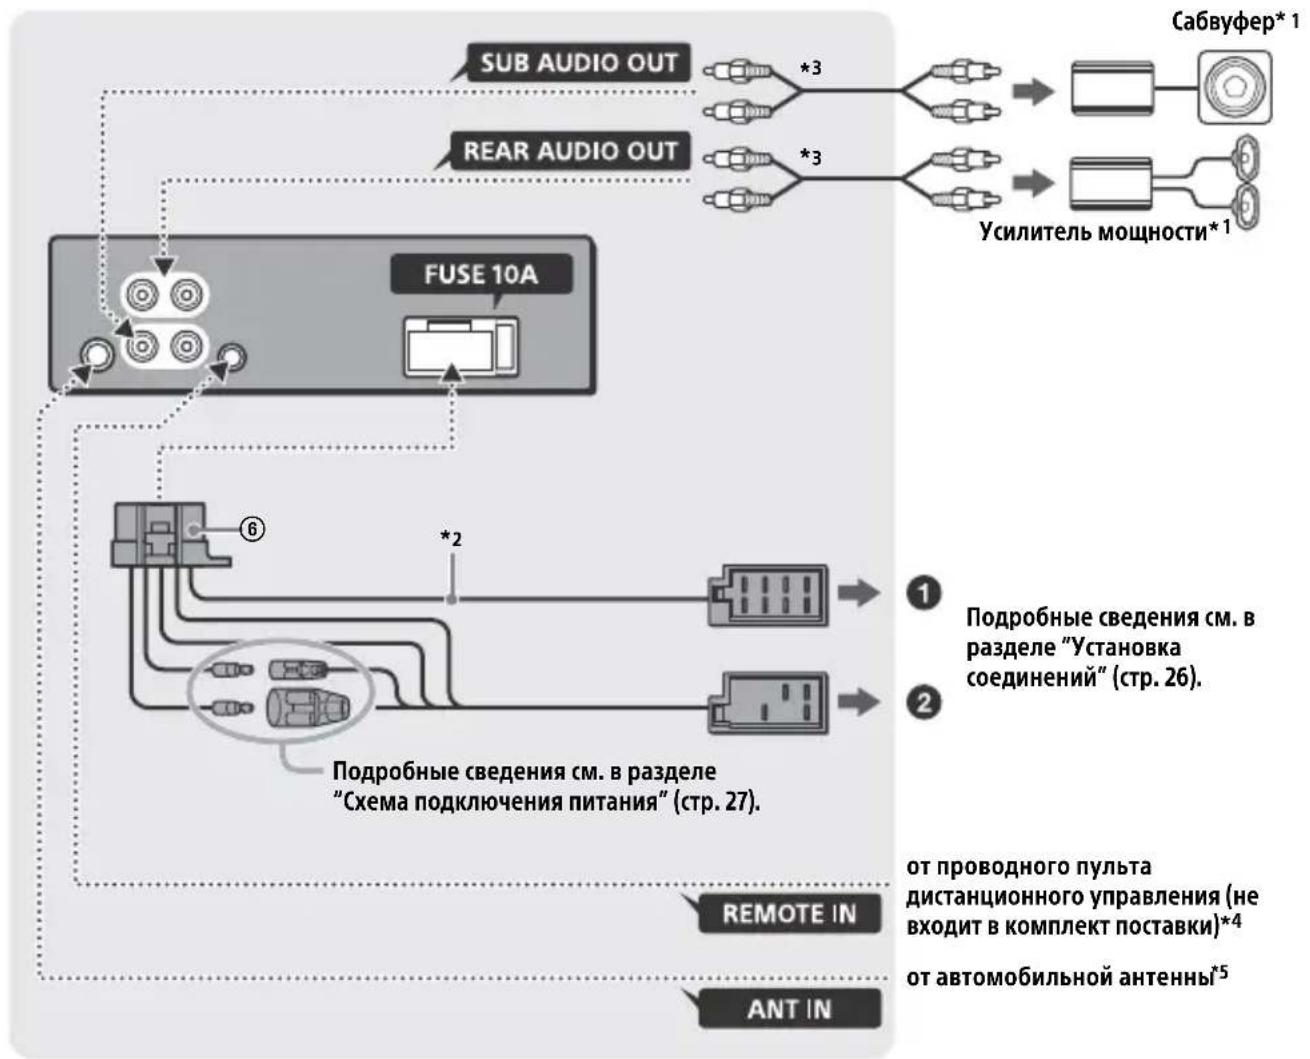
1 Not included in the delivery kit. 2 Total resistance of the speakers: 4Ω-8Ω×4. 3 Cable with RCA connectors (not included in the delivery kit). 4 Depending on the vehicle type, it may be necessary to use an adapter for the wired remote control (not included in the delivery kit). For detailed information on using the wired remote control, see the section "Using the wired remote control" (p. 27). *5 Depending on the vehicle type, use an adapter (not included in the delivery kit) if the antenna connector does not fit.
Installation connections
If an antenna with a built-in amplifier is used, connecting this device with the supplied power cord ⑥ may damage the antenna.
To the vehicle's speaker connector
For details, see the section "Device Reset" (page 6).
Replacing the fuse
When replacing the fuse, be sure to use only fuses that match the current rating indicated on the original fuse.
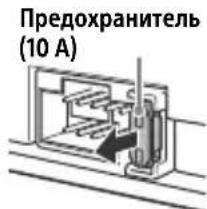
If the fuse has blown, check the power connection and replace the fuse. If the fuse blows again after replacement, this may indicate a malfunction of the device. In this case, contact your nearest Sony dealer.
For safety, be sure to install the device in the dashboard of the car, as the rear side of the device may become hot during use. For details, see "Installation/Connection" (page 23).
Laser output
Laser output power: less than 53.3 µW
(This output value is measured at a distance of 200 mm from the surface of the objective lens on the optical pickup block with a 7 mm aperture.)
The label with information about the operating voltage is located on the bottom of the chassis.
The date of manufacture is indicated on the product and on the packaging in the format: MM.YYYY, where MM is the month and YYYY is the year of manufacture.

Made in China
Manufacturer: Sony Corporation, 1-7-1 Konan Minato-ku, Tokyo, 108-0075 Japan
Authorized representative in Ukraine for questions of liability in accordance with technical regulations: LLC "Sony Ukraine", vul. Dilyeva, 8, Kyiv, 04070, Ukraine.
The declaration of conformity meets the requirements of the technical regulation on restrictions on the use of certain hazardous substances in electrical and electronic equipment (Resolution of the Cabinet of Ministers of Ukraine dated 03.12.2008 No. 1057).
The product is stored in a cardboard box in a dry, clean, ventilated room, protected from direct sunlight.
Storage temperature: from -20 to +60 °C.
Relative humidity during storage: ≤80%
Operating temperature: from 0 to 40 °C
Operating relative humidity: 40-60%.
Disposal of used batteries, old electrical and electronic equipment (applies to the European Union and other European countries with separate waste collection systems)
Battery disposal: if the vehicle is not equipped with a battery disconnect switch
It is mandatory to set the AUTO OFF function (page 12). The device will turn off completely automatically after a set time after switching off, which prevents battery discharge. If the AUTO OFF function is not activated, turn off the device immediately after switching off by pressing and holding the OFF button until the display turns off.
Warranty liability for services provided by third parties
Services provided by third parties may change, be suspended, or cease operation without prior notice. The company is not liable in such cases.
Contents
Device with parts and controls 4
Getting started
Connecting the device 6
Installing the battery 6
Connecting the USB device 6
Connecting a portable audio device 7
Listening to the radio 7
Listening to the radio 7
Using the radio data system (RDS) 8
Playback
Playing a disc 9
Playing a USB device 9
Searching and playing tracks 10
Recording
Canceling the DEMO mode 11
Basic recording operations 11
General settings 12
Sound settings 13
Display settings 14
Additional information
Updating the device software 15
Safety precautions 15
Maintenance 16
Technical specifications 17
Troubleshooting 19
Recycling 21
List of parts for installation 23
Appendix 24
Installation 26
Press and hold the DSPLi (Back)/MODE button for more than 2 seconds.
Rim
Before recharging the device, set the clock, and also check the saved content.
Setting the country/region
After recharging the device, the screen for setting the country/region appears.
1 When [SET AREA] appears, press the ENTER button. Select the desired country or region. 2 Turn the control dial to select [EUROPE] or [RUSSIA], then press the control dial. 3 Turn the control dial to select [YES] or [NO], then press the control dial. If the country or region is changed, the device will restart, and the clock will be set.
The parameters can also be set in the general settings menu (page 12).
Setting the clock
1 Press the MENU button, turn the control dial to select [GENERAL], then press the control dial. 2 Turn the control dial to select [SET CLOCK-ADJ], then press the control dial. The clock display will blink. 3 Turn the control dial to set the hour and minutes. To change the digits, press the SEEK +/- button. 4 After setting the time, press the MENU button. The setting is complete, and the clock will start working.
To display the clock, press the DSPL button.
1 Press the MODE button to change the band (FM1, FM2, FM3, MW or LW). 2 Tune the frequency.
Setting alternative frequencies (AF) and traffic announcements (TA)
The AF function constantly tunes to the station with the strongest signal in the network, and the TA function provides the latest information about traffic situations or traffic programs (TP) that are broadcast.
1 Press the MENU button, turn the control dial to select [GENERAL], then press the control dial. 2 Turn the control dial to select [SET AF/TA], then press the control dial. 3 Turn the control dial to select [SET AF-ON], [SET TA-ON], [SET AF/TA-ON] or [SET AF/TA-OFF], then press the control dial.
The RDS station can be saved together with the AF/TA settings. Set AF/TA, then save the station using the BTM or manually. If the station is programmed manually, it is also possible to save stations without RDS.
Receiving emergency announcements: If AF and TA are turned on, emergency announcements will automatically interrupt the currently selected source.
Adjusting the volume during traffic announcements
The device will be kept for diagnostic purposes regarding the road situation, and it will not depend on the usual level of service.
Receiving a regional program (REGIONAL)
The AF and REGIONAL functions are enabled, and the device will not switch to another regional station with a weak signal. If you want to disable the regional broadcast reception zone, set [SET REG-OFF] in the [GENERAL] setup menu during FM radio reception (page 13). The function does not work in Great Britain and some other countries.
Local radio function (only in Great Britain)
The function allows you to select other local stations in a certain locality, even if they are not assigned to digital buttons. During reception in the FM range, press the digital button (from 1 to 6) on which the local station is stored. No later than 5 seconds later, press the digital button of the local station again. Repeat the procedure until you find the desired local station.
Selecting program types (PTY)
1 Press PTY during FM radio reception. 2 Turn the control knob until the desired program type is displayed, then press the control knob. The station list will appear, which transmits the selected program type.
Program types
NEWS (News), AFFAIRS (Current affairs), INFO (Information), SPORT (Sport), EDUCATE (Education), DRAMA (Drama), CULTURE (Culture), SCIENCE (Science), VARIORED (Varied), POP M (Popular music), ROCK M (Rock music), EASY M (Easy listening music), LIGHT M (Light classical music), CLASSICS (Classical music), OTHER M (Other music genres), WEATHER (Weather), FINANCE (Finance), CHILDREN (Children's programs), SOCIAL A (Social affairs), RELIGION (Religion), PHONE IN (Phone-in programs), TRAVEL (Travel), LEISURE (Leisure), JAZZ (Jazz), COUNTRY (Country music), NATION M (National music), OLDIES (Oldies), FOLKM (Folk music), DOCUMENT (Documentary programs)
Setting the clock (CT)
1 In the [GENERAL] setup menu, set [SET CT-ON] (page 13).
PLAYBACK
Playback disc
1 Insert the disc (with the labeled side facing up).
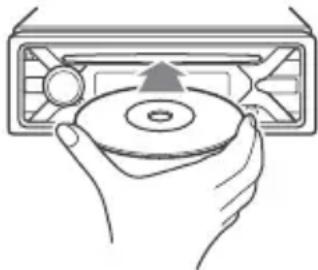
Playback starts automatically.
Built-in player supports MP3/WMA/FLAC.
MP3/WMA/FLAC:
- Files protected by copyright; - Files with DRM (Digital Rights Management); - Multi-channel audio. MP3/WMA: - Files compressed without loss.
Before turning on, select USB mode (Android or MSC/MTP) depending on the type of USB device (p.13).
1 Connect the USB device to the USB port (p.6). The device will turn on. If the USB device is already connected, press the RC button until [USB] appears. 2 Adjust the volume on the device.
Turning off
Press and hold the OFF button for 1 second.
Removing the device
Turn off and remove the device.
FW UPDATE (firmware update)
Start firmware update: [YES], [NO].
Firmware update takes a few minutes. During the update, do not turn off the power or disconnect the USB device.
Sound adjustment (SOUND)
EQ10 PRESET
Select an equalizer curve from 10 preset curves or custom equalizer:
[OFF], [R&B], [ROCK], [POP], [HIP-HOP], [ELECTRONICA], [JAZZ], [SOUL],
[COUNTRY], [KARAOKE]*, [CUSTOM].
The equalizer curve can be adjusted using the remote control.
*If [KARAOKE] is selected, the vocal sound during playback is attenuated, but not completely eliminated. The microphone is not supported.
EQ10 CUSTOM
Set [CUSTOM] to EQ10.
Adjust the equalizer curve: [BAND1] 32 Hz, [BAND2] 63 Hz, [BAND3] 125 Hz, [BAND4] 250 Hz, [BAND5] 500 Hz, [BAND6] 1 kHz, [BAND7] 2 kHz, [BAND8] 4 kHz, [BAND9] 8 kHz, [BAND10] 16 kHz. The gain level is adjustable in the range from -6 dB to +6 dB in 1 dB steps.
BALANCE
Adjust the sound balance: [RIGHT-15] - [CENTER] - [LEFT-15].
FADER
Adjust the relative level: [FRONT-15] - [CENTER] - [REAR-15].
S.WOOFER (subwoofer)
SW LEVEL (subwoofer level)
Adjust the subwoofer volume: [+6 dB] - [0 dB] - [-6 dB].
([ATT] is selected from the lowest value.)
Subwoofer phase
Select subwoofer phase: [NORM], [REV].
LPF FREQ (low-pass filter frequency)
Select subwoofer cutoff frequency: [80Hz], [100Hz], [120Hz].
Maintenance
Cleaning contacts
The amplifier may operate intermittently due to dirty contacts, which are located on the rear and front panels. To prevent this, remove the front panel (page 5) and clean the contacts with a damp cloth. Do not use abrasive substances. In this case, the contacts may be damaged.
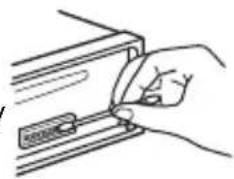
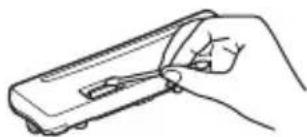
Precautions
Ensure safety: turn off the power switch and remove the power key before cleaning the contacts. Never touch the contacts directly with your hands or with any metal object.
Technical specifications
Tuner
FM
Tuning range:
For parameter [AREA] set to [EUROPE]:
87.5 MHz - 108.0 MHz
For the Area parameter, the value is set to [RUSSIA]:
FM1/FM2: 87.5 MHz - 108.0 MHz (with 50 kHz interval)
Used sensitivity: 7 dB
Selectivity: 75 dB at 400 kHz
Fulfilled/73d6
Separation: 50 per 1 kHz
Frequency response: 20 Hz - 15000 Hz
MW/LW
Tuning range:
MW: 531 kHz - 1602 kHz
LW: 153 kHz - 279 kHz
Antenna input:
For external antenna
Sensitivity: MW: 26 mV, LW: 50 mV
Program CD
Frequency response: 10 Hz - 20000 Hz
Detonation coefficient: according to the manufacturer's method
Maximum quantity (only CD-R/CD-RW):
- Folders (albums): 150 (including root folder);
Files (compositions) and folders: 300
(approximately, less than 300, if the names of folders or files consist of a large number of characters);
- Number of characters for names
folders or files: 32 (Joliet)/64 (Romeo).
Codec: MP3 (.mp3) and WMA (.wma)
USB programming
Interface: USB (full speed)
Maximum current: 500 mA
Maximum number of compositions that are recognized:
- Folders (albums): 256
- Audio input (mono): 256
Supported version of Android Open Accessory (AOA) protocol: 2.0
Codec:
MP3 (.mp3)
Data transfer rate:
8 kbps - 320 kbps
Supports VBR (variable
data transfer rate)
Sampling frequency: 16 kHz - 48 kHz
WMA (.wma)
Data transfer rate:
Sampling frequency: 32 kHz,
44.1 kHz, 48 kHz
FLAC (.flac)
Bit depth: 16 bit, 24 bit
Sampling frequency: 44.1 kHz, 48 kHz
Rated output power
Output: Input terminals
Load impedance: 4 Ω - 8 Ω
Maximum output power:
55 W × 4 channels
General information
Output:
Terminal for subwoofer output (REAR, SUB)
Antenna with electric drive / Remote control terminal for output power (REM OUT)
Input:
Input terminal for remote control
Remote control
BxIDHe rHizdo aHTeHN
BxiIHe rHi3do AUX (ctepeo mHi-rHi3do)
USB port
Power input: automotive
battery direct current
Voltage 12 V (with grounding
of negative terminal)
Nominal current consumption: 10 A
Dimensions:
Parts for installation and
No sound signal.
Buttons do not function. Disc is not ejected.
→ Press and hold the DSPL and
(Back)/MODE buttons for more than 2 seconds to restart the device. The content stored in memory will be erased.
For safety reasons, do not perform the restart operation while driving a vehicle.
Radio stations cannot be received. The sound is accompanied by noise.
→ Incorrect exceptions.
- Check the connection of the car antenna. - If the motorized antenna does not extend, check the connections of the antenna control wire with the motor.
Cannot find programmed stations.
The broadcast signal is too weak.
In the FM3 band, it is impossible to tune to 74 MHz.
→ The station is not an RDS station. No RDS data received. → The station does not display PTY or PI.
The program service name is displayed.
→ There is no alternative frequency for this station.
- Press SEEK + / - while the program service name is displayed. The message [PI SEEK] appears, and the device will search for another frequency with the same PI data (program identification).
Playback
Cannot play CD.
→ Disc is scratched or dirty. → CD-R/CD-RW discs are not intended for audio playback (page 16).
Cannot play MP3/WMA files.
→ Discs recorded in MP3/WMA format. Detailed information about supported discs and formats is provided on the support website indicated on the last page of the manual.
MP3/WMA files require more time to start playback than regular discs.
→ The following discs require more time to start playback: - Discs recorded with a complex file tree structure; - Discs recorded in Multi Session mode; - Discs to which files can be added later.
Sound is interrupted.
→ The disc is scratched or dirty.
Playback via USB device
Elements are not played back through the USB concentrator.
Audio files are not played back.
→ USB devices formatted with file systems other than FAT16 or FAT32 are not supported.* *This device supports FAT16 and FAT32 file systems, but some USB devices may be incompatible with all file systems. For detailed information, refer to the instruction manual of the USB device or contact the manufacturer.
It is not possible to perform album skip, element skip (in random playback mode), and composition search by name (Quick-BrowZer).
→ The operation is unavailable because the USB device is connected in Android mode. - Set [USB MODE] to [MSC/MTP] (page 13). → The USB mode is set incorrectly on the device. - Check that the USB device is set to MSC/MTP mode.
In Android mode, sound from the device is not played back.
→ When the device is in Android mode, sound is played back only from the smartphone with Android OS.
- Check the state of the audio playback program on the smartphone with Android OS. - Depending on the smartphone with Android OS, problems with playback may occur.
The device may display the following messages.
CD ERROR: The disc cannot be read. The disc will be ejected automatically.
Clean the disc or insert it correctly. Make sure the disc is not scratched or damaged.
CD NO MUSIC: No music files on the disc. The disc will be ejected automatically.
Insert a disc with music files (page 17).
CD PUSH EJT: The disc cannot be ejected.
Press (eject).
HUB NO SUPRT: This device does not support USB hubs.
INVALID
The selected operation may not be supported.
NO AF: No alternative frequencies available.
Press SEEK + / - while the station name is displayed. The device will search for another frequency with the same program (PI SEEK) (see page 17).
NO TP: No traffic program available.
The device will continue searching for available TP stations.
NOT SUPPORT - Android MODE
Using the wired remote control for the steering system
To activate the wired remote control for the steering system, set [CONTROL] to [SET STEERING] and set the [PRESET] value (page 12).
Installation
Removing the bracket's protective cap
The pre-installed device protects the cap ③ and the bracket ① from the device.
Pull the tab of the protective cap ③ and remove it.
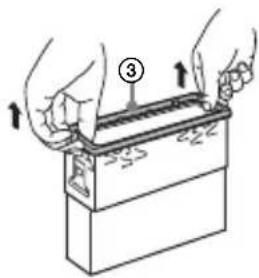
Insert the two removal tools ② together until they click. Pull the bracket ① downward, then pull the device to remove it.
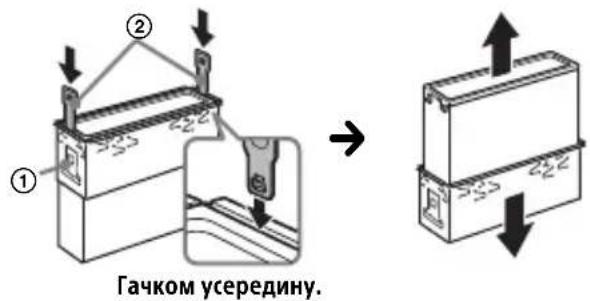
Installing the device in the dashboard panel
Before installation, make sure that the tabs on both sides of the bracket ① are bent inward by 2 mm.
Install the bracket ① into the dashboard panel, then push the protrusions outward to ensure secure fixation.
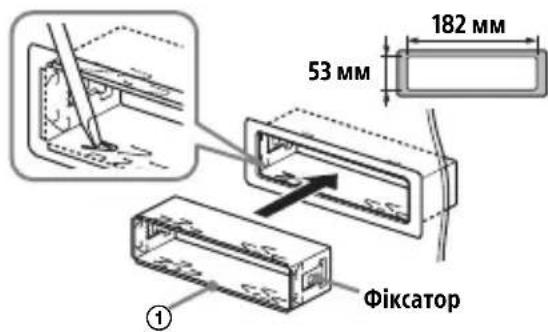
Hereby, Sony Corporation declares that this equipment is in compliance with Directive 2014/53/EU. The full text of the EU declaration of conformity is available at the following internet address: http://www.compliance.sony.de/
Estonian
If you have any questions or for the latest support information on this product, please visit the web site below:
Support site
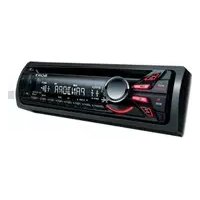
- FM/MW/LW COMPACT DISC PLAYER
- MADE IN THAILAND
- CE
- NOTICE FOR CUSTOMERS: THE FOLLOWING INFORMATION IS ONLY APPLICABLE TO EQUIPMENT SOLD IN COUNTRIES APPLYING EU DIRECTIVES
- DISPOSAL OF WASTE BATTERIES AND ELECTRICAL AND ELECTRONIC EQUIPMENT (APPLICABLE IN THE EUROPEAN UNION AND OTHER EUROPEAN COUNTRIES
- WITH SEPARATE COLLECTION SYSTEMS)
- WARNING IF YOUR CAR'S IGNITION HAS NO ACC POSITION
- DISCLAIMER REGARDING SERVICES OFFERED BY THIRD PARTIES
- TABLE OF CONTENTS
- GETTING STARTED
- LISTENING TO THE RADIO
- PLAYBACK
- SETTINGS
- ADDITIONAL INFORMATION
- CONNECTION/INSTALLATION
- GUIDE TO PARTS AND CONTROLS
- MAIN UNIT
- ALBUM ∇/△
- EXTRA BASS
- AUX INPUT JACK
- DSPL(DISPLAY)
- USB PORT
- DETACHING THE FRONT PANEL
- CAUTION ALARM
- ATTACHING THE FRONT PANEL
- RESETTING THE UNIT
- NOTE
- SETTING THE AREA/REGION
- SETTING THE CLOCK
- CONNECTING A USB DEVICE
- CONNECTING OTHER PORTABLE AUDIO DEVICE
- TO MATCH THE VOLUME LEVEL OF THE CONNECTED DEVICE TO OTHER SOURCES
- STORING AUTOMATICALLY (BTM)
- TUNING
- STORING MANUALLY
- RECEIVING THE STORED STATIONS
- USING RADIO DATA SYSTEM (RDS)
- SETTING ALTERNATIVE FREQUENCIES (AF) AND TRAFFIC ANNOUNCEMENT (TA)
- TO STORE RDS STATIONS WITH THE AF AND TA SETTING
- TO RECEIVE EMERGENCY ANNOUNCEMENTS
- TO ADJUST THE VOLUME LEVEL DURING A TRAFFIC ANNOUNCEMENT
- TO STAY WITH ONE REGIONAL PROGRAM (REGIONAL)
- LOCAL LINK FUNCTION (UK ONLY)
- SELECTING PROGRAM TYPES (PTY)
- TYPE OF PROGRAMS
- SETTING CLOCK TIME (CT)
- PLAYING A DISC
- PLAYING A USB DEVICE
- NOTES
- SEARCHING AND PLAYING TRACKS
- REPEAT PLAY AND SHUFFLE PLAY
- SEARCHING A TRACK BY NAME (QUICKBROWZERTM)
- SEARCHING BY SKIPPING ITEMS (JUMP MODE)
- CANCELING THE DEMO MODE
- BASIC SETTING OPERATION
- TO RETURN TO THE PREVIOUS DISPLAY
- GENERAL SETUP (GENERAL)
- AREA
- DEMO (DEMONSTRATION)
- CLOCK-ADJ (CLOCK ADJUST) (PAGE 6)
- CAUT ALM (CAUTION ALARM)
- BEEP
- AUTO OFF
- STEERING
- CUSTOM
- PRESET
- EDIT CUSTOM
- RESET CUSTOM
- USB MODE
- CT (CLOCK TIME)
- REGIONAL
- FIRMWARE
- SOUND SETUP (SOUND)
- EQ10 PRESET
- EQ10 CUSTOM
- BALANCE
- FADER
- HPF FREQ (HIGH PASS FILTER FREQUENCY)
- AUX VOL (AUX VOLUME LEVEL)
- DISPLAY SETUP (DISPLAY)
- DIMMER
- BRIGHTNESS
- SND SYNC (SOUND SYNCHRONIZATION)
- AUTO SCR (AUTO SCROLL)
- UPDATING THE FIRMWARE
- PRECAUTIONS
- MOISTURE CONDENSATION
- TO MAINTAIN HIGH SOUND QUALITY
- NOTES ON DISCS
- NOTES ON CD-R/CD-RW DISCS
- PLAYBACK ORDER OF AUDIO FILES
- MAINTENANCE
- CLEANING THE CONNECTORS
- SPECIFICATIONS
- TUNER SECTION
- FM
- CD PLAYER SECTION
- USB PLAYER SECTION
- POWER AMPLIFIER SECTION
- GENERAL
- COPYRIGHTS
- LIBFLAC
- TROUBLESHOOTING
- NO SOUND OR THE SOUND IS VERY LOW
- NO BEEP SOUND
- THE CONTENTS OF THE MEMORY HAVE BEEN ERASED
- STORED STATIONS AND CORRECT TIME ARE ERASED
- DURING PLAYBACK OR RECEPTION, THE DEMONSTRATION MODE STARTS
- THE DISPLAY DISAPPEARS FROM/DOES NOT APPEAR IN THE DISPLAY WINDOW
- THE DISPLAY/ILLUMINATION FLASHES
- THE OPERATION BUTTONS DO NOT FUNCTION. THE DISC WILL NOT EJECT
- RADIO RECEPTION
- STATIONS CANNOT BE RECEIVED. THE SOUND IS HAMPERED BY NOISES
- PRESET TUNING IS NOT POSSIBLE
- MHZ TO 74 MHZ IN FM3 CANNOT BE TUNED IN
- RDS
- RDS SERVICES CANNOT BE RECEIVED (WHEN [AREA] IS SET TO [RUSSIA])
- THE SEEK STARTS AFTER A FEW SECONDS OF LISTENING
- NO TRAFFIC ANNOUNCEMENTS
- PTY DISPLAYS [- - - - - - - -]
- PROGRAM SERVICE NAME FLASHES
- CD PLAYBACK
- THE DISC DOES NOT PLAY
- MP3/WMA FILES CANNOT BE PLAYED
- MP3/WMA FILES TAKE LONGER TO PLAY THAN OTHERS
- THE SOUND SKIPS
- USB DEVICE PLAYBACK
- YOU CANNOT PLAY ITEMS VIA A USB HUB
- A USB DEVICE TAKES LONGER TO PLAY
- THE SOUND IS INTERMITTENT
- AUDIO FILE CANNOT BE PLAYED
- OPERATIONS FOR SKIPPING AN ALBUM, SKIPPING ITEMS (JUMP MODE), AND SEARCHING A TRACK BY NAME (QUICKBROWZER) CANNOT BE PERFORMED
- THE SOUND CANNOT BE OUTPUT DURING PLAYBACK IN ANDROID MODE
- MESSAGES
- INVALID
- NOT SUPPORT - ANDROID MODE
- FOR STEERING WHEEL REMOTE CONTROL OPERATION
- CAUTIONS
- NOTE ON THE POWER SUPPLY LEAD (YELLOW)
- MOUNTING ANGLE ADJUSTMENT
- PARTS LIST FOR INSTALLATION
- CONNECTION
- MAKING CONNECTIONS
- TO THE CAR'S SPEAKER CONNECTOR
- TO THE CAR'S POWER CONNECTOR
- SUBWOOFER EASY CONNECTION
- MEMORY HOLD CONNECTION
- SPEAKER CONNECTION
- POWER CONNECTION DIAGRAM
- COMMON CONNECTION
- WHEN THE POSITIONS OF THE RED AND YELLOW LEADS ARE INVERTED
- WHEN THE CAR WITHOUT ACC POSITION
- USING THE WIRED REMOTE CONTROL
- INSTALLATION
- REMOVING THE PROTECTION COLLAR AND THE BRACKET
- MOUNTING THE UNIT IN THE DASHBOARD
- DETACHING AND ATTACHING THE FRONT PANEL
- FUSE REPLACEMENT
- CAUTION
- POWER AMPLIFIER
- DISCLAIMER OF LIABILITY FOR SERVICES PROVIDED BY THIRD-PARTY SUPPLIERS
- CONTENTS
- NUMBER BUTTONS (1-6)
- ALBUM▼/▲
- (REPEAT)
- (RANDOM PLAY)
- II (PLAYBACK/PAUSE)
- DSPL (DISPLAY)
- REMOVING THE FRONT PANEL
- WARNING TONE
- SETTING THE FRONT PANEL
- DEVICE RESET
- SETTING THE COUNTRY/REGION
- SETTING THE CLOCK (CT)
- SEARCH AND PLAYBACK OF COMPOSITIONS
- REPEAT PLAYBACK AND PLAYBACK IN RANDOM ORDER
- SEARCHING FOR COMPOSITION BY NAME (QUICK-BROWZER™)
- SOUND SETTINGS (SOUND)
- HANDLING OF DISCS
- CD DISC PLAYER
- INFORMATION
- NO SOUND SIGNAL IS HEARD
- DATA HAS BEEN DELETED FROM MEMORY
- THE PROGRAM SERVICE NAME IS FLASHING
- PLAYBACK OF CD DISCS
- CANNOT BE REPRODUCED
- NOT SUPPORT -ANDROID MODE
- NOTE ON THE POWER CORD (FUSE)
- INSTALLATION KIT
- INSTALLATION CONNECTIONS
- TO THE VEHICLE'S SPEAKER CONNECTOR
- REPLACING THE FUSE
- DEVICE WITH PARTS AND CONTROLS
- RECORDING
- RIM
- SETTING ALTERNATIVE FREQUENCIES (AF) AND TRAFFIC ANNOUNCEMENTS (TA)
- ADJUSTING THE VOLUME DURING TRAFFIC ANNOUNCEMENTS
- RECEIVING A REGIONAL PROGRAM (REGIONAL)
- LOCAL RADIO FUNCTION (ONLY IN GREAT BRITAIN)
- PROGRAM TYPES
- PLAYBACK DISC
- TURNING OFF
- REMOVING THE DEVICE
- SOUND ADJUSTMENT (SOUND)
- CLEANING CONTACTS
- TECHNICAL SPECIFICATIONS
- TUNER
- MW/LW
- PROGRAM CD
- USB PROGRAMMING
- RATED OUTPUT POWER
- GENERAL INFORMATION
- NO SOUND SIGNAL
- BUTTONS DO NOT FUNCTION. DISC IS NOT EJECTED
- RADIO STATIONS CANNOT BE RECEIVED. THE SOUND IS ACCOMPANIED BY NOISE
- CANNOT FIND PROGRAMMED STATIONS
- IN THE FM3 BAND, IT IS IMPOSSIBLE TO TUNE TO 74 MHZ
- THE PROGRAM SERVICE NAME IS DISPLAYED
- CANNOT PLAY CD
- CANNOT PLAY MP3/WMA FILES
- MP3/WMA FILES REQUIRE MORE TIME TO START PLAYBACK THAN REGULAR DISCS
- SOUND IS INTERRUPTED
- PLAYBACK VIA USB DEVICE
- ELEMENTS ARE NOT PLAYED BACK THROUGH THE USB CONCENTRATOR
- AUDIO FILES ARE NOT PLAYED BACK
- IT IS NOT POSSIBLE TO PERFORM ALBUM SKIP, ELEMENT SKIP (IN RANDOM PLAYBACK MODE), AND COMPOSITION SEARCH BY NAME (QUICK-BROWZER)
- IN ANDROID MODE, SOUND FROM THE DEVICE IS NOT PLAYED BACK
- CD ERROR: THE DISC CANNOT BE READ. THE DISC WILL BE EJECTED AUTOMATICALLY
- CD NO MUSIC: NO MUSIC FILES ON THE DISC. THE DISC WILL BE EJECTED AUTOMATICALLY
- USING THE WIRED REMOTE CONTROL FOR THE STEERING SYSTEM
- REMOVING THE BRACKET'S PROTECTIVE CAP
- INSTALLING THE DEVICE IN THE DASHBOARD PANEL
- ESTONIAN
- SUPPORT SITE
Brand : SONY
Model : CDXG1201U
Category : Car radio