
CDXG1202U - Car stereo SONY - Free user manual and instructions
Find the device manual for free CDXG1202U SONY in PDF.

| Brand | Sony |
| Model | CDX-G1202U |
| Product type | Car stereo with CD player, FM/MW/LW tuner, USB port and AUX input |
| Dimensions (W × H × D) | Approx. 178 mm × 50 mm × 177 mm |
| Weight | Approx. 1.2 kg |
| Power supply | 12 V DC battery (negative ground) |
| Nominal current consumption | 10 A |
| Maximum output power | 55 W × 4 (at 4 Ω) |
| Speaker impedance | 4 Ω – 8 Ω |
| Playable audio formats | CD-DA, MP3, WMA, FLAC (via USB) |
| Connectivity | USB port (front), AUX input (3.5 mm minijack), antenna, steering wheel control (wire) |
| FM radio | 87.5 – 108.0 MHz (Europe) / FM1/FM2 87.5–108 MHz, FM3 65–74 MHz (Russia) |
| MW/LW radio | MW 531 – 1602 kHz, LW 153 – 279 kHz |
| RDS functions | AF, TA, PTY, CT, regional |
| Equalizer | 10-band (EQ10) with 10 presets + custom |
| Extra Bass function | Bass boost (1, 2 or OFF) |
| Front panel | Detachable anti-theft with alarm |
| Display settings | Brightness, auto dimmer, scrolling |
| Outputs | Front/rear speakers, subwoofer, antenna/amp control |
| Firmware update | Via USB |
| Maintenance and cleaning | Clean panel connectors with cotton swab; do not use solvents |
| Safety | Unlock alarm, hardware reset |
| Spare parts / repairability | Detachable front panel, replaceable fuse; optional wired remote control |
Frequently Asked Questions - CDXG1202U SONY
User questions about CDXG1202U SONY
0 question about this device. Answer the ones you know or ask your own.
Ask a new question about this device
Download the instructions for your Car stereo in PDF format for free! Find your manual CDXG1202U - SONY and take your electronic device back in hand. On this page are published all the documents necessary for the use of your device. CDXG1202U by SONY.
USER MANUAL CDXG1202U SONY
FM/MW/LW Compact Disc Player
CD-пponгьВаTeь CBCTpoeHHbIM FM/MW/LW-THHePOM
FM/MW/LW npoRpaBaU KOMNaKT DnCKiB
To cancel the demonstration (DEMO) display, see page 10.
For the connection/installation, see page 20.
Operating Instructions GB
For safety, be sure to install this unit in the dashboard of the car as the rear side of the unit becomes hot during use. For details, see "Connection/Installation" (page 20).
Made in Thailand
Laser Diode Properties
- Emission Duration: Continuous
- Laser Output: Less than 53.3 W
(This output is the value measurement at a distance of 200mm from the objective lens surface on the Optical Pick-up Block with 7 mm aperture.)
The nameplate indicating operating voltage, etc., is located on the bottom of the chassis.
CE
Hereby, Sony Corporation declares that this equipment is in compliance with Directive 2014/53/EU.
The full text of the EU declaration of conformity is available at the following internet address:
http://www.compliance.sony.de/
This equipment is intended to be used with the approved version(s) of software that are indicated in the EU Declaration of Conformity.
The software loaded on this equipment is verified to comply with the essential requirements of the Directive 2014/53/EU. Software version: 1_
The software version can be checked in the firmware setup item of the general setup menu.
Notice for customers: the following information is only applicable to equipment sold in countries applying EU Directives
Manufacturer: Sony Corporation, 1-7-1 Konan Minato-ku Tokyo, 108-0075 Japan For EU product compliance: Sony Belgium, bijkantoor van Sony Europe Limited, Da Vincilaan 7-D1, 1935 Zaventem, Belgium

Disposal of waste batteries and electrical and electronic equipment (applicable in the European Union and other European countries
with separate collection systems)
This symbol on the product, the battery or on the packaging indicates that the product and the battery shall not be treated as household waste. On certain batteries this symbol might be used in combination with a chemical symbol. The chemical symbols for mercury (Hg) or lead (Pb) are added if the battery contains more than 0.0005% mercury or 0.004% lead.
By ensuring these products and batteries are disposed of correctly, you will help prevent potentially negative consequences for the environment and human health which could otherwise be caused by inappropriate waste handling. The recycling of the materials will help to conserve natural resources.
In case of products that for safety, performance or data integrity reasons require a permanent connection with an incorporated battery, this battery should be replaced by qualified service staff only.
To ensure that the battery and the electrical and electronic equipment will be treated properly, hand over these products at end-of-life to the applicable collection point for the recycling of electrical and electronic equipment.
For all other batteries, please view the section on how to remove the battery from the product safely. Hand the battery over to the applicable collection point for the recycling of waste batteries.
For more detailed information about recycling of this product or battery, please contact your local Civic Office, your household waste disposal service or the shop where you purchased the product or battery.
Warning if your car's ignition has no ACC position
Be sure to set the AUTO OFF function (page 10). The unit will shut off completely and automatically in the set time after the unit is turned off, which prevents battery drain. If you do not set the AUTO OFF function, press and hold OFF until the display disappears each time you turn the ignition off.
Disclaimer regarding services offered by third parties
Services offered by third parties may be changed, suspended, or terminated without prior notice. Sony does not bear any responsibility in these sorts of situations.
Table of Contents
Guide to Parts and Controls 4
Getting Started
Detaching the Front Panel. 5
Resetting the Unit 5
Setting the Clock 6
Connecting a USB Device 6
Connecting Other Portable Audio Device 6
Listening to the Radio
Listening to the Radio 7
Using Radio Data System (RDS) 7
Playback
Playing a Disc 8
Playing a USB Device 8
- Searching and Playing Tracks 9
Settings
Canceling the DEMO Mode 10
Basic Setting Operation. 10
General Setup (GENERAL) 10
Sound Setup (SOUND) 11
Display Setup (DISPLAY) 12
Additional Information
Updating the Firmware 13
Precautions. 13
Maintenance. 14
Specifications 14
Troubleshooting 16
Messages 18
Connection/Installation
Cautions 20
Parts List for Installation 20
Connection 21
Installation 23
Guide to Parts and Controls
Main unit

1 Front panel release button
2 SRC (source)
Turn on the power.
Change the source.
OFF
Press and hold for 1 second to turn the source off and display the clock.
Press and hold for more than 2 seconds to turn off the power and the display.
3 Control dial
Rotate to adjust the volume.
PUSH ENTER
Enter the selected item.
MENU
Open the setup menu.
4 Disc slot
5 Display window
6 S E E K - / + )
Tune in radio stations automatically.
Press and hold to tune manually.
I/prev/next)
(fast-reverse/fast-forward)
7 (disc eject)
8 PTY (program type)
Select PTY in RDS.
Q (browse) (page 9)
Enter the browse mode during playback.
Not available when a USB device in
AndroidTM mode is connected.)
EQ (equalizer)
Select an equalizer curve.
10 (back)
Return to the previous display.
MODE (page 7)
11 Receptor for the remote commander
12 Number buttons (1 to 6)
Receive stored radio stations. Press and hold to store stations.
ALBUM /
Skip an album for audio device. Press and hold to skip albums continuously.
(Not available when a USB device in
Android mode is connected.)
(repeat)
(Not available when a USB device in
Android mode is connected.)
(shuffle)
Not available when a USB device in
Android mode is connected.)
II (play/pause)
13 EXTRA BASS
Reinforces bass sound in synchronization with the volume level. Press to change the EXTRA BASS setting: [1], [2], [OFF].
14 AUX input jack
15 DSPL(display)
Change display items.
SCRL (scroll)
Press and hold to scroll a display item.
16 USB port
Getting Started
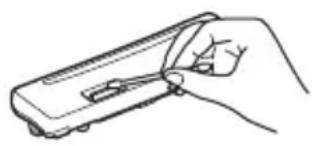
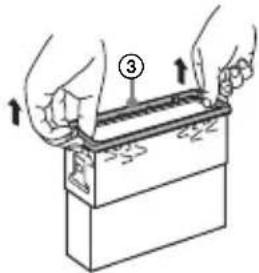
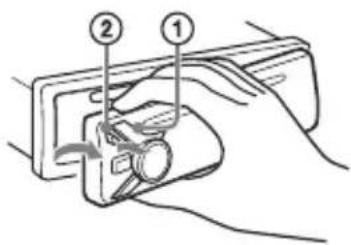
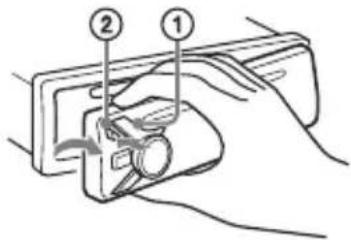
Detaching the Front Panel
You can detach the front panel of this unit to prevent theft.
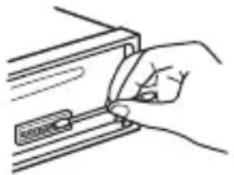
1 Press and hold OFF ① until the unit turns off, press the front panel release button ②, then pull the panel towards you to remove.
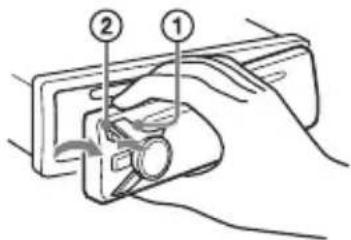
Caution alarm
If you turn the ignition switch to the OFF position without detaching the front panel, the caution alarm will sound for a few seconds. The alarm will only sound if the built-in amplifier is used.
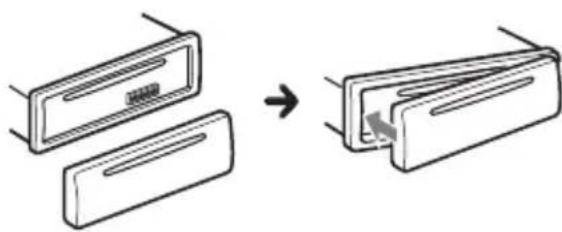
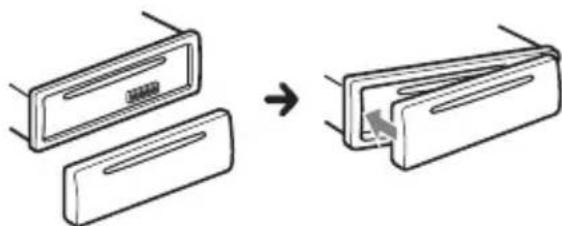
Attaching the front panel
Resetting the Unit
Before operating the unit for the first time, or after replacing the car battery or changing connections, you must reset the unit.
1 Press DSPL and (back)/MODE for more than 2 seconds.
Note
Resetting the unit will erase the clock setting and some stored contents.
Setting the area/region
After resetting the unit, the area/region setting display appears.
1 Press ENTER while [SET AREA] is displayed.
The area/region currently set appears.
2 Rotate the control dial to select [EUROPE] or [RUSSIA], then press it.
3 Rotate the control dial to select [YES] or [NO], then press it. If the setting area/region is changed, the unit is reset, then the clock is displayed.
This setting can be configured in the general setup menu (page 10).
Setting the Clock
1 Press MENU, rotate the control dial to select [GENERAL], then press it.
2 Rotate the control dial to select [SET CLOCK-ADJ], then press it. The hour indication flashes.
3 Rotate the control dial to set the hour and minute. To move the digital indication, press SEEK +/-
4 After setting the minute, press MENU. The setup is complete and the clock starts.
To display the clock Press DSPL.
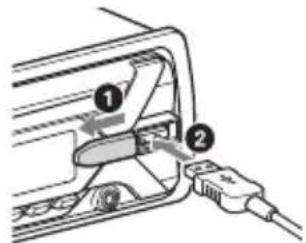
Connecting a USB Device
1 Turn down the volume on the unit.
2 Connect the USB device to the unit.
Connecting Other Portable Audio Device
1 Turn off the portable audio device.
2 Turn down the volume on the unit.
3 Connect the portable audio device to the AUX input jack (stereo mini jack) on the unit with a connecting cord (not supplied)*.
- Be sure to use a straight type plug.
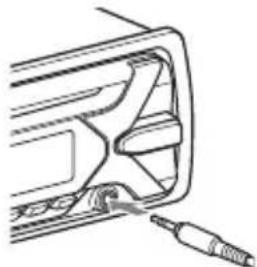
4 Press SRC to select [AUX].
To match the volume level of the connected device to other sources
Start playback of the portable audio device at a moderate volume, and set your usual listening volume on the unit. Press MENU, then select [SOUND] SET AUX VOL.
Listening to the Radio
Listening to the Radio
To listen to the radio, press SRC to select [TUNER].
Storing automatically (BTM)
1 Press MODE to change the band (FM1, FM2, FM3, MW or LW).
2 Press MENU, rotate the control dial to select [GENERAL], then press it.
3 Rotate the control dial to select [SET BTM], then press it.
The unit stores stations in order of frequency on the number buttons.
Tuning
1 Press MODE to change the band (FM1, FM2, FM3, MW or LW).
2 Perform tuning.
To tune manually
Press and hold SEEK + / - to locate the approximate frequency, then press SEEK + / - repeatedly to fine adjust to the desired frequency.
To tune automatically
Press SEEK + / -
Scanning stops when the unit receives a station.
Storing manually
1 While receiving the station that you want to store, press and hold a number button (1 to 6) until [MEM] appears.
Receiving the stored stations
1 Select the band, then press a number button (1 to 6).
Using Radio Data System (RDS)
Setting alternative frequencies (AF) and traffic announcement (TA)
AF continuously retunes the station to the strongest signal in a network, and TA provides current traffic information or traffic programs (TP) if received.
1 Press MENU, rotate the control dial to select [GENERAL], then press it.
2 Rotate the control dial to select [SET AF/TA], then press it.
3 Rotate the control dial to select [SET AF-ON], [SET TA-ON], [SET AF/TA-ON] or [SET AF/TA-OFF], then press it.
To store RDS stations with the AF and TA setting
You can preset RDS stations along with an AF/TA setting. Set AF/TA, then store the station with BTM or manually. If you preset manually, you can also preset non-RDS stations.
To receive emergency announcements
With AF or TA on, emergency announcements will automatically interrupt the currently selected source.
To adjust the volume level during a traffic announcement
Level will be stored into memory for subsequent traffic announcements, independently from the regular volume level.
To stay with one regional program (REGIONAL)
When the AF and REGIONAL functions are on, you will not be switched to another regional station with a stronger frequency. If you leave this regional program's reception area, set [SET REG-OFF] in [GENERAL] during FM reception (page 11).
This function does not work in the UK and some other areas.
Local Link function (UK only)
This function enables you to select other local stations in the area, even if they are not stored on your number buttons. During FM reception, press a number button (1 to 6) on which a local station is stored. Within 5 seconds, press again a number button of the local station. Repeat this procedure until the local station is received.
Selecting program types (PTY)
1 Press PTY during FM reception.
2 Rotate the control dial until the desired program type appears, then press it. The unit starts to search for a station broadcasting the selected program type.
Type of programs
NEWS (News), AFFAIRS (Current Affairs), INFO (Information), SPORT (Sports), EDUCATE (Education), DRAMA (Drama), CULTURE (Culture), SCIENCE (Science), VARIORED (Varied), POP M (Pop Music), ROCK M (Rock Music), EASY M (M.O.R. Music), LIGHT M (Light classical), CLASSICS (Serious classical), OTHER M (Other Music), WEATHER (Weather), FINANCE (Finance), CHILDREN (Children's program), SOCIAL A (Social Affairs), RELIGION (Religion), PHONE IN (Phone In), TRAVEL (Travel), LEISURE (Leisure), JAZZ (Jazz Music), COUNTRY (Country Music), NATION M (National Music), OLDIES (Oldies Music), FOLK M (Folk Music), DOCUMENT (Documentary)
Setting clock time (CT)
The CT data from the RDS transmission sets the clock.
1 Set [SET CT-ON] in [GENERAL] (page 11).
Playback
Playing a Disc
1 Insert the disc (label side up).
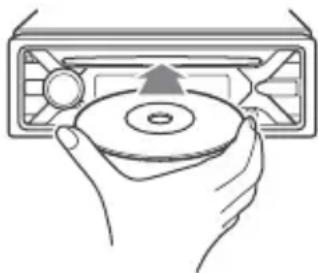
Playback starts automatically.
Playing a USB Device
AOA (Android Open Accessory) 2.0, MSC (Mass Storage Class) and MTP (Media Transfer Protocol) type USB devices* compliant with the USB standard can be used. Depending on the USB device, the Android mode or MSC/MTP mode can be selected on the unit. Some digital media players or Android smartphones may require setting to MTP mode.
- e.g., a USB flash drive, digital media player, Android smartphone
Notes
- For details on the compatibility of your USB device, visit the support site on the back cover.
- Smartphones with Android OS 4.1 or higher installed support Android Open Accessory 2.0 (AOA 2.0). However, some smartphones may not fully support AOA 2.0 even if Android OS 4.1 or higher is installed. For details on the compatibility of your Android smartphone, visit the support site on the back cover.
- Playback of the following files is not supported. MP3/WMA/FLAC:
copyright-protected files
- DRM (Digital Rights Management) files
- Multi-channel audio files MP3/WMA:
- lossless compression files
Before making a connection, select the USB mode (Android mode or MSC/MTP mode) depending on the USB device (page 11).
1 Connect a USB device to the USB port (page 6).
Playback starts.
If a device is already connected, to start playback, press SRC to select [USB].
2 Adjust the volume on this unit.
To stop playback
Press and hold OFF for 1 second.
To remove the device
Stop playback, then remove the device.
Searching and Playing Tracks
Repeat play and shuffle play
Not available when a USB device in Android mode is connected.
1 During playback, press (repeat) or (shuffle) repeatedly to select the desired play mode.
Playback in the selected play mode may take time to start.
Available play modes differ depending on the selected sound source.
Searching a track by name (QuickBrowZerTM)
Not available when a USB device in Android mode is connected.
1 During CD or USB playback, press (browse)* to display the list of search categories.
When the track list appears, press (back) repeatedly to display the desired search category.
- During USB playback, press (browse) for more than 2 seconds to directly return to the beginning of the category list.
2 Rotate the control dial to select the desired search category, then press it to confirm.
3 Repeat step 2 to search the desired track.
Playback starts.
To exit the Quick-BrowZer mode
Press (browse).
Searching by skipping items (Jump mode)
Not available when a USB device in Android mode is connected.
1Press Q (browse).
2 Press SEEK+.
3 Rotate the control dial to select the item.
The list is jumped in steps of 10% of the total number of items.
4 Press ENTER to return to the QuickBrowZer mode.
The selected item appears.
5 Rotate the control dial to select the desired item, then press it.
Playback starts.
Settings
Canceling the DEMO Mode
You can cancel the demonstration display which appears when the source is off and the clock is displayed.
1 Press MENU, rotate the control dial to select [GENERAL], then press it.
2 Rotate the control dial to select [SET DEMO], then press it.
3 Rotate the control dial to select [SET DEMO-OFF], then press it. The setting is complete.
4 Press (back) twice.
The display returns to normal reception/ play mode.
Basic Setting Operation
You can set items in the following setup categories:
General setup (GENERAL), Sound setup (SOUND), Display setup (DISPLAY)
1 Press MENU.
2 Rotate the control dial to select the setup category, then press it. The items that can be set differ depending on the source and settings.
3 Rotate the control dial to select the options, then press it.
To return to the previous display
Press (back).
General Setup (GENERAL)
AREA
Specifies the area/region to use this unit: [EUROPE], [RUSSIA].
If the area/region currently set is changed, this unit is reset, then the clock is displayed.
(Available only while the source is off and the clock is displayed.)
DEMO (demonstration)
Activates the demonstration: [ON], [OFF].
CLOCK-ADJ (clock adjust) (page 6)
CAUT ALM (caution alarm)
Activates the caution alarm: [ON], [OFF] (page 5).
(Available only while the source is off and the clock is displayed.)
BEEP
Activates the beep sound: [ON], [OFF].
AUTO OFF
Shuts off automatically after a desired time when the unit is turned off: [ON] (30 minutes), [OFF].
STEERING
Registers/resets the setting of the steering wheel remote control.
(Available when connected with the connection cable (not supplied).)
(Available only while the source is off and the clock is displayed.)
STR CONTROL (steering control)
Selects the input mode of the connected remote control. To prevent a malfunction, be sure to match the input mode with the connected remote control before use.
CUSTOM
Input mode for the steering wheel remote control
PRESET
Input mode for the wired remote control excluding the steering wheel remote control (automatically selected when [RESET CUSTOM] is performed.)
EDIT CUSTOM
Registers the functions (SOURCE, ATT, VOL + / - ,SEEK + / - ) to the steering wheel remote control:
1 Rotate the control dial to select the function you want to assign to the steering wheel remote control, then press it.
2 While [REGISTER] is blinking, press and hold the button on the steering wheel remote control you want to assign the function to. When registration is complete, [REGISTERED] is displayed.
3 To register other functions, repeat steps 1 and 2.
(Available only when [STR CONTROL] is set to [CUSTOM].)
RESET CUSTOM
Resetsthe setting of the steering wheel remote control: [YES], [NO].
(Available only when [STR CONTROL] is set to [CUSTOM].)
Notes
- While making settings, only button operation on the unit is available. For safety, park your car before making this setting.
If an error occurs while registering, all the previously-registered information remains. Restart registration from the function where the error occurred. - This function may not be available on some vehicles. For details on the compatibility of your vehicle, visit the support site on the back cover.
USB MODE
Changes the USB mode: [ANDROID], [MSC/MTP].
(Available only when the USB source is selected.)
CT (clock time)
Activates the CT function: [ON], [OFF].
AF/TA (alternative frequencies/traffic announcement)
Selects the alternative frequencies (AF) and traffic announcement (TA) setting: [AF-ON], [TA-ON], [AF/TA-ON], [AF/TA-OFF].
REGIONAL
Restricts reception to a specific region: [ON], [OFF].
(Available only when FM is received.)
BTM (best tuning memory) (page 7)
(Available only when the tuner is selected.)
FIRMWARE
(Available only while the source is off and the clock is displayed.)
Checks/updates the firmware version. For details, visit the support site on the back cover.
FW VERSION (firmware version)
Displays current firmware version.
FW UPDATE (firmware update)
Enters firmware update process: [YES], [NO].
Updating the firmware takes a few minutes to complete. During the update, do not turn the ignition to the OFF position, nor remove the USB device.
Sound Setup (SOUND)
EQ10 PRESET
Selects an equalizer curve from 10 equalizer curves or off:
[OFF], [R&B], [ROCK], [POP], [HIP-HOP], [ELECTRONICA], [JAZZ], [SOUL],
[COUNTRY], [KARAOKE]*, [CUSTOM].
The equalizer curve setting can be memorized for each source.
- [KARAOKE] reduces the vocal sound but cannot be fully removed during playback. Also, using a microphone is not supported.
EQ10 CUSTOM
Sets [CUSTOM] of EQ10.
Setting the equalizer curve: [BAND1] 32 Hz, [BAND2] 63 Hz, [BAND3] 125 Hz,
[BAND4] 250 Hz, [BAND5] 500 Hz,
[BAND6] 1 kHz, [BAND7] 2 kHz, [BAND8] 4
kHz, [BAND9] 8 kHz, [BAND10] 16 kHz.
The volume level is adjustable in 1 dB steps, from -6 dB to +6 dB.
BALANCE
Adjusts the sound balance: [RIGHT-15] - [CENTER] - [LEFT-15].
FADER
Adjusts the relative level: [FRONT-15] - [CENTER] - [REAR-15].
([ATT] is displayed at the lowest setting.)
Selects the subwoofer phase: [NORM], [REV].
LPF FREQ (low pass filter frequency)
Selects the subwoofer cut-off frequency:
[80Hz], [100Hz], [120Hz].
HPF FREQ (high pass filter frequency)
Selects the front/rear speaker cut-off
frequency: [OFF], [80Hz], [100Hz], [120Hz].
AUX VOL (AUX volume level)
Adjusts the volume level for each
connected auxiliary device: [+18dB]
[0 dB] - [-8 dB].
This setting negates the need to adjust
the volume level between sources.
(Available only when the AUX is selected.)
Display Setup (DISPLAY)
DIMMER
Changes the display brightness: [ON], [OFF], [CLK].
To set this function to be active only during a fixed period, select [CLK], then set the start and end times.
- To set the brightness when the dimmer function is activated:
Set [DIMMER] to [ON], then adjust [BRIGHTNESS].
- To set the brightness when the dimmer function is deactivated:
Set [DIMMER] to [OFF], then adjust [BRIGHTNESS].
The brightness setting is stored and applied when the dimmer function is activated or deactivated.
BRIGHTNESS
Adjusts the display brightness. The brightness level is adjustable: [1] - [10].
SND SYNC (sound synchronization)
Activates the synchronization of the illumination with the sound: [ON], [OFF].
AUTO SCR (auto scroll)
Scrolls long items automatically: [ON], [OFF].
(Not available when the AUX or tuner is selected.)
Additional Information
Updating the Firmware
To update the firmware, visit the support site on the back cover, then follow the online instructions.
Notes
- Using a USB device (not supplied) is required for updating the firmware. Store the updater in the USB device, and connect the device to the USB port, then perform the update operation.
- Updating the firmware takes a few minutes to complete. During the update, do not turn the ignition to the OFF position, nor remove the USB device.
Precautions
Cool off the unit beforehand if your car has been parked in direct sunlight.
- Do not leave the front panel or audio devices brought in inside the car, or it may cause malfunction due to high temperature in direct sunlight.
- Power antenna (aerial) extends automatically.
Moisture condensation
Should moisture condensation occur inside the unit, remove the disc and wait for about an hour for it to dry out; otherwise the unit will not operate properly.
To maintain high sound quality
Do not splash liquid onto the unit or discs.
Notes on discs
- Do not expose discs to direct sunlight or heat sources such as hot air ducts, nor leave it in a car parked in direct sunlight.
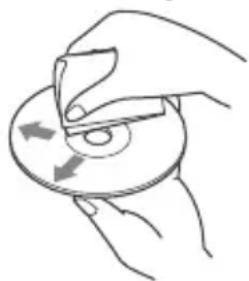
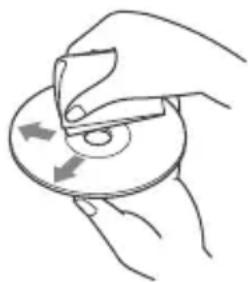
- Before playing, wipe the discs with a cleaning cloth from the center out. Do not use solvents such as benzine, thinner, commercially available cleaners.
- This unit is designed to play discs that conform to the Compact Disc (CD) standard. DualDiscs and some of the music discs encoded with copyright protection technologies do not conform to the Compact Disc (CD) standard, therefore, these discs may not be playable by this unit.
- Discs that this unit CANNOT play
- Discs with labels, stickers, or sticky tape or paper attached. Doing so may cause a malfunction, or may ruin the disc.
- Discs with non-standard shapes (e.g., heart, square, star). Attempting to do so may damage the unit.
- 8 cm (1/4 in) discs.
Notes on CD-R/CD-RW discs
- If the multi-session disc begins with a CD-DA session, it is recognized as a CD-DA disc, and other sessions are not played.
- Discs that this unit CANNOT play
- CD-R/CD-RW of poor recording quality.
- CD-R/CD-RW recorded with an incompatible recording device.
- CD-R/CD-RW which is finalized incorrectly.
- CD-R/CD-RW other than those recorded in music CD format or MP3 format conforming to ISO9660 Level 1/Level 2, Joliet/Romeo or multi-session.
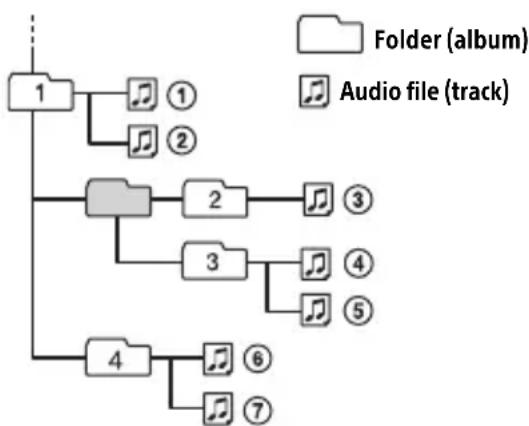
Playback order of audio files
If you have any questions or problems concerning your unit that are not covered in this manual, consult your nearest Sony dealer.
Maintenance
Cleaning the connectors
The unit may not function properly if the connectors between the unit and the front panel are not clean. In order to prevent this, detach the front panel (page 5) and clean the connectors with a cotton swab. Do not apply too much force. Otherwise, the connectors may be damaged.
Notes
- For safety, turn off the ignition before cleaning the connectors, and remove the key from the ignition switch.
- Never touch the connectors directly with your fingers or with any metal device.
Specifications
Tuner section
FM
Tuning range:
When [AREA] is set to [EUROPE]:
87.5 MHz - 108.0 MHz
When [AREA] is set to [RUSSIA]:
FM1/FM2: 87.5 MHz - 108.0 MHz (at 50 kHz step)
FM3: 65 MHz - 74 MHz (at 30 kHz step)
Antenna (aerial) terminal:
External antenna (aerial) connector
Intermediate frequency:
When [AREA] is set to [EUROPE]:
FM CCIR: -1,956.5 kHz to -487.3 kHz and
+500.0 kHz to +2,095.4 kHz
When [AREA] is set to [RUSSIA]:
FM CCIR: -1,956.5 kHz to -487.3 kHz and
+500.0 kHz to +2,095.4 kHz
FM OIRT: -1,815.6 kHz to -943.7 kHz and
+996.6 kHz to +1,776.6 kHz
Usable sensitivity: 7 dBf
Selectivity: 75 dB at 400 kHz
Signal-to-noise ratio: 73 dB
Separation: 50 dB at 1 kHz
Frequency response: 20Hz - 15,000Hz
MW/LW
Tuning range:
MW: 531 kHz - 1,602 kHz
LW: 153 kHz - 279 kHz
Antenna (aerial) terminal:
External antenna (aerial) connector
Sensitivity: MW: 26 V , LW: 50 V
CD Player section
Signal-to-noise ratio: 95 dB
Frequency response: 10Hz - 20,000Hz
Wow and flutter: Below measurable limit
The maximum number of: (CD-R/CD-RW only)
- folders (albums): 150 (including root folder)
- files (tracks) and folders: 300 (may less than 300 if folder/file names contain many characters)
displayable characters for a folder/file name: 32 (Joliet)/64 (Romeo)
Corresponding codec: MP3 (.mp3) and WMA (.wma)
USB Player section
Interface: USB (Full-speed)
Maximum current: 500mA
The maximum number of recognizable tracks:
- folders (albums): 256
- files (tracks) per folder: 256
Compatible Android Open Accessory protocol (AOA): 2.0
Corresponding codec: MP3 (.mp3)
Bit rate: 8 kbps - 320 kbps (Supports VBR (Variable Bit Rate))
Sampling rate: 16kHz - 48kHz
WMA (.wma)
Bit rate: 32 kbps - 192 kbps (Supports VBR (Variable Bit Rate))
Sampling rate: 32 kHz, 44.1 kHz, 48 kHz
FLAC (.flac)
Bit depth: 16 bit, 24 bit
Sampling rate: 44.1 kHz, 48 kHz
Power amplifier section
Output: Speaker outputs
Speaker impedance: 4 -8
Maximum power output: 55W× 4 (at 4
General
Outputs:
Audio outputs terminal (REAR, SUB)
Power antenna (aerial)/Power amplifier control terminal (REM OUT)
Inputs:
Remote controller input terminal
Antenna (aerial) input terminal
Power requirements: 12 V DC car battery (negative ground (earth))
Rated current consumption: 10 A
Dimensions:
Approx. 178mm× 50mm× 177mm
(7 1/8 in × 2 in × 7 in) (w/h/d)
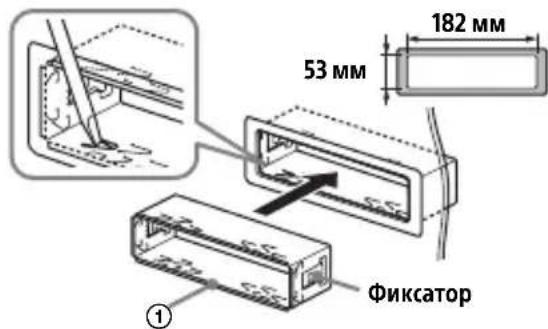
Mounting dimensions:
Approx. 182mm× 53mm× 160mm
(7 1/4 in × 2 1/8 in × 6 5/16 in) (w/h/d)
Mass: Approx. 1.2kg (2 lb 11 oz)
Package contents:
Main unit (1)
Parts for installation and connections (1 set)
Your dealer may not handle some of the above listed accessories. Please ask the dealer for detailed information.
Design and specifications are subject to change without notice.
Copyrights
Windows Media is either a registered trademark or trademark of Microsoft Corporation in the United States and/or other countries.
This product is protected by certain intellectual property rights of Microsoft Corporation. Use or distribution of such technology outside of this product is prohibited without a license from Microsoft or an authorized Microsoft subsidiary.
MPEG Layer-3 audio coding technology and patents licensed from Fraunhofer IIS and Thomson.
Android is a trademark of Google Inc.
libFLAC
Copyright (C) 2000-2009 Josh Coalson
Copyright (C) 2011-2013 Xiph.Org Foundation
Redistribution and use in source and binary forms, with or without modification, are permitted provided that the following conditions are met:
- Redistributions of source code must retain the above copyright notice, this list of conditions and the following disclaimer.
- Redistributions in binary form must reproduce the above copyright notice, this list of conditions and the following disclaimer in the documentation and/or other materials provided with the distribution.
- Neither the name of the Xiph.org Foundation nor the names of its contributors may be used to endorse or promote products derived from this software without specific prior written permission.
THIS SOFTWARE IS PROVIDED BY THE
COPYRIGHT HOLDERS AND COLNTRIButors "AS IS" AND ANY EXPRESS OR IMplied
WARRANTIES, INCLUDING, BUT NOT LIMITED TO, THE IMPLIED WARRANTY OF
MERCHANTABILITY AND FITNESS FOR A
PARTICULAR PURPOSE ARE DISCLAIMED. IN NO EVENT SHALL THE FOUNDATION OR
CONTRIBUTORS BE LIABLE FOR ANY DIRECT,
INDIRECT, INCIDENTAL, SPECIAL,
EXEMPLARY, OR CONSEQUENTIAL DAMAGES (INCLUDING, BUT NOT LIMITED TO,
PROCUREMENT OF SUBSTITUTE GOODS OR SERVICES; LOSS OF USE, DATA, OR PROFITS; OR BUSINESS INTERRUPTION) HOWEVER CAUSED AND ON ANY THEORY OF LIABILITY,
WHETHER IN CONTRACT, STRICT LIABILITY,
OR TORT (INCLUDING NEGLIGENCE OR OTHERWISE) ASISING IN ANY WAY OUT OF THE USE OF THIS SOFTWARE, EVEN IF ADVISED OF THE POSSIBILITY OF SUCH DAMAGE.
Troubleshooting
The following checklist will help you remedy problems you may encounter with your unit. Before going through the checklist below, check the connection and operating procedures.
For details on using the fuse and removing the unit from the dashboard, see "Connection/Installation" (page 20). If the problem is not solved, visit the support site on the back cover.
General
No sound or the sound is very low.
The position of the fader control [FADER] is not set for a 2-speaker system.
The volume of the unit and/or connected device is very low.
- Increase the volume of the unit and connected device.
No beep sound.
An optional power amplifier is connected and you are not using the built-in amplifier.
The contents of the memory have been erased.
The power supply lead or battery has been disconnected or not connected properly.
Stored stations and correct time are erased.
The fuse has blown.
Makes a noise when the position of the ignition is switched.
The leads are not matched correctly with the car's accessory power connector.
During playback or reception, the demonstration mode starts.
If no operation is performed for 5 minutes with [DEMO-ON] set, the demonstration mode starts.
- Set [DEMO-OFF] (page10).
The display disappears from/does not appear in the display window.
The dimmer is set to [DIM-ON] (page 12).
The display disappears if you press and hold OFF.
- Press OFF on the unit until the display appears.
The connectors are dirty (page 14).
The display/illumination flashes.
The power supply is not sufficient.
- Check that the car battery supplies enough power to the unit. (The power requirement is 12VDC .)
The operation buttons do not function. The disc will not eject.
Press DSPL and (back)/MODE for more than 2 seconds to reset the unit.
The contents stored in memory are erased.
For your safety, do not reset the unit while you are driving.
Radio reception
Stations cannot be received. The sound is hampered by noises.
The connection is not correct.
- Check the connection of the car antenna (aerial).
- If the auto antenna (aerial) will not extend, check the connection of the power antenna (aerial) control lead.
Preset tuning is not possible.
The broadcast signal is too weak.
65 MHz to 74 MHz in FM3 cannot be tuned in.
[AREA] is set to [EUROPE].
- Set [AREA] to [RUSSIA] (page 10).
RDS
RDS services cannot be received (when [AREA] is set to [RUSSIA]).
FM3 is selected.
- Select FM1 or FM2.
RDS services are unavailable in the current region.
The SEEK starts after a few seconds of listening.
The station is non-TP or has weak signal.
- Deactivate TA (page 7).
No traffic announcements.
Activate TA (page 7).
The station does not broadcast any traffic announcements despite being TP.
- Tune in another station.
PTY displays [- - - - - - - - ]
The current station is not an RDS station.
RDS data has not been received.
The station does not specify the program type.
Program service name flashes.
There is no alternative frequency for the current station.
- Press SEEK +/- while the program service name is flashing. [PI SEEK] appears and the unit starts searching for another frequency with the same PI (program identification) data.
CD playback
The disc does not play.
Defective or dirty disc.
The CD-R/CD-RW is not for audio use (page 13).
MP3/WMA files cannot be played.
The disc is incompatible with the MP3/WMA format and version. For details on playable discs and formats, visit the support site on the back cover.
MP3/WMA files take longer to play than others.
The following discs take a longer time to start playback.
- A disc recorded with a complicated tree structure.
- A disc recorded in Multi Session.
- A disc to which data can be added.
The sound skips.
Defective or dirty disc.
USB device playback
You cannot play items via a USB hub.
This unit cannot recognize USB devices via a USB hub.
A USB device takes longer to play.
The USB device contains files with a complicated tree structure.
The sound is intermittent.
The sound may be intermittent at a high-bit-rate.
DRM (Digital Rights Management) files may not be playable in some cases.
Audio file cannot be played.
USB device formatted with file systems other than FAT16 or FAT32 are unsupported.*
* This unit supports FAT16 and FAT32, but some USB device may not support all of these FAT. For details, refer to the operating instruction of each USB device or contact the manufacturer.
Operations for skipping an album, skipping items (Jump mode), and searching a track by name (QuickBrowZer) cannot be performed.
These operations cannot be performed when a USB device in Android mode is connected.
- Set [USB MODE] to [MSC/MTP] (page 11).
The USB mode of the device is not set to the appropriate mode.
- Make sure that the USB mode of the device is set to MSC/MTP mode.
The sound cannot be output during playback in Android mode.
While the unit is in Android mode, the sound outputs only from the Android smartphone.
- Check the status of the audio playback application on the Android smartphone.
- Playback may not perform properly depending on the Android smartphone.
Messages
The following messages may appear or flash during operation.
CD ERROR: The disc cannot be played. The disc will be ejected automatically.
Clean or insert the disc correctly, or make sure the disc is not blank or defective.
CD NO MUSIC: There is no playable file. The disc will be ejected automatically.
Insert a disc containing playable files (page 15).
CD PUSH EJT: The disc could not be ejected properly.
Press (eject).
HUB NO SUPRT: USB hubs are not supported.
INVALID
The selected operation could be invalid.
NO AF: No alternative frequencies.
Press SEEK + / - while the program service name is flashing. The unit starts searching for another frequency with the same PI (program identification) data ([PI SEEK] appears).
NO TP: No traffic programs.
The unit will continue searching for available TP stations.
NOT SUPPORT -Android MODE
A USB device not supporting AOA (Android Open Accessory) 2.0 is connected to the unit while [USB MODE] is set to [ANDROID].
- Set [USB MODE] to [MSC/MTP] (page 11).
OVERLOAD: The USB device is overloaded.
Disconnect the USB device, then press SRC to select another source.
The USB device has a fault, or an unsupported device is connected.
READ: Now reading information.
Wait until reading is complete and playback starts automatically. This may take some time depending on the file organization.
USB ERROR: The USB device cannot be played.
Connect the USB device again.
USB NO DEV: A USB device is not connected or recognized.
Make sure the USB device or USB cable is securely connected.
USB NO MUSIC: There is no playable file.
Connect a USB device containing playable files (page 15).
USB NO SUPRT: The USB device is not supported.
For details on the compatibility of your USB device, visit the support site on the back cover.
L L L or :T h e beginning or the end of the disc has been reached.
(underscore): The character cannot be displayed.
For steering wheel remote control operation:
ERROR: An error occurred during the function registration.
Register again from the function where the error occurred (page 11).
TIMEOUT: The function registration failed due to a timeout.
Try completing the registration while [REGISTER] is blinking (about 6 seconds) (page 11).
If these solutions do not help improve the situation, consult your nearest Sony dealer. If you take the unit to be repaired because of CD playback trouble, bring the disc that was used at the time the problem began.
Connection/Installation
Cautions
- Run all ground (earth) leads to a common ground (earth) point.
- Do not get the leads trapped under a screw, or caught in moving parts (e.g., seat railing).
- Before making connections, turn the car ignition off to avoid short circuits.
- Connect the power supply lead (6) to the unit and speakers before connecting it to the auxiliary power connector.
- Be sure to insulate any loose unconnected leads with electrical tape for safety.
Precautions
- Choose the installation location carefully so that the unit will not interfere with normal driving operations.
- Avoid installing the unit in areas subject to dust, dirt, excessive vibration, or high temperature, such as in direct sunlight or near heater ducts.
- Use only the supplied mounting hardware for a safe and secure installation.
Note on the power supply lead (yellow) When connecting this unit in combination with other stereo components, the amperage rating of the car circuit to which the unit is connected must be higher than the sum of each component's fuse amperage rating.
Mounting angle adjustment Adjust the mounting angle to less than 45^
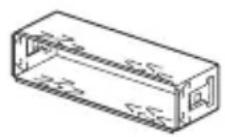
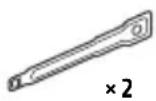
Parts List for Installation
(1)
(2)
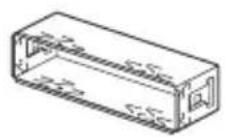
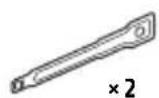
(3)
(4)
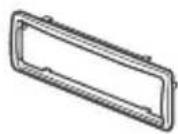
(5)
6


This parts list does not include all the package contents.
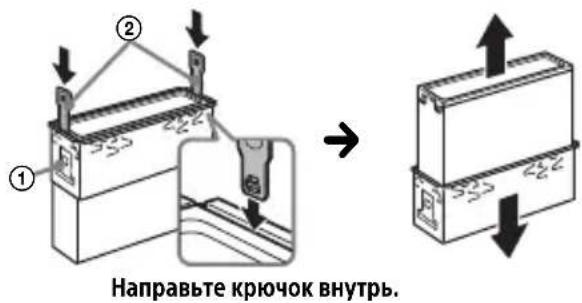
- The bracket ① and the protection collar ③ are attached to the unit before shipping. Before mounting the unit, use the release keys ② to remove the bracket ① from the unit. For details, see "Removing the protection collar and the bracket" (page 23).
- Keep the release keys ② for future use as they are also necessary if you remove the unit from your car.
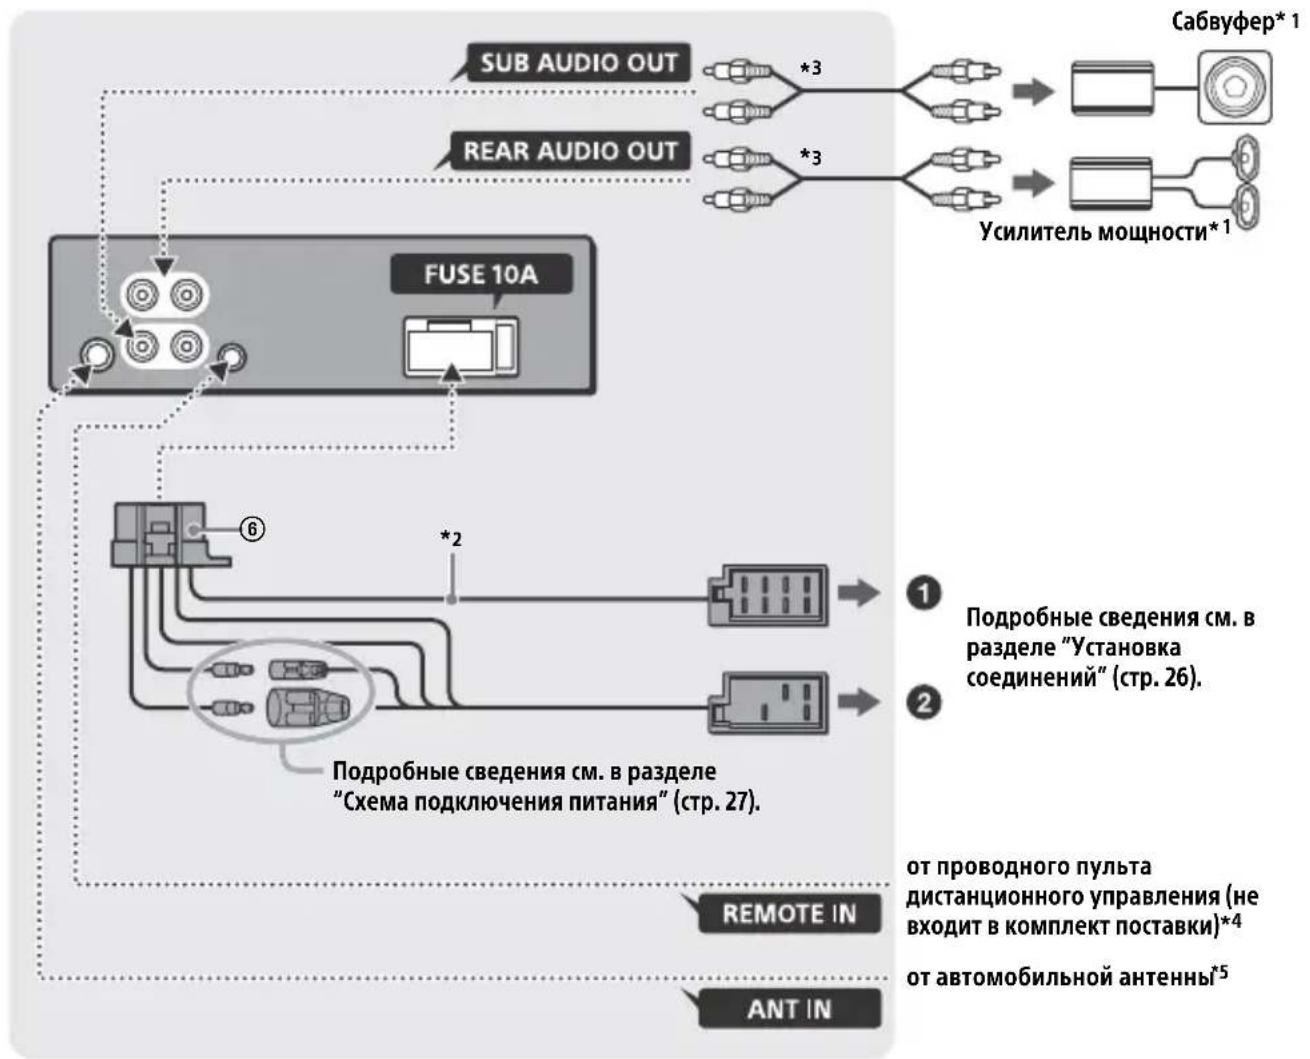
Connection
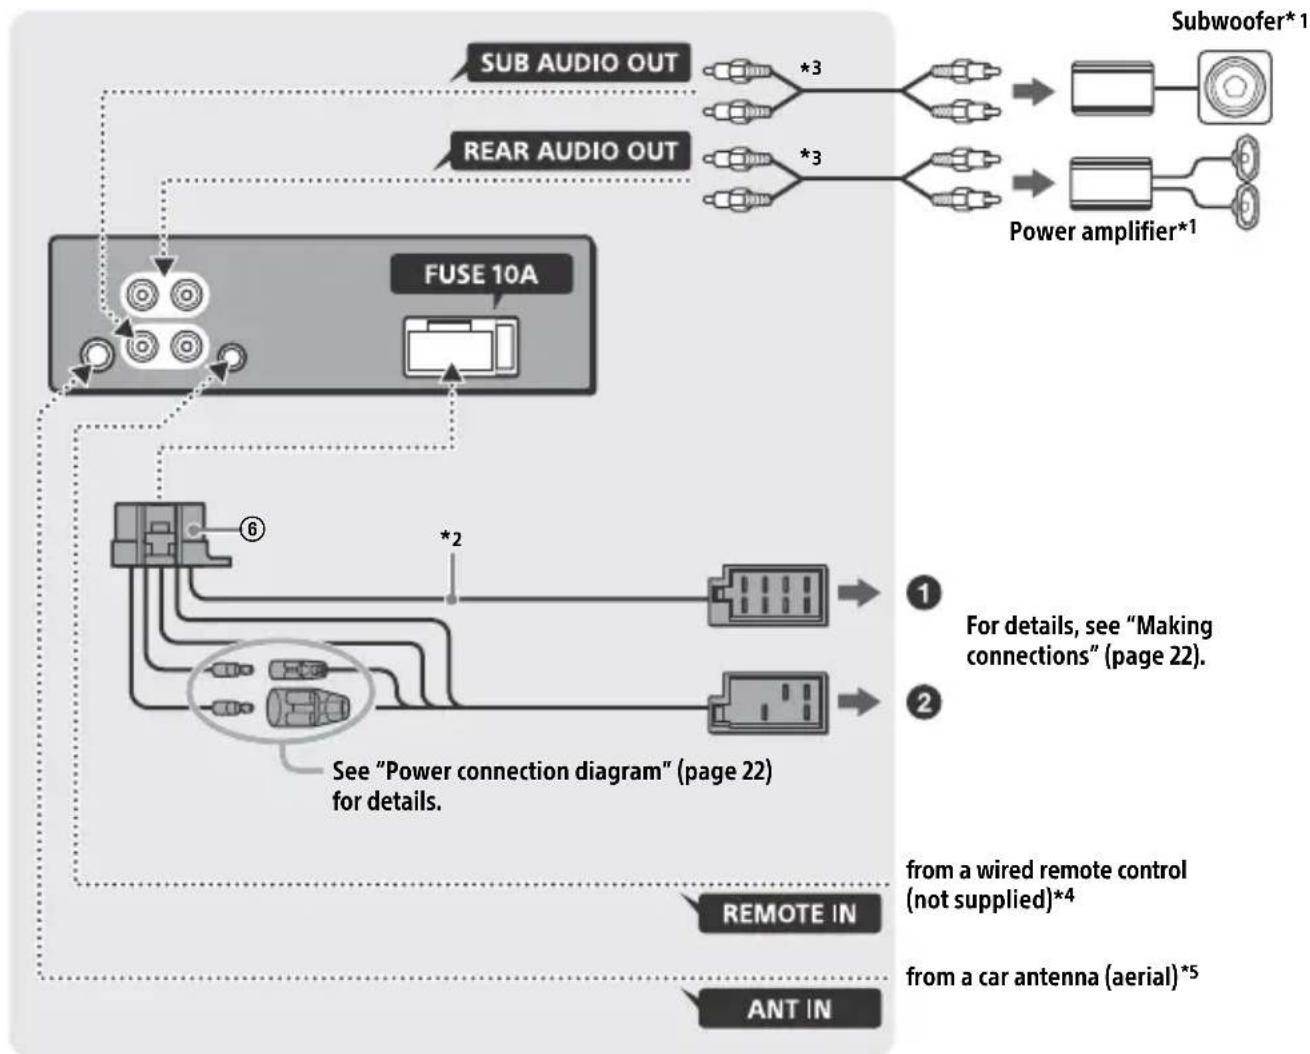
1 Not supplied
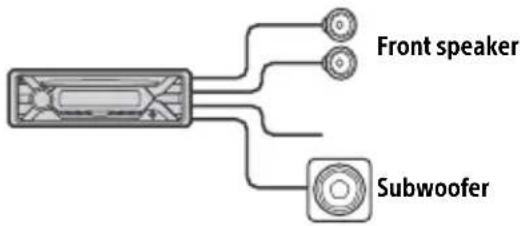
2 Speaker impedance: 4 - 8 × 4
3 RCA pin cord (not supplied)
4 Depending on the type of car, use an adaptor for a wired remote control (not supplied). For details on using the wired remote control, see "Using the wired remote control" (page 23).
*5 Depending on the type of car, use an adaptor (not supplied) if the antenna connector does not fit.
Making connections
If you have a power antenna (aerial) without a relay box, connecting this unit with the supplied power supply lead ⑥ may damage the antenna (aerial).
To the car's speaker connector
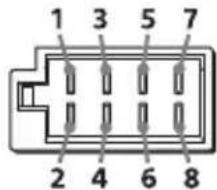
| 1 | Rear speaker (right) | ⊕ | Purple |
| 2 | Purple/black striped | ||
| 3 | Front speaker (right) | ⊕ | Gray |
| 4 | Gray/black striped | ||
| 5 | Front speaker (left) | ⊕ | White |
| 6 | White/black striped | ||
| 7 | Rear speaker (left) | ⊕ | Green |
| 8 | Green/black striped |
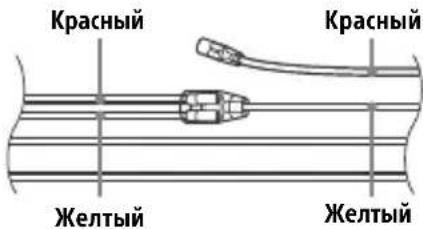
To the car's power connector
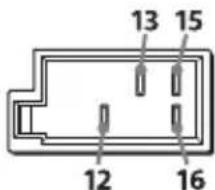
| 12 | continuous power supply | Yellow |
| 13 | power antenna (aerial) /power amplifier control (REM OUT) | Blue/white striped |
| 15 | switched power supply | Red |
| 16 | ground (earth) Black |
Subwoofer Easy Connection
You can use a subwoofer without a power amplifier when it is connected to a rear speaker cord.
Notes
- Preparation of the rear speaker cords is required.
- Use a subwoofer with an impedance of 4 to 8 , and with adequate power handling capacities to avoid damage.
Memory hold connection
When the yellow power supply lead is connected, power will always be supplied to the memory circuit even when the ignition switch is turned off.
Speaker connection
Before connecting the speakers, turn the unit off.
- Use speakers with an impedance of 4 to 8 , and with adequate power handling capacities to avoid damage.
Power connection diagram
Make sure your car's auxiliary power connector, and match the connections of cords correctly depending on the car.

Auxiliary power connector
Common connection
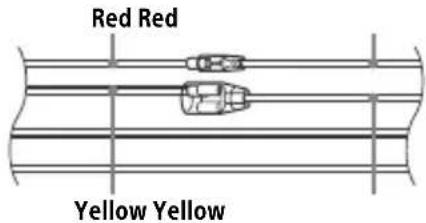
| 12 | continuous power supply | Yellow |
| 15 | switched power supply Red |
When the positions of the red and yellow leads are inverted
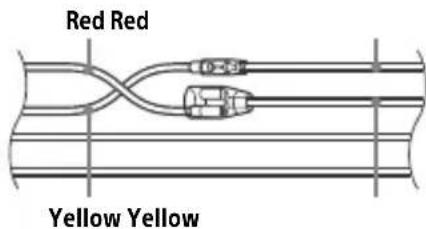
| 12 | switched power supply Yellow | |
| 15 | continuous power supply | Red |
When the car without ACC position
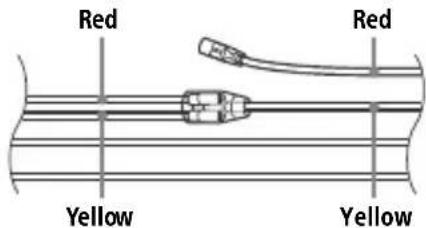
After matching the connections and switching power supply leads correctly, connect the unit to the car's power supply. If you have any questions and problems connecting your unit that are not covered in this manual, consult the car dealer.
Using the wired remote control
1 To enable the wired remote control, set [STR CONTROL] in [SET STEERING] to [PRESET] (page 10).
Installation
Removing the protection collar and the bracket
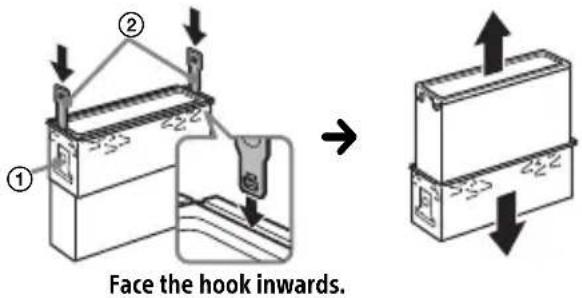
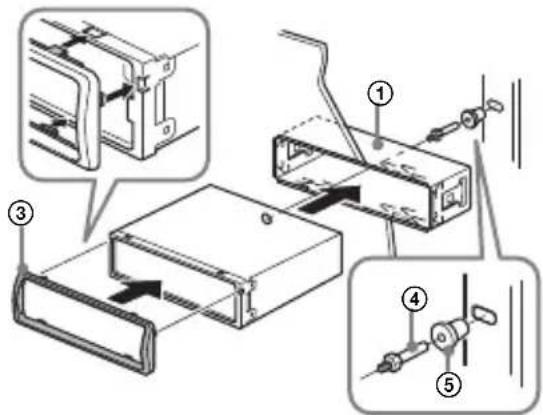
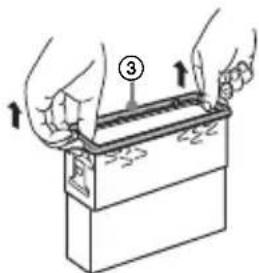
Before installing the unit, remove the protection collar ③ and the bracket ① from the unit.
1 Pinch both edges of the protection collar ③ then pull it out.
2 Insert both release keys ② until they click, and pull down the bracket ①, then pull up the unit to separate.
Mounting the unit in the dashboard
Before installing, make sure the catches on both sides of the bracket ① are bent inwards 2mm (3/32 in).
1 Position the bracket ① inside the dashboard, then bend the claws outward for a tight fit.
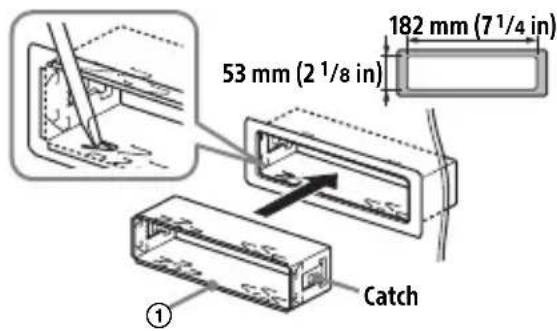
2 Mount the unit onto the bracket ①, then attach the protection collar ③.
Notes
- If the catches are straight or bent outwards, the unit will not be installed securely and may spring out.
Make sure the 4 catches on the protection collar are properly engaged in the slots of the unit.
Detaching and attaching the front panel
For details, see "Detaching the Front Panel" (page 5).
Resetting the unit
For details, see "Resetting the Unit" (page 5).
Fuse replacement
When replacing the fuse, be sure to use one
matching the amperagerating stated on the
is original fuse. If the fuse
blows, check the power connection and replace the
fuse. If the fuse blows again after
Fuse (10 A)
replacement, there may be an internal malfunction. In such a case, consult your nearest Sony dealer.
FW VERSION (Firmwareversion)
[BAND6] 1 kHz, [BAND7] 2 kHz, [BAND8]
4 kHz, [BAND9] 8 kHz, [BAND10] 16 kHz.
87,5 MHz - 108,0 MHz
Abtastrate: 32 kHz, 44,1 kHz, 48 kHz
FLAC (.flac)
Raccordement/Installation
Attention. 24
La lecture commence.
La lecture commence.
DEMO (demonstration)
Permet d'activer la démonstration : [ON], [OFF].
Protocole AOA (Android Open Accessory) compatible : 2.0
Codec correspondent : MP3 (.mp3)
Débit binaire : 8 kbits/s - 320 kbits/s (prise en charge de VBR (Variable Bit Rate))
Appareil principal (1)
Raccordement/Installation
Attention
250 Hz, [BAND5] 500 Hz, [BAND6] 1 kHz, [BAND7] 2 kHz, [BAND8] 4 kHz, [BAND9] 8 kHz, [BAND10] 16 kHz.
Interfaccia: USB (Full speed)
cartelle (album): 256
-file(brani)per cartella:256
Protocollo compatible Android Open Accessory (AOA): 2.0
Codec correspondenti: MP3 (.mp3)
Geproduced in Thailand
Eigenschappen laserdiode
Producent: Sony Corporation, 1-7-1 Konan
Minato-ku Tokyo, 108-0075 Japan
Selecteer PTY in RDS.
250 Hz, [BAND5] 500 Hz, [BAND6] 1 kHz, [BAND7] 2 kHz, [BAND8] 4 kHz, [BAND9]
8 kHz, [BAND10] 16 kHz.
Interface: USB (Full-speed)
Maximale stroom: 500mA
- mappings (albums): 256
bestanden tracks) per map: 256
Geschikt Android Open Accessory Protocol (AOA): 2.0
Bijbehorende codec: MP3 (.mp3)
Bitfrequentie: 8 kbps -320 kbps (Ondersteunt VBR (Variable Bit Rate))
Sampling-frequentie: 16kHz - 48kHz
WMA (.wma)
Bitfrequentie: 32 kbps - 192 kbps
(Ondersteunt VBR (Variable Bit Rate))
Sampling-frequentie: 32kHz 44,1 kHz, 48 kHz
FLAC (.flac)
Bitdiepte: 16 bit, 24 bit
Sampling-frequentie: 44,1 kHz - 48 kHz
Eindversterker
Ipon3Bovntelb: CoHn KopnpoeuH, 1-7-1
KoHaH MnHaTo-Ky TokNo, 108-0075 JnoHna
B ueJx 6e30nacHocTn o6raTeIbHo yCTaHaBnBaIte 3TO yCTpoIcTBO Ha np6bOpHO nAHeJI nABTomO6nJI, TaK KaKe ero 3aDnJa Yactb HArpeBaETcR BO BpeM pa60Tbl.
PnoPpOHee cm. "YcTaHOBka/ PnOKnIoueHne" (cTp. 24).
CboiCTBa Ia3epHoro nnOda
- IpoJIoJIxIeJIbHOcTb n3JIyueHnIa: HenpepbIBHoe
- BbIXoJHa MOnHocTb Ja3epa: MeHbIe 53,3 MKBT
(3начени полунуении Марпастояни 200mm OT NOВЕРХОCTN ЛИНЗblобъктNBа 6ЛOKA ONTNUECKOTO CHTbIBaHЯс aneptypo7 MM.)
Tabnukc cyka3aHneM pa6oeryo HapjKeHnI npyInx xapaKTePncTnK HaxOHTcHa HnXHei naHelen Kopnyca.
Даразиотовлия указаHa Ha TOBape, a TaKxe Ha ynapokBcIeDyUOuem φopMaTe:
MM.YYYY, rnde MM-Meca n YYYYY- roDn3rOToBJIeHn.
HOpMaunIyNokynateneB YkpanHe

YnoHOMOeHHbI npedCTaBntlb YKpaHHe NO BONpocam COOTBeTCTBn Tpe6oBaHm TexHnuecknx peIJaMeHTOB: OOO "COnu YKpaHa", yI. NJIbHcKa, 8, r. KneB, 04070, YKpaHa.
ObopydOBaHne OTBeuaeT Tpe6OBAHnM TexHnueckoro perIamEnTa OpranuHcHn IcNoJIb3OBAHn HeKOTOpbIX ONaChbIX BeueCTB 3JIeKTPnueCKOM N 3JIeKTpOnHHom obopydOBaHn (noCTaHOBLeHne KMY ot 03.12.2008 N° 1057).
YcIOBxpaHeHn
TobapbcoxpaHOT ByynaKOBaHHOM BnDe B TeMHbIX, cyNX, YnCTbIX, XopoSo BeHTnIpyEmbIX NOMEuEHNrX, N3OJInpoBaHHbIX OT MeCt XpaHeHnKNCJOT n IeIoueY.
TemnepaTypa xpaHEny: ot -20 do +60 ^ C OTHOCuTeNbHa BlaXHoCTb XpaHEny: 80%. Pa6oay TempePaTypa: ot 0 do 40°C. Pa6oay OTHOCuTeNbHa BlaXHoCTb: 40-60%.

YTNIN3aunna
NcnoJb3OBaHHbIX
3JeMeHTOB NITAHnI NOTCLyXKBWeRo
3JeKTPnueckoroN
3JIeKTPoHOrO 6OpUdoBaHnA (DInpeKTHBa npImMeHReTcB CtpaHax Ebpocoi03a n Dpynx EBponeNCKNX CtpaHax, rIe JeICTByOT cNCTembl pa3dJIbHOrO c6opa OTXODOB)
IpeDynpexKdHne dIaClyuaeB, KOrda B 3aMKe 3aXnraHnHa Het noLoXkeHnA CC
Y6eINTEcB, YTO HaCTpoEHa FyHKUa
AUTO OFF (ctp. 12).IocNe BbIKIOueHnra
yCTPOiCTBa erO nITaHne 6ydet
aBTOMaTnueCKN OTKIOUeHO uepe3
yCTaHOBJIeHHOE BPEM, YTO
IpeDToBpaAaeT pa3PRAky aKKymJIATopa.
EcIn FyHKUa AUTO OFF He 3aDaHa, To
Pn KaXdOM BbIKIOueHn 3axnRaHn
HaXmMaTe n yDepxNBaIte KhoNkOFF
Do Tex nop, NOKa DnCnJeHne HnORacHeT.
OTka3 OT OTBETCTBEHHOCTN B OTHoWeHn ycIyr, npeDoCTaBJaEmbIX CTOpOHHMn NOCTaBzIKamN
Cnyk6bl, npedocTabIeMbIe CTOpOHHIMNIOCTaBUNKaMn,MOyT 6bITb N3MeHeHbI, pnoctaHOBJIeHbI NN OTMeHeHbI 6e3 npedBaPntbHoro yBeOMJeHn. KompanaHn Sony He Hecet OTBeTCTBeHHOCTn 3a CNTyaun Noo6HOro poJa.
Copepkanhe
CnpaBoUHnK nO DeTajm N opraHaM ynpaBJIeHn . 4
Haualo pa60tbl
ChraTne npeDnei naHei 5
Ipee3arpy3ka yctpoiCTBa 6
YcTaHOBka YacOB 6
PoiKJIIOUeHne yCTpoiCtBa USB 6
IopKluoyeHne dpyroro nepehocchoro aydnooyctpOcTBA 7
Послuyшваиме радио
PpocnyuBauHne paDnO 7
CnCTembl paIIOaHHbIX (RDS) 8
Bocnpon3BeDeHne
Bocnpoun3BeJeHne Dncka 9
Bocnpoun3BeDeneHne yctpoiCTBa USB. 9
Понск и ВоспponЗВеДeне КOMПОЗици 10
NapaMeTpbl
Otmeha pexima DEMO 11
OchOBhIe Oepaunn HacTpoiKn npapaMeTpOB 11
Hactpoika o6uxn napametpoB (GENERAL) 12
HactpoikKa 3Byka (SOUND) 13
Haetpoika niscnpea (DISPLAY) 14
Дононтульнаиформача
06HOBJIeHne MnKpOnporpaMMbl 15
MepblnpedocTopoXHoctn 15
YXoI3a yCTpoIcTBOM 16
TexHueckne xapaKTepeNtKN 17
Ponck uyctpaHHe HEnCnpaBHOCTe 19
Co06ueHn. 22
YcTaHOBKa/NoDKJIIOUeHne
BhImaHne! 24
IpeueHbTeTaeJeNdIyUcTaHOBKn. 24
PoiKJIIOUeHne 25
YcTaHOBka. 27
CnpaBoUHnK no DeTaJAm n opraHaM ynpaBJeHna
OCHOBHOeyCTpOInCTBO

1 Khonka chytna nepedne nahein
2 SRC(ntOuHnK)
BkIoueHne nTaHn.
CmeHa nCTouHnka cnHana.
OFF
HaxmTe u yepXnBaIte B TeueHne 1 ceKyHdbI dIe BBkIIOUeHn ICTOuHNKa n OTo6paKeHn YacOB.
HaxmTe u ydepXnBaIte 6oJee 2 ceKyHd IJIy BbIKIOueHn PNTaHn I dncnJe.
3 DnCKOBbI peYJrTOp
Q (o63op) (ctp. 10, 11)
IepexoBpeKmO63opa npu Bocnpon3BeJeHn.
(Heioctynho,ecnnnoKJIOUeHo yCTpoiCtBO USB bpekme AndroidTM.)
EQ (3Kbanaa3ep)
Bb6op KpnuBoi 3KbaJa3epa.
10 (Ha3aI)
Bo3BpaT K npeIbIyUcEmy ekpaHy. MODE (ctp. 7)
11 PpneMnK CnHAnOB C nYnbTa DnCTaHcNoHHoro ynpabHeHn
12 HomepHbIe KhONKn (1-6)
PpneM coXpaHeHHbIX B namrTaHIOCTaHcN. HaxMITE uYdepXnBaIte dIra coXpaHeHHa CTaHcN.
ALBUM▼/▲
PpOnyck aIb6oMa IJIa ayDnOyCtpoiCTBa.HaxMnte uYdepxNBAiTte IJIa HENpepbIBHOrOp npOyCKa aIb6oMOB.
(HeDocTyHNO,ecnNoKJIOUeHO yCTpoiCtBO USB bpeXmE Android.)
(noBtOp)
(Heioctynho,ecnnoKluoyeHo yctpoicTBO USB bpexime Android.)
(cnyaHna nocJeDoBaTeIbHOCTb)
(Heioctynho,ecn noKluyeHo yctpoicTBO USB b pekme Android.)
II (Bocnpoun3BepeHne/nay3a)
13 EXTRA BASS
YcuiJHeHne 3ByuHaHn6aCoBOro 3Byka BCnHXPOHn3aUuN CypOBHem rPOMKoCTn. HaxMnte, YTObI N3MeHHTb HaCTpoiKy EXTRA BASS: [1], [2], [OFF].
14 BxoHoe rHe3do AUX
15 DSPL (dncnnei)
U3MeHeHne HnDnKaun.
SCRL (npokpyTkα)
HaKmTe n ydepKnBaIe IJI npOKpyTKn INHdNkauuN.
16 NopT USB
Hauano pa60tbl
ChyTne nepedne naheIi
Bo n36exaHne kpaKn yCTpoiCTBa MOxHO CHrTb C HeRo nepeDIOI naHeJIb.
1 HaKMnte u ydepxnBaIte KhoNky OFF ① do tex nop, noka ycTpoNCTBO He OTKJIIOUHTcR. HaKMnte KHOInKy CHaTna nepedne naHei ②, a 3aTeM NOTHnTe NaHeJb Ha Ce6y n CHHMnte ee.
IpeDynpednteHbI 3ByKOBOcNrHaI
EcnI Do NOBOPoTa BbIKJIOUaTeJIa
3axirraHnB NnoLoXeHne OFF cyCTpoiCTBa
He 6bla ChrTa nepdHnaHeIb,TOB
TeueHne HeckOJIbKnx CeKYnd 6yDeT CblIseH
PpeDynpednteHbIy BYKOBoCnHaI.
3ByKOBo CNHaI 6yDeT CblIseH,TOlbKO
ecnINcNoNb3yeTcBCTPOeHHbYcUNNTeJIb.
YctaHOBka nepeDnei paHeJI
Ipe3arpy3ka yctpoiCTBa
IpepeI nePBbIM nCNoJIb3OBAHHeM yCTpoiCTBa, nocJe 3aMeHbI aBtOMo6nIbHOrO aKKyMylTopa IIN NOBtOPHOro nOcOeDInHeHna Ka6eJe HEO6xOdmo nepe3aRpy3ntb yCTpoiCTBO.
1 HaxmTe u ydepxnBaIte KhoIKN DSPL n (ha3aI)/MODE 6oJee 2 ceKyHd.
Ppimechne
Ipeesarpy3ka yctpoiCTBa npnbEeT K ydaJIeHIO HactpoeK YacOB N HeKOtOpbIX COxpaHeHHbIX 3JIeMeHTOB COdePxxMOrO.
YctaHOBKa CTpaHbI/perNoHa
Iocne nepe3arpy3kn yctpoiCTBa OTKpoeTcMeHIO HAcTPOiKN CTpaHbI/perNoHa.
1Пи оTO6paKeHn [SET AREA] Haxmnte KhoNky ENTER.
OTo6pa3ntcTeKyuzaCtpaHa nnpeHn.
2 NobopaunBaJ DNCKOBbI peYJIaTOp, BbI6epnte [EUROPE] nII [RUSSIA] a 3aTeM HaKMITE DNCKOBbl peYJIaTOp.
3Поворачвая дисковый ретуларot, bblберпг [YES] nln [NO], a 3aTe m haxmnte disckobbyi perylartop.
Ipn n3MeHn npnoHa nn cTpaHbI yCTpoNCTBO nepe3aRpy3ntcra, noCne yeRo Ha dncnnee oTo6pa3rTaCyaCbl.
3ToT npaMeTp MoXHo HAcTpOuTb B MeHIO6xNn npaMeTpOB (cTp.12).
YctahOBka yacob
1 HaKMnte KhoNky MENU, nobepHnTe DnCKOBbl peRyJrTOp dIaBb6opa [GENERAL], 3aTeM HaKMnte DnCKOBbl peRyJrTOp.
2 NobopaunBaJ dNCKOBbI peYJrTOp, BbI6epnte [SET CLOCK-ADJ], 3aTeM HaxMMte dNCKOBbI peYJrTOp. Haynet MmraTb INHdkauZna Yaca.
3 Поворачваite ДИСКOBып peгунларTop ДЯ уCTaHOBKN 3HaueHnru YacOBи MmHyT.
ДлЯ n3MeHHeNn INdNkaCmN HaxMnte KhoNky SEEK + / -
4 NocJe yCTaHOBKn MmHyT HaXMMTe KhoNkY MENU.
YcTaHOBka 3aBepSeHa, nocJe yero YacbI NaHyT OTCyET BpeMeHn.
ДяоюбрахенячавOB
HaKMnTe KhONKy DSPL.
YcTaHOBka YacOB (CT)
Дя OCTaHOBKn BOCnpon3BeJeHnA
HaxmTe u yepKuBaIe KhoNky OFF B TeueHne 1 cekyHdbI.
OCTaHOBnTe BOCnPOn3BeDeHne, 3aTeM ydaJIte yCTpO'ntBO.
Понск и Воспpon3ВeДeне КомпоЗиць
Iobtophoe Bocnpon3BeDeHne IN BOCnpon3BeDeHne B ClyuahHOJ NocledoBaTeIbHoCTN
Heioctytnho,ecnnoKIOUeHO yCTPOIcTBO USBBpeXmmeAndroid.
1TObI BbIbpaTb HxKbIpeKIM BOCnpon3BeDeHnA, BO BpemBocnpoN3BeDEHnHaXKMITE KHOKNy C (NOBTO) nnn cnyaHnaNocJeIOBaTeJIbHOCTb) HeCKOJIbKO pa3.
Bocnpoun3BeJeHne B BbI6paHHom pexKMe MoKeT HaaTbcr He cpa3y.
IocTyHbIepeKIMblBOcPpOu3BeJeHnO TlHuAOTcB3aBucMOCtNOT BbI6paHHOrIO NCTOCHNka 3ByKa.
ПОИСК KOMПОЗИЦИ NO Ha3BaHиЮ (Quick-BrowZer™)
HeocTyHNo,ecnnoKIOueHo yCTpoNCTBO USBBpeKmE Android.
1BpeKnme BocnpOn3BeDeHnA CD nIu USB haxmnte 063op), yTo6bl oTo6pa3ntb cnccok kateropn noncka.
Korda noBtca cnCOK KOMno3nui, Haxmaite KHonky Ta3ad), noka He OTo6pa3ntc HyxHaj kateropnia noncka.
*Bo BpemBaocpnoun3BeJeHnC yCTpoiCTBa USB HaxMnte n yIepXnBaIte KHOJky Q (o630p) 6Oone 2 cekyH, uTO6bI BepHyTbcr HeNoOpceDCTBeHHo K Haayany CnNcKa KaTeOpuN.
2 NobopaunBaJ DNCKOBbI peYJIaTOp, BbIbePte Tpe6yEmyIO KaTeropnIO noncKa, 3aTeM HaXMMTe DNCKOBbI peYJIaTOp dJa NOdTBePxKdEHNIA.
3 NOBTOPHe 1ar 2 dIy nonka Tpe6yeMoKOMNo3uIN.
Haunetc Bocnpoun3BeJeHne.
CLOCK-ADJ (yCTaHOBka yacOB) (CTp. 6)
CAUT ALM (npdunpeintelbHbI 3ByKOBOcHnHaI)
BkIIOueHne npEynpeDnTeJbHoro 3BykoBOrO cnHaJa: [ON], [OFF] (cTp.5).
(DocTyHNO TOJbKO npn BbIKIOueHHOM nCTOuHNke, KOrda OTo6paXaOTcYacbl.)
BEEP
AKTUNBn3aun 3ByKOBOrO cnHa: [ON], [OFF].
AUTO OFF
A B T O M A T N U E C K O E O T K J I O U E H N E U c e p 3 O npe d e l e h H o e B p e m, e c n y c t p o i C T B O B b k j I O U e H o: [O N] (30 M n H y T), [O F F].
STEERING
Perectpaun/umMeHneHaCTpOKn nyIbTa DnCTaHcNHOHorO ynpabHeHna Hpyne.
(DocTyHNO npn noDKNoyeHn coeHNHTeIbHO KabeJIa (He BXoIIT B KOMNKeT NOCTaBKn).) (OcTyHNO ToJbKO npn BBKIOUeHHOM NCTOCHNe, KOrDa oTo6paKaIoTc yacbl.)
STR CONTROL (nylt dntctaHcnoHHoуnpabIeHna pyne)
Bb6op peKIma BBOda noKluoyehHoro nylta dNCTaHcNoHHoro ynpabLeHnra.Bo n36eXaHne HeNCpabHocTei nepei NCNoJIb3OBAHNem NOd6epnte
COOTBeTCTBIOUHINpeKIM BBOJa DnIPOdkNIOUeHHOFO NylTa
DnCTaHcUHOHHoro ynpabJeHn.
CUSTOM
Pexm BbOda dIyIbTa InCTaHcNoHHOro ynpabJeHna Ha pyne.
PRESET
Pexim BBOda IJnI npOBdHOro NylbTa
INCTaHcNoHOrO ynpabLeHnra 3a
NCKJIoueHnem NylbTa
INCTaHcNoHOrO ynpabLeHnHa pyJe (BbIbpaTeC aBTOMaTneckn npn
BblOnHeHn [RESET CUSTOM]).
EDIT CUSTOM
Pernctpaunya yHKn (SOURCE, ATT, VOL + / - ,SEEK + / - )IyNbTa InCTaHOnHO ynpabHeHa pyne
1 NOBOPaUNBaI DnCKOBbI peRyJIaTOp, Bbl6epnte yHKUIO, KOtOpYIO HxKHO Ha3HaunTB dIpyNbTa DnCTaHcUOnHOrO ynpaBJeHnA Ha pyIe, a 3aTeM HaXKMITE nCKOBbI peRyJIaTOp.
2ПиMuraIoUeMcoO6UeHnN [REGISTER]HaXMMTeuYdePxNBaITe KHOKNyHaNylbTeDnCTaHcUNOHNOY npaBHeHnHa pyJe, KOtOpoT Tpe6yeTcHa3HaunThbФyHKcIIO.10 3aBepWeHnPeRnCTpaCnOTo6pa3ntc [REGISTERED].
3ДЯpernctpaunnpyrgnxФyHKuIN NOBTOPNTeDeiCTBna 1N2.
(Doctytnho, Tolsko ecn 3haueHne napametpa [STR CONTROL] yctaHOBJeHo Ha [CUSTOM].)
RESET CUSTOM
I3MeHeHne HacTpoE KnybTa InCTaHcNoHHoro ynpabNeHna pyJe: [YES], [NO].
(DoctytnHO, TOLbKO ecn 3HaueHne napameTpa [STR CONTROL] yctaHOBJIeHo Ha [CUSTOM].)
Ppimechnna
- Bo Bpemr n3MeHnra HacTpoek DoCTyHToTbKO KHOIOuHoe ynpaBneHne Ha daHHOMycTpoiCTBe. B cIeJx 6e3oNaCHOCTN octAHOBtTe aBTOMObNb IpeE, n3MeHeHEm 3TNX HAcTpoEK.
- Ecni BO Bpemr pernctpaun npon3oienet Own6ka, Bcra pahee 3apernctpnpobHna HnΦopMauncoxpanTc. BbInOnHnte npoueDpy pernctpaun 3aHOBo,Haunha C Toi yHKun, rpe npon3oJna Own6ka.
-3TaΦyHKUmaMOKet6bITbHeIOCTynHAB HeKOToPbIX TpaHCnOpTHbIX CpeIcTBax.ДЯ NOJUYeHIN NOpDpO6hIX CBeJeHIn O COBMeCTNMOCTIN BaWero TpaHCnOpTHoro CpeIcTBA NocTe Be6-caNTNoIDepKKn, YKa3aHHbI Ha 3aDHe CTopoHe 0bLOXKn.
USB MODE
Измение рекиma USB: [ANDROID], [MSC/MTP].
OTo6paKeHne TeKyuIeBepCnn MnKpOpPOrpaMMbl.
FW UPDATE (O6HOBJIeHne MINKpONpOrpaMMbl)
3aynck o6HOBJIeHnMnKpOnporpaAMMb[YES], [NO].
O6HOBJIeHne MKNpOpnpoPpaMMbI 3aHmMaET HeCKoJbKO MNHyT.Bo BpeMg O6HOBJIeHnHe NOBopauNBAiTte BbIKJIouaTeJIb 3aXnraHnB NIOLOXKeHne OFF n He oTcoEduHnTe uCNoJb3yEmoe yCTpoiCTBO USB.
HactpoNka 3Byka (SOUND)
EQ10 PRESET
Bb6op KpUBoi 3KBaIaI3epa n3 10 KpNBbIX 3KBaIaI3epa IJI N BbIKIOueHne 3KBaIaI3epa:
[OFF], [R&B], [ROCK], [POP], [HIP-HOP], [ELECTRONICA], [JAZZ], [SOUL], [COUNTRY], [KARAOKE]*, [CUSTOM].
Bb6paHHyIO JIJI KAKDOrO NCTOCHNka KpNByIO 3KBAJn3epa MOXHO 3aHeCTN B PAMrTb.
*PnBbIbOpe[KARAOKE]3ByK rOlOca BO BpEm BOCnpoun3BeDeHn npRlNywaetc, Ho He yCTpaHReTcNoJIHOCTbIO. NcNoJb3OBaHne MUKkofoHa He NoIepeXNBaETc.
EQ10 CUSTOM
Bb6op BapnHaTc[CUSOM]dEQ10. HacrpoKa KpNBoN 3KBaIaI3epa: [BAND1]32Γu,[BAND2]63Γu,[BAND3] 125Γu,[BAND4]250Γu,[BAND5]500Γu, [BAND6]1KΓu,[BAND7]2KΓu,[BAND8] 4KΓu,[BAND9]8KΓu,[BAND10]16KΓu. YpOBeHb rPOMKOCTn HaCtpanBaETcR B dIana3OHe oT-6DDo+6DcSwaROM 1d6.
BALANCE
PerylnpoBka 3BykoBOro 6aJaHca: [RIGHT-15] - [CENTER] - [LEFT-15].
FADER
Pereynipobka OTHOCHTeHbHO rpoBn: [FRONT-15] - [CENTER] - [REAR-15].
S.WOOFER (ca6byΦep)
SW LEVEL (ypoBcHb ca6Byepa)
PerynpoBka ypOBn rPOMKocTncabByepea: [+6dB] -[0 dB]-[-6 dB].
([ATT] oTo6paKaetcra, ecn yCTaHOBneHo MNHmajbHoe 3HaueHne.)
SW PHASE (a3a ca6Byepepa)
Bb6op fo3b1 ca6Byepea: [NORM], [REV].
LPF FREQ (uactota hNJIbTpHa Hn3Knx uactot)
Bb6op rpaHnUHOuacTObI ca6Byepa:
[80Hz], [100Hz], [120Hz].
HPF FREQ (caCTOta fNbTpTa BblcOKNX caCTOT)
Bb6op 3NaueHnraPauHnHoJ yactOTbl nepeDnHex/3aDnHex rPOMKOrOBOpnteJeN:[OFF], [80Hz], [100Hz], [120Hz].
AUX VOL (ypoBeHb rpoMkoCTn AUX)
HactpoKa ypoBnI rpoMkOCTn KaXdOro NOcOeDInHeHHoro IOnOpHnTeJIbHOro ycTpoiCTBa: [+18dB] -[0 dB]-[-8 dB].
3Ta HAcTpoiKa NCKJIIOUaET Heo6xoIIMOcTB peRyIINPOBKN rPOMKOCTN dJa pa3HbIX NCTOCHIKOB.
AUTO SCR (aBtOMaTnuecka npokpyTkα)
AByToMaTnuecka npokpyTKaДЛиHHbIX 3JIeMeHToB: [ON], [OFF].
(HeioctynHO,ecn BBbpaH nCTouHnK AUXnn TIOhep.)
He npoJIuBaIe XnIDKOCTn Ha yCTPOIcTBO nII INCKN.
Приимechи OTHOCHTeIbHoДИСКOB
-He noDbepraTe DNCKN BO3deJCTBNU O npMbx COJIHeuHbIX JUyei N IUCTOCHNKOB TeIIa, TaKnx KaK BO3dyXoBOdBi C rOpAUM BO3dyxOM. He OCTabnIe DNCKN B MaUNHe, npnnapKObaHHoB B COJIHeuHOM MecTe.
-NepeBOCPON3BeJeHEmIpoTnpaTe DnCKNuCTaSei TKaHbIO NoHaNpaBLeHIOOTcHTpa K KpaM.HeNoJIb3yITecbpactBOpNTeJAM,TakIMKaK 6eH3uH,pa36abTeb, a TaKKnpoJaKe YnCTaUIMN
-3To yCTpoIcTBO npEHa3HaueHo IJRA BOCnPOIN3BeDeHnA DnCKOB,OTBeuaIOuNX Tpe6oBaHnAM cTaNdApTa Compact Disc (CD).DbYxCtOpOHnHe DnCKn (DualDisc) n HeKOTOpBle My3bIKaJIbHbIE DnCKn, 3aKOINpOBaHHbIe C NOMOUsbTO TexHOJOrn 3aUHTbI aBTOPCKNX npaB, He COOTBeTCTByIOT cTaNdApTy Compact Disc (CD) n PO3Tomy MoYr He BOCnPOIN3BOIDITbc4 TTM yCTPOINCTBOM.
-ДИСКИ, KOТОВЕ 3TO yCTPОИCTBO HE MOXET BOCIPON3BOДNTb:
-ДИСКИСЯрлбИКAMN,HaKJIeIKNaMn,a TaKKe C npNKpeIeHNoI KJIeKOJ IeHTo IIN6bymaro.IpIMeHHeT eTakxДИСКOBMOKeT BbI3BaTb c6OuB pa6Ote IIN NOBpeXdEHneДИSCa.
-ДИСКИ HeCTaHdApTHOиФОмbl (Ha npIMep,ВфОрМe cepДца,KBaIpaTа, 3Be3dbI).BnpOTnBHom cIyuae 3TO MOxKET pINBecTи K NOBpeJdeHnU yCTpoIcTba.
-Диски Диаметюм 8см.
YyBCTBNTeJIbHOcTb: MW: 26 MKB, LW:
50 MKB
PpOurpbBateIb IuCKOB CD
OTHOWeHne "CnHaJ-WhM": 95 d6
Диаэн ВOCпои3ВODIMbIXЧаСТOT: 10Γι - 20000 Γι
Hn3KoactoTHa n BbICOKOaCToTHa DeToHaun: Hxke ypoBn o6hApxKeHH
MaKcImaJIbHoe KOJIInueCTBO (TOJIbKO dJIa CD-R/CD-RW):
- nanopok (aJIb6OMoB): 150 (BkIIOUaJ KOpHeByIO nAnKy);
-файLOB(КOMПОЗИЦИ)и палOK:300 (MOжETбыть MeHee 300,ecnHa3BaHnIЯ палOK/файLOB COCTOТИЗБОЛБИОTO YHCla CIMBOLOB);
- OTO6paXaembIX CmMBOJOB B Ha3BaHnI napan/phiJa: 32 (Joliet)/64 (Romeo).
CoTBeCTByIoUne KoIeKn: MP3 (.mp3) WMA (.wma)
PpOurpbIbATEJb USB
Pa3pIaHocb:166nt,246nt
YacToTa nnckpeTn3aunn: 44,1 KtU, 48KtU
YcHJIteJIb MOUHOCTN
BbIXoJ: BbIXoJIrPOMKOrOBOpnteJIe
PonHoe co npOTnBHeHne
rpoMkoROBOpnteJe:4OM-8OM
MaKcImaJIbHaBbIXOHaMOnHocTb:55BT
x4 (npn conpoTnbJeHnn 4OM)
067aHΦopMaun
BbIXOdbI:
TepmHaJ ayDIOBbIXoO8 (REAR, SUB)
CnloBa aHTeHHa/TepmHnHa
ynpablenya ycnntelem (REM OUT)
Bxodbl:
BxoHOn TepMnHaI nYnbTa
ДиctaHcNoHHOrO ynpabLeHnA
BxodHoi pa3bem aHTehhbl
BxoJHoe rHe3do AUX (MHN
CTepeopaa3bem)
NopT USB
Tpe6obAHnK nCTouHnky nHTAHN:
aBtOMo6nIbHbI aKKymyIaTOp 12 B
IOCTOARHOTo TOKa (COTpuIaTeJIbHbIM
3a3eMnEHHmE)
HOMHaJIbHbI ToK:10A
Pa3Mepbl:
MOHTaXHbIe pa3Mepbl:
HaJIuHn HeKOTOpbIX n3 npHaJdJIeXJHoCTeN,
He cIbIweH 3ByKOBo nIgHaJI.
→ ΠоДКЛЮЧЕн ДОПОЛНИТЕЛБНБИ YСИЛТЕЛБ MOΙΥΝΟΥ, a BCTРОЕΗΝΗ ᴡΕ ΚΝΟЛБ3ΥETÇΑ.
YdaIeHbI daHHbIe n3 naMrtn.
OToCoeHnHnCn Hn Hn npaBnIbHo nOdkJIOueH npoBO nITaHnI, IIN60 n3BLeUeHa 6aTapeiKa.
I3 namrtn ydaJIeHbI 3anporpaMMnpoBaHHbI paNIOCTaHcII N UCTaHOBka BpeMeHN.
Ipeperope npedoxpaHntelb. CbIweH ym npn pekeKIOUeHN nOLOKeHNA KIOUa 3aXnraHna.
→Пювова He npaBnIbHNo NOdCoeINHeHbI K pa3bemy 3JIeKtpoPntaHnB BCNOMORAteNbHOrO O6OpydoBaHnA aBTOMO6nJI.
Bo BpemBocnpOn3BeDeHnI nn npneMa NaunHaeTcA demOHCTpaZna.
EcIn npn BkIIOueHHOM
dEmOHCTpaUHOHHoM peKmme [DEMO-ON]
B TeueHne 5 MInHyT He BbINOnHraOTcR
HnKaKHe ONEpaUHN, HauHnaeTcR
dEmOHCTpaUHa.
-YctaHOBe 3HaueHne [DEMO-OFF] (cTp.12).
Ipona/He OTo6paXaeTcNHdNkaCnB OKoWKe Dncnne.
→ДЯДИММеруCTaHOBJIeHO 3HaueHHe [DIM-ON] (cTp.14).
→Дисплел OTKЛIOUHTcЯ,ecnHaXkaTb n ydepxNBaTB KHONky OFF.
- HaXmTe KhONky OFF ha yCTpoiCTBe n ydepxnBaIte ee HaxaToN, Noka DnCnJIeH He BKJIOUHTc.
KOHTaKTbI 3arpa3HeHbI (CTp.16).
Dncnnei/NoCBeTkaMnaeT.
HeoctaToHnaNoDaHaNTaHn.
- Y6eIITecb, yTO Ha yCTpoIcTBO NOaETcAIOCTaTOUHO NITaHnO T aBTOMo6NJIbHOrO aKKyMylrToPa. (Tpe6oBaHne K nCTouHnKy nITaHn: 12 B NoCToAHOrO ToKa.)
He pa6oTaOT KHOJKN ynpaBJIeHn. NsCK He n3BJIeKaetc.
→ Haxmte u yepknaite KhoNk DSPL n (Ha3aI)/MODE 6oJee 2 cekyH, YTO6bI nepe3arpy3ntb yctpoiCTBO. Coepxmoe naTn 6ydt ydaJeHO. B ceJax 6e30nacHOCTn He BblnoHnTe nepe3arpy3ky BO BpeMBAOKDeHn.
PpneM padnoctaun
He ydaetc npinraTb paNocTaHcnn. 3Byk cOnpOBoXdaetc nomexamn.
HenpaBnIbHoe coeINHeHne.
-Поберп Te NOДСоЕДИнHeHne aBTOMOБиЛьHoI aHTeHHbI.
- EcIn He BbIDBnraeTcA bTOMaTnuecka aHTeHHa, nPoBepbTe CoeINHeHne npoBOda ynpaBJeHna aHTeHHoN C 3JIeKTPuYeCKM npuBOJOM.
He ydaetcBbInolHnTb npedBaPnteIbHyo HacTroky.
→ PpepaBaemb paAnocnHaI cNtKOM cna6.
B dnaana3oHe FM3 He ydaCTcHacTpoNTb
yactotbl 65 MΓu - 74 MΓu.
→Дя [AREA] Вьбрано [EUROPE]. -Установпг Дя [AREA] Знayене [RUSSIA] (стр.12).
RDS
He ydaetc npnHryb ycnyr RDS (korda dansnapaMeTp a [AREA] 3aDaHO 3HaueHne [RUSSIA]).
→ Bbipan nnana30n FM3. -Bb6epnte FM1 nnn FM2.
YcIyRn RDS HeIOCTyINbIB daHHOM perNoHe.
Iocne HeckoJbKnx cekyHd npocnyuBHaHn BkJIIOuaeTcra yHKnra SEEK.
→ CtaHnIa He nepeJaet daHHbIe TP nIII nepeJaET cIIuKOM cIa6bl cIraHaI. -OTKnIOHTe TA (cTp.8).
DopoxKhble coo6ueHn He nepeaOTc.
BKJIIOUHTeTA(cTp.8).
→ CtaHnIa He TpaHcInpyeT DOpOxHbIX coo6uHn, XOTn OTHocntcK TnPy TP. -HaCtpoItecb Ha dpyrTu cTaHcuio.
Pn BkIIOueHnn FyHKcnn PTY oTo6paXkaeTcN HdNkaun [---].
→Пинимаема санця He nepeJaet daHHbIe RDS.
→ДаHHbIe RDS He npHmAlOTcra.
→ CtaHnIa He yka3bIbae TIN npoPpAMMbI.
Ha3BaHne nporpamMHOyCnym MnraeT.
→Дя ВьбраHHОВ ДаHHbIM MOMENT CTaHcUN He NcNoJIb3yETcAЛБТeРHaTINBHaЯчсToTa.
- Haxmte KhoNky SEEK +/-, noka muraet Ha3BaHne npoRpaMMHO yClyr. NOBITcHnDnKaunra [PI SEEK], u YCTPOINCTBO NaHHTNONCK DpyroJ YoACTOTbI C TaKIMn JKe DaHHbIMn PI (npoRpaMMHaNnEHTnΦnKaunra).
Bocnpon3BeJeHne AnckOB CD
KomnakT-ndcK He BocnpOn3BODNTc.
→ДиCK3aRpa3HeHnIIN NOBpeXKeH.
→ДиСКИ CD-R/CD-RW He npeДнa3нaуeны ДЯ BOCnрОu3BedeHnЯ 3Byka (cTp.16).
HeBO3MOxHNO BOCpOu3BecTu φaJbI MP3/WMA.
→ДИСК He COBMeCTUM C φOpMaTOM IN BepCnei MP3/WMA. YTo6bI NOJyUHTb NOДрОБнtie CBeDEHnA O BOCpON3BOIDMbIX DnCKax N φOpMaTAX, NocETInTe Be6-caIT, aJpec KOTOpOrO yKa3aH Ha 3aDHeN O6IoXKe.
CD ERROR: HeB03MOxHOBocpOn3BeCTn DnCK. DnCK 6yJeT n3BJeueH aBTOMaTuYeCKn.
→ПоунстпЕ ИИnpaВиьНВ BCТаБТeДИСК,ЛИбО yбeДИТecь,ЧTO ДИСК HeЯВлЯETС ПYCTbIM ИИN NOВpeЖDEHHbIM.
CD NO MUSIC: OTCYTCTBYeT Φaɪn Для BOCnpoɪЗВeDEHŋ. ДɪСК БуДeТ N3BLeueH ABTOMaTIчecN.
BCTaBbTe DnCK C BOCnpon3BOIDMbIMn aJ lamn (cTp.17).
CD PUSH EJT: He ydaIocb npaBnIbHO n3BJIeYb IINCK.
→ Haxmnte KhoNky (n3Bneyb).
HUB NO SUPRT: He noДерхиВаюТся KOHцЕНтpaTopы USB.
INVALID
→ Bb6paHna onepaunma MoKeT He POndpeKnBaTbcra.
NO AF:OTCYTCTBYOT aIbTePHaTINBHBie yactOTbl.
→Haxmnte KhoNky SEEK + / - ,noka Muraet Ha3BaHne nporpaMMHO yCnyr. YcTpoiCTBO HauHaeT NOCK dpyroJ qactOTbIC TeM Je daHHbIMn PI (nporpaMMHa nDeHTnΦnKaun) (noBJIaETcI INdNkau [PI SEEK]).
NO TP: Het coo6eHn o Tekyein CNTyaun Ha doporax.
YcTpoiCTBO npoOJXHT nonCK cTaHcN, nepedaIOuNX nporpaMMy TP.
NOT SUPPORT -Android MODE
→ KaannapaTy noDkIIOueHo yCTpoiCtBO USB, He noDJIepKINBaIOUe ee npoTOKoJ AOA (Android Open Accessory) 2.0, kOrda nI na napameTpa [USB MODE] 3aIaHOb 3NaueHne [ANDROID].
-Для napaMeTpa [USB MODE] yctaHOBnTe 3HaueHne [MSC/MTP] (cTp.13).
OVERLOAD: yctpoicTBO USB nepenolHeNo.
→ OTKIIOHTe yCTpOInCTBO USB, a 3aTeM HaxMMITE KHOINKy SRCДлЯ Bbl6opa dpyrTO nCTOuHnKa.
YcTPOiCTBO USB IOBpeXJeHO, INI INoDCoeDInHeHO HeNoDJeepKINBaemoe YcTPOiCTBO.
READ: nIeT cHTbIbAHne.
Дождntecb3aBepseHnCHTbIBaHn. Bocnpon3BeDHeNHe NaHcTcra aBTOMaTnueckn.3To MoKet 3aHrTb HeKOTOpoe BpeMBAABCIMOCTN OT ctpyKtypblФaJla.
USB ERROR: HeB03MOXHO BOCPON3BeCTN yCTPOINCTBO USB.
CHOBA NOdkJIIOHTE yCTpOoiCTBO USB.
USB NO DEV: yctpoiCTBO USB He NOdkIIOUeHO NJIH He paCnO3HaHO.
Y6eIntecb, yTO yCTpoiCTBO USB nII KabeIb USB haEJxHO noDKJIIOUeHbl.
USB NO MUSIC: OTCYTCTBYET faJI DnI BOCPON3BeDeHnI.
→ ΠoДcoeДиНTe yCTpoIcTBo USB c BOCpOu3BOdIMbIMn φaIJaMn (CTp. 17).
USB NO SUPRT: yctpoiCTBO USB He IopdepkUBAeTc.
→Дя получени подробных сбendeиоCOBmecTnMoCTn yctpoiNCTBa USBnocetITE Be6-caI T noДepexKn,уka3aHHbI Ha 3aДнEh CTOpOHe O6IoxKn.
LLL nnn TaHao no nn KOHeu, DNCKa DOCTnHyTbI.
(3нak почеркваня): He ydaetcra OTO6pa3ntb CnMBOJ.
MepblnpedoctopoXhOCTn
TuaTeJIbHO BbIbnpaIte MeTo dJa yCTaHOBKn aPnapaTa, YTObI OH He MeJauynpaBLeHnIO aBTOMObIeM.
- He yctaHaBnBaIe Taannapat TaM, rde OH 6ydet nOdBepXeH BO3DeiCTBIO nbIN, rpa3N, Ype3MePHO Bn6paCUN NIN BbICOKNX TempeATyp, HApPIMep B MeCTax, Kya IOnaDAOT npAble COJIHeuHbIe JyuN, INN B6JIn3N BeHTINLAUONHHbIX peWetOK o6OrpeBaTeJeN.
B ueJx o6eNeueHn HaedXHoN i 6e3OnaChoYcTaHOBKn NcNoJIb3yIte IINb BXOJaUne B KOMPJIeKT MOHTaXHbIe DeTaN.
PnmeaHne OTHocnteIbHo npoBoda nTaHna (KeIb)
Pn noKIOueHn DaHHoro yCTpOcTbBA BMeCTe C DpyrMM nTepeOKOMNOHeHTaM HOMHaJIbHOE 3NaueHne CNbl TOKa B KOHType NtTaHn ABTOMOUIA DoJXHO pReBbIaTb CymMapHOE 3NaueHne CNbl TOKa, YKa3aHHoe Ha npdeOxpaHnteJx BCex KOMNoHETOB.
Peynilpobka yrna yctaHOBKn
OtperynpyTe yroJ yctaHOBKn TaK, UTo6bI OH coCTaBJI MeHee 45^
Ipeuehb deTaJei dJa yCTaHOBKn
①
②
(3)

(4)
⑤

(6)

B 3TOT cINcOK BXOJNT He BCE coJIepXUMoe KOMNJIeKTA NOCTaBKN.
-KpoHwTeH ① 3aUHTHaMaHKeTa ③ npKpeIeHbIKyCTpOuCTByIO NOCTaBKn. IpeE yCTaHOBkoYCTPOINCTBa BOCnOJIb3yITecb KJIIOUaMn DJIa DEMOHTaKa ② ,TO6bl OTcoeHNHTb KPOHwTeH ① OT yCTpOuCTBa.IoDPo6hble CBeDeHnA cm.B pa3dJe "OTcoeDInHeHne 3aUHTHO mAHKeTb IN KPOHwTeHHa" (cTp.27).
-CoxpaHnte KJIouN IJRA DeMOHTaJa ② JIINCPONb3OBAHnB 6yDyuIeM, NOCKoJIbky OHI TaKKe NOTpe6yIOTc npI DeMOHTaKe aannapata n3 aBTOMo6nJI.
Поклоченье
1 He BXOДNT B KOMПЛЕКТ NOCTaBKN.
2 Полhoe coppoTINBHeHne rpoMkorOBopnteJeN: 4OM-8OM×4
3 Ka6eNb c pa3bemAmu RCA (He BXoIIT B KOMNJIeK T NOCTaBkU).
^4 B 3aBnCmOCTn OT Tuna aBTOMo6nI, BO3MOxH0, NOTpe6yETcNcNoJb3OBaTb aAnTeP dIra npoBOdHoro nylbTa INCTaHcUHOHOrO ynpabJeHnR (He BXoDIT B KOMJIeK TnocTabKn). NpOBo6hie CBeJeHnO 6 NCNOJb3OBaHN NpOBOdHoro NylbTa INCTaHcUHOHOrO ynpaBLeHnR CM. B pa3DeIe "INcNoJb3OBaHne npoBOdHoro nylbTa INCTaHcUHOHOrO ynpaBLeHnR" (CTp. 27).
*5 B 3aBncmocTn OT Tuna aBTOMO6nla
NcNoJIb3yIte aIaNTep (He BXoJNT B KOMnJIeKT
NocTaBKn), ecnn pa3beM aHTeHHbl He NOxOJNT.
YcTaHOBka CoeHHeHn
Ecnncnojb3yETc aHTeHnac 3NeKtpoPnPBODOM6e3peJeHOrO6Ioka, POnCoeHNHeHne 3TOrO yCTpoiCTBa C NOMOuIO npNlaRaEMO rPOBOda nITaHnA ⑥ MOKeT pNBecTN K NOBpeXdEHnO aHTeHHbl.
Kpa3bemy rpOMKOROBOpTeJra abTOMO6nla

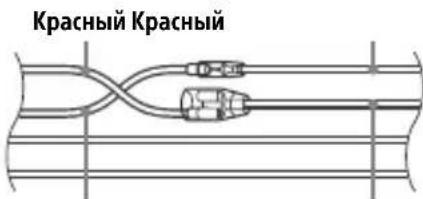
EcnKpaChbI N XeJIbI npoBoda nepeCTaBHeHbI MeCTaMn
XeNTbI XeNTbI
| 12 | Импуньсны NGTOUCHNOK эльктpondыня | Жeльын |
| 15 | Источник бесnéреобийно эльктpondыня | Краснын |
EcnB aBTOMO6nJe HET NOJXeHNA CC
Iocne npOBepKn COOTBeTCTBnA CoeHHeHn I npOBoOB mNpybCHOro NCTOuHnKa 3JIeKTPoNTaHn I NOkJIIOHTe YCTPOINCTBO K ABTOMO6nJIbHOMy KOHTpy 3JIeKTPoNTaHn. B Cnyae BO3HnKHOBeHn KaNX-JIn60 BONpOCOB nI IN pO6Jem, CB3aHHbIX C NOkJIIOUHeHnEM yCTPOINCTBa, KOTOpBle He paCCMaTpNBaIOTcB HAcToIeM pyKOBoIDCTBe, ObaTntEcB 3a COBeTOM K DInIePy ABTOMO6nJIbHoN fIpMbI.
IcnoIb3OBAHne npOBoHoro nylbTa dNCTaHcNoHHoro ynpablenia
1 TTo6bI aKTHBnPoBaTb npoBOHOH nyIbT dNCTaHcUHOHOrO ynpaBJeHnY, YCTaHOBInTe dJa [STR CONTROL] B [SET STEERING] 3HaueHne [PRESET] (ctp. 12).
YctaHOBka
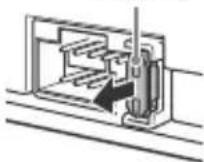
OTcoeHHeHne 3aunTHoMamHexTbI N KPOHSTeHa
IpeD MOHTaXOM yCTpoNCTBa OTcoeINHInTe 3aUHTHyIO MaHXKeTy ③ IN KPOHHTeINH ① OT yCTpoNCTBa.
13aXbATnTe 06a Kpa 3aUHTHO mAHKeTbl ③ a 3aTEM BbITaNTe ee.
2 BCTaBbTe o6a KJIIOUa IJRA DeMOHTaKa ②do ueJIyKa,NOTAHnTE KPOHHTeH ①BHN3,a 3aTEM NOTAHnTE yCTpOuCTBO BBepx,yTO6bl OTCOeDHHITb erO.
YcTaHOBKa YcTpoIcTBa B np6OpHoi paHeJI
Ipeed yctaHOBkoY6eNTecb, YTO
fHKCaTOPbIC O6eHX CTOpOH KPOHHTeHa ①
COrHyTBI BOBHTpb Ha 2 MM.
1 YcTaHOBnTe KPOHUsTeH ① B np6OpHyo NaHeIb, 3aTeM BblHnTe BbICTynb HApyKy, yTO6bl OecneuTb NLOTHyO fNKcaUIO.
2 PnKpeNte yCTpoIcTBO K KPOHHTeHy ①, 3aTeM BCTaBbTe 3aunTHyIO MaHKeTy ③.

PpIMeuaHn
- EcIn ΦɪkcatopbI He corHytBI nII NBirHytBI HapyKy, yCTPOINCTBO He 6yDen YCTaHOBnEHO HADJIeXaUIM O6pa3OM N MOxET BbINAcTb.
Y6eINTecb,HTO 4nKcTopaHa3aunTHoMaHKeTe ③ HAnLeXkaUIM Opa3OM BCTaBHeHbI BOTBepCTra,IMeIOUneCByCTpOINCTBe.
BurotoBneHO TaJnHaNdi
Bnpo6nK: CoHi KopnopeuH, 1-7-1 KOnaH MiHaTo-Ky Tokio, 108-0075 JNoHia
YnoBHOBaKeHn npedCTaBnK B YkpaHi 3
NHTaHB BiIOBIDHOCTI BMOMaTExHicHNx
perlaMeHTIB:
TOB CoHi YkpaHa,ByJ. IJIiHcbKa,8,M.
Knib,04070,YkpaHa.
O6laHaHHa BiNobiJaE BmOram
TexHicHoRo perIaMeHTy 06MeXeHHa
BnKOpNCaHHa DeAKNx He63NeuHnx
peoBnB eJleKtpuHOMy Ta eJleKTpOHHomy
6laHaHHi (noCTaHOba KMy BiD 03.12.2008 N^号 1057).
YMOBn 36epirahnHa
PpOdyKciIO 36epiraIOTb ByynaKOBaHOMy BnDiB TemHnx, cyxnx, uNCTnx, I06peBeHTnIbObaHnx npMIMiueHHJx, i3OJIbOBAHnxBID MlCzB 36epirAHnKNCLOT i LyrIB.
TemnepaTypa 36epirahan: Bi -20 do +60 °C.
BiHocHa BOJorictb 36epirAHn: 80%
Poboua TemnepaTpa: BiD 0 do 40^
Po6oHa BiHocHa BoIorictb: 40-60%.

Ipepeo6Ka BnKOpncTaHnx eIemEnTIB KINBJIeHHa, CTaporo eIeKtpuHoro Ta eIeKTPoHHoro 06laHaHHa (3actOCOByETbCraB
€Bponeckbkomy coo3i Ta iHux €Bponeckbkx kpaIHax i3 cnCTeMaMu po3dIbHorO 36npaHHra cmTTA)
3aTepeXeHHaBnApKIB, KOJI 3aNaIIOBaHHaBTOMo6iHa He Mae noLoXeHHA CC
O6OB'3KOB0 BCTaHOBIb FyHKciIO AUTO OFF(cTOp.12).IpnCTpiBvIMKaTmMeTbcra NobHicTIO aBTOMaTnUHOY BCTaHOBJIeHN Yac NiCJI BvIMKHeHHa PnCTPOU, 0o 3anobiratme pO3pJxKaHHIO akymyIaTopa. JkIo OyHKcIO AUTO OFF He aKTINBOBaHO, UOp3yPiD Yac BVIMKHeHHa 3anaJIIOBAHH HaTnCKaITe N yTpIMyIte KhoNky OFF,doKn dncnneH He 3rache.
BidmoBa BID BiINOBiJaIbHocTi 0oDo nocnyr, 3aPpONHOBaHnx TpeTimn CTOpOHAMN
Iocnyr, 3anponoHObahi TpeTimn CTOpOHaMNI,MOKytb 3MiHOBaTncs, npn3ynnHraTncs a60 npnHHaTn po60Tu 6e3 nonepedNbOro nobiOomJIeHn. Sony He Hece JODHO BIDNOBiaJbHOCTI B TaKnx CHTyaCiX.
3mict
IobiHnK i3 qactnH i opraHIB kepyBaHHa 4
Pouatok po6otn
Bi'εινηνηνη περεινηνηνηνηνηνηνηνηνηνηνηνηνηνηνηνηνηνηνηνηνηνηνηνηνηνηνηνηνηνηνηνηνηνηνηνηνηνηνηνηνηνηνηνηνηνηνηνηνηνην
Ipee3aBaHTaKeHH npncTpoIO 6
YcTaHOBneHHraOuHHnKa 6
PiikIoueHH npncTroo USB 6
PiKJIoueHnIINo nOpTaTHBHO aYdionpncTpoIO 7
PpoclyxOByBaHHpaio
PpocnyxOByBaHHpaio 7
Bukopustahnna cncTeMa paioaHnx (RDS) 8
BiodbopeHn
BiTbOpEnHa nscKa 9
BiTbOpHnI npncTroIO USB. 9
Iouyk i BiTbOpEHNa KOMno3nui. 10
Hanaштуваимя
CkacyBaHHpeKmMy DEMO 11
Ochobhi onepauii HanauTyBaHHra 11
3araIbHi HanaTByBaHnra (GENERAL) 12
HaataTyBaHHa 3Byky (SOUND) 13
HaiauTyBaHHaDcNpea (DISPLAY) 14
Доаткови BiIDOMOCTI
OHOBLeHHB6yDoBaHOro I3 15
3acTepeKHi 3axoNi 15
Texhne 6cbnyroByaHHra 16
TexhiyixapakTepeuCTnKu 17
Nouky i ycyHnHa HecnpaBHOCTe 19
PobidomJIeHHra 21
3MiHeHHIiHnKauiHa nCnJIe.
SCRL (npokpyTKa)
HaTnCHiB i IyTpmyIte, 0o6 npokpyTuH nDnkaucio Ha dncnnei.
16 NopT USB
POnaToKpo6OToN
Bid'εdHaHnpeepHboi naHeI
IpeHIO nHaJIb cboI npIcTpoIO MoXHa BiJ'EDHaTI, 0o6 3anO6irTu KpaIIXci.
1HaTnCHiTB iYtpmMyTe KhONky OFF ①,doKN npncptpi He BnMKHeTbCra. HaTnCHiTB KhONky po36NoKyBaHH naHEni ②, a Notim 3HiIMt b NaHEnb,NotarHyBwn ii do ce6e.
PonepeJxkyBaIbHn cnrHaI
JaKIO 3AMOK 3aNaJIIOBaHnI nepeBecTb IonoJKeHHoFF, He BiD'cIaHbU npeEHI O naHeJIb, IpOTrOM KINbKOx cekyHd 6yde LyHaTu NOnepeJxCyBaIbHN CnHaN. CnHaN 6ynde LyHaTu TiIbKn 3a yMOBu BnKOpNCTaHH B6yDoBaHO rIDcNlIOBaua.
PnncdHaHna nepedhboi naheJI
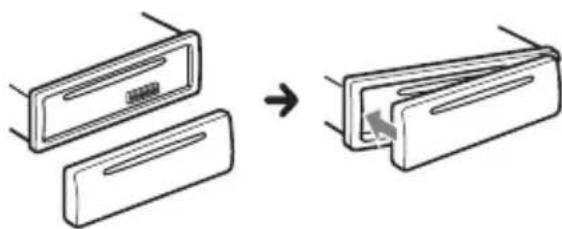
Ipee3aBaHTaxKeHn npncTpoU
IpeepnBm BkOpncTahHm npntpo, nicna3amH elemEnTa KNBleHHa6o nepeo6laHaHnH 3'EdHaNb npntpiinotpiHo nepe3aBaHTaxNTn.
1HaTnchItb i yTpmyTe KhoNk DSPLi (Ha3aD)/MODE doBwe 2 cekyHd.
PnmiTka
Ipe3aBaHTaKeHH npunctpoIO npn3BeDe Do CTnpaHH NaCTpOioK rOuHHNka, a TaKoX NeBHO 36epexeHOro BMicty.
HanaatyBaHHKpaIHn/perioHy
Iicna nepe3aBaHTaxKeHH npntpoB iDkPnEbCra ekpaH HaJaTuBaHH KpaIHn/ perioHy.
1 Koln BiO6paXaTImeTbc8 [SET AREA], HATncHtB KhoNky ENTER. BiO6pa3ntbC npToUHa KpaIHa a6o perioH.
2 NobeptaOuN dNcK KepyBaHHn, Bn6epiTb [EUROPE] a6o [RUSSIA], a NOTIM HaTnCHiTb dNcK KepyBaHHn.
3 NobeptaOnuN dNcK kepyBaHHn, Bn6epitb [YES] a6o [NO], a notim HATnCHiB dNcK kepyBaHHn. Y pa3i 3mHeHH KpaIHn a6o perioHy npnstpi nepe3aBaHTaXtbcra, nicra QTO BIObOpaKaTImeTBc rOINHHNK.
LeynapaMeTpMOxHaHaIaTuBaTINB MeHIO 3aRaJIbHNx HaIaNtYBaHb (CTop.12).
YCTaHOBJIeHHra roINHHnKa
1HaTnCHiTb KhoNky MENU, NOBepTaOuN dNcK KepyBaHHa, Bn6epiTb [GENERAL], a notim HaTnCHiTb dNcK KepyBaHHa.
2 NobeptaOuN dNcK kepyBaHHa, Bn6epitb [SET CLOCK-ADJ], a notim HaTncHiB dNcK kepyBaHHa. 3NaueHnY yacy noUHe 6JIImaTn.
3 NobeptaIte dNcK KepyBaHHa, 06 yCTaHOBHTI rOuHn Ta XBNiHn. 1o6 nepemictNTn uΦpoBy iHnkaio, HATnCKaTe KhoNky SEEK +/-
4 Nicra BCTaHOBJIeHHXBVJINH HATnCHiTB KhoNkY MENU. HactpoOBaHH6yJe 3aBepSeHo, i roDInHHK NOUHe npaIobAtn.
Iio6 BiO6pa3nTn rOuHHNK, HATNCiTB KhoNky DSPL.
1HaTnchItb KhoNky MODE, 06 3miHtNi diaNa3oH (FM1, FM2, FM3, MW a6o LW).
2 HactpoTe yactoty.
HanaHTyBaHHaJIbTePHaTnBHNx YactOT (AF)i NobiOmJeHb npo cHTyaCiIO Ha doporax (TA)
Функця AF noctiHNo HanaTobYecrHa CTaHcIIO 3 NaCnJIbHIuM CnRHaJOM y MepeKia, a yHKzIg TA hAdaE haHOBiSy iHOpMaIIO npo cnTyauIO Ha doporax abO dopoxHi nporpaMn (TP), kUO BOHn PpIMaIOTbcR.
1HaTnchItb KhoNky MENU, NOBepTaIOUH DNCK KepyBaHHa, Bn6epiTb [GENERAL], a notim HaTnCHiTb DNCK KepyBaHHa.
2 NobeptauOn DNCK KepyBaHHa, Bu6epitb [SET AF/TA], notim HATnCHiTb DNCK KepyBaHHa.
3 NOBePtaOuN dIscK KepyBaHHa, Bn6epiTb [SET AF-ON], [SET TA-ON], [SET AF/TA-ON] a6o [SET AF/TA-OFF], a NOTIM HaTnCHiTb dIscK KepyBaHHa.
36epexeHHcTaHcI RDS i3 BnKOpNCTaHHaMaJbYBaHb AFiTA MoXHa 3aIpOpaMyBaTn cTaHcII RDS pa3om i3 HaJaWtYBaHNMa AF/TA. YcTaHObitb AF/ TA, a notim 36epeXitb cTaHcIO 3a DonomoroTO BTM a6o BpyHy. RaKIo npOrpamyBaHHcTaHcI 3diINCHIOETbcr BpyHy, MoXHa TaKox 3aIpOpaMyBaTn cTaHcII 6e3 RDS.
IpnMaHnE ekCTpeHx OOrIoWeHb
Jkso BBimKHeHO AF i TA, ekCTpeHi
OroLoWeHHa ABTomaTuHNo
IpepeNBaTmMyTb NToOuHe Bn6paHe
dxKepeNo.
PerylIOBaHnryuHocTi niD yac oroIooHenr npO cnTyauciIO Ha doporax
Pibehruyhocti 6yde 36epexeHOBnam'ayi
dIraHaCTynHxOrOloWeHb npo CNTyaucio Ha
doporax,IBin He 6yde 3aJexKaTu BiD
3BnuahorO pIBHrauyhocti.
PpHOM oDHiEi perioHaJIbHOI nporpaMn (REGIONAL)
KuOyHKui AF i REGIONAL yBIMKHyTo, npictriH He nepemukatmEtbcra Ha iHwU perioHaJIbHy cTahciO 3 notxHiWM cnHaIOM. KUo BN 3aIIuwaTe 3OHy npiMy ciEi perioHaJIbHoI nepeaui, ycTaHOBIb [SET REG-OFF] y MeHIO HanaStyBaHb [GENERAL] niD qac npiMy FM-paioctaHcii (CTop.13). LyaFyHKsI He npaioe y BeNko6pTuHii Ta deAKNx IHnx KpaIHax.
Функця мicцebero paioomoblenna (tibkn y Benuko6pntahii)
LyaYHKiJaO3BOJAE Bn6upaTn iHwi MicueBi CTanii B neBHi MicueBOcTi, HABiTb kUo BOH He 3akpInJIeHI 3a UΦpoBUMN KHOKNAM.
PiJ uac npinomy B diaNa30Hi FM haTNCIb UΦPOBy KHONKy (Bid 1do 6), Ha kKi36epexeHo MICeBy cTAHciIO. He Ni3HlWe HIX Chepe3 5ceKHy 3HOBy HA TNCITb UΦPOBy KHOKNy MICeBOi cTAHci. NobTopoiTe IIO npOeDpy, DOKn He 3HaNdTe Notpi6Hy MICeBy cTAHciIO.
Bn6ip Tnib nporpaM (PTY)
1 Hatncitb PTY niД yac npniOmy FMpaioctaHci.
2 NobeptaTe DnCK KepyBaHHa, DokHa DnCnJIeI He BiO6pa3ntbCnOTpi6Hn Tnnporpamn,NotImHaTnCHiTb DnCK KepyBaHHa. PnictpiN noUHe NOuYK CTAHcii, KaTpaHCIOE Bn6paHn Tn nporpamn.
Tun nporpam
NEWS (HOBINH), AFFAIRS (AKTyaIbHi noii), INFO (BiIomocTi), SPORT (Cnopt), EDUCATE (Ocbita), DRAMA (PaIIOBucTaN), CULTURE (KylbTypa), SCIENCE (Hayka), VARIORED (Pi3He), POP M (POnyIaRHa My3Nka), ROCK M (PoK), EASY M (Lerka My3Nka), LIGHT M (Lerka KlaacuHa My3Nka), CLASSICS (KlacsuHa My3Nka), OTHER M (My3Nka iInx JKaHpiB), WEATHER (IorOda), FINANCE (PhiHcN), CHILDREN (DITayi nporpamn), SOCIAL A (CycinbHe xHTA), RELIGION (Peiria), PHONE IN (ДзВИнкуnpamn ephiip), TRAVEL (Подороki), LEISURE (ДоЗВлЯ), JAZZ (Джа3), COUNTRY (KaHTpi), NATION M (HaioHaJIbHa My3Nka), OLDIES (Стapiшяrepn), FOLK M (ФолК), DOCUMENT (ДokumentaIbHi nporpamn)
YctaHOBJIeHHra roHHHnka (CT)
1 Y MeHIO HaJaTaYBaHb [GENERAL] yCTaHOBiTb [SET CT-ON] (ctop. 13).
BiodtbopeHH
BiodtbopeHnI ncka
1 BCTaBTe DnCK (niDnncaHOIO CTOpOHIO DoROpN).
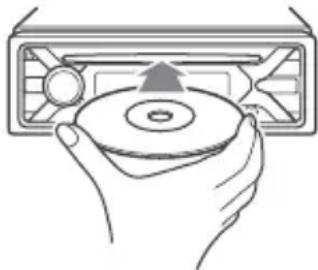
BiTbOpEHn po3NoHcBcA BtOMaTuHo.
BiiTbOpEHNaHabeEHNx HnKHe paaiiB He NiIDTPMMyETbcra.
MP3/WMA/FLAC:
-ФaДИN,3axnueHiaBTOPCbKmMnpaBaMn;
-ФaJIn3DRM(KepyBaHHnUΦpOBmnpaBamn);
-6araTOKaHaJIbHi ayiofoaainn.
MP3/WMA:
-ФаниЗКOMпессio6e3ВТрИДaнx.
Ipeed CTBOpEHHaM NiKJIoueHn Bn6epiTb pexm USB (pexim Android a6o MSC/MTP) 3aJexHo BiD TUny npncTroIO USB (ctop.13).
1ПiДКЛЮчITь npистри USBdo nopTy USB (ctop.6).
Po3noUHTbcB BiTbOpEHnH.
Kku npucpii USB Bxe niKluoyeHo, InnaocKy BiTbOpEnHaTnckaTe KhoNkSy RC, DOKn He BiO6pa3ntbcr iHdkauia [USB].
2 BiDperyIIOTe rUHicTb Ha Icbomy anapati.
Pp3ynnHeHHBiDtBopeHn
HaTnCiHt b i yTpmyTe KhOnKy OFF npotraom 1 cekyn.
BvdaJIeHnI npncTpoI
PpnnHItb BiTbOpEHnTa BnDaJIb npncpti.
FW UPDATE (OHOBJIeHHB6yIOBaHOro 13)
3aynck OHOBneHnBbYIOBaHOro I3: [YES], [NO].
OHOBHeHH B6yDObaHOro I3 TpNBac KJIbKa XBnInH. PId Yac OHOBHeHH He nepeBODbTe 3aMOK 3aJaIeHH B PNOJKeHH OFF i He BiD'EDHyIe npucTpi USB.
HajauTyuBaHHa 3Byky (SOUND)
EQ10 PRESET
Bn6ip kpiBoi ekBaIaJ3epa 3 10 KpNBx ekBaIaJ3epa a6o BmKHeHHeKBaIaJ3epa:
[OFF], [R&B], [ROCK], [POP], [HIP-HOP], [ELECTRONICA], [JAZZ], [SOUL],
[COUNTRY], [KARAOKE]*, [CUSTOM].
Hactpoikn Kpnboi ekBaIaI3epa MoXHa 36epertn IJRA KOxHOrO DKepeJa.
*Kuio Bn6paho [KARAOKE], 3Byk rOIoCy niUac BiTbOpEHn npurnyuYcBcA, aJe He yCyBaETbc NOBHCTIO. BuKOpNCaHHa MIkofoHa He NiITpMMyETcbr.
EQ10 CUSTOM
YcTaHOBJIeHHn[CUSTOM]3EQ10.
HaiauTyBaHnKpBBoi eKBaIaN3epa: [BAND1] 32 Γu, [BAND2] 63 Γu, [BAND3] 125 Γu, [BAND4] 250 Γu, [BAND5] 500 Γu [BAND6] 1 KΓu, [BAND7] 2 KΓu, [BAND8] 4 KΓu, [BAND9] 8 KΓu, [BAND10] 16 KΓu. PIBeHb rYHocTi peRyIHOeTbcS B dIana3c BiD-6 DDo +6 DIs i3 KpOKom B 1 D.
BALANCE
PeylIOBaHHa 3ByKOBOO 6aJaHcy: [RIGHT-15] - [CENTER] - [LEFT-15].
FADER
PerylIOBaHHB BIDHOCHOROp iBnH: [FRONT-15] - [CENTER] - [REAR-15].
S.WOOFER (ca6byΦep)
SW LEVEL (piBHeH ca6ByΦepa)
Perynobannpibnryuhocti ca6Byepa: [+6dB] -[0 dB]-[-6 dB].
([ATT] Biö6paKaεTbC8 3a HaɪHnXyOrO 3HaueHHra.)
SW PHASE (a3a ca6Byepepa)
Bn6ip a3n ca6Byepa: [NORM], [REV].
LPF FREQ (aactota dna iNbTpa Hn3bKnx aactot)
Bn6ip rpaHnUHOJ uactoTn ca6Byfepa: [80Hz], [100Hz], [120Hz].
Texhivhe o6cIyroByBaHHa
Чишина Контактib
Pnncpi MoKe npaObaTn HeHaJIeKHM
HNOM y BnPaIky 3a6pydHHeHHa KOHTaKTIB,
Uo 3^ dHyOtB npcTpi i nepeHIO naHeJIb.
Uo6 3anobirTu cboMy, BiD'edHaIte
nepeHIO naHeJb (CTop.5)i npocntbTe
KOHTaTKn BaTHm TaMnoHom.He
IDoknaaTe HaamipHnx 3ycnlb.B IHsOMy
pa3i MOxHa NOxKOJNTN KOHTaKTN.
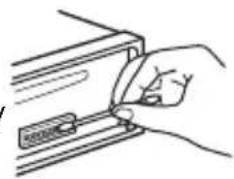
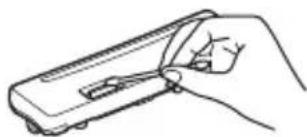
Ppumitkn
3MipkyBaHb 6e3neKn BumkaTe 3anaIIOBaHH Ta BmMaTe KIOU 3aMKa 3anaIOBaHH nepeD YnueHHM KOHTaTtB.
Hikon He TopkaTecKoHTaKtIB 6e3nocepHbO nIbUAM a6o 6yDb-RAkIM MeTaJIeBUM npedMeTOM.
TexhiHi xapaKTepeNtIKN
Tóhep
FM
ДиаэоннстpoIBaHHЯ:
ДляnapaMeTpapArea]BCTaHOBJeHo 3naueHnE [EUROPE]:
87,5 MΓι - 108,0 MΓι
ДляnapaMeTpapArea]BCTaHOBJIeHo 3HaueHHra [RUSSIA]:
FM1/FM2:87,5 MΓι - 108,0 MΓι (3 iHTepBaJIoM 50 κΓι)
FM3:65 MΓι-74 MΓι (3 iHTepBaIOM 30 kΓι)
THi3IaHTeHn:
3'εДнУВач ДЯЗ 30ВишьоI aHTeHn
Pnomixkha yactota:
Для napametpa [AREA] BCTaHOBJIeHo 3HaueHHra [EUROPE]:
FM CCIR: BiD -1956,5 KΓι Σο -487,3 KΓι i BiD +500,0 KΓι Σο +2095,4 KΓι
BnKOpncToByBaHa yTlnBiCTb:7d5Φ
Bn6ipkoBicb:75nb npu 400Kr
BidnoHenncHn/73d6
PozdineHHa:50 nHa 1Kr
YacToTHa xapaKTepeNCTnka: 20 Tg - 15000 Tg
MW/LW
ДиаэоннстpoюBaHHa:
MW: 531 kT - 1602 kT
LW:153KΓu-279KΓu
THi3do aHTeHn:
3'εdhyBaay dny 30BhiHboi aHTeHN
YyTnBicTB: MW: 26 MKB, LW: 50 MKB
PporpaBau CD
BiDHOWeHHcHnHaI/Whm:95d6
YacToTHa xapaKTepeNtka: 10 Tz - 20000 Tz
KoeoiHT deToHaui: no3a BmipuBaHUMM MEkamn
MaKcImaJIbHa KIJIbKICtB (JInWe CD-R/ CD-RW):
- nanopok (aIb6omib): 150 (y TOMy uNcJI KopeheBa nanka);
-ФaиліВ(komnouzi)i nanok:300
(MOJINBO, MeHwe 300, kIIO imHa nAnOK a6o faiJIb cKlaJaIoTbcra 3 BeJIkoI KInbKOci CmBOLiB);
- BiöópaKaYBaHnX CmMbOJIb IЯ Ha3Bn
(πiTpmyetbyc VBR (nepeminHa
YacToTa nnckpeTn3aui: 16 KfU 48KfU
WMA (.wma)
WBndkicb nepedaqui daHux:
(πiTpmyetbycVBR(nepemiHa
WBnKicTb nepaui daHnx)
YacToTa nckpeTn3aui: 32 KfU,
44,1KΓu,48KΓu
FLAC(.flac)
PozpndHicb:16 6it,24 6it
Yactota nucpeTn3aui: 44,1 KfU, 48KfU
Пдсиювачnotухноcti
TepmiHaayioBxOiB (REAR, SUB)
AHTeHa 3 eJekTpnuHm npuBOdom/ TepmiHaI KepyBaHHaPiCnIIOBaem noTyXhOci (REM OUT)
Bxo:
BxidHn TepmHaI pylbTa
ДиСТанцИнHorOКерУВаHHЯ
BxIDHe rHizdo aHTeHN
BxiIHe rHi3Do AUX (ctepeo mHi-rHi3do)
NopT USB
BmOrn do XNBJIeHHa: aBTOMo6JIbHn
akymyIaTOP noCTiHoro CTpyMy
Hanpyro10 12 B (i3 3a3emJIeHHaM
HeratNBHORO KOHTaKTy)
HomHaJIbHe cNoXnBaHnA Ctpymy: 10 A
Po3mipn:
YactHHnDJIaBCTaHOBJeHH Ta
Ponuk i ycyeHnHeCnpaBHOCTeN
HaBeHEn HxKHe KOHTpOJIbHn cncoc
dONOMoKe Bam BnpiuHTn npo6JeMn, kki
MOxyTb BuHNKHyTN 3 npNCtPOeM.
IepH hIX nepeTJMyHn HaBeHn HxKHe
KOHTpOJIbHn cncOK, npeBipTe
PiKJIoueHHra Ta pOboqi npoUeDpyn.
DoklaHiSe npo BnKOpNCTaHHra
3anobixHKnKa Ta 3HRTT npNCtPOU 3 naHeJI
PpuaID INB. _IK_IOeHH / BCTaHOBLeHHra》 (CTop.23).
JaKsO HeCnpaBHiCTb He BdaETbcyCyHTn,
BiDiJaTe Be6-caNTcLyX6n NiIDTpUMKn,
3a3NaueHn Ha OCTaHHi CTopINu
06knaDNKN.
3araJIbHI BiIDOMOCTI
Hemaé 3Byky a6o BIn duJyKe cna6kn.
→ PerylaTOp pIBHcunHaIy [FADER] He BCTaHOBJIeHO B NOIOXeHHra DNCTeMn 32 nnHaMIkAMN.
Гунicitь anapaty Ta/a6o πiДКЛIOueHOrO npIcTpoI OduXe Hn3bKa. -36iJIbUte Гунicitь anapaty n iДКЛIOueHOrO npIcTpoI.
BiDcyTHi3ByKOBn CnRHaJ.
→ IOnaETbca HeIOCTaTHbO XNIBJeHHA.
-ПepekoHaITeCЯ,иоHa npncTpii NOdaεTbcraДocTaTHbOЖИВлeHHЯ BiD abTomo6ilbHOroakymyJrTopa.(BmoradoЖИВлeHHa:12BnoctiHoro cTpyMy.)
KhoNk onepaui He yHKioHyOTb. DnCK He BmMaetbcra.
→ Hatachitb i ytpmmyTe KhoNKn DSPL i
(Ha3aJ)/MODE IOBwe 2 cekyH, uo6 nepe3aBaHTaXHTn npncTpii. Bmict, 36epeXeHn y nam'ATi, bye cTeptO.
3 mipkybaHB 6e3neKn He BnKohynte onepaio nepe3aBaHTaxeHHn iD yac KepybaHH aBTOMo6iJem.
Papionpniom
He npnMaIOb8c cnHann paioctaHci. 3ByK cynpoBODxcyTbc8 wymamn.
He npabnIbHe niiKIOueHHa.
- IpepeBipTe πiДКЛIOUeHHЯ aBTOMO6IJIbHOI aHTeHn.
-Якшо abTomatnuHa aHTeHa 3 eJekTpHnM npuBOdom He BnCyBaTbcra, npeBipTe NiKJIIOueHHa npoBOdy KepyBaHHa aHTeHOIO 3 eJekTpnpuBOdom.
He Bdaetbcra 3HaHTn 3anporpamOBaHi CTaHci.
TpaHcIbOBaHN cnHaJn HaTo cJa6Kn.
Y diaana3oHi FM3 HEMOXJINBO HAcTpoITn 74 Mf.
→ ItoTuHa cTaHcIa He e RDS-CTaHcIeIO.
He oTpmaHo daHux RDS.
→ CtaHciHa He Bka3yE Tn np nepaui.
Ha3Ba nporpamHoi iocIyru 6IImae.
→ДяцiCi CTaHcii HeMae aJIbTepeHaTnBHOI qACTOTN.
- HaTnCHiTb SEEK + / - ,KoJIn 6IImaE Ha3Ba nporpaHoi Iocnyr. 3'ABuTbcr NOBIOMLeHnra [PI SEEK], i npicTpri INOyHe WyKaTu IHwU yAcToTy 3 TaKIMn cAMMn DaHmN PI (nporpaHa iDeHTnΦikaiz).
BiodtbopeHnC
He BiIDTBOPIOETbCnCK.
→ДиСКпОшКоДжЕнйа603a6pydHeHn.
→ДиСКИ CD-R/CD-RW He npn3haeHi IЯ BiIbTBopeHnHa 3Byky (CTop.16).
Hemoklnbo BiTbOpTu ΦaJn MP3/WMA.
→ДиСК HeCyMiCn i3 ФОмaTOM i BepciEIO MP3/WMA.ДoklaDiHi BiDOMocTi npo BiIDTBOPIOBaHI DiNCKI Ta ФОмaTn HabeDeHi Ha caiTi NiIDTpIMKn, 3a3HaueHOMy Ha OCTaHHi CTOpIHcI O6KlaDINHKn.
Фаилmp3/WMA notpe6yIb 6Ibwe acyДЯ NOATKBy BIDTBOpEHnH, HIX IHwi.
→ HabeHeni HnXue DNCKN nOTpe6yIOTB 6Ibwe yacy dny noaTKy BiTbOpeHH:
-ДИСК,ЗАПИСАНМ 3I CКlaДЮ CTpyKТуpoI O DepeBa ФаЛIB;
-ДиСК,Злпсану ржимi Multi Session;
-ДИСК,наяк imm MOxHa IODaBaTn ФaилданHnx.
3Byk nepeepBaetbca.
→ДиckpoWkoJxehn a6o 3a6pydHeHn.
BiTbOpHn3 npncTroo USB
He BiTbOpIOITbcra eIemEnTu Chepe3 KOHcHTpaTop USB.
IpnctpoH He BdaeTbcra po3ni3HaTu npncptpi USB uepe3 koncheHTpaTop USB.
Для поатку BiДТВОРЕнг i3 npистpoю USBnotpi6no 6iNbwe yacy.
→ CtpyKtypa depeBa faaiB y npncTrooi USB CKlaIHa.
IpepepuBvactictb 3Byky.
3ByK MoXe 6yTn nepepuBvactm Upeez BnCOy WbNdkictb nepepaui daHx.
YdeKnx BnnaKax BiTBopeHnaIiB i3 DRM (kepyBaHnHa nΦpOBm npaBam) HEmoXJIbBO.
He BiTbOpIOeTbcya ydiOphiJ.
→Пистри USB, BiДфОрmaTOBaHni 3a ДОпOMorOю ФайлOBuX сИСТЕМ, BiДMiHHnx BiД FAT16 a60 FAT32, He NiДтprIMy€TbCЯ.*
*Ue anapat niItpmmycncTeMn FAT16 i FAT32, npote deaKi npicTroo USB moxyb 6ytn HecymichnM 3 ycima cImN CnCTeMaMn. DoknaHiy InphiopMaio DnB. BInctpyKii 3 ekcnnyataui npicTroo USB a6o 3B'jXiTbcra 3 Bnpo6HnKom.
HeBdaeTbcBnKoHaTu onepaui nponycky aIb6omy, nponycKy eJeMeHTIB (peXm m Wbndkoro nepexOdy) i nowky KOMno3uii 3a Ha3BOIO (Quick-BrowZer).
Liopeaui HeoctynHia, KIO nnKluoyeno npucptpi USB y pexmi Android.
- YctaHOBIbIb [USB MODE] 3haueHnra [MSC/MTP] (cTOp.13).
Ha npicntpoi BcTaHOBJIeHO HenpaBnIbHn peKm USB.
-ПepekoHaITeCЯ,иоДЯUSBн npicTpoi BCTaHOBJIeHo peKIM MSC/ MTP.
Y pejkmi Android 3Byk 3 anapaTa He BiTbOpIOeTbcra.
Koli anapat 3haxoNTbC B pexnmi Android, 3Byk BiTbOpIOeTbC TiiBkn 3i cMaprfoHy 3 OC Android.
- IpepeBipTe cTah nporpaMn BiTbOpeHna ayio Ha cMaprfoHi 3 OC Android.
-3aJIeXHo BiI cMapTfoHy 3 OC Android MOxKyTb BnHnKHyTu npo6JeMn 3 BiIDTBOpEHHaM.
Повимленья
IiD yac pO6OT npncTpoIO MOKytb 3'ABnTnca Taki NOBIOMJeHHa.
CD ERROR: He BiДТВОПЮЕТБСАДСК. ДИСК 6удe Вилучен ABTomatTuHо.
Почисте диck abo BCTaBTe NOrO npabnIbHo.пepekoHaITeCЯ, loДиck He npoJxHi I He nOwKoJxKeHn.
CD NO MUSIC: BiDCyTHiB iD TBOPIOBaHn foai. DnCK 6yde BnIyuEHN aBTOMaTNoHO.
BCTaBTe DnCK 3 BiTbOpIOBaHIMN
paIamn (CTop.17).
CD PUSH EJT: INCK HEMOXJIINBO BNIHHTN.
→ HaTnchItb (BnMmHaHna).
HUB NO SUPRT: uei npicpii He niIDtpmUe KOHcHTpaTOpn USB.
INVALID
→Bn6paHa onepaizj MoKe He NiIDTPMMyBaTncr.
NO AF: BiIDcyTHi aIbTepHaTINBHi acTOTn.
→ HaTnCHiB SEEK + / - , KOJIu 6JIUMaE Ha3Ba nporpaHoi nocnyr. PnpCTpiN noUHe wyKaTu iHsu yacToTy 3 TaKIMn CaMMn DaHmPi (iJeHTnΦikaizr nporpaMn) (3'ABtbcra nobIDomIeHHra [PI SEEK]).
NO TP: BiDcyTHi npoPamn npo cnTyauio Ha doporax.
→ПистрийnpoДOBЖуВATIME noшукdoctynHx TP-CTaHciI.
NOT SUPPORT -Android MODE
Cnncok yactinДЯ BCTaHOBJIeHЯ
①
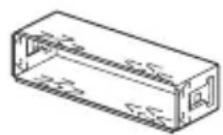
②
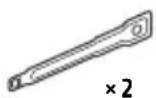
(3)
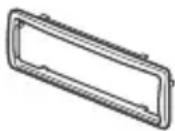
(4)

⑤

(6)

-Lei CnncOK qactH He OXONJIIOBHN KOMNJIeKT NOCTaHaHH.
KpoHHTeH 1 i 3axncha MaHKeTa ③ npNKpInIIOHTbcra do npncTPOu nepek KOMJIeKtaicIO. Npeed yCTaHOBJIeHNrmpNCPTPOO cKOpNCtAaTEcra demoHTaXHMN KJIouAm ②, 0o6 BiD'EDHaTN KPOHHTeH ① BiD npNCtPOU. DOKNaIHIwa iHΦopMaia -y po3diI «BiD'EDHaHHra 3axnchoi MaHXeTn Ta KPOHHTeHa» (CTOP.26).
-36epexiHa MaibyTHcI DeMOHTaXHi KIOUci ② OCKIN BOHn NOTpi6Hi dna 3HIMAHNpNCPTPO3 aBTOMo6iJia.
Підклоченя
1 He BxOuNTb Do KOMnJIeKTy NoCTaHaHH.
2 Повни onip диhamikib: 4 OM - 8 OM × 4.
3 Lhyp RCA 3 KOHTaKTHMm UTNpKaMn (He BXOINb DO KOMNKeTMy NOCTaHaHHa).
*43anexHo BiTnIy aBTOMo6JIЯ, MoJINBO, 3HaOobTbCBAKOpNCTaTN aadantep dIЯ npOBoBOrO pYbTa IInCTaHcHOrO KepyBaHHa (He BxOuHTb Do KOMPNeKTy NOCTaAHHa). DoklaHHiSy IHΦopMaIIO npOBOpNCTaHHa npOBoBOrO pYbTa IInCTaHcHOrO KepyBaHHa INB. B po3diIi «BukOpNCTaHHa npOBoBOrO pYbTa IInCTaHcHOrO KepyBaHHa (CTop.26).
5 3aIeXHo BiD TnHy ABTOMoBij, MoKJIbBO, 3HaIO6bTbcR BkOpNCtAtu aAnTep (He BXOJNTb Do KOMNJIeKTy NOCTaUHn), kKIO He NiJxOJNTb 3'EDHyBaU dIy 3OBHIshBoi aHTehn.
CTBOpENHnPiKlOueHb
JaKuo aHTeHa 3 eJekTpO npBODom He Mae peJeHoi CTiIKN, NiKJIuOyeHHa ZbOro npNCtPOo 3a DOnOMoTO Ka6eIIO XNBLeHHa 3 KOMPNeKTy ⑥ MoKe NOJKoDNTn aHTeHy.
1 Do po3'Emy dHamaKa aBtOMo6iJa
BnKOpncTaHnI npoBoIOBOrO nylbTa IInCTaHciHOrO KepyBaHHa
1Lio6 aKTHyBaTn npoBOIOBn nyIbT nCTaHciHoro KepyBaHHa, yCTaHOBIT b [STR CONTROL] y [SET STEERING] 3HaueHHa [PRESET] (cTOp.12).
YCTaHOBJIeHHJ
Bid'cHaHHaXnCHOi MaHKeTNa KpoHsTeHa
IpeyUcTaHOBHeHHm npnCTpoo Bi'EnHaHte 3axncHy MaHKeTy ③ Ta KPOHHTeH ① Bi nPnCTPOH.
13axonitb 6nDbKa pai 3axnchoi MaHKeTn ③ BNTaHITb ii.
2 BCTaBTe pa3oM o6nDbA deMOHTaKHi KJIouci ② Do KnaCaHn. NotarHItb KPOHtEIN ① DOHN3y, a NOTIM NotarHITb npncptiDorOpn, 0o6 Bi'EDHaTn NOrO.
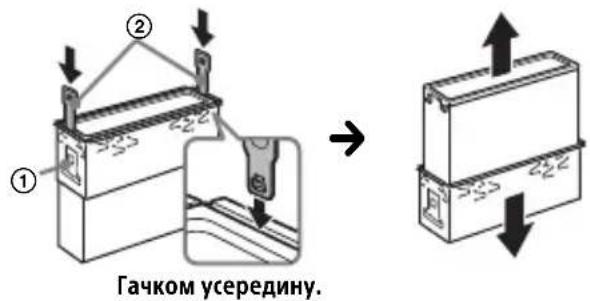
YcTaHOBLeHnI npNCTpOu B naHeI npNlaIb
Ipepe yctaHOBneHHnMa nepekoHaTeC8, 10
fikcatopn 3 o6ox cTOpIH KPOHHTeHa ①
3irHyTo BCEpeDnHy Ha 2 MM.
1 YcTaHOBITb KPOHHTeH ① y naHeIb npnlaIb, a NOTIM BnHITb BNCTyNn Ha3OBHi, 06 3a6e3neuTn ⅢJbHy φikcaciIO.

2 Ппсднайтпрстрийdo Кроншту Ha ①, a NOTIM BCTaBTe 3axnchy MaHxkety ③.
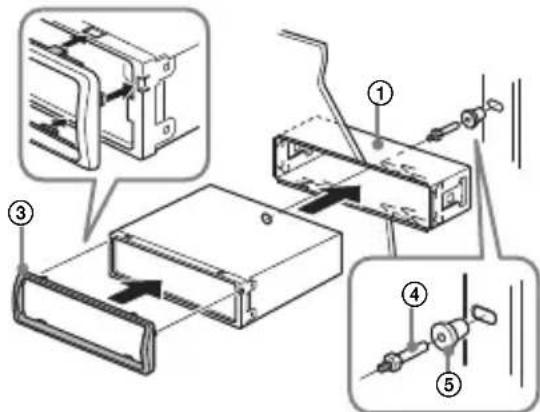
Ppumitkn
- RaKoΦikcatOpn BnnpaMneHi a60 3irHyTi Ha3OBHni, npncTpii He 6ynde BCTaHOBHeHn HAnExHm YHOM i MoKe BnpaCTn.
-NepekoHaTeC, 4 fikCaTOp Ha 3axnChi MaKeti ③ HaleXHM YHOM BCTAHOBJIeHi B OTBOpN, HABHI B anapati.
Bid'εdHaHNaT Ta npEaHaHHa nepeDhboi naHei
Hereby, Sony Corporation declares that this equipment is in compliance with Directive 2014/53/EU. The full text of the EU declaration of conformity is available at the following internet address: http://www.compliance.sony.de/
Eesti Keel
If you have any questions or for the latest support information on this product, please visit the web site below:
