RB468N4EC2 - Fridge HISENSE - Free user manual and instructions
Find the device manual for free RB468N4EC2 HISENSE in PDF.

Frequently Asked Questions - RB468N4EC2 HISENSE
User questions about RB468N4EC2 HISENSE
0 question about this device. Answer the ones you know or ask your own.
Ask a new question about this device
Download the instructions for your Fridge in PDF format for free! Find your manual RB468N4EC2 - HISENSE and take your electronic device back in hand. On this page are published all the documents necessary for the use of your device. RB468N4EC2 by HISENSE.
USER MANUAL RB468N4EC2 HISENSE
RB403N4ZS2
RB403N4ZS3
RB449N4ZS2
RD-44WC4SBA/CLA2
RD-44WC4SQA/CLA2
RD-44WC4SBA/CVA1
RD-44WC4SBA/CLA1
RD-46WC4SBA/CLA2
RD-46WC4SBA/CLA1
RD-46WC4SBA/CPA1
RB403N4AC2
RB403N4CC2
RB403N4DY1
RB403N4BC1/RB403N4DC1
RB468N4AC2
RB468N4BC1
RB468N4BW1
Temperatursteuerung
Before operating this unit, please read this manual thoroughly, and retain for future reference
Contents
Brief introduction. 2
Important safety instructions. 2
Installing your new appliance. 4
Description of the appliance. 9
Display controls. 11
Using your appliance. 13
Helpful hints and tips. 15
Cleaning and care. 16
Troubleshooting 17
Disposal of the appliance. 19
CE notice
This product has been determined to be in compliance with the Low Voltage Directive(2006/95/EC),the Electromagnetic Compatibility Directive(2004/108/EC)and the Eco-Design Directive(2009/125/EC) implemented by Regulation(EC) No 643/2009 of the European Union
Brief introduction
Thank you for your choosing our products. We are sure you will find your new appliance a pleasure to use. Before you use the appliance, we recommend that you read through these instructions carefully, which provides details about its usage and functions.
- Please ensure that all people using this appliance are familiar with its operations and safety features. It is important that you install the appliance correctly and pay attention to the safety instructions carefully.
We recommend that you keep this user's manual with the appliance for future reference and retain it to any future users
- This appliance is intended to be used in household and similar applications such as:
-Staff kitchen- areas in shops, offices and other working environments;
-Farmhouses by clients in hotels, motels and other residential types of environment;
-Bed and breakfast type of environments.
- If you feel that the appliance is not operating correctly, please check the Troubleshooting page for assistance. If still in doubt contact the customer service help line for assistance or to arrange a call out by an authorized service engineer.
Important safety instructions
General safety and daily use

It is important to use your appliance safely. We
recommend that you follow the guidelines below.
Store any food in accordance with the storage instructions from the manufacturer.
Don't use mechanical devices or any other means to speed up the defrosting process, unless they are approved by the manufacturer.
- Don't try to repair the appliance yourself. It is dangerous to alter the specifications or modify this product in any way. Any damage to the cord may cause short circuit, fire or electric shock.
- Pay attention not to damage the tubing of the refrigerant circuit.
-
Don't place too much food directly against the air outlet on the rear wall of both the refrigerator and freezer compartment, as it affects sufficient air circulation.
-
Don't place hot items near the plastic components of this appliance.
Frozen food must not be refrozen once it has been thawed out.
- Don't store bottled or canned drinks (especially carbonated drinks) in the freezer compartment. Bottles and cans may explode.
- Do not consume ice popsicles or ice cubes straight from the freezer as this can cause freezer burn to the mouth and lips.
- To avoid items falling and causing injury or damage to the appliance, do not overload the door racks or put too much food in the risper drawers.
Safety for children and infirm persons
This appliance is not intended for use by persons (including children) with reduced physical, sensory or mental capabilities, or a lack of experience and knowledge, unless they have been given supervision or instruction concerning the use of the appliance by a person responsible for their safety. Children should be supervised to ensure that they do not play with the appliance.
- Keep all packaging away from children to avoid risk of suffocation.
- Protect children from being scalded by touching the very hot compressor at the rear bottom of appliance
- Don't place items on top of the appliance as this could cause injury should they fall off.
- Never allow children to play with the appliance by hanging or standing over or on the doors, racks, shelves and drawers etc.
Safety about electricity
To avoid the risks that are always present when using an electric appliance, we recommend that you pay more attention to the instructions about electricity below.
- Unpack the appliance and check through the appliance. Should any damage be evident, don't plug in the appliance but contact the shop immediately from which you purchased it. Keep all packing materials in this case.
- We recommend that you wait for 4 hours before connecting the appliance to allow the refrigerant to flow back into the compressor.
- The appliance must be applied with single phase alternating current of 220 240V / 50Hz . If the voltage fluctuates exceeding the upper limit, A.C. automatic voltage regulator of more than 350W should be applied to the refrigerator for safety use.
- The mains plug must be accessible when the appliance is installed.
- This appliance must be earthed.
-This appliance is fitted with a fused plug in accordance with local standard. The fused plug should be suitable for use in all houses fitted with sockets in accordance with current specifications.
-If the fitted plug is not suitable for your socket outlets, it should be cut off and carefully disposed of. To avoid a possible shock hazard, do not insert the discarded plug into a socket. If in doubt contact a qualified, registered electrician. - Do not use extension cords or multiple sockets which could cause overloading of wiring circuits and could cause a fire.
Always plug your appliance into its own individual electrical socket which has a voltage rating that matched the rating plate.
Make sure that the plug is not squashed or damaged. Otherwise, it may cause short circuit, electric shock or overheat and even cause a fire. -
Do not insert the mains plug if the socket is loose, there is a risk of electric shock or fire.
-
Switch off the appliance and disconnect it from the mains power before you clean or move it.
- Never unplug the appliance by pulling on the electrical cord. Always grip the plug firmly and pull straight out from the socket to prevent damaging the power cord.
- Do not operate the appliance without the light cover of interior lighting.
Any electrical component must be replaced or repaired by a qualified electrician or authorized service engineer. Only genuine spares should be used. - Do not use electrical appliances such as ice cream makers inside the food storage compartments of the appliance, unless they are approved by the manufacturer.
- Do not look direct into the LED light located in the refrigerator compartment with optical instruments to avoid eye injuries. If it is not functioning correctly, consult a qualified, registered electrician or replace it in accordance with the "cleaning and care" chapter.
The refrigerant and risk of fire
The appliance contains a small quantity of refrigerant (R600a or R134a)
in the refrigerant circuit. Check the compressor label on the rear of the appliance to see which refrigerant is used for your appliance.
- If the appliance contains iso-butane (R600a) refrigerant, which is environmentally friendly but flammable, ensure that tubing of the refrigerant circuit is not damaged during transportation and installation to avoid risk of fire caused by leaking refrigerant.
- Keep burning candles, lamps and other items with naked flames and sources of ignition away from the appliance and ventilate the room thoroughly to avoid the risk of fire and eye injury should any leakage of refrigerant (R600a) exist.
- Do not store products which contain flammable propellants (e.g. spray cans) or explosive substances in the appliance.
The room space must be at least 1m^3 per 8g of refrigerant (R600a). The amount of refrigerant in your appliance is indicated on the rating plate inside.
Installing your new appliance
Before using the appliance for the first time, you should be informed of the following tips.
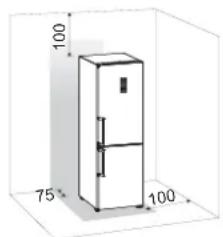
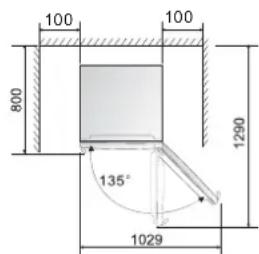
Ventilation of appliance
In order to improve efficiency of the cooling system and save energy, it is necessary to maintain good ventilation around the appliance for the dissipation of heat. For this reason, sufficient clear space should be available around the refrigerator. Suggest :It is advisable for there to be at least 75mm of space from the back to the wall, at least 100mm from its
top, at last 100mm from its side to the wall and a clear space in front to allow the doors to open 135^ . As shown in following diagrams.
Note:
- This appliance performs well within the climate class showed in the table below.
It may not work properly if being left at a temperature above or below the indicated range for a long period.
| Climate class | Ambient temperature |
| SN | +10°C to +32°C |
| N | +16°C to +32°C |
| ST | +16°C to +38°C |
| T | +16°C to +43°C |
- Stand your appliance in a dry place to avoid high moisture.
- Keep the appliance out of direct sunlight, rain or frost. Stand the appliance away from heat sources such as stoves, fires or heaters.
Leveling of appliance
- For sufficient leveling and air circulating in the lower rear section of the appliance, the bottom feet may need to be adjusted. You can adjust them manually by hand or by using a suitable spanner.
- To allow the doors to self-close, tilt the top backwards by about 10mm .

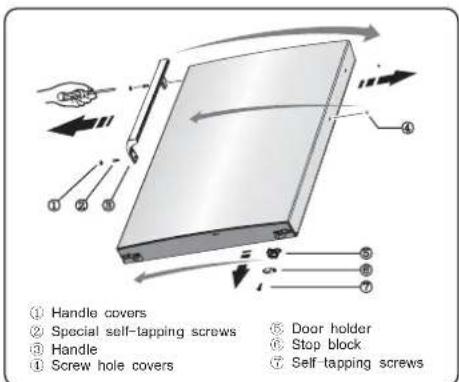
Installing the door handles
For the convenience of transportation, the door handles are separately provided in a plastic bag, you can install the door handles as follows.
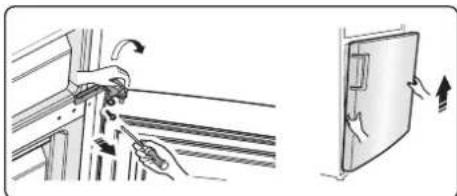
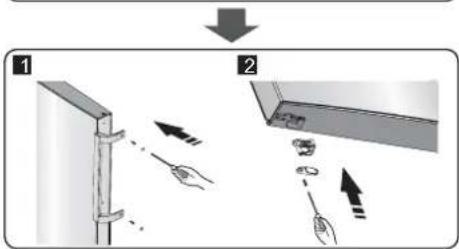
- Lever screw covers on the left side of the door, and then put them back to the plastic bag.
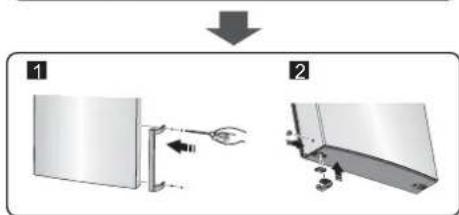
- Match the handle on the left side of the door, keeping axes of screw holes in the handle and the door in a line, as the picture shows.
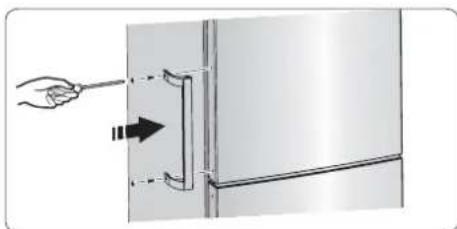
- Fix the handle with the special screws provided in the plastic bag. And then install the handle covers.
Reversing the door
The side at which the door opens can be changed, from the right side (as supplied) to the left side, if the installation site requires.
Warning! When reversing the door, the appliance must not be connected to the mains. Ensure that the plug is removed from the mains socket..
Tools you will need
| 8mm socket wrench | Cross-shaped screwdriver |
| Thin-blade screwdriver | 8mm wrench |
Note: Before you start lay the refrigerator on its back in order to gain access to the base, you should rest it on soft foam packaging or similar material to avoid damaging the backboard of the refrigerator. To reverse the door, the following steps are generally recommended.
- Stand the refrigerator upright. Open the upper door to take out all door racks (to avoid rack sdamaged) and then close the door.
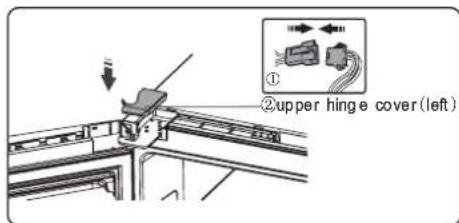
- Open part ① on top of the refrigerator body from right side and then take down part ③ and part ④ on the upper door in the same way. Take down part ② and put it back to the plastic bag.
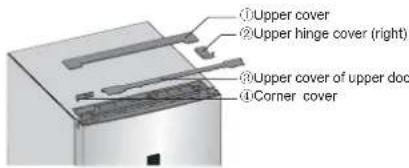
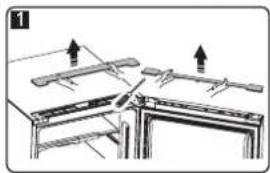
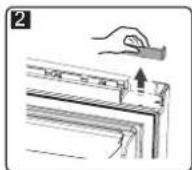
- Disconnect electrical connector ① as well as electrical connector ② and then take down part ③
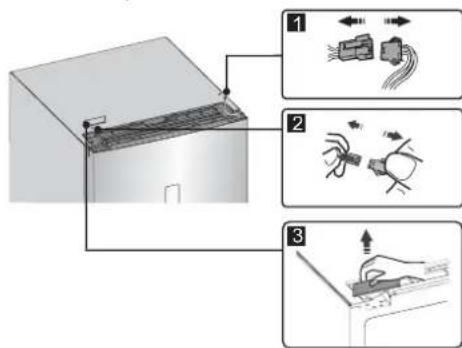
Note: Please hold the upper door by hand during step 4 to prevent door dropping.
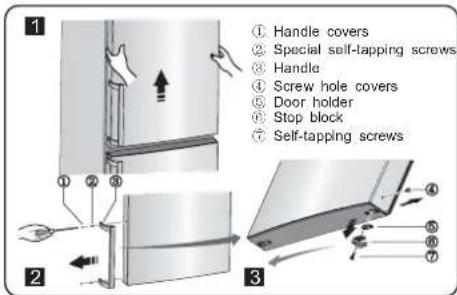
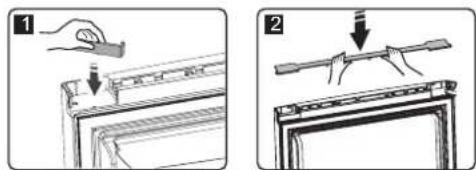
- Remove the upper door and place it on a smooth surface with its panel upwards. Lever part ① and part ④ , then loose screws ② as shown in the picture. Change handle ③ to the right side, then install screws ② , part ① and part ④ in turn. Loose screws ⑦ , detach part ⑥ and part ⑤ then install part ⑤ and another part ⑥ (in the plastic bag) to the left side with screws ⑦ . Put part ⑥ just detached back to plastic bag.
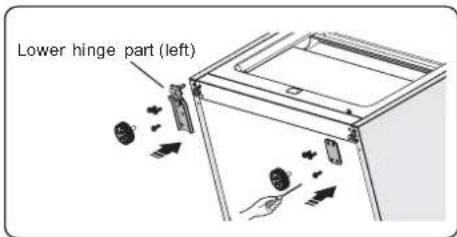
- Loose screws used to fix the middle hinge and remove middle hinge. Then remove the lower door.
- Place the lower door on a smooth surface with its panel upwards. Change the handle to the right side according to step 5. Loose screws, detach part and part. Turn part by 180^ and then install part and part to corresponding position on left side together with screws.
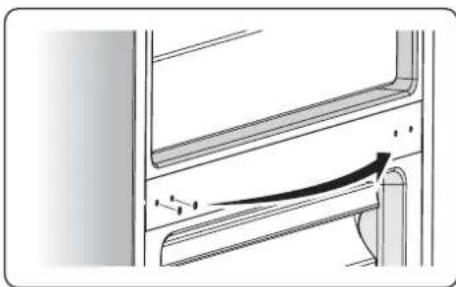
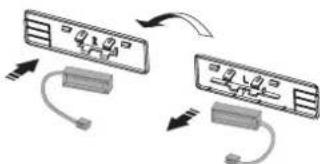
- Change screw hole covers on middle cover plate from left to right (as shown in figure below).
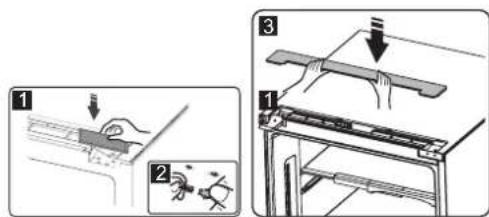
- Place refrigerator flatwise, remove part ③ and then loose screws ④ Remove part ② and part ①
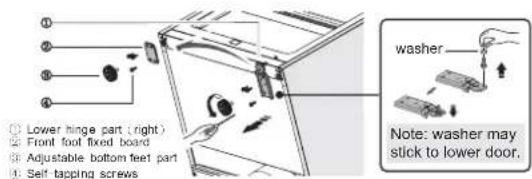
-
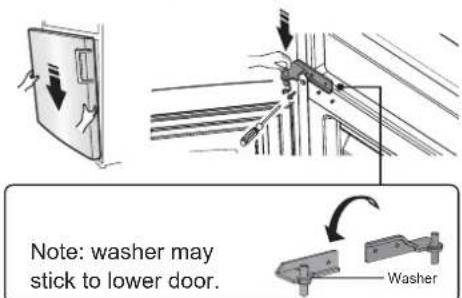
Screw out lower hinge, change it to the near hole site, and then screw up and mount washer.
-
Just remount to the step 9, change part①to left and part②to right and then fix them with screws④. Finally install part③.
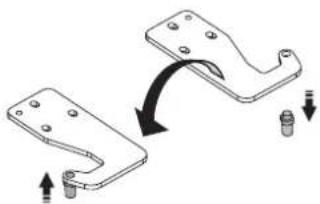
- Move the lower door and adjust its position to align lower hole site and upper hinge axis. Turn the middle hinge by 180, change the washer on the axis to the upper side, adjust the middle hinge to the appropriate position and then install it.
- Screw out The upper hinge axis, turn the upper hinge over and fix axis on it. Then place it at side for use.
- Exchange wires both in the left and right slots of refrigerator body.

- Move the upper door to appropriate position, adjust part ① and upper door, Move the connecting wire ② in the slot of upper door from right to left, and then fix part ① and wire ② by screws ③ . (Please hold upper door by hand when installing)
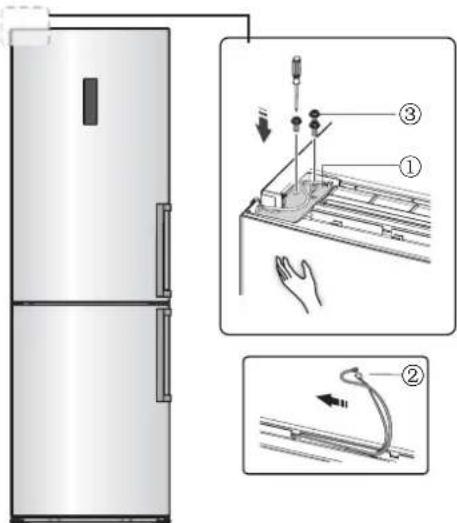
- Connect electrical connector ① in accordance with step 3 and then install part ② (which is in the plastic bag).
17.Reverse part ① by 180^ and install it onto the right corner of upper door, then mount part ② (both of which are taken down in step 2)
- Take the reed switch out of the coping block(part 6 in step 3) and mount it on another block for use (which is with mark "R" in the plastic bag). Put the coping block just removed back to the plastic bag.
Note: Be sure character side of reed switch fits well with coping block.
- Install part ① connect the wire connector②, and then install part③.
- Open the upper door, mount door racks and then close it.
Description of the appliance
- Cabinet
- LED light
- Flexible wine rack
- Glass shelf
- Crisper cover
- Fruit and vegetables crisper
- My fresh choice
- Twist ice maker
- Upper freezer drawer
- Upper freezer glass shelf
11.Middle freezer drawer(huge box)
12.Middle freezer glass shelf - Lower freezer drawer
- Adjustable bottom feet
- Fridge door
- Covered dairy rack
- Egg tray
18.Middle rack - Bottle holder
- Bottle rack
- Fridge door seal
- Handle
- Freezer door seal
- Freezer door
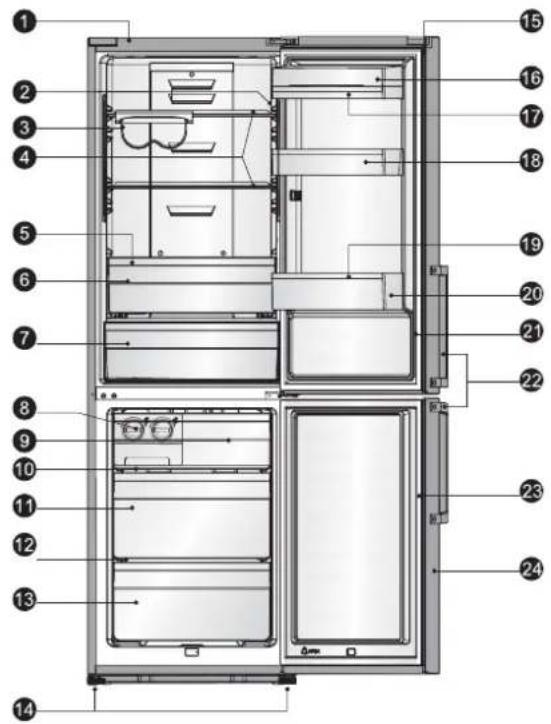
View 1 of the appliance RD-43WC4SBA/CSA2 RB403N4ZS2
Optional part list
| Model Part | RD-43WC4SBA/CSA2 RB403N4ZS2 | RD-43WC4SBA/CSA3 RB403N4ZS3 | RD-44WC4SBA/CLA2 RB403N4AC2 | RD-44WC4SQA/CLA2 RB403N4CC2 | RD-44WC4SBA/CLA1 RB403N4EC1RB403N4DC1 (Spalnother country) | RD-44WC4SBA/CVA1 RB403N4DY1 |
| Top LED light | X | X | X | ✓ | ✓ | ✓ |
| Twin LED light | ✓ | ✓ | ✓ | X | X | X |
| Flexible wine rack | ✓ | ✓ | X | X | X | X |
| Wine rack | X | X | ✓ | ✓ | ✓ | ✓ |
| My fresh choice | ✓ | ✓ | X | X | X | X |
| Moisture 0 cool | X | X | ✓ | X | ✓/X | X |
| Moisture fresh crispier | X | X | X | ✓ | X/✓ | ✓ |
| Twist ice maker | ✓ | ✓ | X | X | X | X |
| Integrative ice maker | X | X | ✓ | ✓ | ✓ | ✓ |
| Upper freezer glass shelf | ✓ | ✓ | ✓ | ✓ | ✓ | ✓ |
| Middle freezer glass shelf | ✓ | ✓ | ✓ | ✓ | ✓ | ✓ |
| Covered dairy rack | ✓ | ✓ | ✓ | ✓ | ✓ | ✓ |
| Handle | ✓ | ✓ | ✓ | X | ✓ | ✓ |
Note: Due to unceasing modification of our products, your refrigerator may be slightly different from this instruction manual, but its functions and using methods remain the same. To get more space in the freezer, you can remove drawers (except lower freezer drawer), installment bracket and integrative ice maker/twistable ice tray.
- Cabinet
- LED light
- Flexible wine rack
- Glass shelf
- Folded shelf
- Crisper cover
- Fruit and vegetables crisper
- My fresh choice
- Twist ice maker
- Upper freezer drawer
- Upper freezer glass shelf
12.Middle freezer drawer(huge box)
13.Middle freezer glass shelf - Lower freezer drawer
- Adjustable bottom feet
- Fridge door
- Covered dairy rack
- Egg tray
19.Middle rack - Bottle holder
- Bottle rack
- Fridge door seal
- Handle
- Installation bracket
- Freezer door seal
- Freezer door

View 2 of the appliance RD-45WC4SBA/CSA2 RB449N4ZS2
Optional part list
| Model Part | RD-45WC4SBA/CSA2 RB449N4ZS2 | RD-46WC4SBA/CLA2 RB468N4AC2 | RD-46WC4SBA/CLA1 RB468N4BC1 | RD-46WC4SBA/CPA1 RB468N4BW1 |
| Top LED light | X | X | ✓ | ✓ |
| Twin LED light | ✓ | ✓ | X | X |
| Flexible wine rack | ✓ | X | X | X |
| Wine rack | X | ✓ | ✓ | ✓ |
| Folded shelf | ✓ | X | X | X |
| My fresh choice | ✓ | X | X | X |
| Moisture 0 cool | X | ✓ | ✓ | ✓ |
| Twist ice maker | ✓ | X | X | X |
| Integrative ice maker | X | ✓ | ✓ | ✓ |
| Upper freezer drawer | ✓ | ✓ | ✓ | ✓ |
| Upper freezer glass shelf | ✓ | ✓ | ✓ | ✓ |
| Middle freezer glass shelf | ✓ | ✓ | ✓ | ✓ |
| Covered dairy rack | ✓ | ✓ | ✓ | ✓ |
| Handle | ✓ | ✓ | ✓ | ✓ |
Note: Due to unceasing modification of our products, your refrigerator may be slightly different from this instruction manual, but its functions and using methods remain the same. To get more space in the freezer, you can remove drawers (except lower freezer drawer), installment bracket and integrative ice maker/twistable ice tray.
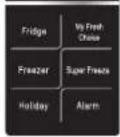
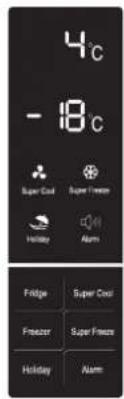
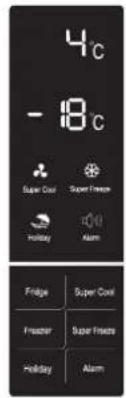
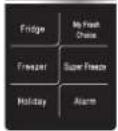
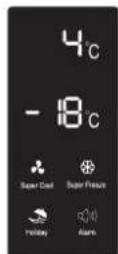
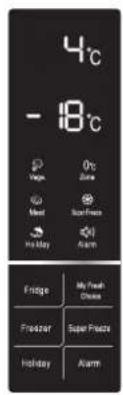
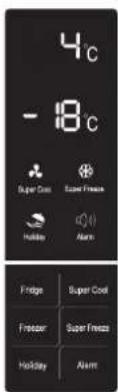
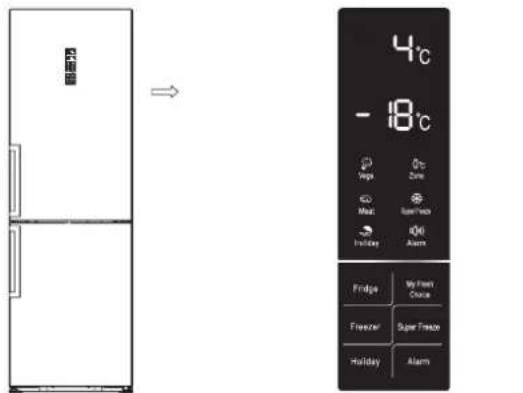
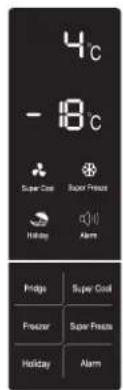
Display controls
Use your appliance according to the following control regulations, your appliance has the corresponding functions and modes as the control panels showed in the pictures below. When the appliance is powered on for the first time, the backlighting of the icons on display panel starts working. If no buttons have been pressed and the doors are closed, the backlighting will turn off.
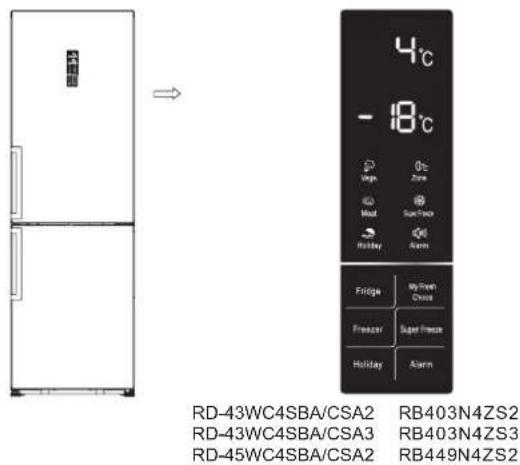
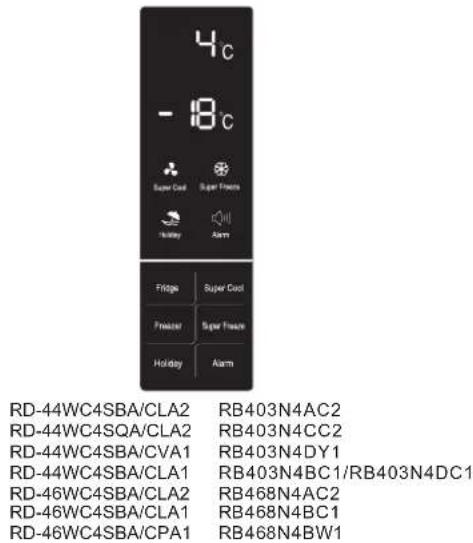
Controlling the temperature
We recommend that when you start your refrigerator for the first time, the temperature for the refrigerator is set to 4^ and the freezer to -18^ . If you want to change the temperature, follow the instructions below.
Caution! When you set a temperature, you set an average temperature for the whole refrigerator cabinet. Temperatures inside each compartment may vary from the temperature values displayed on the panel, depending on how much food you store and where you place them. Ambient temperature may also affect the actual temperature inside the appliance.
1. Fridge
Press "Fridge" to set fridge temperature between 2^ and 8^ as needed, and control panel will display corresponding values according to the following sequence.


2. My fresh choice
There are three modes for my fresh choice function. You can select different modes according to your requirements by pressing the button "My fresh choice" on the control panel, and the corresponding icon will be illuminated.

Vege.
- When vege. Mode is selected, the light will be illuminated and the My Fresh Choice compartment will be set at 3^ .
Zero zone. (0°C Zone)
- When Zero zone Mode is selected, the light will be illuminated and the My Fresh Choice compartment will be set at 0^ .
Meat (Meat)
- When meat Mode is selected, the
light will be illuminated and the My Fresh Choice compartment will be set at -2^ .
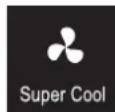
3. Super Cool

Super Cool can refrigerate your food much faster, keeping food fresh for a longer period
- Press" Super Cool" button to activate this function. The light will be illuminated.
Super cool automatically switches off after 6 hours and the refrigerator temperature setting displays 2^ - When super cool function is on you can switch it off by pressing "Super Cool" or "Refrigerator" button and the refrigerator temperature setting will revert back to the previous setting.
4. Freezer
Press "Freezer" to set freezer temperature between -14^ and -24^ as needed, and the control panel will display corresponding value according to the following sequence.


5. Super Freeze

Super Freeze will quickly lower the temperature within the freezer so food will freeze vitamins and
nutrients of fresh food and keep food fresh longer.
- Press "Super Freeze" button to activate the super freeze function. The light will come on.
- In case of the maximum amount of food to be frozen, please wait about 24 h.
- Super freeze automatically switches off after 26 hours and the freezer temperature setting displays -24^ .
- When super freeze function is on you can switch off super freeze function by pressing "Super Freeze" or "Freezer"
button and the freezer temperature setting will revert back to the previous setting.
6.Holiday

If you are going to be away for a long period of time, you can activate this function by pressing "Holiday" button for
3 seconds until the light comes on.
- When the holiday function is activated, the temperature of the refrigerator is automatically switched to 15^ to minimize the energy consumption.
Important! Do not store any food in the fridge during this time.
- When the holiday function is on, you can switch it off by pressing any button of "Holiday", "Fridge" and "Super Cool" button. The fridge temperature setting will revert back to the previous setting.
7. Alarm
In case of alarm, "Alarm" icon will be on and there will be buzzing sound. Press "Alarm" key to clear alarm and then "Alarm" icon will turn off and stop buzzing.
Door Alarm
- When the door of fridge or freezer is open for over 2 minutes, the door alarm will sound. In case of door alarm, buzzer will sound 3 times every 1 min and will stop alarming automatically after 10 minutes.
- To save energy, please avoid keeping the door open for a long time when using the appliance. The door alarm can also be cleared by closing the fridge door.
Temperature alarm
-
If freezer temperature is too high due to power failure or other reasons, there will be a temperature alarm and the freezer temperature setting displays "--" or nothing.
In case of temperature alarm, buzzer will sound constantly for 10 times and then stop automatically. -
In case of temperature alarm, press "Alarm" button for 3 seconds to check the highest freezer temperature. The temperature value and "Alarm" icon will
according to the model.
Caution! When power is restored, it is normal that the temperature alarm appears, this can be cleared by pressing "Alarm".
Using your appliance
You appliance has the accessories as the "Description of the appliance"showed in general, with this part instruction you can have the right way to use them.
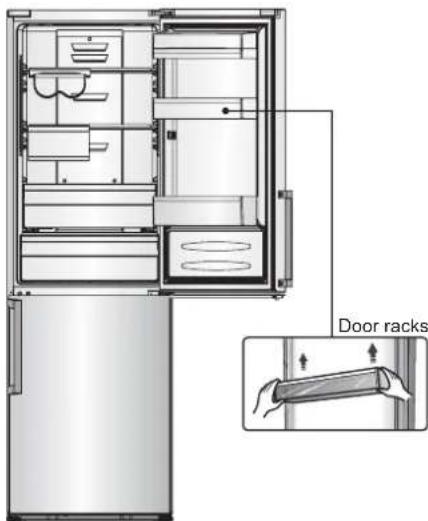
Door rack
It is suitable for the storage of eggs, canned liquid, bottled drinks and packed food, etc. Do not place too many heavy things in the racks
- The middle door shelf can be placed at different heights according to your requirements. Please take food out of the shelf
Note: There are egg trays in the upper shelf and bottle holder in the lower shelf.
Shelf in Refrigerator chamber
- There are shelves in refrigerator chamber, and they can be taken out to be cleaned.
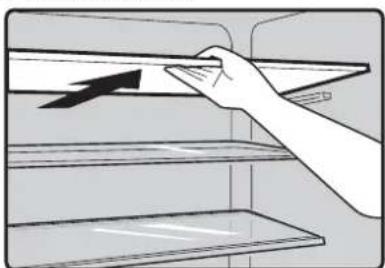
Folded shelf
It is made up of fixed part and flexible part.
It can be adjusted and folded to achieve different storage volume as you need. See the picture
Note: If you want to spread out the folded shelf, please press the outer verge of the flexible part first.
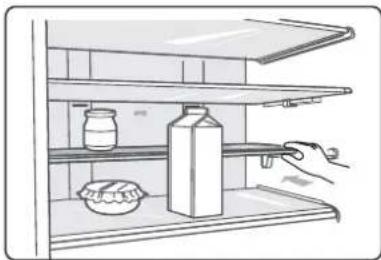
Bottle rack
It is for storing bottled wine or drinks.
It can also slide along the shelf if required.
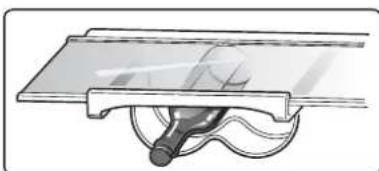
Note: Please use gentle pressure on left or right side face to move the Bottle rack along the shelf.
- Wine rack can be folded up to save space.
- If required, it can also be taken out with its hanger allowing you to adjust the shelf at different heights and save space.
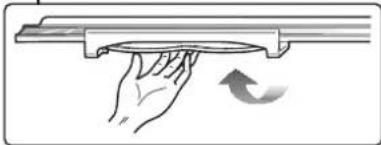
Crisper cover
It is for controlling the temperature of the risper and
Crisper of refrigerator chamber
It is suitable for the storage of fruits and vegetable.
My fresh choice
The temperature there can be set at -2^,0^ and 3^ to meet customers' demand.
- It can store various kinds of food including cheese, meat, fish, fruits, vegetables and other perishable food under proper temperature.
Note: Bottled or canned drinks are not allowed to be stored there.
Moisture 0 Cool
The temperature there is about 2- 3^ lower than that in the refrigerator chamber.
- It is used to store fish, meat and other erodible food.
Note: When selecting the Super Freeze function, ensure there is no bottled or canned liquid which could explode caused by volume expanding.
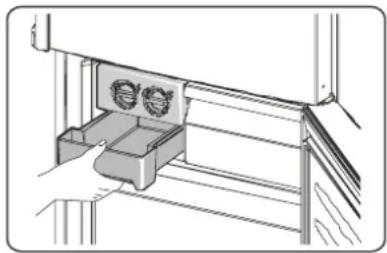
Integrative ice maker
It is used for making ice.
- It is a removable accessory which can be taken out to save space. There is an ice maker cover to keep the ice maker clean.
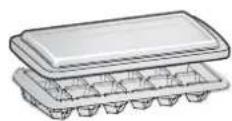
Note: If the ice maker is used for the first time or has not been used for a long time, please clean it before using.
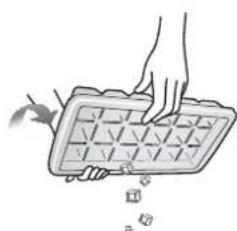
- Ice-making process.
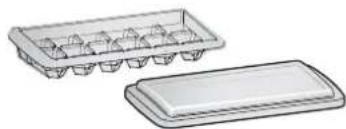
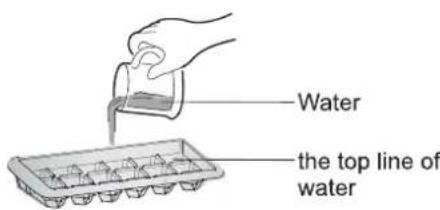
- Pour water into the ice tray and Pour water into the ice trays and the water level shall not exceed the top line as the follow picture shows.
- Place the ice maker in its original position. After the cubes are formed, gently twist the tray to separate the cubes and trays.
Twistable ice tray
Note: If the ice tray is used for the first time or has not been used for a long time, please clean it before using.
-
The twist ice tray is used to make and deposit ice cubes. You should use it as follows.
-
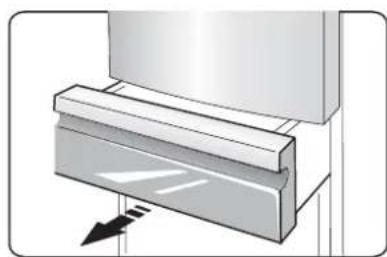
Pull out the twistable ice tray from the installation bracket.
- Pour water into the ice trays and the water level shall not exceed the maximum line.
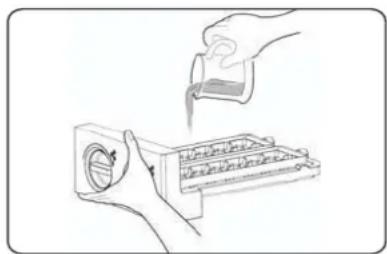
- Place the filled ice tray back to the bracket.
- When ice cubes form, twist the knobs clockwise and the ice will drop into the ice box below.
- Ice cubes can be stored in the ice box, if you need them, you can pull out the ice box and take them out.
Helpful hints and tips
Energy saving tips
We recommend that you follow the tips below to save energy.
- Try to avoid keeping the door open for long periods in order to conserve energy.
- Ensure the appliance is away from any sources of heat (Direct sunlight, electric oven or cooker etc)
- Don't set the temperature colder than necessary.
- Don't store warm food or evaporating liquid in the appliance.
- Place the appliance in a well ventilated, humidity free, room. Please refer to Installing your new appliance chapter.
- If the diagram shows the correct combination for the drawers, crisper and shelves, do not adjust the combination as this is designed to be the most energy efficient configuration.
Hints for fresh food refrigeration
-Do not place hot food directly into the
refrigerator or freezer, the internal temperature will increase resulting in the compressor having to work harder and will consume more energy.
- Do cover or wrap the food, particularly if it has a strong flavor.
- Place food properly so that air can circulate freely around it.
Hints for refrigeration
- Meat (All Types) Wrap in polythene food: wrap and place on the glass shelf above the vegetable drawer. Always follow food storage times and use by dates suggested by manufacturers.
Cooked food, cold dishes, etc.:
They should be covered and may be placed on any shelf.
Fruit and vegetables:
They should be stored in the special drawer provided.
Butter and cheese:
Should be wrapped in airtight foil or plastic film wrap.
film wrap.
- Milk bottles:
Should have a lid and be stored in the door racks.
Hints for freezing
- When first starting-up or after a period out of use, let the appliance run at least 2 hours on the higher settings before putting food in the compartment.
- Prepare food in small portions to enable it to be rapidly and completely frozen and to make it possible to subsequently thaw only the quantity required.
- Wrap up the food in aluminum foil or polyethylene food wraps which are airtight,
- Do not allow fresh, unfrozen food to touch the food which is already frozen to avoid temperature rise of the latter.
- Iced products, if consumed immediately after removal from the freezer compartment, will probably
cause frost burns to the skin.
It is recommended to label and date each frozen package in order to keep track of the storage time.
Hints for the storage of frozen food
- Ensure that frozen food has been stored correctly by the food retailer
-Once defrosted, food will deteriorate rapidly and should not be re-frozen. Do not exceed the storage period indicated by the food manufacturer.
Switching off your appliance
If the appliance needs to be switched off for an extended period, the following steps should be taken prevent mould on the appliance.
- Remove all food.
- Remove the power plug from the mains socket.
- Clean and dry the interior thoroughly.
- Ensure that all the doors are wedged open slightly to allow air to circulate.
Cleaning and care
For hygienic reasons the appliance (including exterior and interior accessories) should be cleaned regularly at least every two months.
Caution! The appliance must not be connected to the mains during cleaning. Danger of electrical shock! Before cleaning switch the appliance off and remove the plug from the mains socket.
Exterior cleaning
To maintain good appearance of your appliance, you should clean it regularly.
-Wipe the digital panel and display panel with a clean, soft cloth.
-Spray water onto the cleaning cloth instead of spraying directly on the surface of the appliance. This helps ensure an even distribution of moisture to the surface.
-Clean the doors, handles and cabinet
surfaces with a mild detergent and then wiped dry with a soft cloth.
Caution!
-Don't use sharp objects as they are likely to scratch the surface.
-Don't use Thinner, Car detergent, Clorox, ethereal oil, abrasive cleansers or organic solvent such as Benzene for cleaning. They may damage the surface of the appliance and may cause fire.
Interior cleaning
You should clean the appliance interior regularly. It will be easier to clean when food stocks are low. Wipe the inside of the fridge freezer with a weak solution of bicarbonate of soda, and then rinse with warm water using a wrung-out sponge or cloth. Wipe completely dry before replacing the shelves and baskets.
Thoroughly dry all surfaces and removable parts.
Although this appliance automatically defrosts, a layer of frost may occur on the freezer compartment's interior walls if the freezer door is opened frequently or kept open too long. If the frost is too thick, choose a time when the supply of food stocks are low and proceed as follows:
- Remove existing food accessories baskets, unplug the appliance from the mains power and leave the doors open. Ventilate the room thoroughly to accelerate the thawing process.
- When defrosting is completed, clean your freezer as described above.
Caution! Don't use sharp objects to remove frost from the freezer compartment. Only after the interior is completely dry should the appliance be switched back on and plugged back into the mains socket.
Door seals cleaning
Take care to keep door seals clean. Sticky food and drinks can cause seals to stick to the cabinet and tear when you open the door. Wash seal with a mild detergent and warm water. Rinse and dry it thoroughly after cleaning.
Caution! Only after the door seals are completely dry should the appliance be powered on.
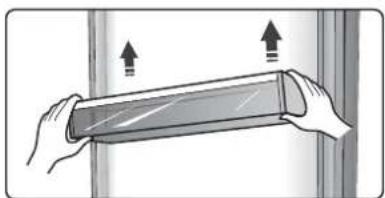
andReplacing the LED light:
Warning: The LED light must not be replaced by the user! If the LED light is damaged, contact the customer helpline for assistance. To replace the LED light, the below steps can be followed:
- Unplug your appliance.
- Remove light cover by pushing up and out.
- Hold the LED cover with one hand and pull it with the other hand while pressing the connector latch.
- Replace LED light and snap it correctly in place.
Troubleshooting
If you experience a problem with your appliance or are concerned that the appliance is not functioning correctly, you can carry out some easy checks before calling for service, please see below. You can carry out some easy checks according to this section before calling for service.
Warning! Don't try to repair the appliance yourself. If the problem persists after you have made the checks mentioned below, contact a qualified electrician, authorized service engineer or the shop where you purchased the product.
| Problem | Possible cause & Solution |
| Appliance is not working correctly | Check whether the power cord is plugged into the power outlet properly. |
| Check the fuse or circuit of your power supply, replace if necessary. | |
| The ambient temperature is too low. Try setting the chamber temperature to a colder level to solve this problem. | |
| It is normal that the freezer is not operating during the automatic defrost cycle, or for a short time after the appliance is switched on to protect the compressor. | |
| Odours from the compartments | The interior may need to be cleaned |
| Some food, containers or wrapping cause odours. | |
| Noise from the appliance | The sounds below are quite normal: • Compressor running noises. • Air movement noise from the small fan motor in the freezer compartment or other compartments. • Gurgling sound similar to water boiling. • Popping noise during automatic defrosting. • Clicking noise before the compressor starts. |
| Other unusual noises are due to the reasons below and may need you to check and take action: The cabinet is not level. The back of appliance touches the wall. Bottles or containers fallen or rolling. | |
| The motor runs continuously | It is normal to frequently hear the sound of the motor, it will need to run more when in following circumstances: • Temperature setting is set colder than necessary • Large quantity of warm food has recently been stored within the appliance. • The temperature outside the appliance is too high. • Doors are kept open too long or too often. • After your installing the appliance or it has been switched off for a long time. |
| A layer of frost occurs in the compartment | Check that the air outlets are not blocked by food and ensure food is placed within the appliance to allow sufficient ventilation. Ensure that door is fully closed. To remove the frost, please refer to cleaning and care chapter. |
| Temperature inside is too warm | You may have left the doors open too long or too frequently; or the doors are kept open by some obstacle; or the appliance is located with insufficient clearance at the sides, back and top |
| Temperature inside is too cold | Increase the temperature by following the "Display controls" chapter. |
| Doors can be closed easily | Check whether the top of the refrigerator is tilted back by 10-15mm to allow the doors to self close, or if something inside |
| is preventing the doors from closing. | |
| Water drips on the floor | The water pan (located at the rear bottom of the cabinet) may not be properly leveled, or the draining spout (located underneath the top of the compressor depot) may not be properly positioned to direct water into this pan, or the water spout is blocked. You may need to pull the refrigerator away from the wall to check the pan and spout. |
| The light is not working | ●The LED light may be damaged. Refer to replace LED lights in cleaning and care chapter. ●The control system has disabled the lights due to the door being kept open too long, close and reopens the door to reactivate the lights. |
Disposal of the appliance
It is prohibited to dispose of this appliance as household waste.
Packaging materials
Packaging materials with the recycle symbol are recyclable. Dispose of the packaging into a suitable waste collection container to recycle it.
Before disposal of the appliance
- Pull out the mains plug from the mains socket.
- Cut off the power cord and discard with the mains plug
Warning! Refrigerators contain refrigerant and gases in the insulation. Refrigerant and gases must be disposed of professionally as they may cause eye injuries or ignition.
Ensure that tubing of the refrigerant circuit is not damage prior to proper disposal.
| Correct Disposal of this product | |
| This symbol on the product or in its packing indicates that this product may not be treated as household waste. Instead, it should be taken to the appropriate waste collection point for the recycling of electrical and electronic equipment. By ensuring this product is disposed of correctly, you will help prevent potential negative consequences for the environment and human health, which could otherwise be caused by the inappropriate waste handling of this product. For more detailed information about the recycling of this product, please contact your local council your household waste disposal service, or the shop where you purchased the product. |
Hisense
life reimagined
RB403N4AC2
RB403N4CC2
RB403N4DY1
RB403N4BC1/RB403N4DC1
RD-44WC4SBA/CLA2
RD-44WC4SQA/CLA2
RD-44WC4SBA/CVA1
RD-44WC4SBA/CLA1
RD-46WC4SBA/CLA2
RD-46WC4SBA/CLA1
RD-46WC4SBA/CPA1

RB468N4AC2
RB468N4BC1
RB468N4BW1
RB403N4ZS2
RB403N4ZS3
RB449N4ZS2

RD-44WC4SBA/CLA2 RD-44WC4SQA/CLA2 RD-44WC4SBA/CVA1 RD-44WC4SBA/CLA1 RD-46WC4SBA/CLA2 RD-46WC4SBA/CLA1 RD-46WC4SBA/CPA1
RB403N4AC2
RB403N4CC2
RB403N4DY1
RB403N4BC1/RB4
RB468N4AC2
RB468N4BC1
RB468N4BW1
| Modello Parte | RD-43WC4SBA/CSA2RB403N4ZS2 | RD-43WC4SBA/CSA3RB403N4ZS3 | RD-44WC4SBA/CLA2RB403N4AC2 | RD-44WC4SQA/CLA2RB403N4CC2 | RD-44WC4SBA/CLA1RB403N4C1/RB403N4DC1(Spain/other country) | RD-44WC4SBA/CVA1RB403N4DY1 |
| Luce LED superiore | X | X | X | ✓ | ✓ | ✓ |
| Luce LED twist | ✓ | ✓ | ✓ | X | X | X |
| Portabottiglie di vino flessibile | ✓ | ✓ | X | X | X | X |
| Portabottiglie di vino | X | X | ✓ | ✓ | ✓ | ✓ |
| Le mie scelte fresche | ✓ | ✓ | X | X | X | X |
| Umidità 0 freddo | X | X | ✓ | X | ✓/X | X |
| Scomparto frutta/verdura | X | X | X | ✓ | X/✓ | ✓ |
| Ice maker twist | ✓ | ✓ | X | X | X | X |
| Ice maker integrativo | X | X | ✓ | ✓ | ✓ | ✓ |
| Ripiano in vetro congelatore superiore | ✓ | ✓ | ✓ | ✓ | ✓ | ✓ |
| Ripiano in vetro congelatore centrale | ✓ | ✓ | ✓ | ✓ | ✓ | ✓ |
| Cestello latticini coperto | ✓ | ✓ | ✓ | ✓ | ✓ | ✓ |
| Maniglia | ✓ | ✓ | ✓ | X | ✓ | ✓ |
| Parte\Modello | RD-45WC4SBA/CSA2RB449N4ZS2 | RD-46WC4SBA/CLA2RB468N4AC2 | RD-46WC4SBA/CLA1RB468N4BC1 | RD-46WC4SBA/CPA1RB468N4BW1 |
| Luce LED superiore | X | X | ✓ | ✓ |
| Luce LED twist | ✓ | ✓ | X | X |
| Portabottiglie di vino flessibile | ✓ | X | X | X |
| Portabottiglie di vino | X | ✓ | ✓ | ✓ |
| Ripiano pieghevole | ✓ | X | X | X |
| Le mie scelte fresche | ✓ | X | X | X |
| Umidità 0 freddo | X | ✓ | ✓ | ✓ |
| Ice maker twist | ✓ | X | X | X |
| Ice maker integrativo | X | ✓ | ✓ | ✓ |
| Cassetto congelatore superiore | ✓ | ✓ | ✓ | ✓ |
| Ripiano in vetro congelatore superiore | ✓ | ✓ | ✓ | ✓ |
| Ripiano in vetro congelatore centrale | ✓ | ✓ | ✓ | ✓ |
| Cestello latticini coperto | ✓ | ✓ | ✓ | ✓ |
| Maniglia | ✓ | ✓ | ✓ | ✓ |
RD-43WC4SBA/CSA2 RB403N4ZS2
RD-43WC4SBA/CSA3 RB403N4ZS3
RD-45WC4SBA/CSA2 RB449N4ZS2
RB403N4ZS2
RB403N4ZS3
RB449N4ZS2
RD-44WC4SBA/CLA2 RB403N4AC2
RD-44WC4SQA/CLA2 RB403N4CC2
RD-44WC4SBA/CVA1 RB403N4DY1
RD-44WC4SBA/CLA1 RB403N4BC1/RB403N4DC1
RD-46WC4SBA/CLA2 RB468N4AC2
RD-46WC4SBA/CLA1 RB468N4BC1
RD-46WC4SBA/CPA1 RB468N4BW1
Zero zone. (0% Zone)
BESCHRIJVING VAN HET APPARAAT
| Model Onderdeel | RD-43WC4SBA/CSA2 RB403N4ZS2 | RD-43WC4SBA/CSA3 RB403N4ZS3 | RD-44WC4SBA/CLA2 RB403N4AC2 | RD-44WC4SQA/CLA2 RB403N4CC2 | RD-44WC4SBA/CLA1 RB403N4BC1/RB403N4DC1 (Spain/other country) | RD-44WC4SBA/CVA1 RB403N4DY1 |
| Bovenste LED-licht | X | X | X | ✓ | ✓ | ✓ |
| Twist LED Licht | ✓ | ✓ | ✓ | X | X | X |
| Flexibel wijnrek | ✓ | ✓ | X | X | X | X |
| Wijnrek | X | X | ✓ | ✓ | ✓ | ✓ |
| My fresh choice | ✓ | ✓ | X | X | X | X |
| Moisture 0 cool | X | X | ✓ | X | ✓/X | X |
| Vacuum verslade | X | X | X | ✓ | X/✓ | ✓ |
| Twist ijsmaker | ✓ | ✓ | X | X | X | X |
| Geintegreerde ijsmaker | X | X | ✓ | ✓ | ✓ | ✓ |
| Bovenste vriezer glasplaat | ✓ | ✓ | ✓ | ✓ | ✓ | ✓ |
| Midden vriezer glasplaat | ✓ | ✓ | ✓ | ✓ | ✓ | ✓ |
| Afgedekt zuivelvak | ✓ | ✓ | ✓ | ✓ | ✓ | ✓ |
| Handgreep | ✓ | ✓ | ✓ | X | ✓ | ✓ |
RD-43WC4SBA/CSA2 RB403N4ZS2
RD-43WC4SBA/CSA3 RB403N4ZS3
RD-45WC4SBA/CSA2 RB449N4ZS2
RD-44WC4SBA/CLA2 RB403N4AC2
RD-44WC4SQA/CLA2 RB403N4CC2
RD-44WC4SBA/CVA1 RB403N4DY1
RD-44WC4SBA/CLA1 RB403N4BC1/RB403N4DC1
RD-46WC4SBCLA2 RB468N4AC2
RD-46WC4SBA/CLA1 RB468N4BC1
RD-46WC4SBA/CPA1 RB468N4BW1
| Modelo Parte | RD-43WC4SBA/CSA2RB403N4ZS2 | RD-43WC4SBA/CSA3RB403N4ZS3 | RD-44WC4SBA/CLA2RB403N4AC2 | RD-44WC4SQA/CLA2RB403N4CC2 | RD-44WC4SBA/CLA1RB403N4BC1RB403N4DC1(Spain/other country) | RD-44WC4SBA/CVA1RB403N4DY1 |
| LED superior | X | X | X | ✓ | ✓ | ✓ |
| LED giratória | ✓ | ✓ | ✓ | X | X | X |
| Grade de vinhos flexivel | ✓ | ✓ | X | X | X | X |
| Grade de vinhos | X | X | ✓ | ✓ | ✓ | ✓ |
| Minha escolha fresca | ✓ | ✓ | X | X | X | X |
| Humidade 0 resfriar | X | X | ✓ | X | ✓/X | X |
| Umidade resfrecante | X | X | X | ✓ | X/✓ | ✓ |
| Gaveta superior do freezer | ✓ | ✓ | X | X | X | X |
| Gelo automatístico integrado | X | X | ✓ | ✓ | ✓ | ✓ |
| Prateleira superior do freezer | ✓ | ✓ | ✓ | ✓ | ✓ | ✓ |
| Prateleira do meio do freezer | ✓ | ✓ | ✓ | ✓ | ✓ | ✓ |
| Grade de laticínios | ✓ | ✓ | ✓ | ✓ | ✓ | ✓ |
| Maçaneta | ✓ | ✓ | ✓ | X | ✓ | ✓ |
| Modelo Parte | RD-45WC4SBA/CSA2 RB449N4ZS2 | RD-46WC4SBA/CLA2 RB468N4AC2 | RD-46WC4SBA/CLA1 RB468N4BC1 | RD-46WC4SBA/CPA1 RB468N4BW1 |
| LED superior | X | X | ✓ | ✓ |
| LED giratória | ✓ | ✓ | X | X |
| Grade flexível de就是在 | ✓ | X | X | X |
| Grade de就是在 | X | ✓ | ✓ | ✓ |
| Prateleira dobrável | ✓ | X | X | X |
| Minha escolha fresca | ✓ | X | X | X |
| Humidade 0 resfriar | X | ✓ | ✓ | ✓ |
| Girar gelo automatístico integrado | ✓ | X | X | X |
| Gaveta superior do freezer | X | ✓ | ✓ | ✓ |
| Gelo automatístico integrado | ✓ | ✓ | ✓ | ✓ |
| Prateleira superior de vida do freezer | ✓ | ✓ | ✓ | ✓ |
| Prateleira do meio de vida do freezer | ✓ | ✓ | ✓ | ✓ |
| Grade coberta de laticínios | ✓ | ✓ | ✓ | ✓ |
| Maçaneta | ✓ | ✓ | ✓ | ✓ |
RD-45WC4SBA/CSA2 RB449N4ZS2
RD-44WC4SBA/CLA2 RB403N4AC2
RD-44WC4SQA/CLA2 RB403N4CC2
RD-44WC4SBA/CVA1 RB403N4DY1
RD-44WC4SBA/CLA1 RB403N4BC1/RB403N4DC1
RD-46WC4SBA/CLA2 RB468N4AC2
RD-46WC4SBA/CLA1 RB468N4BC1
RD-46WC4SBA/CPA1 RB468N4BW1
3. Super gelado