LB 1 - Fitness Equipment CHRISTOPEIT SPORT - Free user manual and instructions
Find the device manual for free LB 1 CHRISTOPEIT SPORT in PDF.

| Product Type | Folding Treadmill |
| Brand | Christopeit Sport |
| Model | LB 1 |
| Dimensions (unfolded) | L 170 x W 72 x H 128 cm |
| Dimensions (folded) | L 105 x W 72 x H 142 cm |
| Running Surface | L 118 x W 43 cm |
| Maximum User Weight | 100 kg |
| Power Supply | 220-240 V / 50 Hz / 750 W |
| Adjustable Speed | 1 to 16 km/h |
| Training Programs | 6 speed programs (P1-P6), 1 manual, time, distance, calories, body fat analysis program |
| Heart Rate Sensors | Handle grips with sensors |
| Display | LCD screen: time, speed, distance, calories, heart rate, laps (1 lap = 400 m) |
| Difficulty Levels | Manual adjustment (mechanical incline) |
| Safety | Emergency stop clip, motor with auto-stop |
| Standards | EN 957-1:2005, EN 957-6:2001, EMC 2004/108/EC, TÜV-GS tested |
| Usage | Domestic, class H/C |
| Maintenance | Lubricate the belt every 50 hours (1-2 months) with silicone oil; adjust belt tension |
| Cleaning | Clean with a soft cloth, avoid harsh detergents; wipe off sweat after each use |
| Repairability | Spare parts available (see list in manual), repairs by manufacturer or qualified electrician |
| Included Accessories | Tool kit, safety clip, assembly instructions |
Frequently Asked Questions - LB 1 CHRISTOPEIT SPORT
User questions about LB 1 CHRISTOPEIT SPORT
0 question about this device. Answer the ones you know or ask your own.
Ask a new question about this device
Download the instructions for your Fitness Equipment in PDF format for free! Find your manual LB 1 - CHRISTOPEIT SPORT and take your electronic device back in hand. On this page are published all the documents necessary for the use of your device. LB 1 by CHRISTOPEIT SPORT.
USER MANUAL LB 1 CHRISTOPEIT SPORT
Assembly and exercise instructions for Order No. 1141


Linkes Display (Puls):
- Summary of Parts Page 3 - 4
- Important Recommendations and Safety Information Page 13
- Technical data Page 14 - 15
- Assembly Instructions With Exploded Diagrams Page 16-17
- Maintenance and adjusting Page 18
- Console Key pad functions Page 19 - 20
- Training Instructions Page 21
Dear customer,
We congratulate you on your purchase of this home training sports unit and hope that we will have a great deal of pleasure with it. Please take heed of the enclosed notes and instructions and follow them closely concerning assembly and use.
Please do not hesitate to contact us at any time if you should have any questions.
Important Recommendations and Safety Instructions
Our products are all TUV-GS tested and therefore represent the highest current safety standards. However, this fact does not make it unnecessary to observe the following principles strictly.
- Assembly the machine exactly as described in the installation instructions and use only the enclosed, specific parts of the machine contained in the parts list. Before assembling, verify the completeness of the delivery against the delivery notice and the completeness of the carton against the parts list in the installation and operating instructions. In case of repair please ask your dealer for advice.
- Check the firm seating off all screws, nuts and other connections before using the machine for the first time and at regular intervals (every 1-2 months) to ensure that the trainer is in a safe condition. Replace defective components immediately and/or keep the equipment put of the use until repair.
- Set up the machine in a dry, level place and protect it from moisture and water. Uneven parts of the floor must be compensated by suitable measures and by the provided adjustable parts of the machine if such are installed. Ensure that no contact occurs with moisture or water.
- Place a suitable base (e.g. rubber mat, wooden board etc.) beneath the machine if the area of the machine must be specially protected against indentations, dirt etc.
- Before beginning training, remove all objects within a radius of 2 metres from the machine.
- Do not use aggressive cleaning agents to clean the machine and employ only the supplied tools or suitable tools of your own to assemble the machine and for any necessary repairs. Remove drops of sweat from the machine immediately after finishing training.
- WARNING! Your health can be impaired by incorrect or excessive training. Consult a doctor before beginning a planned training programme. He can define the maximum exertion (pulse, Watts, duration of training etc.) to which you may expose yourself and can give you precise information on the correct posture during training, the targets of your training and your diet. Never train after eating large meals. Observe that this machine is not suitable for therapeutic purposes.
- Only train on the machine when it is in correct working order. Use original spare parts only for any necessary repairs. WARNING: Replace the worm parts immediately and keep this equipment out of use until repaired.
- When setting the adjustable parts, observe the correct position and the marked, maximum setting positions and ensure that the newly adjusted position is correctly secured. Please remove the Tools you need to adjust after adjusting a new position.
-
Unless otherwise described in the instructions, the machine must only be used for training by one person at a time. The exercise time should not overtake 60 min./daily.
-
Wear training clothes and shoes which are suitable for fitness training with the machine. Your clothes must be such that they cannot catch during training due to their shape (e.g. length). Your training shoes should be appropriate for the trainer, must support your feet firmly and must have non-slip soles.
- WARNING! If you notice a feeling of dizziness, sickness, chest pain or other abnormal symptoms, stop training and consult a doctor.
- Never forget that sports machines are not toys. They must therefore only be used according to their purpose and by suitably informed and instructed persons.
- People such as children, invalids and handicapped persons should only use the machine in the presence of another person who can give aid and advice. Take suitable measures to ensure that children never use the machine without supervision.
- Ensure that the person conducting training and other people never move or hold any parts of their body into the vicinity of moving parts.
- At the end of its life span this product is not allowed to dispose over the normal household waste, but it must be given to an assembly point for the recycling of electric and electronic components. You may find the symbol on the product, on the instructions or on the packing. The materials are reusable in accordance with their marking. With the re-use, the material utilization or the protection of our environment. Please ask the local administration for the responsible disposal place.
- To protect the environment, do not dispose of the packaging materials, used batteries or parts of the machine as household waste. Put these in the appropriate collection bins or bring them to a suitable collection point.
- This machine is a speed-dependant machine, i.e. the power increases with increasing speed, and the reverse.
- The maximum permissible load (=body weight) is specified as 100kg . Evaluate your body weight before you starting the exercise.
- If the connecting cable of this item is damaged, this must be replaced by the manufacturer or the customer service or with an electrically certified person.
- This machine has been tested and certified in compliance with EN 957-1:2005, EN 957-6:2001, EMC Directive 2004/108/EC.
Technical data: Issue: 01.04.2011
0,74KW (1,0PS) Motor with Peak power 1,44KW (1,950PS)
speed from 1-16 km/h
- 6 installed training programs
1 individual program
- body fat program
- Hand pulse measurement
- Manual incline
Vibration absorbing running surface
- Safety pin for emergency stop
- Foldable for save space
- Big Display computer showing at same time: speed, distance, time, heart rate and approx. calories
Technical data 220-240V/50Hz/750Watt
Max. body weight 100 KG
- Walking surface approx. L 118, W 43 cm
Space requirement approx. L 170, W 72, H 128 cm
Space requirement foldable approx. L 105, W 72, H 142 cm
Please check after opening the packing that all the parts shown in the following assembly steps are there. Once you are sure that this is the case, you can start assembly.
Please contact us if any components are defective or missing, or if you need any spare parts or replacements in future:
This treadmill is created only for private Home sports activity and not allowed to us in a commercial or professional area. Home Sport use class H/C
| 0 | 5 | 10 | 15 | 20 | 25 | 30 | 35 | 40 | 50 | 60 | 70 | 80 | 90 | 100 mm |
| Illustration No. | Designation Dimension mm Quantity Attached to ET-Number | Illustration No. | |||
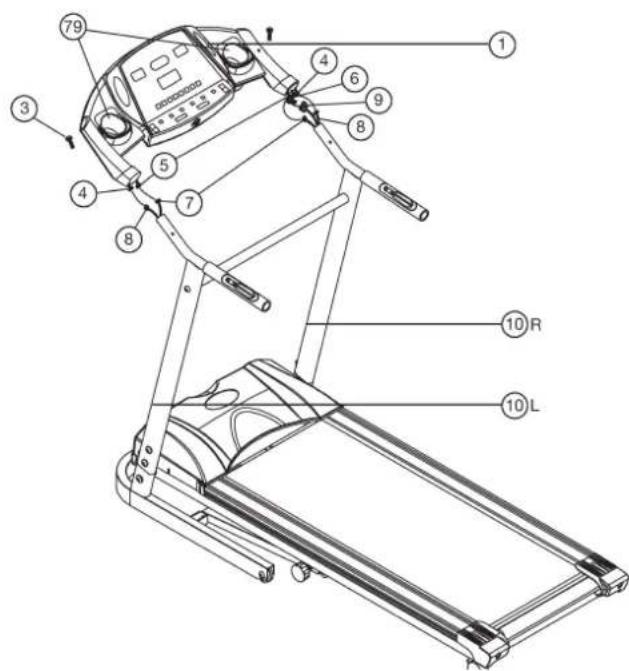
| 1 | Computer | 1 | 10L+10R | 36-1141-03-BT | |
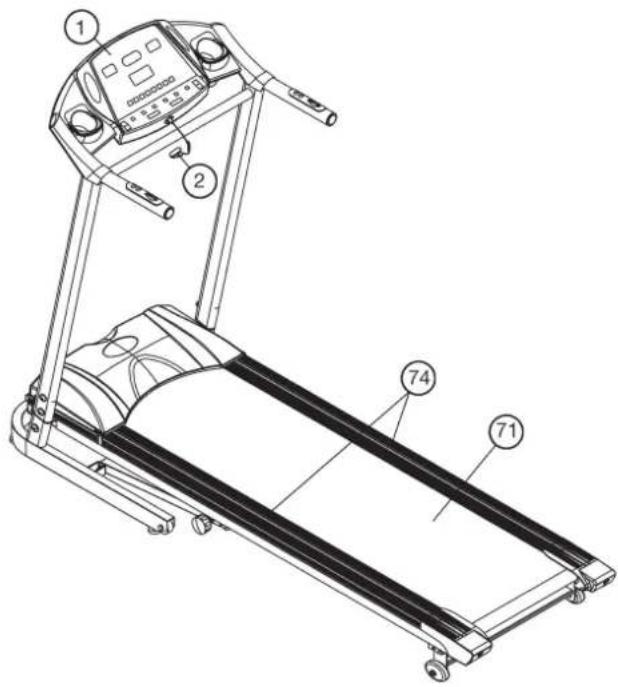
| 2 | Emergency key | 1 | 1 | 36-1141-04-BT | |
| 3 | Screw | M4x16 | 2 | 1+10 | 39-10187 |
| 4 | Pulse connection cable | 2 | 1+8 | 36-1141-05-BT | |
| 5 | Distant key connection cable | 1 | 1+7 | 36-1141-06-BT | |
| 6 | Computer cable 1 | 1 | 1+9 | 36-1141-07-BT | |
| 7 | Distant key cable | 2 | 5+11 | 36-1141-08-BT | |
| 8 | Pulse cable | 2 | 4+11 | 36-1141-09-BT | |
| 9 | Computer cable 2 | 1 | 6+34 | 36-1141-10-BT | |
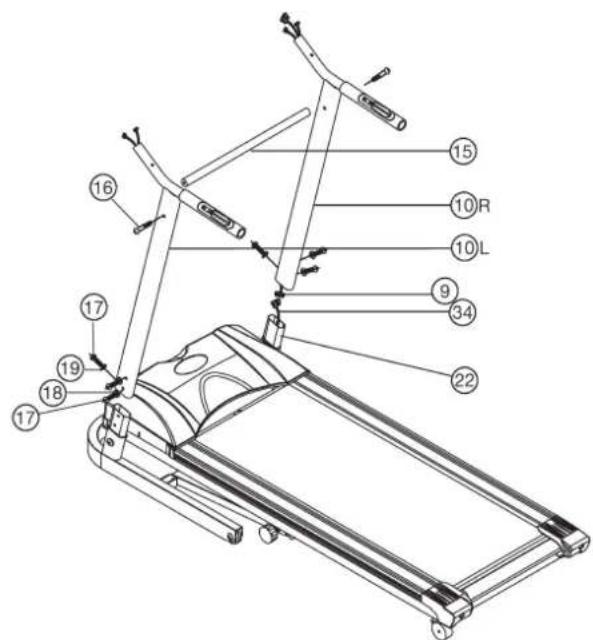
| 10L | Vertical tube left | 1 | 22 | 33-1141-03-SI | |
| 10R | Vertical tube right | 1 | 22 | 33-1141-04-SI | |
| 11 | Distant key/pulse sensor | 2 | 10L+10R | 36-1141-11-BT | |
| 12 | Screw | M4x30 | 2 | 10+11 | 36-9210-31-BT |
| 13 | Handlebar foam | 2 | 10 | 36-1141-12-BT | |
| 14 | Round end cap | 2 | 10 | 36-1141-13-BT | |
| 15 | Horizontal tube | 1 | 10L+10R | 33-1141-05-SI | |
| 16 | Allen screw | M8x40 | 2 | 10+15 | 39-9889-CR |
| 17 | Allen screw | M8x15 | 6 | 10+22 | 39-9888 |
| 18 | Flat washer | 8//16 | 6 | 17+16 | 39-9962-CR |
| 19 | Curved washer | 8//19 | 2 | 17 | 39-9966-CR |
| 20 | Bolt | M12x45 | 2 | 22+55 | 39-10156-SW |
| 21 | Bushing | 2 | 20 | 36-1141-14-BT | |
| 22 | Bottom frame | 1 | 10+55 | 33-1141-02-SI | |
| 23 | Foot pad adjustable | 4 | 22 | 36-1141-15-BT | |
| 24 | Allen screw | M8x35 | 2 | 22+25 | 39-10133 |
| 25 | Transportation wheel | 2 | 22 | 36-1141-16-BT | |
| 26 | Nylon nut | M8 | 14 | 24+27+30+32 | 39-9918-CR |
| 27 | Allen screw | M8x50 | 1 | 22+31 | 39-9811-SW |
| 28 | Plastic washer | 8//20 | 5 | 27+30+32 | 36-9362210-BT |
| 29 | Knob | 1 | 31 | 36-1141-17-BT | |
| 30 | Allen screw | M8x40 | 1 | 31+55 | 39-9889-CR |
| 31 | Adjust tube | 1 | 22+55 | 33-1141-06-SI | |
| 32 | Allen screw | M8x30 | 1 | 33 | 39-9906 |
| 33 | Gas spring | 1 | 22+55 | 33-1141-07-SI | |
| 34 | Computer cable 3 | 1 | 9+44 | 36-1141-18-BT | |
| 36 | Motor | 1 | 5537 | 36-1141-19-BT | |
| 37 | Motor fix plate | 1 | 55 | 33-1141-08-SI | |
| 38 | Allen screw | M10x16 | 4 | 36 | 39-10086 |
| 39 | Washer | 10//20 | 4 | 38 | 39-9989-CR |
| 40 | Nut | M10 | 4 | 38 | 39-10032 |
| 41 | Screw | M8x16 | 2 | 37 | 39-9888 |
| Illustration No. Illustration No. | Designation Dimension mm Quantity Attached to ET-Number | ||||
| 42 Belt 180J | 1 36+60 36-1141-20-BT | ||||
| 43 | Front roller | 1 | 55 | 33-1141-09-SI | |
| 44 | Lower controlling board | 1 | 55 | 36-1141-21-BT | |
| 45 | Screw | M4x10 | 5 | 46 | 39-10185 |
| 46 | Filter | 1 | 55 | 36-1141-22-BT | |
| 47 | Screw | M8x50 | 1 | 37 | 39-9811-CR |
| 48 | Nut | M8 | 1 | 47 | 39-10031 |
| 49 | Screw | M5x12 | 4 | 50 | 39-9903 |
| 50 | Cable clip | 1 | 55 | 36-1141-23-BT | |
| 51 | Screw | M4x15 | 5 | 52 | 39-10188 |
| 52 | Metal plate | 2 | 55 | 36-1141-24-BT | |
| 53 | Hex screw | M8x50 | 8 | 68 | 39-9811-CR |
| 54 Cushion | 8 55+68 36-1141-25-BT | ||||
| 55 | Main frame | 1 | 22 | 33-1141-01-SI | |
| 56 | Screw | M5x10 | 2 | 57 | 39-9903 |
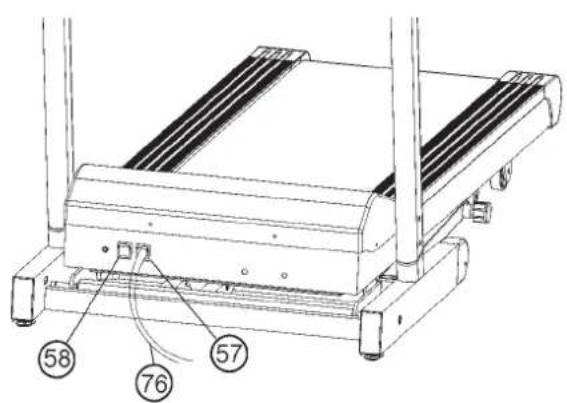
| 57 | Power supply plug | 1 | 55 | 36-1141-26-BT | |
| 58 | Power supply switch | 1 | 55 | 36-1141-27-BT | |
| 59 | Fuse | 1 | 55 | 36-1141-28-BT | |
| 60 | Belt wheel | 1 | 43 | 36-1141-29-BT | |
| 61 | Screw | M8x40 | 1 | 55 | 39-10125-VC |
| 62 | Inclination wheel | 2 | 65 | 36-1141-30-BT | |
| 63 Allen screw | M8x35 | 2 55+65 39-10133 | |||
| 64 Spring | 2 55+65 36-1141-31-BT | ||||
| 65 | Incline adjust frame | 1 | 55 | 33-1141-10-SI | |
| 66 | Rear roller | 1 | 55 | 33-1141-11-SI | |
| 67 Screw | M8x90 | 2 55+66 39-10445 | |||
| 68 | Running board | 1 | 55 | 36-1141-32-BT | |
| 69 | Screw | M4x15 | 8 | 68 | 39-10188 |
| 70 | Side rail fixer | 8 | 68 | 36-1141-33-BT | |
| 71 | Running belt | 1 | 68 | 36-1141-02-BT | |
| 72L | Rear cap left | 1 | 55 | 36-1141-44-BT | |
| 72R | Rear cap right | 1 | 55 | 36-1141-45-BT | |
| 73 | Screw | M5x15 | 2 | 72 | 39-9907-SW |
| 74 | Side Rail | 2 | 55 | 36-1141-36-BT | |
| 75 | Motor cover | 1 | 55 | 36-1141-41-BT | |
| 76 | AC cable | 1 | 57 | 36-1141-37-BT | |
| 77 | Drink bottle holder | 2 | 1 | 36-1141-38-BT | |
| 78 Tool set | 1 | 36-1141-39-BT | |||
| 79 | Assembling and exercise instruction | 1 | 36-1141-42-BT | ||
Assembly Instructions
Before beginning assembly, be sure to observe our recommendations and safety instructions.
Put the preassembled machine out of carton and place the base frame on an even floor.
Step 1:
- Put the 4 foot pads (23) onto the backside of base frame (22).

Step 2:
- Place the lift post (10R) with computer cable (9) to the bottom frame (22) on right side and connect the computer cables 2+3 (9+34).
- Put both lift posts (10R+10L) on bottom frame (22) that screw holes are aligned and bolt it together by using screws (17) and washers (18+19).
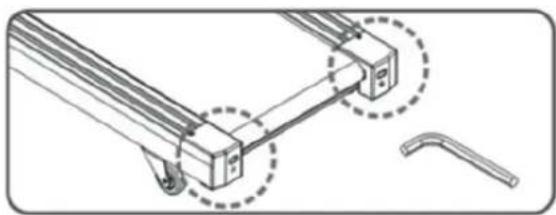
- Place the connection tube (15) between the lift posts (10L + 10R) and fasten the connection tube (15) at lift posts (10) with screw (16) tightly.
Step 3:
- Place the computer (1) onto the ends of handle bars (10L + 10R) and connect the computer cables 1 + 2 (6 + 9) , both pulse cables (4 + 8) and distant key cables (7 + 5) .
- Attach the computer (1) at handle bars (10) with screws (3) and take care that the cables won't be squashed.
- Put the bottle holder (77) into the computer housing (1)
Step 4: Checks and How to start
- Check the correct installation and function of all screwed and plug connections.
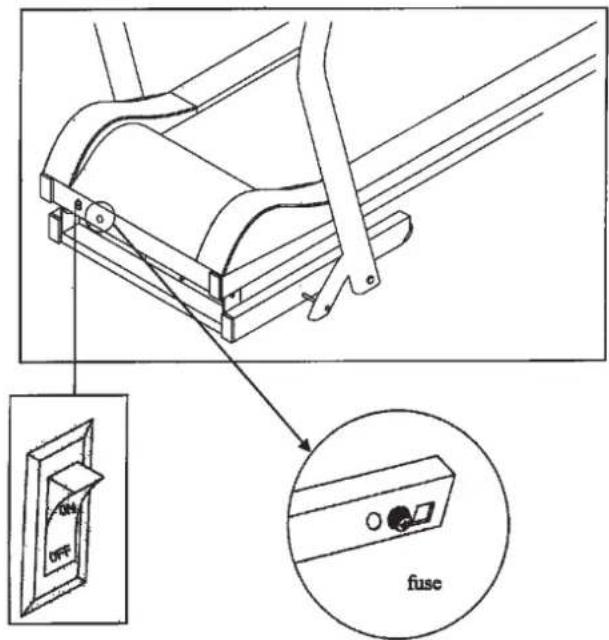
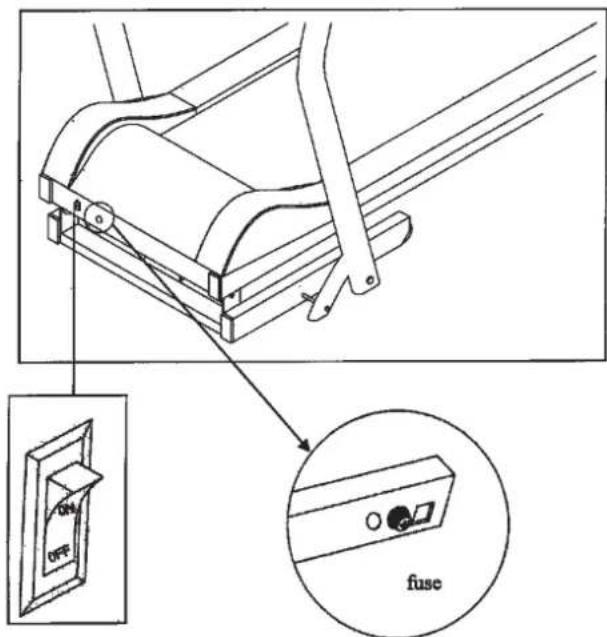
- When everything is in order, connect the power supply plug (57) with power cable (76) and wall power (230~Volts/50Hz) and switch on the main switch (58) below the front frame.
- Put the safety key (2) into the computer (1) and the computer will give you a small sound and go into the normal manual mode. Put the safety clip (2) at you exercising cloth and stand on the side rails (74). Press Start-Button and after a Count Down of 5 sec. the treadmill will start moving. Start walking onto the walk surface (71) when speed is low and follow the speed. Familiarize yourself with the machine at a low speed settings.
Note: Please keep the tool set and the instructions in a safe place as these may be required for repairs or spare parts orders becoming necessary later. benötigt werden.
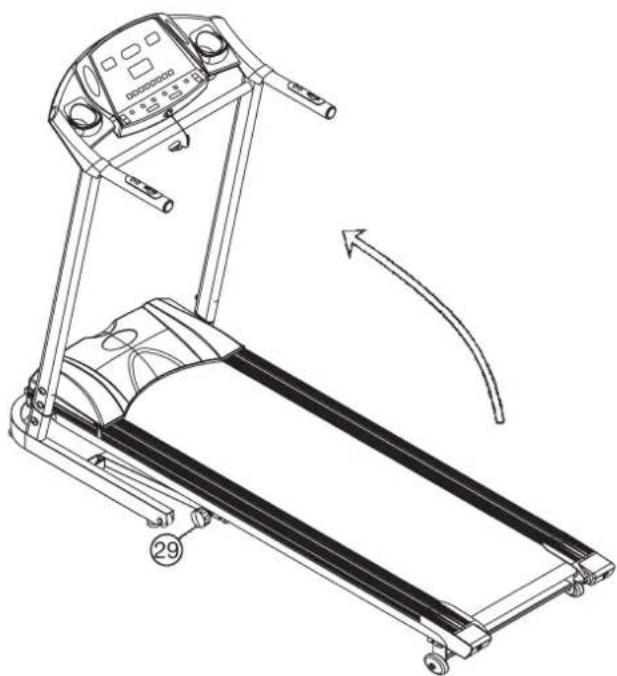
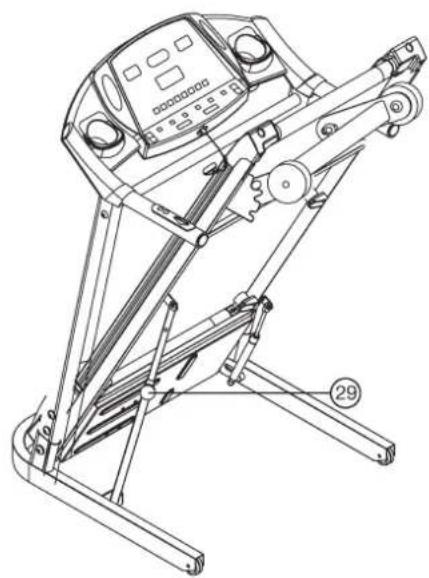
How to move/store your treadmill:
- Pull the locking knob (29) and place your hand on the end cap of the system frame then folding the system frame up and lock it with locking knob.
- Place your hands on top of the handrails, than lean the machine toward your body sideways, this way you can move it easily.
Maintenance and adjusting
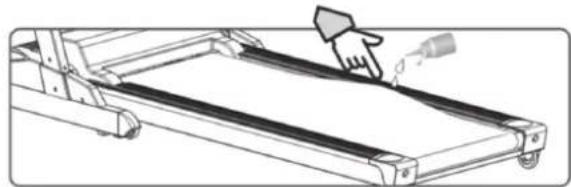
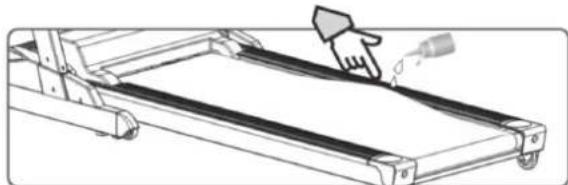
1. Lubrication for the running belt:
In order to keep the machine in the best condition, please add some Silicone oil between the running belt and the running board after 50 hours or 1 to 2 month of use. But the running belt may slip, if you lubricate too much. To lubricate the belt please pull the walking belt up and injection the silicone oil into the gap between belt and walking deck.
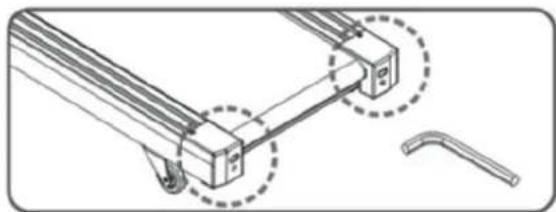
2. Adjusting running belt:
You need to adjust the walking belt to the normal position, per the following steps if it is off.
- Set speed at 3-5km.
- Using the Allen key to adjust the belt tension bolt on the end cap of the system frame.
- If you want to move the belt towards left, turn the right tension bolt clockwise.
- If you want to move the belt towards right, turn the left tension bolt clockwise.
- If you have already done according to the steps above and it is still not at the good range, then the running belt should be damaged already, please contact your local dealer for replacement.
3. No light on the Display:
- Check if the power plug is properly connected.
- Check if the safety key on the computer is in place.
- Check if the wire in the right post is properly connected.
- Check the fuse and put in again if necessary.
Remind! Before you inspect any wire or electrician part, please ensure that the Power supply has been turned off.
4. Running belt slips:
- Make sure the walking belt is not too loose.
- Make sure the motor belt is not too loose.
5. Abnormal noise from the machine
- Check if any screw of machine is loose.
- Check if the motor belt is off.
- Check if the running belt is off.
Note:
Please contact your local dealer if you have checked all the above listed things but the problem is still there.
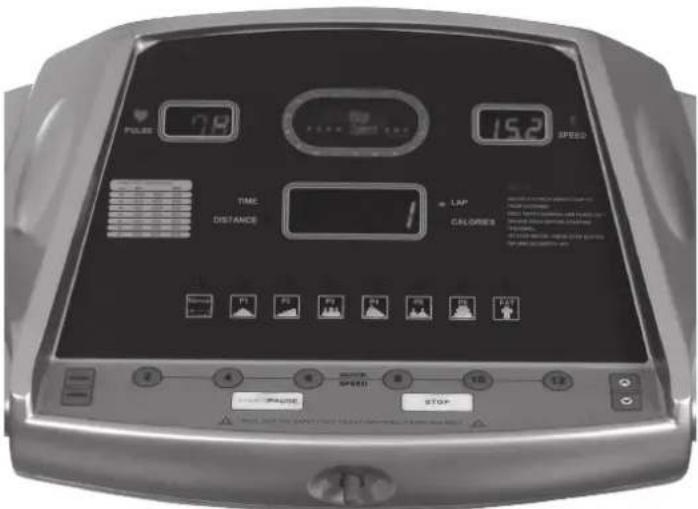
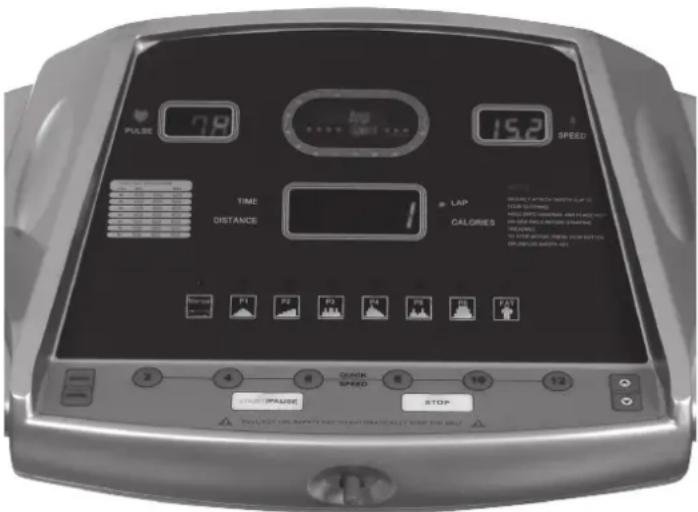
The instruction of windows and key:
1. Three windows display the details of all functions.
A: left window display:pulse data.
B: right window display: speed data.
C: center window scan display of the data of: time, distance cal- lories an RACETRACK number. When the window display a data, the LED of the relevant function will light.
D: As playground in the computer sticker is 18 pcs LED of RACE-TRACK, one cycle is 400M.
E: There are manual mode, time down mode, distance down mode, calories down mode and the LED of TIME,DIST,LAP,CALO around the center window.
2. Function key: program, mode, start/pause, stop, speed up, speed down.
A: PROGRAM key:on the stop status,press program key can select Program circularly :normal manual mode->time down mode-distance down mode->calories down mode->P1->P2->P3->P4-P5->P6->fat->normal manual mode->--/
B: MODE key: on the no setting status, press MODE key can select the display of center circularly :fix display of time->fix display of distance->fix display of calories->fix display of lap number->scan display time->scan display distance->scan display calories->scan display lap number->fix display time->-- when it is in scan, each function displays for 5 seconds If on the fat mode, the operation of MODE key will be recommended in the introduction of FAT.
C: START/PAUSE key: if stop status, press key, the motor will running,If start status, press key, the motor will slow stop.
D: STOP-Key: Press this key to stop the selected program.
The running surface stops slowly.
E: SPEED UP key:if setting status,press key will increase setting value.If the motor running status,press key will up speed value.
F: SPEED DOWN key:if setting status,press key will reduce setting value If the motor running, press key will down speed value.
3: SPEED shortcut key: 2KM/H,4KM/H,6KM/H,8KM/H,10KM/H,12KM/H In the motor running, press one of keys will let the speed of motor as display value.
4: Direct Program-keys:
With these keys you can select directly the programs.
The instruction of PROGRAM:
1: The manual mode include:normal mode, time down mode, distance down mode, calories down mode
2:6 speed programs:P1,P2,P3,P4,P5,P6.
3:1 fat test mode
5:MANUAL MODE:
1: How to start manual mode:
A: Turn the power switch on, it enter the normal manual mode
B: Put the safety key out faceplate in any status, then Put the safety key into Faceplate again, it will go into the normal manual mode and the speed window will display "--" with the buzzer beep each seconds
C: On stop status,press program key can go into the normal manuual mode
2: Three counter down mode: time down, distance down, calories down.
A: On the beginning of normal mode, the center window will display time:0:00, and the relevant LED will light.
B: On the normal manual mode, Press program key, it will enter time down mode, the center window will display time, the initial value is 30:00, press speed up or down key setting value The range is:10:00-99:00. At the same time, the relevant LED will light.
C: On the time down mode, Press program key, it will enter distance down mode, the center window will display distance and light, the initial value: 1.0km, at the same time, the distance LED will light, press speed up or down key can set the value of distance, the range is: 1.0-99.90km.
D: On the distance down mode, Press program key, it will enter calories down mode, the center window will display calories and light, the initial value: 50kcal. At the same time, press speed up or down key can set the calorie's range: 50-9990kcal
RANGE OF ALL FUNCTIONS:
| INITIAL INITIAL SETTING DISPLAY VALUE RANGE | ||||
| TIME(MIN:SEC) | 0:00 | 30:00 | 10:00-99:00 | 0:00-99:59 |
| SPEED(KM/H) | 0.0 | N/A | N/A | 1.0-12.0 |
| DISTANCE(KM) | 0.00 | 1.00 | 1.00-99.90 | 0.00-99.99 |
| PULSE(BPM) | P | N/A | N/A | 40-199 |
| CALORIES(KCAL) | 0 | 50 | 50-9990 | 0-9999 |
6: THE OPERATION OF MANUAL MODE:
1 press START/PAUSE key, the motor will start to run, the initial speed is 1.0km/h.
2 Press speed up or down key to adjust value of speed.
3 press START/PAUSE key again the motor will be slow down until stop.
4 press START/PAUSE again, the speed will increase slowly until the value as the display in the window.
5 press SPEED shortcut key will adjust speed quickly.
6 Put the safety key into from faceplate, the motor will stop quickly, the speed window display ,-- "the buzzer beep one second. Put the safety key on faceplate, it will then enter normal manual mode. All parameter reset to zero.
7 When the setting time count down to zero, the speed will be slow down until stop the buzzer beep each one second for five times, then the center window change to fix display time, press START/PAUSE key, the speed will increase slowly until the value as the display in the window, the time will be in counter up.
8 When the setting distance count down to zero, the speed will slow down until stop the buzzer beep one second, then center window change to fix display distance, press START/PAUSE key, the motor start form 1.0km / h the speed will increase slowly until the value as the display in the window, the distance will count up.
9 When the setting calories count down to zero, the speed will slow down until stop the buzzer beep one second, then the cen
ter window change to fix display calories, press START/PAUSE key,the motor start form 1.0km / h the speed will increase slowly until the value as the display in the window ,the calories will count up. 10 if the value no setting will counter up.
7:PROGRAM MODE:
1 initial setting time is 30mins, press speed up or down key to adjust value.
2 press START/PAUSE key, the motor will start to run, speed according to the inner setting value of program.
3 press speed up or down key can adjust speed.
4 press SPEED shortcut key can set speed as the setting value from speed key.
5 each program is 10 speed level
6 press START/PAUSE key, the speed will slow down until stop.
7 press START/PAUSE key, the speed will increase slowly until the value as the display in the window from 1.0KM/H.
8 only can set time, the setting time range: 10:00-99:00 min
9 When the setting time count down to zero, the speed will slow down until stop the buzzer beep each one second for five times, then the center window change to fix display time, press START/PAUSE key, the motor start form 1.0km / h , the speed will increase slowly until the value as the display in the window. When the time count up, each inner setting value of time can function for 1:30 and it will function again each half hour.
10 Put the safety key out from faceplate, the motor will stop quickly, the speed window display - - - " , the buzzer beep one second. Put the safety key into faceplate, it will then enter normal manual mode. All parameter reset to zero.
play 170(mm),press speed up or speed down to adjust range of stature(range:100-200mm)
6: press mode key to enter the setting weight,pulse window display 70(kg),press speed up or speed down to adjust weight(weight range:20-200kg)
7: press mode key to enter the setting body fat testing, pulse window display 00(xx%), the user must put two hands on pulse sensor for 8 seconds, the pulse window will display body fat testing value.
PROGRAM SPEED TABLE:
| P1 P2 | P3 P4 P5 | P6 | ||||
| S1 1.0 | 1.0 1.0 | 1.0 | 1.0 | 1.0 | ||
| S2 1.5 | 2.0 3.0 | 4.0 | 3.0 | 3.0 | ||
| S3 2.5 | 2.0 6.0 | 6.0 | 6.0 | 6.0 | ||
| S4 3.5 | 3.0 3.0 | 8.0 | 3.0 | 8.0 | ||
| S5 4.5 | 3.0 6.0 | 6.0 | 2.0 | 8.0 | ||
| S6 4.5 | 4.0 6.0 | 5.0 | 3.0 | 8.0 | ||
| S7 3.5 | 4.0 3.0 | 4.0 | 6.0 | 8.0 | ||
| S8 2.5 | 5.0 6.0 | 3.0 | 3.0 | 6.0 | ||
| S9 1.5 | 5.0 3.0 | 2.0 | 2.0 | 3.0 | ||
| S10 | 1.0 | 1.0 | 1.0 | 1.0 | 1.0 | 1.0 |
Function of safety key
Put the safety key out from faceplate on any status, the speed window display is (- - - - - - - - - - - - - - - - - - - - - - - - - - - - - - - - - - - - - - - - - - - - - - - - - - - - - - - - - - - - - - - - - - - - - - - - - - - - - - - - - - - - - - - - - - - - - - - - - - - - - All parameter reset to zero.
FAT TESTING:
1: When the motorized treadmill stop, press program key can select body fat.
2: the pulse window display setting value.
3: After enter the function of body fat testing, it expresses sex, pulse window display 01 for man, press speed up or speed down key to select 01 (man) or 02 (woman)
4: press mode key to enter the setting of age, pulse window display 30 (years old), press speed up or speed to set age (age range:1-99).
5: press mode key to enter the setting stature ,pulse window dis
Training instructions
You must consider the following factors in determining the amount of training effort required in order to attain tangible physical and health benefits:
1. Intensity:
The level of physical exertion in training must exceed the level of normal exertion without reaching the point of breathlessness and / or exhaustion. A suitable guideline for effective training can be taken from the pulse rate. During training this should rise to the region of between 70% to 85% of the maximum pulse rate (see the table and formular for determination and calculation of this).
During the first weeks, the pulse rate should remain at the lower end of this region, at around 70% of the maximum pulse rate. In the course of the following weeks and months, the pulse rate should be slowly raised to the upper limit of 85% of the maximum pulse rate. The better the physical condition of the person doing the exercise, the more the level of training should be increased to remain in the region of between 70% to 85% of the maximum pulse rate. This should be done by lengthening the time for the training and / or increasing the level of difficulty.
If the pulse rate is not shown on the computer display or if for safety reasons you wish to check your pulse rate, which could have been displayed wrongly due to error in use, etc., you can do the following:
a. Pulse rate measurement in the conventional way (feeling the pulse at the wrist, for example, and counting the number of beats in one minute).
b. Pulse rate measurement with a suitable specialised device (available from dealers specialising in health-related equipment).
2.Frequency
Most experts recommend a combination of health-conscious nutrition, which must be determined on the basis of your training goal, and physical training three times a week. A normal adult must train twice a week to maintain his current level of condition. At least three training sessions a week are required to improve one's condition and reduce one's weight. Of course the ideal frequency of training is five sessions a week.
3. Planning the training
Each training session should consist of three phases: the warm-up phase, the training phase, and the cool-down phase. The body temperature and oxygen intake should be raised slowly in the warm-up phase. This can be done with gymnastic exercises lasting five to ten minutes.
Then the actual training (training phase) should begin. The training exertion should be relatively low for the first few minutes and then raised over a period of 15 to 30 minutes such that the pulse rate reaches the region of between 70% to 85% of the maximum pulse rate.
In order to support the circulation after the training phase and to prevent aching or strained muscles later, it is necessary to follow the training phase with a cool-down phase. This should be consist of stretching exercises and /or light gymnastic exercises for a period of five to ten minutes.
You find further information on the subject warm-up exercises, stretch exercises or general gymnastics exercises in our download area under www.christopeit-sport.com
4. Motivation
The key to a successful program is regular training. You should set a fixed time and place for each day of training and prepare yourself mentally for the training. Only train when you are in the mood for it and always have your goal in view. With continuous training you will be able to see how you are progressing day by day and are approaching your personal training goal bit by bit.
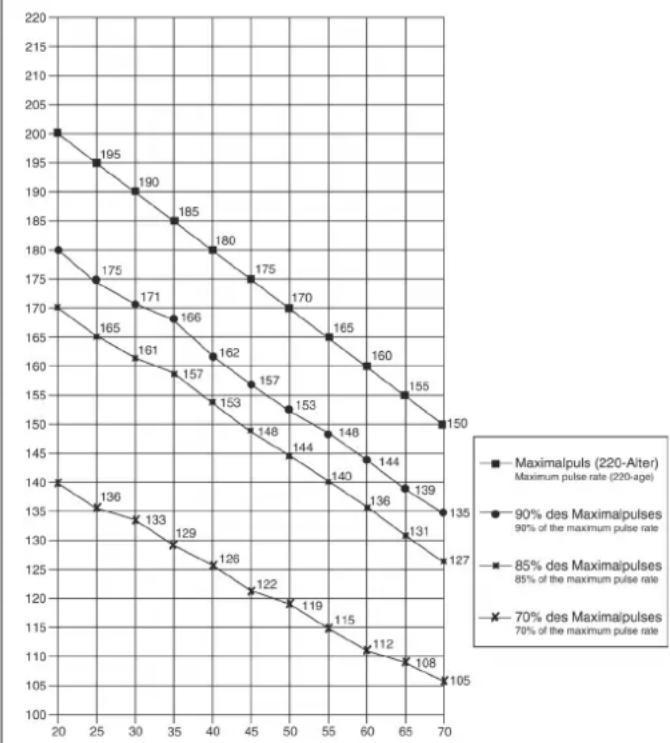
Calculation formula: Maximum pulse rate = 220 - age (220 minus your age)
90% of the maximum pulse rate = (220 - age) x 0.9
85% of the maximum pulse rate = (220 - age) x 0.85
70% of the maximum pulse rate = (220 - age) x 0.7

Sommaire
Chere cliente, cher client,
Linker beeldscherm (puls):
3. Planning van de training
I03dpabnem Bac nokynkTpeHnpoBouHOrO Chapda dIa domaunx 3aHTn Cnoptom I xenaem Bam cambix npaTHbX BneatneHn.
Cneynte, noxanynta, yka3aHnM n HNCTpyKUm HaWero pyKOBOdCTBa no MOHTaxy NkCNIyatau.
Ecnn y Bac Bo3HnKHyT KaKne-Hn6yDb Bonpocbl, To Bbl MoKeTe B JIO6oe Bpem 6e3 CteCHeHn ObaaTaBc K Ham.
CybaeHHnB,BaW
3. OTCyTCTBnE INHdNkauHH:
- PpOBepbTe, BKNIOueH Nn WtENCeNB WtENCeBHyO pO3eTKy HAXoDNTCH Nn PO3ETKa NOd HAnPaxKeHNEM.
- Поверпг, Вклочен Лгавньий Вьклочать Ha OCHOBHЯ pame и haxoДNTСЯ КИLOЧ БЕЗONACHOCТи Ha npeДHAЧЕHHOM ДЯ HERO MeCTe HA KOMПьOTepe.
- PpOBepbTe uTeKePbHeIe COeINHeHnB I npaBOr Tpye OCHOBaHnA.
- PpOBePbTe ppeoXpaHnTeIb n eCn OH HeNCnPpABeH, 3aMeHnTe erO
4. Berobar nobepxhoctb cKoIb3nt:
- Berobar nobepxHocb HenpaBnIbHO haTHyTa. Kpenye 3aBePHte oba BnHTa Ha 3aDHnx KOJIpaKax.
- KlnHOBOI pemeHb HnpaBnJIbHO HaTHyT.
- YdaNTb C NOMOUBIO caNcEeTKN H3NIuKIN CMa3KN.
5. NocToPOHHM Wym
- PpOBeBpTe, KpenKO JIN 3aBnHcHb BnHTOBbl COeDnHeHa.
2.Поверпглockи ремь. - IpoBepbTe 6eROByHO NOBepxHOCTb.
3ameyahne:
B cnyuae, ecn depeKT HeBO3MOXHO nCnpaBt b c NOMOsbIO BbiwepepeuNCHeHHbIX COBToB, o6paNTecb 3a NOMOsbIO B Maar3H, rde Bby Kynnn TpeHaXep, nn K npoN3BODntEnIO.
Onncahne KomnbioTepa nla 6eroB0n 1141
DyHKmH:
JebbI dncnnei (Puls):
HnKauaYacToTb6eHn cepda (npn KOHTaKe pyk c ceHCopam n3Mepnten nyIbca)
PpaBbI nnCnnei (km/h):
HnkaCkopoCTn6eBOBdoPOXKnBKM/
CpeHn 6oJbwo nnIe:
HnIkaun BpeMeHH, paCCTOaHna (KM), npu6n. pacXoN kaIopn (Kkan), KOINueCTBO npOIeHHbIX KpyroB
KoIueCTBO npoJdeHHbIX Kpyrob :
HnDnKaun npoJdeHHbIX no cTaAnOHy kpyroB. KaKdbn Kpyr COOTBeTCTByeT 400 m n pa3deneHa 18 CBETruxxCr ToeK
Zeit/Bpemr:
HnDnkaun npoJOnjNtEnbHOCTn TpeHnpOBKn
HnIkaun DaCTaHun, npeoJoneHHaB XOe TpeHnpOBKn B KNILOMeTpax
Kalorien / KaJOpn:
HnDkaunpnp6J.pacxoJaKaIopnB XoTe TpeHIpOBKn B KkAn
Rundenanzeige / KoluuecTBo npoiDeHHbIX KpyroB:
HnDkaIINpOJdeHHbIX NO cTaADHOy KpyROB.
Knabnu:
KnaBn2,4,6,8,10,12 (KM/):
Pn Haxatnn Ha 3TN KnaBmN CKOPOCTb ABToMaTHueCKn yCTaHaBnBaETcHr COOTBeTCTBeHHo BbIpaHHy CKOPOCTb
Programm/Поррамma
PnnaHaxatnHa3Ty KnaBnUy BbMoKeTe Bb6paTb nporpamMy TpeHnpOBKn (nporpamMy pyuHoi yCTaHOBKn, nporpamMy BpemeHN, nporpamMy pacCToHnN, nporpamMy paCXoOBoHnKanOpn, nporpamMy ckopocTn P1-P6, nporpamMy aHaIIN3a KOJIueCTBa Xnpa TeNa)
Pporpamma KnaBn npBmBx Bb6opOB
C 3TIMN KnaBnAmn OH N MOrY T HeNoCpeIcTBeHHO BblbnpaTb nporpaMbl.
MODE-KJabmua:
Pn Haxatnn Ha 3Ty KnaBnuy Bb MoKTe Bb6paTb onpeIeHHbI nokaTeIb nn aKtNBn3npoBaTb cyHKcHIO Scan. (Scan = Bce nokaTeIb BbcBueHbaOTcNo OyepEn C nepnoDnHocTbIO 6 cekynd)
C nomoubIO 3ToI KJIaBnU Bbl MoKTe TaKaXe 3aDaBaTb
Heo6xOaMbIe npaMeTpbl B nporpaMme aHaJIIN3a KOJIueCTBa Xupa TeNa.
Start/Pause/CTapt
Pn HaxaTn Ha 3Ty KnaBnuy BbIbpaHnA nporpaMMA BKNIOaTeCn INBbIKNIOaTeCn I6EROBa NOBepXHOCTb HAINHaET DBNrA TcC c 3aJepKko5cekyHd.
KnaBnua ,cTOn
HaxnmaOT 30I KJIaBNIe KOHBeNep OCTaHaBnBaET yCTaHOBnEHHyo nporpamMy. IpoteKTop OCTaHaBnBaETcra 3ameJeNo.
KnaBwa,▲“:
Pn Haxatn Ha 3Ty KnaBnuy Bb moKTe yBeHnHTb CKOpocTb BO Bpemr TpeHnpOBKn. B coCToHn NOKo C NOMOuBIO 3ToN KnaBnBu MoKTe 3aDaTb Heo6xoDnMbIe npaMeTpbl.
KnaBnua _·
Pn Haxatn Ha 3Ty KnaBnuy Bby MoKeTe yMeHbUnTb CKOpocTb BO Bpemr TpeHnpOBKn. B CoCToRHN NOKOc NOMOuBIO 3ToN KnaBnBu MoKeTe n3MeHntb 3aDaHHbIe napaMeTpbl.
Pporpamma pyuHOn yctaHObKn
PporpaMMbI C cJIeBbIMN NOKa3aTeJAMN BpeMeHn, pacCToHHN u pacXoJa KaIOpn
C NOMOJIbIO KJIaBNIIN Programm BbI6epNTe CEJIeByIO nporpaMMy BpemHn (Zeit).Ha cpeHem DIncJIeE BbICBeuNBAETCn NOKa3aTeJIb 30:00 MNHT. 3TOT NOKa3aTeJIb Bbl MoKTe N3MeHnTb C NOMOJIbIO KJIaBNIU ^ n ^ B dIna3OHe OT 1:00 Do 99:00 MNHT. IIN HauJana TpeHnpOBKn HaxMnTE Ha KJIaBNIuY Start/ Pause /CTapt IN BBICTaBNTe JekAeMyIO CKOpocTb. HauHnaETCn OTCHT BpemHn NO y6bIBaIOUe.Ipn IOCTNXeHn NOKa3aTeJIa 00:00 MNH. pa3daeTcR 3ByKOBoi CnHaN II 6erOBaI dopoxka OCTaHaBNIBaETCn.
PporpammaC cIeIeBbIM NokaatEnm pacCTOHHN:
C nOmoIIO KnaBnIN Programm BbI6epIne TcneBeyIO nporpaMMy pacCToHHa. Ha CpeHem DncJIee BbICBeHyBaETcN oKa3aTeNb 1 KM. 3TOT noka3aTeNb Bbl MoKte NImeHTb C nOMOuBo KnaBnU △" "N▼" B dHaNa3OHe ot 1:00 do 99:90 KM.ДЯ NaHauJa TpeHnpOBKn HaxMnTe Ha KnaBnUw Start/Pause / Ctap N BbICTaBNTe XeJenaMyIO cKOpocTb. HauHaeTc OTCyET BpemeHn NO y6bIbAioSei. Ppr DoCTnxKeHH NOKa3aTeN 0 KM pa3daETc 3ByKOBoI CNrHaII N 6erOBaI Dopokka OcTaHaBnIBaETcN.
Pporpamma C ceneBbim nokaateJeIe pacxoJa KaJOpn:
C nomoouk KnaBn Programm BbIbepnte ueJeByIO nporpammy pacxoanda Kaonopn. Ha cpeHem dncnnee BbcBceuBaetcnoka3aTeNb 50 Kkan. 3TOT noka3aTeJb Bbl MoKeTe N3MeHNTb C nOmoUBO KlaBn,▲"n,▼" B Dnana3oHe ot 50 do 9990 Kkan.ДнhaHaJa TpeHnpOBKn HaxMnte Ha KnaBnSy Start/Pause /CTapt n BBCTabNTe XeJaEMyO ckOpocTb. HaunHaETc OTCHT BpeMeHn no y6bIbaIouei. Ppi DocTxKeHHN oka3aTeN 0 Kkan pa3daertc
3ByKOBoN CnHaJI N 6eROBaI DOpOxKa OcTaHaBJIbAeTcH.
BbOa daHHbIX:
| INITIAL | INITIAL VALUE | SETTING RANGE | DISPLAY RANGE | |
| TIME(MIN:SEC) | 0:00 | 30:00 | 10:00-99:00 | 0:00-99:59 |
| SPEED(KM/H) | 0.0 N/A | N/A | 1.0-12.0 | |
| DISTANCE(KM) | 0.00 | 1.00 | 1.00-99.90 | 0.00-99.99 |
| PULSE(BPM) | P | N/A | N/A | 40-199 |
| CALORIES(KCAL) | 0 | 50 | 50-9990 | 0-9999 |
Dnarpammbi nporpamm P1-P6
Ioka3aTeNb, IpeBapuTeNbHO 3aAHHbI NOKa3aTeNb, Bo3MOxHocTb 3aAHHN NOKa3aTeJe, INDnKaun NOKa3aTeJe
C nomoBIO KnaBnI Progamm Bb6epnte Ody n3 6
pa3nHbIX nporpamM ckopocTn. B 3TNx nporpamMax
3aDaHHoe BpeM pa3dJIeTcH na 10 INTEPBAIOB nCKOPOCTb
MeHaeTcABTomATnueckn KaK NOKa3aHO B Ta6Ntce BHn3y.
JIIOBOE n3MeHene CKOpocTn (S1-S10) cnpoBoXdaETcH
3-x CEkyHdbIM aKyCTnueckm CnHAnOM, OTCHTbIBaIOUIM
ceKYHdbI no y6bIbAIOSei. C HaxKaTHm Ha KnaBnUy START/
Pause /CTapt TpeHnpOBKa HauHHaTcH. Pocne OKOHuaHn
nporpAMMbI pa3daeTc3ByKOBo CNrHan n 6eroBaJdoPoxkA
ocTaHaBnIBaEtcH. DnI npepBaHn I nporpAmMbI HaxMITE Ha
KnaBnUy START/Pause /CTapt.
Pporpammbi ckopocn P1-P6
| P1 P2 | P3 P4 P5 P6 | ||||||||
| S1 1.0 | 1.0 | 1.0 | 1.0 | 1.0 | 1.0 | ||||
| S2 1.5 | 2.0 | 3.0 | 4.0 | 3.0 | 3.0 | ||||
| S3 2.5 | 2.0 | 6.0 | 6.0 | 6.0 | 6.0 | ||||
| S4 3.5 | 3.0 | 3.0 | 8.0 | 3.0 | 8.0 | ||||
| S5 4.5 | 3.0 | 6.0 | 6.0 | 2.0 | 8.0 | ||||
| S6 4.5 | 4.0 | 6.0 | 5.0 | 3.0 | 8.0 | ||||
| S7 3.5 | 4.0 | 3.0 | 4.0 | 6.0 | 8.0 | ||||
| S8 2.5 | 5.0 | 6.0 | 3.0 | 3.0 | 6.0 | ||||
| S9 1.5 | 5.0 | 3.0 | 2.0 | 2.0 | 3.0 | ||||
| S10 1.0 | 1.0 | 1.0 | 1.0 | 1.0 | 1.0 | ||||
Klou6be3oNachoctn
KlIOU 6e3oNaChOCTn CnykNT DnA CTpaxOBKn B Cnyuae ONaChOCTN. OH dONKeH HAXODITbCA HA KOMNbIOTpe npn BKIOUeHn DOpOKKn n npn ee NOB3OBaHN. POnb3yntecb KIOUOM 6e3oNaChOCTn npn KaKdoT TpeHnpOBKe. OH cNyKNT DnA BaSeH N 6e3oNaChOCTn n DeJaET BO3MOXHBIM 3KCTpeHHoe TOPMOxHe 6eROBoDopOKKn. EcIn N KIOU 6e3oNaChOCTn He HaxODITcH HA KOMNbIOTpe, To Ha DInCIIIEe BBIOIDITcH INDINKAUNR - - - . Iocne TORO, KaK KIOU 6e3oNaChOCTn 6yET NOLOXeH Ha KOMNbIOTep, BCE 3HaueHn CTABATCB H Nbl N KOMNbIOTep RotOB K pa6ote.
AhaHn3 KOInuecTbXknpa TeJa:
C nomoou KnaBn Programm Bb6epnt nporpaMMy n3mepeHn coepkaHn Xnpa TeHa. C nomoou KnaBn mode 3aJaTe Heo6xOIMbIe dIy n3mepeHn daHHbIe.
- 3aai Te Baw non. yTo 03Haaret MyckoH. Ha JEBOM dncnnee (Puls) nokaataIb MoKet 6bIb N3MeHc NMOUIO KJIaBNI 一 I N 一 H a 一 O 2 ^ ,yTo 03Haaret XeHCKN.
- 3aai Te Baw Bo3pact. Ha JEBOM dncnnee (Puls) nokaataIb
«25» MoKET 6bITb N3MeHEn C NOMOuBIO KJIaBnU «▲» N «▼» B dHaana3oHe oT 1 do 99 neT.
-
3aainte Bau poct. Ha neBOM dinCnnee (Puls) nokaataenb «170» MoKet 6bItb N3MeHeH C NOMOuBo KnaBnU «▲» U «▼» B dinaana3ohe ot 100 do 200 cm.
-
3aai Te Bau Bec. Ha IeBOM dncnnee (Puls) nokaataenb «70» MOKeT 6bIb H3MeHc NOMOuBIO KJIaBnU «A» N «V» B dnaana3oHe ot 20 do 200 kr.
Tenepb haxmte Ha KlaBnuy START n 3mepeHne coepkHa Hxupa TeHa HauHetc. Cpa3y Jke noCHe HxkaTnHa KnaBnuy START noLoXnTe pyKn Ha ceHcOpbl 3mepeHnnybca (npn6n.8 ckynd). CoepkHaHne Xupa TeHa B npoceHtax bdyet paCHTaHo N BBICBTnTBcH Ha npabOM dncnnee (km/h).
BbdoJXhbyyntbBaTcIeDyOuueΦaKTopbI,TO6bI ONpeDeHnTB BepHbI npametpbI TpeHNPoBOK dNl DOCTNXKeHH OuyTMbIX cN3HecKnx pe3ynbTaTOB INoJIb3bl DnI 3dOpOBBA.
1. HHTeHCMBHOCTb
YpOBeHb Hn3uecknx Harpy30k npn TpeHnpOBkax Donxhen npeBbIaTb ypOBeHb HopMaIbHbIX Hn3uuecknx Harpy30K, HO Bbl He DonJXbbl 3aDbXaTcN CnIbHO nepeyTomIbCra. YDObHO mepo 3ΦeKTHBHOCTN tpeHnpOBKn Moxtet CnyKntb qactota PnIbCa. Bo BpEMr TpeHnpOBKn qactota PnIbCa Moxtet DOCTNAtb 70-85% OT MAKCMAmlbHO (CMOTPN TabnU yΦopMynrp dnn ONpeDeHEN n paCeta). B nepByIO HeDenIO qactota PnIbCa DOJIbKA OCTaBaTb HA NIXKHe OTMeTKe 3To O6NaTn, T.e. OKono 70% OT MAKCMAmlbHO. B nocNeIyUOUIne HeDenNI MeCAZb IacToTy PnIbCa cIeDyET NOCTeHEN Hora NIXBaTb Do 85% OT MAKCMAmlbHO. JIyuae Bcero dnn FhNecCKOr COCTOHN QeLOBeka, BblONHIOUeBO ynpaxHeHH, ecII NaCTota PnIbCa BO3pACTaET, OCTaBaChB B pPeDenAX 70-85% OT MAKCMAmlbHO. 3TO DOCTNAtc TcB YBeJIuHHeHem BpeMeHN TpeHnpOBKn IIyOBoH CNOXHOCTN.
Ecnn Tactota nynbca He noka3aHa Ha dncnnee KOMnbIotepa HIN Bby XOTne npOBepntb Yactoty nplbca, KOtopan, BO3MOXHO, NOkasaHa HeBepHO, BCNECTBne KaKoNn60 OUn6Kn. Bbl MOxTe ppeDpInHrTa CNeDuOuee: A) N3MEpntb Tactoty npbca ObuHbIM CNOOC6OM (NoCCHrTaB KOJIHeCTBO yApobos Nynbca BmHyTu Ha 3anaTbe)
B) N3MEpntb Tactoty npbca c NMOUbIO CneuaIbHorO ycToPcIeCTBa (KOtOpoe MoXHo KYNITb y npOdaBoc CneuaIaIImPOBaHOrO o6OpydoBaHnA
2. Yactota
BolbHnCTBO 3KcNepTOB peKOMeHnyIOT KOM6HuaHIO 3DopOBoDNtBi, KOtOpa OCHOBaHa Ha uei BaaMx TpeHnpOBK, n Hn3Nueckne 3aHrTn3 p3a B HeJeIO. HopMaNbHbB 3PocNb YHeOBek MoXeT TpeHnpOBaTcBdBAJDb I HeJeIO dnn POnDepXaHNr Ero HopMaNbHO Nn3Nuecko fOpMbI. TpExpa3OBeItepeHnpOBKn Heo6xOdmbl dnn yUyWeHHaBaWe Hn3Nuecko fOpMbI yMeHbSeHHa Beca. NdeAInbHa qactota TpeHnpOBok -5 pa3 B HeJeIO.
Makc. yactota nylbca = 220 - Bo3pact
(220-BauBospacT)
90% OT MaKc. qAcToTb nyIbca = (220 - Bo3pact) x 0.9
85% OT MaKc. YaCToTb IyIbCa = (220 - Bo3pact) x 0.85
70% OT MaKc. YacToTbI nylbca = (220 - Bo3pacT) x 0.7

© by Top-Sports Gilles GmbH
D-42551 Velbert (Germany)