
AC 1 - Exercise bike Christopeit - Free user manual and instructions
Find the device manual for free AC 1 Christopeit in PDF.

| Technical Features | Magnetic resistance, 8 resistance levels, LCD screen displaying time, distance, calories, and speed. |
|---|---|
| Dimensions | Compact dimensions suitable for small spaces. |
| Maximum User Weight | 120 kg |
| Usage | Ideal for home training, suitable for beginners and regular users. |
| Maintenance | Regularly check screws and moving parts, clean after each use. |
| Safety | Use on a flat surface, do not exceed the recommended maximum weight. |
| General Information | Easy to assemble, manufacturer warranty, accessories included. |
Frequently Asked Questions - AC 1 Christopeit
User questions about AC 1 Christopeit
0 question about this device. Answer the ones you know or ask your own.
Ask a new question about this device
Download the instructions for your Exercise bike in PDF format for free! Find your manual AC 1 - Christopeit and take your electronic device back in hand. On this page are published all the documents necessary for the use of your device. AC 1 by Christopeit.
USER MANUAL AC 1 Christopeit
Assembly and exercise instructions for Order No. 1103

- Summary of Parts Page 3 - 4
- Important Recommendations and Safety Information Page 13
- Parts List Page 14 - 15
- Assembly Instructions With Exploded Diagrams Page 16 - 18
- Mount, Use & Dismount Page 19
- Computer instructions Page 20
- Training Instructions Page 21
Dear customer,
We congratulate you on your purchase of this home training sports unit and hope that we will have a great deal of pleasure with it. Please take heed of the enclosed notes and instructions and follow them closely concerning assembly and use.
Please do not hesitate to contact us at any time if you should have any questions.
Important Recommendations and Safety Instructions
Our products are all tested and therefore represent the highest current safety standards. However, this fact does not make it unnecessary to observe the following principles strictly.
- Assembly the machine exactly as described in the installation instructions and use only the enclosed, specific parts of the machine. Before assembling, verify the completeness of the delivery against the delivery notice and the completeness of the carton against the assembly steps in the installation and operating instructions.
- Check the firm seating off all screws, nuts and other connections before using the machine for the first time and at regular intervals to ensure that the trainer is in a safe condition.
- Set up the machine in a dry, level place and protect it from moisture and water. Uneven parts of the floor must be compensated by suitable measures and by the provided adjustable parts of the machine if such are installed. Ensure that no contact occurs with moisture or water.
- Place a suitable base (e.g. rubber mat, wooden board etc.) beneath the machine if the area of the machine must be specially protected against indentations, dirt etc.
- Before beginning training, remove all objects within a radius of 2 metres from the machine.
- Do not use aggressive cleaning agents to clean the machine and employ only the supplied tools or suitable tools of your own to assemble the machine and for any necessary repairs. Remove drops of sweat from the machine immediately after finishing training.
- WARNING! Systems of the heart frequency supervision can be inexact. Excessive training can lead to serious health damage or to the death. Consult a doctor before beginning a planned training programme. He can define the maximum exertion (pulse, Watts, duration of training etc.) to which you may expose yourself and can give you precise information on the correct posture during training, the targets of your training and your diet. Never train after eating large meals.
- Only train on the machine when it is in correct working order. Use original spare parts only for any necessary repairs. WARNING! Replace the worm parts immediately and keep this equipment out of use until repaired.
- When setting the adjustable parts, observe the correct position and the marked, maximum setting positions and ensure that the newly adjusted position is correctly secured.
- Unless otherwise described in the instructions, the machine must only be used for training by one person at a time. The exercise time should not overtake 60 min./daily.
-
Wear training clothes and shoes which are suitable for fitness training with the machine. Your clothes must be such that they cannot catch during training due to their shape (e.g. length). Your training shoes should be appropriate for the trainer, must support your feet firmly and must have non-slip soles.
-
WARNING! If you notice a feeling of dizziness, sickness, chest pain or other abnormal symptoms, stop training and consult a doctor.
- Never forget that sports machines are not toys. They must therefore only be used according to their purpose and by suitably informed and instructed persons.
- People such as children, invalids and handicapped persons should only use the machine in the presence of another person who can give aid and advice. Take suitable measures to ensure that children never use the machine without supervision.
- Ensure that the person conducting training and other people never move or hold any parts of their body into the vicinity of moving parts.
- At the end of its life span this product is not allowed to dispose over the normal household waste, but it must be given to an assembly point for the recycling of electric and electronic components. You may find the symbol on the product, on the instructions or on the packing.
The materials are reusable in accordance with their marking. With the re-use, the material utilization or the protection of our environment. Please ask the local administration for the responsible disposal place. - To protect the environment, do not dispose of the packaging materials, used batteries or parts of the machine as household waste. Put these in the appropriate collection bins or bring them to a suitable collection point.
- This machine is a speed-dependant machine, i.e. the power increases with increasing speed, and the reverse.
- The machine is equipped with 8-speed resistance adjustment. This makes it possible to reduce or increase the braking resistance and thereby the training exertion. Turning the adjusting knob for the resistance setting towards stage 1 reduces the braking resistance and thereby the training exertion. Turning the adjusting knob for the resistance setting towards stage 8 increases the braking resistance and thereby the training exertion.
- The maximum permissible load (body weight) is specified as 120kg . This machine has been tested and certified in compliance with EN 957-1 and -5 "H.C". This item's computer corresponds to the basic demands of the EMV Directive of 2004/108/EC.
Parts List - Spare Parts List AC 1 Order No. 1103
Technical data: Issue: 01.06.2011
Magnetic brake system
- approx. 8 KG flywheel
8-manually adjustable load steps
- Hand Pulse measurement;
- Wheels for easier transportation
- Floor level adjustment
- Body Fat analyse (BMI-BMR)
- Computer with big LCD screen, showing: Speed, time, distance, approx. calories, temperatur, Body fat, SCAN and heart rate.
- Input of limits for time, distance and approx. calorie
Announcement of higher limits.
Max. body weight 120 KG
Space requirement approx. L 102, W 50, H 135 cm
Please contact us if any components are defective or missing, or if you need any spare parts or replacements in future.
Assembly Instructions
Remove all the separate parts from the packaging, lay them on the floor and check roughly that all are there on the base of the assembly steps. Please note that a number of parts have been connected directly to the main frame and preassembled. In addition, there are several other individual parts that have been attached to separate units. This will make it easier and quicker for you to assemble the equipment.
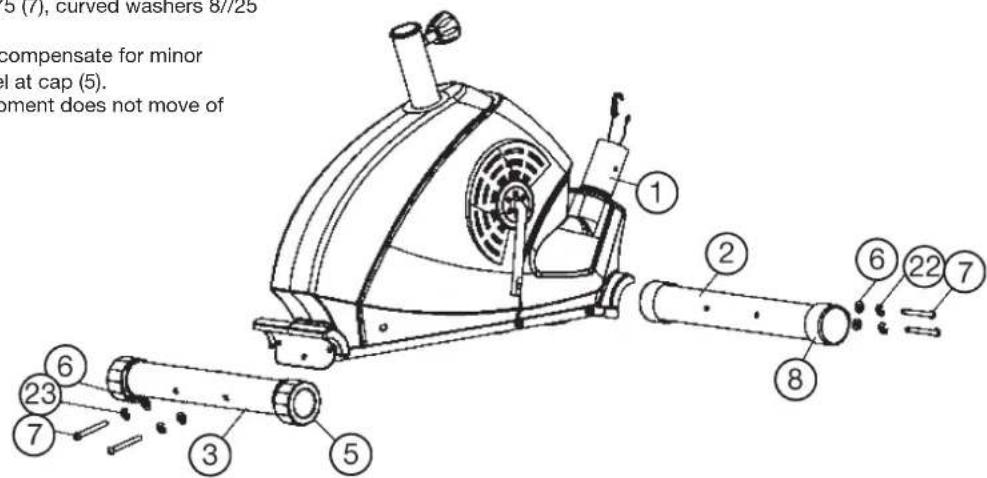
Step 1:
Attach the stabilizer (2 + 3) at main frame (1).
- Attach the front foot (2) with the preassembled transport rollers (8) to the main frame (1). Do this with the two screws M8x75 (7), curved washers 8//25 (6) and spring washers (22).
- Attach the rear foot (3) with height adjustable foot caps (5) to the main frame (1). Do this with the two screws M8x75 (7), curved washers 8//25 (6) and spring washers (22).
After assembly has been completed, you can compensate for minor irregularities in the floor by turning the wheel at cap (5). The equipment should be set up that the equipment does not move of its own accord during a training session.
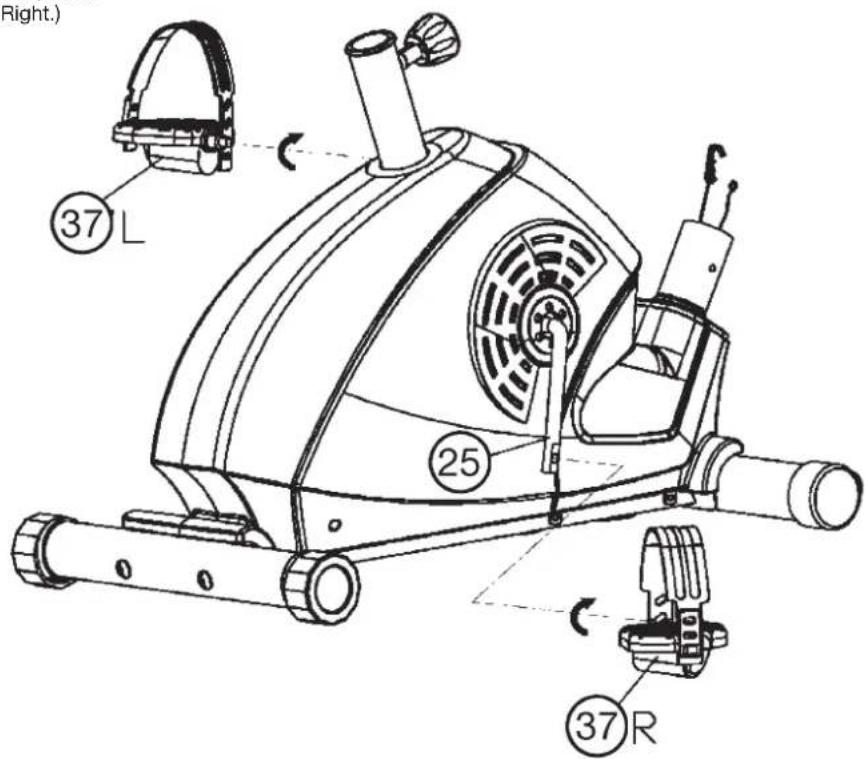
Step 2:
Attach the pedals (37L+37R) at pedal crank (25).
- Screw the right pedal (37R) into the locator in the right-hand side (as seen in operation) for the pedal crank (25) (Note! the screw direction is clockwise).
- Screw the left pedal (37L) into the locator in the left-hand side (as seen in operation) for the pedal crank (25). (Note! the screw direction is anti-clockwise).
- Then mount the pedal straps left and right on the associated pedals (37). (The pedals are signed with "L" for Left and "R" for Right.)
Step 3: Attach the saddle (29) and saddle support tube (34).
- Push the saddle (29) with saddle bracket into the saddle slide (30) and tight it up in desired position.
- Place the saddle slide (30) into the holder of saddle post (34), set it at the desired position and screw it onto the saddle support (34) by washer (32) and star grip nut (33).
- Push the saddle support tube (34) into the matching locator in the main frame (1), set it at the desired position and lock it by inserting the bolt with the quick release (36) in place and doing it up tight. (The setting of the saddle support can be adjusted easily as desired later through turning and pulling the quick release (36).) Furthermore, you must ensure when setting this desired position that the seat pillar is not pulled out of the main frame further than the highest setting position, which is marked.

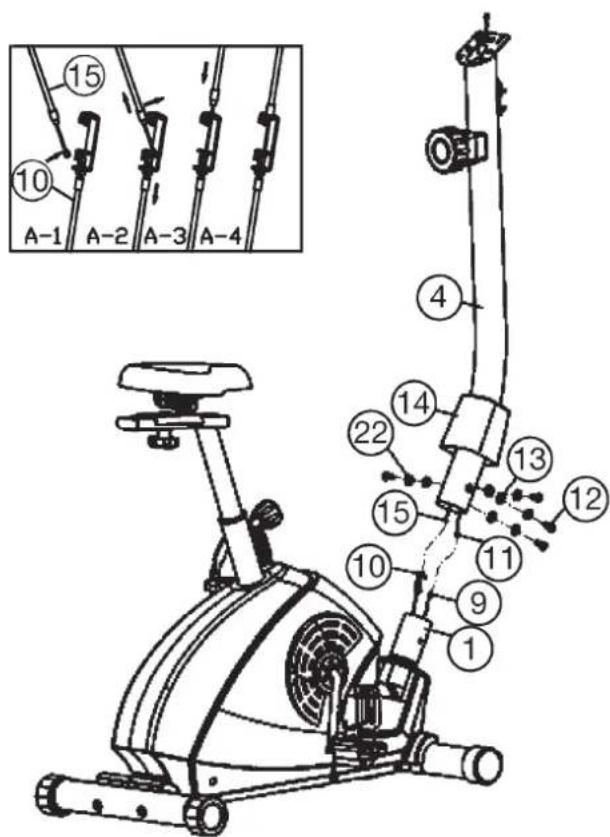
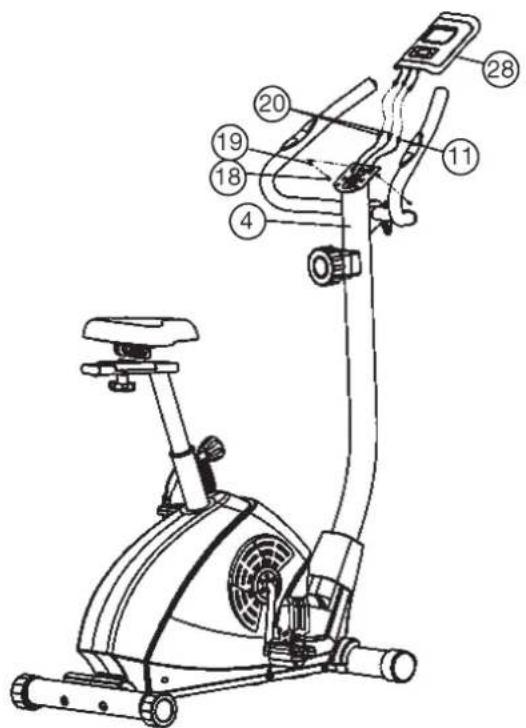
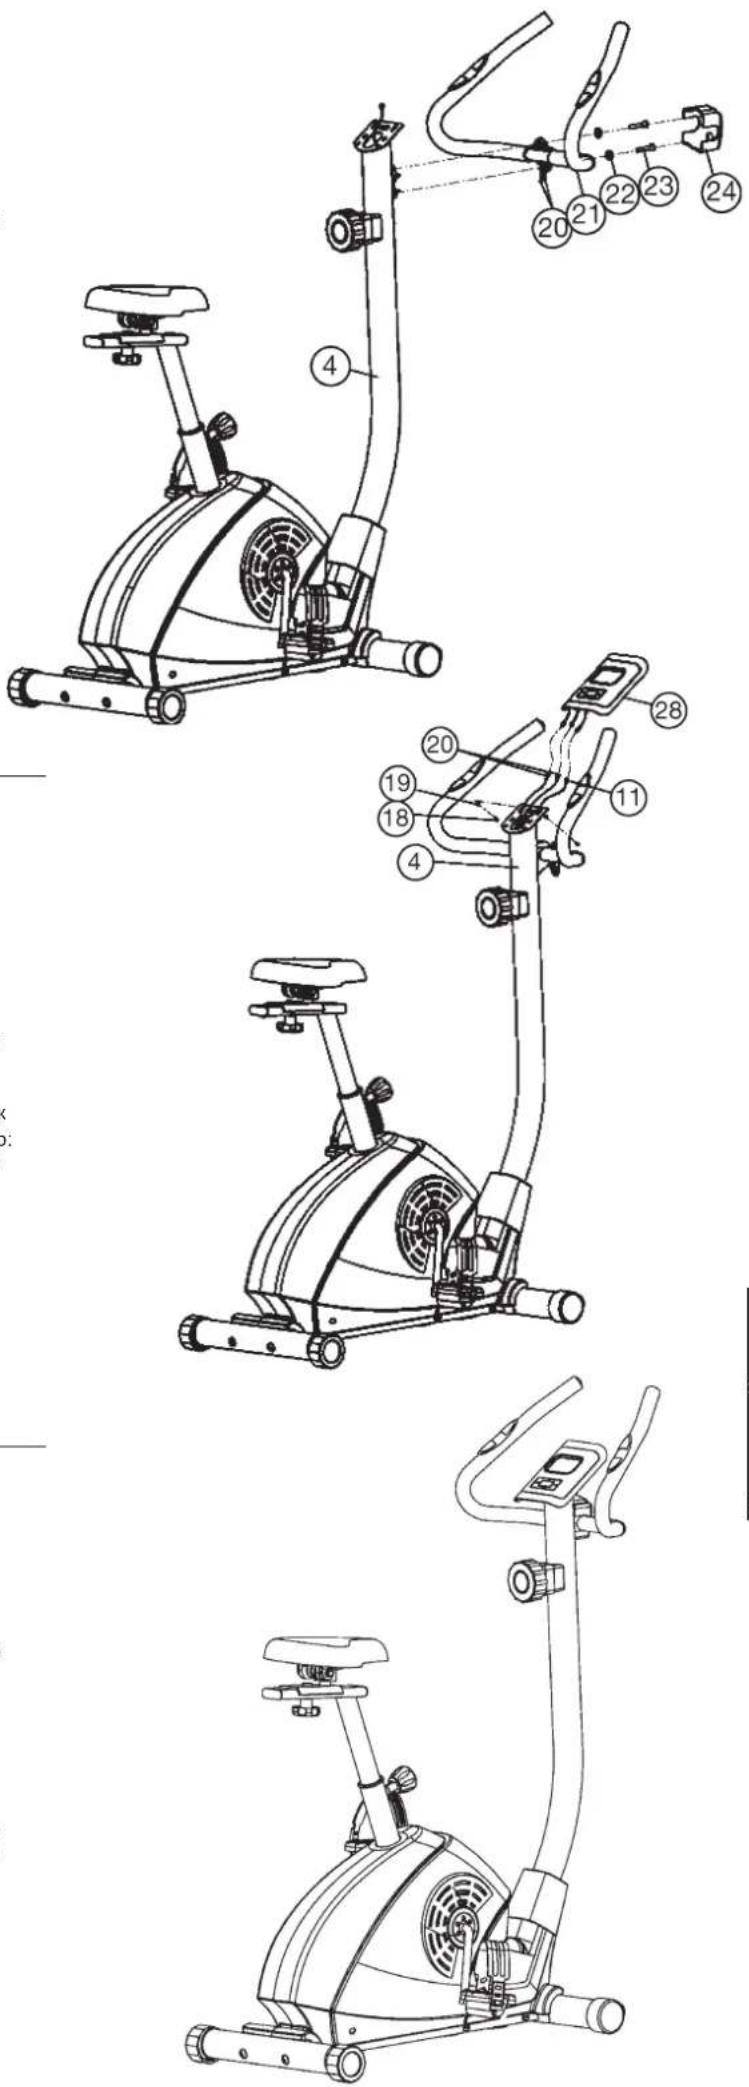
Step 4: Attach the handlebar support (4) at the main frame (1).
- Place the lower end of the support (4) against the main frame (1) and push the handlebar cover (14) onto the support (4).
- Plug the ends of the two computer cable harnesses (11) and (9) projecting from (4) and (1) together. (Note: The computer cable harness (11) projecting from the support (4) must not slide into the tube, as it is required for later steps of installation.)
- Connect the cable of tension control (15) to the bracket of lower section cable tension (10) (See figure A1-A4]. Before this step of the installation, it is advisable to adjust the resistance setting to the position, at which the cable extends furthest from the sheath. Put the lowest part of cable (15) into the small hook of lower tension cable (10) (figure A1). Pull it (figure A2) until the small hook get in higher position (figure A3) and then insert the cable (15) onto the bracket (10) (figure A4). When joining the tubes, ensure that the cable connection is not trapped.
- Put one spring washer (22) and one washer (13) on each screw (12). Push the screws (12) through the holes in the support (4), screw into the threaded holes of the main frame (1) and tighten them firmly.
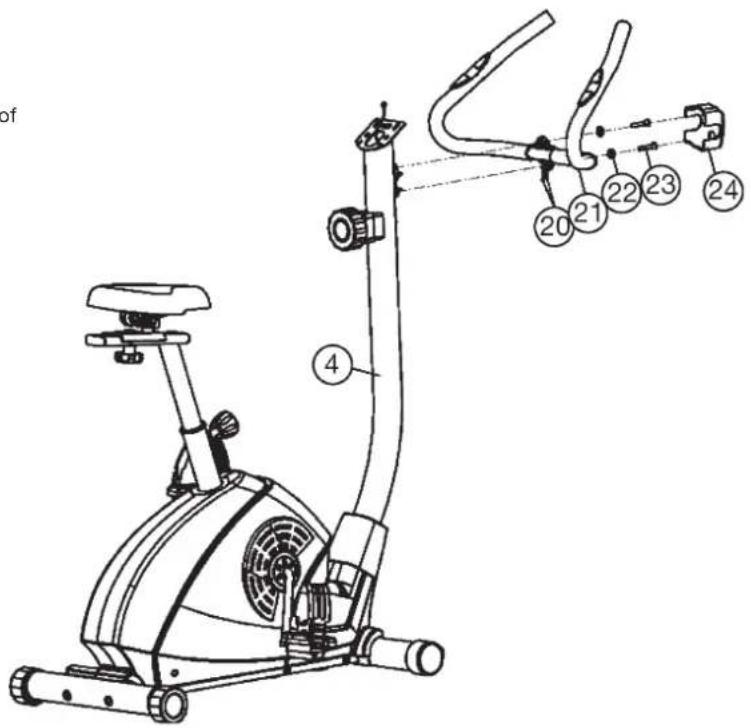
Step 5: Attach the handlebar (21) at the handlebar support (4).
- Place the handlebar (21) against the handlebar support (4) and adjust so that the hole patterns in the handlebar and the handlebar support are aligned. Put one spring washer (22) on each screw (23). Push the screws (23) through the holes in the support, screw into the threaded holes of the support (4) and tighten firmly.
- Push the hand pulse cable (20) thought the holes into the top of handlebar support (4).
- Cover the handle bar connection with handlebar cover (24).
Step 6: Attach the computer (28) at handlebar support (4).
- Put the plug of connection cable (11) into the socket from monitor (28) backside.
- Insert the plug of hand pulse cables (20) into the sockets from monitor (28) backside.
- Attach the monitor (28) to top monitor bracket of front post (4) by using screws (18) and washers (19). (Note: When pushing on the computer, ensure that the cable harnesses are not trapped. Insert the necessary batteries (2 x Micro 1.5V AAA) under ensure the right polarity into the battery compartment located on the rear of the computer.)
Step 6: Checks
- Check the correct installation and function of all screwed and plug connections. Installation is thereby complete.
- When everything is in order, familiarise yourself with the machine at a low resistance setting and make your individual adjustments.
Note: Please keep the tool set and the instructions in a safe place as these may be required for repairs or spare parts orders becoming necessary later.
Mount, Use & Dismount
Transportation of Equipment:
There are two rollers equipped on the front foot. For moving, you can lift up the rear foot and drive it to where you would like to locate or store it.
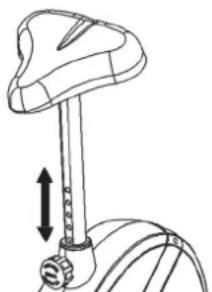
Adjustment - Seat Position
For an effective workout, the seat must be adjusted properly. While your are pedaling, your Knees should be slightly bent when the pedals are in the farthest position. In order to adjust the seat, unscrew the knob few turns and draw it out slightly. Adjust the seat to the right height, then release the knob and tighten it all the way.
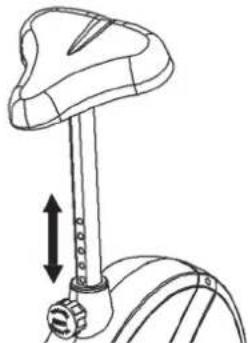
Important:
Make sure to put the knob back into place in the seat post and tighten it completely. Never exceed the maximum height of the seat. Always get off the bicycle before making any adjustment.
Mount, Use & Dismount
Mount:
a. After the seat is adjusted to properly position, insert your foot into retaining strap of pedal step on the pedal and hold the handlebar tightly.
b. Try to put whole body weight on your foot and simultaneously cross over the trainer and land your another foot on the other side.
c. Now you are in the position to start your training.
Use:
a. Keep you hands on the handlebar, and both feet are insert into retaining straps of both pedal properly.
b. Pedal your exercise bike by your both feet alternately.
c. Then you can increase the pedaling speed gradually and adjust braking resistance levels to increase the exercise intension.
Dismount:
a. Slow down the pedaling speed until it comes to rest.
b. Keep the left hand grabbing the left handlebar tightly, put your feet cross over the equipment and land on the floor, then land the other one.
This training equipment is a stationary exercise machine used to simulate without causing excessive pressure to the joints, hence decreasing the risk of impact injuries.
Exercise bike offer a non-impact cardiovascular workout that can vary from light to high intensity based on the resistance preference set by the user. It will strengthen your muscles of legs and increase cardio capacity and maintain fitness of your body also.
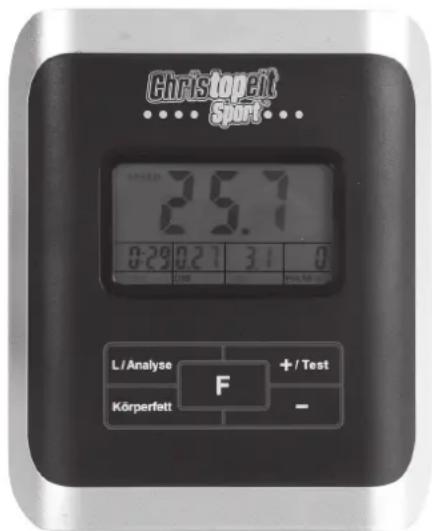
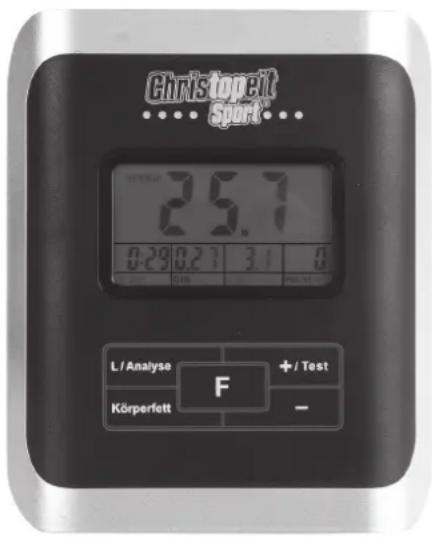
The supplied computer allows the most convenient training. Every value relevant to training is displayed in a corresponding window.
From the beginning of the training session, the required time, the current speed, the approximate calorie consumption, the travelled distance and the current pulse rate are displayed. All values are counted from zero upwards. The speed is indicated on the upper display. All other values are indicated on the lower display.
The computer is switched on by briefly pressing one key or simply by beginning training. The computer begins to register and display all values. To stop the computer, just stop training. The computer stops all measurements and retains the last attained values. The last attained values in the functions TIME, CALORIES and KM are stored and training can continue with these values when training is resumed.
The computer switches of automatically approx. 4 minutes after training is stopped. All values attained until that time are stored and are displayed again when training is resumed. It is then possible to continue training from these values or to reset all functions to zero using the "L" -key for 3 seconds.
Displays:
1. "SPEED" display:
The current speed is displayed in kilometers per hour. It is not possible to specify a particular value using the "+" or "-" -key. The values last attained by this function are not stored. (Limit of the display: 99.9 km/h.)
2. "TIME" display:
The currently required time is displayed in minutes and seconds. It is possible to specify a particular value using the "+" or "-" -key. If a particular time has been specified, the remaining time is displayed. When the specified value is attained, this is indicated by an acoustic signal. The values last attained by this function are stored. (Limit of the display: 99.59 minutes.)
3. DIST display:
The current status of the travelled distance is displayed. It is possible to specify a particular value using the "+" or "-" -key. If a particular distance has been specified, the remaining distance is displayed. When the specified value is attained, this is indicated by an acoustic signal. The values last attained by this function are stored. (Limit of the display: 99,9 km.)
4. CALORY display:
The current status of the consumed calories is displayed. It is possible to specify a particular value using the "+" or "-" -key. If a particular consumption has been specified, the remaining number of calories to be consumed is displayed. When the specified value is attained, this is indicated by an acoustic signal. The values last attained by this function are stored. (Limit of the display: 999 calories.)
5. "PULSE" display:
The current pulse rate is displayed in beats per minute. It is possible to specify a particular value using the "+" or "-" -key. (Limit of display: 40 - 240 pulse beats per minute.)
Pulse Rate:
The whole set of heart rate detector include 2 sensors each side. Each sensor has 2 pieces of metal parts. The correct way to get detected is to
gently hold both metal parts each hand. With the good signals picked up by the computer, the heart mark in the HEART RATE Display shall flash. Sometimes the heart rate value is not useable, based on wet hands or any other contact problems during exercising. If you need high accuracy heart rate value you have to use an external heart rate measurement with a pulse belt.
6. "Temperature" -display
In stand by mode the computer indicates the surroundings temperature.
Keys:
1. "F"-key:
Pressing this key once briefly makes it possible to change from one function to another, i.e. the respective functions can be selected for which entries can be made using the "+" or "-" -key. The currently selected function is indicated by an icon in the respective window.
2. “+” or “-” -key:
By pressing this key once, it is possible to specify values step by step in the respective functions. For this, the desired function must firstly be selected using the F^ -key.
Holding the key pressed activates faster running, which can be stopped by pressing the key again. When training begins, the specified values are then counted down to zero.
3. "Test" -key:
With this key, a test can be conducted to assess your fitness. The grades F1 (highest mark = high fitness) to F6 (lowest mark = low fitness) are awarded. To be able to conduct this test, the training session must have been completed, the "TEST" key pressed and the contact surfaces of the pulse measuring handle unit must be gripped. All functions disappear and the window indicates a one minute countdown. During this time, the contact surfaces of the pulse measuring handle unit must be gripped with both hands. The corresponding grade is then displayed in the window. To return to the main menu, press the "TEST" -key.
-
Körperfett (BODY FAT) -key: Press the key to input your individual data: Gender, Age, Height and Weight. Use "+" or "-" -key to put in the data and "F" - key for enter.
-
Messung (Analyse) -key: Press this key after you have entered the body fat data And grip with both hands at the pulse sensors to start body fat measurement.
The computer will show the test results of FAT PERCENT, BMI and BMR. There are 3 body types divided according to the FAT% calculated.
Type1:BODY FAT% > 27
Type2: 27 ≥ BODYFAT% ≥ 20
Type3:BODY FAT % < 20
-
BMI (Body Mass Index): BMI is a measure of body fat based on height and weight that applies to both adult men and women.
-
BMR (Basal Metabolic Rate): Your Basal Metabolic Rate (BMR) shows the number of calories your body needs to operate. This doesn't account for any activity, it's simply the energy needed to sustain a heartbeat, breathing and normal body temperature. It measures the body at rest, not sleep, at room temperature.
6. L^ = Delete:
When this key is pressed briefly, the values chosen with the F^ key are reset to zero. If the key is held longer (approx. 3 seconds), all last attained values are deleted.
Training instructions
You must consider the following factors in determining the amount of training effort required in order to attain tangible physical and health benefits:
1. Intensity:
The level of physical exertion in training must exceed the level of normal exertion without reaching the point of breathlessness and / or exhaustion. A suitable guideline for effective training can be taken from the pulse rate. During training this should rise to the region of between 70% to 85% of the maximum pulse rate (see the table and formular for determination and calculation of this).
During the first weeks, the pulse rate should remain at the lower end of this region, at around 70% of the maximum pulse rate. In the course of the following weeks and months, the pulse rate should be slowly raised to the upper limit of 85% of the maximum pulse rate. The better the physical condition of the person doing the exercise, the more the level of training should be increased to remain in the region of between 70% to 85% of the maximum pulse rate. This should be done by lengthening the time for the training and / or increasing the level of difficulty.
If the pulse rate is not shown on the computer display or if for safety reasons you wish to check your pulse rate, which could have been displayed wrongly due to error in use, etc., you can do the following:
a. Pulse rate measurement in the conventional way (feeling the pulse at the wrist, for example, and counting the number of beats in one minute).
b. Pulse rate measurement with a suitable specialised device (available from dealers specialising in health-related equipment).
2. Frequency
Most experts recommend a combination of health-conscious nutrition, which must be determined on the basis of your training goal, and physical training three times a week. A normal adult must train twice a week to maintain his current level of condition. At least three training sessions a week are required to improve one's condition and reduce one's weight. Of course the ideal frequency of training is five sessions a week.
3. Planning the training
Each training session should consist of three phases: the warm-up phase, the training phase, and the cool-down phase. The body temperature and oxygen intake should be raised slowly in the warm-up phase. This can be done with gymnastic exercises lasting five to ten minutes.
Then the actual training (training phase) should begin. The training exertion should be relatively low for the first few minutes and then raised over a period of 15 to 30 minutes such that the pulse rate reaches the region of between 70% to 85% of the maximum pulse rate.
In order to support the circulation after the training phase and to prevent aching or strained muscles later, it is necessary to follow the training phase with a cool-down phase. This should be consist of stretching exercises and / or light gymnastic exercises for a period of five to ten minutes.
You find further information on the subject warm-up exercises, stretch exercises or general gymnastics exercises in our download area under www.christopeit-sport.com
4. Motivation
The key to a successful program is regular training. You should set a fixed time and place for each day of training and prepare yourself mentally for the training. Only train when you are in the mood for it and always have your goal in view. With continuous training you will be able to see how you are progressing day by day and are approaching your personal training goal bit by bit.
Calculation formula: Maximum pulse rate = 220 - age (220 minus your age)
90% of the maximum pulse rate = (220 - age) x 0.9
85% of the maximum pulse rate = (220 - age) x 0.85
70% of the maximum pulse rate = (220 - age) x 0.7

Chere cliente, cher client.
4. Affichage "CAL" (affichage des calories):
6. Touche ^ = effacement:
3. Planning van de training
MaKcImaJIbHbI BcNoJIb3OBaTeJr:120Kr
F6apHTbIe pa3Mepe: np6n. 102 x W50 x B 135 cm
| № HaMHemno | Ванne PaizmepbI B MM Kol-Bo MoHTnpuyetcna | № ET-Ne | ||
| kapTINKn | штук | |||
| 1 | Оснobная рама | 1 | ||
| 2 | Туба пожки вореди | 1 | 33-1103-01-SI | |
| 3 | Туба пожки сади | 1 | 33-1122-02-SI | |
| 4 | Опогая труба руня | 1 | 33-1122-03-SI | |
| 5 | Нakончник за戒指рка | 2 | 36-9913110-BT | |
| 6 | Гунтay подладнашайба | 8//25 | 4 | 39-9966-CR |
| 7 | БоNT | M8x75 | 4 | 39-10019-CR |
| 8 | Коллачни пожес с trанспportноюв�ы IMMPОПИКAMN | 2 | 36-9220-06-BT | |
| 9 | Кабел датчika | 1 | 36-1103-08-BT | |
| 10 | Тая | 1 | 36-1103-10-BT | |
| 11 | Соединтельный кабел | 1 | ||
| 12 | БоNT | M8x16 | 4 | 39-9886-CR |
| 13 | Гунтay подладнашайба | 8//20 | 4 | 39-9864-VC |
| 14 | Ошивka олорнaya рама | 1 | 36-1103-06-BT | |
| 15 | Ретули探测ка соротавлий | 1 | 36-9213-06-BT | |
| 16 | Гунтay подладнашайба | 5//14 | 1 | 39-10111-VC |
| 17 | БоNT | M5x55 | 1 | 39-10406 |
| 18 | БоNT | M5x10 | 2 | 39-9907 |
| 19 | Покладнашайба | 5//10 | 2 | 39-9903 |
| 20 | Кабел пльба | 2 | 36-1122-09-BT | |
| 21 | Рунь | 1 | 33-1103-03-SI | |
| 22 | Прочишистец калло | 10 | 39-9864-VC | |
| 23 | БоNT | M8x30 | 2 | 39-9906 |
| 24 | Пere'dний кожух | 1 | 36-9110-13-BT | |
| 25 | шатuya | 1 | 33-1122-04-SI | |
| 26 | Концевные заглушkin | 2 | 39-9847 | |
| 27 | Овлочka руня | 2 | 36-1103-08-BT | |
| 28 | Комлько对接 | 1 | 36-1103-03-BT | |
| 29 | Сedло | 1 | 36-9913106-BT | |
| 30 | Сedло сedлa | 1 | 33-1103-04-SI | |
| 31 | Концевные заглушkin | 2 | 36-1122-19-BT | |
| 32 | Покладнашайба | 10//20 | 1 | 39-9989-CR |
| 33 | Гайka | M10 | 1 | 36-9814-14-BT |
| 34 | Опорная труба сedлa | 1 | 33-1103-05-SI | |
| 35 | Пл actмасовий ползун | 1 | 36-1103-11-BT | |
| 36 | Быстroduястуюшей 3atВов | M16 | 1 | 36-1103-12-BT |
| 37L | Педал сева | 1 | 36-9913120-BT | |
| 37R | Педал справа | 1 | 36-9913121-BT | |
| 38 | Рeshinовая Встава | 1 | 36-1103-13-BT | |
| 39 | Рeshina habиванe | 2 | 36-1103-14-BT | |
| 40 | БоNT | 4x18 | 18 | 39-10187 |
| 41L | Ошивka сева | 1 | 36-1103-01-BT | |
| 41R | Ошивka сspава | 1 | 36-1103-02-BT |
| № Haimeno Картуну 42LОбраза 42R 43 44 45 46 47 48 49 50 51 52 53 54 55 56 57 58 59 60 61 62 63 64 65 66 67 68 69 70 71 72 73 74 75 76 77 78 79 80 81 82 83 84 85 86 87 88 89 90 91 92 93 94 95 96 97 98 99 100 101 102 103 104 105 106 107 108 109 110 111 112 113 114 115 116 117 118 119 120 121 122 123 124 125 126 127 128 129 130 131 132 133 134 135 136 137 138 139 140 141 142 143 144 145 146 147 148 149 150 151 152 153 154 155 156 157 158 159 160 161 162 163 164 165 166 167 168 169 170 171 172 173 174 175 176 177 178 179 180 181 182 183 184 185 186 187 188 189 190 191 192 193 194 195 196 197 198 199 200 201 202 203 204 205 206 207 208 209 210 211 212 213 214 215 216 217 218 219 220 221 222 223 224 225 226 227 228 229 230 231 232 233 234 235 236 237 238 239 240 241 242 243 244 245 246 247 248 249 250 251 252 253 254 255 256 257 258 259 260 261 262 263 264 265 266 267 268 269 270 271 272 273 274 275 276 277 278 279 280 281 282 283 284 285 286 287 288 289 290 291 292 293 294 295 296 297 298 299 300 301 302 303 304 305 306 307 308 309 310 311 312 313 314 315 316 317 318 319 320 321 322 323 324 325 326 327 328 329 330 331 332 333 334 335 336 337 338 339 340 341 342 343 344 345 346 347 348 349 350 351 352 353 354 355 356 357 358 359 360 361 362 363 364 365 366 367 368 369 370 371 372 373 374 375 376 377 378 379 380 381 382 383 384 385 386 387 388 389 390 391 392 393 394 395 396 397 398 399 400 401 402 403 404 405 406 407 408 409 410 411 412 413 414 415 416 417 418 419 420 421 422 423 424 425 426 427 428 429 430 431 432 433 434 435 436 437 438 439 440 441 442 443 444 445 446 447 448 449 450 451 452 453 454 455 456 457 458 459 460 461 462 463 464 465 466 467 468 469 470 471 472 473 474 475 476 477 478 479 480 481 482 483 484 485 486 487 488 489 490 491 492 493 494 495 496 497 498 499 500 501 502 503 504 505 506 507 508 509 510 511 512 513 514 515 516 517 518 519 520 521 522 523 524 525 526 527 528 529 530 531 532 533 534 535 536 537 538 539 540 541 542 543 544 545 546 547 548 549 550 551 552 553 554 555 556 557 558 559 560 561 562 563 564 565 566 567 568 569 570 571 572 573 574 575 576 577 578 579 580 581 582 583 584 585 586 587 588 589 590 591 592 593 594 595 596 597 598 599 600 601 602 603 604 605 606 607 608 609 610 611 612 613 614 615 616 617 618 619 620 621 622 623 624 625 626 627 628 629 630 631 632 633 634 635 636 637 638 639 640 641 642 643 644 645 646 647 648 649 650 651 652 653 654 655 656 657 658 659 660 661 662 663 664 665 666 667 668 669 670 671 672 673 674 675 676 677 678 679 680 681 682 683 684 685 686 687 688 689 690 691 692 693 694 695 696 697 698 699 700 701 702 703 704 705 706 707 708 709 710 711 712 713 714 715 716 717 718 719 720 721 722 723 724 725 726 727 728 729 730 731 732 733 734 735 736 737 738 739 740 741 742 743 744 745 746 747 748 749 750 751 752 753 754 755 756 757 758 759 760 761 762 763 764 765 766 767 768 769 770 771 772 773 774 775 776 777 778 779 780 781 782 783 784 785 786 787 788 789 790 791 792 793 794 795 796 797 798 799 800 801 802 803 804 805 806 807 808 809 810 811 812 813 814 815 816 817 818 819 820 821 822 823 824 825 826 827 828 829 830 831 832 833 834 835 836 837 838 839 840 841 842 843 844 845 846 847 848 849 850 851 852 853 854 855 856 857 858 859 860 861 862 863 864 865 866 867 868 869 870 871 872 873 874 875 876 877 878 879 880 881 882 883 884 885 886 887 888 889 890 891 892 893 894 895 896 897 898 899 800 801 802 803 804 805 806 807 808 809 810 811 812 813 814 815 816 817 818 819 820 821 822 823 B. |
PykoBoDCTBO NO MOHTaKy
IoxaJynta, BbHbTe BCE OTdEhbHe qactn N3 Kopo6Kn npOBepbTe Hx Ha KOMJIeKTHocTb CooTBetCTBm Co cneuΦkaue. Ipumnte BO BHMaHHe, YTO HeKOTOpbI YeACTn PpeBaPnteBHO CMHTnpoBAhbl.
Uar 1: MoHTax HOxek (2+3) Ha oCHOBHyOp pamy (1).
- CMOHTpyyIte nepeHIOIO HOKky (2) c TpaHCnOpTnpOBOuHbIMn pONkAMN (8) Ha oCHOBHyIO pamY (1). NcNoJIb3yIe dIra 3TO rO NO dBa 6oJIa M8x75 (7), DBe NoIKNaIaNbIe Wai6bl 8//25 (6) n DBe npyXHHbIe Wai6bl (22).
- CMOHTpyyTe 3aHIOHO Hoxky (3) Ha cHOBHyO paMy (1). NcNoB3yIte DnA 3TOrO no DBA 60NTa M8x75 (7), DBe NOknaDhble wai6bI 8//25 (6) n DBe npYKHHbIe wai6bI (22). NocTe TORO, KAK Bb CMOHTnpOBaN BeCb TpeHaKepe, npABINbHO BbICTaBnTE KomneHCAToPbI HepOBHOctn nona. 3TmM Bbl pndynpeDInTe HnpeDnHapepeHbIe DBNXeHn TpeHaKepa BO Bpem TpeHNPBOK.

Uar 2: MoTax neaen (37L+37R) watyhb neanen (25).
- PnKpyTne npabyNo neaIb (37R) Ha watyH neaIIN (25), HaxoJusmCc npabObl cToPOhbl B HapabHeHH DBeKeHn. (BHMHaHHe! HapabHeHnEzakpyuBaHn6 BoJIta: no yacobO blpeJIke).
- PnKpyTne nebyo nepaIb (37L) Ha 7atyn nepaII (25), HaxoJusnc c neBOI CTOPOBH B HappBHeHN DnBKeHn. (BHMaHHe! HappBHeHn 3akpyuBaHn60JIa: npotNB yacobO CTpeNk).
3.YcTahOBInTe PnKcnpyoUne NeHTbI neJaen Ha COOTBeTCTByOuUne neJaIN.ДЯурошнma MOnTaKa Jbea neJaNb 6o3HaueHa 6yKBoi L,a npabar neJaNb 6o3HaueHa 6yKBoi R.
Uar 3: MoTax ceNa (29) n onopnyo Tpy6y ceNna (34).
- BcTaBbTe ceIIO (29) KpennneHnem CeIaBaCnCeIa (30) n KpeNko npKpyTTE BKeNaeMOM HAcNOHe.
- BCTaBbTe cana3n cedna (30) BkpenneHa onopHou Tpy6ce3na (34) n3akpeneTBe XkaeMaM torno3HOtaJIbHM noONOxEHn C nOMOuBo rpo6koBo 1sai6bl (33) n oNKnAIOHoi 1sai6bl (32).
- BCTaBbTe MaHKeTy onOpHyTo ty6y ceJa (34) n COOTBeTCTByOuIe e KpeNHeHne Ha oCHOBHO paMe (1) n 3aФnKcnpyTe ee B JxEJaEMOM NOJoxEHm C NOMoUb6 bICTpOeNCTByOuIero 3aTbopa (36).
(5bICTPODEICTBYUOu3aTBOP (36)DOnJKeHbITbHEMHOroOCnAbneH NocpeIcTBOM He0BbWOro NobopaunBaHn, Nocne 3TOrO OH BbTARBaETCnA OCBoKDeHn FHKCaUN BBICOTb H BICoTa CeJa MoKet 6bITb NepeCTabHeHa. Nocne XeNaemoh HAcTpOKn CHOBa 3akpenHb 5bICTPODEICTBYUOu3aTBOP (36)NocpeIcTBOM 3akpyuHBnA.
Uar 4: MONTAX ONOPHOI Tpy6bl (4) Ha oCHOBHyO pamy (1).
- BCTaBBte HnKHOO Yactb onOpHoi Tpy6bl (4) B OCHOBHyO pamy (1), HadeHBTe 0BMBky (14).
- KoHbI o6oNkOMNbTePbIX Ka6eJIe (9) n (11), BbIXOJaUne I3 (1) n (4), CoeHNHTe. (BHIMAHnE! BxIOJAAuIN 3n OOnpHO Tpy6bl (4) KOHeu KOMNbTePHorO Ka6eJIa (11) He DoJIKeH 3anaDaTb B TpyOy, T.K. OH Bam eJe NoHaDoBnCTc npn NocLeNyUoiem MOHTaxe). TaKke ObpaTnTE BHIMAHnE Ha To, TTo6bl pni CoeINHeHHn Tpy6 KomNbTePbHie Ka6eJIH He 6blnn 3aKaTbI.
- PpOBeaTe KOHe perynnpOBKn cOnpoTnBneHna (15) K KpeNneHIO TPOCOBNI Tnn (10) n CoeHNHte IN dpyr C dpyrom, KaK npEcdTaNHe H na pncyHKax C (A1-A4). PerynnpOBky cOnpoTnBneHny yCTaHOBNbTaK, YTO6bl
- Hanehbe Ha KaekbI 60nt (12) npyKHHHy wai6y (22) n noKnadhy wai6y (22). BCTabTe 60ntbl (12) B OTBepctn KpEnKO 3aTHeHte.
Uar 5: MoTaxk pyra (21) Ha onopnyo Tpy6y pyra (4).
- BCTaBbTe pyNb (21) B onOpHyIO Tpy6y pyJn4 (4) TaKIM oBaPazOM, YTO6bI OTBepCTHn B pyNe n B onOpHO Tpy6e pyJn CoBnaAdnn. HadeHbTe Ha 60NTb (23) NO OJHO npyKHHoN WaiBe (22), BCTaBbTe 60NTb (23) B OTBepCTHn HA pyNe, BkpyTtE B pe3b6y B onOpHO Tpy6y (4) N KpEnko 3aTBAHte.
- Побете Кабь Измени пььca (20) черс OTВерспь B onopну Tpyбpe pyя (4) habepx.
- 3akpoTe coeHHeHnOboNochkoykoTkn (24).
War 6: MoHTaX KOMNbIOTepa (28) Ha onOpHyIO Tpy6y (4).
1.Bo3bMITE KOMNbIOTep (28) INCTaBtE COeINHITeNBHbIK Ka6eNb (11) B THe3IO Ha 6oPaTHOH CTOpOHE KOMNbIOTepa (28).
2. BCTABbTe Ka6eBn NynBa (20) B COOTBeTCTByIOuee THe3do C o6paTHoI CTOPHObl KOMNbIOTepa (28) IN PnKpyTIne KOMNbIOTep (28) Ha KpenNeHne IINKOMNbIOTepa, HaxOJaUeecE Ha ONOpHoi (4), C NOMOJIbIo 6oNTOB (18) IN NOkKnAIDbIX Wai6 (19). (BHIMAHNE! Pn MOHTaxe CneDInTe 3a TEM, YTO6bbl Ka6eBbHle KryTbI He NepeXKmAMINCb HaxOJINcB KAK MOxHOr pRy6ke B ONOpHoi Tp6e. Heo6xoImMbE 6atapeKN (2x Typ: Micro1,5V AAA) BNOxNtB B CeKuIO dNRA 6atapeH, HaxOJaUyOcH Ha 3aHNr CTOpOHE KOMNbIOTepa).
7: KoHTpoB
- PpOBeBpTe Bce CoeHHeHna H npaBnIbHocTb c6OpKn I npoBeDnte npoBePkyHKUHOHaJIbHocTn. Ppi 3OM MoHTaK ChNTaETCaJOKHHbHM.
- EcnB Bn nopAKe, npoBeHnTne np6HyTo TpeHnpOBky npn MaIeHbKo HApv3Ke, nHmNBnuYabHo HAcTOPOTe TpeHaKepe
3ameyane: IoxaJyntca, coxpaHnTe Habop INHCTpyMeHTOB nIPOncJeDyoUnx BO3MOKhBIX pEMOHTOB INHCTpyKuNIO MOHTaxy dJI B03MOKhBIX 3aKa3OB 3anaChbIX qAteT.
IoiB3OBaHne TpeHaXepom
Ponb30BaHne TpeHaXkepom
Ha nepeHne HoxKe HaxoJrTcB Dba TpaHCnOpTnpOBOHybIX pONka. Ira TORO, YTObI nepeBnHybT TpeHaXep Ha dpyroE MeCTO INI NOMEcTb Ha MeCTO XpAHeHIn, BO3BMNTec 3a pyNb I HAKnOHte TpeHaXep Ha nepeDHOIO HOKky TaK, YTObI TpeHaXep MOxHO bJIIO NERKO nepeBnHybT C NOMOsbIO TpaHCnOpTnpOBOHybIX pONIKOB Ha HyXHOe MeCTO.
PerynpoBbKa BbICOTb ceHa:
I npnHrna ydo6HOro noLoXeHnHa CeJne Bo BpeM rpeHnpOBKn, Heo6xoDmO yctaHObntB npabunbHyIO BicOTy ceJna.
PpabunbHbIM NOxOHeHMe CEJNa CHTAeTcN NOxOHeMe, KOna KOJIeHN B HIXHEM NOxOHeH N peJAN HAXODTcB HEMHO
corHytOM noNoXeHnH He MOrY 6bItb DO KOJua BblpAmHeH. I na YcTaHOBJeHn npabunbHoro noNoXeHnCeJna Ocna6bTe
OHOpyKoB 6bItroepdEybTuOu 3atBoT BvITBaHNTe rp6ok, Dpyroyn pyKo nepeCTaBte CeJNO B XeJaemoe noNoXeHme.
OTnyCTte rpn6ok, YTO6bOH 3anAn n KpENKO 3akpyTnte erO.
BaxkHo:
YIOCTOBEPbTecb TOM, YTO 6bIcTpOeHcTByIOU3aTbOp 3aФИKcnpOBaH IN KpeNko 3akpyeH. He BbITACKnBaTe onopHyIO Tpy6y cedna do KOHua H Me MeHrTe No3uHm CEda BO BpEma TpeHnpOBKn.
CaHbCnCyckatbc C TpeHaXepa:
CaHntbcaHaTpeHaKepe:
Iocne yctahobnHn npabunbHO BbcOTb CeDna Bo3bMntecb 3a pyNb. YcTahOBtbe 6nKauyio neDaB b HxNHOIO no3uio n BdeHbTe CTynHIO BΦNKcnpyoosnnpeMeoK TAK, YTObO hAHXoINacB H aDeXHom nOIOKeHN Ha neDaII. IpeKeINbTe dpyrHy HO Hy npotnbONoONKHyIO CTOpOHy H CAnbTe HA ceNo. Pn3OM KpENKO dEpxNTecb DByMa pyKaAMn 3a pyNb. Iocne 3TOBOeHbTe dpYrO CTynHO BΦNKcnpyoosnnpeMeoK neDanII.
NoJb30BaHHe:
DepKNTecb DBym pykAm 3a pynb Hc BCTabaTe C cedna BO BPem TpeHnpOBKn. CneiTe 3a Tem, YTO6bl CTynn Ha neaIHX BCE BPem TpeHnpOBKn 6bln 3aΦnkCupObaHb peMeuKamn.
Cnyckatbcac Tpehakepa:
PpeKpaTnTe TpeHnpOBky, KpENKO DePKacb 3a pyNb. Chmnte cHaJaO dHy cTyHIO C neJaI N nocTaBte ee HaDeXHom PnoJoxeHH HA noI coJnte c ceJa. Chmnte NotOM dpryIc tyHIO C neJaI N nocTaBte ee Ha noI noCoiDnTe M tpeHaxepa.
3TOT TpeHaeep - HEnoDBNkHbI DOMaunn TpeHaeep, MMInTppyuOuIN e3dy Ha BeNoCOnneJe. 1s-3a TpeHnpOBKn npn IIObo noroDe, 6e3 BHeuHnx BO3dEiCTBn, a TaKxe 6e3 daBneHnprn e3eB rpynnne yMeHbuaeTCB BepoTHocTh naDeHHn nepeyTomJIeHna.
N3-3a BO3MOXHOCTn N3MEHHeNn COpOTNBHeHn, e3Ja Ha BENOCnnepepeOCTabJIeT BO3MOXHOCTb TpeHPOBKn cepDeHOCocyDnCToCnCTembl 6e3 Hepe3MepHoro HAnpJxHeHn. PInr 3TOM BO3MOXHa 60nee nIIM MeHee INTEHCNBnA TpeHINPOBaK. PInr 3TOM TpeHpyIOcra HxKHeKe KOHeHOCtN, yKpePnIeTCa CepDeuHO-CocyDnCTaCnCTema n CnOCO6CTByeTc NoIepKaHne XopoWSe cnOpTNBHO fOpMbI.
Pykooeodcmno no ucnonb306aHuO KOMnbIomepa Ha mpehaxkepe cepuu 1103
BxOJaun B KOMnIeK TObOpyOBoAHn TpeHaKepa KOMnbIopep ObecneuH Bam MaKcImaNbHbI KOMΦoT Bo BpEm TpeHIpOBKn. IIO60 BaXhBn DnA TpeHIpOBouHO npOecca NOKa3aTeIb OtpKaaeTc H aDcNnee.C HaayanOM TpeHIpOBKn Ha DCnNee BbcBeVNaBOCTc Heo6XoDMOe BpeM, fakTNueckar CKoPocTb, pInmepHb pacXOD KaOpN, npOJeHoe paccToHHe N yNbc TpeHnpYIOUeOcR B MOpENT CHrTIN NOKa3AHN. KomNbIeTp BkNoOaTcnpOCTbIM HaxaTneM Ha IIO6yIO KnABnWy INn npOCTo C HaayanOM TpeHIpOBKn. KOMnbIopep HaUNHaET OTCeT BCex NOKa3AHN INHNkaUIO IH NaCnNee.
TTO6blOCTaHOBnTB KOMNbIOTep, Heo6xOJIMo npocTo 3aBepuNTb TpeHnOBKY. KOMNbIOTep octaHabINBaet BCE n3MepEHn I DEMOHCTpnpyET KOHeHbIe pe3yNbTaBt. NocLeHnE pe3yNbTaBt FynKU BPEM, KAIOPIN IN PACCTORHE 3aHOCrTaB nAMrTb, n pRn BO3o6HOBNEHn TpeHnOBKN Bbl MoKeTe Haatb C 3tnx NOKa3aTeJe. KOMNbIOTep aTOMaTnueckn OTKInOuaTe rnpimeHo uepe3 4 MNHyb1 NoCne OKOHcHnra TpeHnOBKn. Bce DoCTmHyTbe Do 3toro NOKa3aTeJI 3aHOcTcB nAMrTb MOrTy nCNOJb30aTbC npRn BO3o6HOBNeHn TpeHnOBKN CHOBA. NcXoJa n3 3tnx NOKa3aTeJe, MOKHO npdoJnatb DaJIbHeuTu TpeHnOBKY nII yCTaHOBNTb BCE FyHKU B HONb C NOMouhbo KNABMN L".
Функшн
1.ФункuaSPEED"/《KM/4》
PpOu3BOoNTcN HnDnKaZnI pAKnTneCKn DocTnHyToN cKOpocN B KNoometpax B Yac. 3dAnHe NopTepeHOro NOKa3aTeN C NOMOuBHO KNaBnUe +" N -" He npEduCMoTpeHo. CoXpaHeHne NocJeHNx n3 DOCTyHbTx nOKa3aTeN dJaHnOH FyHKmH Ne PpOu3BOoNTcN (BepxHra rpaHnca noka3aHm 99,9 KM/).
2.ФункцЯ „TIME“/«BPEM»
IpoH3BOJNTcR INHINkaqnaФakTnueckn 3aTpaueHHoro BpeMeHN B MHyTax n cekyndax.3aHaHne OnPepenHeHO 3NaueHrB03MOxHO NocpeCTBOM KNAHNI.“HNN.”E.CmN 3aHaHO ONpepenHeHO BpEMr,TO pOIN3BOJNTcR INHINkaqna Eue octabueroCnI npoxKHeBpEMr.DoCTNKeHne 3aDaHOro 3aHuEnCnHAnN3npYcTe NocpeCTBOM AkyCTNueecko rCnHArA.IpoH3BOJNTcR COXpaHene NocNEdNHxDOCTNHybIX NapaMeTPOB dJaDnHOfynKU. (BepxraPanua NOKa3AHN:99,5MnHT.)
3.ФункцЯ „DIST" / «PACCTOHRHNE»
Ipnoun3BODNTCA INHnkaunna npoJeHHbIX KINOMeTPOB. 3aHaHne onpepeenHHORO 3NaueHnBaMOxHO NocpeCTBOM KnaBn+“Nn”Ecn 3adaHO nppepeenHoe pacCToHnne,TO npOn3BOIDNTC INDnKaunna eue octabeweroCnI npoxKdHnra pacCToHnne. DocTNKeHn 3aHaHHoro 3NaueHn CnHnIn3npyTeCn nocpeCTBOM AkyctNucecko CnHana. Ipnoun3BODTC CoXPaHHeNe nocneDnHX DoCTnHytbX npaMeTPOB dnaDHHO fynkun. (BepxHra rpaHnua nokaahn 999,9 km).
© by Top-Sports Gilles GmbH
D-42551 Velbert (Germany)
