
CPS 6 - Exercise bike Christopeit - Free user manual and instructions
Find the device manual for free CPS 6 Christopeit in PDF.

| Features | Details |
|---|---|
| Product type | Exercise bike |
| Dimensions | Length: 110 cm, Width: 50 cm, Height: 130 cm |
| Maximum user weight | 110 kg |
| Resistance system | Magnetic resistance |
| Training programs | 8 resistance levels |
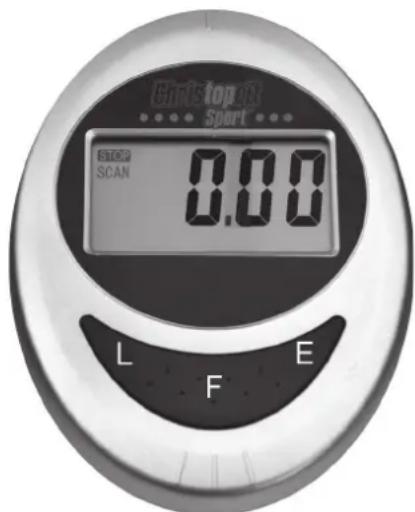
| Display | LCD display for distance, time, calories, and speed |
| Comfort | Height-adjustable seat |
| Transport | Built-in transport wheels |
| Maintenance | Regularly check screws and bolts, clean after each use |
| Safety | Stability ensured by a sturdy frame, non-slip feet |
| Warranty | 2 years |
Frequently Asked Questions - CPS 6 Christopeit
User questions about CPS 6 Christopeit
0 question about this device. Answer the ones you know or ask your own.
Ask a new question about this device
Download the instructions for your Exercise bike in PDF format for free! Find your manual CPS 6 - Christopeit and take your electronic device back in hand. On this page are published all the documents necessary for the use of your device. CPS 6 by Christopeit.
USER MANUAL CPS 6 Christopeit
Assembly and exercise instructions for Order No.
F
RU O63op coeepkaHnA CTP. 35

- Summary of Parts Page 3 - 4
- Important Recommendations and Safety Information Page 15
- Parts List Page 16 - 17
- Assembly Instructions With Exploded Diagrams Page 18 - 20
- Computer instructions Page 21 - 24
- Training Instructions Page 24
Dear customer,
We congratulate you on your purchase of this home training sports unit and hope that we will have a great deal of pleasure with it. Please take heed of the enclosed notes and instructions and follow them closely concerning assembly and use.
Please do not hesitate to contact us at any time if you should have any questions.
Important Recommendations and Safety Instructions
Our products are all TUV-GS tested and therefore represent the highest current safety standards. However, this fact does not make it unnecessary to observe the following principles strictly.
- Assembly the machine exactly as described in the installation instructions and use only the enclosed, specific parts of the machine contained in the parts list. Before assembling, verify the completeness of the delivery against the delivery notice and the completeness of the carton against the parts list in the installation and operating instructions.
- Check the firm seating off all screws, nuts and other connections before using the machine for the first time and at regular intervals to ensure that the trainer is in a safe condition.
- Set up the machine in a dry, level place and protect it from moisture and water. Uneven parts of the floor must be compensated by suitable measures and by the provided adjustable parts of the machine if such are installed. Ensure that no contact occurs with moisture or water.
- Place a suitable base (e.g. rubber mat, wooden board etc.) beneath the machine if the area of the machine must be specially protected against indentations, dirt etc.
- Before beginning training, remove all objects within a radius of 2 metres from the machine.
- Do not use aggressive cleaning agents to clean the machine and employ only the supplied tools or suitable tools of your own to assemble the machine and for any necessary repairs. Remove drops of sweat from the machine immediately after finishing training.
- Your health can be impaired by incorrect or excessive training. Consult a doctor before beginning a planned training programme. He can define the maximum exertion (pulse, Watts, duration of training etc.) to which you may expose yourself and can give you precise information on the correct posture during training, the targets of your training and your diet. Never train after eating large meals.
- Only train on the machine when it is in correct working order. Use original spare parts only for any necessary repairs.
- When setting the adjustable parts, observe the correct position and the marked, maximum setting positions and ensure that the newly adjusted position is correctly secured.
- Unless otherwise described in the instructions, the machine must only be used for training by one person at a time.
- Wear training clothes and shoes which are suitable for fitness training with the machine. Your clothes must be such that they cannot catch during training due to their shape (e.g. length). Your training shoes should be
appropriate for the trainer, must support your feet firmly and must have non-slip soles.
12. If you notice a feeling of dizziness, sickness, chest pain or other abnormal symptoms, stop training and consult a doctor.
13. Never forget that sports machines are not toys. They must therefore only be used according to their purpose and by suitably informed and instructed persons.
14. People such as children, invalids and handicapped persons should only use the machine in the presence of another person who can give aid and advice. Take suitable measures to ensure that children never use the machine without supervision.
15. Ensure that the person conducting training and other people never move or hold any parts of their body into the vicinity of moving parts.
16. At the end of its life span this product is not allowed to dispose over the normal household waste, but it must be given to an assembly point for the recycling of electric and electronic components. You may find the symbol on the product, on the instructions or on the packing. The materials are reusable in accordance with their marking. With the re-use the material utilization or the protection of our environment. Please ask the local administration for the responsible disposal place.
17. To protect the environment, do not dispose of the packaging materials, used batteries or parts of the machine as household waste. Put these in the appropriate collection bins or bring them to a suitable collection point.
18. This machine is a speed-dependant machine, i.e. the power increases with increasing speed, and the reverse.
19. The machine is equipped with 8-speed resistance adjustment. This makes it possible to reduce or increase the braking resistance and thereby the training exertion. Turning the adjusting knob for the resistance setting towards stage 1 reduces the braking resistance and thereby the training exertion. Turning the adjusting knob for the resistance setting towards stage 8 increases the braking resistance and thereby the training exertion.
20. This machine has been tested and certified in compliance with EN 957-1 -5 "H, C". The maximum permissible load (=body weight) is specified as 150kg .
Parts List - Spare Parts List CPS 6 Order No. 99062, 99062A, 99063
Technical data: Issue: 01.06.2008
Magnetic brake system
approx. 8 KG flywheel
8-manually adjustable load steps
Hand Pulse measurement
Saddle horizontally- vertically- and inclination adjustable
Iwheels for easier transportation
Computer, showing: Speed, time, distance, ODO, approx. calories and heart rate.
Input of limits for time, distance and approx. calories
Announcement of higher limits.
Max. body weight 150 KG
Space requirement approx. L 112, W 56, H 140 cm
Please check after opening the packing that all the parts shown in the following parts lists are there. Once you are sure that this is the case, you can start assembly.
Please contact us if any components are defective or missing, or if you need any spare parts or replacements in future:
Assembly instructions
Remove all the separate parts from the packaging, lay them on the floor and check that all are there on the basis of the packing list in these instructions for assembly and use. Please note that a number of parts have been connected directly to the main frame and preassembled. In addition, there are several other individual parts that have been attached to separate units. This will make it easier and quicker for you to assemble the equipment.
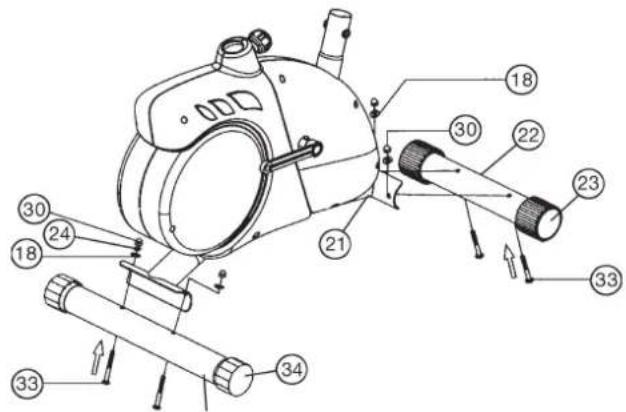
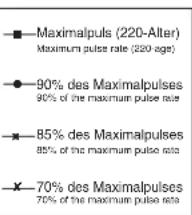
Step 1: Attach the stabilizer (22) + (32) at main frame (21).
- Attach the front foot (22) with the preassembled transport rollers (23) to the main frame. Do this with the two screws (33), washers (18), spring washers (24) and cap nuts (30).
- Attach the rear foot (32) to the main frame. Do this with the two screws (33), washers (18), spring washers (24) and cap nuts (30). After assembly has been completed, you can compensate for minor irregularities in the floor by turning the eccentric cap (34). The equipment should be set up that the equipment does not move of its own accord during a training session.
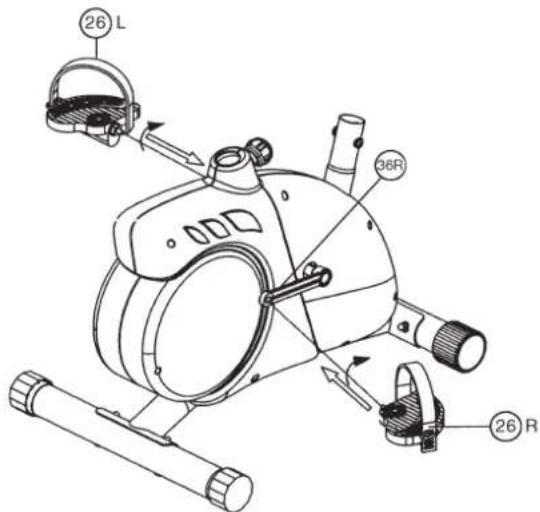
Step 2: Attach the pedal (26) at pedal crank (36).
- Screw the right pedal (26R) into the locator in the right-hand side (as seen in operation) for the pedal crank (36R) (warning! the screw direction is clockwise).
- Screw the left pedal (26L) into the locator in the left-hand side (as seen in operation) for the pedal crank (36L)
(Warning: the screw direction is anti-clockwise). - Then mount the pedal straps left and right on the associated pedals (26). (The pedals are signed with ^ for Left and Rfor Right.)
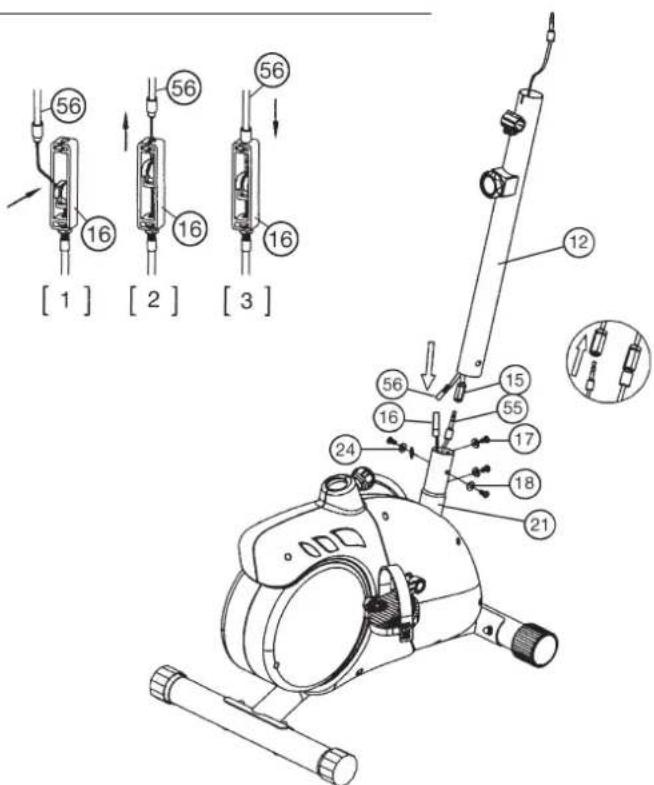
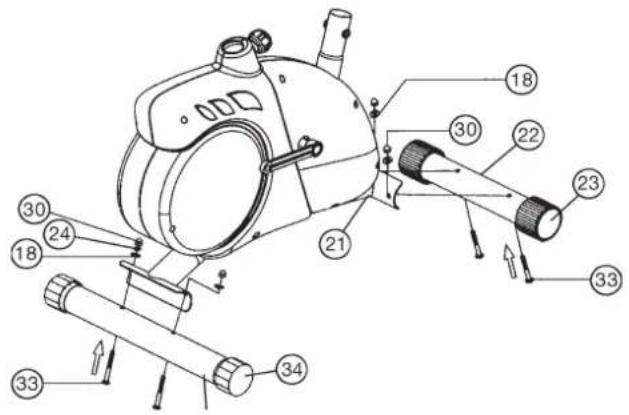
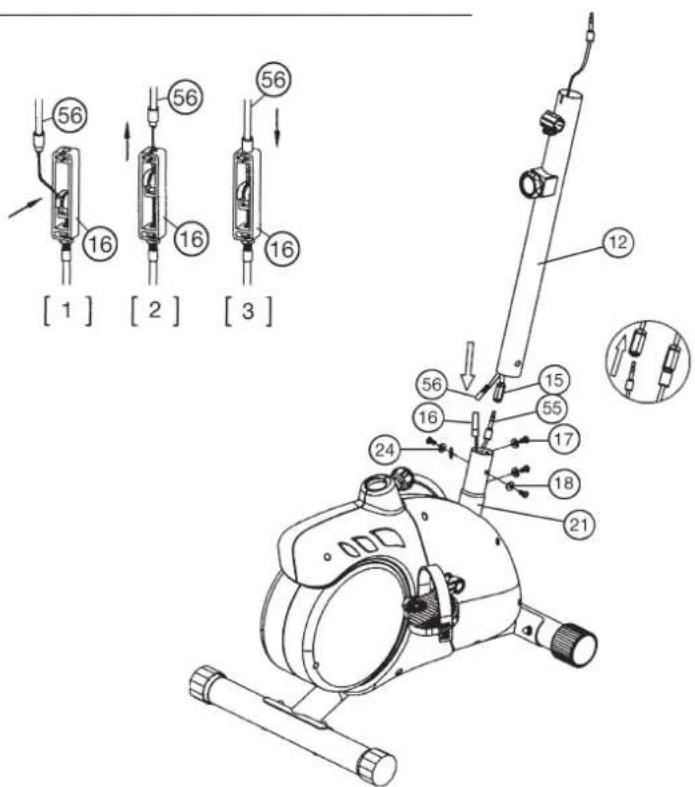
Step 3: Attach the front post (12) at main frame (21).
- Hold the handlebar support (12) with the computer cable (15) Against the main frame holder. Connect the plug for the computer cable (15) coming out of the bottom of the handlebar support (12) of the computer with the matching plug for the sensor cable (55) coming out of the main frame (21).
(Note: The computer cable harness (15) projecting from the support (12) must not slide into the tube, as it is required for later steps of installation.) - Connect the middle section tension cable (56) to the bracket of lower section cable tension (16) (See figure [1]-[3]). Before this step of the installation, it is advisable to adjust the resistance setting to the highest stage, at which the cable extends furthest from the sheath. Put the lowest part of cable (16) into the small hook (figure 1). Pull it (figure 2) until the small hook gets in higher position and then inserts the cable (16) onto the bracket (56) (figure 3).
- Place the handlebar support (12) in the locator provided for it in the main frame (21). Ensure that the cable connections made in step 3 are not squashed. When putting the steering tube in place, push the former slowly down into the locator in the main frame. Screw the handlebar support (12) onto the base frame (21) with the screws (17), spring washers (24) and washers (18).
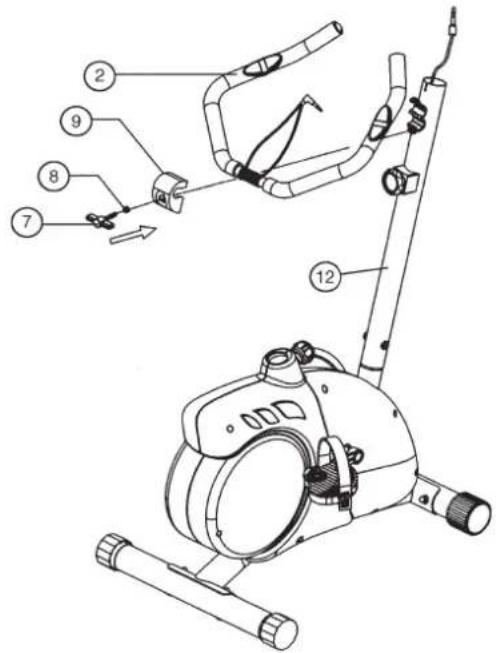
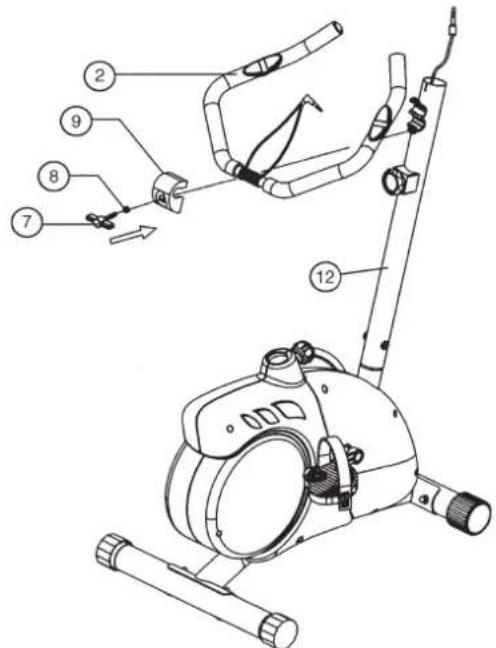
Step 4: Attach the handlebar (2) at handlebar support (12).
- Guide the preassembled handlebar unit (2) through the upper part of the handlebar post (12) and close the bracket of handlebar holder.
-
Attach the handlebar cover (9) at the handlebar holder of handlebar support (12).
-
Screw the handlebar (2) in desired position at the handlebar post (12) with washer (8) and handlebar screw (7).
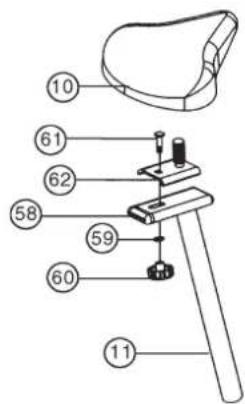
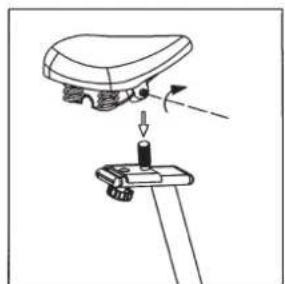
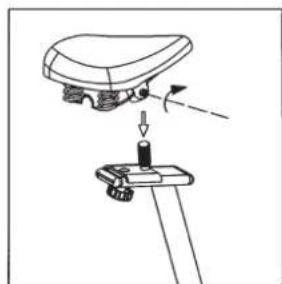
Step 5: Attach the saddle (10) at saddle slide (62).
- Push the saddle (10) with saddle bracket into the saddle slide (62) and tight it up in desired position.
- Place the saddle slide (62) into the holder of saddle post (11), set it at the desired position and screw it onto the saddle support (11) by screw (61) washer (59) and star grip nut (60).
Step 6: Attach the saddle support (11) at main frame (21).
- Push the saddle support wrapping (57) over the saddle support tube (11). Place the saddle support (11) into the matching locator in the main frame (21), set it at the desired position and lock it by inserting the bolt with the quick release (20) in place and doing it up tight.
(The setting of the saddle support can be adjusted easily as desired later through turning and pulling the quick release (20).)
Furthermore, you must ensure when setting this desired position that the seat pillar is not pulled out of the main frame further than the highest setting position, which is marked.

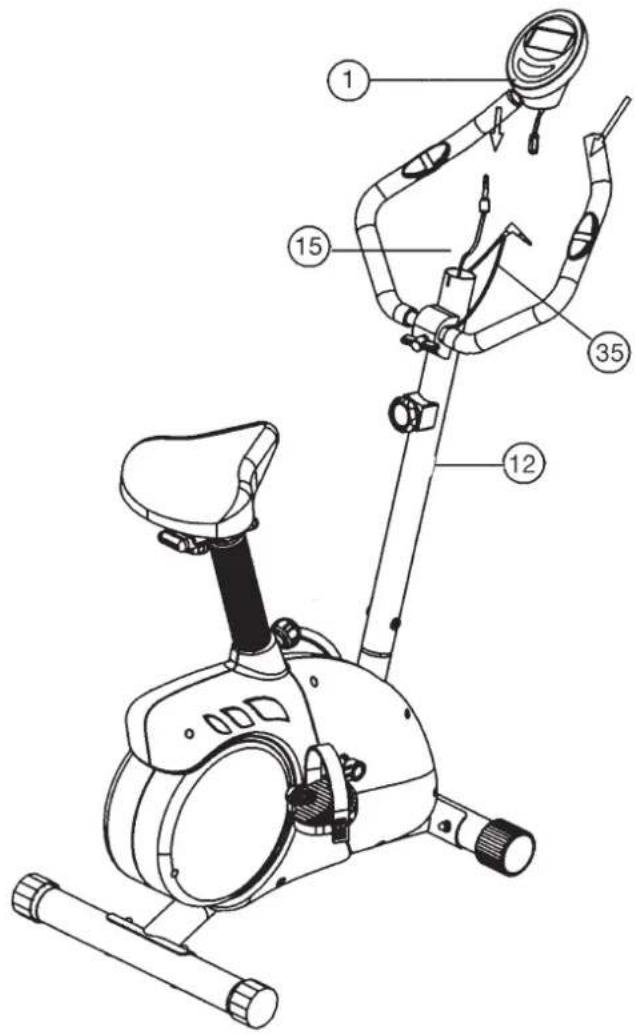
Step 7: Attach the computer (1) at handlebar support (12).
- Take the computer (1) that has been supplied out of the packaging and insert the batteries (Type "AA"-1.5 V pencells) by watching for the right polarity on the back of the computer (1). (Batteries for the computer are not included in this item. Please buy them at your located market.)
- Push the plug of the connecting cable (4) projecting from the handlebar support (12) into the associated socket of the computer (1).
- Place the computer (1) on top of the handlebar support (12).
- Push the plug of the pulse cable (35) projecting from the handlebar into the associated socket of the computer (1).

Step 8: Checks
- Check the correct installation and function of all screwed and plug connections. Installation is thereby complete.
- When everything is in order, familiarise yourself with the machine at a low resistance setting and make your individual adjustments.
Note: Please keep the tool set and the instructions in a safe place as these may be required for repairs or spare parts orders becoming necessary later.
Computer instructions for 99062
The enclosed training computer provides high convenience in training. All values relevant to the training are displayed in a corresponding window.
From the beginning of the training session onwards, the required time, the current speed, the approximate energy consumption, the travelled distance and the current pulse rate are displayed. All values are recorded incrementally for zero upwards. If the training session is to last for a particular period, a particular number of calories is to be consumed, a particular distance travelled and a particular pulse rate not exceeded, these values can be entered individually or as combinations.
The computer is switched on by briefly pressing one of the buttons or simply by beginning a training session. Select the desired function for input by pressing the ^ button. The function which can be changed is displayed.
Each desired value can be entered by pressing the two arrow buttons. The "E" button stand for an increasing value starting from zero
and also for a decreasing value starting from the maximum value.
To start the computer, simply begin your training session. The computer then begins to measure and display all values.
To stop the computer, simply end the training session. The computer stops all measurements and holds the last achieved values. The last reached values in the functions TIME, CALORIES, ODO and KM are stored and training can proceed with these values when the training session is resumed.
The computer switches off automatically approx. 4 minutes after the training session has ended. All values reached by then are erased.
Displays:
1. "TMR" time- display:
Usually, the currently required time is displayed in minutes and seconds. A particular value can be specified using the "E" button. If a particular time has been specified, the remaining time is displayed. When the specified time has elapsed, this is indicated by an acoustic signal. In this function, the last reached time is stored until the computer switches off. (Maximum limit of the display is 99.59 minutes.)
2. "SPD" speed-display:
The current speed is displayed n kilometres per hour. A particular value cannot be specified with the ^a button. The last achieved value is not stored in this function.
(Upper limit of the display is 99.9km / h
3. "CAL" display:
The current amount of consumed calories is displayed. A particular value can be specified with the ,E^ button. If a particular consumed amount is specified, the amount of calories remaining to be consumed is displayed. When the specified value is reached, this is indicated by an acoustic signal.
In this function, the last reached time is stored until the computer switches off. (Upper limit of the display is 9:999 calories)
4. DST display:
The current value of the travelled kilometres is displayed. A particular value can be specified with the E^ button. If a particular distance is specified, the distance remaining to be travelled is displayed. When the specified value is reached, this is indicated by an acoustic signal. In this function, the last reached time is stored until the computer switches off. (Upper limit of the display is 99,99 km)
5. "PULSE" display:
The current pulse rate is displayed in beats per minute (bpm).
A particular value can not be specified with the ,E" button.
(Upper limit of the display is 90-220 pulse beats per minute)
6. "ODO TOTALDISTANCE - display:
The current status of the travelled kilometres of all previous training sessions including current training session is displayed. A particular value cannot be specified. The values last attained by this function are stored. (Limit of the display: 9.999 km.)
7. ^ function
If this function is selected, the current values of all functions are displayed successively in a constant sequence approx. every 5 seconds.
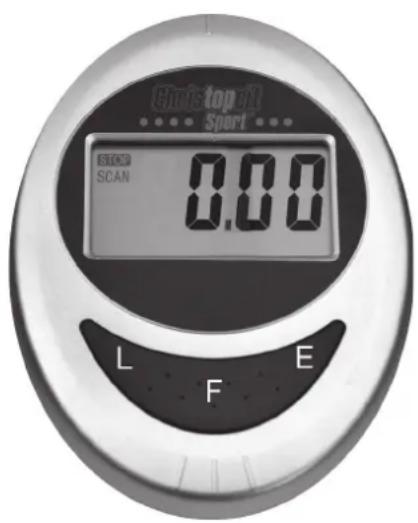
Buttons:
1. E^ enter-key:
The specified values of the individual functions can be entered in steps by each pressing of these buttons. The desired function must firstly be selected using the "F" button.
After training has begun, the display counts down from the specified value to zero.
2. F^ function-key:
Pressing this key once briefly makes it possible to change from one
function to another, i.e. the respective functions can be selected for which entries can be made using the E^ key. The currently selected function is indicated by an icon in the respective window. Holding the key pressed (approx. 2 seconds) allows all last attained values to be deleted. All values of all displays are then set to zero except the Totaldistance ODO^ .
3. _L^ = Delete -key:
When this key is pressed briefly, the values chosen with the „E“ key are reset to zero.
Training instructions
You must consider the following factors in determining the amount of training effort required in order to attain tangible physical and health benefits:
1. Intensity:
The level of physical exertion in training must exceed the level of normal exertion without reaching the point of breathlessness and / or exhaustion. A suitable guideline for effective training can be taken from the pulse rate. During training this should rise to the region of between 70% to 85% of the maximum pulse rate (see the table and formular for determination and calculation of this).
During the first weeks, the pulse rate should remain at the lower end of this region, at around 70% of the maximum pulse rate. In the course of the following weeks and months, the pulse rate should be slowly raised to the upper limit of 85% of the maximum pulse rate. The better the physical condition of the person doing the exercise, the more the level of training should be increased to remain in the region of between 70% to 85% of the maximum pulse rate. This should be done by lengthening the time for the training and / or increasing the level of difficulty.
If the pulse rate is not shown on the computer display or if for safety reasons you wish to check your pulse rate, which could have been displayed wrongly due to error in use, etc., you can do the following:
a. Pulse rate measurement in the conventional way (feeling the pulse at the wrist, for example, and counting the number of beats in one minute).
b. Pulse rate measurement with a suitable specialised device (available from dealers specialising in health-related equipment).
2.Frequency
Most experts recommend a combination of health-conscious nutrition, which must be determined on the basis of your training goal, and physical training three times a week. A normal adult must train twice a week to maintain his current level of condition. At least three training sessions a week are required to improve one's condition and reduce one's weight. Of course the ideal frequency of training is five sessions a week.
3. Planning the training
Each training session should consist of three phases: the warm-up phase, the training phase, and the cool-down phase. The body temperature and oxygen intake should be raised slowly in the warm-up phase. This can be done with gymnastic exercises lasting five to ten minutes.
Then the actual training (training phase) should begin. The training exertion should be relatively low for the first few minutes and then raised over a period of 15 to 30 minutes such that the pulse rate reaches the region of between 70% to 85% of the maximum pulse rate.
In order to support the circulation after the training phase and to prevent aching or strained muscles later, it is necessary to follow the training phase with a cool-down phase. This should be consist of stretching exercises and / or light gymnastic exercises for a period of five to ten minutes.
4. Motivation
The key to a successful program is regular training. You should set a fixed time and place for each day of training and prepare yourself mentally for the training. Only train when you are in the mood for it and always have your goal in view. With continuous training you will be able to see how you are progressing day by day and are approaching your personal training goal bit by bit.
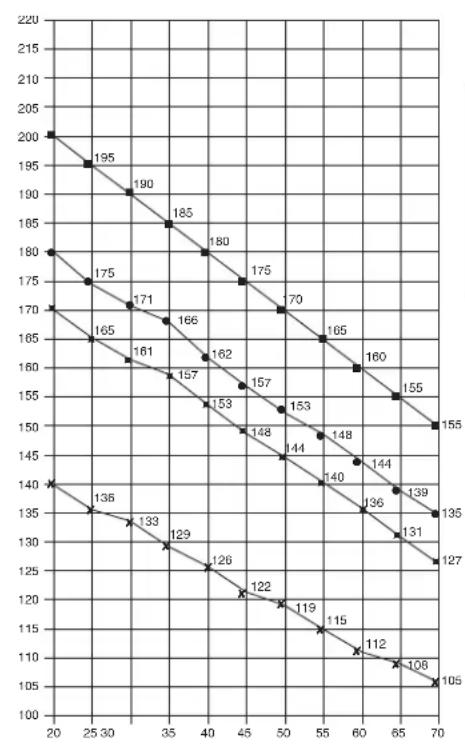
Calculation formula: Maximum pulse rate = 220 -age (220 minus your age)
90% of the maximum pulse rate = (220 - age) x 0.9
85% of the maximum pulse rate = (220 - age) x 0.85
70% of the maximum pulse rate = (220 - age) x 0.7

Sommaire
Chere cliente, cher client,
90% of the maximum pulse rate
85% des Maximalpulses
85% of the maximum pulse rate
-70% des Maximalpulses
70% of the maximum pulse rate
Formules de calcul: Pouls maximum = 220 - âge
2. "SPD"-Km/h-weergave:
3. Planning van de training
Bo3MOxHOCTb 3aabaTb co6CTBeHHbIe npaMeTpbl: BpEM, DnCTaHcU, npv6n I
pacxoKanopn
I3BeueHne O nppeBbIeHm 3aDaHHbIX npapMeTpoB
MaKcHmAbHbBn BEC NOb3OBaTeHa; 150 Kt
Ta6apHTbIe pa3Mepe: npn6n. 112xB56xB140cm
CHAB ynaKOBky, npoBepbTe No cnNcKy, BCE Jn DeTaHn Ha MeCTe. EcIn Bce B nopAKe, To MOxHO HauHaTb c6OpKy. EcIn KaKoHn6yDb arperaT He B nopAKe Nn OTCyTcByeT, ObpaaaiTecb K HAm:
War 1: MoHTaX HOxEK (22+32) Ha oCHOBHyIO pamy (21)
1.CMOHTpyyTe nepeHIO HOxky (22) c TpaHCnOpTPOBOHbIM pOJIKAmN (23) Ha oCHOBHyO paMy (21). NcnoIb3yIe dIa 3TORo no Dba 60NTa (33), nOKnJaIbHbIe Wai6bi (18), npJxHHbIe Wai6bi (24) nKoJIpaKOBbIe rAIKN (30).
2.CMOHTpyyTe 3aIHOIO HOxKy (32) Ha OCHOBHyO paMy (21). NcnoIb3yIe dIa 3TORo no Dba 60NTa (33), nOKnJaIbHbIe Wai6bi (18), npJxHHbIe Wai6bi (24) nKoJIpaKOBbIe rAIKN (30).
Piocne TORo, kak Bbl CMOHTpOBaII BeCb TpeHaxEp, npAbINbHO BbICTaBte KOMneHcATOpBi HepOBHocTN IOna. 3TIm Bbl npDeynpeIte HepeDHaMepeHHbIe DBVxHeHra TpeHaxepa BO BpEMr TpeHnpOBKn.
MOnTaX neJaIe (26L+26R) 7aTuHbI neJaIe (36L+36R)
- PnKpyTne npabyIO neJaIb (26R) Ha WAtyH neJaII (36R), HaxOJaIcnC nPpBOI CTOpOHb I HAnpaBHeIN DmXKeHIn. (BnMaHHe! HAnpaBHeHne 3aKpyuBaHn8 6oNTa: no YacobO BCTpeJIke).
2.Пикpyтnte nebyIO neДaIb (26L)Ha wATyH neДaIIN (36L),HaxOДИИСС cNeB0I CTOpOBi B HAnpaBHeHn DBIXKeHn.(BHNMaHne!HAnpaBHeHn 3akpyuBaHn6oNTa: npOTuYacOB0I CTpeKN).
3.YcTaHOBInTe pKcpyIOuIe IeHTbI neJaIe Ha COOTBeTCTByIOUne neJann.
IynpoeneHMOntaxaJIeBaIeJaIbO63HaueHa 6yKBoiL,a npabaI neJaIbO63HaueHa 6yKBoiR.

Uar 3: MoHTax onOpHoi Tpy6bl pyn (12) Ha oChOBHyO pamy (21)
1.Bo3mnte onOpHyTO ty6y pyn(12)CnpEaBapnteIbHO CMOHTPOBaHHbIM coeHNHtEnbHbIMKa6eEM(15)。CoeHNHte WTeKep KOMbIOTepHoro Ka6e(15),BbIXoAunuN 3 onOpHOr Tpy6bl pyn(12),co WTeKepom cepBOdBVaTeN(55),BbIXoJauero n3 OCHOBHO paMb(21).
(BHIMAHNE! BbIXOaIuN I3 OOnHO Tpy6bl (12) KOHeU KOMNbIoTePHORo Ka6eIa(15) He DoJIKeH 3anaDaTb B Tpy6y, T.K. OH Bam eue NoHaNoBnTCa npn nocneJeIOUcEM MoHTaKe). TaKke o6paTte BHIMAHNE Ha To, YTO6bl npn CoeINHeHH Tpy6 KOMNbIoTePbIe Ka6eI H 6bln 3axKaTbI.
2. PpOBeHnTe KOHe peryNipOBKn cOnpOTNBnEHH (56) K KpeNneHIO TpocobT TaHn (16) n CoeDInHTe IN dpyr C dpyrom, KaK npedCTaBNEHO Ha pucyHKx C ([1]-[3]). PeryNipOBky cOnpOTNBnEHn yCTAHOBNTb TAK, YTO6bl TaRa C rONOBKO BbIXoDnHa KaK MOXHO daIbue n3 o6uINBKN. (YpOBeH 8). Iocne Yero 3aennte rONOBKY Ha KOHe Tn peryNipOBKn cOnpOTNBnEHn HA KpaChh b KpOyok, HaxoDraunca Ha KpaCHOM KpeNneHHn. (Pnc. 1). IOTaNHe BcIO ONOPHy TOpy6C nPruenenneHHO rONOBKO TnBbEPx TaK, YTO6bl KpOuCK b KpeNneHHn NepMeCTnncb Habepx (Pnc. 2) n O6uINBk aKpeNneHHa 3actonopnnaCb (Pnc. 3).
3. Bctabte onophyo Tpy6y pyra (12)B COOTBeTcTByoOe KpeIneHHe Ha ochOBHO pame (21). O6paTne BHNMaHHe HA To, YTO6bI Ka6JIbHOe coeINHeHHe He 3aueMnAIOcb, IN MeDNHeHO BCTaBtE ONOPHyo Tpy6y pyra (12) B COOTBeTcTByoOee KpeIneHHe Ha ochOBHO pame. PpIKpyTInTe onOpHyo Tpy6y pyra (12) K OCHOBHO pame (21) c NOMOuBo 50NTOB (17), npyKHHbIX Wai6 (24) n noDKnaHbIX Wai6 (18).
Uar 4: MoHTax pyna (2) Ha onopHyTO Tpy6y pyna (12)
1.ПОДБЕДЛТЕ рунь (2)КОТКРБITOMу Крпнелю руня Ha onopHoi Tpy6y руня (12)и зakpoite erо hab рунem (2).
2.BCTaBbTe oboOnouKnykoTkn (9)Ha pylb (2).
3. HadehBe TnoKnAHyU Wai6y (8) Ha rpi6KOBbl 6oT (7) n npikpyTe mN pyIb (2) K onopHoi Tpy6e pyIa (12).
Uar 5: MoTax ceNa (10) n cana3ok ceNa (62) Ha onopHyTOpy6y ceNa (11)
1.Bctabte ceNo (10) KpenneHemceNa B caana3kn ceJa (62) n Kpenko npnKpyTnte BKeJemaMOM HAKNoHe.
2.Bctabte cana3kn ce1na (62) B KpeIeHne Ha onOpHo Tpy6 ce1na (11) n 3akpeInTe B XeJeaEMOM rOpINoTHaJIbHOM nIOJoxEHn C nOMOuBo Ipn6koBoi Wai6bl (60),noKlnaHO Hoi Wai6bl (59) n 6oNTa (61).

MOnTaX onOpHoi Tpy6bI cedna (11) Ha ochOBHyIO pamy (21)
- Bctabte MaHKeTy onOpHoi Tpy6bI ceJa (57) Ha onOpHyIO Tpy6yceJa (11) n B COOTBeTCTByIOoJIe KpeJIeHne HA OCHOBHO pAME (21) n 3aΦNKcUpYTe ee B JKeJAEOM NOnOKeHN C NOMOuBIO 6bICTPOeIeCTByIOUe 3aTBopa (20).
(5bIcTpOeIcTByUoH 3aTbOp (20) Donxhen 6bItb HEMHO OcnaBHeN nocpeCTBOM Heobhoro NOBOPaunBaHnA, Nocne 3TOOR OH BITrNBaETCA DnOCBOoxKeHnH PhKCaUN BICOTb N BICOTa CeJNa MoXeT 6bItb NepeCTABNeHa. Nocne XeJaemOH HAcPOKn CHoTa 3aKpeNTb 6bIcTpOeIcTByUoH 3aTbOp (20) nocpeCTBOM 3aKpyuHBAHnA.

War 7: MoHTaX KOMNbHOTepa (1) Ha onOpHyIO Tpy6y pyJn (12)
- BCTaBtBe 6atapeKn (2x Mignon AA 1,5V) B KOMNbHOTep (1). (6atapEn IJRA KOMNbHOTep He npunaraTcB O6beMe NOCTABOK. IoxanyuCTa, 3aIMNTe ee B TOPROBne.)
2.BCTaBtE wTeKep KOMnBTopeHoro Ka6enr (15), BbIXoAun CBepy H3 onOpHou Tpy6bl pyra (12), B COOTBETCTByIOOee rHe3do, HaxoAunueeHa 0bpaTHOH CTOpOHe KOMnBTopeA (1). - BctabbTe KOMnbIOpEep CBepxHa onopHyIO Tpy6y pyra (12).
4.BCTabBe TWEKEK Ka6eNn3MEpeHnnybca (35),BbIXoDnMn n3pyna, B COOTBeTcByIOOee rHe3do HA KOMNbItepe(1).
War 8: KoHTpObl
- Поберпье BCE coeINHeHЯ Na npaBnIbHocTb c6OpKN n npoBeHnte npobepkyФункцioHaJIbHocTи.Пр n ATOM MOHTax CHTaTeC3aKOHcHbIM.
2.EcnnBce B npndke, npoBeNTe np6HyTO tpeHPOBky npMaJIeHbKO Harpys3E, INHUNBnUaIbHO HAcTpoNE TpeHaXep.
3aMeyHHe:
Ioxayncta, coxpaHnTe Ha6Op HnCTpyMeHTOB nna NOcneDyOux BO3MOXhBIX pEmoHTOB INHCTpyKUIO NO MOHTaxy DnRA BO3MOXhBIX 3aKa3OB 3anachbix qacte.
PykoBODCTBO NO nCNoIb3OBAHnIO KOMNbIoTepa
Ha TpeHaekepe cepnn 98062
Bxodn B KOMPNeKT O6OpyOBoAHN CHAPa KOMNbTeP o6ecneHT Bam MaKcMmaIbHb KOMpO T Bo BpeM TpeHnpOBKn. IIO6o BaxHbIN DnTpeHnpOBOUHO npOceCa NOKa3aTeB OTPaKaETcHa DNcNlEe.
C Hauanom TpeHnOBKn Ha nncnnee BbcBcHbAIOCT Heo6xoIIMoe Bpem, qakTuuecka CKOpocTb, npMepHbI paXoJ kaIopni,
npoJeHHOe paccToHHe N yIbC TpeHpyIOeOcB M oMeHT CHATN Ioka3aHn. OTCeT BceX 3HaueHn HaunHaetcO t C yCTaHOBKO cTaTe BnepeD.
KOMnbOTep BKNIOaETC npocTbIM HauKaTHm KHOJIKN "NIN npocTo c NaHApom TpeHnPOBKn. KomnbOTep HaUNHaet OTCeT BCEx NOKa3AHm I OTO6paKaTaBnx HA DCnJIee.
YTo6blOCTaHOBnTB KOMNbHOTep, Heo6xOJIMO npocTo 3aBepuTb TpeHINPOBky. KomnbHOTep octaHaBnBaet BCE n3MepeHHN
dmoHCTpnpyET KOHeHbIe pe3ynbTaTb. Camblie nocJeHnpe3ynbTaTb fynkun BPEM, KAIOPUN IN KNIOMETPAX 3aHocTcB NAmrTB, npu BO3o6HOBJIeHN TpeHnpOBKn Bb MoKTe Haayt b C 3TNx nokaatene.
KOMnbOTep aBOMaTnueckn OTKIOHaeTc npMmepHOepe3 4 MNHytbl nocne OKOHahn TpeHnpOBKn. Bce DOCTNRHyTbe Do 3TOrO NOKa3aTeNl. 8.Bce DOCTNRHyTbe Do 3TOrO NOKa3aTeNl ycTaHaBnBaIOTc Ha Hylb.
BHHMaHHe:
IINH3MEpeHHIpyIbCa Heo6XODIMO OJHOBpeMeHHO B3RTbC6OeHMpykAMn 3a 06e KOHTAKTHbIE NOBepxHOCTn Ha KOMNbOTpe. Ipn 3TOMKOHTaKTHbIE NOBepxHOCTn DOJIKNbI HAXOITbCn PO cepENHEBHytpenHe CTOpOHblJaDOHei.
ФУHKUH:
1.Функ,在TMR"(BpeM):
Ioka3bBAeT qakTuueckn 3aTpaueHHoe BpeM B mHyTaX n CeKyHdax.
C NOMOUIKHOKN E MOXHO pEbnapntbHO 3aDaTb
onpeeneHHbIe noka3aTeH. EcNn Bbl 3aJann onpeeneHHoe Bpemr, To yka3bIbAEtCn Bpemr, OCTabIeecr do 3aJahHoro npedeJa. KaK TOnbKO yka3aHHn ppeen IOCTnHyT, TyT JKe pa3daeTCR akCyCTnueckn CnHAn. Ipon3BOdntCraNNB namrTb NocJeDHnx pe3yNbTaTOB B3ToI fYHKnn.
(MakcmaJIbHaI rpaHnca nokaTeIa 99,59 mHyr.)
OCTAHOBNTb KOTOpBm MOXHO NOBOTOpHbIM HaKaTneM.
2. Khonka F:
KopOTKIM OJHOKpaTHbIM HaxaTneM KnaBnUIM MOXHO NepExoDHTb OT OJHOI cyHKUIM KpyrO,TO eCTb BblbnpaTc8 COOTBeTCTBYouaI dyHKUIN, B KOTOPYIO CNOMOUbHO KHONK, E BBOJATC JxenaEMbIE BoJeE dInTeJIbHM HaxaTneM (OKONO 5 cekyH) MOXHO ydaJIbTB BCE DOCTIHHytble Do 3TORO MOMeHTA NOKa3aTeJI.
3. Khonka, L" = ydaJIeHne daHHbIX:
KopOTKnM HaxKaTneM 3ToN KHNK MoXHO yCTaHOBtB BbIbpaHHbI C nOMOsbIO KHNKn "E" NOKa3TeNb HA HOJI. COOTBeTcTBYIOUnn IOKa3AteNb BBICBeuMbAEcHr Ha DnCnJee.
BbI DOnJXHbI yUHTbIBaTb CNeDyUOune PaKToPbI, YTO6bI ONpeDenITb BepHbI napameTpbl TpeHnPoBOK dNl DOCTNXKeHnO uTyTmblx cN3nHecknx pe3ynbTaTOB INoJIb3bl dNl 3doPobBa.
1. WHTEHCMBHOCTb
YpOBeHbФn3Nuecknx Harpy3OK npn TpeHnpOBkax DoJxKeH npeBbIaTb ypOBeHb HOpMaNbHbIX Φn3Nuecknx Harpy3OK, HO Bbl He DoJXHbI 3aDbXbTaCn CnBbHO nepeyTOMrTbC. Yo6HOmepo 3ΦΦeKTHBHOCTN tpEHNPBOKn MoKET cnyKNTb Yactota Nybca. Bo BpEMa TpeHnpOBkn cactota Nybca MokKet DOCTNaTb 70-85% OT MaKcMaNbHO (CMOTPN Tabmuy nΦopMylapnOnpeDeHneu paCyeA).B nepByo HeJeHNO cactota Nybca DOJXHa OCTaBaTb HA NHXHe OTMKe 3ToI ObnActn, T.e. OKono 70% OT MaKcMaNbHO. B NocNeDyUOme HeJeN m MecBz YactOtY nybca CneDyET NOCTeNEHNO HapaunBaTb Do 85% OT MaKcMaNbHO. JyUwe Bcero DnE Pn3NueCKoro COCTOHN YeNoBeka, BblONHIOUero ynpaXHeHn, ecn NaCTota NpLbCa BO3pactaet, OCTaBaHCB b NpeDeJax 70-85% OT MaKcMaNbHO. 3To DOCTNaTeTcBA YbeJIuHeHem BpeMeHN tpEHnpOBKn IIN yPObHn CNOXHOCTN.
Ecni cactota nybc a He noka3aHa Ha dncnlee KOMnbTepea nn BbIXOTte npOBepntb yactOty nybc, KOtopaB, BO3MOxHO, noka3HaHeBepHO, BCJeCDTBne KaKoJ-Ni6o Own5Kn . Bbl MoXe TpeDpInHrTb CNeDyUoOee:
A)ИЗМерпь沧ToTy Пиьса OБчнбIM CПОСБOM (ПОДСИТаТКОЛЧЕСТВуДAPОВ ПиьсaВ MИнHyТ Ha 3ANCTBe)
B) n3Mepntb yactoty nybca c nOMOuIb CneuaIbHoro yCTpoIcTBA (KOTOpoe MOxHO KynITb y npOaBIOB CneuaIaN3nPOBaHoro 06OpyDoBaHH)
2. Yactota
BolbHnCTBO 3KcNepTOB peKOMeHdyIOT KOM6HnauHIO 3dOpOBOn DneTbI, KOtOpa OCHOBaHa Ha CEIN BaaMx TpeHnpOBOK, NfN3UeCKNe 3aHnTn 3 p3a B HeJeHIO. HopMaNbHbB B3PocJIbY eNoBek MoKeT TpeHnpOBaTcBc DbaJbB H HeJeIO IIN NOdEpxAHn ERO HopMaNbHO NfN3UeCKo fOpMbT. TpExpaOBoIte TpeHnpOBKn Heo6XoIMnbl IyN yUyWeHNBAwe fN3UeCKo fOpMbI yMeHbWeHN BEca. NdeAanBaHr qACTota TpeHnpOBK
-5pa3BHeJeIIO.
© by Top-Sports Gilles GmbH
D-42551 Velbert (Germany)
