
Profi Center de Luxe - Fitness Equipment Christopeit - Free user manual and instructions
Find the device manual for free Profi Center de Luxe Christopeit in PDF.
| Brand | Christopeit |
| Model | Profi Center de Luxe |
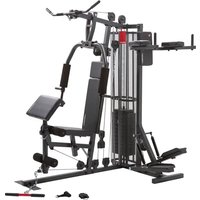
| Product Type | Multifunctional strength station for two people |
| Dimensions (L x W x H) | 179 x 151 x 197 cm |
| Weight of station | 140 kg |
| Maximum user load | 130 kg |
| Load weight | 60 kg (12 plates of 5 kg) |
| Weight selection | Weight selector bar |
| Frame material | Square steel tube 50 x 50 mm |
| Number of workstations | 2 |
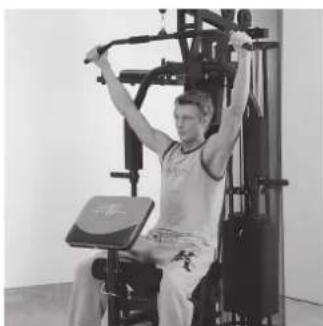
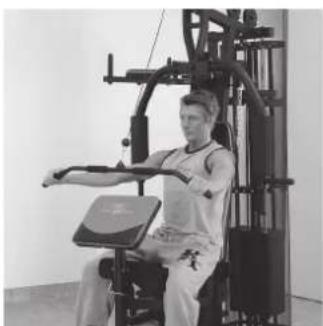
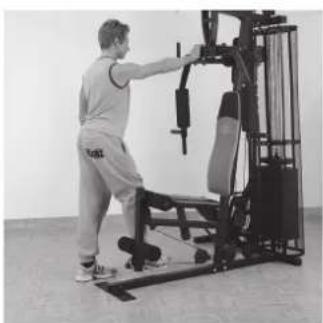
| Possible exercises | Latissimus, butterfly, leg curl, stepper, dips, pull, bicep curl, etc. |
| Included accessories | Latissimus and curl bars, handles, ankle strap, chains and carabiners, hydraulic stepper |
| Seat adjustment | Quick lock button with multiple positions |
| Resistance type | Free weights (plates) + hydraulic cylinder for stepper |
| Safety | Check tightness of screws before each use, use original parts for repairs |
| Maintenance and cleaning | Clean with mild detergent and damp cloth, avoid harsh chemicals |
| Repairability | Spare parts available under specific order numbers |
| Standards | TÜV certified according to EN 957-1/2/4, class H |
| Use | Domestic use, non-therapeutic |
Frequently Asked Questions - Profi Center de Luxe Christopeit
User questions about Profi Center de Luxe Christopeit
0 question about this device. Answer the ones you know or ask your own.
Ask a new question about this device
Download the instructions for your Fitness Equipment in PDF format for free! Find your manual Profi Center de Luxe - Christopeit and take your electronic device back in hand. On this page are published all the documents necessary for the use of your device. Profi Center de Luxe by Christopeit.
USER MANUAL Profi Center de Luxe Christopeit
Assembly and exercise instructions for Order No.
F
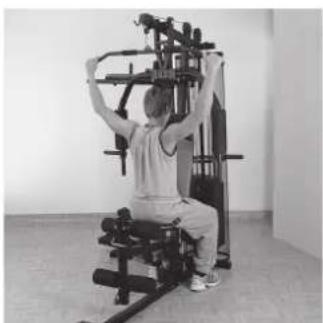
Überzug, Pull over, Pull over, Trekoefening
Ubung 2
Beinbeugen, Leg Curl, Flexion des jambes, Beenbuigen
Ubung 4
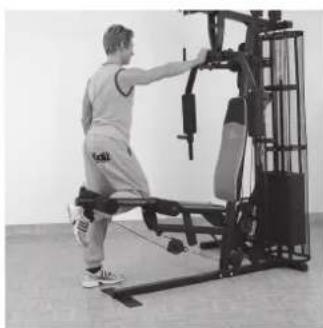
Latissimuszug, Latissimus Pull, Traction latissimus, Latissimusoefening
Ubung 5
Arm/Schulterzug, Arm/shoulder pull, Traction arm/deltoides, Arm/shoulder oefening
Ubung 7
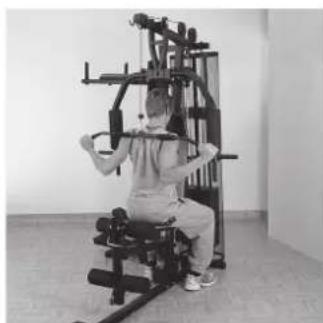
Butterfly, Butterfly, Butterfly, Butterfly
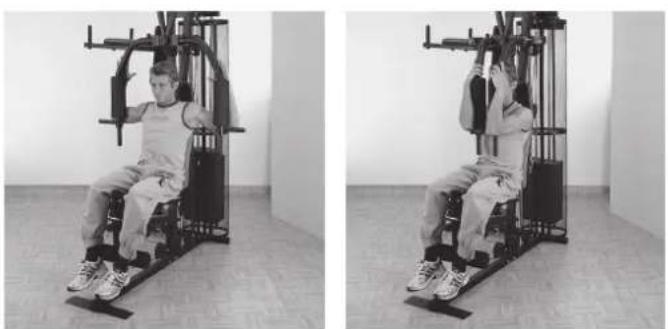
Ubung 6
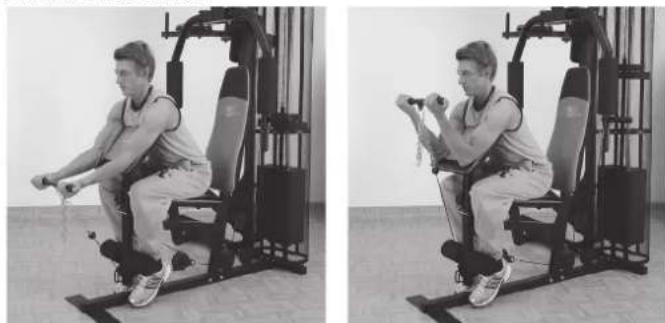
Arm curl, Arm curl, Bras curl, Arm curl
Ubung 8
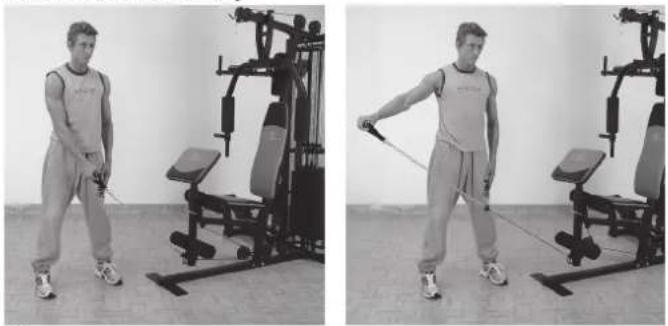
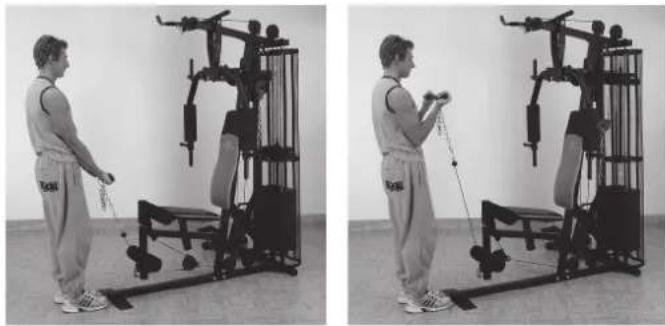
ArmcurlmitSeil,Armcurlwithrope,Brascurlaveccable, Arm curl met kabel
Ubung 10
Rudern, Rowing, Rameur bas, Roeien
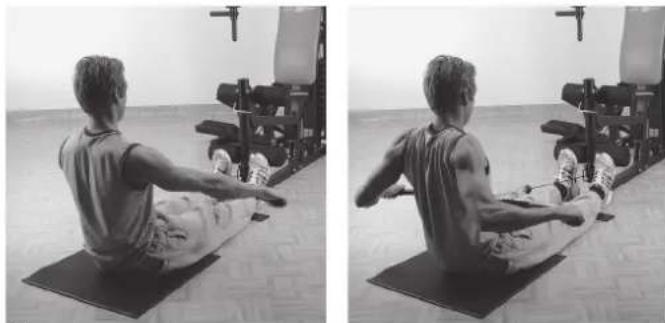
Ubung 12
Steppen, Steps, Piquer, Stappen

Ubung 14
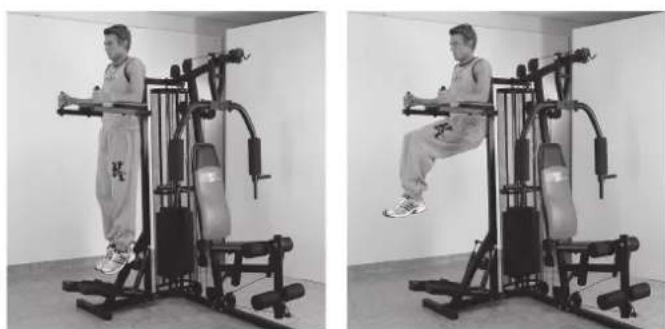
Dips, Dips, Dips, Dips
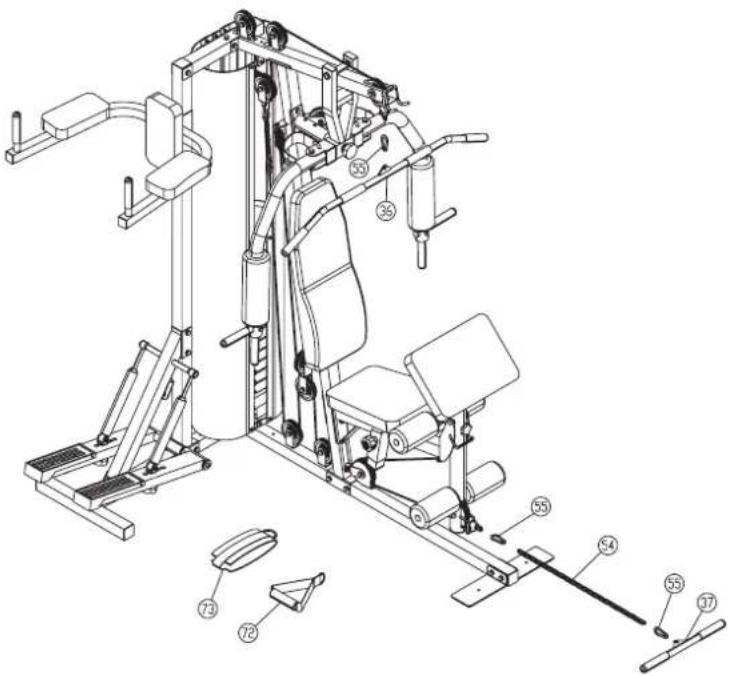
- Summary of Parts Page 3
- Important Recommendations and Safety Information Page 17
- Parts List Page 18 - 20
- Assembly Instructions With Exploded Diagrams Page 21 - 28
- Training Instructions / Pulsratemeasurementtable Page 28
- Descriptions of the forms of training Page 15 - 16
Dear customer,
We congratulate you on your purchase of this home training sports unit and hope that we will have a great deal of pleasure with it. Please take heed of the enclosed notes and instructions and follow them closely concerning assembly and use.
Please do not hesitate to contact us at any time if you should have any questions.
Important Recommendations and Safety Information
Our product has been tested by TUV-GS and meets the latest and toughest safety standards. This fact does not however mean that you can fail to closely observe the following basic points:
- Assemble the equipment according to the assembly instructions and only use the individual parts enclosed for assembly of the equipment and which are listed as being specifically for this equipment. Before you start assembly, check against the delivery to make sure that everything has been delivered, and check against the packing list to make sure all the parts have been enclosed.
- Check before the equipment is first used, and again at regular intervals, that all screws, bolts, nuts and other connections have been done up tightly, to ensure that your training equipment is in a safe operating condition at all times. This is especially true for the cable system. Before each workout should ropes, carbine hook and train accessories are checked for proper mounting and any signs of wear. If misaligned, wear and tear is to be immediately recognizable traces of an exchange the affected parts are required. This is especially true for the cable system. Before each workout should ropes, carbine hook and train accessories are checked for proper mounting and any signs of wear. If misaligned, wear and tear is to be immediately recognizable traces of an exchange the affected parts are required.
- Place the equipment on a dry, level surface and protect it against damp and wetness. If you wish to protect the area underneath the equipment against damage from pressure or from becoming dirty or the like, we recommend that you place a suitable non-slip item under the equipment (such as a rubber mat or sheet of wood).
- Always wear training clothing and shoes that are suitable for fitness training when you are doing training work on the equipment. The clothing must be of a type that will not hang down during training due to its shape (e.g., length). Shoes should be selected for their suitability when using the training equipment, primarily so that they provide a secure grip for the foot and have a non-slip sole.
- Remove any objects from a vicinity of 2 meters avound the equipment before you start any training work.
- In general, you should consult your doctor before starting targeted training work. He can make a definitive statement as to the maximum exertion (pulse rate, wattage, duration of training, etc.) you can set for yourself and can also give you detailed information with respect to the correct body position during training, your training target, and questions of diet.
It is to take care that this item is not useable for therapeutic purpose. Exercise never after heavy meals.
- Only carry out training work on the equipment when it is in perfect working order. Only use original spare parts in the event of a repair.
- If it has not been explicitly stated otherwise in the instructions, the equipment may only be used by one person for training.
- If you experience giddiness, nausea, chest pains or other abnormal symptoms, stop the training at once and see a doctor.
- In general, sports training equipment is not a toy. It may only be used in an appropriate manner and by persons who have been suitably informed or instructed.
- Children, invalids and the handicapped should only use the equipment in the presence of another person who can provide assistance and instruction.
- Always pay attention that you or any other persons never bring parts of the body in close proximity to any parts of the equipment that are still moving.
- When making settings for any adjustable parts, check that they are in the right position and also check the marked maximum setting.
- Do not use strong solvents for cleaning, and only use the tools supplied, or suitable ones of your own, for any repairs that may be required.
- Please dispose of the packaging and any parts that have to be replaced subsequently (all parts for the unit) at suitable collecting points or containers with a view to saving the environment.
- This machine has been tested and certified in compliance with EN 9571+2+4 "H". The maximum permissible load (=body weight) is specified as 130kg .
Parts List - Spare Parts List Profi Center de Luxe Order No. 99881 Profi Center XL Order No. 1153
Technical data: Stand: 01.03.2012
Fitness Station usable for two persons. Individual muscle training and strenght exercising with many equipment. 60Kg weights (12pcs. with 5Kg)
Bench press
Leg curls
Stepper with hydraulic cylinder
Latissimus bar and curl bar
Butterfly combinations
Different rope exercises
Hand grip and ankle strap
Suitable for weights up to max. 70kg Square - section steel tube 50× 50mm
Please check after opening the packing that all the parts shown in the following assembly steps are there. Once you are sure that this is the case, you can start assembly. Please contact us if any components are defective or missing, or if you need any spare parts or replacements in future:
Station weight: 140Kg
Load max. 130 kg
Space requirement approx.: L 179, W 151, H 197 cm

| Illustration No. | Designation Dimensions Quantity Attached to ET number mm | ET number illustration No. | 99881 | 1153 | |
| 1 | Front foot | 1 | 2 | 33-9188101-SW | |
| 2 | Rear foot | 1 | 1 | 33-9188102-SW | |
| 3 | Tubular guide holder | 1 | 4+5 | 33-9188103-SW | |
| 4 | Support 1 | 1 | 2+3 | 33-9188104-SW | |
| 5 | Top cross beam | 1 | 3+7 | 33-9188104-SW | |
| 6 | Cable pulley holder 2 | 2 | 55 | 33-9188106-SW | |
| 7 | Support 2 | 1 | 1+5 | 33-9188107-SW | |
| 8 | Cable pulley holder 1 | 2 | 7 | 33-9188108-SW | |
| 9 | Butterfly arm holder | 1 | 39 | 33-9188109-SW | |
| 10 | Guide bar | 2 | 2+3 | 33-9188110-SW | |
| 11 | Right butterfly arm | 1 | 9 | 33-9188111-SW | |
| 12 | Leg curler holder | 1 | 7 | 33-9188112-SW | |
| 13 | Seat support frame | 1 | 12 | 33-9188113-SW | |
| 14 | Left butterfly arm | 1 | 9 | 33-9188114-SW | |
| 15 | Leg curler | 1 | 12 | 33-9188115-SW | |
| 16 | Arm curl stand | 1 | 20 | 33-9188116-SW | |
| 17 | Seat padding | 1 | 13 | 36-9188101-BT | |
| 18 | Round pad holder | 2 | 13+15 | 33-9188117-SW | |
| 19 | Handgrip 1 | 2 | 11+14 | 33-9188118-SW | |
| 20 | Arm curl pad | 1 | 16 | 36-9188102-BT | |
| 21 | Right pedal | 1 | 34 | 33-9188119-SW | |
| 22 | Crossbar | 1 | 2+4 | 33-9188120-SW | |
| 23 | Weight support | 2 | 10 | 33-9188121-SW | |
| 24 | Left pedal | 1 | 34 | 33-9188122-SW | |
| 25 | Dipping bar | 1 | 4 | 33-9188123-SW | |
| 26 | Cable 1 | 2750mm | 1 | 5+40 | 36-9988-02-BT |
| 27 | Twin cable pulley holder | 1 | 83 | 33-9188124-SW | |
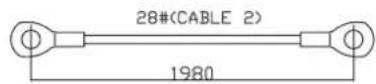
| 28 | Cable 2 | 1980mm | 1 | 6+53 | 36-9988-03-BT |
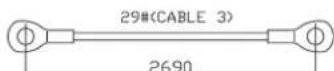
| 29 | Cable 3 | 2690mm | 1 | 11+14 | 36-9988-04-BT |
| 30 | Handgrip 2 | 2 | 25 | 33-9188125-SW | |
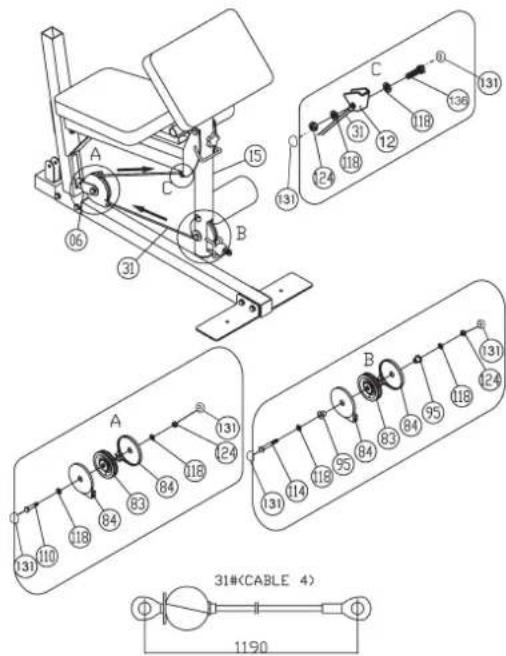
| 31 | Cable 4 | 1190mm | 1 | 12+15 | 36-9988-05-BT |
| 32 | L plate | 1 | 5 | 33-9188126-SW | |
| 33 | Round pipe fitting | 1 | 50 | 36-9988-06-BT | |
| 34 | Shaft 1 | 1 | 4 | 36-9588-03-BT | |
| 35 | Cabel pulley holder incl.hook | 1 | 22+83 | 33-9588-24-VZ | |
| 36 | Latissmus bar | 1 | 55 | 33-9188127-SW | |
| 37 | Curl bar | 1 | 55 | 33-9188128-SW | |
| 38 | Bench press support | 1 | 7 | 33-9188129-SW | |
| 39 | Shaft 2 | 1 | 9 | 36-9588-01-BT | |
| 40 | Weight disc bar | 1 | 26 | 33-9188130-SW | |
| 41 | Weight casing | 2 | 42+43 | 33-9188131-SW | |
| 42 | Weight casing support | 2 | 41 | 33-9188132-SW | |
| 43 | Bending plate | 4 | 41 | 33-9188133-SW | |
Parts List - Spare Parts List Profi Center de Luxe Order No. 99881 Profi Center XL Order No. 1153
Technical data: Stand: 01.03.2012
Fitness Station usable for two persons. Individual muscle training and strenght exercising with many equipment. 60Kg weights (12pcs. with 5Kg)
Bench press
Leg curls
Stepper with hydraulic cylinder
Latissimus bar and curl bar
Butterfly combinations
Different rope exercises
Hand grip and ankle strap
Suitable for weights up to max. 70kg Square - section steel tube 50× 50mm
Station weight: 140Kg
Load max. 130 kg
Space requirement approx.: L 179, W 151, H 197 cm

| Illustration No. | Designation Dimensions Quantity Attached to ET number mm | 2 | 15 | 99881 | 1153 | |
| 44 | Steel bearing 1 | 2 | 15 | 33-9988-24-SI | ||
| 45 | Butterfly shaft | 2 | 11+14 | 33-9988-25-SI | 33-9988-25-SI | |
| 46 | Hydraulic cylinder holder | 2 | 21+24 | 33-9588-22-VZ | 33-9588-22-VZ | |
| 47 | Standing plate | 2 | 1 | 33-9188134-SW | 33-1153-34-WS | |
| 48 | Adjusting plate | 1 | 7 | 33-9188135-SW | 33-1153-35-WS | |
| 49 | Locking pin | 2 | 11+14 | 36-9988-07-BT | 36-9988-07-BT | |
| 50 | Washer | 29//50 | 1 | 38 | 36-9988-08-BT | 36-9988-08-BT |
| 51 | Weight selector bar | 1 | 40 | 36-9988-09-BT | 36-9988-09-BT | |
| 52 | Long safety bracket | 1 | 15 | 36-9988-10-BT | 36-9988-10-BT | |
| 53 | Chain 1 | 8 links | 1 | 55(+28) | 36-9988-11-BT | 36-9988-11-BT |
| 54 | Chain 2 | 22 links | 1 | 55(+31) | 36-9788-03-BT | 36-9788-03-BT |
| 55 | Carbine hook | 5 | 36+53+54 | 36-9588-35-BT | 36-9588-35-BT | |
| 56 | Steel bearing 2 | 6 | 4+21+24 | 36-9588-32-BT | 36-9588-32-BT | |
| 57 | Steel bearing 3 | 10 | 5+9 | 36-9588-33-BT | 36-9588-33-BT | |
| 58 | Hydraulic cylinder | 2 | 22+46 | 36-9588-08-BT | 36-9588-08-BT | |
| 59 | Cable 5 | 1 | 21+24 | 36-9588-15-BT | 36-9588-15-BT | |
| 60 | Large back pad | 1 | 7 | 36-9188103-BT | 36-1153-03-BT | |
| 61 | Forearm pad | 2 | 25 | 36-9188104-BT | 36-1153-04-BT | |
| 62 | Small back pad | 1 | 25 | 36-9188105-BT | 36-1153-05-BT | |
| 63 | Foam rubber roll | 100//300 | 2 | 11+14 | 36-9988-12-BT | 36-9988-12-BT |
| 64 | Foam rubber roll | 100//180 | 2 | 18 | 36-9588-25-BT | 36-9588-25-BT |
| 65 | Foam rubber roll | 100//180 | 2 | 18 | 36-9588-25-BT | 36-9588-25-BT |
| 66 | First weight | 1 | 40 | 36-9988-13-BT | 36-9988-13-BT | |
| 67 | Weight plate | 11 | 10 | 36-9988-14-BT | 36-9988-14-BT | |
| 68 | Antislip covering left | 1 | 24 | 36-9988106-BT | 36-9988106-BT | |
| 69 | Handgrip bolt 1 | 1 | 15 | 36-9988-15-BT | 36-9988-15-BT | |
| 70 | Handgrip bolt 2 | 1 | 9 | 36-9988-16-BT | 36-9988-16-BT | |
| 71 | Handle foam | 2 | 36 | 36-9988-17-BT | 36-9988-17-BT | |
| 72 | V-handle | 1 | 55+26 | 36-9988-18-BT | 36-9988-18-BT | |
| 73 | Ankle strap | 1 | 55+31 | 36-9988-19-BT | 36-9988-19-BT | |
| 74 | Lock knob | 1 | 12 | 36-9988-20-BT | 36-9988-20-BT | |
| 75 | Handgrip nut | 2 | 46 | 36-9588-21-BT | 36-9588-21-BT | |
| 76 | Handle wrapping | 4 | 11+14+25 | 36-9588-19-BT | 36-9588-19-BT | |
| 77 | Handle wrapping | 6 | 11+14+36+37 | 36-9588-19-BT | 36-9588-19-BT | |
| 78 | Rubber buffer 1 | 26//56 | 2 | 10 | 36-9988-30-BT | 36-9988-30-BT |
| 79 | Rubber buffer 2 | 25*40 | 2 | 11+14 | 36-9988-21-BT | 36-9988-21-BT |
| 80 | Plastic tube sleeve | 1 | 15 | 36-9988-22-BT | 36-9988-22-BT | |
| 81 | Plastic buffer 1 | 1 | 12 | 36-9588-20-BT | 36-9588-20-BT | |
| 82 | Plastic buffer 2 | 2 | 21+24 | 36-9588-38-BT | 36-9588-38-BT | |
| 83 | Cabel pulley | 13 | 5+84 | 36-9588-27-BT | 36-9588-27-BT | |
| 84 | Cable pulley cover | 24 | 83 | 36-9588-26-BT | 36-9588-26-BT | |
| 85 | Square stopper | 50x50 | 7 | 1+2+3+4 | 39-9841 | 39-9841 |
| 86 | Square stopper | 25x50x1.5 | 2 | 13 | 39-9842 | 39-9842 |
| Illustration No. mm Illustration No. 99881 1153 | |||||||
| 87 | Square stopper | 25x50x2 | 2 | 9 | 39-9842 | 39-9842 | |
| 88 | Square stopper | 45x45 | 1 | 12 | 39-9845 | 39-9845 | |
| 89 | Square stopper | 38x38 | 2 | 25 | 39-9840 | 39-9840 | |
| 90 | Round stopper | 50x1.5 | 2 | 11+14 | 36-9988-23-BT | 36-9988-23-BT | |
| 91 | Round stopper | 60x1.5 | 1 | 15 | 36-9988-24-BT | 36-9988-24-BT | |
| 92 | Round stopper | 25x1.5 | 2 | 11+14 | 36-9988-25-BT | 36-9988-25-BT | |
| 93 | Round stopper | 25x2 | 4 | 18 | 39-10146 | 39-10146 | |
| 94 | Plastic bushing for pulley | 15 | 2 | 5 | 36-9588-18-BT | 36-9588-18-BT | |
| 95 | Plastic bushing for pulley | 20 | 2 | 15 | 36-9988-26-BT | 36-9988-26-BT | |
| 96 | Plastic cap | 1 | 40 | 36-9988-27-BT | 36-9988-27-BT | ||
| 97 | Fillister-head Philips screw | M6x15 | 5 | 81+82 | 39-9911 | 39-9911 | |
| 98 | Fillister-head Philips screw | 4 | 39-10296-SW | 39-10296-SW | |||
| 99 | Round-headed Allen screw | M8x15 | 6 | 22+34+39 | 39-9888-CR | 39-9888-CR | |
| 100 | Hexagonal bolt | M6x16 | 18 | 32+41+42+43 | 39-10120 | 39-10120 | |
| 101 | Hexagonal bolt | M8x20 | 4 | 20+62 | 39-10095-CR | 39-10095-CR | |
| 102 | Hexagonal bolt | M8x30 | 2 | 11+14+19 | 39-9906 | 39-9906 | |
| 103 | Hexagonal bolt | M8x40 | 2 | 46 | 39-9817 | 39-9817 | |
| 104 | Hexagonal bolt | M8x45 | 2 | 17 | 39-9914 | 39-9914 | |
| 105 | Hexagonal bolt | M8x55 | 4 | 61 | 39-10056 | 39-10056 | |
| 106 | Hexagonal bolt | M8x65 | 1 | 5+32 | 39-9814-CR | 39-9814-CR | |
| 107 | Hexagonal bolt | M8x70 | 2 | 60 | 39-10157 | 39-10157 | |
| 108 | Hexagonal bolt | M10x20 | 14 | 5+7+10+30+45 | 39-9974-CR | 39-9974-CR | |
| 109 | Hexagonal bolt | M10x25 | 1 | 6 | 39-10025-CR | 39-10025-CR | |
| 110 | Hexagonal bolt | M10x45 | 11 | 1+5+6+8+27+35 | 39-10131-CR | 39-10131-CR | |
| 111 | Hexagonal bolt | M10x65 | 2 | 38 | 39-9982-CR | 39-9982-CR | |
| 112 | Hexagonal bolt | M10x70 | 15 | 3+4+5+7+12+22 | 39-10148-CR | 39-10148-CR | |
| 113 | Hexagonal bolt | M10x75 | 2 | 47 | 39-10186-CR | 39-10186-CR | |
| 114 | Hexagonal bolt | M10x80 | 3 | 8+15 | 39-10055-CR | 39-10055-CR | |
| 115 | Hexagonal bolt | M10x90 | 1 | 12 | 39-10015 | 39-10015 | |
| 116 | Washer | 6//12 | 36 | 100 | 39-10007-CR | 39-10007-CR | |
| 117 | Washer | 8//16 | 20 | 99+101-107 | 39-9917-CR | 39-9917-CR | |
| 118 | Washer | 10//20 | 86 | 108-115 | 39-9989-VC | 39-9989-VC | |
| 119 | Washer | 12//24 | 1 | 40(+26) | 39-9986-CR | 39-9986-CR | |
| 120 | Washer | 10//38 | 5 | 70+75+99 | 39-10249-CR | 39-10249-CR | |
| 121 | Washer | 8//28 | 4 | 99 | 39-10180-CR | 39-10180-CR | |
| 122 | Spring washer | for M10 | 12 | 108 | 39-9995-CR | 39-9995-CR | |
| 123 | Spring washer | for M8 | 20 | 99+101+102+104+105+107 | 39-9864-CR | 39-9864-CR | |
| 124 | Self-locking nut | M10 | 36 | 109-115 | 39-9981-CR | 39-9981-CR | |
| 125 | Self-locking nut | M8 | 3 | 103+106 | 39-9818-CR | 39-9818-CR | |
| 126 | Self-locking nut | M6 | 18 | 100 | 39-9816-VC | 39-9816-VC | |
| 127 | Square stopper | 21+24 | 36-9988111-BT | 36-9988111-BT | |||
| 128 | Antislip covering right | 1 | 21 | 36-9988110-BT | 36-9988110-BT | ||
| 129 | Washer | 6//18 | 4 | 98 | 39-9993 | 39-9993 | |
| 130 | Spring washer | for M6 | 4 | 98 | 39-9865-CR | 39-9865-CR | |
| 131 | Cap | for M10 | 80 | 36-9988108-BT | 36-9988108-BT | ||
| 132 | Cap | for M8 | 20 | 36-9988109-BT | 36-9988109-BT | ||
| 133 | Tool Set | 1 | 36-9988-28-BT | 36-9988-28-BT | |||
| 134 | Adjusting plate | 1 | 2 | 33-9988136-SW | 33-1153-36-WS | ||
| 135 | Assembly instructions | 1 | 36-1153-06-BT | 36-1153-06-BT | |||
| 136 | Bolt | M10x40 | 1 | 12 | 39-10402 | 39-10402 | |
Assembly Instructions
Before beginning assembly, be sure to observe our recommendations and safety instructions. Some parts are pre assembled.
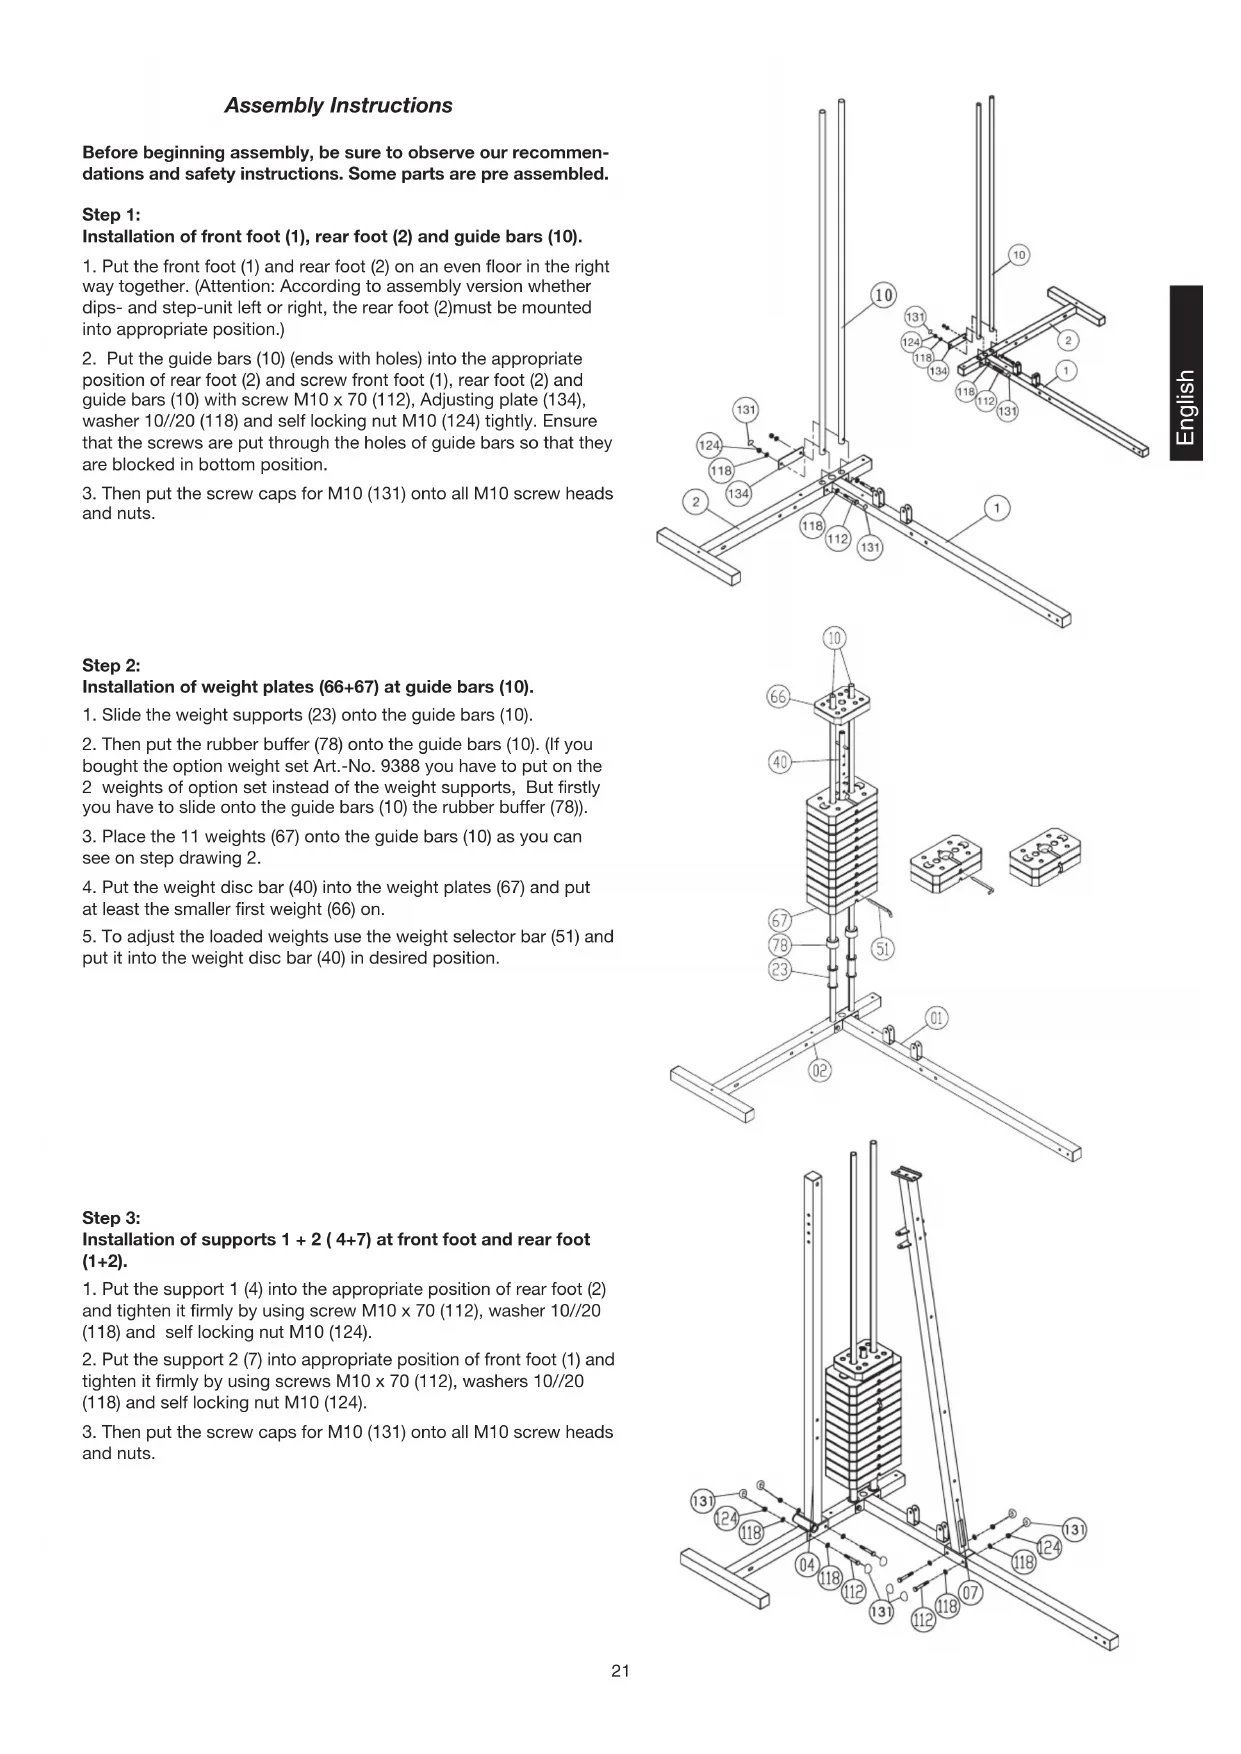
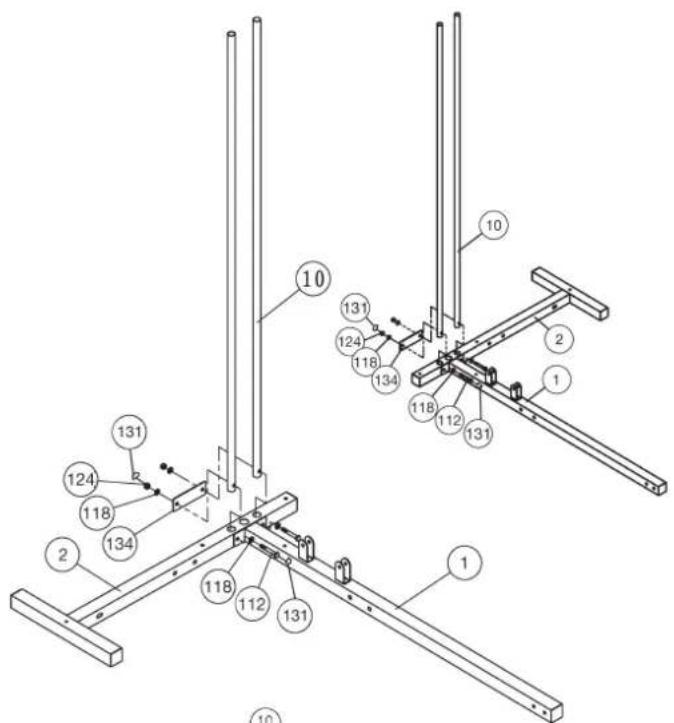
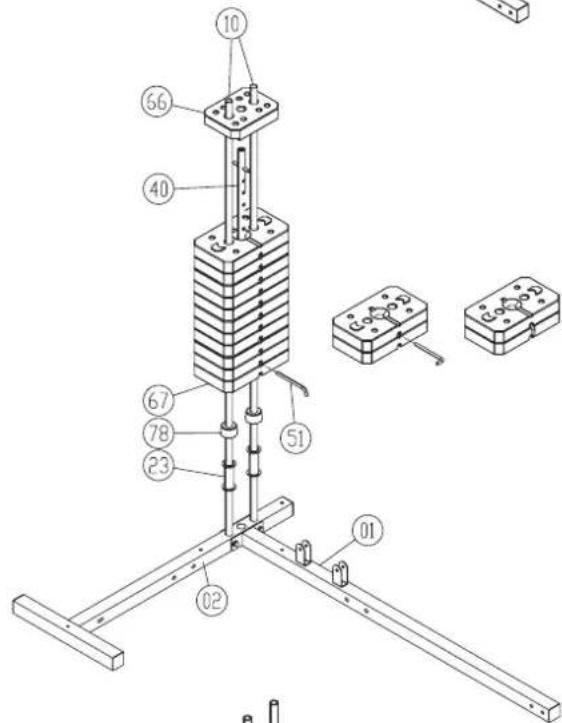
Step 1: Installation of front foot (1), rear foot (2) and guide bars (10).
- Put the front foot (1) and rear foot (2) on an even floor in the right way together. (Attention: According to assembly version whether dips- and step-unit left or right, the rear foot (2) must be mounted into appropriate position.)
- Put the guide bars (10) (ends with holes) into the appropriate position of rear foot (2) and screw front foot (1), rear foot (2) and guide bars (10) with screw M10 x 70 (112), Adjusting plate (134), washer 10//20 (118) and self locking nut M10 (124) tightly. Ensure that the screws are put through the holes of guide bars so that they are blocked in bottom position.
- Then put the screw caps for M10 (131) onto all M10 screw heads and nuts.
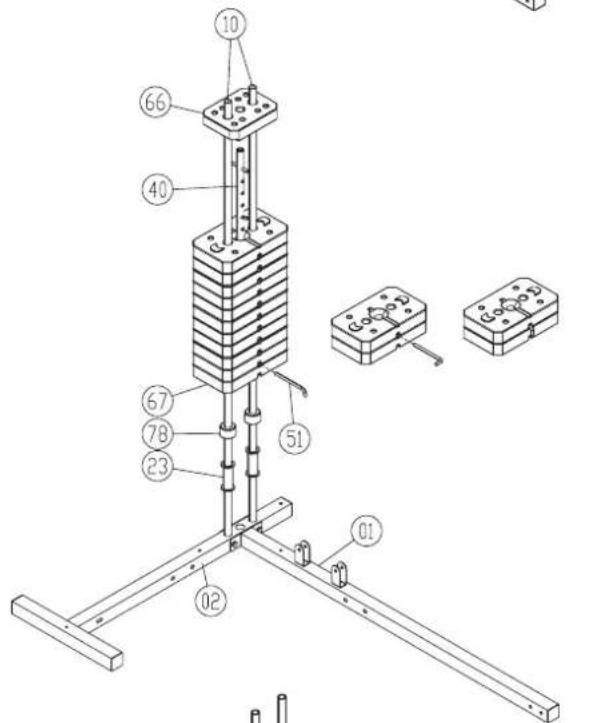
Step 2: Installation of weight plates (66+67) at guide bars (10).
- Slide the weight supports (23) onto the guide bars (10).
- Then put the rubber buffer (78) onto the guide bars (10). (If you bought the option weight set Art.-No. 9388 you have to put on the 2 weights of option set instead of the weight supports, But firstly you have to slide onto the guide bars (10) the rubber buffer (78)).
- Place the 11 weights (67) onto the guide bars (10) as you can see on step drawing 2.
- Put the weight disc bar (40) into the weight plates (67) and put at least the smaller first weight (66) on.
- To adjust the loaded weights use the weight selector bar (51) and put it into the weight disc bar (40) in desired position.
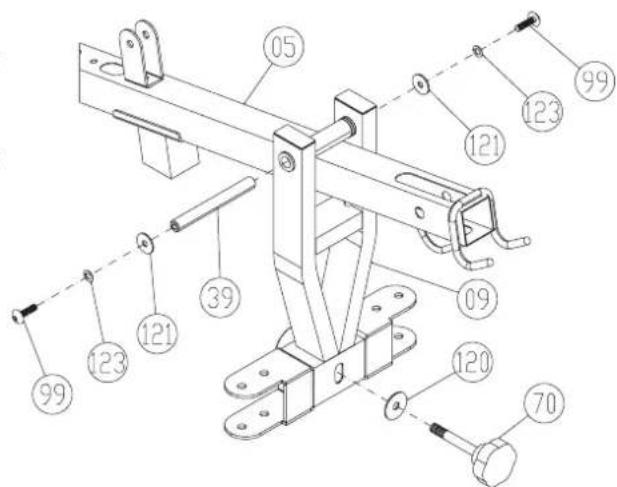
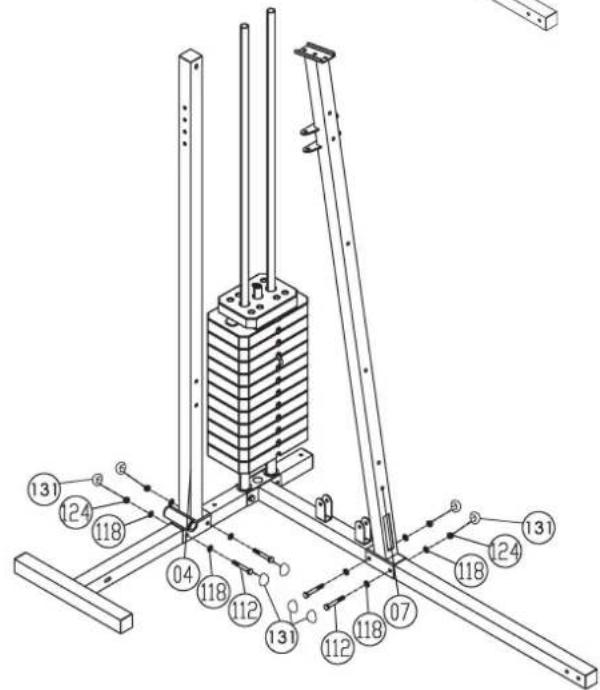
Step 3: Installation of supports 1 + 2(4 + 7) at front foot and rear foot (1 + 2) .
- Put the support 1 (4) into the appropriate position of rear foot (2) and tighten it firmly by using screw M10 x 70 (112), washer 10//20 (118) and self locking nut M10 (124).
- Put the support 2 (7) into appropriate position of front foot (1) and tighten it firmly by using screws M10 x 70 (112), washers 10//20 (118) and self locking nut M10 (124).
- Then put the screw caps for M10 (131) onto all M10 screw heads and nuts.

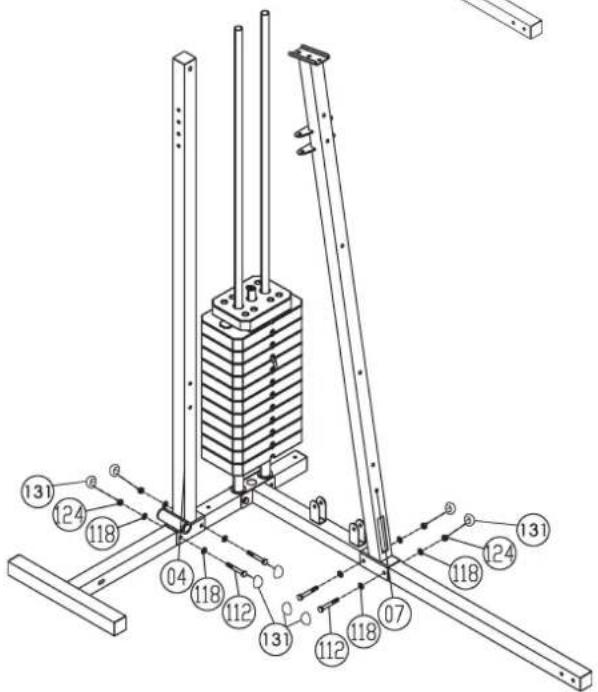
Step 4: Installation of tabular guide holder (3) and top cross beam (5) at supports 1 + 2(4 + 7)
- Place the tabular guide holder (3) onto the ends of guide bars (10) and support 1 (4).
- Screw the tabular guide holder (3) at guide bars (10) tightly by using screw M 10x20 (108), spring washers for M10 (122) and washers 10//20 (118). Screw two screws (108) with the washers (118) to decorate the thread holes of the support 1 (3).
- Connect the end of support 1 (4) with tabular guide holder (3) und screw them together by using screw M10 x 70 (112), washer 10//20 (118) and self locking nut M10 (124).
- Put the top cross beam (5) in appropriate position onto the support 2 (7) and tighten it firmly by using screw 10 × 20 (108), spring washer for M10 (122) and washers 10 / / 20 (118) at support 2 (7).
- Screw tightly the top cross beam (5) at tabular guide holder (3) by using screw M 10x20 (108), spring washer for M10 (122) and washers10//20 (118).
- Then put the screw caps for M10 (131) onto all M10 screw heads and nuts.

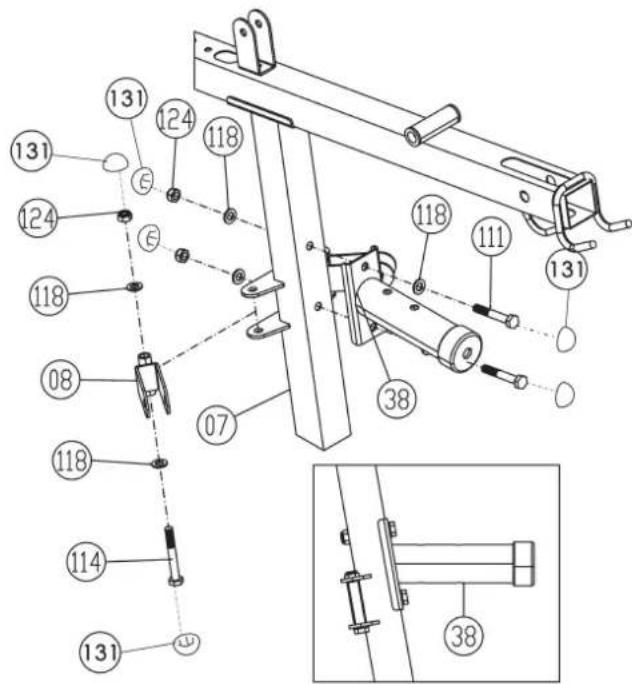
Step 5: Installation of bench press support (38) and cable pulley holder 1 (8) at support 2 (7).
- Place the bench press support (38) in appropriate position at support 2 (7) and screw these parts together by using screw M10 x 65 (111), washers 10//20 (118) and self locking nut M10 (124).
- Put the cable pulley holder 1 (8) into the holder at support 2 (7) and screw them together by using screw M10 x 80 (114), washer 10//20 (118) and self locking nut M10 (124). Attention, the cable pulley holder 1 (8) should turn easy when it is assembled.
- Then put the screw caps for M10 (131) onto all M10 screw heads and nuts.
Step 6: Installation of butterfly arm holder (9) at top cross beam (5).
- Place the butterfly arm holder (9) in appropriate position at top cross beam (5), so that the holes with steel bearings are align and slide the axle 2 (39) through the butterfly arm holder (9) and top cross beam (5).
- Secure the axle 2 (39) by using screw M8x15 (99), spring washers for M8 (123) and washers 8//28 (121) on both sides.
- For butterfly exercising you have to secure the butterfly arm holder (9) with handgrip bolt 2 (70) and washer 10//38 (120) at bench press support (38).
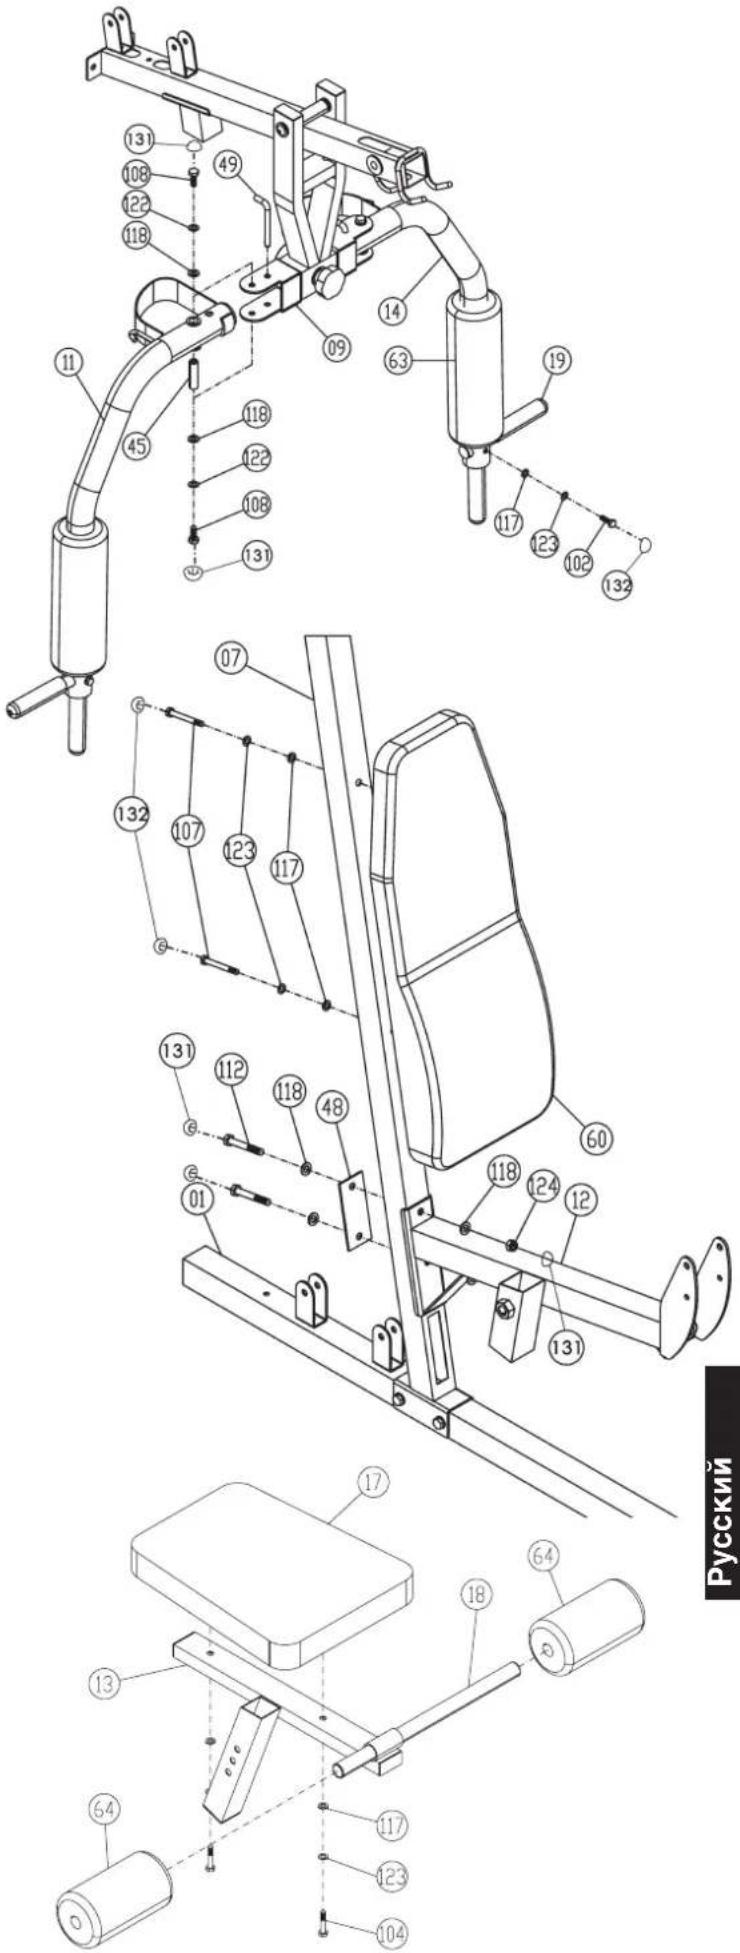
Step 7: Installation of butterfly arms (11+14) at butterfly arm holder (9) and foam rubber roll (63) and hand grips (19).
- Put the butterfly shafts (45) into the holder of butterfly arm left and right (11 + 14) and place the butterfly arms (11 + 14) in right position into the appropriate holder of butterfly holder (9).
- Screw the butterfly arms (11+14) at butterfly arm holder (9) tightly by using screw M10x20 (108), spring washer for M10 (122) and washer 10//20 (118) on bottom and top side.
- Slide the foam rubber roll (63) with help of a little bit soap water onto the butterfly arms (11+14).
- Place the hand grips (19) into appropriate holder of butterfly arm left and right (11 + 14) and screw them tightly by using screw M8x30 (102), washer 8//16 (117) and spring washer for M8 (123).
- For bench press exercising secure the butterfly arms left and right (11 + 14) with locking pins (49) at butterfly holder (9) and screw out the handgrip bolt 2 (70) of bench press support (9).
- For butterfly exercising secure the butterfly arm holder (9) with hand grip bolt 2 (70) at bench press support (38) und take out the locking pins (49) from butterfly arms (11+14).
- Then put the screw caps for M10 (131) onto all M10 screw heads and nuts and the screw caps(132) for M8 onto all M8 screw heads and nuts.
Step 8: Installation of the back pad (60) and leg curler holder (12) at support 2 (7).
- Adjust the back pad (60) on support 2 (15) so that the threaded holes in the rear of the back pad (60) are align with the holes in support 2 (7) and screw it tightly by using screw M8 x 70 (107), spring washer for M 8 (123) and washer 8//16 (117).
- Place the leg curler holder (12) in appropriate position at support 2 (7), so that the holes are align and screw it tightly by using screw M10x70 (112), adjusting plate (48), washers 10//20 (118) and self locking nut M 10 (124).
- Then put the screw caps for M10 (131) onto all M10 screw heads and nuts and the screw caps(132) for M8 onto all M8 screw heads and nuts.
Step 9: Installation of seat pad (17) and round pad holder (18) at seat support frame (13).
- Adjust the seat pad (17) on seat support frame (13) so that the threaded holes in the rear of seat pad (17) are align with the seat support frame (13) and screw it tightly by using screw M8 x 45 (104), spring washer for M 8 (123) and washer 8//16 (117).
- Slide the round pad holder (18) into the seat support frame (13) in middle position.
- Slide two black foam rubber roll (64) onto the ends of round pad holder (18).
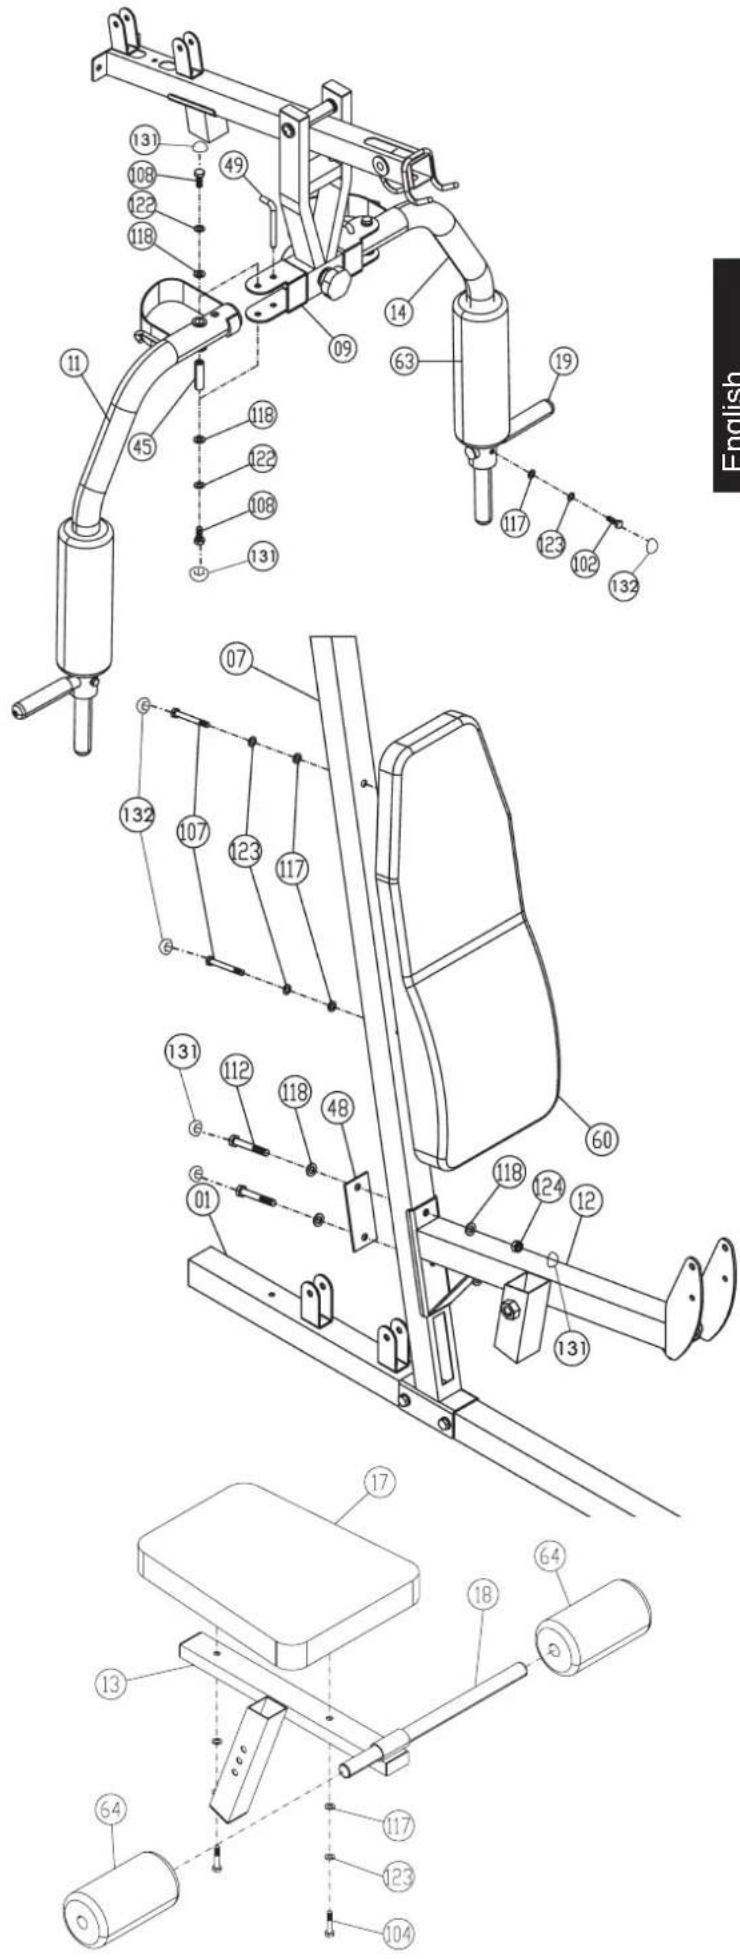
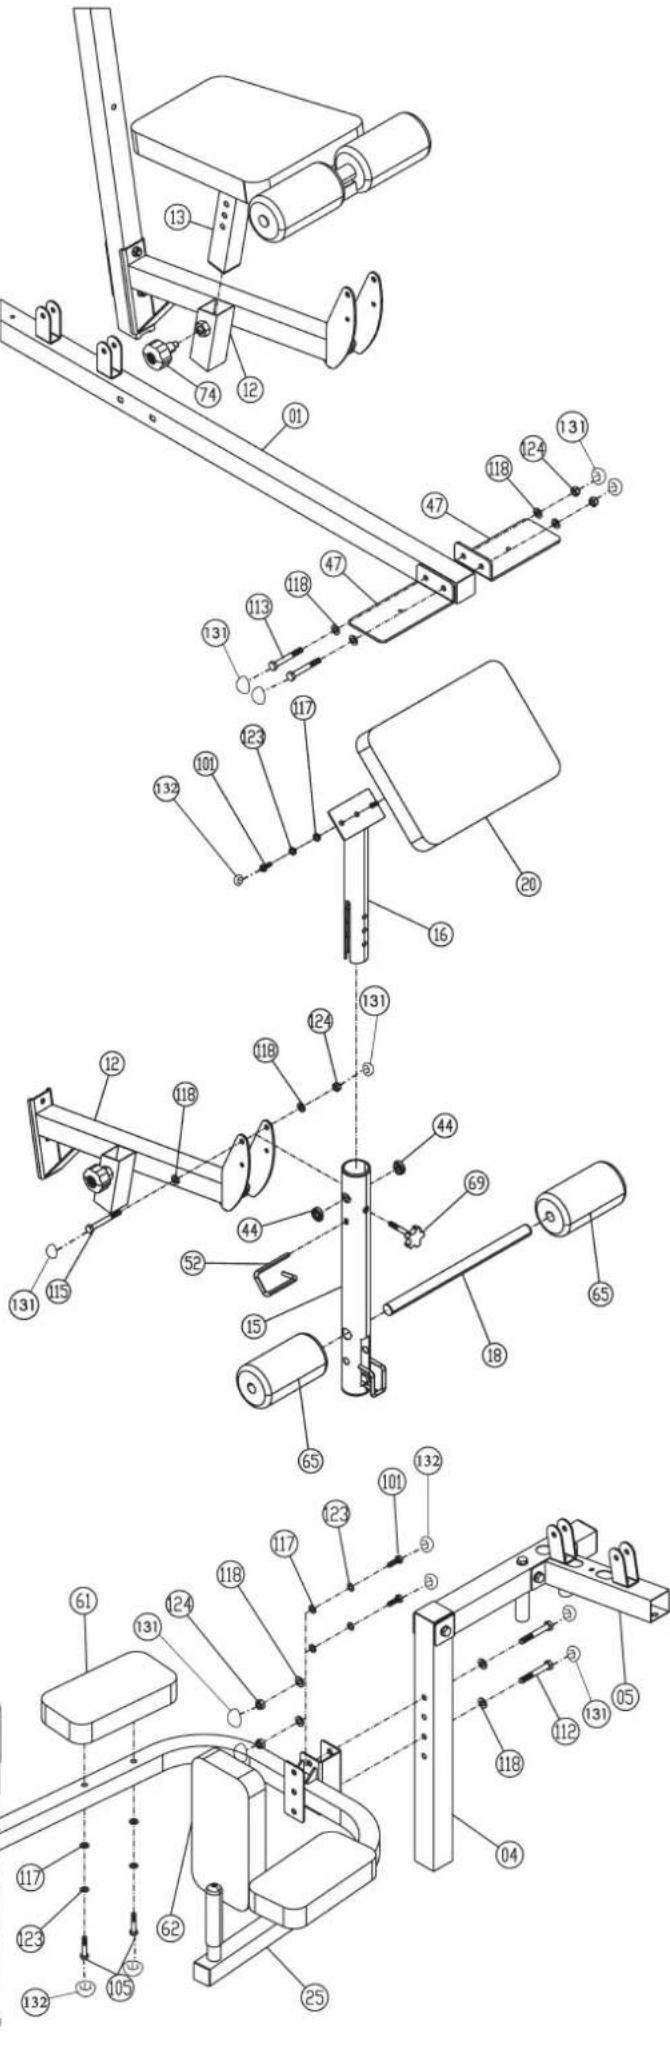
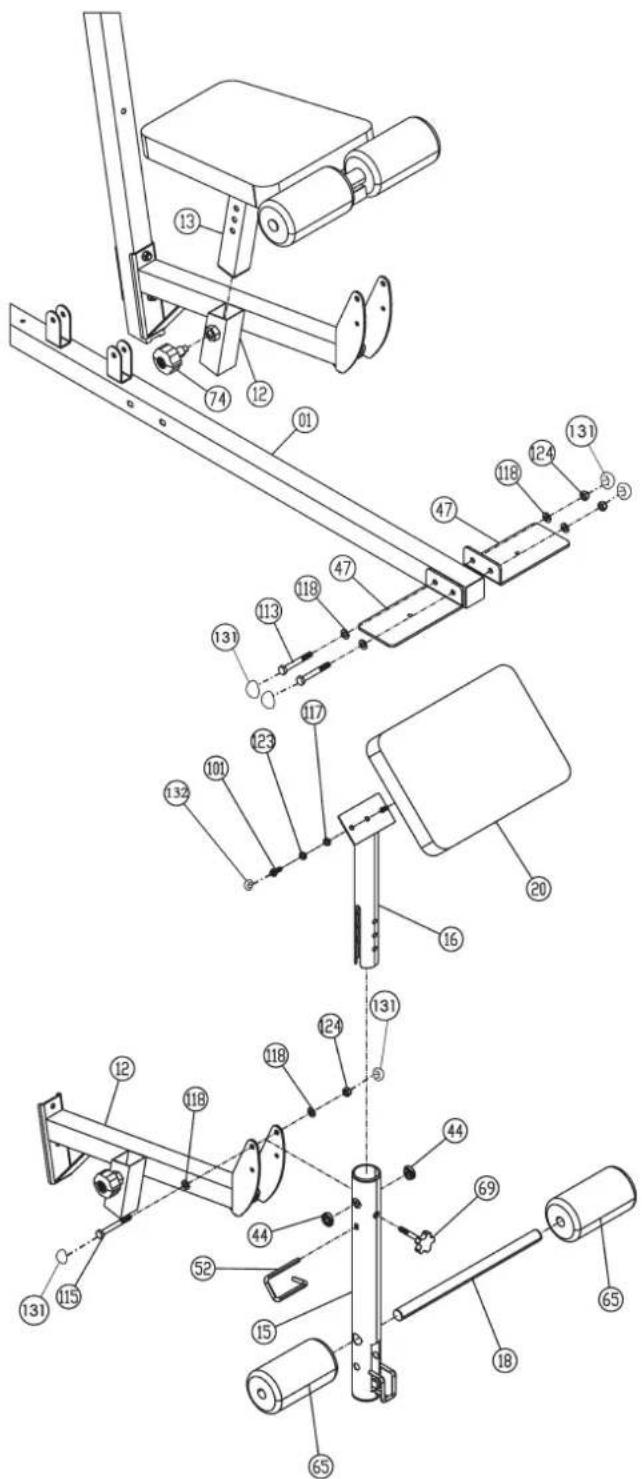
Step 10: Installation of seat frame (13) at leg curler support (12) and standing plates (47) at front foot (1).
- Slide the seat frame (13) into the appropriate holder of leg curler holder (12) and secure it into desired position by using the quick lock knob (74).
(Note: to screw in the quick lock knob (8), the treaded hole in the leg curler support (12) and one of the holes in the seat frame (13) must be aligned. The setting of the seat can be adjusted as desired later. For this, the quick lock knob (8) must be loosened by only a few revolutions, the cap of the lock must be pulled away and the seat adjusted. Then secure the new setting by tightening the quick lock knob (8).) - Place the standing plates (47) in front of the holder at front foot (1) und screw them tightly by using screw M10 x 75 (113), washer 10//20 (118) and self locking nut M10 (124).
- Then put the screw caps for M10 (131) onto all M10 screw heads and nuts.
Step 11: Installation of leg curler (15) and arm curl pad (20) at leg curler holder (12).
- Put the leg curler (15) with pre-assembled steel bearings 1 (44) into the appropriate holder of leg curler holder (12) and screw it tightly by using screw M10 x 90 (115), washer 10//20 (118) and self locking nut M10 (124). Attention, the leg curler (15) should turn easy when it is assembled.
- Slide the round pad holder (18) into the holder of leg curler (15) in middle position and slide two red foam rubber rolls (65) onto the ends of round pad holder (18).
- Adjust the arm curl pad (20) on arm curl stand (16) so that the threaded holes in the rear of arm curl pad (20) are align with the arm curl stand (16) and screw it tightly by using screw M8 x 20 (101), spring washer for M 8 (123) and washer 8//16 (117).
- The arm curl stand (16) with pre-assembled arm curl pad (20) could be mounted in desired position at leg curler (15) and secured by using the hand grip bolt 1 (69).
- To secure the position of leg curler (15) please slide the long safety bracket (52) through the aligned holes of leg curl holder (12) and leg curler (15).
- Then put the screw caps for M10 (131) onto all M10 screw heads and nuts and the screw caps(132) for M8 onto all M8 screw heads and nuts.
Step 12: Installation of forearm pad (61), small back pad (62) and handgrip 2 (30) at dipping bar (25) and support 1 (4).
- Adjust the small back pad (62) on dipping bar (25) so that the threaded holes in the rear of small back pad (62) are align with dipping bar (25) and screw it tightly by using screw M8x20 (101), spring washer for M8 (123) and washer 8//16 (117).
- Adjust the forearm pad (61) on dipping bar (25) so that the threaded holes in the rear of forearm pad (61) are align with dipping bar (25) and screw it tightly by using screw M8x55 (105), spring washer for M8 (123) and washer 8//16 (117).
- Place the hand grips (30) into appropriate holder of dipping bar (25) and screw them tightly by using screw M10x20 (108), spring washer for M10 (122) and washer 10//20 (118).
- Put the pre-assembled dipping bar (25) into appropriate holder of support 1 (4) and screw it tightly into desired position by using screw M10 x 70 (112), washer 10//20 (118) and self locking nut M10 (124).
- Then put the screw caps for M10 (131) onto all M10 screw heads and nuts and the screw caps(132) for M8 onto all M8 screw heads and nuts.
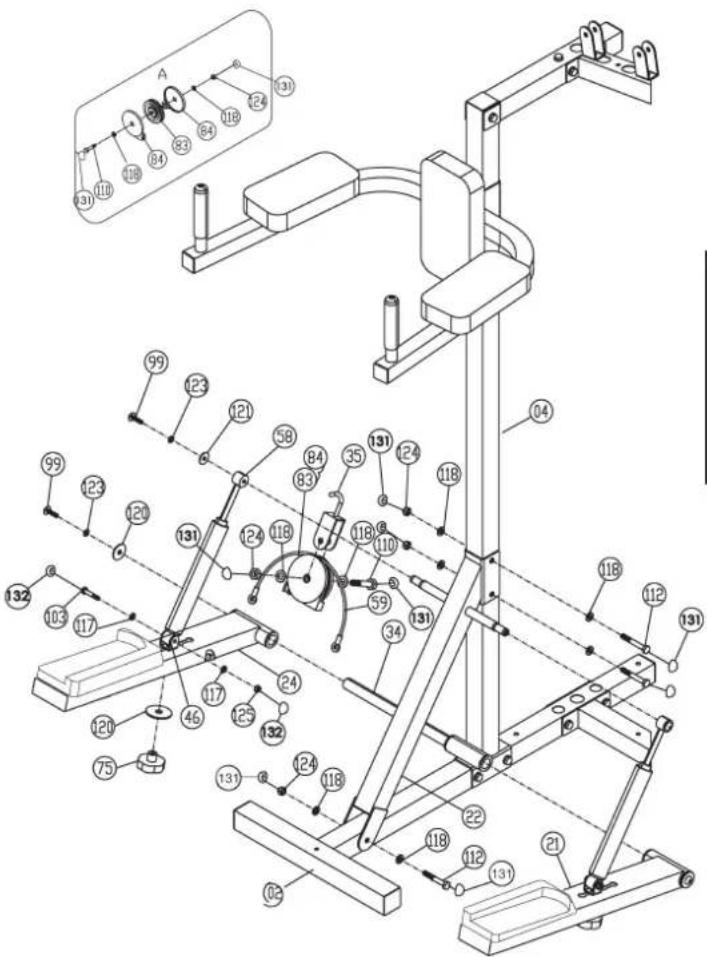
Step 13: Installation of Stepper and Crossbar (22) at support 1 (4).
- Place the crossbar (22) into appropriate position at support 1 (4) and rear foot (2), so that the holes are align and screw it tightly by using screw M10x70 (112), washers 10//20 (118) and self locking nut M 10 (124). (Note: Perhaps you have to loosen the connection point of support 1 (4) and rear foot (2) a little bit to mount crossbar easy.)
- Put the left and right pedal (21+24) in right direction at appropriate holder at support 1 (4), that the steel bearings align and slide the axle 1 (34) through. Secure the axle 1(34) by using screw M8x15 (99), spring washer for M8 (123) and washer 8//38 (120) on both ends of axle.
- Put the hydraulic cylinder (58) with top side onto the holder of crossbar (22) and secure this position by using screw M8x15 (99), spring washer for M8 (123) and washer 8//28 (121).
- Screw the bottom end of cylinder (58) at the holder for cylinder (46) by using screw M8x40 (103), washer 8//16 (117) and self locking nut M 8 (125). Ensure that the cylinder (58) can turn at holder a little bit.
- Insert the holder for hydraulic cylinder (46) from top side trough the pedal left and right (21 + 24) and connect the holder (46) into desired position by using handgrip nut (75) and washer 10//38 (120). You can adjust the stepper resistance at holder (46) by choosing different positions at pedal left and right (21 + 24)
- Put a cable roller unit as figure „A“ show together, put the cable 5 (59) over the pulley (83) and connect this at cable pulley holder incl. hook (35) in a way that the cable pulley can roll easy.
- Insert the cable pulley holder incl. hook (35) into the welded holder at crossbars' (22) bottom side and connect the ends of cable 5 (59) with the pedal left and right (21 + 24) .
- Then put the screw caps for M10 (131) onto all M10 screw heads and nuts and the screw caps(132) for M8 onto all M8 screw heads and nuts.
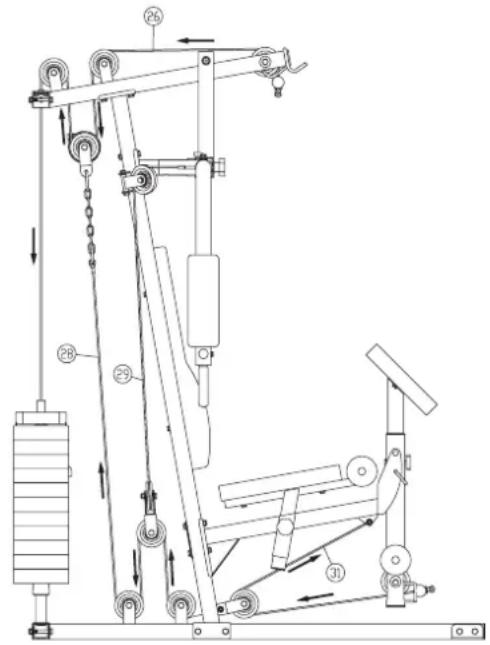
Step 14: Installation of cable 1 for latissimus (26) with cable pulley units. Please note following situation regarding the cable pulley units: The cables have to put on the cable pulleys (83) and should covered on both sides with cable pulley covers (84) that the input and output of cable is leaded.
The cable pulley units have to install at the same time with cables at right position.
- Put the cable 1 (26) as showed in Step 14 drawing through the top cross beam (5), screw the screw end of cable 1 (26) with washer 12//24 (119) into the weight disk bar (40) and secure the screw with nut.
- Take cable 1 (26) and a cable pulley unit as showed in figure "A" (without cable pulley cover) with screw M10x70 (112), washer 10//20 (118), plastic bushing for pulley (94) and nut M10 (124). Insert the cable pulley (83) into the top cross beam (5), position the plastic bushing (94) from outer side of top cross beam (15) and screw in tightly.
- Put a cable roller unit as figure "B" shows together with screw M10x45 (110), washer (118) and self locking nut (124), insert the cable 1 (26) and connect this at top cross beam (5).
- Take cable 1 (26) and a cable pulley unit as showed in figure „B" with screw M10x70 (112), washer 10//20 (118), plastic bushing for pulley (94) and nut M10 (124) and attach it at cable pulley holder 2 (6).
- Then put the screw caps for M10 (131) onto all M10 screw heads and nuts.
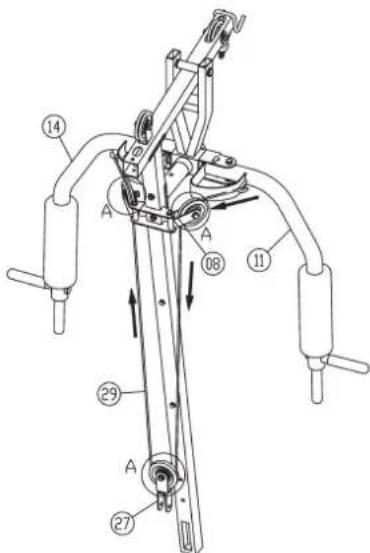
Step 15: Installation of cable 3 for butterfly (29) with cable pulley units.
- Connect the both ends of cable 3 (29) with the appropriate holder at butterfly arm left and right (11 + 14) .
- Put two cable roller units as figure „A“ shows together with screw M10x45 (110), washer (118) and self locking nut (124), insert the cable 3 (29) and connect them at cable pulley holders 1 (8) in a way that the cable pulley can roll easy.
- Put a cable roller unit as figure "A" shows together with screw M10x45 (110), washer (118) and self locking nut (124), insert the cable 3 (29) and connect this at twin cable pulley holder (27) in a way that the cable pulley can roll easy.
- Then put the screw caps for M10 (131) onto all M10 screw heads and nuts.
Step 16: Installation of cable 4 for leg curler (31) with cable pulley units.
- Pull cable 4 (31) through the big hole of leg curler (15) and connect the end of cable 4 (31) at appropriate holder on bottom side of leg curler holder (12) by using screw M10x40 (136), washer 10//20 (118) and self locking nut M10 (124) as showed in figure "C".
- Take cable 4 (31) and a cable pulley unit as showed in figure „B" with screw M10x80 (114), washer 10//20 (118), plastic bushing for pulley (95) and nut M10 (124). Insert the cable pulley (83) with cable pulley cover (84) into the leg curler (15) and position the plastic bushing (95) from outer side of leg curler (15).
- Put a cable roller unit as figure "A" shows together with screw M10x45 (110), washer (118) and self locking nut (124), insert the cable 4 (31) and connect this at cable pulley holder 1(8) in a way that the cable pulley can roll easy.
- Then put the screw caps for M10 (131) onto all M10 screw heads and nuts.
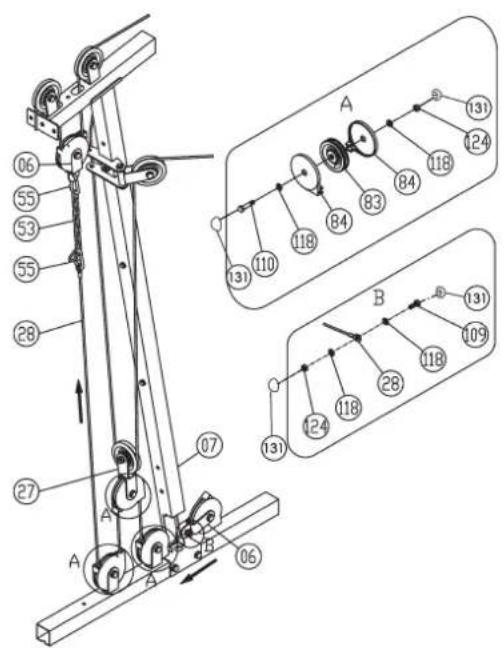
Step 17: Installation of cable 2 (28) with cable pulley units.
- Pull cable 2 (28) through the big hole of support 2 (7) and connect the end of cable 2 (28) at cable pulley holder 2 (6) by using screw M10x25 (109), washer 10//20 (118) and self locking nut M10 (124) as showed in figure „B".
- Put two cable roller unit as figure "A" shows together with screw M10x45 (110), washer (118) and self locking nut (124), insert the cable 2 (28) and install these units at holder of front foot (1) in a way that the cable pulley can roll easy.
- Put a cable roller unit as figure "A" shows together with screw M10x45 (110), washer (118) and self locking nut (124), insert the cable 2 (28) and connect this at twin cable pulley holder (27) in a way that the cable pulley can roll easy.
- Take cable 2 (28) and enlarge it with 8 links chain (53) and two carbine hooks (55) and connect cable 2 (28) with cable pulley holder 2 (6), which is pre-assembled at cable 1 (26).
(Note: To get a smooth sliding cable system, you may adjust the cable system at 8 links chain (53) with carbine hooks (55) through setting them into another position.)
5. Then put the screw caps for M10 (131) onto all M10 screw heads and nuts.

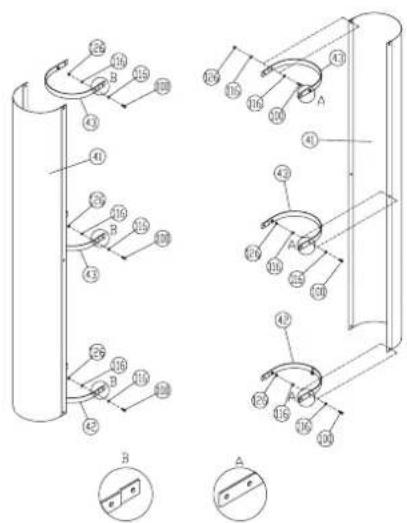
Step 18: Installation of weight casing (41) with weight casing support (42) and bending plate 43).
- Connect the weight casing support (42) and bending plate (43) at appropriate position of weight casing (41) by using screw M6x16 (100), washer 6//12 (116) and self locking nut M 6 (126). Note, that the weight casing supports (42) and bending plates (43) have to mount into the right position as showed in Step 18 drawing.
Step 19: Installation of weight casing (41) with supports (42 + 43) at L-plate (32) and rear foot (2).
- Put the weight casing (41) with pre-assembled weight casing support (42) into the holes of rear foot (2). Get the end of opposite weight casings supports (42) and bending plates (43) together and screw them tightly by using screw M6x16 (100), washer 6//12 (116) and self locking nut M 6 (126) as showed in figure "A".
- Put the L-plate (32) under the top cross beam (5) into appropriate position and screw it tightly by using screw M8x65 (106), washer 8//16 (117) and self locking nut M 8 (125) as showed in figure „B".
- Connect the upper bending plate connection additionally at L-plate (32) by using screw M6x16 (100), der Unterlegscheiben 6//12 (116) and der Selbstsichernde Mutter M 6 (126).
- Then put the screw cap for M8 (132) onto the M8 nut.
Step 20: Installation of latissimus bar (36) and curl bar (37).
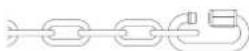
- Connect the latissimus bar (36) at cable 1 (26) by using carbine hook (55).
To storage the latissimus bar (36) you can put it on the appropriate holder in front of the top cross beam (5). - Connect the curl bar (37) at cable 4 (31) by using the 22 links chain (54) and carbine hooks (55). (When you use leg curler for exercising you should take away the curl bar (37) with chain (54).
- Depends on exercising you can use the handgrip (72) instead of latissimus bar (36) or the ankle strap (73) instead of curl bar (36).
Important-Safety-Information for using carbine hooks.

Loose the screw nut of C-hook(55) and put the chain (54) into the C-hook(55).

Put the cables' end (26+31) or pull bars (36+37) into the C-hook (55).

Screw the nut of carbine hook (55) tightly and ensure that it is closed.
WARNING: Before start exercising ensures that the 5 carbine hooks (55) are closed tightly.
Step:21 Checks:
- Check the correct installation and function of all screwed and plug connections. Installation is thereby complete.
- Before starting training, ensure that the recommended safety clearances are maintained to other objects. To secure a particular position of the machine, the machine can be fastened firmly to the floor using bolts and plugs, which you must obtain yourself. Holes are provided for this purpose in the tubes which have direct contact with the floor.
- When using the machine, particularly the dipping bar, always be sure to wear suitable headwear and clothes. This must protect against catching hair or clothing and trapping hair or clothing in the moving parts of the machine.
- When everything is in order, familiarise yourself with the machine with light weights. The weights have to secure with weight selector bar (51). Maximum load of weight: 70Kg.
Training Instructions
You must consider the following factors in determining the amount of training effort required in order to attain tangible physical and health benefits:
1. Intensity:
The level of physical exertion in training must exceed the level of normal exertion without reaching the point of breathlessness and/or exhaustion. A suitable guideline for effective training can be taken from the pulse rate. During training this should rise to the region of between 70% to 85% of the maximum pulse rate (see the table and formular for determination and calculation of this).
During the first weeks, the pulse rate should remain at the lower end of this region, at around 70% of the maximum pulse rate. In the course of the following weeks and months, the pulse rate should be slowly raised to the upper limit of 85% of the maximum pulse rate. The better the physical condition of the person doing the exercise, the more the level of training should be increased to remain in the region of between 70% to 85% of the maximum pulse rate. This should be done by lengthening the time for the training and / or increasing the level of difficulty.
If the pulse rate is not shown on the computer display or if for safety reasons you wish to check your pulse rate, which could have been displayed wrongly due to error in use, etc., you can do the following:
a. Pulse rate measurement in the conventional way (feeling the pulse at the wrist, for example, and counting the number of beats in one minute).
b. Pulse rate measurement with a suitable specialised device (available from dealers specialising in health-related equipment).
2. Frequency
Most experts recommend a combination of health-conscious nutrition, which must be determined on the basis of your training goal, and physical training three times a week. A normal adult must train twice a week to maintain his current level of condition. At least three training sessions a week are required to improve one's condition and reduce one's weight. Of course the ideal frequency of training is five sessions a week.
3. Planning the training
Each training session should consist of three phases: the warm-up phase, the training phase, and the cool-down phase. The body temperature and oxygen intake should be raised slowly in the warm-up phase. This can be done with gymnastic exercises lasting five to ten minutes.
Then the actual training (training phase) should begin. The training exertion should be relatively low for the first few minutes and then raised over a period of 15 to 30 minutes such that the pulse rate reaches the region of between 70% to 85% of the maximum pulse rate.
In order to support the circulation after the training phase and to prevent aching or strained muscles later, it is necessary to follow the training phase with a cool-down phase. This should be consist of stretching exercises and / or light gymnastic exercises for a period of five to ten minutes.
You find further information on the subject warm-up exercises, stretch exercises or general gymnastics exercises in our download area under www.christopeit-sport.com
4. Motivation
The key to a successful program is regular training. You should set a fixed time and place for each day of training and prepare yourself mentally for the training. Only train when you are in the mood for it and always have your goal in view. With continuous training you will be able to see how you are progressing day by day and are approaching your personal training goal bit by bit.
Pulse Rate Measurement Table
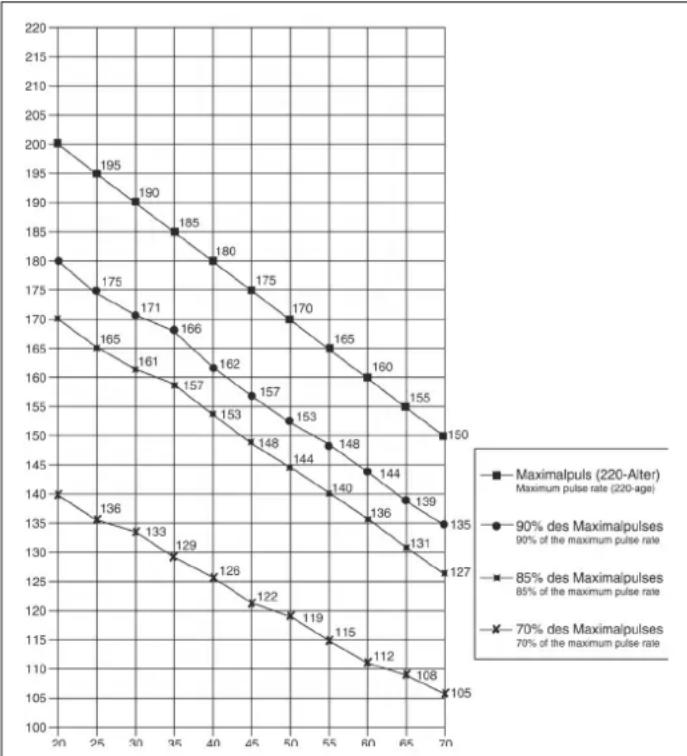
Calculation formula: Maximum pulse rate = 220 - age (220 minus your age)
90% of the maximum pulse rate = (220 - age) x 0.9
85% of the maximum pulse rate = (220 - age) x 0.85
70% of the maximum pulse rate = (220 - age) x 0.7

Sommaire
Chere cliente, cher client,
Differents exercices de corde
3. Planning van de training
NATnCCmmy nnoCTabka dna6nceca
Bartepn
Pa3nHbIe TAROBbIe ynpaxHeHa
Ctennep
YnopblnnpykNokTei
Kbaaptha CtaIbHa Tpy6a 50x50 MM
YcTaHOBOUHbIe ra6apntbI npn6n.179xW 151xB197cm
CHAB ynaKOBky, npoBepbTe NO cnNcKy, BCE JI n DeTaN Ha MeCTe. EcIN Bce B nopAKe, To MOxHO HauHnHaTb c6OpKy. EcIn KaKoHn6yDb arperaT He B nopAKe IIN OTCyTCTByeT, oBaPaaTecb K HAm:
NATNCMMYC INOCDTABKa DnR 6nueNa
Bartepn
Pa3nHbIe TAROBbIe ynpaxHeHa
Ctennep
YnopblnnpykNokTei
KbaapHaCtAaHbHa Tpy6a 50X50 MM
YcTaHOBOUHbIe ra6apntbI npn6J.179xL151xB197cm

| №Нанмени Картонки | Оваиме Разmersы в мь Кал-во Монтук 99881 1153 | уется на № ET-Ne | ET-Ne | |||
| 43 | Креленце ддя обшевки ддя гузов 2 | 4 | 41 | 33-9188133-SW | 33-1153-33-WS | |
| 44 | Стольно пошимник 1 | 2 | 15 | 33-9988-24-SI | 33-9988-24-SI | |
| 45 | Валник батерфлг | 2 | 11+14 | 33-9988-25-SI | 33-9988-25-SI | |
| 46 | Креленце рindравлиескоцлинда | 2 | 21+24 | 33-9588-22-VZ | 33-9588-22-VZ | |
| 47 | Угован пл actина | 2 | 1 | 33-9188134-SW | 33-1153-34-WS | |
| 48 | Пл actина | 1 | 7 | 33-9188135-SW | 33-1153-35-WS | |
| 49 | Пробхан滥юшнишфт 2 | 2 | 11+14 | 36-9988-07-BT | 36-9988-07-BT | |
| 50 | Покладная shayba | 29//50 | 1 | 38 | 36-9988-08-BT | 36-9988-08-BT |
| 51 | Пробхан滥юшнишфт 1 | 1 | 40 | 36-9988-09-BT | 36-9988-09-BT | |
| 52 | Стоорная скоба | 1 | 15 | 36-9988-10-BT | 36-9988-10-BT | |
| 53 | Ц emb 1 | 8 спевa | 1 | 55(+28) | 36-9988-11-BT | 36-9988-11-BT |
| 54 | Ц emb 2 | 22 спевa | 1 | 55(+31) | 36-9788-03-BT | 36-9788-03-BT |
| 55 | Карбшины крик | 5 | 36+53+54 | 36-9588-35-BT | 36-9588-35-BT | |
| 56 | Стольно пошимник 2 | 6 | 4+21+24 | 36-9588-32-BT | 36-9588-32-BT | |
| 57 | Стольно пошимник 2 | 10 | 5+9 | 36-9588-33-BT | 36-9588-33-BT | |
| 58 | Покладн� чаский с铝合金 | 2 | 22+46 | 36-9588-08-BT | 36-9588-08-BT | |
| 59 | Тос 5 | 1 | 21+24 | 36-9588-15-BT | 36-9588-15-BT | |
| 60 | Могская симпka | 1 | 7 | 36-9188103-BT | 36-1153-03-BT | |
| 61 | Пожucha ддя рук | 2 | 25 | 36-9188104-BT | 36-1153-04-BT | |
| 62 | Пожucha ддя симпы | 1 | 25 | 36-9188105-BT | 36-1153-05-BT | |
| 63 | Проблочь рожik boлшо | 100//300 | 11+14 | 36-9988-12-BT | 36-9988-12-BT | |
| 64 | Проблочь рожik boлшо | 100//180 | 18 | 36-9588-25-BT | 36-9588-25-BT | |
| 65 | Проблочь рожik boлшо | 100//180 | 18 | 36-9588-25-BT | 36-9588-25-BT | |
| 66 | Гуз маленьки | 1 | 40 | 36-9988-13-BT | 36-9988-13-BT | |
| 67 | Гуз | 11 | 10 | 36-9988-14-BT | 36-9988-14-BT | |
| 68 | Heckolyэшee покгыт otherwise links | 1 | 24 | 36-9988106-BT | 36-9988106-BT | |
| 69 | Грибковы вин 1 | 1 | 15 | 36-9988-15-BT | 36-9988-15-BT | |
| 70 | Гriбковы вин 2 | 1 | 9 | 36-9988-16-BT | 36-9988-16-BT | |
| 71 | Могская рожотka | 2 | 36 | 36-9988-17-BT | 36-9988-17-BT | |
| 72 | Рожотka | 1 | 55+26 | 36-9988-18-BT | 36-9988-18-BT | |
| 73 | Ремешек ддя hor | 1 | 55+31 | 36-9988-19-BT | 36-9988-19-BT | |
| 74 | Фиksатор本市�ы санделя | 1 | 12 | 36-9988-20-BT | 36-9988-20-BT | |
| 75 | Гriбковая رайka | 2 | 46 | 36-9588-21-BT | 36-9588-21-BT | |
| 76 | Могская obolotka рожотк | 4 | 11+14+25 | 36-9588-19-BT | 36-9588-19-BT | |
| 77 | Могская obolotka рожотк | 6 | 11+14+36+37 | 36-9588-19-BT | 36-9588-19-BT | |
| 78 | Рразношага рожотда | 26//56 | 10 | 36-9988-30-BT | 36-9988-30-BT | |
| 79 | Рразношага рожотда 1 | 25*40 | 2 | 36-9988-21-BT | 36-9988-21-BT | |
| 80 | Пл actikobога вунka | 1 | 15 | 36-9988-22-BT | 36-9988-22-BT | |
| 81 | Пл actikobога рожотда 1 | 1 | 12 | 36-9588-20-BT | 36-9588-20-BT | |
| 82 | Пл actikobога рожотда 2 | 2 | 21+24 | 36-9588-38-BT | 36-9588-38-BT | |
| 83 | Рожоты слok | 13 | 5+84 | 36-9588-27-BT | 36-9588-27-BT | |
| 84 | Крышka канathoro福建省 | 24 | 83 | 36-9588-26-BT | 36-9588-26-BT | |
| 85 | Четырөг olьога заглшka | 50x50 | 7 | 39-9841 | 39-9841 | |
| № Картонки | Наменованne | Раимеры в мм | Кол-во штук | Монатуетс на № | ET-№ 99881 | ET-№ 1153 |
| 86 YeTubepexуrolьnamа заглушka 25x50x1.5 2 13 39-9842 | 39-9842 | |||||
| 87 YeTubepexуrolьnamа заглушka 25x50x2 2 9 39-9842 | 39-9842 | |||||
| 88 YeTubepexуrolьnamа заглушka 45x45 1 12 39-9845 | 39-9845 | |||||
| 89 YeTubepexуrolьnamа заглушka 38x38 2 25 39-9840 | 39-9840 | |||||
| 90 Kryptлязаглшka | 50x1.5 | 2 | 11+14 | 36-9988-23-BT | 36-9988-23-BT | |
| 91 Kryptлязаглшka | 60x1.5 | 1 | 15 | 36-9988-24-BT | 36-9988-24-BT | |
| 92 Kryptлязаглшka | 25x1.5 | 2 | 11+14 | 36-9988-25-BT | 36-9988-25-BT | |
| 93 Kryptлязаглшka | 25x2 | 4 | 18 | 39-10146 | 39-10146 | |
| 94 Пл actmaccobуй podшинник 1 | 15 | 2 | 5 | 36-9588-18-BT | 36-9588-18-BT | |
| 95 Пл actmaccobуй podшинник 2 | 20 | 2 | 15 | 36-9988-26-BT | 36-9988-26-BT | |
| 96 Пл actmaccobуй колачok | 1 | 40 | 36-9988-27-BT | 36-9988-27-BT | ||
| 97 Кестообразnéй бOLT | M6x15 | 5 | 81+82 | 39-9911 | 39-9911 | |
| 98 Кестообразnéй сOLT | 4 | 39-10296-SW | 39-10296-SW | |||
| 99 Вintc крtnоу rolовко | M8x15 | 6 | 22+34+39 | 39-9888-CR | 39-9888-CR | |
| 100 БOLT c secttrgpanno rolovko | M6x16 | 18 | 32+41+42+43 | 39-10120 | 39-10120 | |
| 101 БOLT c secttrgpanno rolovko | M8x20 | 4 | 20+62 | 39-10095-CR | 39-10095-CR | |
| 102 БOLT c secttrgpanno rolovko | M8x30 | 2 | 11+14+19 | 39-9906 | 39-9906 | |
| 103 БOLT c secttrgpanno rolovko | M8x40 | 2 | 46 | 39-9817 | 39-9817 | |
| 104 БOLT c secttrgpanno rolovko | M8x45 | 2 | 17 | 39-9914 | 39-9914 | |
| 105 БOLT c secttrgpanno rolovko | M8x55 | 4 | 61 | 39-10056 | 39-10056 | |
| 106 БOLT c secttrgpanno rolovko | M8x65 | 1 | 5+32 | 39-9814-CR | 39-9814-CR | |
| 107 БOLT c secttrgpanno rolovko | M8x70 | 2 | 60 | 39-10157 | 39-10157 | |
| 108 БOLT c secttrgpanno rolovko | M10x20 | 14 | 5+7+10+30+45 | 39-9974-CR | 39-9974-CR | |
| 109 БOLT c secttrgpanno rolovko | M10x25 | 1 | 6 | 39-10025-CR | 39-10025-CR | |
| 110 БOLT c secttrgpanno rolovko | M10x45 | 11 | 1+5+6+8+27+35 | 39-10131-CR | 39-10131-CR | |
| 111 БOLT c secttrgpanno rolovko | M10x65 | 2 | 38 | 39-9982-CR | 39-9982-CR | |
| 112 БOLT c secttrgpanno rolovko | M10x70 | 15 | 3+4+5+7+12+22 | 39-10148-CR | 39-10148-CR | |
| 113 БOLT c secttrgpanno rolovko | M10x75 | 2 | 47 | 39-10186-CR | 39-10186-CR | |
| 114 БOLT c secttrgpanno rolovko | M10x80 | 3 | 8+15 | 39-10055-CR | 39-10055-CR | |
| 115 БOLT c secttrgpanno rolovko | M10x90 | 1 | 12 | 39-10015 | 39-10015 | |
| 116 Пдкладнашайba | 6//12 | 36 | 100 | 39-10007-CR | 39-10007-CR | |
| 117 Пдкладнашайba | 8//16 | 20 | 99+101-107 | 39-9917-CR | 39-9917-CR | |
| 118 Пдкладнашайba | 10//20 | 86 | 108-115 | 39-9989-VC | 39-9989-VC | |
| 119 Пдкладнашайba | 12//24 | 1 | 40(+26) | 39-9986-CR | 39-9986-CR | |
| 120 Пдкладнашайba | 10//38 | 5 | 70+75+99 | 39-10249-CR | 39-10249-CR | |
| 121 Пдкладнашайba | 8//28 | 4 | 99 | 39-10180-CR | 39-10180-CR | |
| 122 Говпан ддг M10 | 12 | 108 | 39-9995-CR | 39-9995-CR | 39-9995-CR | |
| 123 Говпан ддг M6 | dla M8 | 20 | 99+101+102+104+105+107 | 39-9864-CR | 39-9864-CR | |
| 124 CamoФИСспуншан с райka | M10 | 36 | 109-115 | 39-9981-CR | 39-9981-CR | |
| 125 CamoФИСспуншан с райka | M8 | 3 | 103+106 | 39-9818-CR | 39-9818-CR | |
| 126 CamoФИСспуншан с райka | M6 | 18 | 100 | 39-9816-VC | 39-9816-VC | |
| 127Чебriхуrolьдан заглшka | 2 | 21-24 | 36-9988111-BT | 36-9988111-BT | ||
| 128 Heckolyзшая поочьшая rechts | 1 | 21 | 36-9988110-BT | 36-9988110-BT | ||
| 129 Пдкладнашайba | 6//18 | 4 | 98 | 39-9993 | 39-9993 | |
| 130 Говпан ддг M6 | dla M6 | 4 | 98 | 39-9865-CR | 39-9865-CR | |
| 131 Kolлачok dla M10 | dla M10 | 80 | 36-9988108-BT | 36-9988108-BT | ||
| 132 Kolлачok dla M8 | dla M8 | 20 | 36-9988109-BT | 36-9988109-BT | ||
| 133 Habор Исторгов | 1 | 36-9988-28-BT | 36-9988-28-BT | |||
| 134 Пл actina | 1 | 2 | 33-9988136-SW | 33-1153-36-WS | ||
| 135 Исторци по сборке и特有的орвам | 1 | 36-1153-06-BT | 36-1153-06-BT | |||
| 136 БOLT c secttrgpanno rolovko | M10x40 | 1 | 12 | 39-10402 | 39-10402 | |
Pykooeodcmeo no MoHmaxy
Ipeed Tem KaK haaTaB MoTax, 6o3aTeJIbHO O3HaKOMbTeCb C HaaMM peKOMHeAaJMaH N HcTpyKunMn NO TexNke 6e3OnaChOCTN. HeKOtopBie Yactn PpeBapnteJIbHO Co6paHbI. BHNMaHne: He BbIbPaCbIaBteYnaKOBky, noka NoHocTbHO He 3aKOHuHIn IpOuecc c6OpKN, TTo6bl clyauHNo He BbIbPoCnTB KaKe-TO MeNKe Detann!
War 1:
MOnTak Npeedne CToKn (1), 3aDHe CToKn (5) n Hapabniox (10).
1.ПОJOKTe NepeHIOI CToIky (1)Ha pOBHy IO NOBepXHOCTb I npIIOJOKeTc 3aDHIIO CTOky (2) K KpePNeHIO NpePeHne CToIKn (1). (BHNMaHHe: B 3aBHCIMOCtN OT Bercnn MOHTaxa 6yDb To YNCTOTy OOnopa dIra NoITrNBaHIN n CTeNHyo YNCTOTy CCblNK INI IN PpBa ecNn 3aDnHora DOJNXH MaONTHPOBaTbC4 COOTBetCTBeHHO)
2.Bctabte HappnaHIOue (10) (OTKpbTbIMN KOHcAMN) B COOTBeTCTByOoee MeTo 3aDHe N CToKN (2) IN KpeNko npNKpyTNTE NepeDHee OCHOBAHne (1) INaDHee OCHOBAHne (2) c NOMOuBb60NTOB M10 x 70 (112),PiactnHa (134),NoKnadhix wai6 10//20 (118) n CamoOpncypouuxraekM10 (124).Y6eInTeCb,HTo 60NTbI pOnyueHe byeep3 OTBepCTBa HappnaHIOx (10) IN B a3dHe N CToiKe (2).
3.ПослесeroHaedeHBeKoJNaUOKДЯM10(131)HaBc6OJIbM10nraKn
War 2:
MoHTaX rpy3OB (66+67) Ha HappaBJIIOUne (10).
- Hadehbe He Ka kdyu HnpanBnaIooyU (10) no OndHn Btynke (23).
- Nocne 3toro HadehTe no OndH pe3HHOBn npoknaKe (78) Ha HapabIaoune (10). (Ecnn Bb np6penn DonolHnteBbHn Ha6op rpy3OB Art.-No.9388, HadehTe BmecTo orpaHnHTeJe 2 rpy3a n3 DonolHnteBHorO Ha6opa.Ho Chahana HadehTe pe3HHObBe npoknKn (78) nTobko Notom dononHnteBHe Ipe py3a.)
- HandeHbTe Ha Hapabnloane (10) 11 rpy3OB (67) KaK noka3aHO Ha pncyHke.
4.BCTaBbTe caIa3Kn IINrpy3OB (40) B rpy3bl HAeHbTe cambl MaIeHb- Kn rpy3 (66).
5.Ппedoхантelenьштгt1(51)инлбayetcдяуctановс BECOB Hary3Kn.ДЯЗTOROBCTaBBTeEROВ Cana3KnДЯ rpy3OB(40)ВжenaMOM noLoxKeHn.(Yem bIWe noLoXKeHne npedoxpaHntelbHorO wTnФTa1 (51),TeM Mehble BecOBa Hary3ka.)
War 3:
MOnTax onOpHbIX Tpy6 1 + 2 (4+7) Ha nepeDnHO u 3aDnHO cToiKn (1+2).
1.BCTaBbTe onOpHyTo Tpy6y 1 (4) B COOTBeTcByUoIe MeCtO Ha 3aDHei cToIke (2) IN KpENKO npIKpyTuTE onOpHyTO Tpy6y 1 (4) C NOMOuIbIO BoJIoTB M10 x 70 (112), noKnaadhbiX uai6 10//20 (118) n caMoΦHKCuPyUoIuXcraek M10 (124).
2.BCTaBtE onOpHyTOpy6y 2 (7 B COOTBeTCTByOuue MeCTo Ha nepeDHe CTOnke(1) INKpENKO npNKpyTHTe onOpHyIO ty6y 2 (7) C NOMOUsbO BoJTOB M10x70(112),noKnadhIxwa610//20(118)INcAmoΦHKnpyUoxcxraekM10(124).
3.ПосечeroнадьтколпayokдяM10(131)HaBce6ontbIM10ngai
Uar 4: MoHTaX KpeIeHnB BeDyue Tpy6bl (3) cToKn NaTtccmMyca (5) Ha onOpHbIe Tpy6bl 1+2 (4+7).
1.YctaHOBtE KpennHe BedyIe Tpy6bI (3)Ha BepHne KOuIb HappaBJIyIOxN (10) n Ha onOpHyTO py6y 1 (4).
2. Kpenko npnkynte KpenneHne Bedyue Tpy6b (3) c nomoBto BoTob M10x20 (108), rpoebhix maw6 dny M1 0 (122) n noKnadhix wai6 10//20 (118) k Bedyue Tpy6e. BepHNTe 2 BNHTa (108) c noKnadhimm Waa6amn (118) k deKopaun B dyibpB bINTOB pe3b6bl npnHrtna KpenneHne Bedyue Tpy6b (3).
3.ПОДВЕДЛТЕ ВERTХИЙ KOHEU ONOPHОТ py6bl 1 (4)Крелпению ВEDушь
Ту6bl (3)И КрELKO CBpyTINTE OBE YAcTH C NOMOuBIO BOJTOB M10 x 70 (112),
норкадых wai6 10//20 (118) И р罗BERPbIx wai6 M10 (124).
4.YCTAHOBHTe CTOky NaTnCCMMyCA (5) HADJIeKaUIM O6pa3OM Ha ONOPHOI Tpy627NKPENKO npKpyTne CTOky NaTnCCMMyCA (5) c NOMOuBIO B0TOB M10x20 (108), rpoBepbix wai6 dnn M10 (122) n noKnlaHbIX wai6 10//20 (118) HA onOpHyTOy6v2 (7).
5. PnKpyTte CToKy NaTCCmmyCa (5) K KpennneHIO BeDyuee Tpy6bi (3) c nOmoIbO BoTTOB M10x20 (108), rpoBephIx Wai6 dnaM 10 (122) n noJ KlaadHix Wai6 10/20 (118).
6. Nocne yero haenebte konnaoyk dny M10 (131) Ha BCE 6oNTbM10 n raikn..

Uar 5: MoHTax ynpa dna 6aTepn (38) n KpeNneHne KaHaTHoro 6Joka 1 (8) Ha onOpHyTOpy6y 2 (7).
- UCTAHOBITE yron dna 6aTeppna (38) B COOTBETCTBYUOe MecTo Ha onopHou Tpybe 2 (7) n KpeNko npKpyTne erO C NOMOuBo 6oTTOB M10 x 65 (111), noKlaadhbx uai5 10//20 (118) n cAmOΦnKcnpyUOxrcraek M10 (124).
- UcTaHOBITE KpENNEHHe KaAHTHO 6noka 1 (8) B KpENNEHHe Ha onOpHoI type 2 (7) u KpENKO npKpyTHe erO c NOMOsbHO bONTOB M10 x 80 (114), noKnAaHbX 10//20 (118) camoNkCnpUOuXcRAeK M10 (124). BnMaHne: KpENNEHKe KaAHTHO 6noka 1 (8) doJxHo nobopaauBaTbcdoCTaTOHcBO6DOHNO
4.Посné уero наданту конпачок дя M10(131)Ha Bce 6ontbI M10 n raikn

Uar 6: MoHTax KpENHeHn pyIaRb 6aTepn (9) Ha cToKy IaTHCCmYca (5).
- PnOBeInTe KpENHeHne pIyarOB (9) K COOTBeTCTBHeHOMy MecTy Ha CTOnKe NaTHCCMMyCa (5) TAKIM Opb3Am, QTO6bI OTBePcTnC NOuINNHIKAMn pacONaRanncNo npraMoN, npoJeHbTe ocb 2 (39)Yepe3 KpENHeHna Pbl- yarOB SaTtepPfN (9) N cToKy NaTHCCMycA (5).
2.3akpenite ocb 2 (39)c nOmoIbIO 6oITOB M8x15 (99),rpoBepHbIX wai6
draM8(123)nnoKnaHbIX uai6/28(121)c06ox cTOPOH.
3.Пи ВьINONHENn ynpaXHeHn6BaTepФnI 3aФнKcUpYTe KpeNHeHn pyCharOB SaTepФnI (9) rpn6KBbIM BInrTom (70) n noKnadHOu Wai6oB 10//38(120)Haynope dna 6aTepФnI (38).

Uar 7: MoTax pIyAROB 6aTepfJn (11+14), KpennneHn pyIarOB 6aTePfJn (9), KpyIIOJ o6uBKn (63) n pyKoTOK (19).
1.Bo3bMNTe pbluarn BaTTePfnn(11+14),BCTaBte BAnKn(45)B Bepx-Hee KpEnIeHne H BCTaBte pbluarn 6aTTePfnn(11+14)B COOTBeTCTByIO-uee MecTo Ha KpEnIeHnn PbUarOB (9).
2.Kpenko npnKpyTne pbuarn (11+14)c nOmoosbIO 6oNTOB M10x20 (108), rpoBepbIX wai6 dnn M10 (122) n oDknaIaNbIX wai6 10//20 (118) K kpe- pIeHIO pbuaor (9) cH3y u Cbepxy.
3.CIeKcMaOHTMeMbIbHOBBOIOIN3HHTPNNPOJIOHOBBIEPOJIKN(63)HnadeHeHaPbUar1(11+14).
4.ПисоeINHte pyKoTKn (19)КpbYaram cnPaba n cneBa (11+14) n KpeKNI pIpiKpyTHe C NOMOJIb6 60NTOB M8x30 (102),noJknAaHbIX Wai6 8//16 (117) n rpoBepHBx Wai6 dnn M8 (123).
5.ДЯунрахнениHa npecc 6IokpyTe peharrn (11+14)ФИКСТОРAMN(49)Ha dePkaTeNe (9)и bIkyrTeФИKCSryUOuIM BHT 2 (70).
6.ДЯВынОнHeHЯУрaxHHeHЯБATePФnA3aBLOKpyTeDEpKaTeNb(9),3akpyTnBФИKNCpUOuM BHT2(70)Bynop(38),OCBO6oDnTe pblaHn(11+14),BbIHyBФИKCaTopbl(49).
7. Nocne Yero HadehBe KOJNaQOK dR M10 (131) Ha Bce 6oNTbM10 n raIKn, a KOJNaQOK dR M8 (132) Ha Bce 6oNTbM8 n raIKn.
Uar 8: MoNTaX MArKoCmHKn (60) N KpeIeHnA Tpy6bl dny ynpaxHeHn HaMbIuBbHor (12)Ha onOpHyTO py6y 2 (7).
1.YCTAHOBHTE MANKYIO CnHky (60) cpe3b6oBbIMN OTBepCTNMAH o6patHOI CTOPHO K OTBepCTNAM Ha onOpHOI Tpy6e 2 (7) n KpEnKO npKpyTInTe ee c NOMOJIbIO 60JTOB M8x70 (107), NOkNaIbHbIX Wai6 8//1 6 (117) n rpoBepHbIX Wai6 dJaM 8 (123).
2.ПОДBEДTe KрENJIeHne Tpy6b1(12)KOnOPHoi Tpy6e 2(7)TakIM O6pa-3OM,YTO6bI YTO6bI OTBepCTNpACNoJARANcB NO pPraMoN I KpeNko npNKpy-Tte C nMOUbIO B0NTOB M10x70(112),nPacTHNbI(48),noPnaDHBIX Wai610/20(118)и cAmOΦNcCpUOuXcxra RaekM10(124).
3. Nocne Yero HadehBe KOJNaQOK DnM 10 (131) Ha Bce 6oNTbM10 n raikn, a KOJNaQOK DnM 8 (132) Ha Bce 6oNTbM8 n raikn.
Uar 9: MoHTaX CnDeHbA (17) n KpeNneHnI dIy KpyrIoN o6NBKn (18) Ha paMy cnDeHbA (13).
1.ПодокиTe cнeHbe(17)cpe3b60bIMN OTBepCTnMn Ha obpaTHo CTOpOHe HA OTBepCTnB pame cndeHbY (13)И крпкО npNKpyTte C nOMOuIbO BoNTOB M8x45 (104),noKnaHbIx wa6 8//16 (117)И rpoBepbIX wa6ДЯ M8 (123).
2.BctabBeKpennHeIg KpyrnoOBnBk(18)B KpeNHeHa pame cn-DeHb(13)B CpeHem NonoKeHN.HaedeHbTe Ha o6e CTOpObI KpeNHeHnDnKpyrnoOBnBk(18)Kpyrnyu QepHyoOBnBky(64).
Uar 10: MoHTax paMbI cnDeHbY (13) K KpePnneHIO dnn Tpy6bl dny npaxHeHH NaMbIuCbI Hor (12) n onOpHO nnactnHbI (47) Ha nepeDHOO cToiKy (1).
- BctabBe cndHe (13) B depkataB (12) n 3aФnkCpyTe erO B JKeJaEMOM NIOJOeHN C NOMOsbIO 6bICTpOeNCTByoUeero 3aTBopa (74). (BHIMaHne! YTObI 3aKpyNTb FOKCATOp BICOTb CIdEhBra (74), Heo6xoDMo COBMecTb OTBepCTnB DEpXaTeNE (12) n ONDHO 3OTBepCTnB P aMe cNDHeBIA (13). PeryINPOBka CndHeBpaPOn3BODNTc CNeyUOUM 06pa3OMOCaNbTe Ha HeCKOBko 06bopoTb 3aTBOP (74), NotAHNTe 3a NpactNKOBbl KONNAQOK, yCTaHOBtPaMcy CndHeBA (13) B HOBY IO NsIOuO do 3aueKNBaHNb6bCTpo3AkPBBAIOUeOERc 3aTBopa, Nocne Yero CHOBa KpeNKO 3aKpyTnte 6bICTpO3AkPBBAIOUncr 3aTBop.)
- Kpenko npinkpenite yrnoBle nactnHbI (47) K COOTBeTCTByUIM Me-CTAM Ha nepeDne Ctoke (1) c nomoBIO 60ntOB M10 x 75 (113), noKnadhix wai6 10//20 (118) n caMoФИСИСИСРУОДСЯ RAK M10 (124).
3.Посе сero haedeHbte konnaqok dЯ M10 (131)Ha Bce 6oNTbM10 nraikn.
Uar 11: YcTaHOBka Tpy6bl (dny ynpaxHeHn HaMbIuCbHor) (15),napTb dna 6nncca (20),dePkateJIa cnDHeHn (12).
1.ПисоeINHITep6y(15)cYCTaHOBJIeHHbIMN BHeI cTaNbHbIMN NOIuHNKAMn 1(44)KdEpaTeJIO CnDEHnA(12),NCIOJIb3y BNHT M10 X90(115),wai6y10//20(118)nCamaOfHKcnpuyOciOyraKyM10(124).BHIMaHHe:tpy6a(15)dONXHa CBO6oJHO BpaUaTbcR Bco6paHOM BVne.
2.BctabTe KpennHeHn DnKpyrnoo6bBn (18) B KpennHeHn BHN3y Tpy- 6by (15) B cpeHem nnonOxehn H3aTe HaedeHbTe KpaChbIe npoNoHOBBle polKn (65)Ha KOHcIb KpennHeHn (18).
3. Pnpnojnte npTy dny 6uenceca (20) o6paTHo CTopoHO c haxOaIeC Hn He np3b6oBOB BCTABKO HA OTBepCTN B KpeJIeHm Dnna npTbI 6uIeCA (16) n KpEnko npKpytnte e e nomoubu 6oITOB M8 × 20 (101), rpoBephbx wai6 dny M8 (123) n noKnadHyx wa6 8 // 16 (117).
4. Co6paHnA npTa DnA 6nCenca (20+16) MoKet 6bItb yCTaHOBnHeBA B KEnaemO nO3nMn B Tpy6y (15) n 3akpeIneHa rpn6KBOM BHTOM 1 (69).
5. YTo6bI 3a6nOKnpoBaT bpy6 (15), BCTaBbTe cTOnOpHyIOCKo6y (52) cepe3 COOTBeTcTBouOuNE OTBepCTNBApeKxATEne (12) n Tpy6e (15).
6. Nocne yero hadehbe koNnaQok dnn M10 (131) Ha Bce 6oNTbM10 nraikn, a konnaqok dnn M8 (132) Ha BCE 6oNTbM8 nraikn.
Uar 12: YcTaHOBka noDyweK dny pyk (61), noDyWKn dny cInHbI (62) n pyKoTOK 2 (30) ha onopy dny noTyrBaHn (25) n ha onOpHyTo pTy6y 1 (4).
- YctaHOBnTe noDyUkny dny CnHbI (62) 06paTHoCtOPOHo, c HaxOJa-ueiHa He pe3b6OBoB BCTABKoi, Ha OTBepCTNBA ONope IINoTARuBaHHa (25) n KpEnKO pnpKpyTne C nOMouB6OToB M8x20 (101), rpoBepHbix wai6 dny M8 (123) n noKnadhix wai6 8 // 16 (117).
2.YctahOBInTeNoDyUKNnpyK61)ObpaTHoCtopoHOn,C haxoJusen
cHa Hepe3b60Bn BCTaBko,HaOTBepCTnB Onpoe nnoTnBAHH25)nKpenoPnPKpyTnE C nmoou6oJTOB M8x55(105),rpoBephix Wain6nM8(123)nnoKnnaNbix Wain68//16(117). - Bctabte pykoTkn (30) B onopy nIy noITraBHaHn (25) n KpeNko npKpyTne C nOMOUsb6oNTOB M10x20 (108), rpoBepbix 7a#6 dnn M10 (122), nnoKnadhbx 7a#6 10//20 (118).
- YctahOBHTe 3apaHee co6paHnyo paMy dIy IIOITBHaHn (25) Ha onOpHyTOkky 1 (4) n KpeNko CkpyTne B HJXHOM NIOJKeHN C noMoUb60NTOB M10 X 70 (112), NOKNaHbIX Wai6 10 // 20 (118) n cAmOΦNKcnpuOxncraeK M10 (124).
- Nocne yero Hadehbe KOnnaok dnn M10 (131) Ha Bce 6oNTbl M10 nraKn, a KOnnaok dnn M8 (132) Ha Bce 6oNTbl M8 nraKn.
Uar 13: MoTax Ctenepa u yrnoBoi nonepeuHbI (22) Ha onopHoN cToKe 1(4).
- PnncoeHNHTe yrnoBvO nonepuHny (22) K onopHOn cToKe 1 (4) n3aHNe cToKe (2) TAKIM o6pa3OM, YTObI OTBepCTra pacONanarINbc no npA MoN, HnpKpyTHe C NOMoBIO 60nTob M10x70 (112), NOkNaADhIX WAn6 10 / 20 (118) n CamoPcNcPuyOuXcRAeM10 (124). (Bo3MOxHO, Bam npiDTeC BpEmHoO cOaNbCoEINHEHn ONOpHOn cToKn 1 (4) n3aHNe cToKn (2), YTObI O6neRHTb MOHTaK nonepuHbI (22)).
2.YctaHOBnTe npabyu n nebyu neaun (21+24) Ha COOTBeTCTByoUne KpeIeHnHa onopHOn CTOnKe 1 (4) TaKHM o6pa3OM, YTO6bI OTBepcTna C noDnHNHkAMn pacnoJarAanCb no npraMoN u BCTabTe ocB 1 (34). Ha ha 3aKpeneTocb 1 (34) c noMoUb 60ntOB M8x15 (99), rpoBephIx wae6 dnn M8 (123) nOdknAdhbx wae6 8 // 38 (120) Ho o6Om KOuaX osn.
3.BctabTe rnpabnueckne cunHdpb(58)BepxHM KOHcOM B nonepuHy (22) n 3akpeTte C nmoou60ntOB M8x15 (99),rpoBephix wain6 dnnM8(123) n noKnaHbIX wa68//28(121).
4.HnKHe qactuunnnHpOB (58) 3aФнкCpyTe B kpenneHm nunHpOB (46)c nOmoBHO 6oTob M8x40(103),noKnlaJbHbIX wai5 8//16(117)ncAMoФнкCpyUoxxCraeK M8(125).Y6eIITecb B TOM,yTO uINHdp (58)MOXET CnerKa BpaAaTbcB KpenneHm. - PpOeHbTe KpENHeHnU HApOB (46) CBepx CKB03 neaIneByIO npabyu (21+24) n 3aKpEnIte INB HuyHom NPOJKeHm C NOMoUbIO rPb6-koBoi raN (75) n OndKnadHO mAb6b1 10 / 38 (120). Bbl MokeTe oTpeyInpobatc conpoTbneneHne cTeennepa, ppeMeua KpENHeH (46) n Bbl6pa pa3JInuHbIe No3nIe IeBOI npabOIN ean (21+24).
- Co6epnte polnKobii 6nok A, kak noka3Ho pucyHke. PponycntTe Tpoc 5 (59) Hau polnKOM (83) n3akpeNTe polnk B depkaTeJe C KPHOKOM (35) TaKIM o6pa30M, YTObI polnK JERKO BpaUaJcA.
7.BctabTe depKateJIb C kPkoKOM (35) B KpeIeHne NoJ nonepeHnHOJ (22) I ODeHbTe KOHbI TpOca 5 (59) Ha neaann cneBa n cnpaBa (21 + 24) - Nocne yero Hadenbte konnaqok nM 10 (131) Ha Bce 6ontbM 10 n raikn, a konnaqok nM 8 (132) Ha Bce 6ontbM 8 n raikn.
Uar 14: MoNTaX TpOca 1IyI NaTnCCmMyca (26) c poJINKOBbIMN 6JIOkAMn. BHIMAHne: npc C6OpKe POJIKNOBoro 6JOKa CHaJaA yJNOXHTe TPOC Ha pONIK (83) n3aTeM 3aKpoIte 60KOBIMN KpbIbKAMn (84) c 6Obx CTOpOH TaK, YTO6bI KOHcI TpOca 6BIMn ChApYxN. CoBaPbHbE 6JOKN MOH-Tpyiye Ha TpeHaxep C 3apaHee BCTaBNeHHbIMN TPOCaMn.
- PpOraHnTe Tpoc 1 (26) CKBo3b CTOnKy LaTmCCmMyCa (5) IN KpeIeHne BeDyuei Tpy6bl (3) KAK NOKa3aHo Ha PucyHke, BkpyTnte KOHeu Ka6enr 1 (26) C NOKnaHoi uai60i 12 // 24 (119) B cana3kn dnn rpy3OB (40) n 3aФNKcPnyTe CoedHHeHne raKoN.
2.Bo3bMnTE Tpoc 1 (26) n Poka3aHHbHa pncyHke, A" polNKOBbI 6Iok 6e3 60KobBix KpbIbEck C 60TOM M10x70 (112), noKnlaHn 7aNb6o10 / / 20 (118), nPactNKOBbIM NOuHNHnKOM (94) nraKoM M10 (124). BcTaBtpe polIK (83) B cToKny NaTnCCmUca (5), a nPactNKOBbI NouHNHnK 1 (94) CHAPVKN CTOnKN N 3AKPeNTNE.
3.ПикртугтЕ ДВа рОнковьх БлOKа C TrPoCom 1 (26),Кak nokаэноHa pucnyke,5"H, Hc STOуКу NaTnCCmUyca (5) c NOMOuBIO BoJNTa M10x45 (110), NOIKNlaHNoI Wai6bI (118) n CamoФИССРУЮ ueic raiKn (124).
4.Bo3bMnTe Tpoc 1 (26) n OkaaHHbHa pncyHke, B" pOnIKOBbI 6JOKc 6oTOM M10x45 (110), noKJIaHoi WaiBoi (118) nraikoi (124) uycTaHOBnTe erO B depKaTeIb pONIKOBOrO 6Joka 2 (6) B NOKAaHHo N03uIMn.
5. Nocne yero haenebte konnaohok dnn M10 (131) Hc Bce 6ontbM10 n raKn.
Uar 15: MoTax Tpoca 3 dnia 6aTePfJra (29) c pOJIHKOBbIMn 6IOKAMN.
- 3açeniTE KOHcIb Tpoca 3 (29) K COOTBeTCTByOuIM MeCTAm Ha JEBOM Hn npabom (11 +14) pbiharax BaTepfJIA, npoBdA IH 3a 3aDHeI CTOnKoi 2 (7).
- Co6epnte Dba pONIKOBbIX 6NOKa KAK NOKa3aHO Ha PnCyHKe A", BCTA BNB B HNX Tpoc 3 (29), n 3aФИКСИРТЕ B KpePNeHm 6NOKa 1 (8), nCNoJIb- 3yBnHT M10x45 (110), wai6y (118) n CamoФИKcIpyIOUyOcraIky(124).
3.Bo3mIe Tpoc 3(29) n okaaHHbHa pucyHke, A^ polnKobbl 6nok c 60ntom M10x45 (110), noKnlaHno 7aB6o (118) nraKo (124) u yctaHOBEte erO CMEUHHb DBOHOBepKaTeB polnKOBoro 6noka (27) B nOKa3AHHOPO3H
4.ПосечeroнадьтколпачokдяM10(131)HaBce6ontbIM10nraKn
War 16:
MoHTaX TpOca 4 nIynpaxHeHn HaMbIuCbHor (31) npOnKOBbIX 6JIOKOB.
1.ПOTЯнITE TPOC 4 (31)Черпсинхkee OTBepctne B Tpy6e (15) И пикpenite KOHeT TPOca 4 (31) Chn3y K COOTBECTByIOmeMy KpeINNEHNO Ha DePkaTeJe DnI Tpy6bl Dny ynpaxKHeHn Ha MbUcIHor (12) C nOMOuIbO 60nta M10x40 (136), NOknaDHOJ uMba6b10 / 20 (21) n CamoФNKcPuyouse raikn M10 (124), kak nokaaHOn Ha pncyHke "C".
2.Bo3bMnTe Tpoc 4 (31) npoNkoBb6nok, kak noKa3aHo ha pncyHke,5c 60JToM M10x80 (114),noKlAadHOI sai6o10//20 (118),nlaactMaCCOBbIM NOuNNHnKOM 2 (95) nraKOI M10 (124).BCTaBBte poNkoBb 6nOK (83)c KpbIshKo KaHaTHOrO 6loka (84) B Tpy6y dny npaxkHeHH HaMbIuZbHor (15), aNaTcMAccBOBIO NooNnHnK 2 (95) caphyXn CMOHeTpuyTe Hx HA COOTBeCTByIOUeM MeCTe.
3.Bo3bMnTe Tpoc 4 (31) n OkaaHHbHa pncyHke "A" pOJNKobI 6JOK c 6oTOM M10x45 (110), noKnaHoi WaiBoi (118) n raikoi (124) u yctaHOBNTe erO B depKaTeJIb pOJKOBOrO 6Joka 2 (6) B nokaahHOH no3uIN.
4. Nocne yero haenebte konnaqok nra M10 (131) hBa Bce 6ontbM10 n raKn.
War 17:
MOHTAX Tpoca 2 (28) c poJIKOBbIMN 6JIOKaMn.
1.ПOTЯНITE TPOC (28)ЧЕЗ HIXHHeE OTBepCTne ONOPHOr CTOKN 2(7) npNKpePNTe KOHeT PTOCA c pAM-RAKKO K KPNPEHIO 6NOKA 2 (6) c NOMO- bIo 6oTa M10x25 (109), NOkKaIADHOI 7aM6bI 10/20 (118) n CamoФИК-CNYUeICraIKM10(124),KAK NOKa3aHOHa PnCyHKe."
2. Co6epnte DaBa polnKOBbix 6Ioka KaK noka3aHo Ha pucyHke ,A" BCTaBv B Hx Tpoc 2 (28), n CMOHTnpTe Hx Ha nepeDnei CToKe (1) c nomoBIO bonta M10x45 (110), noKnlaHoi Wai6bl (118) n camoPknCpyuOeuieraRkn (124).
3. Co6epnte poJIKOBbI 6nok kak nOKa3aHO Ha pncyHke ,A" BCTaBnB B Hero Tpoc 2 (28), n 3akpenTe erO B DBOHOM dEpxaTeNe (27), nCNoJIb3yB BuHT M10x45 (110), uai6y (118) n CamoФнксруUyOu raiky (124) B NOKa3AHHOI NO3uNN.
4. PnpcoeHNHTE K KOHcy TpOca 2 (28) cENb n3 8 3BeHbeB (53) n Dba Ka pa6nHa (55) n CoeHNHTE TpOc 2 (28) cKpeNHeM E 2 (6), B KOTOPm YKe yCTaHOBnEH TpOc 1 (26). (PnpmeHne: NOnyueHnI pNaBHO rCKoJIbXeHH Bbl MoKTe DoONKbHM Opba3OM yCTaHOBnTb HATxHeHne TpCOB, PeCTabJRA Kapa6nH (55) Ha COOTBeTCTByIOUee 3BeHO cENI (53)).
5. Nocne yero haedeHbTe konnaoyok dny M10 (131) Ha Bce 6onTbM10 n raikn.
War 18:
C6opka 05wnBkn dny rpy3OB (41) c KpeIeHnMn (42 +43)
- PnKpeNtE KpEnIeHn 1+2 (42+43) Ha COOTBeTCTBlyUOHe No3uIN o6wnBk nIra rpyoB (41) c NMOuIb 6oTob M6x16 (100), NOkJaIbIx wa6 /12 (116) n CamoФнсИруоxrcraekM6(126).
- 06paTte BnHmHaHne, yTo6bI KpeNHeHn1 +2 (42+43) 6bln CMOHTnpoBaHb I npaBnBHO No3uHN (cm. pCNYok A+B) n KpeNHeHne dny rpy3OB 1 (42) KpeNIOsc CHn3y O6wnBKn dny rpy3OB (41).
War 19:
YcTaHOBka 06uWbKn DnI rpy3OB (41) c KpennneHnMaN (42 +43) Ha yroJIOK (32) n 3aNDHIO CTOnKy(2).
1.YcTaHOBnTe 3apaHHee co6paHbHe 06WmKn dIpy3OB (41) c Kpenne Hm 1 (42) B OTBepCTN 3aADHei CTOnKe (2). CoeHNHTe MEXy Do6o npOTBOONIOXKHe KOHb KpeJIeHn 1+2(42+43) n PnIKpyTnTe C nomO bbo 60ntOB M6x16 (100), NOkNaDhIx uan6 / 12 (116) n CamoФNKCu-pyUxxCraekM 6 (126), Ka NKa3AHO Ha pCnyKe, A".
2.3akpenite MeTAPINHueckn yrOIOK (32) noD cToIKO JATNCCMcya (5)c nOMoUb60JIa M8x65 (106),noDKIADHOJ WAIb8/16(117)u camo- fHKcnpuyooieCraIKM8(125).
3.CBHTTE BepxHHe KpeIeHnO6uWbKn Ipy3OBcMeTajNueckm yrKOM C nOmoUb 6oTa M6x16 (100), noqknadHou wai6bl 6 / / 12 (116) n cAmoФксуоцяraiknM 6 (126).
4. Nocne Yero HadenbTe KOJINaUOK dIg M8 (132) Ha Bce 6oNTbM 8 n raiKn.
War 20:
YcTaHOBka WtAHn JatNCCmMyca (36) N KopoTkoI WaHrN (37).
- Ykpene Tte 7aTahry naTnccmmyca (36) Ha Tpoc 1 (26), nCnoB3yra Kapa-6HHbKpK (55).ДЯ XpaHEHIO 7TaTHN NaTnCCmmyca (36), Bbl MoKeTe NOMeCTuB eHa COOTBeTCTByOuIe DePkaTeIN B NpeDHeY qAcTn BepxHne nonepuHb (5).
- YkpeneTe KopoTkyu 8TuHry (37) Ha Tpoc 4 (31), nCnoB3ay cIeB n3 22 3BeHbE (54) n Kapa6HHbKpOK (55). (Ipeep BbInonHeHem ynpaxHeHn HaMbUcbl Hor Heo6xOdImo OToCoeHNHT uTaHry (37) C cIeNoOyKo (54)).
3.B 3aBcIMOCn OT BbINONHReMbIX ynpaxHeHH Bb MoKTe npNKpeNTb K TpOcy 4 (31) pEmeEck (73), a K TpOcy 1 (26) pyKoTky (72), nCnONb3y Ka pa6HHbIKpIok.
Baxhna HOpmaun no 6e30nacHocTn cnoNb3oBaTb kpoK.
90% OT MaKc. YaCTOBy nYbCa = (220 - Bo3pact) x 0.9
85% OT MaKc. YacToTb Iynbca = (220 - Bo3pacT) x 0.85
70% OT MaKc. qactotbl nyIbca = (220 - Bo3pact) x 0.7
© by Top-Sports Gilles GmbH
D-42551 Velbert (Germany)
Service:
Tel.: +49 (0)2051/6067-0
Fax: +49 (0)2051/6067-44

- Ubung 2
- Ubung 4
- Ubung 5
- Ubung 7
- Ubung 6
- Ubung 8
- Ubung 10
- Ubung 12
- Ubung 14
- Important Recommendations and Safety Information
- Parts List - Spare Parts List Profi Center de Luxe Order No. 99881 Profi Center XL Order No. 1153
- Assembly Instructions
- Step 1: Installation of front foot (1), rear foot (2) and guide bars (10).
- Step 2: Installation of weight plates (66+67) at guide bars (10).
- Step 3: Installation of supports 1 + 2(4 + 7) at front foot and rear foot (1 + 2) .
- Step 4: Installation of tabular guide holder (3) and top cross beam (5) at supports 1 + 2(4 + 7)
- Step 5: Installation of bench press support (38) and cable pulley holder 1 (8) at support 2 (7).
- Step 6: Installation of butterfly arm holder (9) at top cross beam (5).
- Step 7: Installation of butterfly arms (11+14) at butterfly arm holder (9) and foam rubber roll (63) and hand grips (19).
- Step 8: Installation of the back pad (60) and leg curler holder (12) at support 2 (7).
- Step 9: Installation of seat pad (17) and round pad holder (18) at seat support frame (13).
- Step 10: Installation of seat frame (13) at leg curler support (12) and standing plates (47) at front foot (1).
- Step 11: Installation of leg curler (15) and arm curl pad (20) at leg curler holder (12).
- Step 12: Installation of forearm pad (61), small back pad (62) and handgrip 2 (30) at dipping bar (25) and support 1 (4).
- Step 13: Installation of Stepper and Crossbar (22) at support 1 (4).
- Step 14: Installation of cable 1 for latissimus (26) with cable pulley units. Please note following situation regarding the cable pulley units: The cables have to put on the cable pulleys (83) and should covered on both sides with cable pulley covers (84) that the input and output of cable is leaded.
- Step 15: Installation of cable 3 for butterfly (29) with cable pulley units.
- Step 16: Installation of cable 4 for leg curler (31) with cable pulley units.
- Step 17: Installation of cable 2 (28) with cable pulley units.
- Step 18: Installation of weight casing (41) with weight casing support (42) and bending plate 43).
- Step 19: Installation of weight casing (41) with supports (42 + 43) at L-plate (32) and rear foot (2).
- Step 20: Installation of latissimus bar (36) and curl bar (37).
- Important-Safety-Information for using carbine hooks.
- Step:21 Checks:
- Training Instructions
- Intensity:
- Frequency
- Planning the training
- Motivation
- Pulse Rate Measurement Table
- Sommaire
- Planning van de training
- Pykooeodcmeo no MoHmaxy
- War 1:
- War 2:
- MoHTaX rpy3OB (66+67) Ha HappaBJIIOUne (10).
- War 3:
- MOnTax onOpHbIX Tpy6 1 + 2 (4+7) Ha nepeDnHO u 3aDnHO cToiKn (1+2).
- Uar 4: MoHTaX KpeIeHnB BeDyue Tpy6bl (3) cToKn NaTtccmMyca (5) Ha onOpHbIe Tpy6bl 1+2 (4+7).
- Uar 5: MoHTax ynpa dna 6aTepn (38) n KpeNneHne KaHaTHoro 6Joka 1 (8) Ha onOpHyTOpy6y 2 (7).
- Uar 6: MoHTax KpENHeHn pyIaRb 6aTepn (9) Ha cToKy IaTHCCmYca (5).
- Uar 7: MoTax pIyAROB 6aTepfJn (11+14), KpennneHn pyIarOB 6aTePfJn (9), KpyIIOJ o6uBKn (63) n pyKoTOK (19).
- Uar 8: MoNTaX MArKoCmHKn (60) N KpeIeHnA Tpy6bl dny ynpaxHeHn HaMbIuBbHor (12)Ha onOpHyTO py6y 2 (7).
- Uar 9: MoHTaX CnDeHbA (17) n KpeNneHnI dIy KpyrIoN o6NBKn (18) Ha paMy cnDeHbA (13).
- Uar 13: MoTax Ctenepa u yrnoBoi nonepeuHbI (22) Ha onopHoN cToKe 1(4).
- Uar 14: MoNTaX TpOca 1IyI NaTnCCmMyca (26) c poJINKOBbIMN 6JIOkAMn. BHIMAHne: npc C6OpKe POJIKNOBoro 6JOKa CHaJaA yJNOXHTe TPOC Ha pONIK (83) n3aTeM 3aKpoIte 60KOBIMN KpbIbKAMn (84) c 6Obx CTOpOH TaK, YTO6bI KOHcI TpOca 6BIMn ChApYxN. CoBaPbHbE 6JOKN MOH-Tpyiye Ha TpeHaxep C 3apaHee BCTaBNeHHbIMN TPOCaMn.
- Uar 15: MoTax Tpoca 3 dnia 6aTePfJra (29) c pOJIHKOBbIMn 6IOKAMN.
- War 16:
- MoHTaX TpOca 4 nIynpaxHeHn HaMbIuCbHor (31) npOnKOBbIX 6JIOKOB.
- War 17:
- MOHTAX Tpoca 2 (28) c poJIKOBbIMN 6JIOKaMn.
- War 18:
- C6opka 05wnBkn dny rpy3OB (41) c KpeIeHnMn (42 +43)
- War 19:
- War 20:
Brand : Christopeit
Model : Profi Center de Luxe
Category : Fitness Equipment