
AP 1 - Exercise bike Christopeit - Free user manual and instructions
Find the device manual for free AP 1 Christopeit in PDF.

| Features | Details |
|---|---|
| Product type | Exercise bike |
| Dimensions (L x W x H) | Approximately 110 x 50 x 130 cm |
| Maximum user weight | 100 kg |
| Resistance | Manual resistance adjustment |
| Screen | LCD display with information on distance, time, calories burned, and speed |
| Additional features | Built-in heart rate sensors |
| Usage | Suitable for home training, ideal for cardio and fitness |
| Maintenance | Regularly check screws and bolts, clean frame and components |
| Safety | Use on a flat and stable surface, do not exceed maximum weight |
| Warranty | 2 years on frame, 1 year on parts |
| Included accessories | Pedals, user manual |
Frequently Asked Questions - AP 1 Christopeit
User questions about AP 1 Christopeit
0 question about this device. Answer the ones you know or ask your own.
Ask a new question about this device
Download the instructions for your Exercise bike in PDF format for free! Find your manual AP 1 - Christopeit and take your electronic device back in hand. On this page are published all the documents necessary for the use of your device. AP 1 by Christopeit.
USER MANUAL AP 1 Christopeit
Assembly and exercise instructions for Order No. 1100

- Summary of Parts Page 3
- Important Recommendations and Safety Information Page 12
- Parts List Page 13 - 14
- Assembly Instructions With Exploded Diagrams Page 15 - 17
- Mount, Use & Dismount Page 18
- Computer instructions Page 19
- Training Instructions Page 20
Dear customer,
We congratulate you on your purchase of this home training sports unit and hope that we will have a great deal of pleasure with it. Please take heed of the enclosed notes and instructions and follow them closely concerning assembly and use.
Please do not hesitate to contact us at any time if you should have any questions.
Important Recommendations and Safety Instructions
Our products are all tested and therefore represent the highest current safety standards. However, this fact does not make it unnecessary to observe the following principles strictly.
- Assembly the machine exactly as described in the installation instructions and use only the enclosed, specific parts of the machine. Before assembling, verify the completeness of the delivery against the delivery notice and the completeness of the carton against the assembly steps in the installation and operating instructions.
- Check the firm seating off all screws, nuts and other connections before using the machine for the first time and at regular intervals to ensure that the trainer is in a safe condition.
- Set up the machine in a dry, level place and protect it from moisture and water. Uneven parts of the floor must be compensated by suitable measures and by the provided adjustable parts of the machine if such are installed. Ensure that no contact occurs with moisture or water.
- Place a suitable base (e.g. rubber mat, wooden board etc.) beneath the machine if the area of the machine must be specially protected against indentations, dirt etc.
- Before beginning training, remove all objects within a radius of 2 metres from the machine.
- Do not use aggressive cleaning agents to clean the machine and employ only the supplied tools or suitable tools of your own to assemble the machine and for any necessary repairs. Remove drops of sweat from the machine immediately after finishing training.
- WARNING! Systems of the heart frequency supervision can be inexact. Excessive training can lead to serious health damage or to the death. Consult a doctor before beginning a planned training programme. He can define the maximum exertion (pulse, Watts, duration of training etc.) to which you may expose yourself and can give you precise information on the correct posture during training, the targets of your training and your diet. Never train after eating large meals.
- Only train on the machine when it is in correct working order. Use original spare parts only for any necessary repairs. WARNING! Replace the worm parts immediately and keep this equipment out of use until repaired.
- When setting the adjustable parts, observe the correct position and the marked, maximum setting positions and ensure that the newly adjusted position is correctly secured.
- Unless otherwise described in the instructions, the machine must only be used for training by one person at a time. The exercise time should not overtake 60 min./daily.
-
Wear training clothes and shoes which are suitable for fitness training with the machine. Your clothes must be such that they cannot catch during training due to their shape (e.g. length). Your training shoes should be appropriate for the trainer, must support your feet firmly and must have non-slip soles.
-
WARNING! If you notice a feeling of dizziness, sickness, chest pain or other abnormal symptoms, stop training and consult a doctor.
- Never forget that sports machines are not toys. They must therefore only be used according to their purpose and by suitably informed and instructed persons.
- People such as children, invalids and handicapped persons should only use the machine in the presence of another person who can give aid and advice. Take suitable measures to ensure that children never use the machine without supervision.
-
Ensure that the person conducting training and other people never move or hold any parts of their body into the vicinity of moving parts.
-
At the end of its life span this product is not allowed to dispose over the normal household waste, but it must be given to an assembly point for the recycling of electric and electronic components. You may find the symbol on the product, on the instructions or on the packing.
The materials are reusable in accordance with their marking. With the re-use, the material utilization or the protection of our environment. Please ask the local administration for the responsible disposal place. - To protect the environment, do not dispose of the packaging materials, used batteries or parts of the machine as household waste. Put these in the appropriate collection bins or bring them to a suitable collection point.
- This machine is a speed-dependant machine, i.e. the power increases with increasing speed, and the reverse.
- The machine is equipped with 8-speed resistance adjustment. This makes it possible to reduce or increase the braking resistance and thereby the training exertion. Turning the adjusting knob for the resistance setting towards stage 1 reduces the braking resistance and thereby the training exertion. Turning the adjusting knob for the resistance setting towards stage 8 increases the braking resistance and thereby the training exertion.
- The maximum permissible load (=body weight) is specified as 100 kg. This machine has been tested and certified in compliance with EN 957-1 and -5 "H. C". This item's computer corresponds to the basic demands of the EMV Directive of 2004/108/EC.
Parts List - Spare Parts List AP 1 Order No. 1100
Technical data:
Issue: 01.04.2011
- Magnetic brake system
- Aprox. 6 kg flywheel mass
8-gears manual resistance - Hand pulse measurement
- Vertically adjustable saddle (quick release)
- Handlebar inclination adjustable
- Floor level compensation
- Touch Screen Computer showing at same time: speed, time, distance, distance total, approx calories and pulse frequency
- Input of limits for time, distance and approx calories
- Announcement of higher limits
- Load max. 100 kg (Body weight)
Space requirement approx. L 72, W 54, H 122 cm
Please contact us if any components are defective or missing, or if you need any spare parts or replacements in future.
Assembly Instructions
Remove all the separate parts from the packaging, lay them on the floor and check roughly that all are there on the basis of the following assembling steps. Please note that a number of parts have been connected directly to the main frame and preassembled. In addition, there are several other individual parts that have been attached to separate units. This will make it easier and quicker for you to assemble the equipment.
Step 1: Attach the stabilizer (54 + 58) at main frame (26).
- Attach the front foot (54) with the preassembled transport rollers (53) to the main frame. Do this with the two screws (56), spring washers (21), washers (17), and cap nuts (55).
- Attach the rear foot (58) to the main frame (26). Do this with the four screws (16), spring washers (21), and washers (42). After assembly has been completed, you can compensate for minor irregularities in the floor by turning the wheel at cap (57). The equipment should be set up that the equipment does not move of its own accord during a training session.

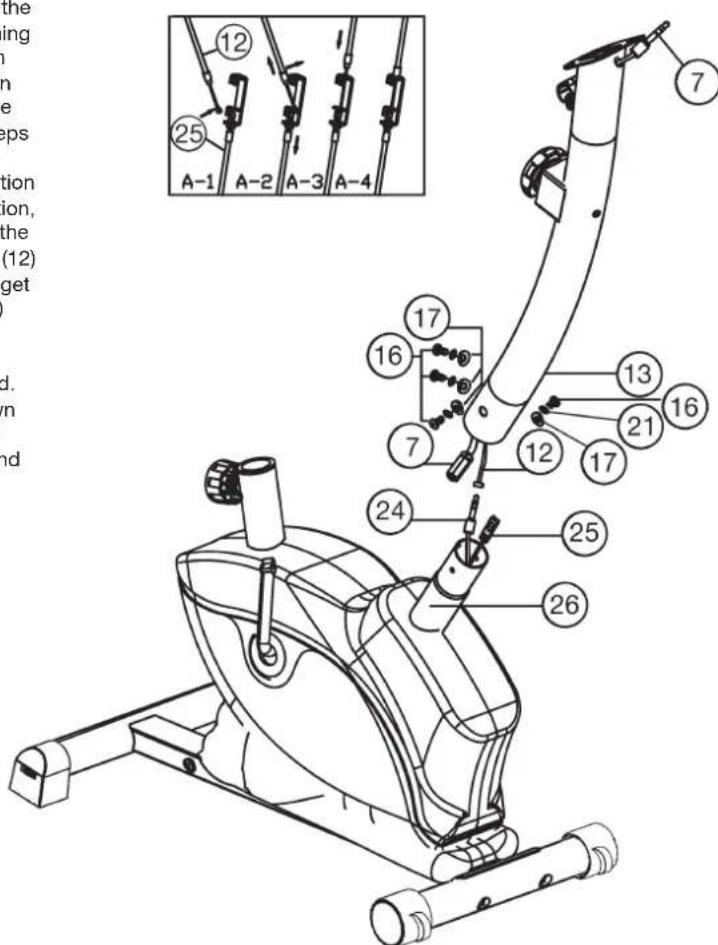
Step 2: Attach the front post (13) at main frame (26).
- Hold the handlebar support (13) with the computer cable (7) against the main frame holder. Connect the plug for the computer cable (7) coming out of the bottom of the handlebar support (13) of the computer with the matching plug for the sensor cable (24) coming out of the main frame (33). (Note: The computer cable harness (7) projecting from the support (13) must not slide into the tube, as it is required for later steps of installation.)
- Connect the cable of tension control (12) to the bracket of lower section cable tension (25) (See figure A1-A4). Before this step of the installation, it is advisable to adjust the resistance setting to the stage, at which the cable extends furthest from the sheath. Put the lowest part of cable (12) into the small hook (figure A1). Pull it (figure A2) until the small hook get in higher position and then insert the cable (12) onto the bracket (25) (figure A3+4).
- Place the handlebar support (13) in the locator provided for it in the main frame (26). Ensure that the cable connections are not squashed. When putting the steering tube in place, push the former slowly down into the locator in the main frame. Screw the handlebar support (13) onto the base frame (26) with the screws (16), spring washers (21) and washers (17).
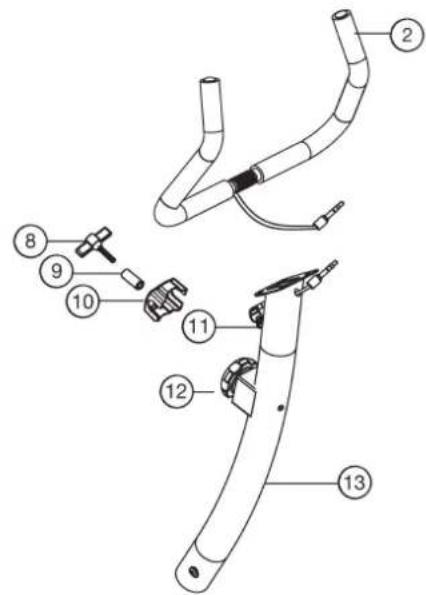
Step 3: Attach the handlebar (2) at handlebar support (13).
- Guide the preassembled handlebar unit (2) through the upper part of the handlebar post (13) and close the bracket of handlebar holder.
- Attach the handlebar cover (10) at the handlebar holder of handlebar support (13).
- Screw the handlebar (2) in desired position at the handlebar post (13) with spacer (9) and handlebar screw (8).
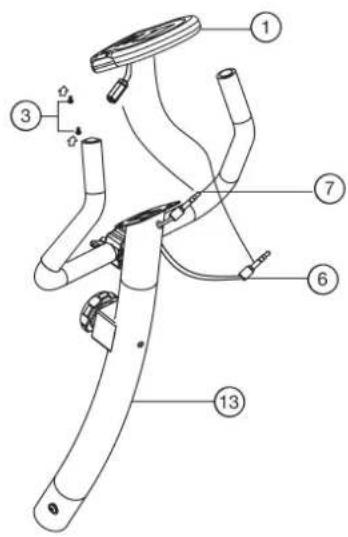
Step 4: Attach the computer (1) at handlebar support (13).
- Take the computer (1) that has been supplied out of the packaging and insert the batteries (Type "AA"-1.5 V pencells) by watching for the right polarity on the back of the computer (1). (Batteries for the computer are not included in this item. Please buy them at your located market.)
- Push the plug of the connecting cable (7) projecting from the handlebar support (13) into the associated socket of the computer (1).
- Place the computer (1) on top of the handlebar support (13) and tight firmly by using screw (3).
- Push the plug of the pulse cable (6) projecting from the handlebar (2) into the associated socket of the computer (1).
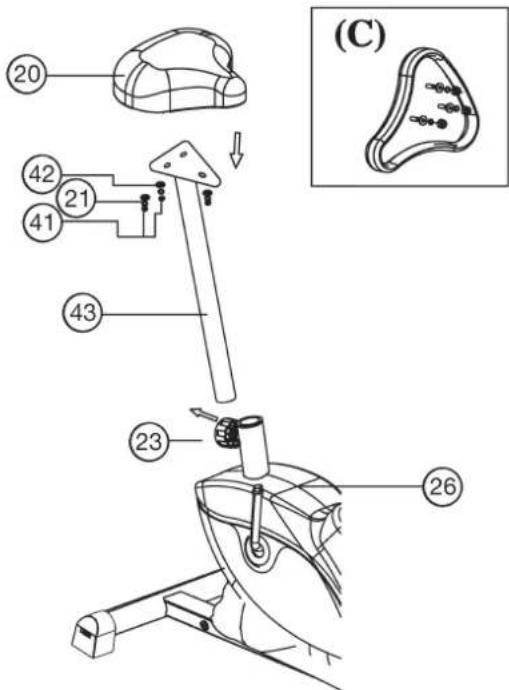
Step 5: Installation of the saddle (20) on the saddle support (43) and of the saddle support (43) on the main frame (26).
- Place the saddle with the seat surface downwards.
- Place the retaining plate of the saddle support (43) on the upwards pointing bottom of the saddle (20). The threaded pieces on the bottom of the saddle must project through the corresponding holes in the retaining plate of the saddle support.
- Place washers (42) and spring washers (21) on the threaded pieces, screw on nuts (41) and tighten firmly.
- Insert the saddle support (43) into the provided holder of the main frame (26) and secure at the desired position by screwing in the rapid action lock (23).
(Note: To screw in the rapid-action lock (23), the threaded hole in the main frame (26) and one of the holes in the saddle support (43) must be aligned. Furthermore, ensure that the saddle support (43) is not pulled out of the main frame beyond the marked maximum adjustment position. The setting of the saddle support can be adjusted as desired later.) For this, the rapid-action lock (23) must be loosened by only a few revolutions (do not unscrew completely), the top cap of the lock must be pulled away and the saddle adjusted. To set the new position, release the top cap and move the saddle support upwards and downwards until the rapid-action lock engages. Then secure the new setting by tightening the rapid-action lock.)
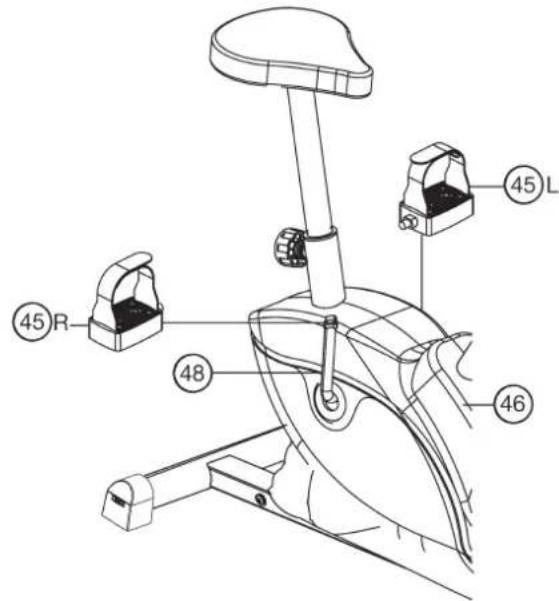
Step 6: Attach the pedals (45L+45R) at pedal crank (48).
- Screw the right pedal (45R) into the locator in the right-hand side (as seen in operation) for the pedal crank (48) (warning! the screw direction is clockwise).
- Screw the left pedal (45L) into the locator in the left-hand side (as seen in operation) for the pedal crank (48) (Warning! the screw direction is anti-clockwise).
Step 7: Checks
- Check the correct installation and function of all screwed and plug connections. Installation is thereby complete.
- When everything is in order, familiarise yourself with the machine at a low resistance setting and make your individual adjustments.
Note: Please keep the tool set and the instructions in a safe place as these may be required for repairs or spare parts orders becoming necessary later.

Mount, Use & Dismount
Transportation of Equipment:
There are two rollers equipped on the front foot. For moving, you can lift up the rear foot and drive it to where you would like to locate or store it.
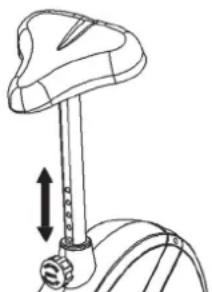
Adjustment - Seat Position
For an effective workout, the seat must be adjusted properly. While your are pedaling, your Knees should be slightly bent when the pedals are in the farthest position. In order to adjust the seat, unscrew the knob few turns and draw it out slightly. Adjust the seat to the right height, then release the knob and tighten it all the way.
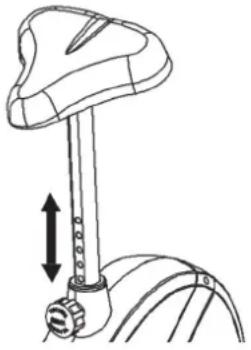
Important:
Make sure to put the knob back into place in the seat post and tighten it completely. Never exceed the maximum height of the seat. Always get off the bicycle before making any adjustment.
Mount, Use & Dismount
Mount:
a. After the seat is adjusted to properly position, insert your foot into retaining strap of pedal step on the pedal and hold the handlebar tightly.
b. Try to put whole body weight on your foot and simultaneously cross over the trainer and land your another foot on the other side.
c. Now you are in the position to start your training.
Use:
a. Keep you hands on the handlebar, and both feet are insert into retaining straps of both pedal properly.
b. Pedal your exercise bike by your both feet alternately.
c. Then you can increase the pedaling speed gradually and adjust braking resistance levels to increase the exercise intension.
Dismount:
a. Slow down the pedaling speed until it comes to rest.
b. Keep the left hand grabbing the left handlebar tightly, put your feet cross over the equipment and land on the floor, then land the other one.
This training equipment is a stationary exercise machine used to simulate without causing excessive pressure to the joints, hence decreasing the risk of impact injuries.
Exercise bike offer a non-impact cardiovascular workout that can vary from light to high intensity based on the resistance preference set by the user. It will strengthen your muscles of legs and increase cardio capacity and maintain fitness of your body also.
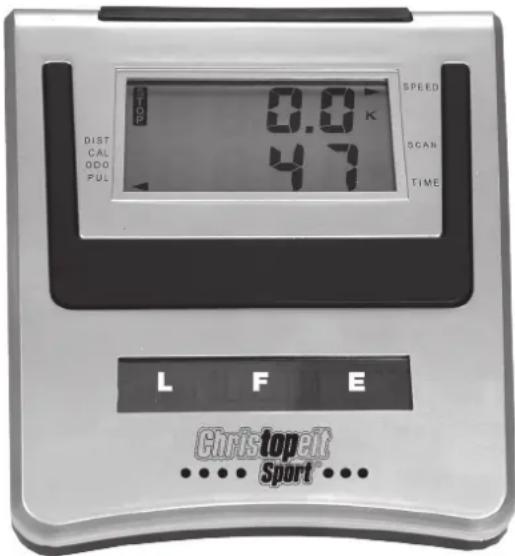
Computer instructions for 1100
The supplied computer allows the most convenient training. Every value relevant to training is displayed in a corresponding window. From the beginning of the training session, the required time, the current speed, the approximate calorie consumption, the travelled distance ad the current pulse rate are displayed. All values are counted from zero upwards. The speed is indicated on the upper display. All other values are indicated on the lower display.
If you wish to see one value displayed constantly as well as the speed during training, select this with the F^ key. If you wish to see these values in constant alternation, select the ,SCAN^ function. The display then changes from one function to the next at intervals of approx. 6 seconds.
The computer is switched on by briefly pressing the F- key or simply by beginning training. The computer begins to register and display all values. To stop the computer, just stop training. The computer stops all measurements and retains the last attained values. The last attained values in the functions TIME, CALORIES and KM are stored and training can continue with these values when training is resumed.
The computer switches of automatically approx. 4 minutes after training is stopped. All values attained until that time are stored and are displayed again when training is resumed. It is then possible to continue training from these values or to reset all functions to zero using the L- key.
Displays:
1. "SPEED" (KM/H) display:
The current speed is displayed in kilometres per hour. It is not possible to specify a particular value using the E^ key. The values last attained by this function are not stored. (Limit of the display: 99.9km / h .)
The currently required time is displayed in minutes and seconds. It is possible to specify a particular value using the E^ key. If a particular time has been specified, the remaining time is displayed. When the specified value is attained, this is indicated by an acoustic signal. The values last attained by this function are stored. (Limit of the display: 99.59 minutes.)
3. DIST (KM) display:
The current status of the travelled distance is displayed. It is possible to specify a particular value using the E key. If a particular distance has been specified, the remaining distance is displayed. When the specified value is attained, this is indicated by an acoustic signal. The values last attained by this function are stored. (Limit of the display: 999 km.)
4. "CALORY" (CAL) display:
The current status of the consumed calories is displayed. It is possible to specify a particular value using the E^ key. If a particular consumption has been specified, the remaining number of calories to be consumed is displayed. When the specified value is attained, this is indicated by an acoustic signal. The values last attained by this function are stored. (Limit of the display: 999 calories.)
5. KM TOTAL (ODO) display:
The current status of the travelled kilometres of all previous training sessions including current training session is displayed. A particular value cannot be speci. ed. The values last attained by this function are not stored. (Limit of the display: 9.999km .)
6. "PULSE" display:
The current pulse rate is displayed in beats per minute. It is not possible to specify a particular value using the E key.
The values last attained by this function are not stored. (Limit of both displays: 40 - 240 pulse beats per minute.)
Note:
For pulse measurement, the two contact surfaces of the pulse measuring handle unit (11) must be gripped simultaneously. The contact surfaces should be located centrally in the palms of the hands.
7. "SCAN" function:
If this function is selected, the current values of all functions are displayed successively in a constant sequence approx. every 5 seconds.
Keys:
1. F^ key:
Pressing this key once briefly makes it possible to change from one function to another, i.e. the respective functions can be selected for which entries can be made using the "E" key. The currently selected function is indicated by an icon in the respective window.
2. E key:
By pressing this key once, it is possible to specify values step by step in the respective functions. For this, the desired function must firstly be selected using the F^ key.
Holding the key pressed activates faster running, which can be stopped by pressing the key again. When training begins, the specified values are then counted down to zero.
3. L^ = Delete:
When this key is pressed briefly, the values chosen with the F key are reset to zero. If the key is held longer (approx. 3 seconds), all last attained values are deleted with the exception of the values in the KM TOTAL display.
Training instructions
You must consider the following factors in determining the amount of training effort required in order to attain tangible physical and health benefits:
1. Intensity:
The level of physical exertion in training must exceed the level of normal exertion without reaching the point of breathlessness and / or exhaustion. A suitable guideline for effective training can be taken from the pulse rate. During training this should rise to the region of between 70% to 85% of the maximum pulse rate (see the table and formular for determination and calculation of this).
During the first weeks, the pulse rate should remain at the lower end of this region, at around 70% of the maximum pulse rate. In the course of the following weeks and months, the pulse rate should be slowly raised to the upper limit of 85% of the maximum pulse rate. The better the physical condition of the person doing the exercise, the more the level of training should be increased to remain in the region of between 70% to 85% of the maximum pulse rate. This should be done by lengthening the time for the training and / or increasing the level of difficulty.
If the pulse rate is not shown on the computer display or if for safety reasons you wish to check your pulse rate, which could have been displayed wrongly due to error in use, etc., you can do the following:
a. Pulse rate measurement in the conventional way (feeling the pulse at the wrist, for example, and counting the number of beats in one minute).
b. Pulse rate measurement with a suitable specialised device (available from dealers specialising in health-related equipment).
2. Frequency
Most experts recommend a combination of health-conscious nutrition, which must be determined on the basis of your training goal, and physical training three times a week. A normal adult must train twice a week to maintain his current level of condition. At least three training sessions a week are required to improve one's condition and reduce one's weight. Of course the ideal frequency of training is five sessions a week.
3. Planning the training
Each training session should consist of three phases: the warm-up phase, the training phase, and the cool-down phase. The body temperature and oxygen intake should be raised slowly in the warm-up phase. This can be done with gymnastic exercises lasting five to ten minutes.
Then the actual training (training phase) should begin. The training exertion should be relatively low for the first few minutes and then raised over a period of 15 to 30 minutes such that the pulse rate reaches the region of between 70% to 85% of the maximum pulse rate.
In order to support the circulation after the training phase and to prevent aching or strained muscles later, it is necessary to follow the training phase with a cool-down phase. This should be consist of stretching exercises and / or light gymnastic exercises for a period of five to ten minutes.
You find further information on the subject warm-up exercises, stretch exercises or general gymnastics exercises in our download area under www.christopeit-sport.com
4. Motivation
The key to a successful program is regular training. You should set a fixed time and place for each day of training and prepare yourself mentally for the training. Only train when you are in the mood for it and always have your goal in view. With continuous training you will be able to see how you are progressing day by day and are approaching your personal training goal bit by bit.
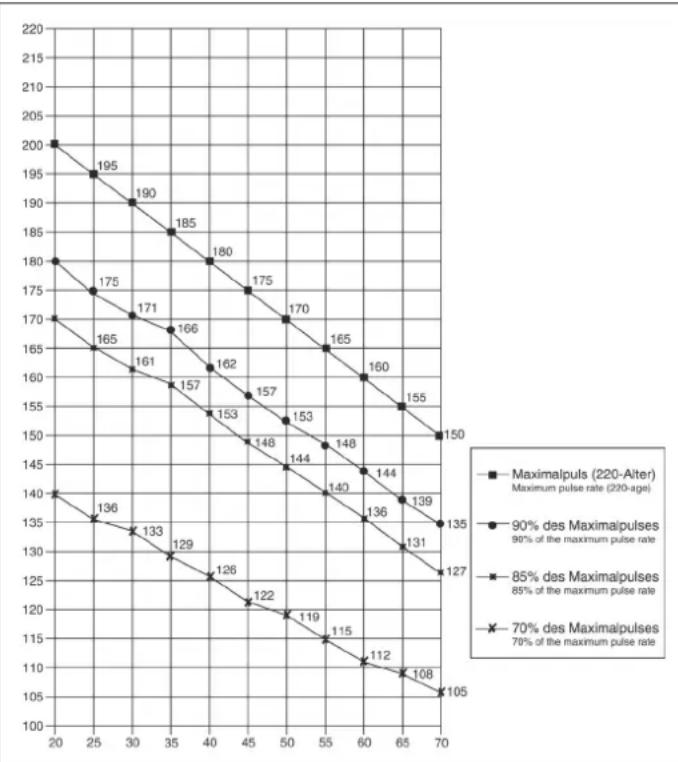
Calculation formula: Maximum pulse rate = 220 - age (220 minus your age)
90% of the maximum pulse rate = (220 - age) x 0.9
85% of the maximum pulse rate = (220 - age) x 0.85
70% of the maximum pulse rate = (220 - age) x 0.7

Sommaire
Chere cliente, cher client.
3. Touche, L" = effacement:
2. "SPEED"-Km/h-weergave:
3. Planning van de training
ctp. 45
CTp. 46
CTp. 47
Ybaxaemble nOKyNaTeBnHcBi n NOKyNaTeJI!
I03dpaBnem Bac c NOKyKoTpeHnpOBOuHOr Chapda dIOMaunx 3aHTn Cnoptom HKeNaem Bam cambix npaTHbIX BneaTneHn.
CneNyIte, noXaIyIcTa, yKa3aHnM m HNCTpyKUm HaWero pyKOBoDCTBa no MOHTaxy nEKCnJyatau.
Ecnn y Bac Bo3HnKHyT KaKHe-NH6yDb BOpocbl, To Bbl MoKeTe B JIO6oe Bpem 6e3 CTEcEHNA ObaaTaBcR K Ham.
Cybaxhenm,BauKpctonaTllnpTm6X

BaxKbIe peKomeHdaun yKa3aHn no 6e30NaCHOCTn
HaHn3deHn npHnHnnaIbHo NOBepraIOTcN cNbItaHm CO CTOpOHb H TcMcbIM ToBeHahOT AkyIaHbOMy CaMOY BbICOKOMy CTAHApTy 6e3onacHO. OJHaKO 3T0 fKt HE oCbo6OxJaet OT o63aHnHOCTn CTporo Co6bnoDaT npNBedeHNbHe HIXe npHnHnnaIbHbYe kA3aHH.
- MoHTnpOBaTb TpeHaeKep B ToCHOM COOTBcTCTBm C MOHTaxHoN INHCTpyKUnei N IcONJb3OBAbT ToIbKO Te OTHOCaUneC K TpeHaeKepy DeTaJI, KOtOpBe I npOnIOxeHbl DnRA MOHTaxa TpeHaeKepA. PepeI pOBeHeHem MOHTaxa I npOBepNTb KOMIIeKTHoCTb NOCTaBKN HaOCHOBaHM HAKNaDHO N KOMNIJEKTHoCTCoDEpXIMORO KAPTOHHO KoP6Kn-ynakOBKn NO MOHTaKy N 3KcPnPyTaun.
- NpeepnepbIM nCnonb3oBaHnem Hpeep peryIapHbIe INHTepBaIbI BpEmEH npOBepaTb npOuHocTb nocAdKbcEx BNHTOB, Raek N npOuyX CoedHHcN C TEm, YTObI ObecneuHTb HaedEXHOE 3KcIIpyaTuIOHOHoe COCTOHN TeHaHexepa.
- Pa3mecntb Tpehaxep B cyxom, POBHom Mecte N npedeoxpaHtB erO t Blanr n cbipoctn. CKOMnEHcPOBaT HEPOBHOCTN nona 3a CHT COOTBEcTByIOxHmep, OcyuectBnaEmbix Ha NOly, N npedyCMoTPeHHbIX Dn 3TOR, OCTpyEmbIX Detanei TpeHaKepe, ECIN OH eCTb Ha daHOM TpeHaKepe. NCKIOHNTb KOHTAKT C Blanr N cbipocTbIO.
- Ecnn CneIyEe3aunITb MeTO pa3MeueHINr TpeHaxepaB OOC6EHNOCTN OT npOaBnBaHnn, 3aRp3HeHH N TOM YIOIO6HO, NOIOKHTb NOI TpeHaxepoNIOxOJyU, HECKoJIb3Auyu POKNaDky (HaNPmEp, pe3INOBbl KObpNK, DEpeBHHyU pINTy UIN T. n.).
5.Пелерпгенровков удаллть ВсппдметыВ радиуce 2 MeТРОВ BOKpyr Tpeнхжета.
6.ДЯ OYNCTKI TpeHaKepe HaHb3a NOB3OBAtBaC aRpeCCNBbIMN OYNCTHbIMn CPeDCTBaMn, aДЯ MOHTaJa N BO3MOKHO rO pEmoHTa HcONOb3OBArTOJko NOCTaBNeHHbIM BmecTe C Hm NIN NOxOdAun M CO6CTBeHHbIMN HCTpyMHTe.
YdaJIbTcTpEaKepaCneblNtOa cpa3yKeIocNe OKOHaHnTreHnpOBKn.
- BHIMAHHE: CnCTeMbI cepdeHOn YacToTb KOHTpObl MOrY 6bItb HeTOHbI. TObblweHNHaTpeHINPOBaKMOxET K CepbEsHOMy rInneHHeCKOMy NOBpeJxHEnIO INN BEmY K CMePtn. HekBaIIuPcUnpoBaHnA N qPe3MepHnA TpeHINPOBaKMOxET pNHyHnTb
Bpe3DopOBbIO. No3ToMy nepeTtem, KaK npCtynatb K cKeIeHAnpaBHeHHo TpeHNPBOE, pOKOHcyIbTHnpOaBbCS C COOTBeCTByIOUIM BpaOH. OH MOKET ONpeDEJIbTB, KAKIM MaKcMmaJIbHbIM Harpy3kAM (nybc, BaTT, npOJONIXeJIbHOCT TpeHNPBOKn I T. ) pa3peuaeTcN NOBepraTbc, N DaTb ToHYIO INHOpMaUN O npaBInbHom NINOXeHN TeNa BO BpEM TpeHNPBOKn, O ceJeX TpeHNPBOKn O nITAHm. 3anpeuaTeTc TpeHNPoBaTcNoCne ObINbHOJ ebl. - TpeHPOBaTbca Ha TpeHaepe TOIbKO ToIa, KOrda OH pa6oTaet 6e3ynpeuHO.ДЯ BO3MOKHOrpoMeHOtaNcNoB3ObaTbTOIbKOOpnHaJIbHbIe 3anaChbteacty. BHHMAHVE: Ecnu Yactn prn IcNoB3OBAHIn yCTpoCTBa CTaHOBATcYpe3MepHo ropAnOn OHn 3aMeHraOT ee bJIn cpoHbI OHN eJe He rapaHTnpYIOCTpOCTBO pOITNB INcNoB3OBAHIn Do TEX nop NOKa 3TO B COCTOHINb 6blnn NOMEueHbI.
- HactpanBaB perynpemyBte deTann, cneintb 3a npabnHbIM NOJOKEHNIEM INN, COOTB., yHTbIBATb NOMeHHYIO MAKcImaJIbHyIO NO3NIIO NaCTPOnIKNIO BoccepeINBaT haIeKaUyO fNKcaUHO 3aHOBO HAcTpoEHNO NOJOKEHNI.
- EcnB pykoObCTBe Yka3aHO HnHOro To TpehXepOM MoKET nIb3OBaTcBToJIbKO OdnH HeNoBek. Bpemr TpeHnPoBKn He DoJxHo 6blno npEBOCxoOHTB Cenom 60 Min./exeHneBHO.
11.Heo6xoJIMO Hocntb TpeHnpOBOHyIO OeKdy N o6yBb, KOtOpbl E NOxOaT DnA O3DopOBuTeBHO TpeHnpOBKn Ha TpeHaxKepe. OeJka DOJXHa TakoI, YTOb6I N CBOeI cOpme (HaNPIMep, DnInHe) OHa He MOrJa 3aueNITbCBA BO BPEM TpeHnpOBKn. CneJeT NO6bpaT bpeHnpOBOHyO 06yBb, KOTOPAR NOxOJNT K TpeHaxKepy, ObcneNeBaet yToHnBOCTb DnB HOR N IMeET HECKoJIb3rUyIO nOdoWBy.
12. BHIMAHNE: Ecnn Bo3HnKHyr TOnoBokpyKeHne, TouHToA, 60nB rpyn n Dpyrme aHOAmJIbHe CmTTOMbI, IpePBaTb TpeHnpOBky N o6paNTbC K COOTBTCTByUOeMByaY.
13. CneIyET npHnHnnaHbHO yecTb, YTO cnOpTNBbIE ChapAdbI - He IrgpyKn.
N03OTMy IX pa3pe7aetcN cNoB5oBaT ToIbKO B COBTBeTCTBmC H3Na3HaueHem N IuCaMn, KOToPbe pacOJaAOT COBTBeTCTByUoiE INHOpMaIeN KOTOpBe npOJN COBTBeTCTByUoiN IHCTpyTKaX.
14. TaKIM LInaAM KaK DeTn, INHBAInDbI NIOOn CByeBAMn CNeNyET NOb3ObaTbTpeHaePOM TOLbKO B nPcYCTBm EeE OJHOrO YeNoBEka, KOtOpBn MOKeT OKa3aTb NOMoCb N DaTb pyKOBoDAuNue Yka3aHn. NckIOuHTb BO3MOXHOCTb NCIOB3oBaHn TpeHaeXepa DTeBm 6e3HaD30pa, npINHB COOTBETCTBYUQne MEPbl.
15.Cneintb 3a TeM, YTO6bI TpeHpyUOuNecr N dpyrue Nua HnKoJa He nonaann KaKmN-JIOo cAtractm CBOOero TaB 30Hy eue DBNXyuxxCd TaTaeTaeHIN YTO6bONH e HaxoDUNCb Tam.
16. B KOHcpe cpoKa cnyKbI 3OT npOyKT He dOnKeH 6bITb yTNIN3nPOBaH B domaunHe OTXoBbl, a DoJKeH 6bITb OTdAn Ha c6OpHbI nYHK T yTNIN3aUn CnONB3OBaHHbIX 3NeKTPnueckux N 3NeKTPoHHbIX np6Opob. Ha 3To yKa3bIbaET CmB0N Ha npOyKTe, Ha INCTpyKuN no 3KcNpyTaun NIn Hn Ha yNaKOBke.
Bce MaTePnaJIbI MOrYT 6bITb ChOBA IcNoJIb3ObaHbI corNaCHO mapKnpoBKe
PnIO NobTOpHOM IcNoJIb3ObaHN, BTOpNCHIpepeBaOTke ININ dpyrnx
ΦopMxBTOpHrHO IcNoJIb3ObaHNCTaBPbIX pNbOpOB Bbl BHCnTe CBOI
BKJaD 3aAHTy OKpyKaUoE CpeDbI.
Ioxayncta,y3HaTe B KOMMyHbHom ynpabHeHH aDpe 6n3NeJkaeero c60pHorO nyHKta yTnIn3aun.
17.YuHTbBaTpe6oBaHnI3KoNOrn,He ydaIaTbYnaKoBOHybMaTePnAn, n3pAcXoDaOBaHbIe 6TaapeKnN DeTaN TpeHaKepa BMeCte C bStOBbIMn OTxOaAMn, a KNaCTb IN B PpeyCMToPTpeHbE DnA 3TOr KOtHeBepblc6OpHNnn CcbAbaTNb X COOTBeTCTByUOHmne PyHKtbl cOpa yTuINbCbipR.
18.3TOT TpeHaxep npedctabnreT CO6o CnpTNBHy CNAPJ, DeNCTBYIOUHN B 3aBNCMOCTN OT CKOPOCTN.T.EERO MOUHOCTb BO3pactaET NO MEpe yBeMueHHeHuaCToTB BpaueHn HAO6OpOT.
19.DaHbI npB6Op ABnAeTc3aBnCnMbIM OT cKOpocTn, t.E. cyBEnuHeHnEM
HCna 06opOTOB MOoHOCbYBEJIuNBAeTcN HAo6OpOT.Pnp6Op Chabxhen
fIKCNpyMeON B8-MN pNOJooHEHXPERyINpOBKOConPcOtnBnEHHN, KOTOPAR
No3BOAnET CHN3NTb NIO NOBbICbTb MTOmOHe COpnTOBnEHHN, TEm
camblM, TpeHIpOBoCHyHO Harpy3kY. PnT OTM BpaueHne pyuKN PEryNJPOBKN
CONpOtnBnEHHN B HAnpaBNeHHN CTyHeN 1 BeDEt K CHNXeHHIO TopMO3HO
CoPpOtnBnEHHN, TEm camblM, TpeHIpOBoCHOH Harpy3kN. BpaueHne
pyKnpeyNJPOBKN CoPpOtnBnEHHN B HAnpaBNeHHN CTyHeN 8 BeDEt K
NoBbLIeHHIO TopMO3HOcoPpOtnBnEHHN, TEm camblM, TpeHIpOBoCHOH
Harpy3kN.
20. DoryctmaMaKcMaJIbHaNHarpy3Ka (= Bec TeJa) yCTaHOBNeHa B 100 kr. KomblbOTe npoIe IncblTaHnIe n cepTnФkauuio corgNaCHO HOpMe EN 957-1/-5.H/C" u EMC Directive 2004/108/EC.
CneuФkaun - Cnncok 3anachbix qacte
AP 1 № 3aka3a 1100
Texnueckx xapaKTepeNtukn
No coctoHHIO Ha 01.04.2011
MarHHTha CnCTema HarpyKeHn
HHepnoHna Macca 6 Kr
- 8 ypoBHeH harpy3kn
-Измерени пльба датчима на руковTKax
BepTnKaJIbHoe peryIIpOBAHne ceIa
-PerynpobKa yrga haknoha pyra
TpaHcnpOpTnpoBouhIbe pONIKIN
KOMNbIOTep cHnDkaUne CNeyIOuNX napaMeTPOB:BpeMCKOPOCTb,DCtAHUN, np6bn. pacXoJ KaIOpN,nybc, n Scan
-Bo3MOXHOCT 3aDaBaTb co6cTBHeHHbIe npaMeTpbl: BpeMn, nctanu, np6bn n pacxOJ kalOpni
H3BeueHHe O npEeBbIeHn 3aDaHHbIX npaMeTpoB
MaKcMmaBbHbBec nonb3OBaTeJr:100Kr
Fa6apnThbpea3Mepbl: np6n.Д 72x 54 x B 122 cm
CnB ynpaKOBky, npoBepbTe NO cnNcKy, BCE JI n DeTaN Ha MeCTe. EcIn Bce B nopAKe, TO MOxHO HauHnHaTb c6OpKy. EcIn KaKoHn6yDb arperat He B nopAKe HnO TcyTCTByeT, ObaaauTecb K HA:
Uar 6: MoHTax neJaIe (45L+45R) WATyHbI neJaIe (48).
- PnKpyTne npabyIO neaIb (45R) Ha 7atYH neaIIN (48), HaxOJaIcNc C npABoB CTOpOBb HnPpABHeHm DnBxKeHn. (BnMaHne! Ha-npAbeHne zakpyuBaHn60Ira: no yacobO cnpeKe).
- PnKpyTne neByIO neIaB (45L) Ha 7aTyH neIaII (48), HaxoJaIIN-cra C neBOI cTOPOHI B HAnpABNeHN DInKeHna. (BNHMaHHe! HApab-NeHne 3akpyuBaHn6 BoNTa: npOTIB uacOBoi CTpeJIKN).

War7: KOnTpOnb
- PpOBepbTe Bce coeHHeHn Ha npaBnIbHocTb c6OpKn nPpOBeHnTe npoBepky fHKUHOHaJIbHOCTn. PpN 3OM MOHTaK ChNTaETc 3aKOHHeHbIM.
- EcnBCE B npAKe, npOBeDnTe npOHyTo TpeHnpOBky npn MaNeHbKo Harpy3Ke, INHdNvDyAnbHO NaCtpoTe TpeHaKe.
3ameyahne:
IoxaJyncTa, coxpaHnTe HaBOp INhCTpyMeHTOB dJa NocNe dyUOux BO3MOKhbIX pEmoHTOB INhCTpyKcNIO NO MOHTaKy dJa BO3MOKhbIX 3aKa3OB 3anaChbix qacte.
IoiB3OBaHne TpeHaXePOM
Ponb30BaHne TpeHaXkepom
Ha nepeHne HoxKe HaxoJrTcB Dba TpaHCnOpTnpOBOHybIX pONka. Ira TORO, YTo6bl nepeBnHybT TpeHaeKep Ha dpyroe MeCTO nIIN NOMEcTb Ha MeCTo XpAHeHIn, BO3BMNTecb 3a pyNb I HAKnOHte TpeHaeKep Ha nepeDHOIO HOxky TaK, YTo6bl TpeHaeKep MOXHO bJIIO NERKO nepeBnHybT C NOMOsbIO TpaHCnOpTnpOBOHybIX pONIKOB Ha HyXHOE MeCTO.
PerynpoBbKa BlicOTb ceHa:
I npnHrna ydo6HOro noLoXeHnHa CeJne Bo BpeM rpeHnpOBKn, Heo6xoDmO yctaHObntB npabunbHyIO BicOTy ceJna.
PpabunbHbIM NOxoeHnem CeJNa CHTAeTcN NOxOHeMe, KOna KOJIeHN B HIXHEM NOxOHeHN neJaan HAXODTcB HEMHORO
corHytOM noLoXeHnH He MOrY 6bItb DO KOHa BblpAmHeH. I na YcTaHOBJeHN npabunbHoro noNoxHeHnCeJna Ocna6bTe
Oho ryKoB 6bIcTpoedByuOns 3atBoP bITBaHITNE rp6ok, Dpyroyn pyKo nepctabBe TceJNO B XeJaemoe noLoXeHnE.
OTnyCTte rpi6ok, YTO6bOH 3anAn n KpknO 3akpynte erO.
BaxkHo:
YIOCTOBEPbTecb TOM, YTO 6bIcTpOeHcTByUoU 3aTbOp 3aФNKcPObaH IN KpeNko 3akpyeH. He BbITacknBaTe onopHyIO Tpy6y cedna do KOHua H Me MeHrTe No3uHm Cedna BO Bpem TpeHnpOBKn.
CaHbCnCyckatbc C TpeHaXepa:
CaHntbcaHaTpeHaKepe:
Iocne yctahobnHn npabunbHO BbcOTb CeDna Bo3bMntecb 3a pyNb. YcTaHOBtE 6nKaiyUo neDaB H NxHIO IO No3nIO n BDeHbTe CTynHIO BΦNKcnpuOoi pEmeWOK TAK, YTObI OHa HaxOOnlac B HAdEcxHOM NOIOKeHHN Ha neDaII. IpeKeINbTe dpyryIO Hory Ha npotNBONONOHyIO CTOpOHy I CAnbTe HA ceNo. PpN 3TOM KpeNko DePxxNTecb DByMa pyKaAMn 3a pyNb. Iocne 3TOrO BDeHbTe dpyryIO CTynHIO BΦNKcnpuOoi pEmeWOK neDanII.
Ponb3ObaHne:
DepKNTecb DBym pykAm 3a pynb Hc BCTabaTe C cedna BO BPem TpeHnpOBKn. CneiTe 3a Tem, YTO6bl CTynnHa neaIHX BCE BPem TpeHnpOBKn 6bln 3aΦnkCupObaHb peMeuKaMn.
Cnyckatbca c Tpehaxepa:
PpeKpaTne TpeHnpOBky, KpENKO dEpxKaB 3a pyNb. Chmnte cHaayana Ody CTynHc C neJaN n NoCTaBte ee HaJeXHom noNoxKeHH HA non I coiDnTe C ceNa. Chmnte Notom dpIryIO CTynHc C neJaN n NoCTaBte ee Ha non I coiDnTe M TpeHaxKepa.
3TOT TpeHaeep - HeNoDBNkHbI DOMaunn TpeHaeep, MMInTppyoUe3dy Ha BeNoCmneJe. 13-3a TpeHApOBKn pnp IIObo noroDe, 6e3 BHeuHX BO3dEiCTBn, a TaKxe 6e3 DaBNeHn npn e3e B rpynne yMeHbuaeTcB BepoTHocTb NaedHn IN nepeyTomJIeHna.
N3-3a BO3MOXHOI 3MEHNEI COPIOTBILHNE, e3da Ha BENOCINeIpeIOCTABnHT BO3MOXHOCTb TpeHPOBKn cepDEHO COCYDnCTO CNCTEMbl 6e3 uepe3MePHORo HAnpJKeHNI. Ppi 3TOM BO3MOXHA 6Oone NIM MeHee INTEHCNBnA TpeHPOBKa. Ppi 3TOM TpeHpyIOCTn HIXKHe KOHeHOCtN, YKpePnIeTcR cepDeHCO-CocyDnCTaCnCTema n CnOCO6CTByeTc NoIDepXaHne XopoWSe cnOpTnBHO fOpMbI.
Pykooeodcmno no ucnonb306aHuO KOMnbIomepa Ha mpehaxepe cepuu 1100
BxOJaun B KOMnIeK TobApOHaBAnH TpeHaKepa KOMnbIOp EocneuHT Bam MaKcMaJIbHbI KOMΦOpT BO BPeM TpeHIpOBKn. IIO6oB BaXHbI dIa TpeHIpOBouHOro npoceca Noka3aTeNb OTpKaaeTc H daCnnee.
C Haayanom TpeHnpoBKN Ha DnncNee BbcBceuBaIOCT Heo6xoDnMOe Bpem, pakTtueckaCKopocTB, npMephbl pacxOJ kaIopn, npoiDeHHePpacctOraHne Hnybc TpeHpyIOUeroCBA MOpHT ChrTNA NOKa3AHN.OTcET BCex 3HaueHn HaunhaeTcraO TcYcaHOBK CteTa Bnepeid.
B BepxHem OKoUkne npOn3BODITcN INnKauCnCKopoCTN. B HnKhem OKoUkne npOn3BODITcN INnKauCn BCExc OCTaNbHbIX NOKa3ATEneJ. EcnB BiXOTnTe, TOTb BO BpEmr TpeHnpOBKn BMeCte C INnKauCnEeN NOKa3ATEneJ CKOPOCTN npOn3BODITcN INnKauCn ODHOrO ONpeDeeHNO ROKa3ATEneJ, Bbi6epnte 3OT NOKa3ATeJIb C NOMOsbIO KNaBmIINF." ECnn Bbl XOTnTe, TOTb BO BpEmr TpeHnpOBKn INnKauCnBcN NOKa3ATEneJ NO OuepeIN, Bbi6epnte FyHKuio "SCAN". C nepnoDnHocTbO B 6 cekHyd MeHReTcN INnKauCn NOKa3ATEneJ. KOMnbOpET BKlOuaeTcN PocTbIM Haxatmeh KhoKNF" INII PocTO C HaayAMoTpeHnpOBKn. KOMnbOpET HauHnaeT OTCHTcBex NOKa3ATeNeI INnKauCnIO IN HA DncnIee. YOTbBI OCTaHOBNTb KOMnbOpET, Heo6XoDNMO POCTo 3aKOHHTb TpeHnpOBKy. KOMnbOpET OCTaHaBNIbaeBCE nM3MepeHnI N DEMOHCTPnPyeT KOHeHNbIE pe3yIbTaTb.Camble NoceJeHne pe3yIbTaTbI fynKuIN BPEM, KAIOPN I PACCTOAHNE 3aHOcTcB B NaMBy, IN PN BO306HOBJIeHN TpeHnpOBKn Bbi MoKeTe Haatb C 3TNX NOKa3ATeNeI.
KOMNbTepe ABToMaTHeCKN OTKNoHaeTcnpMepHoYepe3 MHyTbI NocNe OKOHuaHnTreHnPOBKn.Bce DoCTnHryTbe Do 3TOrO nOKa3aTeIN 3aHocTcB B NaMTb NMOY IcNOJIb3oBaTbc PnB 03o6HOBnEHn TpeHnPOBKn CHOBA. IVxOJaN 33TNX NOKa3aTeEn, MoXHO pnoJOnjKaTa DaNbHeN JyU TpeHnPOBky INy yCTaHOBnTB BCE cyHKuIN Ha HONb c NOMoubIO KhoNkL
Toka3aHnA:
© by Top-Sports Gilles GmbH
D-42551 Velbert (Germany)
