USER MANUAL HT 3 Christopeit
- Summary of Parts Page 3
- Important Recommendations and Safety Information Page 12
- Parts List Page 13 - 14
- Assembly Instructions With Exploded Diagrams Page 15-17
Mount, Use & Dismount Page 17
-
Computer instructions Page 18
-
Cleaning, Storage, Checks, Troubleshooting, Page 19
Warm up exercises (Warm Up)
- Training Instructions
Dear customer,
We congratulate you on your purchase of this home training sports unit and hope that we will have a great deal of pleasure with it. Please take heed of the enclosed notes and instructions and follow them closely concerning assembly and use.
Please do not hesitate to contact us at any time if you should have any questions.
Important Recommendations and Safety Instructions
Our products are all tested and therefore represent the highest current safety standards. However, this fact does not make it unnecessary to observe the following principles strictly.
- Assembly the machine exactly as described in the installation instructions and use only the enclosed, specific parts of the machine. Before assembling, verify the completeness of the delivery against the delivery notice and the completeness of the carton against the assembly steps in the installation and operating instructions.
- Before the first use and at regular intervals (approximately every 50 Operating hours) check the tightness of all screws, nuts and other connections and the access shafts and joints with some lubricant so that the safe operating condition of the equipment is ensured. In particular, the adjustment of saddle and handlebar need smooth function and good condition.
- Set up the machine in a dry, level place and protect it from moisture and water. Uneven parts of the floor must be compensated by suitable measures and by the provided adjustable parts of the machine if such are installed. Ensure that no contact occurs with moisture or water.
- Place a suitable base (e.g. rubber mat, wooden board etc.) beneath the machine if the area of the machine must be specially protected against indentations, dirt etc.
- Before beginning training, remove all objects within a radius of 2 metres from the machine.
- Do not use aggressive cleaning agents to clean the machine and employ only the supplied tools or suitable tools of your own to assemble the machine and for any necessary repairs. Remove drops of sweat from the machine immediately after finishing training.
- WARNING! Systems of the heart frequency supervision can be inexact. Excessive training can lead to serious health damage or to the death. Consult a doctor before beginning a planned training programme. He can define the maximum exertion (pulse, Watts, duration of training etc.) to which you may expose yourself and can give you precise information on the correct posture during training, the targets of your training and your diet. Never train after eating large meals.
- Only train on the machine when it is in correct working order. Use original spare parts only for any necessary repairs. WARNING! Replace the worm parts immediately and keep this equipment out of use until repaired.
- When setting the adjustable parts, observe the correct position and the marked, maximum setting positions and ensure that the newly adjusted position is correctly secured.
- Unless otherwise described in the instructions, the machine must only be used for training by one person at a time. The exercise time should not overtake 60 min./daily.
- Wear training clothes and shoes which are suitable for fitness training with the machine. Your clothes must be such that they cannot catch during training due to their shape (e.g. length). Your training shoes should be
appropriate for the trainer, must support your feet firmly and must have non-slip soles.
12. WARNING! If you notice a feeling of dizziness, sickness, chest pain or other abnormal symptoms, stop training and consult a doctor.
13. Never forget that sports machines are not toys. They must therefore only be used according to their purpose and by suitably informed and instructed persons.
14. People such as children, invalids and handicapped persons should only use the machine in the presence of another person who can give aid and advice. Take suitable measures to ensure that children never use the machine without supervision.
15. Ensure that the person conducting training and other people never move or hold any parts of their body into the vicinity of moving parts.
16. At the end of its life span this product is not allowed to dispose over the normal household waste, but it must be given to an assembly point for the recycling of electric and electronic components. You may find the symbol on the product, on the instructions or on the packing. The materials are reusable in accordance with their marking. With the re-use, the material utilization or the protection of our environment. Please ask the local administration for the responsible disposal place.
17. To protect the environment, do not dispose of the packaging materials, used batteries or parts of the machine as household waste. Put these in the appropriate collection bins or bring them to a suitable collection point.
18. This machine is a speed-dependant machine, i.e. the power increases with increasing speed, and the reverse.
19. The machine is equipped with 8-speed resistance adjustment. This makes it possible to reduce or increase the braking resistance and thereby the training exertion. Turning the adjusting knob for the resistance setting towards stage 1 reduces the braking resistance and thereby the training exertion. Turning the adjusting knob for the resistance setting towards stage 8 increases the braking resistance and thereby the training exertion.
20. The maximum permissible load (=body weight) is specified as 150 kg. This machine has been tested and certified in compliance with EN 957-1 and -5 "H. C". This item's computer corresponds to the basic demands of the EMV Directive of 2004/108/EC.
Parts List - Spare Parts List HT 3 Order No. 9114(A)
Technical data: Issue: 01.06.2014
Magnetic brake system
Approx. 10 kg centrifugal mass
8-stage gear shift
- Hand pulse measurement
- low entrance
- horizontally (6cm) and vertically (30cm) adjustable saddle (quick release)
- incline adjustable handlebar
- Transport rollers at front foot
- Easy to use computer with digital display of: Time, Distance, ODO, Speed, approx. calorie consumption and pulse rate.
- Input of limits for time, distance, approx. calories and heart rate.
Announcement of higher limits.
- Suitable for a height of 150-198cm
Load max. 150kg (Body weight)
Space requirement approx L 108 x W 55 x H 139 cm
Items weight: 30kg
Exercise space approx: min. 1,5m²
Please contact us if any components are defective or missing, or if you need any spare parts or replacements in future.
Assembly Instructions
Before beginning assembly, be sure to observe our recommendations and safety instruction. Remove all the part of your cycle from the carton and place them on the floor carefully. Some parts are pre-assembled. Assembly time: 30 - 40 min.
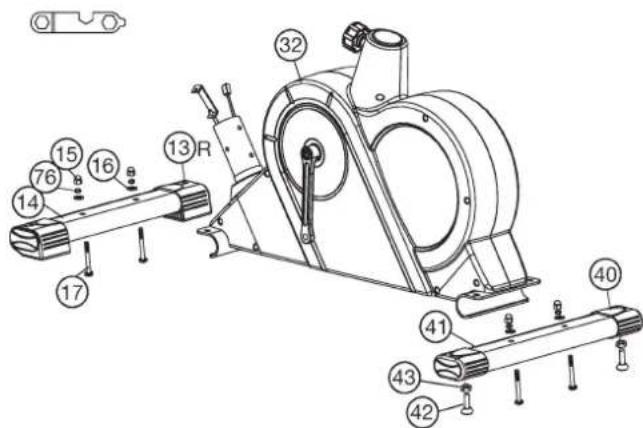
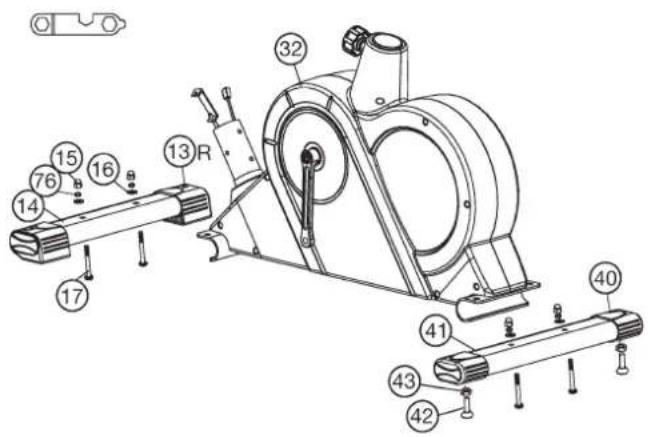
Step 1:
Attach the stabilizer (14+41).
- Attach the front stabilizer (14) assembled with 2 front cross bar caps (13) to main frame (32), using 2 bolts M8x55 (17), 2 washers (16), 2 spring washers (76) and 2 cap nuts (15). The transportation wheel of foot-caps (13) need front direction for use.
- Attach the rear stabilizer (41) assembled with 2 rear cross bar caps (40) and 2 height adjustable screws (42) to main frame (32), using 2 bolts M8x55 (17), 2 washers (16), 2 spring washers (76) and 2 cap nuts (15). (For uneven floor you can adjust the height with screw (42) and secure position with nut (43).)
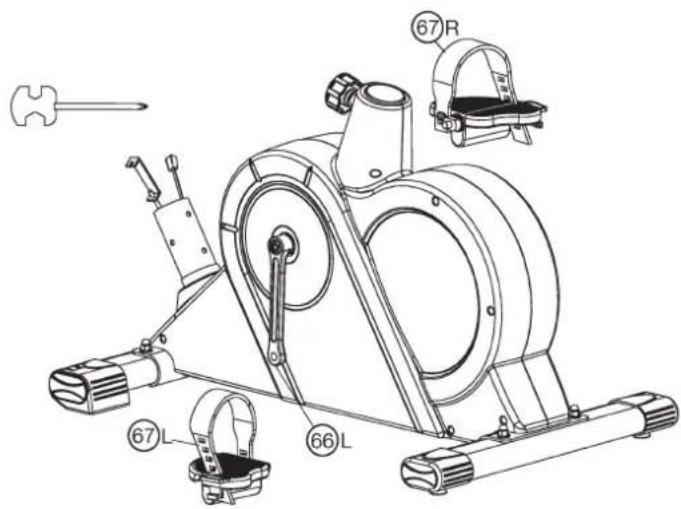
Step 2:
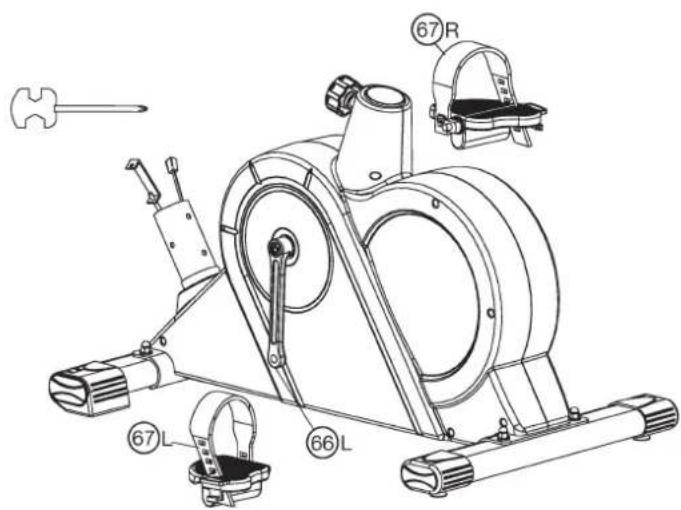
Attach the pedals (67L+67R).
- Attach the pedal straps to the pedals (67R/67L).
(Note: The end with many adjustable holes must be set outwards.)
- The pedals (67R/67L) are marked with n^nR^ & n^nL^
Note: Right and Left are specified as viewed seated on the machine during training. Connect each pedal (67R/67L) to the matching crank arm (66L+66R)
(Note: The right pedal "R" should be threaded on clockwise. The left pedal "L" should be threaded on counter-clockwise.)
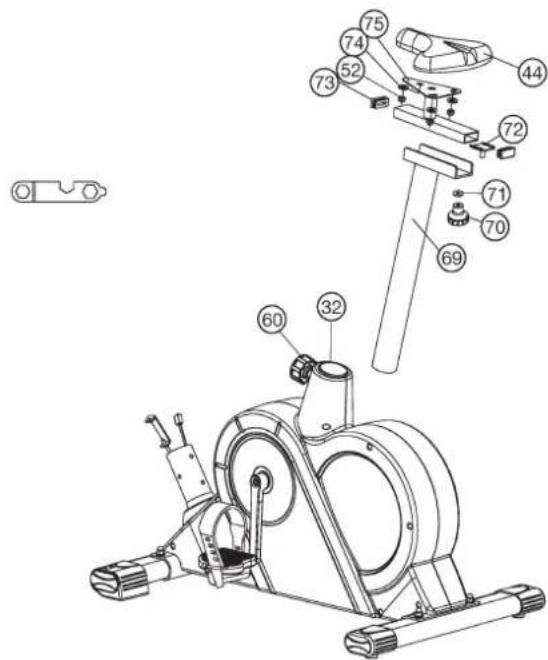
Step 3:
Installation of saddle (44) at saddle support (69) by using saddle slide (75).
- Push the saddle (44) with saddle bracket into the movable saddle slide (75) and tight it up with washer (74) and nut (52).
- Place the movable seat post (75) into the holder of saddle post (69), set it at the desired horizontally position and tighten it by washer (71) and movable seat knob (70).
- Insert the saddle support (69) into the provided holder of the main frame (32) and secure at the desired position by screwing in the rapid action lock (60).
(Note: To screw in the rapid-action lock (60), the threaded hole in the main frame (32) and one of the holes in the saddle support (69) must be aligned. Furthermore, ensure that the saddle support (69) is not pulled out of the main frame beyond the marked maximum Position. The setting of the saddle post can be adjusted as desired later. For this, the rapid action catch (60) must be loosened by only a few revolutions, the cap of the lock must be pulled away and the saddle adjusted. Then secure the new setting by tightening the rapid action catch.

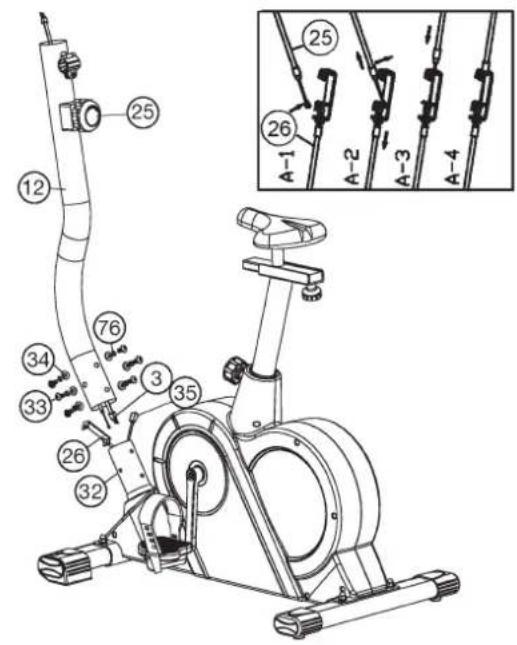
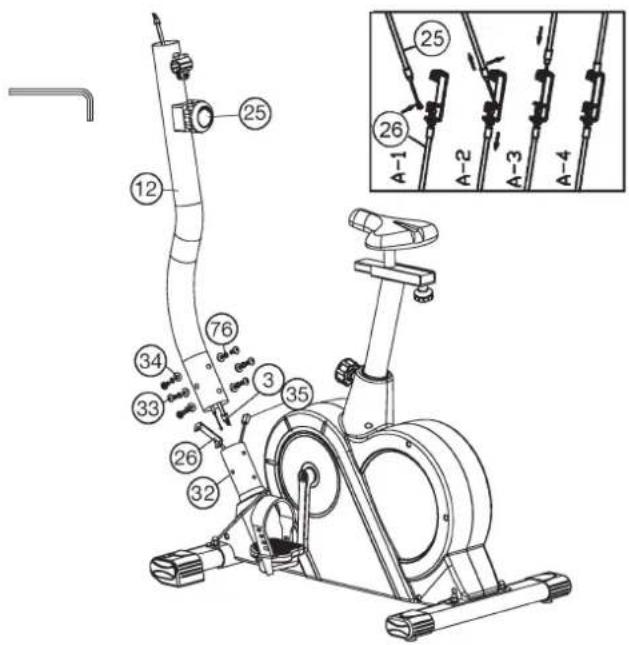
Step 4: Attach the front post (12) at main frame (32).
- Attach the front post (12) to the front post mounting tube of main frame (32) and connect the plug of connection cable (3) to the socket of the sensor cable (35).
- Connect the cable of tension control (25) to the bracket of lower section cable tension (26) (See figure A1-4). Before this step of the installation, it is advisable to adjust the resistance setting to the highest stage, at which the cable extends furthest from the sheath. Put the lowest part of cable (25) into the small hook (figure A 1). Pull it (figure A 2) until the small hook get in higher position and then insert the cable (25) onto the bracket (26) (figure A3+A4).
- Insert the front post (12) to main frame (32) and secure, using allan head bolts M8x16 (33), spring washers (76) and washers (34).
(Attention: Ensure that the cable loom are not crunched or pinched during installation.)
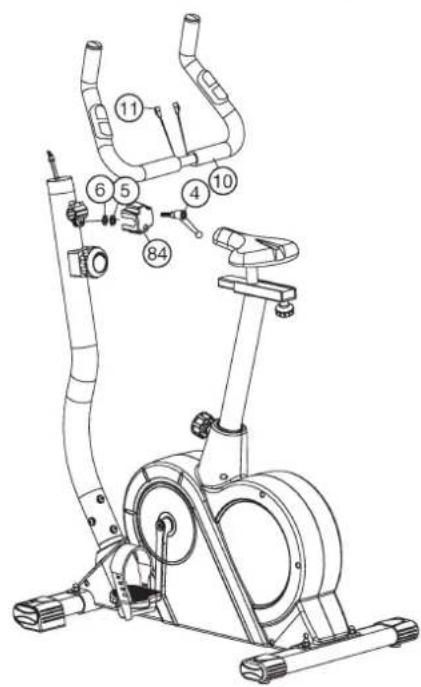
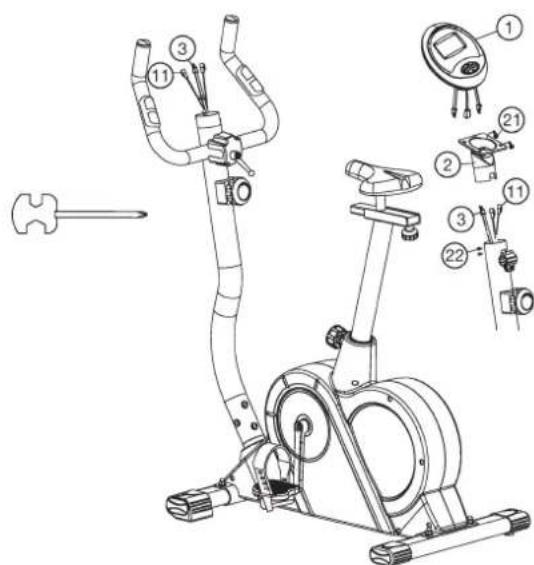
Step 5: Attach the handlebar (10) at handlebar support (12).
- Guide the preassembled handlebar unit (10) through the upper part of the handlebar post (12), put the pulse cable (11) through the hole and close the bracket of handlebar holder.
- Attach the front handlebar cover (84) at the handlebar holder of handlebar support (12) and screw the handlebar (10) in desired position at the handlebar post (12) and tighten firmly with spring washer (5), washer (6) and handlebar screw (4).

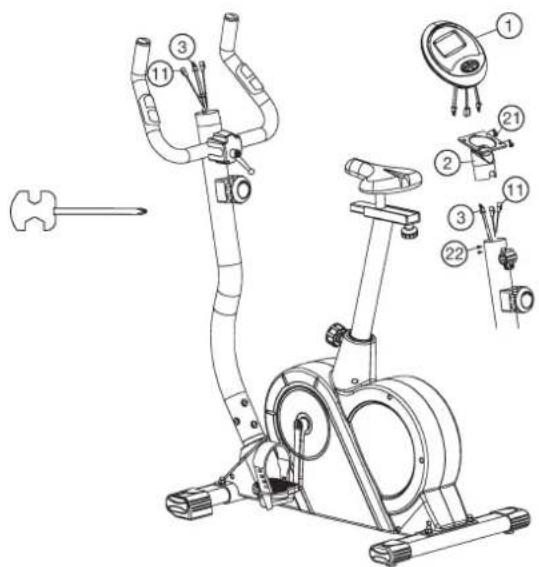
Step 6: Attach the computer (1) at handlebar support (12).
- Take the computer (1) that has been supplied out of the packaging and insert the batteries (Type "AA"-1.5 V pen cells) by watching for the right polarity on the back of the computer (1). (Batteries for the computer are not included in this item. Please buy them at your located market.)
- Place the computer (1) on the computer holder (2) and put the cables through the computer holder (2) and attach it with the screws (21) without squeezing the cables.
- Push the plug of the connecting cable (3) and pulse cable (11) into the associated socket of the computer (1).
- Put the computer holder (2) onto the handlebar support (12) and attach it with screws (22).
Step 7: Checks
- Check the correct installation and function of all screwed and plug connections. Installation is thereby complete.
- When everything is in order, familiarise yourself with the machine at a low resistance setting and make your individual adjustments.
Note:
Please keep the tool set and the instructions in a safe place as these may be required for repairs or spare parts orders becoming necessary later.

Mount, Use & Dismount
Transportation of Equipment:
There are two rollers equipped on the front foot. For moving, you can lift up the rear foot and drive it to where you would like to locate or store it.
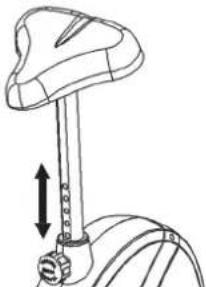
Adjustment - Seat Position
For an effective workout, the seat must be adjusted properly. While your are pedaling, your Knees should be slightly bent when the pedals are in the farthest position. In order to adjust the seat, unscrew the knob few turns and draw it out slightly. Adjust the seat to the right height, then release the knob and tighten it all the way.
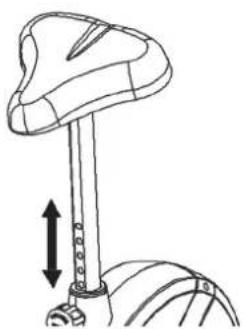
Important:
Make sure to put the knob back into place in the seat post and tighten it completely. Never exceed the maximum height of the seat. Always get off the bicycle before making any adjustment.
A biomechanically optimal seating position ensures optimum power transmission. The aim is that the existing force as large as possible arrives on the pedals and the muscles with optimal effect works. The seat position affects which muscles are in use primarily in essence. The right handlebar position is responsible for keeping the upper body portion. Is the handlebar settings chosen horizontally so you get an athletic posture. With each further step towards the body, you adjust a more relaxed attitude. To adjust the handlebar, simply loosen the screw handlebar until the handlebar can brought into the desired position and tighten them after adjustment again firmly.
To avoid any problems such as back- / knee pain or numbness in the feet through bad seat position on the bike, the maintenance of a proper adjustment of the saddle and handlebar we strongly recommend.
Mount, Use & Dismount
Mount:
a. After the seat is adjusted to properly position, insert your foot into retaining strap of pedal step on the pedal and hold the handlebar tightly.
b. Try to put whole body weight on your foot and simultaneously cross over the trainer and land your another foot on the other side.
c. Now you are in the position to start your training.
Use:
a. Keep you hands on the handlebar, and both feet are insert into retaining straps of both pedal properly.
b. Pedal your exercise bike by your both feet alternately.
c. Then you can increase the pedaling speed gradually and adjust braking resistance levels to increase the exercise intention.
Dismount:
a. Slow down the pedaling speed until it comes to rest.
b. Keep the left hand grabbing the left handlebar tightly, put your feet cross over the equipment and land on the floor, then land the other one.
This training equipment is a stationary exercise machine used to simulate without causing excessive pressure to the joints, hence decreasing the risk of impact injuries.
Exercise bike offer a non-impact cardiovascular workout that can vary from light to high intensity based on the resistance preference set by the user. It will strengthen your muscles of legs and increase cardio capacity and maintain fitness of your body also.
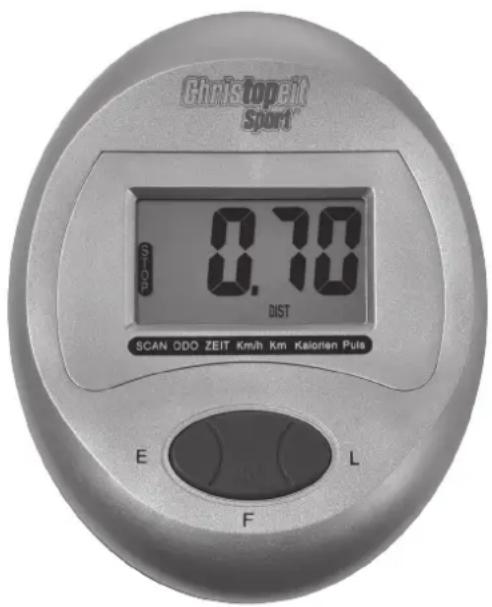
Computer instructions for 9114(A)
The supplied computer allows the most convenient training. Every value relevant to training is displayed in a corresponding window.
From the beginning of the training session, the required time, the current speed, the approximate calorie consumption, the travelled distance ad the current pulse rate are displayed. All values are counted from zero upwards. The speed is indicated on the upper display. All other values are indicated on the lower display.
If you wish to see one value displayed constantly as well as the speed during training, select this with the F^ key. If you wish to see these values in constant alternation, select the SCAN^ function. The display then changes from one function to the next at intervals of approx. 6 seconds.
The computer is switched on by briefly pressing the F- key or simply by beginning training. The computer begins to register and display all values. To stop the computer, just stop training. The computer stops all measurements and retains the last attained values. The last attained values in the functions TIME, CALORIES and KM are stored and training can continue with these values when training is resumed.
The computer switches of automatically approx. 4 minutes after training is stopped. All values attained until that time are stored and are displayed again when training is resumed. It is then possible to continue training from these values or to reset all functions to zero using the L- key.
Displays:
1. KM/H" Speed-display:
The current speed is displayed in kilometres per hour. It is not possible to specify a particular value using the E key. The values last attained by this function are not stored. (Limit of the display: 99.9km / h .)
2. "ZeIT" Time-display:
The currently required time is displayed in minutes and seconds. It is possible to specify a particular value using the E^ key. If a particular time has been specified, the remaining time is displayed. When the specified value is attained, this is indicated by an acoustic signal. The values last attained by this function are stored. (Limit of the display: 99.59 minutes.)
3. KM Distance-display:
The current status of the travelled distance is displayed. It is possible to specify a particular value using the "E" key. If a particular distance has been specified, the remaining distance is displayed. When the specified value is attained, this is indicated by an acoustic signal. The values last attained by this function are stored. (Limit of the display: 999 km.)
4. "CALORIEN" Calory-display:
The current status of the consumed calories is displayed. It is possible to specify a particular value using the "E" key. If a particular consumption has been specified, the remaining number of calories to be consumed is displayed. When the specified value is attained, this is indicated by an acoustic signal. The values last attained by this function are stored. (Limit of the display: 999 calories.)
5. "ODO" Km Total-display:
The current status of the travelled kilometres of all previous training sessions including current training session is displayed. A particular value cannot be speci. ed. The values last attained by this function are not stored. (Limit of the display: 9.999km .)
6. PULS Pulse-display:
The current pulse rate is displayed in beats per minute. It is possible to specify a particular value using the "E" key.
If a particular upper pulse rate limit has been specified, an acoustic signal will indicate if these limits are infringed.
The values last attained by this function are not stored. (Limit of both displays: 40 - 240 pulse beats per minute.)
Pulse Rate:
The whole set of heart rate detector include 2 sensors each side. Each sensor has 2 pieces of metal parts. The correct way to get detected is to gently hold both metal parts each hand. With the good signals picked up by the computer, the heart mark in the HEART RATE Display shall flash. Sometimes the heart rate value is not useable, based on wet hands or any other contact problems during exercising. If you need high accuracy heart rate value you have to use an external heart rate measurement with a pulse belt.
7. "SCAN" function:
If this function is selected, the current values of all functions are displayed successively in a constant sequence approx. every 5 seconds.
Keys:
1. ^ key:
Pressing this key once briefly makes it possible to change from one function to another, i.e. the respective functions can be selected for which entries can be made using the "E" key. The currently selected function is indicated by an icon in the respective window.
2. E^ key:
By pressing this key once, it is possible to specify values step by step in the respective functions. For this, the desired function must firstly be selected using the F^ key.
Holding the key pressed activates faster running, which can be stopped by pressing the key again. When training begins, the specified values are then counted down to zero.
3. L^ = Delete:
When this key is pressed briefly, the values chosen with the F key are reset to zero. If the key is held longer (approx. 3 seconds), all last attained values are deleted with the exception of the values in the KM TOTAL display.
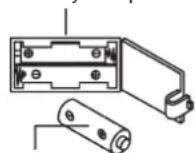
Battery compartment
AA batteries
Replacing the batteries:
-
Open the battery compartment cover and then remove the used Batteries. (If the batteries should leak remove them under increased considering that the battery acid is not into contact with skin come and clean the battery compartment thoroughly.)
-
Insert the new batteries (type (AA) 1.5 V in the correct order and taking into account the polarity in the battery compartment and close the battery cover so that it clicks into place.
-
If the computer does not pick up immediately, the function should Batteries are removed for 10 seconds and re-inserted.
-
The empty batteries properly in accordance with the disposal regulations disposed of and do not give residual waste.
Cleaning, Checks and Storage of the home bike:
1. Cleaning
Use only a less wet cloth for cleaning.
Caution: Never use benzene, thinner or other aggressive cleaning agents for surface cleaning as this damage caused.
The device is only for private home use and for use suitable indoors. Keep the unit clean and moisture from the device.
2. Storage
Remove the batteries from the computer while intending the unit for more than 4 weeks not to use. Push the saddle slide toward the handlebar and the seat support tube as deeply as possible into the frame. Choose a dry storage in-house and put some spray oil to the pedal bearings left and right, to the thread of the handlebar bolt, and on the thread of the quick release for saddle support.
Cover the bike to protect it from being discolor by any sunlight and dirty through dust.
3. Checks
We recommend every 50 hours to review the screw connections for tightness, which were prepared in the assembly. Every 100 operating hours, you should put some spray oil at the pedal bearings left and right, to the thread of the handlebar bolt and to the thread of quick release for saddle support.
Troubleshooting
If you cannot solve the problem with the following information, please contact the authorized service center.
| Problem Possible Cause Solution | |
| Computer has no value at Display if you press any key. | No Batteries insert or batteries empty |
| Computer is not counting data and do not switch on after start cycling. | Sensor impulse missing base on not well plugged connection |
| Computer is not counting data and do not switch on after start cycling. | Sensor impulse missing base on not correct position of sensor. |
| No pulse value | Pulse cable is not plugged in. |
| No pulse value | Pulse sensors not well connected |
| Resistance don’t change | Connection of resistance not well |
Warm up exercises (Warm Up)
Start your warm up by walking on the spot for at least 3 minutes and then perform the following gymnastic exercises to the body for the training phase to prepare accordingly. The exercises do not overdo it and only as far run until a slight drag felt. This position will hold a while.
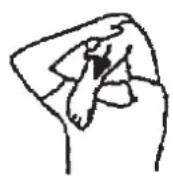
Reach with your left hand behind your head to the right shoulder and pull with the right hand slightly to the left elbow. After 20sec. switch arm.
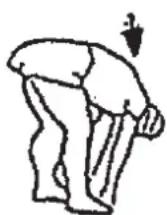
Bend forward as far forward as possible and let your legs almost stretched. Show it with your fingers in the direction of toe. 2 x 20sec.
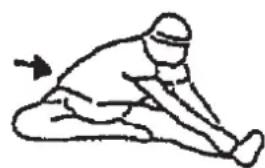
Sit down with one leg stretched out on the floor and bend forward and try to reach the foot with your hands. 2 x 20sec.
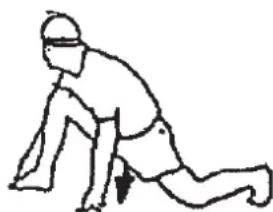
Kneel in a wide lunge forward and support yourself with your hands on the floor. Press the pelvis down. Change after 20 sec leg.
Training instructions
You must consider the following factors in determining the amount of training effort required in order to attain tangible physical and health benefits:
1. Intensity:
The level of physical exertion in training must exceed the level of normal exertion without reaching the point of breathlessness and / or exhaustion. A suitable guideline for effective training can be taken from the pulse rate. During training this should rise to the region of between 70% to 85% of the maximum pulse rate (see the table and formular for determination and calculation of this).
During the first weeks, the pulse rate should remain at the lower end of this region, at around 70% of the maximum pulse rate. In the course of the following weeks and months, the pulse rate should be slowly raised to the upper limit of 85% of the maximum pulse rate. The better the physical condition of the person doing the exercise, the more the level of training should be increased to remain in the region of between 70% to 85% of the maximum pulse rate. This should be done by lengthening the time for the training and / or increasing the level of difficulty.
If the pulse rate is not shown on the computer display or if for safety reasons you wish to check your pulse rate, which could have been displayed wrongly due to error in use, etc., you can do the following:
a. Pulse rate measurement in the conventional way (feeling the pulse at the wrist, for example, and counting the number of beats in one minute).
b. Pulse rate measurement with a suitable specialised device (available from dealers specialising in health-related equipment).
2. Frequency
Most experts recommend a combination of health-conscious nutrition, which must be determined on the basis of your training goal, and physical training three times a week. A normal adult must train twice a week to maintain his current level of condition. At least three training sessions a week are required to improve one's condition and reduce one's weight. Of course the ideal frequency of training is five sessions a week.
3. Planning the training
Each training session should consist of three phases: the warm-up phase, the training phase, and the cool-down phase. The body temperature and oxygen intake should be raised slowly in the warm-up phase. This can be done with gymnastic exercises lasting five to ten minutes.
Then the actual training (training phase) should begin. The training exertion should be relatively low for the first few minutes and then raised over a period of 15 to 30 minutes such that the pulse rate reaches the region of between 70% to 85% of the maximum pulse rate.
In order to support the circulation after the training phase and to prevent aching or strained muscles later, it is necessary to follow the training phase with a cool-down phase. This should be consist of stretching exercises and / or light gymnastic exercises for a period of five to ten minutes.
4. Motivation
The key to a successful program is regular training. You should set a fixed time and place for each day of training and prepare yourself mentally for the training. Only train when you are in the mood for it and always have your goal in view. With continuous training you will be able to see how you are progressing day by day and are approaching your personal training goal bit by bit.
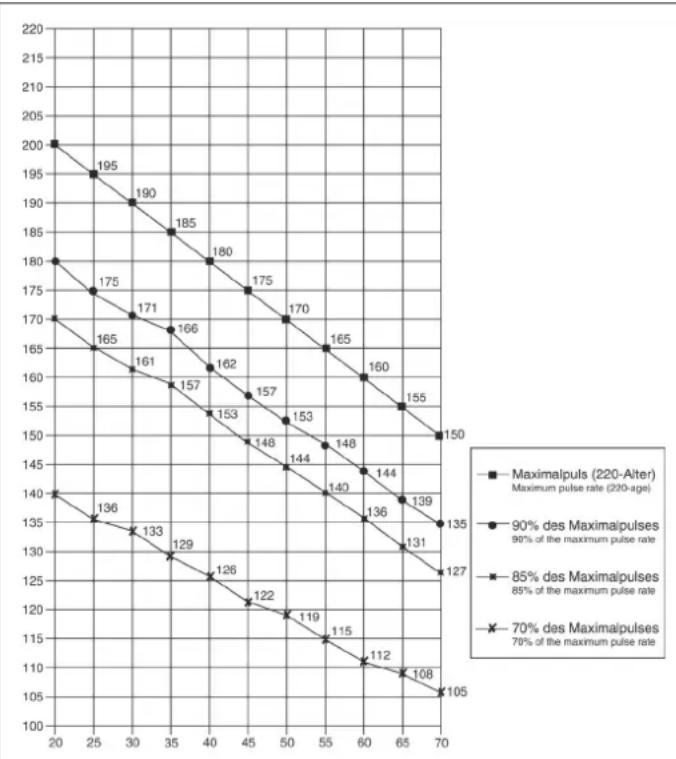
Calculation formula: Maximum pulse rate = 220 - age (220 minus your age)
90% of the maximum pulse rate = (220 - age) x 0.9
85% of the maximum pulse rate = (220 - age) x 0.85
70% of the maximum pulse rate = (220 - age) x 0.7

Sommaire
Chere cliente, cher client,
3. Touche ^ = effacement:
Warming-up oefingen (Warm Up)
3. Planning van de training
PykoBOCTBO TpeHnPOBkAM
ctp. 40 - 41
CTp. 44
ctp. 45
ctp. 46
YbKaemble noKynatelBnUbi nnoynatae!
No3paBnBcBac c noKynkO trpeHnpoBOHOro chapra da DmAoWnx
3aHnTcnpToM nKeJaEM Bam cambix npnaTHbIX BneHtJeHn.
Cneyute, noKanyuCTa, yka3aHnM nHCTpyKlum HaWero pykoBDCTBa
no MoTAtxy n 3KnIpyatauM. Ecn y Bac Bo3HNHyT kKaHe-Nb6yDb
Bonpocbl, To Bi MoKeTe B IIO6oe BpEm 6e CtecheHn ObaPauTaBCr K
HAM.
CyBaKeHnEm, Bau KpncTOnaHT UInopt Tm6X
Uar 1: MoHTax nepeDHeN 3aDHeH HOKKN
- YcTaHOBnTe NpeDnIO HOKky (14), CMOHTnpOBaHHyO c KOnnaKaMn U TpaHcnpTnpoBOHybIM 6NOKOM (13), Ha OCHOBHyO pamy (32) u KpeNko npKpyNTe e c NOMOuIbIO KpeNexKbIX 60JTOB M8x55 (17), npYknHbIX WaN6 (76) NOkKnAdbX Wai6 (16) u KOnnaKOBa rAka (15). B Cyf-Twank (13) c TpaHcnpTnpoBOHybIe poNkNdoNkHbI no npNBecTn B COOTBeCTBne C PpOHTA.
- YcTaHOBtE 3aHIO HOKky (41), CMOHTnPOBaHHyO C KOJINaKaMn(40), Ha OCHOBHyO pamy (32) u KpeNko npNKpyTne ee c NOMoUb6oNTOB C BHYtpEHNM WecTnRpaHHNKOM (17), npyKHHbIX 76, NOknaHbIX 6 (16) u KoJINaKOBa rAka (15).
(BontbI yctaHOBKn ypOBN (42) npedHa3aHaeHb I nI npuaHn yctoHBOCTTpehakopy npn HnoBHOCTx. Nocne yctaHOBHeHn ypOBN, zakpenite noJoxHne c nomoubIO CTonOpHo raKn (43).
Uar 2: MoIax neaJe (67R + 67L).
- YctahOBITE pKcnpyIOUne NeHTb NeJaTe Ha COOTBeTCTByOuNe ne DaNN (67R/67L). (PpmeaHne: KOHeMHOXeCTBOM OTBepCTn DnY YctahOBKa Pa3Mepe DoJxHb 6bTB o6paueHb Hapxy.)
- YctahOBITE neDan (67R/67L)Ha pbuHn neJane (66L+66R). NeDan NmEOT MapKupOBky ^ nI npABoN 工 _ · ^ nJIeBOi. (PpMueaHHe: IeBaI npabA CTOpOHa NOpa3yMeBaIOc npn HaXoxKeHHn Ha TpeHaxKepe B MOMENT TpeHnpOBKn. PpaBaI neJaB (67R)doJxHa BpaTaTbcra No cacoBoI cTepeKe, a neBaI neJaB (67L) npOTNB YacOBoC tpeJkn.)
Uar 3: MoHTaK ceHa (44) n caJa3ok ceHa (75) Ha onOpHyIO Tpy6y ceHa (69).
- BctaBte ceIIO (44) Ha cana3Kc ceIina (75) n KpEnKO npNkpyTne erO C nOMoUbIO NOKnAaHbIX Wai6 (74) n raeK (52).
- Bnoknte cana3kne 75) B kpeIeHne Ha onopHou Tpy6 ce3na (69) n 3aФнкUpyTe IN B JKeNaEMOM Trop3OHTaIbHOM NOJoxHeN C nOMoBHO rpi6koBOrO 60TtA (70) n NODKnAdHoi Wai6bI (71) Ha onopHou Tpy6e pyra (69).
- BCTaBtte onOpHyTo Tpy6y CeINa (69) B COoTBeTcTByIOUe ee KpeJIeHHe HAOCHOBHOpaMe (32). 3aФuNKcPuyTe ee B XeJaEMOM NIOJOKeHm C nOMOsbIO 6bICTPOeNCTByIOUe 3aTBopa (60).
(BHIMAHHE! DnA 3akpyuBHaNn 6bIcTpOaKpbIbAOUeROCa 3aTbOp a (60)peBb6oBoe OTBepCTne B OCHBOH pAmE (32) n OTBepCTna B ONOP HON Tpy6e CeNa (69) DOJKNbIO CoBnAdTa. TaKe npMmTE BO BHIMAHNE, YTO ONOpHnA Tpy6a CeNa (69) He DoJINKa HbBXoNDITb N3 OCHBOH PAMbl 3a MaKCNMaNbHyIO No3NiIO, Oo3NaueHHyIO Ha OCHOBHO pAME. YcTAHOBA CEaMoKet 6bITB NIOBoe BPemr N3MeHeNA NO KeJAAHIO CNeDyUOM 6pazOM. OTKpyTnte N BtTRHnTe 6bICTpOaKpbIbAOUmCnCR 3aTbOp (60), yCTaHOBnTE OOnpHyIO Tpy6y CeNa B HOBy IONo3NiIO DO 3aJeKnBHaNn 6bICTpOaKpbIBAOUeROCa 3aTbOp, noCeYeO ChoBa Kpenko 3akpyTnte 6bICTpOaKpbIBAOUncra 3aTbOp.)
Uar 4: MoTax onopHoi ty6bI pyJIa (12) Ha ochOBHyIO paMy (32).
- POnBeHnTe OnOpHyIO Tpy6y pyIa (12) K KpeNneHIO HA OCHOBHO paMe (32) n CoeHNHTe KOHTpOJIbHbIM Ka6eINb (35) C coeHNHTeJIbHbIM Ka- 6enEM (3).
- NoBHeNTe KOHeI perynIOBKn COpoTnBHeHn (25) K Tare (26) n co- eHNHTe IN KAK NOKa3ato Ha pncyHke A1-A4.YcTaHObnte perynIOBky cOPOTnBHeHn TAkIM OpbzOM, YTObbl TaRc C rpn6KOM KAK MOxHO daNbue BbIXoDnHa 33 OboNoUck (CtynHb 1). Nocne yero 3auenite roJOBKY Ka KOHe TRe perynIOBKn (25) cOnpOTnBHeHn HA KpOuOK, HaxoJaunca Ha KpennHeHH (26). (Pnc. A1). NotraHnTe BCIO ONOpHyTOpy6By c npuienEHHo RONBOKm Tarn BBepx TAK, YTObbl KpOuHKn B Kpe nnHnn nepeMeCTINNCb HabePx (Pnc. A2) n o6wnBka KpennHeHH 3a- cTOnopnAncb (Pnc. A3+A4).
- BCTaBbTe onopHyIO ty6y pyIa (12 B COOTBeTCTByIOuee KpENneHHe Ha OCHOBHO pAmE (32) n 3aФнксИpyIe ee c NOMOuIbIO BoNTOB M8x16 (33), npyXHHbIX Wai6 (76) n NOKJIaHbIX Wai6 (34).
(BHMaHHe:O6paTInTe BHMaHHe Ha To,HTo6bI Ka6eJIbHoe coeINHe HHe He 3aUeMnIocb.)
Uar 5: MoTack pyra (10) ha onophyo Tpy6y pyra (12).
- PoiBBeHTE pyIb (10) K OTKpbITOMy KpennnHIO pyIHa onOpHO Tpy-6e (12), npOeHbTe Ka6eIb DaTuNka NyIbca (11) Upe3 OTBepCTne Ha onOpHO Tpy6e (12) n 3aKpoTe KpennHeNe pyIHa npEm (10).
- Hadehhe Te 6oIOnOky pyra pyra (84) Ha pyb (10) n 3aKpeNITe pyb (10) B JKeJaEMoN pOnuMn Ha onOpHOr Tpy6e pyra (12) c NOMOuBb 6bIcTpoJeNCTByUoIero 3aTBopa (4), npyXHHoN uai6bi (5) n oDknadHOH uai6bi (6).
War 6: MoHTaX KOMNbIOTepa (1) Ha onOpHyIO Tpy6y (12).
- BCTaBtBe 6aTapeKn (2x Mignon AA 1,5V) B KOMNbIOTep (1). (BaTapeN DnA KOMNbIOTepa He npunaraTOcB O6beMe NOCTABOK. IoxaanyIcTa, 3aIMTe ee B TOPROBne.)
2.BCTaBbTe KOMMbIoTeP (1) B COOTBeTcTBYIOOee KpennneHHe KOMMbIoTepe (2) 6paNTe BHmAHHe Na To,TO6bI Ka6ebNbHoe CoeMHeHHe He 3a- 1nncob) KpENKO npKpyTnE KOMMbIoTeP (1) C NOMouBo 60ntOB (21) Ha KpENNEHe KOMMbIoTepe (2).
3.BcTaBbTe coeINHtEnbHbI Ka6enb (3) n Ka6enb DaTnka nybca (11) B COOTBeTCTBHOUne rHe3da KOMNbIOTepa (1).
- Hanehbe TKepeHne KOMbIeTepa (2) Ha BepxHn KOHeu ONOpHO Tpy6b1 (12) INKpenKO npHKpyTte ero C nOmoUb6oTob (22) K onOpHO Tpy6e (12).
Uar 7: KoHTpoNb
- PpOBepbTe BCE COeINHeHn 6oJTOB u CoeINHeHn Ha npaBnIbHOCTb IN C6OpKn u cyHKUHOHPOBaHN.C6OpKa HA 3OM 3aBepuHa.
- EcnB BCE B nopAKe, To onpOByTe Chapd, yCTaHOBNB ero Ha cambI neKnIOkAsaTeNb conPoTnBHeHn, n OnpOByTe TpeHaXep.
Примочанe:
XpaHNTe 6epKHO INCTpyMENT n pyKOBOCTBO, TAK KA KOnn N03JHee MoryT noHaDo6BtCB npN MeNKOM peMOHTe IIN 3aKa3e 3anaChbIX Ya-ctEi.
NoJb3OBaHne TpeHaXePOM
Ponb3OBaHne TpeHaXepoM
Ha nepeHne HoxKe HaxOaTcB Db TpaHCnOpTnpOBOHybIX pONka. IINrTO, YTO6bI NepeDINHyb TpeHaeKep HA dpYroe MecTo INN NOMECTNb HA MECTo XpAHeHH, BO3BMTEcB 3a PyNB INAKHOHTe TpeHaeKep Ha nepeHIO HOxKy TaK, TTO6bI TpeHaeKep MOXHO BbIO NERKe peDINHybC NMOUHIO TPAHCnOpTnpOBOHybIX pONIKOB HA HYXHOE MEOCTO.
Perynpobka BbICOTbI ceHa:
Длгпиняту удбогу поожени Ha ceлne Bo Врмг TrpenpoBkn, Heobxodmo yctahOBntb npabnIbHyO bICOTy ceIna. ПрabnIbHbIM noJoxehem сedna ChITaETCn NOJoxHeHc, KOrda KOJIeHn B HIXKHEm noJoxEHn peIaII NaHaxoIATCB HEMHOr cORHTOM noJoxEHn n He MOrYt 6bIbdoKOnca BBynpamIeHbI.ДуycaTHOBHeHn pabnIbHOrO noJoxEHn ceHa ocNabTe OHDny pKoBbCTPOdEChByUOu3aTbOp n BblTAHInTe rpn6ok,dpyro pykoi nepectabte CeIO n B Jxenaemoe noJoxEHne. OTnyctnte rpn6ok,чтбын оЗanl n Kpenko 3akpyTite erO.
BaXHo:
YIOCTOBEPBTECB TOM, YTO 6bICTPOEeCTByOuMn 3aTBOP 3aΦNKcPObAH n KpENKo 3akpyeH. He BbITACKnBaIte ONOpHyIO Tpy6y CeNla Do KOHua n HE MeHnTe N03uMn CEJNa BO BPMe TpeHnPoBKn.
BiomexAHnKn ONTImaHbHOe NOLOXeHne DnA cnDEHnOBecneuBaET ONTImaHbHyIOpeDaHuMoUHcTn. LcIb COCTOnB TOM, YTO cyueCTByOuaa Cnna KaMoxHO 60NbIe Pnp6bIAeT Ha NpdaJnx MbluC OONTMALbHbIMN 3ΦΦeKT pa6ot. NocAdKa BnInet, KAKHeMbIuBbOCHOBHM NCNOJIbSyOTcN o CyueCTBy. IpaBnHbOE NOLOXeHne pyNA HecET OTBETCTBeHHOCt b 3a BeDeHne BepxHIOO ChTb Tena. Bbl6NuAeTcNo rOpun3oHTaIN B PerynipOBKa pyNA TaK TBObl NOnyHte CnpTbHyIO OCAhky. C KaKdbm DaNbHeuero NepeKocA B CTOPOHy Tena, BoJee cnoKoHoe OTHouHne perynipyeTc. JnnerpyNIpOBKn pyNB IpocTo OcnabTe BnHT pyNb, NOKa pyNb He MoXeT 6bIT npBBeHn HuyKHOe NOLOXeHne n 3aTnHnTe IN NocJe peryNIpOBKn CHOBA TBepdo.
IJIIO6bIX npo6nEM, TAKINK KAK 60JIb Ha3aJ / KOJIeHa NII OHMeHHe B HORAX ppeOIBpATNTb I3-3a OTCYCTBnMecTa IIN CINDEHn HA BELOCInede NOIDepXaHHe npabNbHO perylnpOBKn CeIJa n PyIra HAcToTebHo peKOMEHdyETcR.
Cauntbcn n cnyskaTbcn C TpehaKepa:
CaHtbcnHaTpeHaeKepe:
Iocne yctahOBHeHn npabInbHO BbICOTb CeNa Bo3BMNTecb 3a pyNb. YcTaHOBtE 6nnKaunyIO neJaB B HNXHIO IO No3NIO I BDeHbTe CTynHO BΦHKcypouu nnpeMwOk TAK, QTObI OHa HaxoDnAcB HAdeXHOM NOJKeHN Ha neAa. NpeKnHbTe DpyrIO Hory Ha npTINBOONOXHyIO CTOPOHy n cAdbTe Ha ceNo. PpN 3Tom KpeNko DePxxNTecb DByMa pyKaMn 3a pyNb. Iocne 3TORo BdeHbTe dpyrIO CTynHIO BΦKcypouu nnpeMwOk neaann.
TnB3oBaHne:
Depkntecb DByMa pyKaMn 3a pyNb Hc BCTaBaIe C ceJa BO BpeMa TpeHnpOBKn. CneINTe 3a TEM, YTO6bl CTynHn Ha neDanRxC BCE BpeMa TpeHnpOBKn 6bln 3aФNKCuPObaHbI peMeuKamn.
CnyckaTbcn C tpehXepa:
Ipekpatnte TpeHnpOBky, Kpenko DepeXac 3a pynb. Chmnte Chauana ONDHY CTynHIO C neJaIN N NOCTaBbTe ee HAdEXKHM NNOXKeHN Ha noN i COUNTE C cedna. Chmnte NOTOM DpyryHO CTynHIO C neJaIN N NOCTaBbTe ee HA non n coOnnTe M TpeHaxKepa.
3TOT Tpehaxep - HenoDbnKbI DOMaHn TpeHaXep, IMMtnpyuOu n e3dy Ha BEnocnne. 13-3a TpeHnpOBKn pni IIObo noroDe, 6e3 BHeuHX BO3deICTBn, a TaKxE 6e3 DaBNeHn npn e3e B rpynne yMeHbwaetc BepoTHOCTb Naehn N nepeyTOMJeHn.
13-3a BO3MOXHOCTN 3MeHeHn COpOTNBHeHn, e3da Ha BEnOcIneDe npEOCTABnRETOB3MOXHOCTb TpeHIpOBKn cepDEuHO-COCyDnCTOn CnCTEMbl 6e3Yepe3MEpHOr HApRjExHn. PnI 3OM BO3MOxHa 6oJee Nm MeHee INHTECBnA TpeHIpOBKa. PnI 3OM TpeHpyOTc HNXHne KOeHocTn, yKpENIIeTcR cepDEuHO-COCyDnCTa CnCTema n CnOCO6CTByETcN noIDepXAnHe XopoWe CnpOTNBHoΦOpMbI.
Pykooeodcmno no ucnonb306aHuO KOMnbomepa Ha mpehaKepe cepuu 9114(A)
BxOJyIN B KOMNKeT ObOpYoBaHnI TpeHaKepa KOMblbTeP oEceNeHT Bam MaKcMaNbHb KOMΦOT B YoBMe TpeHnPoBKn. IIO6oB aXHHbI dIe TpeHnPoBOHOro NpOecCa NOKa3ATEnb OTpAkaeTcHa DnCnnee.
C Hauanom TpeHnpOBKn Ha nCnIe BbICBeYBaTc Heo6XoDImoeBpM, qKTHuecka ckOpctb, npImepHbI pAcxOJ kAnOpI, npOndeHHOpcTac0rHHe N yNtBc TpeHpyUeEcoB M BOHET CHATIN NOKa3AHNI.
OTcET BCEx 3HaeHn HauHnaeTcO T O C yctaHOBKo CHTa BnepeI. KOMNbIbTeP BKIOHaeTcI NpOCTbIM HAKATNEM KHONK IIN NpOCTO cHauHApOM TpeHOBKn. KOMNbIbTeP HaunHaeT OcTcET BCEx NOKa3aHIn NTO6bpaxTaBix HA DnCnJIee.
YTo6blOctaHOBnTb KOMlbOTep, Heo6xoDIMO npocTo 3aBepuHTb TpeHnPOBky. KOMlbOTep octaHaBnBaET BCE n3MepeHn yDemOHCTpnpyET KOeHbIpe pe3yIbTaTb.CambloeNocEHNHe pe3yNbTaTb fpyHKun BPEMRA KANOPIN NIKLOMEPTAK 3aHOCrTaB NaMaTb, nPnBo306HOBJeHH TpeHnPOBKn Bbl MoKTe HauTaB C 3TNX NOKa3aTeJIe.
KOMNbIOpT aBOMaTHUeCKN oTKHIOuAeTc npIMepHO uepe3 4 MNHytbl Nocne OKOHuaHHa TpeHnPOBKn. Bce DoCTNIHTbIe Do 3TOrO NOKa3aTeIN 3aHOCTcB N aMaTb MOrYT nCNOJb30BaTbCpN BO3o6HOBHeHM N TpeHnPOBKn CHOBA. IVxOJa N3 3TNX NOKa3aTeNei, MoKHO npDoONKaT b DaJIbHeMUYo TpeHnPOBky IIn yCTaHOBNTb BCE ΦyHKcIM Ha HOJIb C NOMOuBHO KHONK "L".
Toka3aHn:
C NOMOUBIO KHOKNFMOYT BbIbnpaTcra OTeJIbHbIe FyHKUNN,Ha DaNCNNE DEMOHCTPNpyTOCR COOTBETCTBYUOUIe DaHHBe. BbIbPAHHa FyHKUNYKAsbBaAeTC Ha DcNnEE C NOMOUBIO CNMBOJa CpeIN CnNCKa BCEx FyHKUN Tpehakepa.
1.Функц,在KM/H(KM B qac):
Ioka3bIbaeTc4 pakTnueckn DocTnHyTaC kOpocTb B KInlomeTpax B 4ac. HeBo3MOxHO npEdBapnteNbHo 3aAatb C NOMOuBIO KHONK, E" onpeHEnHbN noka3aTeNb. 3AnCb B nAmrTaB NOCEdHnx pe3yNbTaTOB B 3ToI FyHKIN He POn2BOITc4.
(MakcmaBnaIpaHua nokaTea99,9Km/aca)
2.ФУнкUNI „ZEIT“
Ioka3bIbaeT aKtUWeckn 3aTpauHHeB bPemB MmHyTaX nCeKyHdx. C NOMOsbIO KHOKN E MOxHO npEdBaPntbHO 3aDaTb onpeDeHbIe NOKa3aTeIN. EcnN Bbl 3aDAni ONpeDenHoe BpEmr, To yka3bIbaetc Bpemr, octabweecn Do 3aHaHHOr npedeJa. KaK TOnbKO yKa3aHHbI npedeN DOCTnHT, TyT Ke pa3daTeCn AkyCTnEckn CNrHan. PpOn3BODITc 3aNNCb B NaMrtb NoCneDnHex pe3yNbTaTOB B 3ToN FyHKuN. (MaKcImaJIbHa rpaHnca NOKa3aTeJr 99,59 MNHyT.)
3.Функ,在"(KINOMeTpax):
Ioka3bIbaeTcKoJIHecTBo IpoJdeHHbIX KINOMeTpOB. MoXHo npedBapntbHO 3aTaB onpeJenHHb NOKa3aTeBb 3ToI cyHKun C nOMOu bKOHN, E".Ecn Bbl 3aDaII ONpeJenHHb NOKa3aTeBb, To yka3bIbaeTc KOnIECTBO OCTabHnxCn DO 3aDaHHoro npedeNa KInOMeTpOB. KaK TOnbko yka3aHHb npeDen DocTHHT, TO TyT Ke pa3daTcAkyCTNueckn CnHAn. Ipon3BOIDTCaNNCb B nAmrTb nocneHnx pe3yIbTaTOB B 3ToI cyHKUn. (MaKcImaJIbHaR rpaHnua noka3aTeJIg 999 km)
4.Функци „KALORIEN" (Kajopm):
Yka3bBAeTcpaKTHueckoe KOnHecTBo 3paccxOobAHhIX KaOpn. MoKHO npedBapntbHO 3aTaB onpeDeneHHbI Noka3aTeB B 3ToI ΦHKUIN C NMOuBIO KHOKN, E".Ecn BBi 3aDaNn ONpeDeneHHbI nOKa3aTeB, To Yka3BaAeTc KOJInueCTBO OctBUnXc8 Do 3aHaHHoro npedeJa KaOpn. KaTolbKO Yka3aHHbI ppeDen DocTrHyT, To Tyt Xe pa3daTeC akyCTNuCeckm CnHAn. 3aINCb B naMBy NocneHHx pe3yJbTaTOB B 3ToI oynKuIN PpOn3BouNTcR. (MaKcHMabHra rpaHua noka3aTeN 999 kaOpn)
© by Top-Sports Gilles GmbH
D-42551 Velbert (Germany)


