DDW399W - Dishwasher DANBY - Free user manual and instructions
Find the device manual for free DDW399W DANBY in PDF.

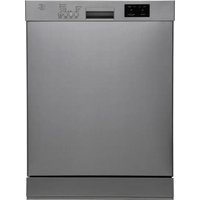
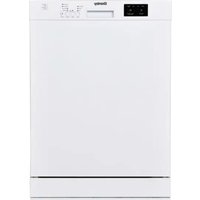
| Product Type | Compact Dishwasher |
| Brand | Danby |
| Model | DDW399W |
| Capacity | 4 standard place settings |
| Power Supply | 120 V~, 60 Hz, 15 A |
| Required Water Pressure | Between 15 and 120 psi (1-8.3 bar) |
| Recommended Water Temperature | Minimum 130°F (55°C), maximum 160°F (71°C) |
| Wash Programs | Pre-rinse (6 min), Normal (35 min), Short (23 min) |
| Options | Sani-Wash (high temperature 151°F/66°C), Econo (normal temperature) |
| Water Consumption (Pre-rinse) | 3.2 liters |
| Water Consumption (Normal) | 12.6 to 12.8 liters |
| Water Consumption (Short) | 9.6 liters |
| Connection Type | Quick connect to faucet |
| Filter | Removable, clean regularly |
| Detergent Dispenser | Approximately 7 grams capacity |
| Rinse Aid Dispenser | Approximately 125 cc capacity |
| Warranty | 1 year on parts |
| Care and Cleaning | Clean filter regularly; run an empty cycle with white vinegar once a week if water is hard |
| Safety | Grounding mandatory; automatic spray arm stop if obstructed; high temperature in Sani-Wash mode |
| Minimum Installation Height | 43.18 cm (17 in) under a counter |
Frequently Asked Questions - DDW399W DANBY
User questions about DDW399W DANBY
0 question about this device. Answer the ones you know or ask your own.
Ask a new question about this device
Download the instructions for your Dishwasher in PDF format for free! Find your manual DDW399W - DANBY and take your electronic device back in hand. On this page are published all the documents necessary for the use of your device. DDW399W by DANBY.
USER MANUAL DDW399W DANBY
CAUTION: Read and follow all safety rules and operating instructions before first use of this product.
COUNTERTOP DISHWASHER
Table of Contents 1
Danby Designer
LAVE-VAISSELLE A COMPTOIR
Table des matieres 9
Danby Designer
Unit Parts Identification 1
Important Safety Instructions 2
Installation 3
Water Pressure 3
Connecting & Disconnecting Instructions 3
Care and Maintenance 4
Features 5
Operating Tips 6
Program Summary/Selection 6
Common Problems and Solutions. 7
Warranty 8
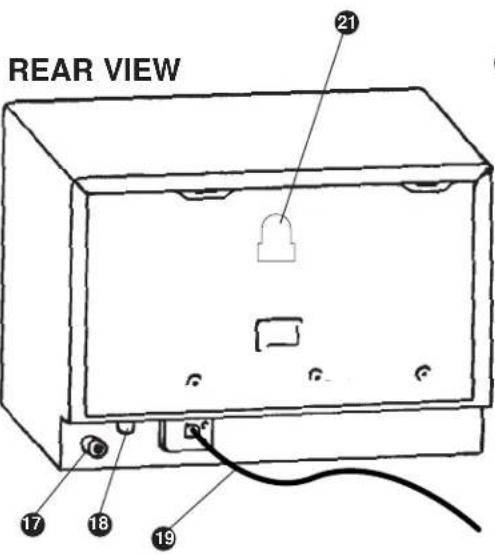
Unit Part Identification
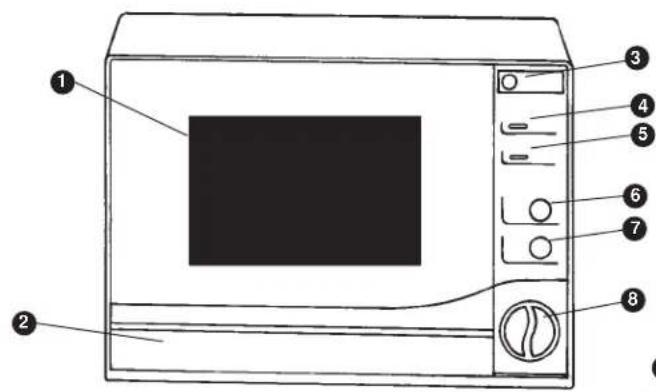
FRONT VIEW
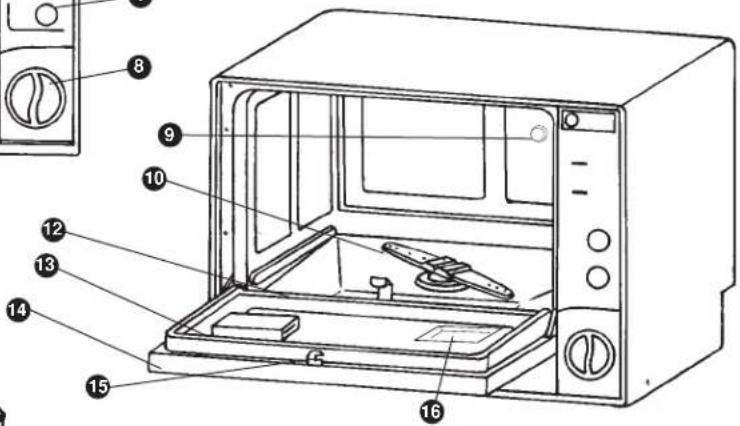
INSIDE VIEW
1.WINDOW
2.FRONT PANEL
3. DOOR RELEASE BUTTON
4. PILOT LIGHT (SANI-WASH)
5. PILOT LIGHT (POWER ON/OFF)
6. SANI-WASH/ECONO BUTTON
7. POWER (ON/OFF) BUTTON
8.PROGRAM/TIMER SELECTOR
9. RINSE AGENT DISPENSER
10. SPRAY ARM
11. DISH RACK (NOT SHOWN)
11a.SILVERWARE BASKET (NOT SHOWN)
- FILTER
- INNER VENTILATION OUTLET
- DOOR ASSEMBLY
- DOOR LATCH MECHANISM
- DETERGENT (INDENT) LOCATION
- DRAIN HOSE CONNECTION
18.WATER INLET CONNECTION - POWER CORD
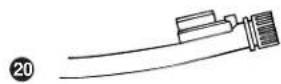
- QUICK CONNECT HOSE
ASSEMBLY
- HOSE HANGER
IMPORTANT SAFETY INSTRUCTIONS

WARNING

When using your dishwasher, follow basic safety precautions
- Read all instructions before using the dishwasher.
- Use the dishwasher only for its intended function.
- Use only detergents or wetting agents recommended for use in a dishwasher and keep them out of the reach of children.
When loading items to be washed:
- Locate sharp items so that they are not likely to damage the door seal.
- Load sharp knives with the handles up to reduce the risk of cut-type injuries.
- Do not wash plastic items unless they are marked "dishwasher safe" or the equivalent.
For plastic items not so marked, check the manufacturer's recommendations.
-
Do not touch the heating element during or immediately after use.
-
Do not operate your dishwasher unless all enclosure panels are properly in place.
- Do not tamper with controls.
- Do not abuse, sit on, or stand on the door or dishwasher rack of the dishwasher.
- T o reduce the risk of injury, do not allow children to play in or on a dishwasher.
- Under certain conditions, hydrogen gas may be produced in a hot-water system that has not been used for two weeks or more. HYDROGEN GAS IS EXPLOSIVE. If the hot-water system has not been used for such a period, before using the dishwasher turn on all hot-water faucets and let the water flow from each for several minutes. This will release any accumulated hydrogen gas. As hydrogen gas is flammable, do not smoke or use an open flame during this time.
- Remove the door to the washing compartment when removing an old dishwasher from service or discarding it.
SAVE THESE INSTRUCTIONS

WARNING

Instructions pertaining to a risk of fire, electric shock, or injury to persons.
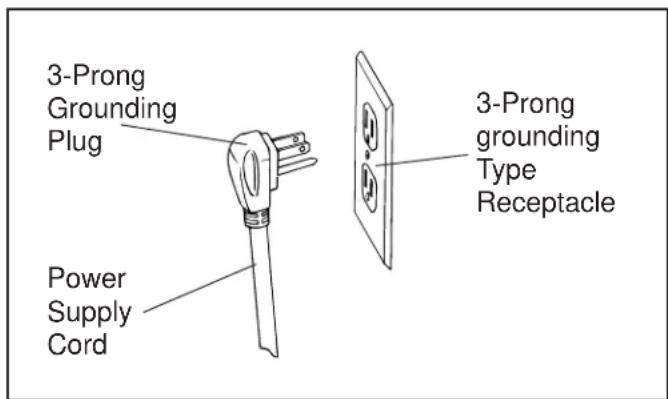
Electrical Instructions:
An electrical supply of 120 volts AC only, 60Hz is required. For your personal safety, the appliance must be grounded. This appliance is equipped with a power supply cord having a 3-prong grounding plug. To minimize possible shock hazards it must be plugged into a matching 3-prong grounding type electrical outlet.
Grounding Instructions:
This appliance must be grounded. In the event of a malfunction or breakdown, grounding will reduce the risk of electric shock by providing a path of least resistance for electric current. This appliance is equipped with a cord having an equipment-grounding conductor and a grounding plug. The plug must be plugged into an appropriate outlet that is installed and grounded in accordance with all local codes and ordinances.
Installation Instructions

WARNING

A hose that attaches to a sink spray can burst if it is installed on the same water line as the dishwasher. If your sink has one, it is recommended that the hose be disconnected and the hole plugged.
If your existing faucet adapter is not compatible with the "quick connect" hose assembly supplied;
- Connect the faucet adapter (included with dishwasher) to your faucet.
- If your faucet is inclusive of a "male" type (threaded) connection, use only the standard rubber washer (2mm thick) supplied inside adapter. Remove the second (5mm thick) rubber washer.
Water Pressure
For best operating results, incoming water pressure should be between 15 and 120 pounds per
square inch (psi). Incoming water supply for the dishwasher is controlled by a "pressure switch" application, so if household water pressure is low, dishwasher fill time will be longer.
FOR BEST RESULTS:
Your dishwasher cleans by spraying a mixture of hot clean water and detergent (under pressure) against the soiled surface of dishes. The water is pumped through a rotating spray arm, drained through a filter removing food and soiled particles and pumped back through the spray arm.
Soiled water is pumped out and replaced with clean water at the end of each cycle. (the number of times depends on the cycle being used) For best cleaning results, the water temperature must be at least 130^ (55^) . To prevent dishwasher damage, the temperature of the incoming water supply should not exceed 160^ (71^) .
Connecting your Dishwasher
Your dishwasher comes equipped with a "quick connect" (fill & drain) hose assembly.
A quick connect faucet adapter must be installed on the faucet before you can connect the dishwasher. This adapter is included inside your dishwasher.
The quick connect faucet adapter is compatible with faucets inclusive of either male (exterior) and female
- If your faucet is inclusive of a "female" type (threaded) connection, both rubber washers (2mm & 5mm) must be installed inside the tap adapter.
- The minimum height clearance required to install your dishwasher on a countertop surface with overhead cupboards is 17-1/4" (43.8cm)
- Make sure there is an electrical supply (outlet) within distance of the electrical power supply cord. (6 feet /182.8 cm).
- Make sure the water supply faucet connection is within distance of the (fill & drain) hose assembly (6 feet / 182.8cm).
- The dishwasher must be installed on a "solid" level surface.
- T o level the dishwasher, adjust the 4 level screws (feet) under the dishwasher.
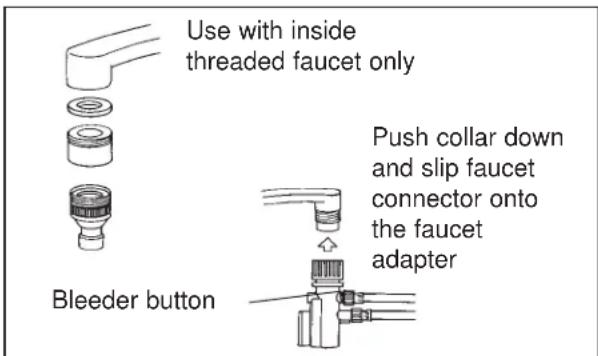
(interior) threaded faucet connections.
- Screw the faucet adapter onto the faucet. (check for leaks, use Teflon tape to eliminate if necessary)
- Connect the open end of the drain hose to the drain port connection at the back of the dishwasher cabinet and secure with hose clamp. (included)
- Connect the hot water inlet hose to the water inlet valve at the back of the dishwasher cabinet. (do not over-tighten to avoid damage to threads)
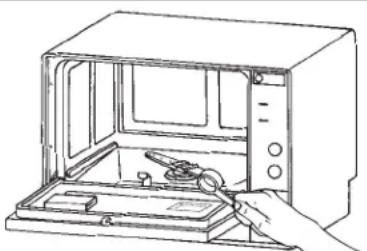
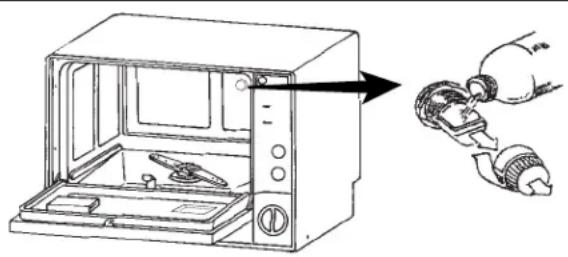
- Attach the quick-connect onto the faucet adapter, by pulling down the (outer) locking collar of the quick connect, while pushing the quick connect upward up onto the faucet adapter.
- When the quick-connect snaps onto the faucet adapter, release the locking collar. Check for a positive fit.
- Slowly open the hot water line and check for any sign of water leaks at all hose connections.
If leaks are located, immediately close the water supply and repair the hose connections.
If for any reason you are unable to affect suitable repairs yourself call our toll free
CUSTOMER HELP LINE at "1 800 26 DANBY" for assistance.

IMPORTANT

Once you open the water supply line, (even if it is closed immediately thereafter) the water inlet hose will be pressurized.

IMPORTANT

Torelieve water pressure from inside the water inlet hose. Make sure the water line (faucet) is closed. Press and hold the "red" pressure relief button on the quick connect assembly, until the flow of water stops.

WARNING

FAILURE TO RELIEVE WATER PRESSURE BEFORE DISCONNECTING THE QUICK CONNECT ASSEMBLY FROM THE FAUCET, WILL RESULT IN BACK-PRESSURE OVER-SPRAY. THE TEMPERATURE OF INCOMING WATER CAN BE VERY HOT AND BACK PRESSURE OVER-SPRAY COULD CAUSE SEVERE BURNS AND/OR SCALDING.

CAUTION

DO NOT LET CHILDREN DISCONNECT THE DISHWASHER. Close supervision of children is always important around appliances.
NOTE: Hard Water conditions will adversely effect washability performance of your dishwasher. Hard Water conditions will also contribute to "Lime" (white film substance) deposits and/or "Scaling" on the stainless steel surface of the dishwasher tub and "Heater Element" located in the sump underneath the removable filter screen. To assist in minimizing these conditions, it is recommended to periodically operate/rinse the inside of the dishwasher (empty) using 1 cup of white vinegar. (at least once a week)
Disconnecting your Dishwasher
- Close the hot water supply at the faucet.
- Disconnect the power supply cord.
- Remember to release the water pressure inside the fill hose. Press and hold the "red" pressure relief button on the quick connect unit until the flow of water stops.
- Disconnect the quick connect hose assembly from the faucet, by pulling down on the (outer) locking collar. When the dishwasher is not in use, place/store the hose on the hanger hose bracket located on the rear wall of the dishwasher cabinet.
Loading your Dishwasher
The dishwasher is designed to receive a standard "4 piece" plate setting consisting of the following:
4 Dinner Plates
4 Bread &Butter Plates
4 Fruit Bowls
4 Cups & Saucers
4 Dinner Forks
4 Dinner Knives
4 Salad Forks
4 Teaspoons
2 Serving Spoons
1 Serving Fork
NOTE: For ease of loading/unloading large size dinner plates from the dish rack it may be necessary to (temporarily) remove the silverware basket. When loading/unloading is complete, return the silverware basket to its original position.
Preparing your Dishes for Washing
- Scrape off all solid food particles from the dishes.
- Remove excessive quantities of oil or grease.
- Empty any liquids from glasses and cups.
- All dishes should be thoroughly rinsed before being placed inside the dishwasher.
NOTE: Dishes with dried-on foods are more difficult to wash and may not come clean in a normal wash cycle.
Using the Right Detergent
Use only detergent specifically made for use in dishwashers, as other types will cause oversudsing. If your detergent is old and/or lumpy, it away. Old detergent loses its washing power. Lumpy detergent won't dissolve.
How Much Detergent Should You Use
That depends if your water is "hard" or "soft".
HARD WATER REQUIRES MORE DETERGENT TO GET DISHES CLEAN.
SOFT WATER REQUIRELES LESS DETERGENT TO GET DISHES CLEAN.
- The recessed detergent area located on the inside door panel will hold approximately 7 grams of detergent.
Using a Rinsing Agent
You can help prevent unsightly spots on dishes and glassware and reduce drying time by using a
rinse agent. A rinse agent is specially formulated to rinse away food and detergent residues that
can be left behind on your dishes. Used regularly, a rinse agent will automatically provide you with cleaner dishes every time you wash.
- T o fill the rinse agent dispenser, unscrew the dispenser cap located on the inner back wall of the wash tub. Add the rinse agent slowly into the container until it just reaches the bottom of the filling cap inside the dispenser opening. Replace the cap. The dispenser automatically releases the rinse agent into the final rinse water at the end of the wash cycle. The dispenser holds approximately 125 cc of rinse agent.
Pre-Rinse Feature
The "Pre-Rinse" is a convenience feature that allows dishes to be rinsed, if you don't have a full load ready to be washed. (preventing foods from becoming dried/caked on the dish surface) It is not necessary to add detergent to the dishwasher during the Pre-Rinse cycle. However, due to the short duration of the pre-rinse cycle, (6 minutes only) make sure the incoming water supply is hot. Open the hot water faucet and run till hot, before connecting the dishwasher.

IMPORTANT

Your dishwasher is not a "garburator", clean off large particles of food sediments before placing dishes in the dishwasher.
Using the "Santi Wash" Feature
The "Sani-Wash" feature gives you the option of washing/drying dishes at very high water temperatures. When activated, the "Sani-Wash" feature energizes a heating element that will raise and maintain the internal water temperature of the dishwasher at 151^ (66^) .

CAUTION

Water temperatures this high can cause severe burns/scalding. Always exercise extreme care when opening and/or entering the dishwasher during the Sani-Wash cycle.
Toactivate this feature, push the "Sani" button on the control panel.
- Push button "in" = the "Sani-Wash" feature is activated. (Sani-Wash indicator light remains illuminated during the entire cycle)

WARNING

For the drain system to operate properly. The highest distance between the faucet quick connect and base of the dishwasher, should not exceed 15cm (6")
Using the "Econo" Feature
The "Econo" feature gives you the option of washing dishes at "normal" incoming water tank temperature. (usually between 130^ 140^ / 54.4^ 60^ )
When activated, the "Econo" feature "de-energizes" (by-passes) the heating element.
Toactivate the "Econo" feature push the "Sani/Econo" button on the control panel.
- Push button "out" the "Econo" feature is activated. (Sani-Wash indicator light remains off)

IMPORTANT

When the "Econo" feature is activated, drying time for the dishes will be increased. The dishes dry by a "convection" method only. To speed-up the drying time, suggest you leave the dishwasher door partially open after the program is complete. This will allow humidity from within to escape. Push the door open button and the door pops opens to a pre-set convection dry position.
Operating Instructions
Tooperate the dishwasher;
- Attach the quick connect hose assembly to the faucet.
2.Push the door release button to open the door. - Place the dishes on the dishrack and cutlery inside the cutlery basket.
- Fill the detergent area on inner door panel. (approx. 7 grams)
NOTE: If using the "Pre-Rinse" cycle only, it is not necessary to add detergent.
5.Close the door firmly.
6.Open the hot water faucet.
7. Turn the selector switch to the desired wash program. (Pre-Rinse, Normal, Short)
8.Push the power (on/off) button.
- Push Button in = power on.
- Push Button out = power off.
The power light will illuminate indicating the machine is receiving power.
- The dishwasher stops automatically at the end of the program. Both the power light and sani-wash light will remain illuminated, until the power (on/off) button is switched off.
NOTE: At the beginning of each cycle, the dishwasher always starts in the "drain" mode. This is because the drain pump always retains a small amount of water (in the sump) from the previous (last) cycle. This is necessary to keep the pump primed.
Therefore, don't be alarmed if you see a small amount of water being pumped-out from the drain hose prior to the start of the regular wash cycle. (THIS IS NORMAL)
Program Summary/Selection
PRE-RINSE
Water Temperature: Incoming Water
(Tank Temperature)
Program Duration: 6 Minutes
Water Consumption: 3.2 liters / 0.84US/gal.
NORMAL/SANI-WASH
Water Temperature: 151^ / 66^
Program Duration: 35 Minutes
Water Consumption: 12.8 liters / 3.3US/gal.
NORMAL/ECONO
Water Temperature: Incoming Water
(Tank Temperature)
Program Duration: 35 Minutes
Water Consumption: 12.8 liters / 3.3US/gal.
SHORT/SANI-WASH
Water Temperature: 151^ / 66^
Program Duration: 23 Minutes
Water Consumption: 9.6 liters / 2.5 US/gal.
SHORT/ECONO
Water Temperature: Incoming Water
(Tank Temperature)
Program Duration: 23 Minutes
Water Consumption: 9.6 liters / 2.5 US/gal.
| Common Dishwashing Problems and Solutions | ||
| PROBLEM POSSIBLE CAUSE POSSIBLE SOLUTION | ||
| Dishwasher will not start | ·Dishwasher not receiving electrical power. Fuse/circuit breaker. ·Door is unlatched. ·Close and latch door. ·Dishwasher not level. ·Level unit. | ·Check electrical connection ·Check electrical connection ·Door is unlatched. ·Close and latch door. ·Dishwasher not level. ·Level unit. |
| Dishes not clean | ·Improper loading. ·Spray arm not rotating freely. ·Check spray arm to make sure nothing (i.e. cutlery) is obstructing spray arm rotation. ·Check if filter screen has become dislodged and obstructing spray arm rotation. ·Not enough detergent and/or ·Use more dishwasher detergent. improper detergent being used. ·Do not use detergent that is hard or caked. ·Use only a recommended dishwasher detergent. ·I improperly prepared dishes. ·Excess food soil and liquids should be removed from dishes before loading. ·W ater inlet hose kinked/bent ·Eliminate kink or bend from due to improper installation. | ·Arrange dishes so spray action reaches all surfaces. ·Do not overload dishwasher. ·Check spray arm to make sure nothing (i.e. cutlery) is obstructing spray arm rotation. ·Check if filter screen has become dislodged and obstructing spray arm rotation. ·Use more dishwasher detergent. ·Do not use detergent that is hard or caked. ·Use only a recommended dishwasher detergent. ·W ater inlet hose kinked/bent ·Eliminate kink or bend from due to improper installation. |
| Chipping or breaking glassware | ·Improper loading of dishes. ·Do not overload dishwasher. Load glasses on the upper rack only, not over dishwasher pins. Glasses loaded over dishwasher pins are not properly supported and subject to damage. | |
| Water remains in bottom of dishwasher | ·A small amount of water (in sump area) is normal. ·Excessive amount of water; Cycle not completed. | ·This is necessary to keep the pump primed and is drained automatically at the beginning of each cycle. ·Allow dishwasher to complete full cycle. |
Danby Designer LIMITED PRODUCT WARRANTY
This quality product is warranted to be free from manufacturer's defects in material and workmanship, provided that the unit is used under the normal operating conditions intended by the manufacturer.
This warranty is available only to the person to whom the unit was originally sold by Danby or by an authorized distributor of Danby, and is nontransferable.
TERMS OF WARRANTY
Plastic parts are warranted for thirty (30) days only from purchase date, with no extensions provided.
First Year During the first year (1), any electrical parts of this product found to be defective will be repaired or replaced, at warrantor's option, at no charge to the ORIGINAL purchaser.
Nothing within this warranty shall imply that Danby will be responsible or liable for any damage to any items placed in this appliance, whether due to any defect of the appliance, or its use, whether proper or improper.
EXCLUSIONS
Save as herein provided, Danby Products Limited (Canada) or Danby Products Inc. (U.S.A.), there are no other warranties, conditions, representations or guarantees, express or implied, made or intended by Danby Products Limited or its authorized distributors and all other warranties, conditions, representations or guarantees, including any warranties, conditions, representations or guarantees under any Sale of Goods Act or like legislation or statue is hereby expressly excluded. Save as herein provided, Danby Products Limited (Canada) or Danby Products Inc. (U.S.A), shall not be responsible for any damages to persons or property, including the unit itself, howsoever caused or any consequential damages arising from the malfunction of the unit and by the purchase of the unit, the purchaser does hereby agree to indemnify and save harmless Danby Products Limited from any claim for damages to persons or property caused by the unit.
GENERAL PROVISIONS
No warranty or insurance herein contained or set out shall apply when damage or repair is caused by any of the following
1) Power Failure.
2) Damage in transit or when moving the appliance.
3) Improper power supply such as low voltage, defective house wiring or inadequate fuses.
4) Accident, alteration, abuse or misuse of the appliance such as inadequate air circulation in the room or abnormal operating conditions.
5) Use for commercial or industrial purposes.
6) Fire, water damage, theft, war, riot, hostility, acts of God such as hurricanes, floods etc.
7) Service calls resulting in customer education.
Proof of purchase date will be required for warranty claims; so, please retain bills of sale. In the event warranty service is required, present this document to our AUTHORIZED SERVICE DEPOT.
Warranty Service-Carry In Only \*This unit is not intended for built in use.
Danby Products Limited
PO Box 1778, 5070 Whitelaw Road,
Guelph, Ontario, Canada N1H 6Z9
Telephone: (519) 837-0920 FAX: (519) 837-0449
6/99
Danby Products Inc.
PO Box 669, 101 Bentley Court,
Findlay, Ohio, U.S.A. 45839-0669
Telephone: (419) 425-8627 FAX: (419) 425-8629
Table des matieres
Page
PO Box 1778, 5070 Whitelaw Road,
Guelph, Ontario, Canada N1H 6Z9
Telephone: (519) 837-0920 Télécopieur: (519) 837-0449
6/99
Danby Products Inc.
PO Box 669, 101 Bentley Court,
Findlay, Ohio, U.S.A. 45839-0669
Telephone: (419) 425-3627 FAX: (419) 425-8629
Indices
Page
Danby Products Limited
PO Box 1778, 5070 Whitelaw Road,
Guelph, Ontario, Canada N1H 6Z9
Telephone: (519) 837-0920 FAX: (519) 837-0449
6/99
Danby Products Inc.
PO Box 669, 101 Bentley Court,
Findlay,Ohio,U.S.A.45839-0669
Telephone: (419) 425-8627 FAX: (419) 425-8629