
DDW2404EBSS - Dishwasher DANBY - Free user manual and instructions
Find the device manual for free DDW2404EBSS DANBY in PDF.


| Product Type | Built-in dishwasher |
| Brand | Danby |
| Model | DDW2404EBSS |
| Dimensions (W x H x D) | 60 x 82,5 x 58 cm |
| Wash Programs | Heavy, Normal, ECO, Glass, Quick, Rinse |
| Special Functions | High temperature wash (60°C), Heated drying, Ultra hot (69°C), Delay start, Child lock |
| Indicators | Rinse aid low, End of cycle, Tap alert |
| Water pressure | 0.04 - 1 MPa |
| Feed water temperature | 48°C - 65°C |
| Filter system | Removable filter, cleaning recommended after each cycle |
| Intelligent wash system | Adapts cycle according to load and soil level |
| Warranty | 12 months parts and labor (in-home) |
| Maintenance and cleaning | Clean filters and spray arms regularly; use vinegar for descaling |
| Safety | Grounding required; do not use extension cord; child lock |
Frequently Asked Questions - DDW2404EBSS DANBY
User questions about DDW2404EBSS DANBY
0 question about this device. Answer the ones you know or ask your own.
Ask a new question about this device
Download the instructions for your Dishwasher in PDF format for free! Find your manual DDW2404EBSS - DANBY and take your electronic device back in hand. On this page are published all the documents necessary for the use of your device. DDW2404EBSS by DANBY.
USER MANUAL DDW2404EBSS DANBY
OWNER'S MANUAL MANUEL DU PROPRIÉTAIRE MANUAL DEL PROPIETARIO
DISHWASHER
Owner's Manual....1 -14
LAVE-VAISSELLE
Danby Products Limited, Guelph, Ontario, Canada N1H 6Z9
Danby Products Inc. Findlay, Ohio, U.S.A. 45840
www.danby.com
Printed in China | Imprimé en Chine | Impreso en China
2024.12.17
Welcome to the Danby family.
We are proud of our quality products and we believe in dependable service. We suggest that you read this owner's manual before plugging in your new appliance as it contains important operation information, safety information, troubleshooting, and maintenance tips to ensure the reliability and longevity of your appliance.
You are entitled to the warranty coverage as described in the owner's manual provided with your new appliance.
- Please write down your appliance information below. You must keep the original proof of purchase receipt to validate and receive warranty services.
- Register your product online and receive a FREE 2 MONTH WARRANTY EXTENSION after filling out a product survey, at www.danby.com/support/product-registration/
Model Number:
Serial Number:
Date of Purchase:
Need Help?
- Read your Owner's Manual for installation help, troubleshooting, and maintenance assistance.
- Visit www.Danby.com to access self-service tools, FAQs and much more by searching your model number in the search bar.
- For the Quickest Customer Service, please fill out the web form at www.danby.com/support. Your submission will go directly to an expert on your particular appliance. Our average response times are between 20 minutes and 2 hours, during EST business hours.
- Call 1-800-263-2629 - please note that during peak hours, hold times can exceed one hour.

Important Safety Information READ AND FOLLOW ALL SAFETY INSTRUCTIONS
GROUNDING INSTRUCTIONS
This appliance must be grounded. In the event of an electrical short circuit, grounding reduces the risk of electrical shock by providing an escape wire for the electrical current.
This appliance is equipped with a cord that has a grounding wire and grounding plug. The power cord must be plugged into an outlet that is properly grounded. If the outlet is a 2-prong wall outlet, it is your responsibility to have it replaced with a properly grounded 3-prong wall outlet. The serial rating plate indicates the voltage and frequency the appliance is designed for.
WARNING - Improper use of the grounding plug can result in a risk of electric shock. Consult a qualified electrician or service agent if the grounding instructions are not completely understood, or if doubt exists as to whether the appliance is properly grounded.
DO NOT USE AN EXTENSION CORD
Do not connect your appliance to extension cords or together with another appliance in the same wall outlet. Do not splice the power cord. Do not under any circumstances cut or remove the third ground prong from the power cord.
If the power supply cord is damaged, it must be replaced by the manufacturer, its service agent or similar qualified person in order to avoid hazard.
Ensure that component parts are replaced with like components and that servicing is done by factory authorized service personnel to minimize the risk of possible ignition due to incorrect parts or improper service.
This appliance is not intended for use by persons (including children) whose physical, sensory or mental capabilities may be different or reduced, or who lack experience or knowledge, unless such persons receive supervision or training to operate the appliance by a person responsible for their safety.
SAFETY REQUIREMENTS
- Children should be supervised to ensure that they do not play with the appliance.
- Do not stand, sit or lean on the door or dish rack. Do not place heavy items on the door when it is open.
- Do not touch the heating element during or immediately after use.
- Do not operate the appliance unless all enclosure panels are properly installed.
- Open door carefully during operation, water may leak. Proceed with caution as water may be hot.
- Do not wash plastic items unless they are marked dishwasher safe.
- Use only detergent and rinse additives that are designed for an automatic dishwasher.
- Never use soap, laundry detergent or hand washing detergent in the dishwasher.
- Keep detergent and rinse aid out of the reach of children.
- Check that the detergent dispenser is empty after completion of the wash cycle.
- Dishwasher detergents are strongly alkaline and can be extremely dangerous if swallowed. Avoid contact with the skin and eyes.
- Remove the door of the appliance when removing from service or discarding.
- The hot water supply line pressure must be between 0.04 - 1 MPa.
- The water supply inlet temperature should be between 48 - 65°C (120 - 149°F).
INSTALLATION INSTRUCTIONS
ACCESSORIES
- ST3.5*9 screws for the installation brace (x2)
- ST3.9*13 screws for the kick plate (x2)
- ST4*14 screws for the installation brace (x2)
- Condensation strip
- Installation brace (x2)
- Adjustment caps (x2)
- Cable tie to secure the drain hose
ENCLOSURE
The installation location must have a solid floor that is able to support the appliance when it is fully loaded and filled with water. The location must be within 3 meters of a sink with easy access to the water supply, the drain and an electrical outlet. The location must have enough space in front of it for the door to open to 90° so that the dishwasher can be loaded.
The installation enclosure should have the following dimensions: 23.6 inches (60 cm) wide by 32.5 inches (82.5 cm) tall by 22.8 inches (58 cm) deep. There should be less than 5 mm between the top of the dishwasher and the cabinet and the dishwasher door should align with the cabinet face.
If necessary, cut holes in the surrounding cabinetry to provide access to the water and power connections.
WATER CONNECTION INSTRUCTIONS
The hot water supply line pressure must be between 0.04 - 1 MPa.
The water supply inlet temperature should be between 48 - 65°C (120 - 149°F). Ensure that the water temperature does not exceed 65°C (149°F) to avoid damage to dishes.
Ensure that the circuit breaker and the water supply valve are turned off before connecting the hot water supply line to the dishwasher.
The power cable will connect to the junction box on the front right side of the appliance. The hot water supply line will connect to the water port on the front left side of the appliance.
Note: It is recommended to only use soft water in the appliance to achieve the best washing results.


INSTALLATION INSTRUCTIONS
Connecting the hot water line
Run the hot water line through the channel on the bottom left side of the appliance. Make sure the hot water line is not twisted and then connect it to the back of the appliance using an elbow joint. Use Teflon tape or sealing compound on the connection to avoid leaks.
Do not over tighten the 90° elbow. This can damage the water inlet and cause a leak.
Connecting the drain line
The drain hose will connect to the drain pump on the bottom of the appliance. Run the drain line in the same channel on the bottom of the appliance as the hot water line. Ensure there is nothing inside the drain hose and that it does not tear during the installation process.
There are a number of different ways to connect the drain hose depending on the configuration of the sink. Review the different ways of connecting the drain system and choose a method that best suits the application. Local codes may require the installation of an air gap kit. Check with a qualified plumber if there is any doubt.
- Air gap
- Air gap with garbage disposal
- No air gap
- No air gap with garbage disposal
Use a rubber connector to connect drain hoses and hose clamps on all connection points.
Secure the drain hose to the sink wall using cable ties or other fastening materials. If not fastened, the drain hose may bend causing drainage problems.
The drain hose internal diameter is 0.8 inches (21 mm).
The top of the drain hose must be less than 39 inches (100 cm) from the floor.
If the drain hose is not looped up the water may siphon out during a wash cycle.
Any bends in the drain hose must be supported so that the hose will not kink or bend.


INSTALLATION INSTRUCTIONS
WIRING CONNECTION INSTRUCTIONS
Before connecting the power cable to the dishwasher, make sure the circuit breaker is off.
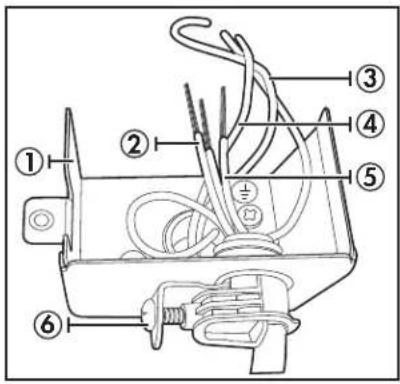
In the junction box located at the front bottom right of the dishwasher, find the three power wires from the dishwasher including the grounding line.
Pass the power cable through the strain relief, and then into the junction box.
Connect the black wire of the dishwasher to the black wire of the power cable by inserting both into a wire nut and then rotating the wire connector.
Connect the white wire to the white wire and the green to the green in the same manner.
Recheck each wire to ensure it is connected correctly and securely.
Each colored wire should be connected to the corresponding wire of the same color.
White should be connected to white, black to black, and green to green.
Replace the junction box cover on the dishwasher.
Recheck each wire to ensure it is connected correctly and securely. Each colored wire should be connected to the corresponding wire of the same color.
WARNING: ELECTRICAL SHOCK HAZARD
To avoid electrical shock, do not work on an energized circuit. Doing so could result in serious injury or death. To avoid a fire hazard, make sure electrical work is properly installed. Only qualified electricians should perform electrical work.
- Junction box
- Power cable
- Black to black
- White to white
- Green to green (ground to ground)
- Strain relief

INSTALLATION INSTRUCTIONS
LEVELING INSTRUCTIONS
Ensure that the appliance is level before placing it into the enclosure. The rear foot can be adjusted from the front of the dishwasher by turning. Use a flat screwdriver to adjust the front feet until the appliance is level.

INSTALLATION BRACES
The appliance must be secured in place with the installation braces. There are two different ways to use the braces.
A. Normal work surface
Put the installation hook into the slot of the side plane and secure it to the work surface with the wood screws.
B. Marble or granite counter top
Fix the side with the screw. Place the screw covers over the internal screws to protect them from water.


CONDENSATION STRIP
Attach the condensation strip under the work surface of the cabinet. Ensure that the strip is flush with the edge of the work surface.

OPERATING INSTRUCTIONS
CONTROL PANEL

- Power button: Use to turn the appliance on or off.
- Handle
- Programs: The light will illuminate to show which program has been selected.
A: Heavy wash
B: Normal wash
C: ECO wash
D: Glass wash
E: Rapid wash
F: Rinse
- Features: The light will illuminate to show which features have been selected.
G: High temp wash - water temperature will be maintained at 60°C (140°F)
H: Heated dry - the heater will operate during the drying cycle
I: ULTRA HOT - water temperature will be maintained at 69°C (156°F)
J: Rinse aid indicator light - light will illuminate when the rinse aid dispenser is empty
K: Cycle end indicator light - light will illuminate when the program is finished
L: Faucet warning indicator light - light will illuminate when the appliance is not receiving enough water; turn on the nearby water faucet to correct the water flow
- Display screen: Shows the remaining running time in the current program.
- Program button: Press to select the desired program.
- Features button: Press to select the desired features.
- Timed delay button: Press to set the desired time delay.
- Start/Cancel button: Press to start the desired program. Press to cancel a program which is in operation.
OPERATING INSTRUCTIONS
WASH CYCLE TABLE Press the program button to select the desired wash program.
Note: Cycle times are approximate and will vary based on the options selected.
| Program Cycle Description Cycle Breakdown Running Time Water Use | ||||
| Heavy For h | heavily soiled loads such as pots and pans | Pre-WashWash (60°C)Rinse (65°C)Rinse (with sani 69°C)Drying | 155 minutes 21.5 | litres(5.7 gallons) |
| Normal For | normally soiled loads; standard daily cycle | Pre-WashWash (50-55°C)Rinse (58-60°C)Rinse (with sani 69°C)Drying | 100~130 minutes | 10.5~21.5 litres(2.8~5.7 gallons) |
| ECO Energy | conserving cycle for lightly soiled loads | Pre-WashWash (45-50°C)Rinse (50-55°C)Rinse (with sani 69°C)Drying | 115 minutes 18 litres | (4.8 gallons) |
| Glass For lightly | lightly soiled glassware Pre-Wash | Wash (48-50°C)Rinse (50-55°C)Drying | 105 minutes 18 litres | (4.8 gallons) |
| Rapid | A fast cycle for lightly soiled loads | Pre-washWash (50°C)Rinse (50°C) | 60 minutes | 14 litres(3.7 gallons) |
| Rinse | Rinse cycle only | Pre-WashWash | 20 minutes | 7.5 litres(2 gallons) |
SMART WASH SYSTEM
This appliance is equipped with a Smart Wash System. When a partial load of lightly soiled dishes is placed in the appliance, a wash cycle similar to a short wash will automatically be performed.
When a full load of heavily soiled dishes is placed in the appliance, a heavy wash cycle will automatically be performed.
When a cycle is running, the remaining time could suddenly increase or drop several minutes. This indicates that the Smart Wash System has checked the soil level and determined if additional water fills are needed or if water fills can be deleted.
CHILD LOCK FUNCTION
Press and hold the features button and the time delay button for three seconds to engage the child lock function. The display screen will show a lock icon and the buttons on the control panel will not respond. Press and hold the features button and the time delay button for three seconds to disengage the child lock function.
OPERATING INSTRUCTIONS
LOADING THE DISHWASHER
- Scrape all dishes to remove any large food residue before placing in this appliance.
- Only place dishes in this appliance that are marked as dishwasher safe.
- Use a mild detergent.
Items that should not be placed in a dishwasher
- Cutlery with wooden, bone china or mother-of-pearl handles.
- Plastic items that are not heat resistant.
- Items that have been repaired with glue that is not heat resistant.
- Pewter, copper or steel items.
- Wooden platters.
- Items made from synthetic fibers.
- Items with glazed patterns may fade if machine washed frequently.
Tips for efficient loading
- Load hollow items such as cups, glasses or pans with the opening downward so that water cannot collect in the container.
- Items must not lie inside one another or cover one another.
- To avoid damage to glasses, they should not touch.
- Sharp items of cutlery such as carving knives should be loaded horizontally in the basket to avoid injury when unloading.
- Do not overload the appliance.
LOADING THE CUTLERY BASKET
Cutlery should be placed in the cutlery basket with the handles facing down. Ensure that cutlery items do not nest inside of one another as this can affect cleaning performance.
Sharp or pointed items should be placed in the cutlery basket with points facing down to avoid injury when unloading.
Do not place excessively small items into the dishwasher as they could fall through the basket and impact the operation of the appliance.
LOADING THE UPPER BASKET
The upper basket is designed for cups, glasses, small plates, bowls and plastic items that are marked dishwasher safe.
Make sure the loaded dishes do not interfere with the rotation of the spray arm located on the bottom of the upper basket.

LOADING THE LOWER BASKET
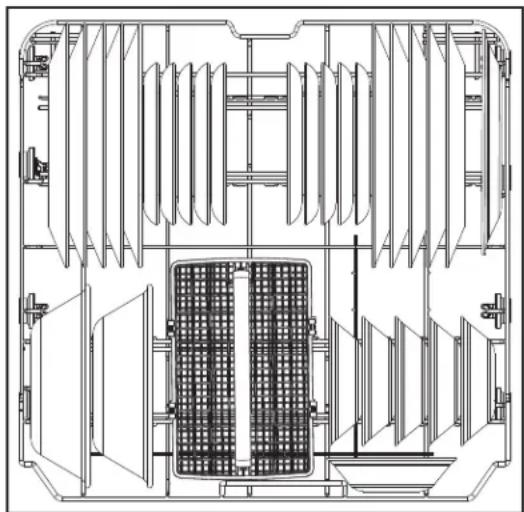
The lower basket is designed for dinner dishes, soup bowls, plates, pots, lids, casserole dishes and plates.
Load large items such as pans and pots should be loaded with their open sides facing downwards.
OPERATING INSTRUCTIONS
DETERGENT DISPENSER
The detergent dispenser must be filled before the start of each wash cycle. Add the detergent just before starting the wash cycle. Adding the detergent to the appliance too soon can cause it to become damp and it may not dissolve properly.
- If the detergent dispenser is closed, press the latch to open it.
- Add the recommended amount of detergent to the main detergent compartment.
- Close the flap by sliding it to the left and pressing down.


RINSE AID DISPENSER
Rinse aid can be used to prevent water droplets or streaks from forming on dishes. The rinse aid will be released automatically during the final rinse. This appliance is designed to use liquid rinse aid only. Do not use a powdered rinse aid as it will clog the reservoir opening. Do not put any other substance in the rinse aid dispenser as this can damage the appliance.
- Open the rinse aid dispenser by lifting the lid.
- Use the viewing port when filling the rinse aid reservoir. Do not fill the reservoir above the full level indicator.
- If the display screen shows "LSb", the rinse aid dispenser is empty.
- Close the rinse aid cap by pressing down.


OPERATING INSTRUCTIONS
CARE & MAINTENANCE
STARTING A WASH CYCLE
- Load the dishwasher as per the loading instructions.
- Add detergent and rinse aid as required.
- Close the dishwasher door and press the power button to turn on the appliance.
- Press the Program button repeatedly to choose the desired wash program. The programs will cycle in the following order: Heavy -> Normal -> ECO -> Glass -> Rapid -> Rinse
- Press the Options button to select the desired options.
- Run the hot water faucet nearest the appliance until the water is hot and then turn it off.
- Press the Start/Pause button to begin the cycle.
Note: When a wash program is finished the appliance will buzz 8 times and END will appear on the display screen.
CLEANING
- After every wash, leave the door slightly open so that moisture and odors are not trapped inside the appliance.
- Only use a soft cloth and mild detergent to clean the appliance. Never use solvents or abrasive cleaning agents as this can damage the appliance.
- To remove water spots from the interior of the appliance, use a soft cloth dampened with a small amount of vinegar.
- If the appliance will not be used for a long period of time, it is recommended to run a normal wash cycle with the dishwasher empty and then leave the door open until the interior of the appliance is completely dry. This will help the door seals last longer and will help prevent odors from forming inside the appliance.
- Clean the door seals with a damp sponge regularly to prevent odors from food particles that can become trapped in the door seal.
ADDING A FORGOTTEN DISH
A forgotten dish can be added to a running cycle any time before the detergent dispenser has opened. If the detergent has already been released into the appliance, it is recommended not to add more dishes as they will not receive adequate cleaning.
To add a dish:
- Open door slightly and wait a few seconds until the wash action stops before completely opening.
- Add the forgotten item.
- Close the door and press the start button to restart the cycle.
Caution: Wait until wash action completely stops before opening the door. Hot water may splash out of the dishwasher and can cause injury.
CARE & MAINTENANCE
FILTER SYSTEM
The filter system removes food particles from the wash water and traps them. It is highly recommended to empty and clean the filters after every wash cycle.
To clean the filter system:
- Turn off the dishwasher. Turn the filter and lift upwards to remove the filter system from the appliance.
- Rotate the filter insert counterclockwise to unfasten and then detach the filter insert.
- Rinse and clean the filters with water and replace them inside the appliance.


SPRAY ARM
The spray arm can be removed from the appliance by pulling gently upwards. Rinse the spray arm with warm water to remove any debris that can clog the nozzles. Replace the spray arm in the appliance by pushing downward until it clicks into place. Ensure that the spray arm movement is not impeded before running another cycle.

ERROR CODES
E1: Water intake is restricted or water pressure is too low. E3: Malfunction of heating element E4: Water overflow
If the appliance displays any error code, a power reset may resolve the issue. Unplug the appliance, wait approximately 5 minutes and then plug the unit back in.
TROUBLESHOOTING
| PROBLEM POSSIBLE CAUSE | |
| No power • A fuse may be blown or the | circuit breaker trippedPower surgePlug not fully inserted into the wall outletDoor not closed correctly |
| Water not drained from dishwasher • | Kink in drain hoseFilter cloggedDrain pump malfunction |
| Detergent left in the dispenser • Dishes | blocking dispenser from fully opening; unit may be over loaded |
| Suds left in the appliance • Too much | detergent or wrong kind of detergentToo much rinse aid |
| White film or cloudiness on dishes or interior tub | Hard water mineralsToo much detergentNot enough rinse aid |
| Noise inside the tub while running • The | spray arm is hitting an item in the basketAn item has fallen out of the basket and is on the bottom of the wash tub |
| Dishes are not clean • Dishes were loaded | incorrectlyThe wash program was not powerful enoughNot enough detergentItems are blocking the spray arm; unit may be over loadedFilter clogged |
| Dishes are not drying • Dishes were loaded | incorrectlyToo many dishes were loadedNot enough rinse aidDishes removed too quickly |
Danby.
Limited "In-Home" Warranty
This quality product is warranted to be free from manufacturer's defects in material and workmanship, provided that the unit is used under the normal operating conditions intended by the manufacturer. This warranty is available only to the person to whom the unit was originally sold by Danby Products Limited (Canada) or Danby Products Inc. (U.S.A.) (hereafter "Danby") or by an authorized distributor of Danby, and is non-transferable.
Terms of Warranty
Plastic parts are warranted for thirty (30) days from the date of purchase, with no extensions provided.
First 12 months
During the first twelve (12) months, any functional parts of this product found to be defective, will be repaired or replaced, at warrantor's option, at no charge to the original purchaser.
To obtain service
Contact the dealer where the unit was purchased, or contact the nearest authorized Danby service depot, where service must be performed by a qualified service technician. If service is performed on the unit by anyone other than an authorized service depot, all obligations of Danby under this warranty shall be void.
Boundaries of in-home service
Danby reserves the right to limit the boundaries of "In Home Service" to the proximity of an authorized service depot. Any appliance requiring service outside the limited boundaries of "In Home Service", will be the consumer's responsibility to transport at their own expense to the original point of purchase or a service depot for repair. If the appliance is installed in a location that is 100 kilometers (62 miles) or more from the nearest service center, it must be delivered to the nearest authorized Danby Service Depot by the purchaser.
Transportation charges to and from the service location are not protected by this warranty and are the responsibility of the purchaser.
Exclusions
Save as herein provided, by Danby, there are no other warranties, conditions, representations or guarantees, express or implied, made or intended by Danby or its authorized distributors and all other warranties, conditions, representations or guarantees, including any warranties, conditions, representations or guarantees under any Sale of Goods Act or like legislation or statute is hereby expressly excluded. Save as herein provided, Danby shall not be responsible for any damages to persons or property, including the unit itself, howsoever caused or any consequential damages arising from the malfunction of the unit and by the purchase of the unit, the purchaser does hereby agree to indemnify and hold harmless Danby from any claim for damages to persons or property caused by the unit.
General Provisions
No warranty or insurance herein contained or set out shall apply when damage or repair is caused by any of the following:
- Power failure.
- Damage in transit or when moving the appliance.
- Improper power supply such as low voltage, defective house wiring or inadequate fuses.
- Accident, alteration, abuse or misuse of the appliance such as inadequate air circulation in the room or abnormal operating conditions (i.e., extremely high or low room temperature).
- Use for commercial or industrial purposes (i.e., if the appliance is not installed in a domestic residence).
- Fire, water damage, theft, war, riot, hostility, acts of God such as hurricanes, floods, etc.
- Service calls resulting in customer education.
- Improper installation (i.e., building-in of a free standing appliance or using an appliance outdoors that is not approved for outdoor application, including but not limited to: garages, patios, porches, or anywhere that is not properly insulated or climate controlled).
Proof of purchase date will be required for warranty claims; retain bills of sale. In the event that warranty service is required, present the proof of purchase to our authorized service depot.


INSTALLATION INSTRUCTIONS
WIRING CONNECTION INSTRUCTIONS

WARNING: RISK OF ELECTRIC SHOCK
INSTALLATION BRACKETS

CONDENSATION STRIP
INSTRUCTIONS FOR USE
CONTROL PANEL

LOADING THE LOWER BASKET
INSTRUCTIONS FOR USE
DETERGENT DISPENSER


RINSE AGENT DISPENSER


INSTRUCTIONS FOR USE CARE AND MAINTENANCE
STARTING A WASH CYCLE


SPRAY ARMS
ERROR CODES


LOADING THE LOWER BASKET


SPRAY ARM
ERROR CODES
Danby Products Limited, Guelph, Ontario, Canada N1H 6Z9 Danby Products Inc. Findlay, Ohio, U.S.A. 45840
www.danby.com

- OWNER'S MANUAL MANUEL DU PROPRIÉTAIRE MANUAL DEL PROPIETARIO
- WELCOME TO THE DANBY FAMILY
- NEED HELP
- IMPORTANT SAFETY INFORMATION READ AND FOLLOW ALL SAFETY INSTRUCTIONS
- GROUNDING INSTRUCTIONS
- DO NOT USE AN EXTENSION CORD
- SAFETY REQUIREMENTS
- INSTALLATION INSTRUCTIONS
- ACCESSORIES
- ENCLOSURE
- WATER CONNECTION INSTRUCTIONS
- CONNECTING THE HOT WATER LINE
- CONNECTING THE DRAIN LINE
- WIRING CONNECTION INSTRUCTIONS
- WARNING: ELECTRICAL SHOCK HAZARD
- LEVELING INSTRUCTIONS
- INSTALLATION BRACES
- NORMAL WORK SURFACE
- MARBLE OR GRANITE COUNTER TOP
- CONDENSATION STRIP
- OPERATING INSTRUCTIONS
- CONTROL PANEL
- SMART WASH SYSTEM
- CHILD LOCK FUNCTION
- LOADING THE DISHWASHER
- ITEMS THAT SHOULD NOT BE PLACED IN A DISHWASHER
- TIPS FOR EFFICIENT LOADING
- LOADING THE CUTLERY BASKET
- LOADING THE UPPER BASKET
- LOADING THE LOWER BASKET
- DETERGENT DISPENSER
- RINSE AID DISPENSER
- CARE & MAINTENANCE
- STARTING A WASH CYCLE
- CLEANING
- ADDING A FORGOTTEN DISH
- FILTER SYSTEM
- SPRAY ARM
- ERROR CODES
- TROUBLESHOOTING
- DANBY
- LIMITED "IN-HOME" WARRANTY
- TERMS OF WARRANTY
- FIRST 12 MONTHS
- TO OBTAIN SERVICE
- BOUNDARIES OF IN-HOME SERVICE
- EXCLUSIONS
- GENERAL PROVISIONS
- WARNING: RISK OF ELECTRIC SHOCK
- INSTALLATION BRACKETS
- INSTRUCTIONS FOR USE
- RINSE AGENT DISPENSER
- INSTRUCTIONS FOR USE CARE AND MAINTENANCE
- SPRAY ARMS
Brand : DANBY
Model : DDW2404EBSS
Category : Dishwasher