DDW2400EW - Dishwasher DANBY - Free user manual and instructions
Find the device manual for free DDW2400EW DANBY in PDF.

User questions about DDW2400EW DANBY
0 question about this device. Answer the ones you know or ask your own.
Ask a new question about this device
Download the instructions for your Dishwasher in PDF format for free! Find your manual DDW2400EW - DANBY and take your electronic device back in hand. On this page are published all the documents necessary for the use of your device. DDW2400EW by DANBY.
USER MANUAL DDW2400EW DANBY
Owner's Manual......1 - 17
LAVE-VAISSELLE
Danby Products Limited, Guelph, Ontario, Canada N1H 6Z9
Danby Products Inc. Findlay, Ohio, U.S.A. 45840
www.danby.com
f in x p
Printed in China | Imprimé en Chine | Impreso en China
2024.02.05
Welcome to the Danby family.
We are proud of our quality products and we believe in dependable service. We suggest that you read this owner's manual before plugging in your new appliance as it contains important operation information, safety information, troubleshooting, and maintenance tips to ensure the reliability and longevity of your appliance.
You are entitled to the warranty coverage as described in the owner's manual provided with your new appliance.
- Please write down your appliance information below. You must keep the original proof of purchase receipt to validate and receive warranty services.
- Register your product online and receive a FREE 2 MONTH WARRANTY EXTENSION after filling out a product survey, at www.danby.com/support/product-registration/
Model Number:
Serial Number:
Date of Purchase:
Need Help?
- Read your Owner's Manual for installation help, troubleshooting, and maintenance assistance.
- Visit www.Danby.com to access self-service tools, FAQs and much more by searching your model number in the search bar.
- For the Quickest Customer Service, please fill out the web form at www.danby.com/support. Your submission will go directly to an expert on your particular appliance. Our average response times are between 20 minutes and 2 hours, during EST business hours.
- Call 1-800-263-2629 - please note that during peak hours, hold times can exceed one hour.

Important Safety Information READ AND FOLLOW ALL SAFETY INSTRUCTIONS
GROUNDING INSTRUCTIONS
This appliance must be grounded. In the event of an electrical short circuit, grounding reduces the risk of electrical shock by providing an escape wire for the electrical current.
This appliance is equipped with a cord that has a grounding wire and grounding plug. The power cord must be plugged into an outlet that is properly grounded. If the outlet is a 2-prong wall outlet, it is your responsibility to have it replaced with a properly grounded 3-prong wall outlet. The serial rating plate indicates the voltage and frequency the appliance is designed for.
WARNING - Improper use of the grounding plug can result in a risk of electric shock. Consult a qualified electrician or service agent if the grounding instructions are not completely understood, or if doubt exists as to whether the appliance is properly grounded.
DO NOT USE AN EXTENSION CORD
Do not connect your appliance to extension cords or together with another appliance in the same wall outlet. Do not splice the power cord. Do not under any circumstances cut or remove the third ground prong from the power cord.
If the power supply cord is damaged, it must be replaced by the manufacturer, its service agent or similar qualified person in order to avoid hazard.
Ensure that component parts are replaced with like components and that servicing is done by factory authorized service personnel to minimize the risk of possible ignition due to incorrect parts or improper service.
This appliance is not intended for use by persons (including children) whose physical, sensory or mental capabilities may be different or reduced, or who lack experience or knowledge, unless such persons receive supervision or training to operate the appliance by a person responsible for their safety.
SAFETY REQUIREMENTS
- Children should be supervised to ensure that they do not play with the appliance.
- Do not stand, sit or lean on the door or dish rack. Do not place heavy items on the door when it is open.
- Do not touch the heating element during or immediately after use.
- Do not operate the appliance unless all enclosure panels are properly installed.
- Do not tamper with the controls.
- Open door carefully during operation, water may leak. Proceed with caution as water may be hot.
- Do not wash plastic items unless they are marked dishwasher safe.
- Use only detergent and rinse additives that are designed for an automatic dishwasher.
- Never use soap, laundry detergent or hand washing detergent in the dishwasher.
- Keep detergent and rinse aid out of the reach of children.
- Check that the detergent dispenser is empty after completion of the wash cycle.
- Dishwasher detergents are strongly alkaline and can be extremely dangerous if swallowed. Avoid contact with the skin and eyes.
- Remove the door of the appliance when removing from service or discarding.
- Use the dishwasher only for its intended purpose.
WARNING - Hydrogen gas is explosive!
Hydrogen gas may be produced in a hot water system that has not been used for a long period of time. If the hot water system has not been used in two weeks or more, turn on all hot water faucets and let the water flow for several minutes before using the dishwasher. This will release any accumulated hydrogen gas. Do not smoke or use an open flame during this time.
SAVE THESE INSTRUCTIONS!
OPERATING INSTRUCTIONS
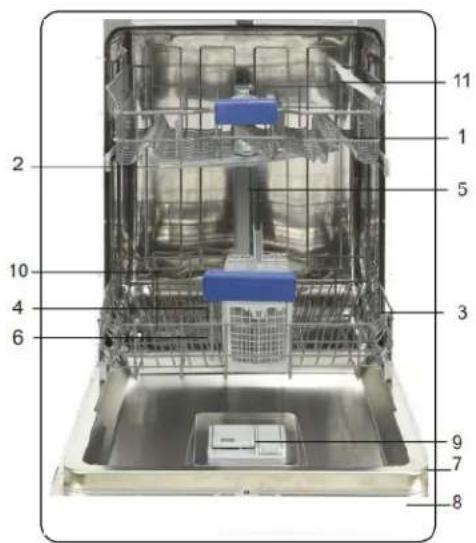
FEATURES
- Upper basket with racks
- Upper spray arm
- Lower basket
- Lower spray arm
- Top nozzle (Not available on all models)
- Filters
- Rating plate
- Control panel
- Detergent and rinse aid dispenser
- Salt dispenser (Not available on all models)
- Upper basket track latch
- Drying Unit
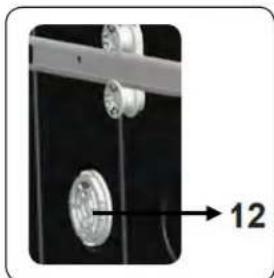
natural_image
Close-up of a mechanical component with a labeled part '12' and two metallic parts attached to a black surface (no text or symbols beyond the number)| Water pressure 43.5 - 145 PSI(0.3 - 10 bars) | |
| Electrical requirements 120 V; 12 A; 60 Hz | |
| Total power 1400 W | |
| Heater power 1100 W | |
LOADING THE DISHWASHER
- Scrape all dishes to remove any large food residue before placing in the dishwasher.
- Only place dishes in this dishwasher that are marked as dishwasher safe.
- Use a mild detergent.
Items that should not be placed in a dishwasher
- Cutlery with wooden, bone china or mother-of-pearl handles.
- Plastic items that are not heat resistant.
- Items that have been repaired with glue that is not heat resistant.
- Pewter, copper or steel items.
- Wooden platters.
- Items made from synthetic fibers.
- Items with glazed patterns may fade if machine washed frequently.
Tips for efficient loading
- Load hollow items such as cups, glasses or pans with the opening downward so that water cannot collect in the container.
- Items must not lie inside one another or cover one another.
- To avoid damage to glasses, they should not touch.
- Sharp items of cutlery such as carving knives should be loaded horizontally in the basket to avoid injury when unloading.
- Do not overload the appliance.
LOADING THE CUTLERY BASKET
Cutlery should be placed in the cutlery basket with the handles facing down. Ensure that cutlery items do not nest inside of one another as this can affect cleaning performance.
Sharp or pointed items should be placed in the cutlery basket with points facing down to avoid injury when unloading.
Do not place excessively small items into the dishwasher as they could fall through the basket and impact the operation of the appliance.
OPERATING INSTRUCTIONS
LOADING THE UPPER BASKET
The upper basket is designed for cups, glasses, small plates, bowls and plastic items that are marked dishwasher safe.
Make sure the loaded dishes do not interfere with the rotation of the spray arm located on the bottom of the upper basket.
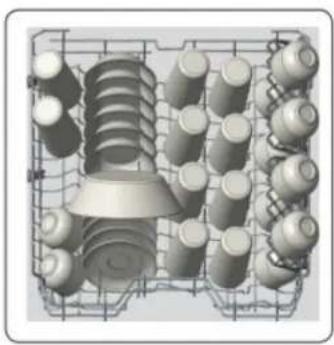
natural_image
3D rendering of an electrical insulator assembly with multiple cylindrical components (no text or symbols visible)Upper rack load pattern for 10 place settings.
LOADING THE LOWER BASKET
The lower basket is designed for dinner dishes, soup bowls, plates, pots, lids, casserole dishes and plates.
Load large items such as pans and pots should be loaded with their open sides facing downwards.
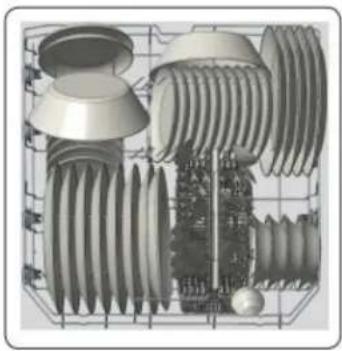
natural_image
3D cutaway view of a mechanical component with multiple helical and gear-like structures (no text or symbols visible)Lower rack load pattern for 10 place settings.
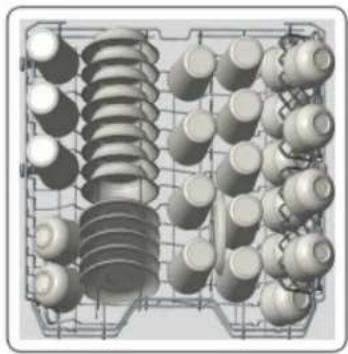
natural_image
3D rendering of industrial equipment with cylindrical components and insulators (no text or symbols visible)Upper rack load pattern for 12 place settings.
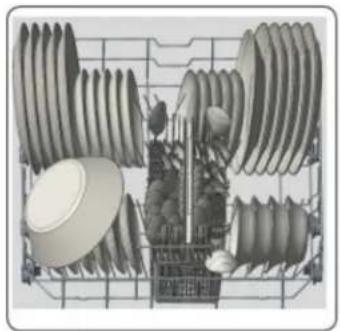
natural_image
3D rendering of industrial equipment with multiple cylindrical components and a central structure (no visible text or symbols)Lower rack load pattern for 12 place settings.
UPPER BASKET RACK
The upper basket rack can be used for extra cups and glasses.
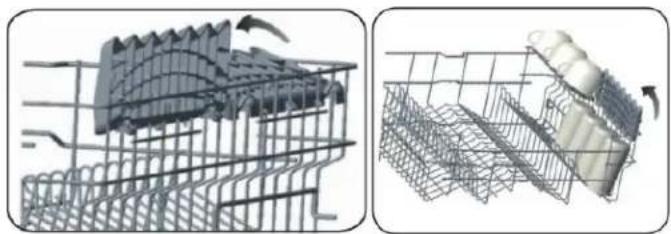
natural_image
Two technical diagrams showing a wire mesh structure and its 3D rendering of a mechanical component (no text or symbols present)OPERATING INSTRUCTIONS
LOWER BASKET FOLD-DOWN TINES
Four rows of fold-down tines located in the lower basket to allow the placement of larger items such as pots & pans. Each row of tines can be folded separately or together as required. Return them to their upward position as required.
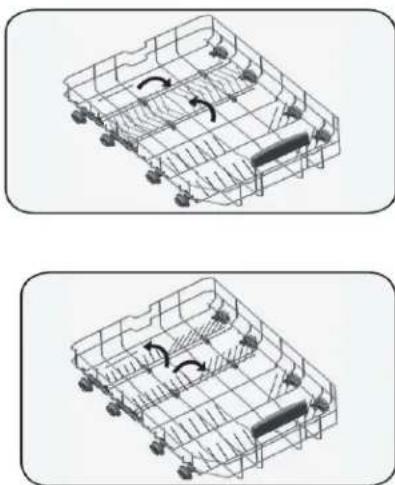
natural_image
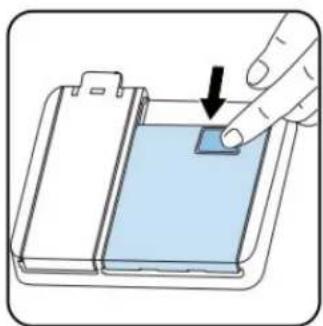
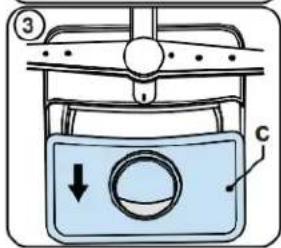
Two technical line drawings of a multi-compartment storage unit with internal compartments and directional arrows indicating flow or movement (no text or symbols)DETERGENT DISPENSER
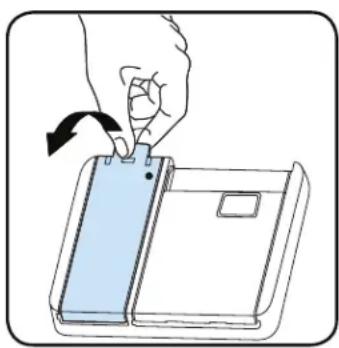
The detergent dispenser must be filled before the start of each wash cycle. Add the detergent just before starting the wash cycle. Adding the detergent to the appliance too soon can cause it to become damp and it may not dissolve properly.
Push the latch to open the dispenser.
Add the recommended amount of detergent to the main detergent component. The detergent dispenser has lines on the inside to indicate amounts of detergent.
If dishes are heavily soiled, extra detergent can be added to the main cabinet as necessary. Do not use too much detergent as this can leave a residue on dishes.
Ensure the detergent dispenser is closed before closing the door.
The detergent dispenser will always be open and empty at the end of a wash program.
Detergent tablets may not fully dissolve during a short program. Only use detergent tablets with longer programs to avoid residue on tableware.
Always follow the instructions included with the detergent for best results.
natural_image
Illustration of a hand pressing a small blue object on a rectangular tray (no text or symbols)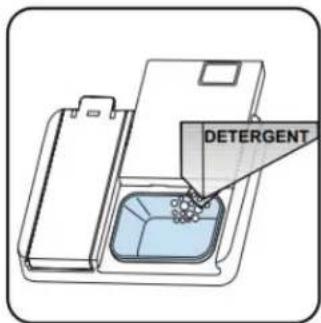
OPERATING INSTRUCTIONS
RINSE AID DISPENSER
Rinse aid can be used to prevent water droplets or streaks from forming on dishes. The rinse aid will be released automatically during the final rinse. This dishwasher is designed to use liquid rinse aid only. Do not use a powdered rinse aid as it will clog the reservoir opening. Do not put any other substance in the rinse aid dispenser as this can damage the dishwasher.
The rinse aid indicator light on the control panel will illuminate when the rinse aid dispenser is empty.
FILLING RINSE AID DISPENSER
- Open the rinse aid department cap.
- Fill the compartment to the MAX level.
- Close the compartment cap until it clicks.
Be careful to not overfill the rinse aid compartment and wipe up any spills.
NOTE
Do not put detergent in the rinse aid dispenser as this can damage the rinse aid dispenser and leave a soap film on dishes.
To change how much rinse aid is being dispensed with every wash, follow the steps below.
- When the appliance is in the off position, press the Program button and hold it down.
- Turn on the appliance by pressing the On/Off button and continue to press the Program button until "rA" disappears from the display.
- The appliance will display the last setting.
- Set the level by pressing the Program button to the desired level (see table below).
- Turn off the appliance to save the setting.
NOTE
The factory setting is "4".
| Level Dose |
| r:1 no rinse aid |
| r:2 1 dose |
| r:3 2 doses |
| r:4 3 doses |
| r:5 4 doses |
NOTE: If the dishes are not drying properly or are spotted, increase the level.
If there are blue stains on the dishes, decrease the level.
natural_image
Illustration of a hand holding a notebook with a scroll arrow indicating rotation (no text or symbols)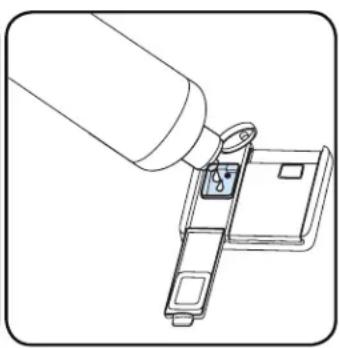
natural_image
Line drawing of a mechanical assembly with a cylindrical component inserted into a bracket (no text or symbols)OPERATING INSTRUCTIONS
CONTROL PANEL - BUTTONS

Danby
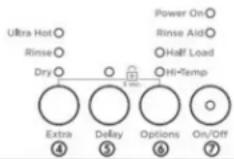
1 - Regular
2 - Auto
3 - Intensive
4 - Quick
- Program Button
- Start/Pause Button
- Handle
- Extra Button
- Delay Button
- Options Button
- On/Off Button
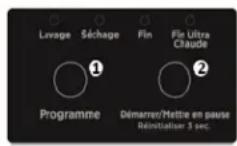
PROGRAM SELECTION
Select a suitable program by pressing the program buttons.
START/PAUSE
Press the Start/Pause to start the selected program. When the program has started, the display shows the remaining time for that specific program.
Press the Start/Pause button for 3 seconds to cancel the selection.
HANDLE
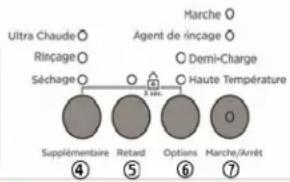
EXTRA
This button is used to select the auxiliary functions of Ultra Hot, Extra Rinse, Extra Dry.
DELAY
This button is used to set up the time delay settings.
OPTIONS
This button is used to select Half Load and Hi-Temp options.
ON/OFF
Power on the machine by pressing the On/Off button. The On/Off indicator remains lit as long as the machine is on.
OPERATING INSTRUCTIONS
WATER TEMPERATURE
Hot water is needed for best dishwashing and drying results. Water entering the appliance should be at least 120^ F ( 49^ C) to give satisfactory results.
To check the water temperature entering the dishwasher:
- Turn on on the hot water faucet nearest the appliance for several minutes to clear any cool water from the pipes.
- Hold a candy or meat thermometer in the stream of water to check the temperature.
- If the water temperature is below 120^ F ( 49^ C) have a qualified person raise the hot water heater thermostat setting.
PROGRAM SELECTION
- Press the On/Off button to turn on the unit.
- Refer to the "Programs Table" to determine a suitable setting.
- Press the program selection button until the number of the program selected appears on the display.
AUXILIARY FUNCTIONS
Auxiliary functions are provided in order to enable savings of time, water and energy and to perform a more comfortable washing with conditions specified by you.
NOTE
Auxiliary functions may cause changes in the program duration.
NOTE
Auxiliary functions are not suitable for all washing programs. Indicator of the auxiliary function that is not compatible with the program will not be active. The unit gives aural warning via buzzer if an auxiliary function is not compatible with a selected programs. Please see the "Programs and Options Table".
ADDING AUXILIARY FUNCTION
Select the desired washing program by pressing the Program Selection button.
In the selected washing program if an auxiliary function is selected, the corresponding indicator will illuminate. If the Extra Function button is pressed again, the corresponding indicator light of another auxiliary function will illuminate.
The selection of the auxiliary function can by cancelled by pressing the Extra Function button six times.
ULTRA-HOT FUNCTION
Raises the water temperature in the final rinse, associated light will illuminate.
At the end of a successful cycle with Ultra-Hot function, the "Ultra Hot End" indicator will illuminate.
Available programs and options are indicated on the Program Table and Options charts.
EXTRA DRY FUNCTION
The unit changes the water temperature from the value described for each different program and the extra dry is performed.
HALF LOAD FUNCTION
Used to operate the unit without loading it completely.
- Load dishes into the unit.
- Turn the unit on with the On/Off button.
- Select the desired program and press the Options button one to activate the Half Load function. The associated light will illuminate.
- Press the Start/Pause button to start the selected program.
- The Half Load function can save power.
HI-TEMP FUNCTION
Press the Options button twice to activate the Hi-Temp function. Use this specific option when using combined detergents that contain salt and rinse aid.
When this option is selected, both the water temperature and the washing time are increased.
OPERATING INSTRUCTIONS
PROGRAMMING THE WASH TIME
DELAY TIMER
Used to delay the start of the selected wash program up to 19 hours. The Delay Timer cannot be set after the selected program starts.
- Press the Delay Timer button after selecting the wash program and other auxiliary functions.
- Display will show "1h", program number, program duration and delay timer alternately for 2 seconds.
- Set the desired start time by pressing the Delay Timer button. The time will increase by 1 hours every time the Delay Timer button is pressed.
- To start the selected wash program with delay, press the Start/Pause button. The Delay light will be illuminated during the time the delay timer is active.
NOTE
If after setting the delay timer you opened and then closed the door within 4 seconds, the appliance resumes the delayed start. If the door is open for more than 4 seconds, the delay timer is paused and can be restarted by pressing the Start/Pause button.
CHANGING SETTINGS WHILE DELAY TIMER IS ENABLED
After the Delay Timer function is activated, you cannot change the washing program, auxiliary functions or duration of the delay time.
CANCELLING DELAY TIMER FUNCTION
- Press and hold Start/Pause button for 3 seconds.
- After 3 seconds "1" appears on the display. At the end of the cancellation process "0" appears on the display.
You can select and start a new program following the cancellation of the Delay Timer function.
STARTING THE PROGRAM
Select the program and auxiliary functions the press the Start/Pause button. Once the program starts, the estimated time remaining to the end of the program will appear on the display.
STARTING THE PROGRAM
Select the program and auxiliary functions the press the Start/Pause button. Once the program starts, the estimated time remaining to the end of the program will appear on the display.
The current wash cycle will be indicated by the indicator lights above the Program button (Wash, Dry, End, Ultra Hot End). The appliance will be silent for approximately 40 - 50 minutes during the drying stage.
NOTE
The total program time can change based on the ambient temperature, temperature of the water supply and amount of dishes.
NOTE
It is not recommended to open the door of the appliance when it is running. Stop the appliance by pressing the Start/Pause button then open the door.
If the door is opened without pressing the Start/Pause button, the appliance will stop. If any button is not pressed, the appliance will be paused automatically 4 seconds after the door is opened. To continue the program, close the door and press the Start/Pause button.
If the door is closed within 4 seconds after the door is opened, the program will continue automatically.
NOTE
Program and auxiliary functions cannot be set/ changed after the program has started. A new program can be selected and started following the paus or cancellation of the program.
CHILD LOCK
The Child Lock function can be activated by pressing and holding the "Extra" and "Options" buttons simultaneously for 3 seconds. When activated, all lights flash on the appliance and "CL" is shown on the display.
To deactivate the Child Lock function, repeat the above instructions. All lights and "CL" will flash twice and then remain off.
OPERATING INSTRUCTIONS
CANCELLING THE PROGRAM
- Press the Start/Pause button for 3 seconds to cancel the program
- After 3 seconds "1" will appear on the display. During cancellation, the appliance discharges the water inside for about 30 seconds.
NOTE
There might residues of detergent or rinse aid left in the appliance and/or on the pieces being washed depending on the cycle the programs was in when it was cancelled.
RINSE AID INDICATOR
Check the Rinse Aid indicator light on the control panel to confirm there is an adequate amount in the appliance or not.
Fill the rinse aid reservoir with rinse aid whenever the indicator light is illuminated.
END OF PROGRAM
The End of Program indicator light will illuminate continuously when the washing program is over.
- Open the door of the appliance.
- Press the On/Off button to turn off the appliance.
NOTE
Leave the dishes in the machine for about 15 minutes to cool down after they are washed. The dishes will dry in a shorter time if the door of the appliance is left ajar during this period. This process will increase the drying effectiveness of the appliance.
WATER CUT-OFF WARNING
If the water supply is turned off and the appliance can not take water in, "FF" will flash continuously on the display. As long as the problem continues, the washing program is stopped.
Once the water supply issue is resolved, the appliance is ready to start a new program.
OVERFLOW WARNING
If the appliance intakes too much water or there is a leak with any of the components, the appliance will detect this and "F1" will flash on the display. The machine will continue to discharge the water and flash the warning until the issue has been resolved.
If after attempting to resolve the issue and the "F1" error does not disappear, please contact the Consumer Service Department.
OPERATING INSTRUCTIONS
TURNING DISHWASHER OFF
"0" will be shown on the display when the selected program is complete. You can then turn the dishwasher off using the On/Off button.
NOTE
Do not open the door before the program is complete.
NOTE
If there is a lose of power while a program is in operation, the program will continue when the power returns.
NOTE
If there is a loss of power during the drying cycle, the program will terminate. The appliance will be ready for a new program selection once power has returned.
PROGRAMS AND OPTIONS TABLE
- The program duration may change according to the amount of dishes, the water temperature, the ambient temperature and selected additional functions.
- The energy usage label is based on the regular program. It is the most efficient in terms of its combined energy and water consumption at cleaning normally soiled dishes.
- Only use powder detergent for short programs.
- Short programs do not include drying.
PROGRAMS AND OPTIONS TABLE
| Programs | Duration (min) | Descriptions | |
| Regular | Dirty | 145 | Standard program for daily, regular or typical use to competely wash a load of normally soiled dishes |
| Clean | 122 | ||
| Auto | Dirty | 155 | This program automatically adjusts the temperature and the quantity of water, energy consumption and program duration. |
| Clean | 110 | ||
| Intensive | 130 | Suitable for heavily soiled dishes. | |
| Quick | 50 | Suitable for normally soiled daily dishes with faster program. | |
OPERATING INSTRUCTIONS
COMPATIBILITY OF PROGRAMS AND OPTIONS
| Compatibility of Programs and Options | Options | |||||
| Half Load | Hi-Temp | Ultra Hot | Extra Rinse | Extra Dry | ||
| Programs | Regular | √ | √ | √ | √ | √ |
| Auto | √ | √ | √ | √ | √ | |
| Intensive | √ | √ | √ | √ | √ | |
| Quick | √ | √ | √ | √ | √ | |
CLEANING THE MACHINE
- Turn off the dishwasher breaker and water supply before cleaning.
- After every wash, leave the door slightly open so that moisture and odors are not trapped inside the appliance.
- Only use a soft cloth and mild detergent to clean the appliance. Never use solvents or abrasive cleaning agents as this can damage the appliance.
- To remove water spots from the interior of the appliance, use a soft cloth dampened with a small amount of vinegar.
- If the appliance will not be used for a long period of time, it is recommended to run a normal wash cycle with the dishwasher empty and then leave the door open until the interior of the appliance is completely dry. This will help the door seals last longer and will help prevent odors from forming inside the appliance.
- Clean the door seals with a damp sponge regularly to prevent odors from food particles that can become trapped in the door seal.
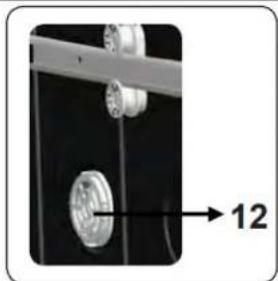
- It is recommended to clean the filter and spray arms at least once a month.
- Clean the spray arms at least once a week to keep the machine operating efficiently.
CARE & MAINTENANCE
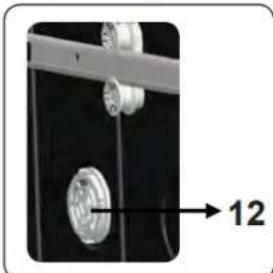
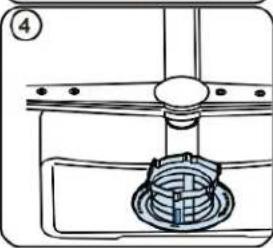
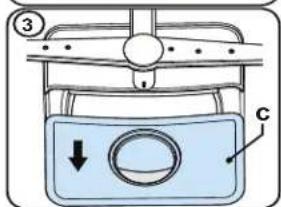
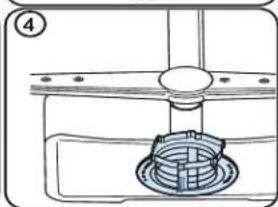
FILTER
Check filters for any food waste accumulation. Remove the coarse and fine filters, and rinse under tap to clean them.
a. Micro filter
b. Coarse filter
c. Metal/plastic

natural_image
Technical diagram of a mechanical assembly with a central component and a circular component, no visible text or symbols

natural_image
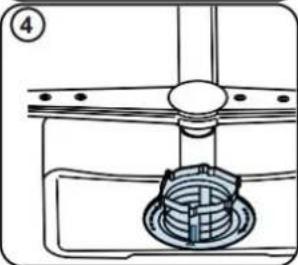
Technical line drawing of a mechanical assembly with a central component and base (no text or symbols)SPRAY ARMS
The spray arms should be periodically removed and cleaned to remove any hard water build up.
To remove the upper spray arm hold the nut in the center and rotate the spray arm counterclockwise.
To remove the lower spray arm gently pull it upward.

natural_image
Technical line drawing of a mechanical assembly with gears and shafts (no text or symbols)CLEANING THE SPRAY ARMS
The Upper and Lower spray arms should be cleaned at least once per week in order for the appliance to operate efficiently.
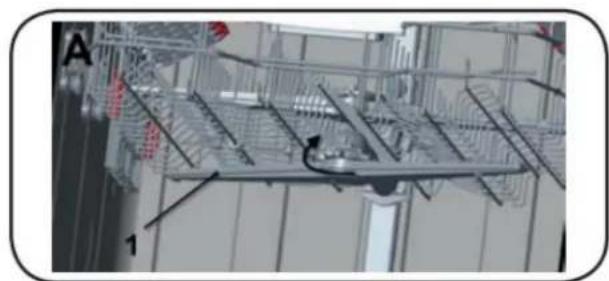
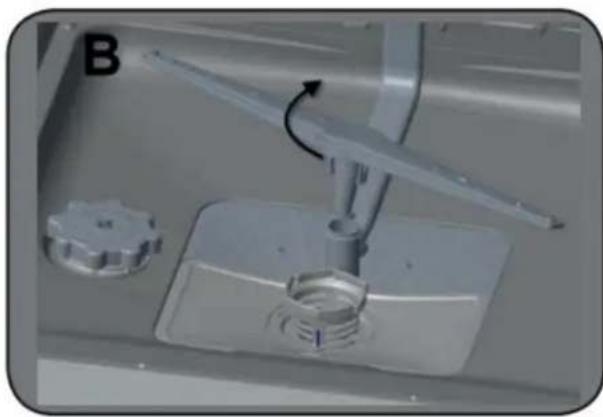
UPPER SPRAY ARM
The upper spray arm is attached to the bottom of the upper basket.
Check if the holes on the spray arm are clogged. See 1 in image A below.
If the holes are clogged, the spray arm should be removed and cleaned.
Turn the nut to the left to remove the spray arm as shown in the image below.
Ensure the nut is well tightened when re-installing the spray arm.
natural_image
Interior view of a server rack with metal racks and wiring (no visible text or symbols)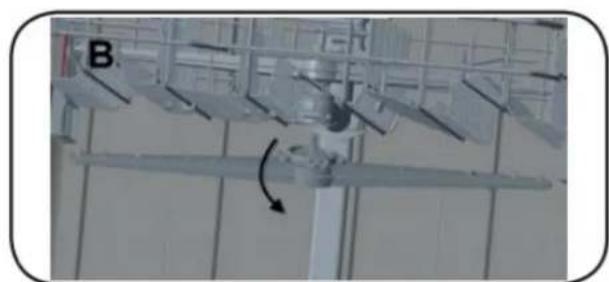
natural_image
Exterior view of a modern office building (no signage)CARE & MAINTENANCE
FREQUENTLY ASKED QUESTIONS
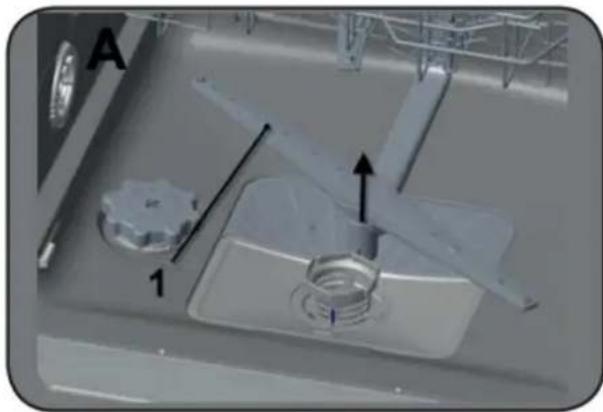
LOWER SPRAY ARM
The lower spray arm is located in the bottom of the dishwasher below the lower basket.
Check if the holes on the spray arm are clogged. See 1 in the image A below.
If the holes are clogged, the spray arm should be removed and cleaned.
Pull the spray arm up to remove.
Once cleaned, push the spray arm back into place.
natural_image
Close-up of a mechanical device with labeled parts (1 and A), no readable text or symbols beyond labelsDo I need to put rinse aid in?
Rinse aid is not needed, however it is recommended. Note that if you do not use rinse aid, although the unit will still function, the rinse aid indicator light will remain illuminated.
My dishwasher won't drain what should I do?
Check to make sure that the filters and drainage area are not clogged.
My control panel is bubbling is there something wrong with it?
There is a protective layer of plastic that protects your control panel during transportation. This should be removed during installation.
natural_image
Close-up of a mechanical component with a lever and base, labeled 'B' (no readable text or symbols)TROUBLESHOOTING
Program does not start
- A fuse may be blown or the circuit breaker tripped
• Door not closed correctly
Water not drained from dishwasher
• The program has not finished
- Filter clogged
- Drain pump malfunction
White film or cloudiness on dishes or interior tub
- Hard water minerals
- Too much detergent
• Not enough rinse aid
Noise inside the tub while running
• The spray arm is hitting an item in the basket
- An item has fallen out of the basket and is on the bottom of the wash tub
Dishes are not clean
• Dishes were loaded incorrectly
• The selected was unsuitable
• Not enough detergent
- Items are blocking the spray arm; unit may be over loaded
- Filter clogged
Dishes are not drying
• Dishes were loaded incorrectly
• Too many dishes were loaded
• Not enough rinse aid
• Dishes removed too quickly
ERROR CODES
| FAULT | POSSIBLE CAUSE |
| Program does not start | Fuse has blown.Appliance door is open.Filters are clogged |
| Water remains inside appliance | Drain hose is clogged or twisted.Program has not finished.Filters are clogged. |
| Stops during washing | Power failure.Water inlet or supply issue. |
| Shaking and hitting noises are heard during washing | Spray arm is hitting the dishes in the lower basket. |
| Dishes are not fully cleaned | Appliance is overloaded.Dishes placed incorrectly, sprayed water not reaching affected dishes.Dishes leaning against each other.Not enough detergent used.Incorrect program was selected.Spray arms clogged with food waste.Filters or water drain pump clogged or filter misplaced. |
| ERROR CODE | POSSIBLE CAUSE | WHAT TO DO |
| FF | Water inlet system failure | Check water is flowing.Contact for service if error continues. |
| F5 | Pressure system failure | Contact for service |
| F3 | Continuous water input | Turn off water supply.Contact for service. |
| F2 | Inability to discharge water | Clean filters.Cancel program.Contact for service if error continues |
| F8 | Heater error | Contact for service. |
| F1 | Overflow | Turn off power supply.Turn off water supply.Contact for service. |
| F7 | Overheating | Contact for service. |
| F9 | Divisor position error | Contact for service. |
| F6 | Faulty heater sensor | Contact for service. |
| HI | High voltage failure | Contact for service. |
LIMITED "IN HOME" WARRANTY
This quality product is warranted to be free from manufacturer's defects in material and workmanship, provided that the unit is used under the normal operating conditions intended by the manufacturer.
This warranty is available only to the person to whom the unit was originally sold by Danby Products Limited (Canada) or Danby Products Inc. (U.S.A.) (hereafter "Danby") or by an authorized distributor of Danby, and is non-transferable.
TERMS OF WARRANTY
Plastic parts are warranted for thirty (30) days from the date of purchase, with no extensions provided.
First 12 months During the first twelve (12) months, any functional parts of this product found to be defective, will be repaired or replaced, at warrantor's option, at no charge to the original purchaser.
To obtain service Contact the dealer where the unit was purchased, or contact the nearest authorized Danby service depot, where service must be performed by a qualified service technician. If service is performed on the unit by anyone other than an authorized service depot, all obligations of Danby under this warranty shall be void.
Boundaries of in-home service Danby reserves the right to limit the boundaries of "In Home Service" to the proximity of an authorized service depot. Any appliance requiring service outside the limited boundaries of "In Home Service", will be the consumer's responsibility to transport at their own expense to the original point of purchase or a service depot for repair. If the appliance is installed in a location that is 100 kilometers (62 miles) or more from the nearest service center, it must be delivered to the nearest authorized Danby Service Depot by the purchaser.
Transportation charges to and from the service location are not protected by this warranty and are the responsibility of the purchaser.
Nothing within this warranty shall imply that Danby will be responsible or liable for any spoilage or damage to food or other contents of this appliance, whether due to any defect of the appliance, or its use, whether proper or improper.
EXCLUSIONS
Save as herein provided, by Danby, there are no other warranties, conditions, representations or guarantees, express or implied, made or intended by Danby or its authorized distributors and all other warranties, conditions, representations or guarantees, including any warranties, conditions, representations or guarantees under any Sale of Goods Act or like legislation or statute is hereby expressly excluded. Save as herein provided, Danby shall not be responsible for any damages to persons or property, including the unit itself, howsoever caused or any consequential damages arising from the malfunction of the unit and by the purchase of the unit, the purchaser does hereby agree to indemnify and hold harmless Danby from any claim for damages to persons or property caused by the unit.
GENERAL PROVISIONS
No warranty or insurance herein contained or set out shall apply when damage or repair is caused by any of the following:
1) Power failure.
2) Damage in transit or when moving the appliance.
3) Improper power supply such as low voltage, defective house wiring or inadequate fuses.
4) Accident, alteration, abuse or misuse of the appliance such as inadequate air circulation in the room or abnormal operating conditions (i.e. extremely high or low room temperature).
5) Use for commercial or industrial purposes (i.e. If the appliance is not installed in a domestic residence).
6) Fire, water damage, theft, war, riot, hostility, acts of God such as hurricanes, floods etc.
7) Service calls resulting in customer education.
8) Improper Installation (i.e. Building-in of a free standing appliance or using an appliance outdoors that is not approved for outdoor application, including but not limited to: garages, patios, porches or anywhere that is not properly insulated or climate controlled).
Proof of purchase date will be required for warranty claims; retain bills of sale. In the event that warranty service is required, present the proof of purchase to our authorized service depot.
Warranty Service
In Home
Danby Products Limited
PO Box 1778, Guelph, Ontario, Canada N1H 6Z9
Telephone: (519) 837-0920 FAX: (519) 837-0449
1-800-263-2629
04/17
Danby Products Inc
PO Box 669, Findlay, Ohio, U.S.A. 45840
Telephone: (419) 425-8627 FAX: (419) 425-8629
natural_image
Close-up of a mechanical component with a numbered arrow pointing to a circular component (no text or symbols visible)natural_image
3D technical illustration of a mechanical assembly with cylindrical components and housing (no text or symbols)natural_image
3D rendering of industrial equipment with cylindrical components and insulators (no text or symbols visible)natural_image
3D rendering of industrial electrical insulators and transformers inside a grid structure (no text or symbols visible)natural_image
3D rendering of industrial equipment with coiled components and a central structure (no visible text or symbols)natural_image
Two technical diagrams showing a wire mesh structure and its 3D rendering of a grid-like structure with internal components (no text or symbols)CONSIGNES D'UTILISATION
PANIER INFÉRIEUR DENTS RABATTABLES
natural_image
Isometric line drawing of a multi-level container or storage unit with internal flow arrows (no text or symbols)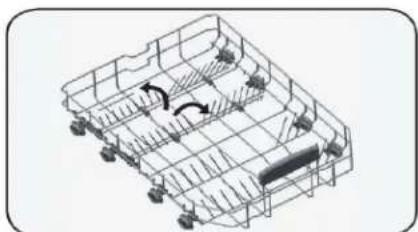
natural_image
Isometric line drawing of a multi-level storage or warehouse structure with internal compartments and directional arrows (no text or symbols)DISTRIBUTEUR DE DÉTERGENT
natural_image
Illustration of a hand pressing a small object on a blue surface within a rectangular container (no text or symbols)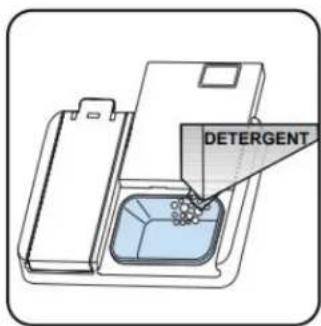
CONSIGNES D'UTILISATION
DISTRIBUTEUR DE PRODUIT DE RINÇAGE
natural_image
Illustration of a hand inserting a component into a device (no text or symbols)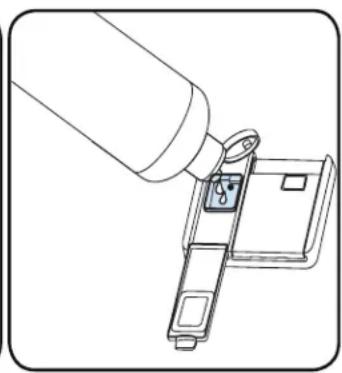
natural_image
Line drawing of a mechanical device with a lever and handle (no text or symbols)CONSIGNES D'UTILISATION
PANNEAU DE COMMANDE - BOUTONS

flowchart
graph TD
    A["Ultra Chaude"] --> B["Rincage"]
    B --> C["Séchage"]
    C --> D["Supplémentaire"]
    C --> E["Retard"]
    C --> F["Options"]
    C --> G["Marche/Arrêt"]
    H["Agent de rincage"] --> I["Demi-Charge"]
    J["Haute Température"] --> K["O"]
    style A fill:#f9f,stroke:#333
    style B fill:#f9f,stroke:#333
    style C fill:#f9f,stroke:#333
    style D fill:#ccf,stroke:#333
    style E fill:#ccf,stroke:#333
    style F fill:#ccf,stroke:#333
    style G fill:#ccf,stroke:#333
1 - Normal 2 - Auto 3 - Intensif 4 - Rapide
Auxiliary functions may cause changes in the program duration.
REMARQUE
ANNULATION DU PROGRAMME
INDICATEUR D'AIDE AU RINÇAGE
natural_image
Diagram of a mechanical device with a central knob and internal component (no text or symbols)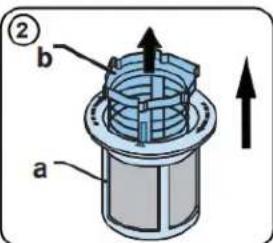
natural_image
Mechanical assembly diagram showing a bolted joint inserted into a housing (no text or symbols)BRAS GICLEUR
natural_image
Technical line drawing of a mechanical assembly with gears and shafts (no text or symbols)NETTOYAGE DES ROUES
natural_image
Interior view of a building with metal shelving and wiring, labeled 'A' and '1' (no readable text or symbols)
natural_image
Exterior view of a modern office building (no signage)SOINS ET ENTRETIEN
QUESTIONS FRÉQUEMMENT POSÉES
BRAS GICLEUR INFÉRIEURE
natural_image
Close-up of a kitchen appliance with a tool and labeled parts (no readable text or symbols)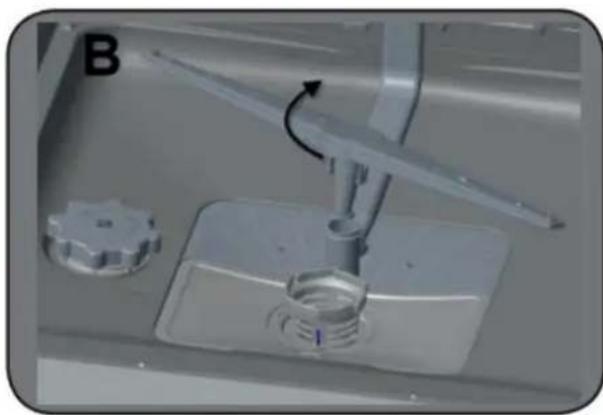
natural_image
Close-up of a mechanical component with a tool and screw base, no visible text or symbolsDanby Products Limited
PO Box 1778, Guelph, Ontario, Canada N1H 6Z9
natural_image
Close-up of a mechanical component with a numbered arrow pointing to a circular component (no text or symbols visible)natural_image
3D technical illustration of an electrical insulator assembly (no text or labels visible)natural_image
3D rendering of an electrical insulator assembly with multiple cylindrical components (no text or symbols visible)natural_image
Technical illustration of industrial equipment with multi-tiered components (no visible text or symbols)natural_image
Illustration of a steel rebar cage with a curved roof structure and an arrow indicating upward motion (no text or symbols)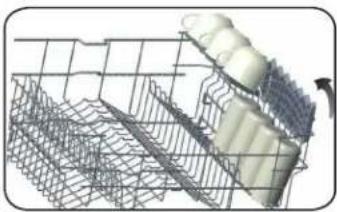
natural_image
3D wireframe model of a mechanical assembly with layered components (no text or symbols visible)CARGA DE LA CESTA INFERIOR
natural_image
Cross-sectional diagram of a high-voltage transformer showing stator, rotor, and core components (no text or labels)natural_image
Isometric line drawing of a shopping cart with wheels and a handle, no text or symbols present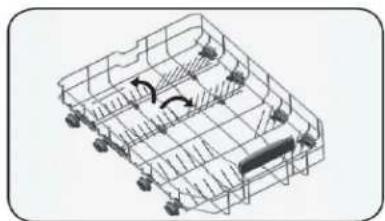
natural_image
Isometric line drawing of a multi-level storage or warehouse structure with internal components and directional arrows (no text or symbols)DISPENSADOR DE DETERGENTE
natural_image
Illustration of a hand pressing a small object on a blue surface within a rectangular container (no text or symbols)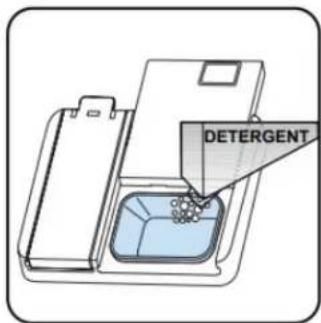
natural_image
Illustration of a hand using a tool to press or adjust a device (no text or symbols visible)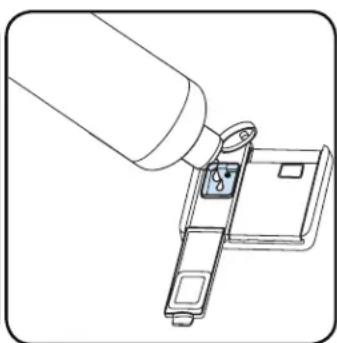
natural_image
Line drawing of a hand inserting a small component into a device (no text or symbols)1 - Regular 2 - Auto 3 - Intensive 4 - Quick
COMPATIBILITY OF PROGRAMS AND OPTIONS
natural_image
Technical diagram of a mechanical component with a central hub and internal structure (no text or symbols)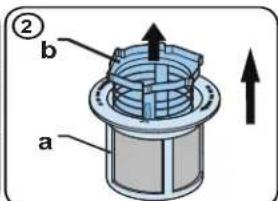
natural_image
Diagram of a mechanical assembly with a central component and a circular base (no text or symbols)BRAZO ROCIADOR
natural_image
Technical line drawing of a mechanical assembly with gears and shafts (no text or symbols)natural_image
Interior view of a server rack with metal racks and a cable (no visible text or labels)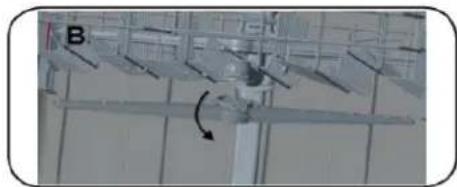
natural_image
Diagram of an aircraft wing structure with directional arrows and label B (no readable text or symbols)BRAZO ASPERSOR INFERIOR
natural_image
Mechanical component diagram showing a housing with labeled parts and arrows indicating motion (no readable text or symbols)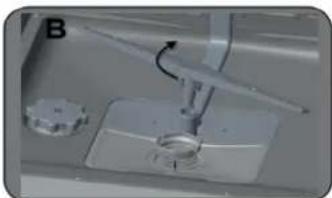
natural_image
Close-up of a mechanical assembly with a pointed tool and circular component (no visible text or symbols)Danby Products Limited
PO Box 1778, Guelph, Ontario, Canada N1H 6Z9
Telephone: (519) 837-0920 FAX: (519) 837-0449
1-800-263-2629
04/17
Danby Products Inc.
PO Box 669, Findlay, Ohio, U.S.A. 45840
Telephone: (419) 425-8627 FAX: (419) 425-8629
Danby Products Limited, Guelph, Ontario, Canada N1H 6Z9 Danby Products Inc. Findlay, Ohio, U.S.A. 45840
www.danby.com