LVF13AX - Dishwasher FAGOR - Free user manual and instructions
Find the device manual for free LVF13AX FAGOR in PDF.
| Product type | Dishwasher |
| Brand | Fagor |
| Model | LVF13AX |
| Capacity | 12 place settings |
| Energy class | A++ |
| Annual energy consumption | 258 kWh |
| Annual water consumption | 2800 litres |
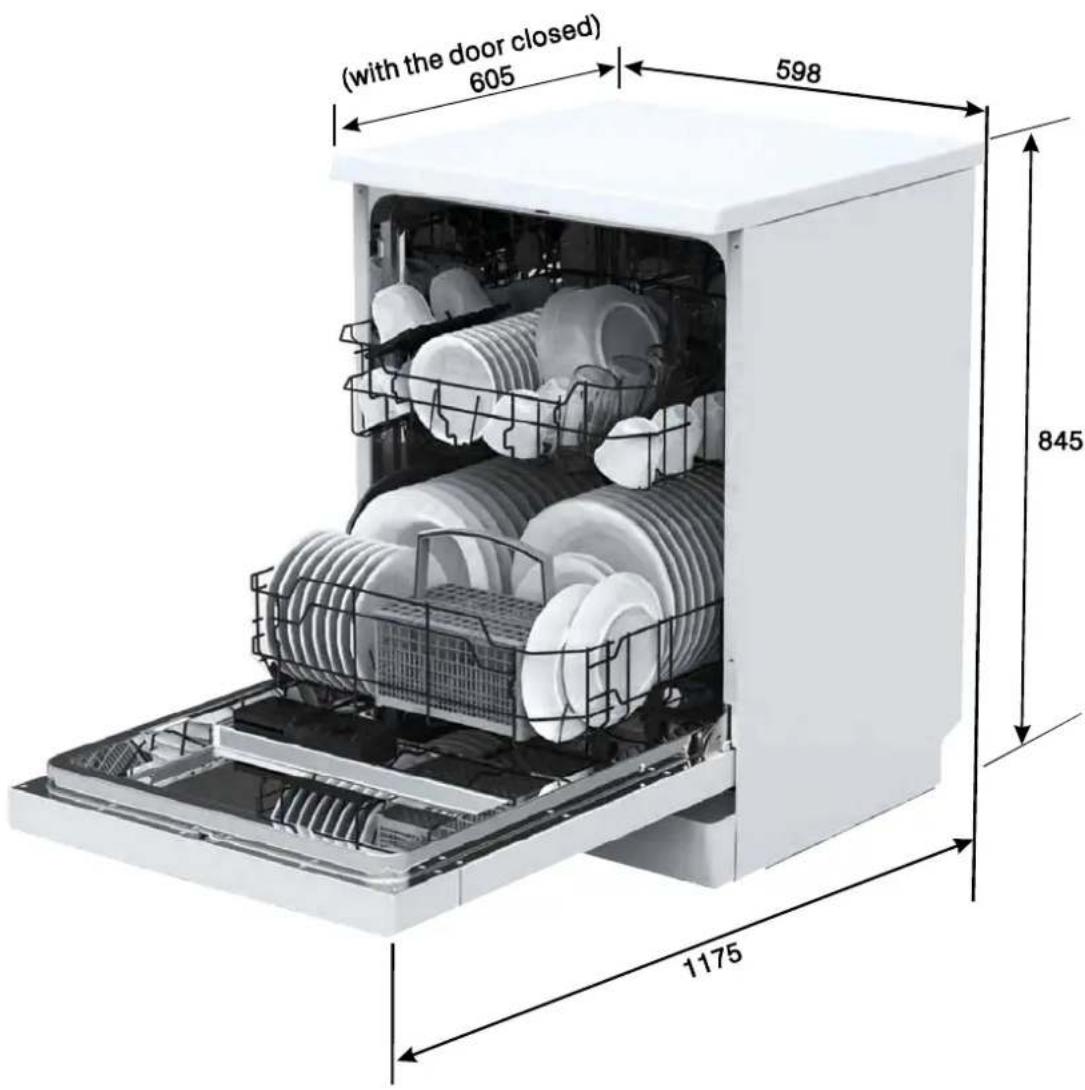
| Dimensions (HxWxD) | 845 x 598 x 605 mm |
| Power supply | 230 V ~ 50 Hz, 1930 W |
| Water pressure | 0.04 - 1.0 MPa |
| Noise level | 49 dB(A) |
| Wash programs | Auto, Intensive, Normal, ECO, Glass, 1 Hour, Quick, Soak |
| Special functions | Water Softener, Extra Dry, Delay Start, Child Lock |
| Installation type | Freestanding / Built-in |
| Tub material | Stainless steel |
| Filtration system | Main filter, coarse filter, microfilter |
| Water hardness adjustment | 6 positions (H1 to H6) |
| Rinse aid dispenser | Capacity ~110 ml, adjustable (4 or 6 positions) |
| Detergent compartment | With prewash and main wash compartment |
| Racks | Upper rack adjustable in height, lower rack with foldable spikes |
| Spray arms | Upper and lower arms, cleanable |
| Safety | Grounding, child lock, secure door opening |
| Maintenance | Regular cleaning of filters and spray arms |
| Weight (approximate) | Approximately 45 kg |
Frequently Asked Questions - LVF13AX FAGOR
User questions about LVF13AX FAGOR
0 question about this device. Answer the ones you know or ask your own.
Ask a new question about this device
Download the instructions for your Dishwasher in PDF format for free! Find your manual LVF13AX - FAGOR and take your electronic device back in hand. On this page are published all the documents necessary for the use of your device. LVF13AX by FAGOR.
USER MANUAL LVF13AX FAGOR
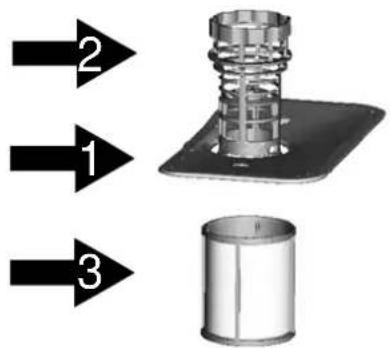
natural_image
Cutaway view of a white kitchen appliance showing internal compartments and storage racks (no text or symbols visible)
Read this Manual
Dear Customer,
Please carefully read this manual before using the dishwasher, it will help you to use and maintain the dishwasher properly.
- Keepit torefertoitatalaterdate.
Passitonto any subsequent owner of the appliance.
This manual contains sections on safety Instructions, Operating Instructions, Installation Instructions and Troubleshooting Tips, etc.

Before Calling for Service
To review the section on troubleshooting Tips will help you to solve some common problems by yourself.
If you can not solve the problems by yourself, please ask for the help of professional technicians.
NOTE:
The manufacturer, following a policy of constant development and updating of the product, may make modifications without giving prior notice.
This usermanual shall also be got from the manufacturer or responsible vendor.
1) Safety Information....1
2) Quick operation guide.... 2
3) Operation Instruction....3
Control Panel....3
Dishwasher Features....3
4) Prior using for the first time....4
A、Water Softener....4
B、Loading the Salt into the Softener....5
CFill the Rinse Aid Dispenser....5、
DFunction of Detergent....6
5) Loading the Dishwasher Basket....9
Attention before or after loading the Dishwasher Baskets....9
LoadingtheupperBasket....10
LoadingtheLowerBasket....10
CutleryBasket....10
6) Starting a washing programme....11
WashCycleTable....11
Turning on the Appliance....12
Changethe Programme....12
At the end of the Wash Cycle....12
7) Maintenance and cleaning....13
Filtering System....13
Caring for the Dishwasher....14
8) Installation instruction....15
Positioning the Appliance....15
About Power Connection....15
Water Connection....16
Start of dishwasher....17
9) Troubleshooting Tips....18
Before calling for service....18
Errorcodes....19
Technical information....20
1. IMPORTANT SAFETY INFORMATION

WARNING!
When using your dishwasher, follow the precautions listed below:
■ This appliance is intended to be used in household and similar applications such as:
-staffkitchenareasinshops, offices and other working environments;
-farmhouses;
-by clients in hotels, motels and other residential type environments;
-bed and breakfast type environments.
■ This appliance can be used by children aged from 8 years and above and persons with reduced physical, sensory or mental capabilities or lack of experience and knowledge if they have been given supervision or instruction concerning use of the appliance in a safety and understand the hazards involved.
Children shall not play with the appliance. Cleaning and user maintenance shall not be made by children without supervision. (For EN60335-1)
■ This appliance is not intended for use by persons (including children) with reduced physical, sensory or mental capabilities, or lack of experience and knowledge, unless they have been given supervision or instruction concerning use of the appliance by a person responsible for their safety. (For IEC60335-1)
■ This appliance is for indoor use only, for household use only.
■ Toprotectagainsttheriskofelectricalshock, donot immersetheunit, cordorpluginwaterorotherliquid.
■ Please unplug before cleaning and maintenance the appliance.
■ Use asoftclothmoistenwithmildsoap,andthenuse adryclothtowipeitagain.
■ Thisappliancemustbeearthed. Intheeventofa malfunctionorbreakdown, earthingwillreducetherisk ofanelectricshockbyprovidingapathofleast resistanceofelectriccurrent. Thisapplianceisequipped withacordhavinganequipment-earthingconductor andagroundingplug.
■ Theplugmustbepluggedintoanappropriateoutletthat isinstalledandearthedinaccordancewithalllocal codesandordinances.
■ Improperconnectionoftheequipment-earthing conductorcanresultintheriskofanelectricshock.
■ Checkwithaqualifiedelectricianorservice representativeifyouareindoubtwhethertheappliance isproperlygrounded.
■ Donotmodifytheplugprovidedwiththeappliance; Ifitdoesnotfittheoutlet.
■ Haveaproperoutletinstalledbyaqualifiedelectrician.
■ Donotabuse, siton, or standard on the door or dish rack of the dish washer.
■ Donotoperateyourdishwasherunlessallenclosure panelsareproperlyinplace.
■ Openthedoorverycarefullyifthedishwasheris operating,thereisariskofwatersquirtingout.
■ Donotplaceanyheavyobjectsonorstandonthedoor whenitisopen. The appliance could tip forward.
■ Whenloadingitemstobewashed:
1) Locatesharpitemssothattheyarenotlikelyto damagethedoorseal;
■2) Warning: Knives and other utensil with sharp points must be loaded in the basket with their points down or placed in a horizontal position.
■ Check that the detergent powder is empty after completion of the wash cycle.
■ Donotwashplasticitemsunlesstheyaremarked dishwashersafeortheequivalent.
■ Forplasticitemsn otsomarked, checkthemanufacturer's recommendations.
■ Useonlydetergentandrinseadditivesdesignedfor anautomaticdishwasher.
■ Neverusesoap, laundry detergent, or handwashing detergent in your dish washer.
■ Childrenshouldbesupervisedtoensurethattheydonot playwiththeappliance.
■ Thedoorshouldnotbeleftopen, sincethiscouldincrease theriskoftripping.
If the supply cordisdamaged, it must bereplaced by the manufacturer or its service agent or as similarly qualified person in order to avoid a hazard.
■ Duringinstallation, thepowersupplymustnotbe excessivelyordangerouslybentorflattened.
■ Donottamperwithcontrols.
■ The applianceistobeconnectedtothewatermainsusing newhosesetsandthatoldhose-setsshouldnotbereused.
■ Themaximumnumberofplacesettingstobewashed is12.
■ Themaximumpermissibleinletwaterpressureis1MPa.
■ Theminimumpermissibleinletwaterpressureis0.04MPa.
Disposal
■ Dispose of the dishwasher packaging material correctly.
■ All packaging materials can be recycled.
■ Plastic parts are marked with the standard international abbreviations:
PE for polyethylene, e.g. sheet wrapping material PS for polystyrene, e.g. padding material POM polyoxymethylene, e.g. plastic clips PP polypropylene, e.g. Salt filler ABSAcrylonitrile Butadiene Styrene, e.g. Control Panel.

WARNING!
■ Packaging material could bed dangerous for children!
■ Ford disposing of package and the appliance please goto arecyclingcentre. Therefore cutoff the power supply cable and make the door closing device unusable.
■ Cardboard packaging is manufactured from recycled paper and should be disposed in the waste paper collection for recycling.
■ By ensuring this product is disposed of correctly, you will help prevent potential negative consequences for the environment and human health, which could otherwise be caused by inappropriate waste handling of this product.
■ Formore detailed information about recycling of this product, please contact your local city office and your household wasted disposalservice.
■ DISPOSAL: Donotdisposethisproductasunsorted municipalwaste. Collectionofsuchwasteseparately forspecialtreatmentisnecessary.
2. Quick operation guide
For detailed operating method read the corresponding content on the instruction manual.
| Switch on the appliance | Press the On/Off button to switch on the appliance, Open the door. | |
 | ||
| Fillthedetergentdispenser | Compartment A:Witheachwashcycle.Compartment B:Forprogrammeswithpre-washonly.(Followtheuserinstructions!) | 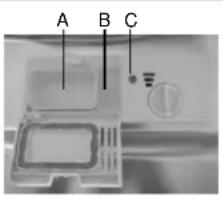 |
 | ||
| Checktherinseaidlevel | Mechanicalindicator C.Electricindicatoroncontrolpanel(ifprovided). | |
 | ||
| Checktheregeneration saltlevel | (Onmodelswithwatersoftenersystemonly.)Electricindicatoroncontrolpanel(ifprovided).Ifthereisnosaltwarninglightinthecontrolpanel(forsomodels),youcanestimatewhentofillthesaltintothesoftenerbythenumberofcyclesthedishwasherhasrun. |  |
 | ||
| Loadthebaskets | Scrapeoffanylargeamountofleftoverfood.Softenremnantsofburntfoodinpans,then load the baskets. Refer to the dishwasher loading instructions. | |
 | ||
| Selectaprogramme | Closethedoor,presstheProgrammeButtonuntiltheselectedprogrammelightsup.(SeethesectionentitledOperationinstruction) “” | |
 | ||
| Runningthedishwasher | TurnonthewatertapandpresstheStart/PauseButton.Themachinewillstartworkingafterabout10seconds. | |
| [ZKKH] | ||
| Changingtheprogramme | 1.A running cycle can only be modified if it has been running for a short time. Otherwise the detergentmay have already been released and the water already drained. If this is the case, the detergentdispensermustberefilled.2. Press the Start/Pause button, press the program button more than 3 seconds,the machinewill be in standby state, then you can change the program to the desired cycle setting | |
 | ||
| Addforgottendishesinthe dishwasher. | 1.PresstheStart/PauseButtonto stopthewashing.2.Openthedooralittle.3.Afterthesprayarmsstopworking,youcanopenthedorcompletely.4.Addforgottendishes.5.Closethedoor6.PresstheStart/PauseButton,thedishwasherwillrunafter10seconds. |  Open the doorcarefully.Hot steam may escapewhen the door is opened! Open the doorcarefully.Hot steam may escapewhen the door is opened! |
 | ||
Iftheapplsswitchedoffduringa  cycle. cycle. | Iftheapplianceisswitchedoffduringawashcycle,whenswitchedonagain,pleasere-selectthewashingcycleandoperatethedishwasheraccordingtotheoriginalPower-onstate). | |
Switchc  appliance appliance | Whentheworkingcyclehasfinished,thebuzzer ofthedishwasherwillsound8times,thenstop.TurnofftheapplianceusingtheOn/OffButton. | |
| TurnofWatertap,unload [ZWS2] skets | Warning:waitafewminutes (about15minutes) beforeunloadingthedishwashertoavoidhandlingthedishesandutensilswhiletheyarestillhotandmoresusceptibletobreak.Theywillalsodrybetter.Unloadtheappliance,startingfromthelowerbasket. | |
3. Operation Instruction

IMPORTANT Togetthebestperformancefromyourdishwasher,readalloperatinginstructions beforeusingitforthefirsttime.
Control Panel
text_image
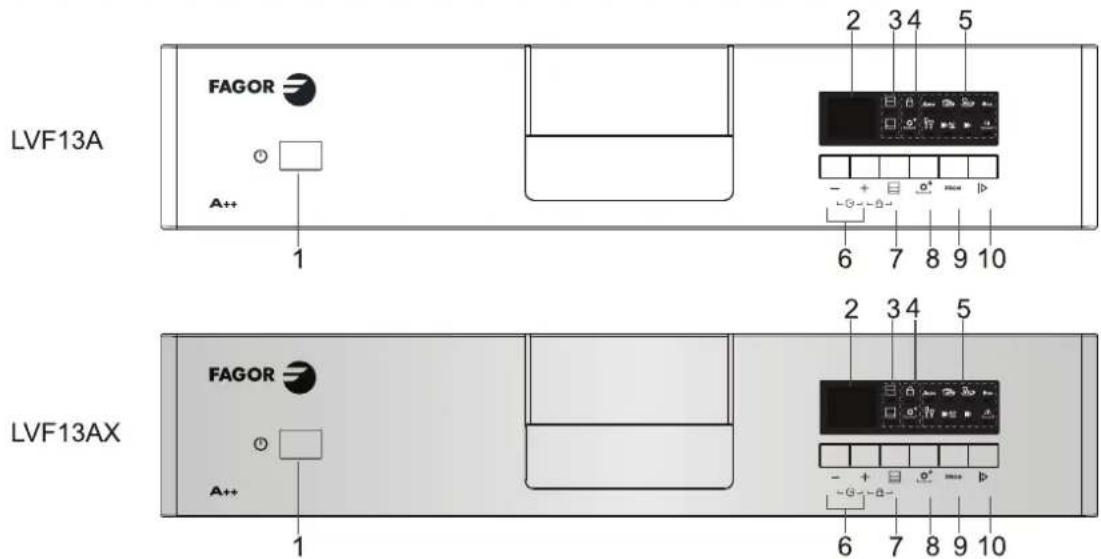
LVF13A FAGOR A++ 1 2 3 4 5 6 7 8 9 10 LVF13AX FAGOR A++ 1 2 3 4 5 6 7 8 9 101 On/Off Button: To turn on/off the power supply.
2 Display screen: to show the reminding time and the state (running state, delay time etc)
- RinseAid indicator: * Indicates when the dispenser needs to be refilled.
- Add salt indicator: Indicates when the dispenser needs to be refilled.
- Delay time, Remain time, or error codes indicator: 8:88
3 Alt function indicator: ☐☐
4 Child lock and Extra Drying indicator 🏠 🌿
5 Program indicators: Auto Eco 60 min
6 Delay Button: To Press the button to delay.
7 Alt Button: Dual zone wash function, press the button to select either upper basket or lower basket loaded, and the response indicator.
8 Extra Drying function select Button :To select Extra Drying function.(With this function only be used with programmes Intensive,Normal,ECO,Glass and 1 Hour.)
9 Program Button: To Press the button to select appropriate Program.
10 Start/Pause Button: To start the selected washing program or pause the washing program when the machine is working.
Attention: 🔒
Child lock function: press Delay Button and Alt Button simultaneously more than 3 second to lock the program, use the same method to cancel the child lock function.
Dishwasher Features
text_image
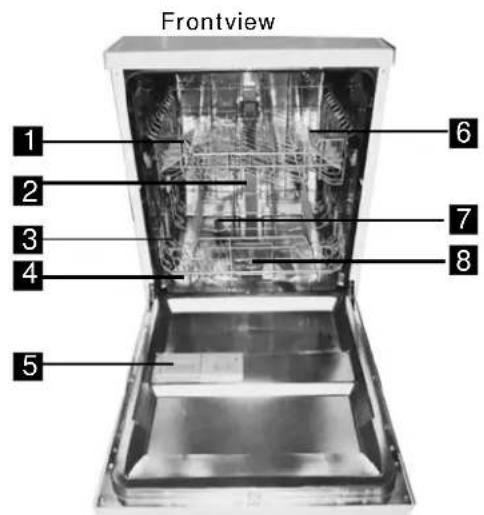
Frontview 1 2 3 4 5 6 7 81 UpperBasket
2Innerpipe
3 LowerBasket
4 SaltContainer
5 Dispenser
6 CupShelf
7 Sprayarms
8 Filterassembly
9 Inletpipeconnector
10 Drainpipe
4. Prior using for the first time
Before using your dishwasher for the first time:
A. Setthewatersoftener
B. Add 1.5Kg dishwasher salt and then full fill the salt container with water
C. Fill the rinse aid dispenser
D. Fill in detergent
A. Water Softener
The watersoftenermustbesetmanually, using the waterhardnessdial.
The water softener is designed to remove minerals and salts from the water, which would have a detrimental or adverse effect on the operation of the appliance.
The higher the content of these minerals and salts, the harder your water is.
The softener should be adjusted according to the hardness of the water in your area. Your local Water Authority can advise you on the hardness of the water in your area.
Adjusting Salt Consumption
The dishwasher is designed to allow for adjustment in the amount of salt consumed based on the hardness of the water used. This is intended to optimise and customise the level of salt consumption.
- Close the door, switch on the appliance;
- Press the Start/Pause button for more than 5 seconds to start the water softener set model within 60 seconds after the appliance was switched on (The Salt and Rinse aid warning lights will be on periodically when it get in the set model);
- Press the Start/Pause button to select the proper set according to your local environment, the sets will change in the following sequence: H1->H2->H3->H4->H5->H6;
- Press the On/Off button or no operation for 5 seconds to end the set up model.
| WATERHARDNESS | SelectorPosition | Saltconsumption(gram/cycle) | |||
| ^ | ^ | ^ | mmol/l | ||
| 0~90~50~0 | 94 0~6 | H1 | 0 | ||
| 6-11 | 10-20 | 7-14 | 1.0-2.0 | H2 | 9 |
| 21-3012-172 | 1.1-3.0 15-21 | H3 | 12 | ||
| 18-2231-40 | 22-28 | 3.1-4.0 | H4 | 20 | |
| 41-6023-344 | 1.1-6.0 29-42 | H5 | 30 | ||
| 35-4561-80 | 43-56 | 6.1-8.0 | H6 | 60 | |
Note:1
1^ = 1.25Clarke = 1.78fH = 0.178mmol / l
^ DH: German degree
°fH: Frenchdegree
°Clark: British degree
Note:2
Themanufactory setting: H4(EN50242)
Contact your local water board for information on the hardness of your water supply.

NOTE: If your model does not have any water softener, you may skip this section.
WATERSOFTENER
The hardness of the water varies from place to place. If hard water is used in the dishwasher, deposits will form on the dishes and utensils.
The appliance is equipped with a special softener that uses a salt container specifically designed to eliminate lime and minerals from the water.
B. Loading the Salt Into the Softener
Always use the salt intended for use with dishwasher.
The salt container is located beneath the lower basket and should be filled as explained in the following:
Attention!
■ Only use salt specifically designed for the use in dishwashers! Every other type of salt not specifically designed for the use in a dishwasher, especially table salt, will damage the water softener. In case of damages caused by the use of unsuitable salt the manufacturer does not give any warranty nor is liable for any damages caused.
■ Only fill with salt just before starting one of the complete washing programs. This will prevent any grains of salt or salty water, which may have been spilled, remaining on the bottom of the machine for any period of time, which may cause corrosion.
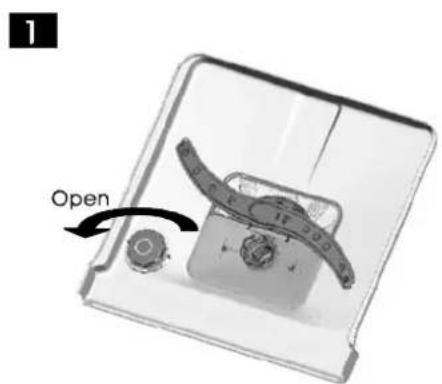
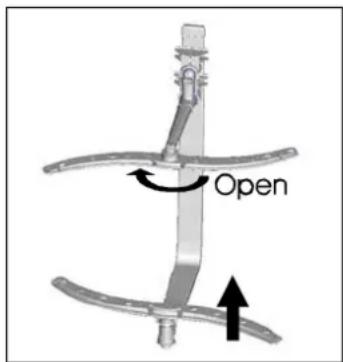
text_image
1 Open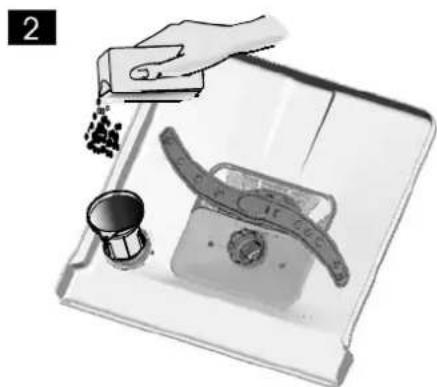
natural_image
Illustration of a hand pouring granular material into a kitchen appliance with a side panel (no text or symbols)A After the lower basket has been removed, unscrew and remove the cap from the salt container. 1 B Place the end of the funnel (supplied) into the hole and introduce about 1.5kg of dishwasher salt.
C Full fill the salt container with water, It is normal for a small amount of water to come out of the saltcontainer.
D After filling the container, screw the cap tightly back clockwise. E The salt warning light will stop being after the salt container has been filled with salt.
F Immediately after filling the salt into the salt container, a washing program should be started (Wesuggesttouseashort program). Otherwise the filter system, pump or other important parts of the machine may be damaged by salty water. This is outofwarranty.
NOTE:
-
The salt container must only be refilled when the salt warning light in the control panel comes on. Depending on how well the salt dissolves, the salt warning light may still be on even though the saltcontainerisfilled. If there is no salt warning light in the control panel (for some Models), you can estimate when to fill the salt into the softener by the cycles that the dishwasher has run.
-
If there are spills of the salt, a soak or a rapid program should be run to remove the excessive salt.
- If the machine needs to be dumped for the reasons of transit, repair and so on, please use the bibulous cloth or analog to blot up the water in the salt container, and screw the captightly, afterward, transistor repair the machine. After transiting or repairing the machine and confirming it in order, load the salt into the softener according to the process of "B. Loading the salt into the Softener". Otherwise, it could be make the big damage to the machine, for example, rustiness, conk and soon. Such problems are out of the guarantee range.
C. Fill the Rinse Aid Dispenser
RinseAidDispenser
The rinse aid is released during the final rinse to prevent water from forming droplets on your dishes, which can leave spots and streaks. It also improves drying by allowing water to roll off the dishes. Your dishwasher is designed touseliquidrinseaids. The rinseaid dispenser is located inside the door next to the detergent dispenser. To fill the dispenser, open the cap and pour the rinse aid into the dispenser until the level indicator turns completely black. The volume of the rinse aid container is about 110ml.
FunctionofRinseAid
Rinse aid is automatically added during the last rinse, ensuring thorough rinsing, and spot and streak free drying.
Attention!
Only use branded rinse aid for dishwasher. Never fill the rinse aid dispenser with any other substances (e.g. Dishwasher cleaning agent, liquid detergent). This would damage the appliance.
When to Refill the Rinse Aid Dispenser
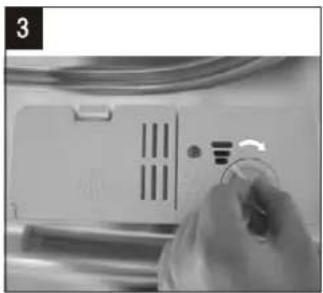
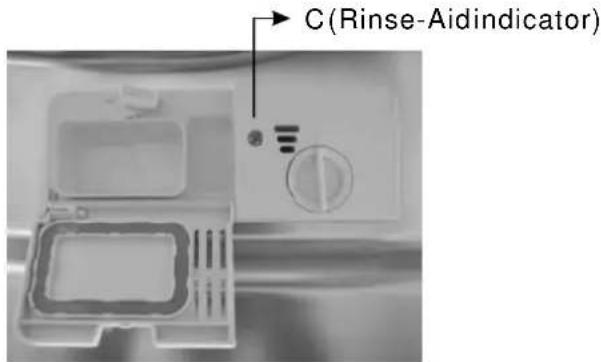
If there is no rinse-aid warning light in the control panel, you can estimate the amount from the colour of the optical level indicator" C" located next to the cap. When the rinse-aid container is full, the whole indicator will be dark. As the rinse-aid diminishes, the size of the dark dot decreases. You should never let the rinse aid level fall 1 / 4 full.
As the rinse aid diminishes, the size of the black dot on the rinse aid level indicator changes, as illustrated below.
Full
3/4full
1/2full
1/4 full-Should refill to eliminate spotting
Empty
text_image
C(Rinse-Aidindicator)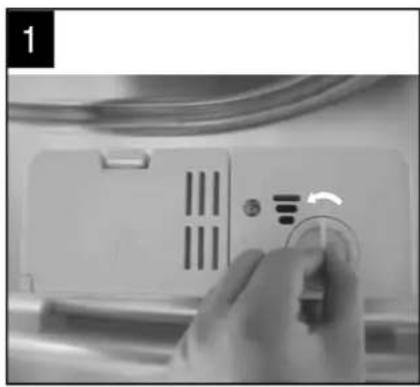
natural_image
Close-up of a hand holding a control knob next to a white appliance with ventilation slots and buttons (no visible text or symbols)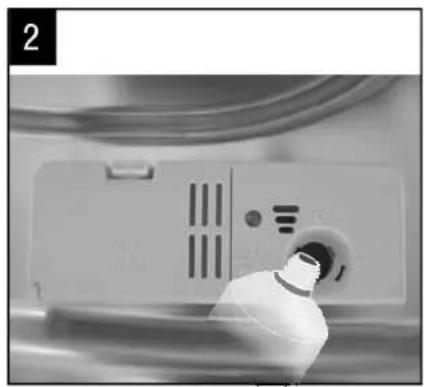
natural_image
Close-up of a white electronic device with a circular button and indicator lights, no visible text or symbols.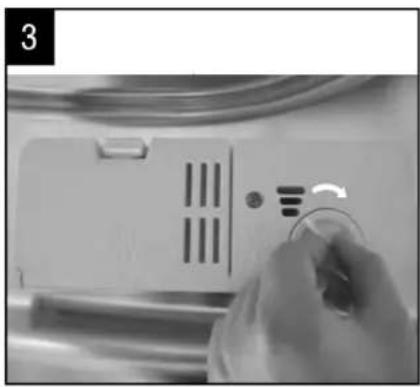
natural_image
Close-up of a hand adjusting a device panel with a circular button, no visible text or symbols1 To open the dispenser, turn the cap to the "open" (left) arrow and lift it out.
2 Pour the rinse aid into the dispenser, being careful not to overfill.
3 Replace the cap by inserting it aligned with "open" arrow and turning it to the closed (right) arrow.
NOTE: Clean up any rinse aid spilled while during filling with an absorbent cloth to avoid excessive foaming during thenextwash. Don't forget to replace the cap before you close dishwasher door.
Adjusting Rinse Aid Dispenser
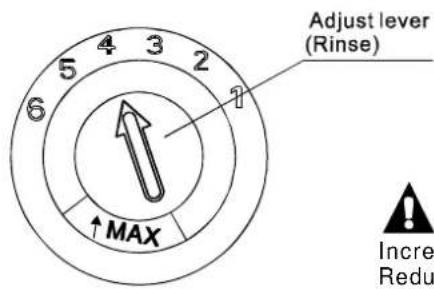
text_image
Adjust lever (Rinse) ↑MAX Incre ReduThe rinse aid dispenser has six or four settings. Always start with the dispenser set on "4". If spots and poor drying are a problem, increase the amount of rinse aid dispensed by removing the dispenser lid and rotating the dial to "5". If the dishes still are not drying properly or are show spots, adjust the dial to the next higher lever until your dishes are spot-free. The recommended setting is "4". (Factoryvalueis"4".)
NOTE:
Increase the dose if there are drops of water or limespots on the dishes after washing. Reduce it if there are sticky whitish stains on your dishes or a bluish film on glassware or knife blades.
D. Function of Detergent
Detergents with its chemical ingredients are necessary to remove dirt, crush dirt and transport it out of the dishwasher. Most of the commercial quality detergents are suitable for this purpose.
Attention!
ProperUseofDetergent
Use only detergent specifically made for the use in dishwashers. Keep your detergent fresh and dry.
Don't put powdered detergent into the dispenser until you're ready to wash dishes.
Detergents
Thereare3sortsofdetergents
- With phosphate and with chlorine
- With phosphate and without chlorine
- Without phosphate and without chlorine
Normally new pulverised detergent is without phosphate. Thus the water softener function of phosphate is not given. In this case we recommend to fill salt in the salt container even when the hardness of water is only 6 °dH. If detergents without phosphate are used in the case of hard water often white spots appear on dishes and glasses. In this case please add more detergent to reach better results. Detergents without chlorine do only bleach a little. Strong and coloured spots will not be removed completely. In this case please choose a program with a higher temperature.
Concentrated Detergent
Based on their chemical composition, detergents can be split into two basic types:
■ conventional, alkaline detergents with caustic components
■ low alkaline concentrated detergents with natural enzymes
Detergent Tablets
Detergent tablets of different brands dissolve at different speeds. For this reason some detergent tablets cannot dissolve and develop their full cleaning power during short programs. Therefore please use long programs when using detergent tablets, to ensure the complete removal of detergent residuals.
Detergent Dispenser
The dispenser must be refilled before the start of each wash cycle following the instructions provided in the wash cycle table. Your dishwasher uses less detergent and rinse aid than Conventional dishwasher. Generally, only one tablespoon of detergent is needed for anormal wash load. More heavily soiled items need more detergent. Always add the detergent just before starting the dishwasher, otherwise it could get damp and will not dissolve properly.
Amount of Detergent to Use
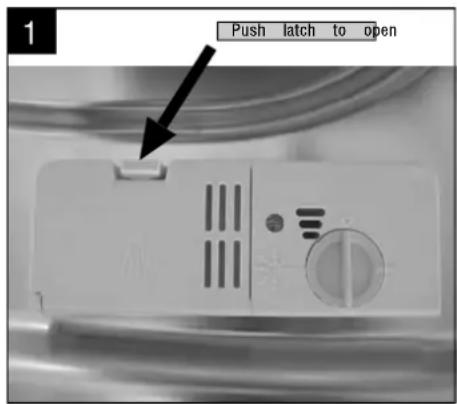
text_image
1 Push latch to open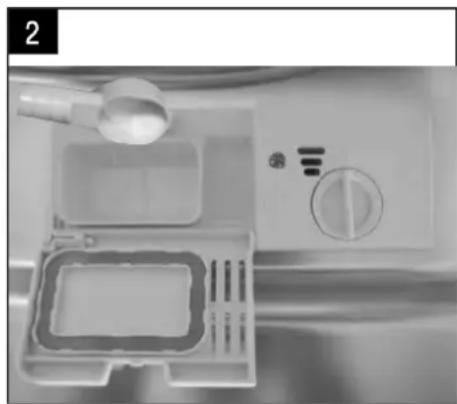
natural_image
Close-up of a kitchen appliance with a lid and control panel (no visible text or symbols)NOTE:
If the lid is closed: press release button. The lid will spring open.
■ Always add the detergent just before starting each wash cycle.
■ Only use branded detergent aid for dishwasher.
!WARNING!
Dishwasherdetergentiscorrosive! Takecaretokeepitoutofreachofchildren.
Fillin Detergent
Fill the detergent dispenser with detergent. The marking indicates the dosing levels, as illustrated on the right:
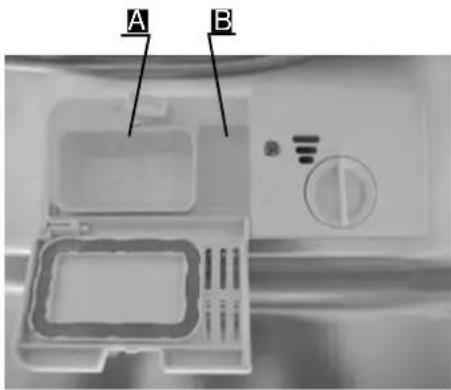
A The place of main wash cycle detergent placed.
B The place of pre-wash cycle detergent placed.
Please observe the manufacturers dosing and storage Recommendations as stated on the detergent packaging.
Closethelidandpressuntilillocksinplace.
text_image
A BIf the dishes are heavily soiled, place an additional detergent dose in the pre-wash detergent chamber. This detergent will take effect during the pre-wash phase.

NOTE:
■ You find information about the amount of detergent for the single programme on the last page.
■ Please aware, that according to the level soiling and the specific hardness of water differences are possible.
■ Please observe the manufacturer's recommendations on the detergent packaging.
5. Loading the Dishwasher Baskets
Recommendation
■ Consider buying utensils which are identified as dishwasher-proof.
■ Useamild detergentthat is described as 'kindtodishes'. If necessary, seek further information from the detergent manufacturers.
■ Forparticularitems, select a program with as low atemperature as possible.
■ To prevent damage, do not take glass and cutlery out of the dishwasher immediately after the programme has ended.
For washing in the dishwasher the following cutlery/dishes
Are not suitable
■ Cutlery with wooden, hornchina or mother-of-pearlhandles
■ Plastic items that are not heat resistant
■ Oldercutlerywithgluedpartsthatarenot temperatureresistant
■ Bonded cutlery items or dishes
■ Pewterorcooperitems
■ Crystalglass
■ Steel items subject to rusting
■ Woodenplatters
■ Items made from synthetic fibres
Are of limited suitability
■ Some types of glasses can become dull after alargenumberofwashes
■ Silver and aluminum parts have a tendency to discolour during washing
■ Glazed patterns may fade if machine washed frequently
Attention before or after loading the Dishwasher Baskets
(For best performance of the dishwasher, follow these loading guidelines.
Features and appearance of baskets and cutlery baskets may vary from your model.)
Scrape off any large amounts of leftover food. Soften remnants of burnt food in pans.
It is not necessary to rinse the dishes under running water.
Place objects in the dishwasher in following way:
- Items such as cups, glasses, pots/pans, etc. are faced downwards.
- Curved items, or ones with recesses, should be loaded aslant so that water can run off.
- All utensils are stacked securely and can not tip over.
- All utensils are placed in the way that the spray arms can rotate freely during washing.

NOTE: Very small items should not be washed in the dishwasher as they could easily fall out of the basket.
- Load hollow items such as cups, glasses, pans etc. With the opening facing downwards so that water cannot collect in the container or a deep base.
■ Dishes and itemsof cutlery must not lie inside one another, or cover each other.
■ To avoid damage to glasses, they must not touch.
■ Load large items which are most difficult to clean into the lower basket.
■ The upper basket is designed to hold more delicate and lighter dishware such as glasses, coffee and teacups
■ Long bladed knives stored in an upright position are a potential hazard!
■ Long and/or sharp items of cutlery such as carving knives must be positioned horizontally in the upper basket.
■ Please do not overload your dishwasher. This is important for good results and for reasonable consumption of energy.
Removing the Dishes
To prevent water dripping from the upper basket into the lower basket, we recommend that you empty the lower basket first and then the upper basket.
The Method Loading Normal Dishware
Loading the Upper Basket
The upper basket is designed to hold more delicate and lighter dishware such as glasses, coffee and teacups and saucers, as well as plates, small bowls and shallow pans (as long as they are not too dirty). Position the dishes and cookwares that they will not get moved by the spray of water.
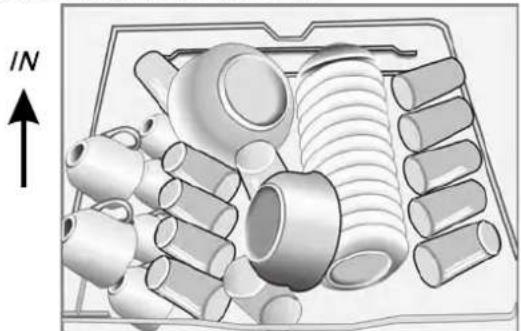
natural_image
3D mechanical assembly diagram showing internal components and a north arrow (no text or labels)Pleaseberemindedthat:
Pots, serving bowls, etc, must always be placed top down.
- Deep pots should be slanted to allow water to flow out.
The Bottom Basket features folding spikes so that larger or more pots and pans can be loaded.
Adjusting the Upper Basket
The height of the upper basket can be adjusted in order to create more space for large utensils both for the upper /lower basket. The height of the upper basket can be adjusted by placing the wheels on different height of the rails. Long items, serving cutlery, salad servers and knives should be placed on the shelf so that they do not obstruct the rotation of the spray arms..
Lift the basket for upper position
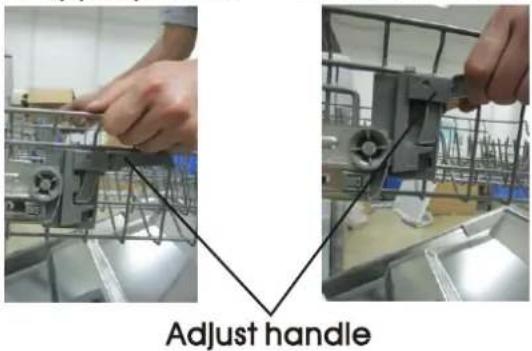
text_image
Adjust handleUp press the handle to lower the basket
Loading the Lower Basket
We suggest that you place large items and the most difficult to clean items are to be placed into the lower basket: such as pots, pans, lids, serving dishes and bowls, as shown in the figure below. It is preferable to place serving dishes and lids on the side of the racks in order to avoid blocking the rotation of the top spray arm.

natural_image
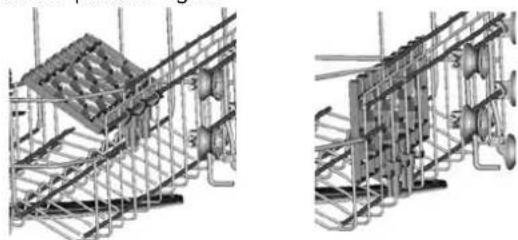
Illustration of a kitchen setup with a basket, cooking panes, and eggplant (no text or symbols)Foldingbackthe cupshelves
For better stacking of pots and pans, the spikes can be folded down as show in the picture right.
natural_image
Two technical diagrams showing structural steel frameworks with pipes and valves, no text or symbols present.FoldingSpikesof LowerBasket
Forbetter stacking of pots and pans, the spikes can be folded down as show in the pictureright.

Cutlery Basket
Cutlery should be placed in the cutlery basket with the handles at the bottom. If the rack has side baskets, the spoons should be loaded separately into the appropriate slots, especially long utensils should be placed in the horizontal position at the front of the upper basket as shown in the picture.

WARNING!
- Do not let any item extend through the bottom.
■ Always load sharp utensils with the sharp point down!
Forpersonalsafety and a top quality cleaning, place the silverware in the basket makingsurethat:
■ Theydonotnesttogether.
■ Silverware is placed with the handles-down.
■ But place knives and other potentially dangerous utensils are placed handles-up.
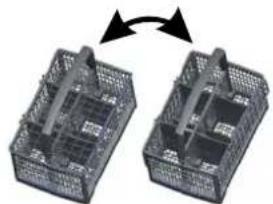
natural_image
Two 3D wireframe models of a building structure, one with an arrow indicating transformation or assembly (no text or symbols)6. Starting a washing program
Wash Cycle Table

NOTE: (★) Means: need to fill rinse into the Rinse-Aid Dispenser.
| Program | Cycle Selection Information | Description of Cycle | Detergent pre/main | Running time(min) | Energy (Kwh) | Water (L) | Rinse Aid |
| Auto | Auto sensing wash, lightly, normallyorheavilysoiled crockery, with or without dried-onfood | Pre-wash (45 °C) Autowash(45-55 °C) Rinse Rinse(62 °C) Drying | 5/25g | 120-180 | 0.9-1.3 | 8.4-12.7 | |
Intensive  | Forheaviestsoiledcrockery, andnormallysoiledpots、pans、dishesetcwithdried onsoiling. | Pre-wash(50)°C Wash(65) °C Rinse Rinse Rinse(55)°C Drying | 5/25g(or)3in1 | 165 | 1.5 | 17 | |
| Normal | Fornormallysoiledloads, such as pots, plates,glasses andlightlysoiledpans. | Pre-wash(45)°C Wash(55) °C Rinse Rinse (65) °C Drying | 5/25g(or)3in1 | 180 | 1.3 | 14 | |
| Eco (*EN50242) | This is standard programme, it is suitable to clean normally soiled tableware and it is the most efficient programme in terms of its combined energy and water consumption for that type of tableware. | Pre-wash Wash(50) °C Rinse(65)°C Drying | 5/25g(or)3in1 | 175 | 0.91 | 10 | |
| Glass [3062] | For lightly soiled crockery and glass. | Pre-wash wash(40)°C Rinse Rinse(60)°C Drying | 5/25g | 115 | 0.87 | 14 | |
1Hour  | Forlightlysoiledloadsthat do not need excellent drying efficiency. | Pre-wash(50)°C Wash(60 °C) Rinse(60)°C Drying | 5/25g | 60 | 1.15 | 10 | |
| Rapid ➤ | A shorter wash for lightly soiled loads and quick wash. | Wash (40) °C Rinse Rinse(45) °C | 20g | 40 | 0.6 | 10 | |
| Soak ➤ | To rinse dishes that you plan to wash later that day. | Pre-wash | 8 | 0.01 | 3.5 |

NOTE:
*EN 50242 : This programme is the test cycle. The information for comparability test in accordance with EN50242, as follows:
■ Capacity:12setting
■ Position Upper basket: upper wheels on rails
■ Rinseaidsetting:6
■ PI:0.49W; PO:0.45W.
Turning On the Appliance
Starting a cycle wash
1 Draw out the lower and upper basket, load the dishes and push them back. It is commended to load the lower basket first, then the upper one (see the section entitled "Loading the Dishwasher").
2 Pour in the detergent (see the section entitled "Salt, Detergent and Rinse Aid").
3 Insert the plug into the socket. The power supply is 220-240 VAC /50 Hz, the specification of the socket is 10A 250VAC. Make sure that the water supply is turned on to full pressure.
4 Close the door, press the ON/OFF Button, and the display will turn on.
5 Press the program Button, the wash program will be changed as follows direction:
Auto->Intensive->Normal->ECO->Glass->1 Hour->Rapid->Soak;
If a program is selected, the response light will light. Then press the Start/Pause button, the dishwasher begins to start. ____ 11 ____
Change the Program...
Premis e:
A cycle that is un derway can on ly be mod ifed if it has only been running for a short time. O therwis e, the de tergent m ay have a lread y be en releas ed, a nd the appli ance m ay have alrea dy dr ained the wash wa ter. If t his is the case , th e deter gent d ispenser mu st be refil led ( see t he sec tio n ent it led " Load ing t he Det ergent " ).
2 Ope n the do or , the m machine w ill pa use, press the pro gram button more th an 3s then you can change the pro gram to th e de sired cycle s etting (see th e section en titled " S tartin g a wash cycle. . .".).

NOTE:
If you open the door during a wash cycle, the machine will pause. the LE D d is play w in dow "will stopblinking and the buzzer will mooing every minute unless you close the door. After you close the door, the machine will keep on working after 10 seconds.
Forgot to Add a Dish?
A forgotten dish can be added any time before the detergent cup opens.
1 Press the Start/Pause Button to stop the washing.
2 Open the door a little.
3 After the spray arms stop working, you can open the door completely.
4 Add forgotten dishes.
5 Close the door
6 Press the, tStadishPavashButtoil run after 10 seconds.
At the End of the Wash Cycle
When the working cycle has finished, the buzzer of the dishwa sher will sound for 8 seconds, then s to p. Turn off the appli ance using the ON/O FF butto n, shut o ff th e wa ter supp ly and open t he door of t he di shwashe r. Wait for a few mi nutes bef ore unlo ading the dis hwa she r t o a voi d ha ndlin g t he di shes and ute nsils w hile th ey are s till h ot a nd m ore suscept ible to break age. The y wil l al sod ry better.
■ Switch Off the Dishwasher
The program light is on but is not blinking, only in this case the progr amme h as ended.
- Sw itch off the di shwasher by pressing the O N/OFF button.
- Turn off the water tap!
■ Open the door carefully.
Hot dishes are sensitive to knocks. The dishes should therefore be allowed to cool down around 15 minutes before removing from the appliance. Open the dishwasher's door, leave it a jar and wait a few minutes before removing the dishes. In this way they will be cooler and the drying will be improved.
■ Unloading the dishwasher
It is normal that t he di shw as her is wet insid e.
Empty the lower ba sket fir stand then the up per one. This will avoid water dripping from the upper Basket onto the dis hes in the lower one.

WARNING!
It is dangerous to open the door when washing, because the hot water may scald you.
7. Maintenance and Cleaning
Filtering System
The filter prevents larger remnants of food or other objects from getting inside the pump. The residues may block the filter, in this case they must be removed.
text_image
2 1 3The filter system consists of a coarse filter, a flat (Main filter) And a microfilter(Fine filter).
Mainfilter 1
Food and soil particles trapped in this filter are pulverized by a special jet on the lower spray arm and washed down to drain.
Coarsefilter 2
Larger items, such as pieces of bones or glass, that could block the drain are trapped in the coarse filter. To remove the items caught by the filter, gently squeeze the tap on the top of this filter and liftout.
Finefilter 3
Thisfilterholds soil and food residues in the sumparea and prevents it from being redeposit on the dishes during wash cycle.
Filterassembly
The filter efficiently removes food particles from the wash water, allowing it to be recycled during the cycle. For best performance and results, the filter must be cleaned regularly. For this reason, it is a good idea to remove the larger food particles trapped in the filter after each wash cycle by rinsing the semicircular filter and cup under running water. To remove the filter device, pull the cup handle in the upward direction.
WARNING!
■ The dishwasher must never be used without the filters.
■ Improper replacement of the filter may reduce the performance level of the appliance and damaged dishes and utensils.
1
text_image
OpenStep 1: Turn the filter in anti-clockwise direction,
2
natural_image
Mechanical assembly diagram showing internal components with a directional arrow (no text or symbols)Step2liftthefilterassyup:

NOTE: When following this procedure from step1 to step 2, the filter system will be removed; when following it from Step 2 to Step 1, the filter system will be installed.
Remarks:
- Inspect the filters for blocking after every time the dishwasher has been used.
- By unscrewing the coarse filter, you can remove the filter system. Remove any food remnants and clean the filters underrunning water.

NOTE: The entire filter assembly should be cleaned once a week.
Cleaning the Filter
To clean the coarse filter and the fine filter, use a cleaning brush. Reassemble the filter parts as shown in the figures on the last page and reinsert the entire assembly in the dishwasher, positioning it in its seat and pressing downwards.

WARNING!
When cleaning the filters, don't knock on them. Otherwise, the filters could be contorted and the performance of the dishwasher could be decreased.
Caring for the Dishwasher
The control panel can be cleaned by using a lightly dampened cloth.
After cleaning, make sure to dry it thoroughly.
For the exterior, use a good appliance polish wax.
Never use sharp objects, scouring pads or harsh cleaners on any part of the dishwasher.
Cleaning The Door
natural_image
Interior view of a rectangular electronic device with internal components and a black arrow pointing to a section (no visible text or symbols)To clean the edge around the door, you should use only a soft warm, damp cloth. To avoid penetration of water into the door lock and electrical components, do not use aspraycleanerofanykind.

WARNING!
■ Never use a spray cleaner to clean the door panel as it may damage the door lock and electrical components.
■ Abrasive agents or some paper towels should not be used because of the risk of scratching or leaving spots on the stainless steel surface.
ProtectAgainstFreezing
please take frost protection measures on the dishwasher in winter. Every time after washing cycles, please operate as follows :
- Cutoff the electrical power to the dishwasher.
- Turn off the water supply and disconnect the water inlet pipe from the water valve.
- Drain the water from the inlet pipe and water valve. (Use a pan to gather the water)
- Reconnect the water inlet pipe to the water valve.
- Remove the filter at the bottom of the tub and use a sponge to soak up water in the sump.

NOTE: If your dishwasher cannot work because of the ice, please contact professional service persons.
CleaningtheSprayArms
It is necessary to clean the spray arms regularly for hard waterchemicalswillclogthesprayarmjetsandbearings.
To remove the upper spray arm, hold the nut, rotate the arm clockwise to remove it.
Toremovethelowerspray arm, pull out the spray arm upward.
Wash the arms in soapy and warm water and use a soft brush to clean the jets. Replace them after rinsing them thoroughly.
text_image
OpenHow to Keep Your Dishwasher in Shape
■ After Every Wash
After every wash, turn off the water supply to the appliance and leave the door slightly open so that moisture and odours are not trapped inside.
■ Remove the Plug
Before cleaning or performing maintenance, always remove the plug from the socket.
■ No Solvents or Abrasive Cleaning
Toclean the exterior and rubber parts of the dishwasher, do not use solvents or abrasive cleaning products. Only use a cloth with warm soapy water. To remove spots or stains from the surface of the interior, use a cloth dampened with water an a little vinegar, or a cleaning product made specifically for dishwashers.
■ WhennotinUse for aLongTime
It is recommend that your run a washcycle with the dishwasher empty and then remove the plug from the socket, turn off the water supply and leave the door of the appliance slightly open. This will help the door seal to last longer and prevent odours from forming within the appliance.
■ Moving the Appliance
If the appliance must be moved, try to keep it in the vertical position. If absolutely necessary, it can be positioned on its back.
Seals
One of the factors that cause odoursto for min the dishwasher is food that remains trapped in the seals. Periodic cleaning with a damp sponge will prevent this from occurring.
8. Installation instruction
Positioning the Appliance
Position the appliance in the desired location. The back should rest against the wall behind it, and the sides, along the adjacent cabinets or walls. The dishwasher is equipped with water supply and drain hoses that can be positioned either to the right or the left sides to facilitate proper installation.
Levelling the Appliance
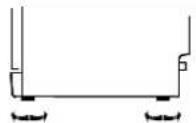
Once the appliance is positioned for levelling, the height of the dishwasher may be altered via adjustment of the screwing level of the feet. In any case, the appliance should not be inclined more than 2°.
About Power Connection
! WARNING!
For personal safety:
■ Do not use an extension cord or an adapter plug with this appliance.
■Do not, under any circumstances, cut or remove the earthing
■Connection from the power cord.
Electrical Requirements
Please look at the rating label to know the rating voltage and connect the dishwasher to the appropriate power supply. Use the required fuse 10 amp, time delay fuse or circuit breaker recommended and provide separate circuit serving only this appliance.
Electrical Connection
⚠️ Insure proper ground exists before use
Ensure the voltage and frequency of the power being corresponds to those on the rating plate. Only insert the plug into an electrical socket which is earthed properly. If the electrical socket to which the appliance must be connected is not appropriate for the plug, replace the socket, rather than using a adaptors or the like as they could cause overheating and burns.
Water Connection
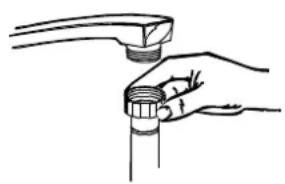
Cold Water Connection
natural_image
Line drawing of a hand holding a faucet with a pipe fitting (no text or symbols)Connect the cold water supply hose to a threaded 3/4 (inch) connector and make sure thatitisfastenedtightlyinplace.
If the water pipes are new or have not been used for an extended period of time, let the water run to make sure that the water is clear. This precaution is needed to avoid the risk of the water inlet to be blocked and damage the appliance.

WARNING!
Please close the hydrant after using.
Drain hose Connection
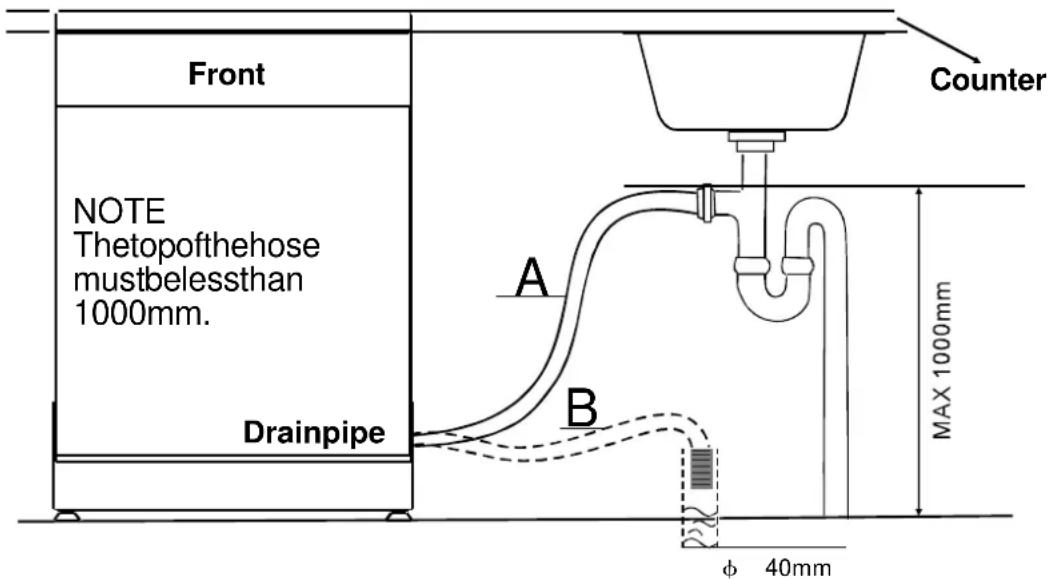
Insert the drain hose into a drain pipe with a minimum diameter of 40mm, or let it run into the sink, making sure to avoid bending or crimping it. The top of the hose must be less than 1000mm.

PLEASE HANG UP THE DRAIN HOSE EITHER WAY OF A, B
text_image
Front NOTE Thetopofthehose mustbelessthan 1000mm. Drainpipe Counter A B MAX 1000mm φ 40mmHow to Drain Excess Water From Hoses
If the sink is 1000 higher from the floor, the excess water in hoses cannot be drained directly into the sink. It will be necessary to drain excesswater from hoses into a bowl or suitable container that is held outside and lower than the sink.
Water Outlet
Connect the water drain hose. The drain hose must be correctly fitted to avoid water leaks. Ensure that the water drain hose is not kinked or squashed.
ExtensionHose
If you need a drain hose extension, make sure to use a similar drain hose. It must be no longer than 4 metres; otherwise the cleaning effect of the dishwasher could be reduced.
SyphonConnection
The waste connection must be at a height less than 1000 mm (maximum) from the bottom of the dish. The water drain hose should be fixed.
Start of Dishwasher
The following things should be checked before starting the dishwasher.
1 The dishwasher is level and fixed properly
2 The inlet valve is open
3 There is a leakage at the connections of the conducts
4 The wires are tightly connected
5 Thepowerisswitchedon
6 The inlet and drain hoses are knotted
7 All packing materials and printings should be taken out from the dishwasher

Attention: After installation, please make sure to keep this manual.
The content of this manual is very helpful to the users.
9. Troubleshooting Tips
Before Calling for Service
Review the charts on the following pages may save you from calling for service.
| ? | Problem | Possible Causes What To Do | |
| Dishwasher doesn't start | Fuseblown,orthe circuitbreakeracted | Replacefuseorresetcircuitbreaker.Removeanyother appliancessharingthesamecircuitwiththedishwasher | |
| Powersupplyisnot turnedon | Makesurethedishwasheristurnedonandthedooris closedsecurely.Makesurethepowercordisproperlypluggedintothe wallsocket. | ||
| Waterpressureislow | Checkthatthewatersupplyisconnectedproperlyand thewateristurnedon. | ||
| Doorofdishwasher notproperlyclosed. | Makesuretoclosethedoorproperlyandlatchit. | ||
| water not pumped form dishwasher | Kinkindrainhose | Checkdrainhose. | |
| Filterclogged | Checkcoarsethefilter (seesectiontitled"CleaningTheFilter") | ||
| Kitchensinkclogged | Checkthekitchensinktomakesureitisdrainingwell. Iftheproblemisthekitchensinknotdraining,youmay needaplumberratherthanaservicemanfordishwashers. | ||
| General problems | Suds in the tub | Improperdetergent | Useonlythespecialdishwasherdetergenttoavoidsuds. Ifthisoccurs,openthedishwasherandletsudsevaporate. Add1gallonofcoldwatertothetub.Closeandlatchthe dishwasher,thenselectanycycle.Dishwasherwilldrain outthewateratthefirststep.Openthedoorafterdraining isstopandcheckifthesudsisdisappeared.Repeatifnecessary. |
| Spilledrinse-aid | Alwayswipeuprinse-aidspillsimmediately. | ||
| Stained tub interior | Detergentwith colourantwasused | Makesurethatthedetergentistheonewithout colourant. | |
| White film on inside surface | Hardwaterminerals | Tocleantheinterior,useadampspongewith dishwasherdetergentandwearrubbergloves. Neveruseanyothercleanerthandishwasher detergentfortheriskoffoamingorsuds. | |
| There are rust stains on cutlery | Theaffecteditemsare notcorrosionresistant. | ||
| Aprogrammewasnot runafterdishwasher saltwasadded. Tracesofsalthave gottenintothewashcycle. | Alwaysrunthequickwashprogramme. withoutanycrockeryinthedishwasherand withoutselectingtheTurbofunction(ifpresent), afteraddingdishwashersalt. | ||
| Thelidofthesofter isloose | Checkthelip.Ensurethefixisfine. | ||
| Noise | Knocking noise in the wash cabinet | Asprayarmis knockingagainst aniteminabasket | Interrupttheprogramme.andrearrangetheitems whichareobstructingthesprayarm. |
| Rattling noise in the wash cabinet | Itemsofcrockery arelooseinthe washcabinet | Interrupttheprogramme, andrearrangetheitemsofcrockery. | |
| Knocking noise in the water pipes | Thismaybecaused byon-siteinstallation orthecross-sectionof thepiping. | Thishasnoinfluenceonthedishwasherfunction. ifindoubt,contactasuitablyqualifiedplumber. | |

| Problem | Possible Causes | What To Do | |
| Unsatis-factory washing result | The dishes are not clean | Thedisheswerenot loadedcorrectly. | Seenotesin"LoadingtheDishwasherBaskets". |
| Theprogrammewas notpowerfulenough. | Selectamoreintensiveprogramme.See"WashCycleTable". | ||
| Notenoughdetergent wasdispensed. | Usemoredetergent,orchangeyourdetergent. | ||
| Itemsareblocking thepathofsprayarms. | Rearrangetheitemssothatthespraycanrotatefreely. | ||
| Thefiltercombination in the base of wash cabinetisnotcleanor isnotcorrectlyfitted. Thismaycause thesprayarmjets togetblocked. | Cleanand/orfitthefiltercombinationcorrectly.Cleanthesprayarmjets.See"CleaningtheSpray Arms". | ||
| Cloudiness on glassware | Combinationofsoft waterandtoomuch detergent. | Uselessdetergentifyouhavesoftwaterandselect ashortestcycletowashtheglasswareandtoget themclean. | |
| Black or gray marks on dishes | Aluminumutensils haverubbedagainst dishes. | Useamildabrasivecleanertoeliminatethosemarks. | |
| Detergent left in dispenser cups | Dishesblock detergentcups. | Re-loadingthedishesproperly. | |
| Unsatis-factory drying result | The dishes are not drying | Improperloading | Loadthedishwasherassuggestedinthedirections. |
| Toolittlerinse-aid | Increasetheamountofrinse-aid/refilltherinse-aid dispenser. | ||
| Dishesareremoved toosoon | Donotemptyourdishwasherimmediatelyafter washing.Openthedoorslightlysothatthesteamcan escape.Beginunloadingthedishwasheronlyoncet hedishesarebarelywarmtothetouch.Emptythelow basketfirst.Thispreventswaterformdroppingoff dishesintheupperbasket. | ||
| Wrongprogram hasbeenselected | Inshortprogramthewashingtemperatureislower. Thisalsolowerscleaningperformance.Choose aprogramwithalongwashingtime. | ||
| Useofcutlerywith alow-qualitycoating | Waterdrainageismoredifficultwiththeseitems.Cutleryordishesofthistypearenotsuitablefor washinginthedishwasher. |
Error Codes
When some malfunctions come on, the appliance will display error codes to warn you:
| Codes | Meanings | Possible Causes |
| E1 | Longerinlettime. | Faucetsisnotopened,orwaterintakeis restricted,orwaterpressureistoolow. |
| E4 | Overflow. | Someelementofdishwasherleaks. |
| E8 | Failureoforientationofdistributaryvalve | Opencircuitorbreakofdistributaryvalve |

WARNING!
■ If overflow occurs, turn off the main water supply before calling a service.
■ Ifthereiswaterinthebasepanbecauseofanoverfillorsmallleak, thewatershouldberemovedbeforererestartingthedishwasher.
text_image
(with the door closed) 605 598 845 1175| Height:845mm | |
| Width:598mm | |
| Depth:605mm | (with the door closed) |
| Water pressure: | 0.04-1.0MPa |
| Power supply: | see rating label |
| Capacity:12placesettings | |
Technical Data Sheet
Sheet of household dishwasher according to EU Directive 1059/2010:
| Manufacturer | FAGOR |
| Type/Description | LVF13A.LVF13A |
| Standardplacesettings | 12 |
| Energy efficiency class 1 | A++ |
| Annual energy consumption 2 | 258kWh |
| Energy consumption of the standard cleaning cycle | 0.91 kWh |
| Powerconsumptionofoff-mode | 0.45 W |
| Power consumption of left-on mode | 0.49 W |
| Annual waterconsumption 3 | 2800 liter |
| Drying efficiency class 4 | A |
| Standardcleaningcycle 5 | ECO 50°C |
| Programdurationofthestandardcleaningcycle | 175min |
| Noiselevel | 49 dB(A) re 1 pW |
| Mounting | Free standing |
| Couldbe built-in | Yes |
| Height | 84.5 cm |
| Width | 59.8 cm |
| Depth (with connectors) | 60.5 cm |
| Powerconsumption | 1930 W |
| Ratedvoltage/frequency | 230V~50 Hz |
| Water pressure (flow pressure) | 0.4-10bar=0.04-1MPa |
NOTE:
① A+++ (highest efficiency) to D (lowest efficiency)
② Energy consumption “258” kWh per year, based on 280 standard cleaning cycles using cold water fill and the consumption of the low power modes. Actual energy consumption will depend on how the appliance is used.
3 Water consumption “2800” litres per year, based on 280 standard cleaning cycles. Actual water consumption will depend on how the appliance is used.
4 A (highest efficiency) to G (lowest efficiency)
5 This program is suitable for cleaning soiled normally soiled tableware and that it is the most efficient programme in terms of its combined energy and water consumption for that type of tableware.
The device meets the European standards and the directives in the current version at delivery:
-LVD2006/95/EC
-EMC2004/108/EC
-ErP 2009/125/EC
The above values have been measured in accordance with standards under specified operating conditions. Results may vary greatly according to quantity and pollution of the dishes, water hardness, amount of detergent, etc.
The manual is based on the European Union's standards and rules.
Loading the baskets according to En50242:
- Upper basket:
3.Cutterly basket:
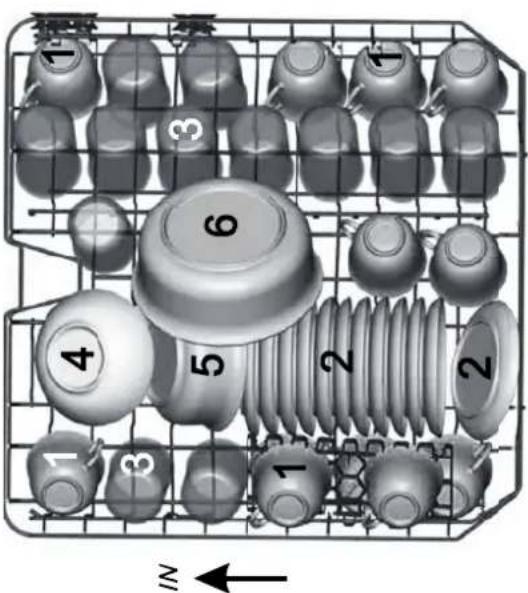
text_image
1 3 4 5 6 3 1 2 2 1 IN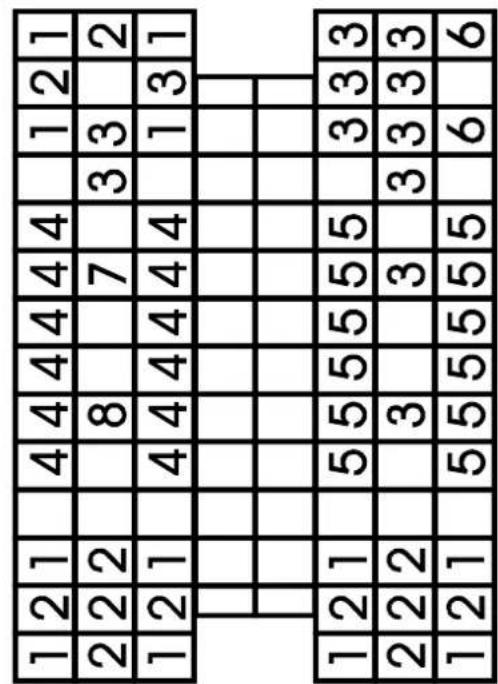
text_image
1 2 1 | 4 4 4 4 4 4 | 1 2 1 2 2 2 | 8 | 7 | 3 3 | 2 1 2 1 | 4 4 4 4 4 4 | 1 3 1 | | | 1 2 1 | 5 5 5 5 5 5 | 3 3 3 2 2 2 | 3 | 3 | 3 3 3 1 2 1 | 5 5 5 5 5 5 | 6 | 6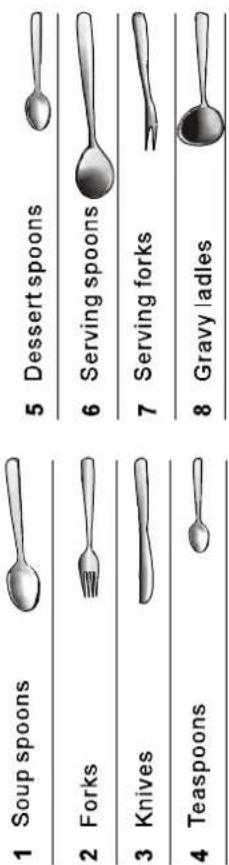
text_image
1 Soup spoons 2 Forks 3 Knives 4 Teaspoons 5 Dessert spoons 6 Serving spoons 7 Serving forks 8 Gravy ladlesInformation for comparability tests in accordance
with EN 50242
Capacity: 12 place settings
Position of the upper basket: lower position
Programme: ECO
Rinse aid setting: 6
Softener setting: H4
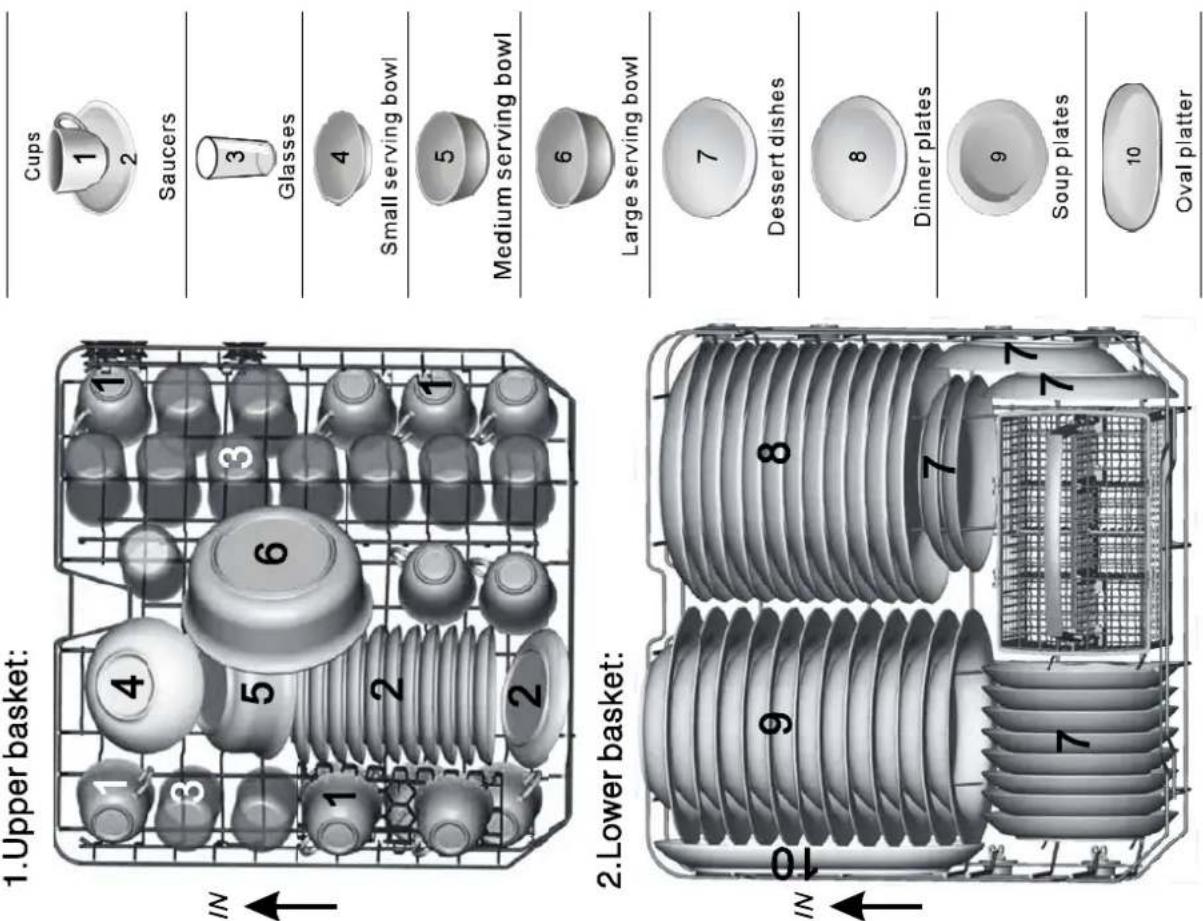
text_image
1. Upper basket: Cups 1 2 Saucers 3 5 6 3 1 2 1 2 2. 2. Lower basket: Small serving bowl 5 Medium serving bowl 6 Large serving bowl 7 Dessert dishes 8 Dinner plates 9 Soup plates 10 Oval platterFAGOR

natural_image
Abstract graphic with three overlapping circles in grayscale (no text or symbols)CNAgroup
EDESA INDUSTRIAL S.L.
natural_image
Cutaway view of a white kitchen appliance showing internal compartments and battery racks (no text or symbols visible)
Lea este manual
Estimado cliente,
For detailed operating method read the corresponding content on the instruction manual.
natural_image
Illustration of a hand pouring granular material into a kitchen appliance with a control knob (no text or symbols)text_image
C (Rinse-A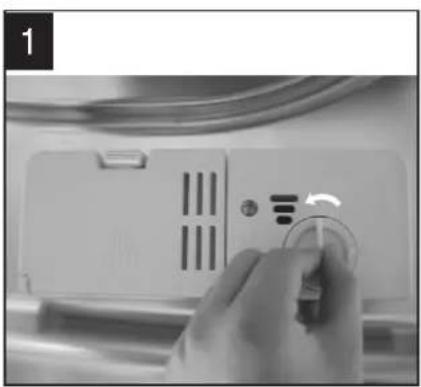
natural_image
Hand holding a circular button next to a white electronic device with ventilation slots (no visible text or symbols)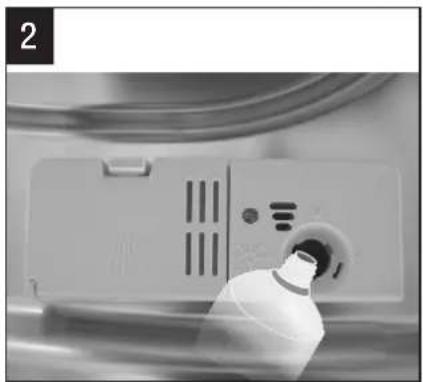
natural_image
Close-up of a medical or laboratory device with a bulb inserted, no visible text or symbols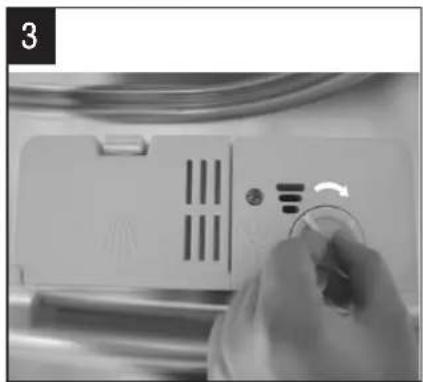
natural_image
Close-up of a hand adjusting a circular component with arrows, next to a white electronic device (no visible text or symbols)natural_image
Close-up of a kitchen appliance with a plastic tray, handle, and control panel (no visible text or symbols)NOTA:
natural_image
Technical line drawing of a structural framework with steel frameworks and internal components (no text or symbols)natural_image
Mechanical assembly diagram showing internal components and a directional arrow (no text or symbols)natural_image
Interior view of a computer case with a black arrow pointing to a component (no visible text or symbols)natural_image
Line drawing of a hand holding a faucet with a threaded handle (no text or symbols)natural_image
Cutaway view of a white kitchen appliance showing internal compartments and exterior casing (no text or symbols visible)
Leia este manual
Caro Cliente,
natural_image
Close-up of a curved cable or wire component mounted on a grid base, with no visible text or symbols.9 Conector do tubo
10 Tubo de descarga
natural_image
Illustration of a hand using a tool to clean or wash a small container (no text or symbols visible)natural_image
Close-up of a hand holding a control knob next to a white device with ventilation slots and buttons (no visible text or symbols)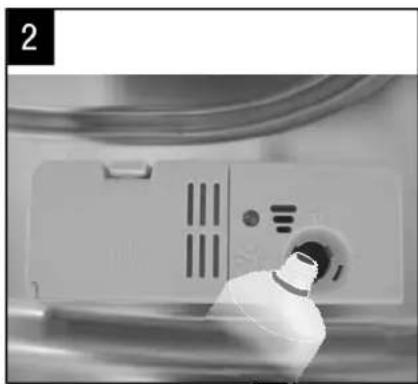
natural_image
Close-up of a white electronic device with a circular button and indicator lights, no visible text or symbols.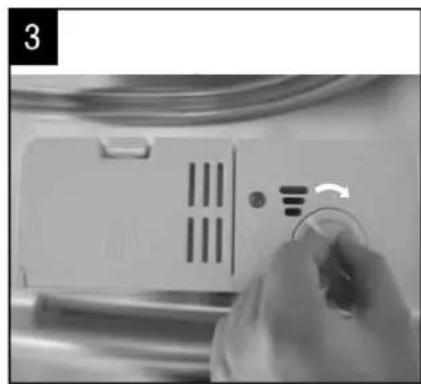
natural_image
Close-up of a hand pressing down on a white electronic device with a circular button and arrow indicator (no visible text or symbols)natural_image
Close-up of a kitchen appliance with a plastic tray, handle, and control panel (no visible text or symbols)
NOTA:
text_image
INTRODUZIRtext_image
INTRODUZIRnatural_image
Two technical line drawings of industrial scaffolding components, no text or symbols presentBaixar fileiras de dentes cesto inferior
natural_image
3D mechanical assembly diagram showing internal components and a directional arrow (no text or symbols)natural_image
Interior view of a rectangular electronic device with internal components and a black arrow pointing to a section (no visible text or symbols)natural_image
Hand holding a faucet with a handle, no text or symbols presentnatural_image
Cutaway view of a white kitchen appliance showing internal compartments and storage racks (no text or symbols visible)
Lisez ce manuel
Cher Client,
text_image
C (Indica)natural_image
Close-up of a hand pressing down on a white appliance panel with buttons and a circular button (no visible text or symbols)
natural_image
Close-up of a medical device with a surgical tool inserted, showing internal components and no visible text or symbols.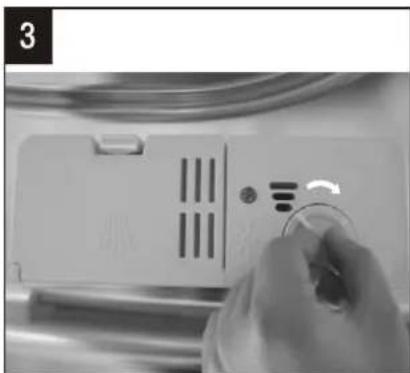
natural_image
Close-up of a hand holding a control knob next to a white appliance with ventilation slots (no visible text or symbols)natural_image
Close-up of a kitchen appliance with a showerhead and control panel (no visible text or symbols)! REMARQUE :
natural_image
Two-panel photo showing hands assembling or adjusting a mechanical component in a factory setting (no visible text or symbols)Ajuster la poignée
natural_image
Architectural or engineering line drawing showing structural framework with no visible text or symbolsnatural_image
Mechanical assembly diagram showing a clamping device with mounting bracket and internal components (no text or symbols)natural_image
Interior view of a computer case with a black arrow pointing to a component (no visible text or symbols)natural_image
Hand holding a faucet with a handle, no text or symbols presenttext_image
Front NOTE The top of the hose must be less than 1000mm. Drainpipe Counter A B MAX 1000mm φ 40mmtext_image
605(with the door closed) 598 845845 1175natural_image
Abstract graphic with two gray circles and a stylized black circle containing three horizontal white stripes (no text or symbols)CNAgroup
EDESA INDUSTRIAL S.L.
natural_image
Cutaway view of a white kitchen appliance showing internal compartments and storage racks (no text or symbols visible)natural_image
Illustration of a hand pouring liquid into a container with a lid and a brush (no text or symbols)natural_image
Close-up of a hand pressing down on a white electronic device panel with buttons and ventilation slots (no visible text or symbols)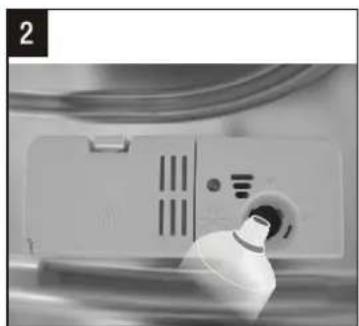
natural_image
Close-up of a medical device with a bulb inserted, showing internal components and tubing (no visible text or symbols)
natural_image
Close-up of a hand holding a small electronic device with visible ports and cables (no text or symbols)natural_image
Close-up of a kitchen appliance with a lid, handle, and control panel (no visible text or symbols)MEGJEGYZÉS:
natural_image
Exploded view diagram of a mechanical assembly with cylindrical components and threaded shafts (no text or labels)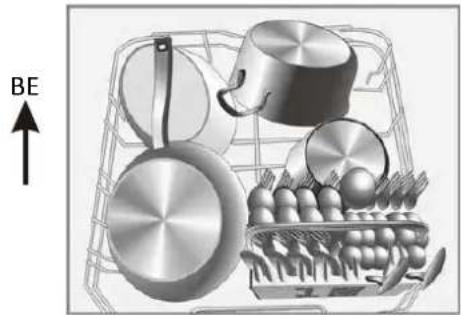
natural_image
Illustration of a kitchen setup with a basket, cooking panes, and utensils (no text or symbols)Kérjük, ne feledje:
natural_image
Technical line drawing of a structural framework with rebar and support components (no text or symbols)natural_image
Two 3D wireframe models of a mechanical housing, one with a curved arrow indicating rotation or assembly (no text or symbols)natural_image
Mechanical assembly diagram showing a component with a central hub and directional arrow (no text or symbols)natural_image
Interior view of a rectangular electronic device with internal components and a black arrow pointing to a section (no visible text or symbols)FIGYELMEZTETÉS!
natural_image
Line drawing of a hand holding a pipe fitting (no text or symbols)natural_image
Cutaway view of a white kitchen appliance showing internal components like plates and dish dividers (no text or symbols visible)natural_image
Illustration of a hand pouring granular material into a kitchen appliance with a side bowl (no text or symbols)natural_image
Hand pressing a button on a white appliance panel (no visible text or symbols)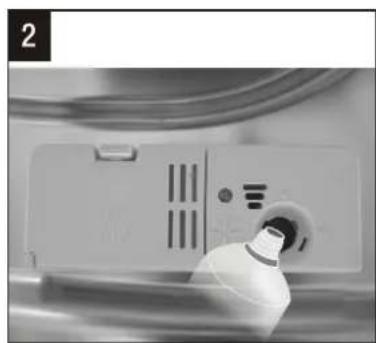
natural_image
Close-up of a medical device with a bulb and internal components (no visible text or symbols)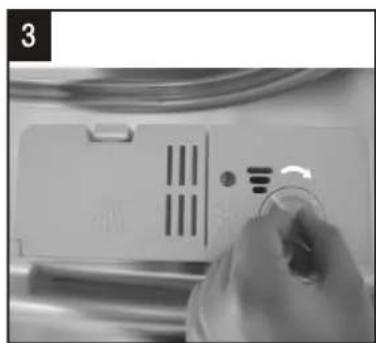
natural_image
Close-up of a hand holding a small circular device with three vertical bars, next to a white electronic device (no visible text or symbols)natural_image
Interior view of a kitchen appliance with a hand tool and control panel (no visible text or symbols)POZNÁMKA:
text_image
DOVNÚ TRA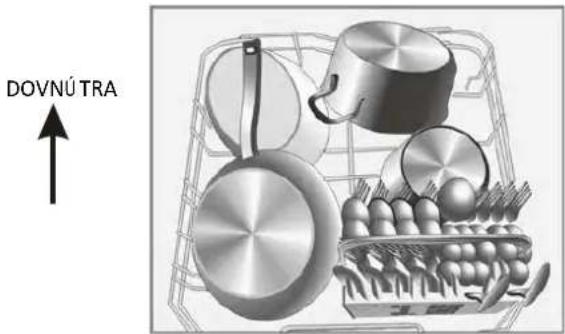
text_image
DOVNÚ TRAPripomíname, že:
natural_image
Technical line drawing of a structural framework with steel frameworks and internal components (no text or symbols)natural_image
Two 3D wireframe models of a mechanical housing with internal components, shown in side and top views (no text or symbols)natural_image
Mechanical assembly diagram showing a component with a central hub and directional arrow (no text or symbols)- krok: zdvihnite Iter hore
POZNÁ MKA:
natural_image
Interior view of a rectangular electronic device with internal components and a black arrow pointing to a section (no visible text or symbols)VAROVANIE!
natural_image
Cutaway view of a white kitchen appliance showing internal compartments and storage racks (no text or symbols visible)natural_image
Close-up of a flexible cable or wire wrapped in a mesh, mounted on a dark surface with two labeled points (9 and 10) marked below.natural_image
Illustration of a hand pouring granular material into a kitchen appliance with a handle and sink (no text or symbols)natural_image
Interior view of a kitchen appliance showing a tray with a handle and control knob (no visible text or symbols)
natural_image
Close-up of a hand pressing a button on a white appliance panel (no visible text or symbols)
natural_image
Close-up of a medical device with a white cap and tubing, no visible text or symbols