
FS 20 IX - Microwave Oven CATA - Free user manual and instructions
Find the device manual for free FS 20 IX CATA in PDF.
| Product type | Microwave oven |
| Brand | CATA |
| Model | FS 20 IX |
| Capacity | 20 liters |
| Microwave power (output) | 700 W |
| Grill power | 1000 W |
| Power supply voltage | 230 V ~ 50 Hz |
| Power consumption (microwave) | 1,050 W |
| Dimensions (W x H x D) | 439.5 x 345.3 x 258.2 mm |
| Net weight | 11 kg |
| Turntable diameter | 255 mm |
| Main functions | Microwave, grill, combination cooking, weight/time defrost, auto menu (8 programs), quick cook, preset |
| Automatic programs | 8: reheating, vegetables, fish, meat, pasta, potatoes, pizza, soup |
| Control type | Electronic with rotary knob and buttons |
| Child safety lock | Yes, activation by long press on "Stop" |
| Recommended cleaning | Damp cloth, avoid abrasive products and metal scrapers |
| Supplied accessories | Glass tray, turntable mounting ring, grill rack, user manual |
| Repairability | Spare parts available via authorized service center |
Frequently Asked Questions - FS 20 IX CATA
User questions about FS 20 IX CATA
0 question about this device. Answer the ones you know or ask your own.
Ask a new question about this device
Download the instructions for your Microwave Oven in PDF format for free! Find your manual FS 20 IX - CATA and take your electronic device back in hand. On this page are published all the documents necessary for the use of your device. FS 20 IX by CATA.
USER MANUAL FS 20 IX CATA
GB Microwave Oven Owner's Manual
Read these instructions carefully before using your microwave oven, and keep it carefully.
If you follow the instructions, your oven will provide you with many years of good service.
SAVE THESE INSTRUCTIONS CAREFULLY
PRECAUTIONS TO AVOID POSSIBLE EXPOSURE TO EXCESSIVE MICROWAVE ENERGY
(a) Do not attempt to operate this oven with the door open since this can result in harmful exposure to microwave energy. It is important not to break or tamper with the safety interlocks.
(b) Do not place any object between the oven front face and the door or allow soil or cleaner residue to accumulate on sealing surfaces.
(c) WARNING: If the door or door seals are damaged, the oven must not be operated until it has been repaired by a competent person.
ADDENDUM
If the apparatus is not maintained in a good state of cleanliness, its surface could be degraded and affect the lifespan of the apparatus and lead to a dangerous situation.
Specifications
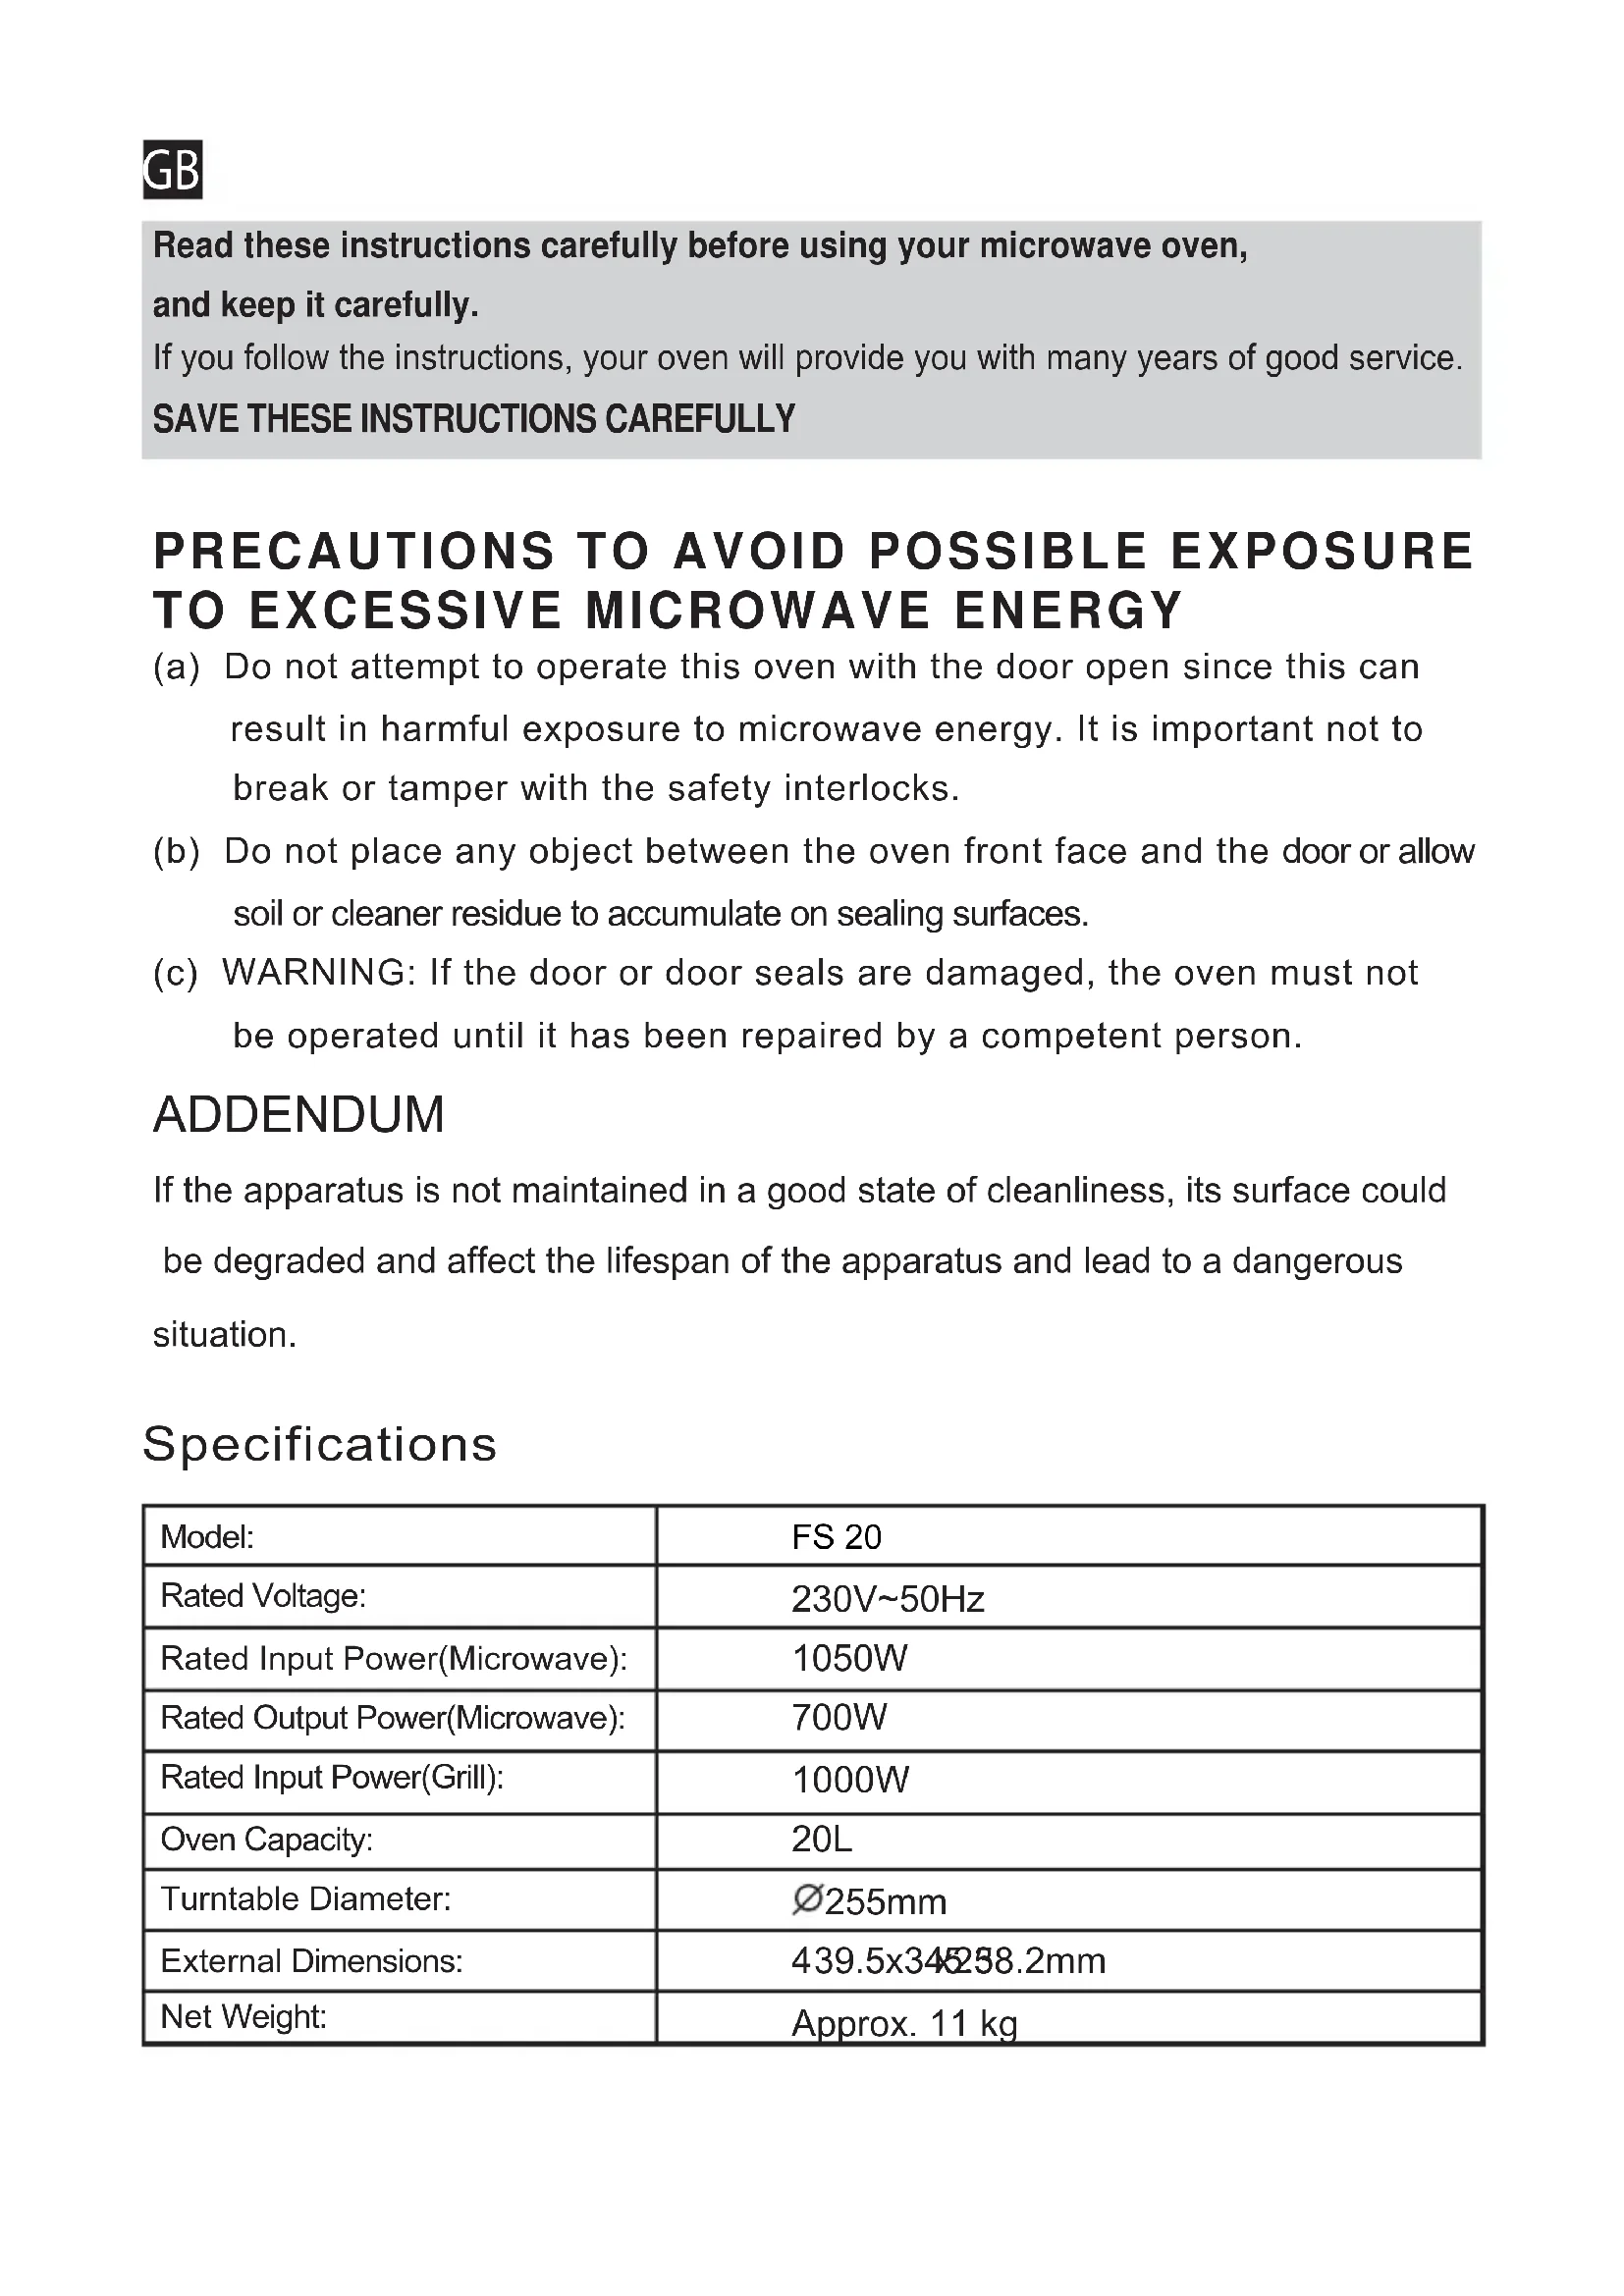
| Model: | FS 20 |
| Rated Voltage: | 230V~50Hz |
| Rated Input Power(Microwave): | 1050W |
| Rated Output Power(Microwave): | 700W |
| Rated Input Power(Grill): | 1000W |
| Oven Capacity: | 20L |
| Turntable Diameter: | Ø255mm |
| External Dimensions: | 439.5x345258.2mm |
| Net Weight: | Approx. 11 kg |
IMPORTANT SAFETY INSTRUCTIONS
WARNING
To reduce the risk of fire, electric shock, injury to persons or exposure to excessive microwave oven energy when using your appliance, follow basic precautions, including the following:
- Warning: Liquids and other foods must not be heated in sealed containers since they are liable to explode.
- Warning : It is hazardous for anyone other than a competent person to carry out any service or repair operation that involves the removal of a cover which gives protection against exposure to microwave energy.
- This appliance can be used by children aged from 8 years and above and persons with reduced physical, sensory or mental capabilities or lack of experience and knowledge if they have been given supervision or instruction concerning use of the appliance in a safe way and understand the hazards involved. Children shall not play with the appliance. Cleaning and user maintenance shall not be made by children unless they are older than 8 and supervised.
- Keep the appliance and its cord out of reach of children less than 8 years.
- Only use utensils suitable for use in microwave ovens.
- The oven should be cleaned regularly and any food deposits should be removed.
- Read and follow the specific:"PRECAUTIONS TO AVOID POSSIBLE EXPOSURE TO EXCESSIVE MICROWAVE ENERGY".
- When heating food in plastic or paper containers, keep an eye on the oven due to the possibility of ignition.
- If smoke is emitted, switch off or unplug the appliance and keep the door closed in order to stifle any flames.
- Do not overcook food.
- Do not use the oven cavity for storage purposes. Do not store items, such as bread, cookies, etc. inside the oven.
-
Remove wire twist-ties and metal handles from paper or plastic containers/bags before placing them in the oven.
-
Install or locate this oven only in accordance with the installation instructions provided.
- Eggs in the shell and whole hard-boiled eggs should not be heated in microwave ovens since they may explode, even after microwave heating has ended.
- This appliance is intended to be used in household and similar applications such as:
- staff kitchen areas in shops, offices and other working environments;
- by clients in hotels, motels and other residential type environments;
- farm houses;
- bed and breakfast type environments.
- If the supply cord is damaged, it must be replaced by the manufacturer, its service agent or similarly qualified persons in order to avoid a hazard.
- Do not store or use this appliance outdoors.
- Do not use this oven near water, in a wet basement or near a swimming pool.
- The temperature of accessible surfaces may be high when the appliance is operating. The surfaces are liable to get hot during use. Keep cord away from heated surface, and do not cover any vents on the oven.
- Do not let cord hang over edge of table or counter.
- Failure to maintain the oven in a clean condition could lead to deterioration of the surface that could adversely affect the life of the appliance and possibly result in a hazardous situation.
-
The contents of feeding bottles and baby food jars shall be stirred or shaken and the temperature checked before consumption, in order to avoid burns.
-
Microwave heating of beverages can result in delayed eruptive boiling, therefore care must be taken when handling the container.
- The appliance is not intended for use by persons (including children) with reduced physical, sensory or mental capabilities, or lack of experience and knowledge, unless they have been given supervision or instruction concerning use of the appliance by a person responsible for their safety.
- Children should be supervised to ensure that they do not play with the appliance.
- The appliances are not intended to be operated by means of an external timer or separate remote-control system.
- Accessible parts may become hot during use. Young children should be kept away.
- Steam cleaner is not to be used.
29 During use the appliance becomes hot. Care should be taken to avoid touching heating elements inside the oven. - Only use the temperature probe recommended for this oven.(for ovens provided with a facility to use a temperature-sensing probe.)
- WARNING: The appliance and its accessible parts become hot during use. Care should be taken to avoid touching heating elements. Children less than 8 years of age shall be kept away unless continuously supervised.
- The microwave oven must be operated with the decorative door open.(for ovens with a decorative door.)
- The rear surface of appliance shall be placed against a wall
34The microwave oven shall not be placed in a cabinet unless it has been tested in a cabinet.
READ CAREFULLY AND KEEP FOR FUTURE REFERENCE
To Reduce the Risk of Injury to Persons Grounding Installation
DANGER
Electric Shock Hazard
Touching some of the interna components can cause serious personal injury or death.
Do not disassemble this appliance.
WARNING
Electric Shock Hazard
Improper use of the grounding can result in electric shock. Do not plug into an outlet until appliance is properly installed and grounded.
This appliance must be grounded. In the event of an electrical short circuit, grounding reduces the risk of electric shock by providing an escape wire for the electric current. This appliance is equipped with a cord having a grounding wire with a grounding plug. The plug must be plugged into an outlet that is properly installed and grounded.
Consult a qualified electrician or serviceman if the grounding instructions are not completely understood or if doubt exists as to whether the appliance is properly grounded. If it is necessary to use an extension cord, use only a 3-wire extension cord.
-
A short power-supply cord is provided to reduce the risks resulting from becoming entangled in or tripping over a longer cord.
-
If a long cord set or extension cord is used:
1) The marked electrical rating of the cord set or extension cord should be at least as great as the electrical rating of the appliance.
2)The extension cord must be a grounding-type 3-wire cord.
3) The long cord should be arranged so that it will not drape over the counter top or tabletop where it can be pulled on by children or tripped over unintentionally.
CLEANING
Be sure to unplug the appliance from the power supply.
- Clean the cavity of the oven after using with a slightly damp cloth.
- Clean the accessories in the usual way in soapy water.
- The door frame and seal and neighbouring parts must be cleaned carefully with a damp cloth when they are dirty.
- Do not use harsh abrasive cleaners or sharp metal scrapers to clean the oven door glass since they can scratch the surface, which may result in shattering of the glass.
- Cleaning Tip--For easier cleaning of the cavity walls that the food cooked can touch: Place half a lemon in a bowl, add 300ml (1/2 pint) water and heat on 100% microwave power for 10 minutes. Wipe the oven clean using a soft, dry cloth.
UTENSILS
CAUTION
Personal Injury Hazard It is hazardous for anyone other than a competent person to carry out any service or repair operation that involves the removal of a cover which gives protection against exposure to microwave energy.
See the instructions on "Materials you can use in microwave oven or to be avoided in microwave oven." There may be certain non-metallic utensils that are not safe to use for microwaving. If in doubt, you can test the utensil in question following the procedure below.
Utensil T est:
- Fill a microwave-safe container with 1 cup of cold water (250ml) along with the utensil in question.
- Cook on maximum power for 1 minute.
- Carefully feel the utensil. If the empty utensil is warm, do not use it for microwave cooking.
- Do not exceed 1 minute cooking time.
Materials you can use in microwave oven
| Utensils | Remarks |
| Aluminum foil Shielding only. Small smooth pieces can be used to cover thin parts of meat or poultry to prevent overcooking. Arcing can occur if foil is too close to oven walls. The foil should be at least 1 inch (2.5cm) away from oven walls. | |
| Browning dish | Follow manufacturer's instructions. The bottom of browning dish must be at least 3/16 inch (5mm) above the turntable. Incorrect usage may cause the turntable to break. |
| Dinnerware | Microwave-safe only. Follow manufacturer's instructions. Do not use cracked or chipped dishes. |
| Glass jars | Always remove lid. Use only to heat food until just warm. Most glass jars are not heat resistant and may break. |
| Glassware | Heat-resistant oven glassware only. Make sure there is no metallic trim. Do not use cracked or chipped dishes. |
| Oven cooking bags | Follow manufacturer's instructions. Do not close with metal tie. Make slits to allow steam to escape. |
| Paper plates and cups | Use for short-term cooking/warming only. Do not leave oven unattended while cooking. |
| Paper towels | Use to cover food for reheating and absorbing fat. Use with supervision for a short-term cooking only. |
| Parchment paper | Use as a cover to prevent splattering or a wrap for steaming. |
| Plastic | Microwave-safe only. Follow the manufacturer's instructions. Should be labeled "Microwave Safe". Some plastic containers soften, as the food inside gets hot. "Boiling bags" and tightly closed plastic bags should be slit, pierced or vented as directed by package. |
| Plastic wrap | Microwave-safe only. Use to cover food during cooking to retain moisture. Do not allow plastic wrap to touch food. |
| Thermometers Microwave-safe only (meat and candy thermometers). | |
| Wax paper Use as a cover to prevent splattering and retain moisture. | |
Materials to be avoided in microwave oven
| Utensils | Remarks |
| Aluminum tray | May cause arcing. Transfer food into microwave-safe dish. |
| Food carton with metal handle | May cause arcing. Transfer food into microwave-safe dish. |
| Metal or metal-trimmed utensils | Metal shields the food from microwave energy. Metal trim may cause arcing. |
| Metal twist ties | May cause arcing and could cause a fire in the oven. |
| Paper bags | May cause a fire in the oven. |
| Plastic foam | Plastic foam may melt or contaminate the liquid inside when exposed to high temperature. |
| Wood | Wood will dry out when used in the microwave oven and may split or crack. |
SETTING UP YOUR OVEN
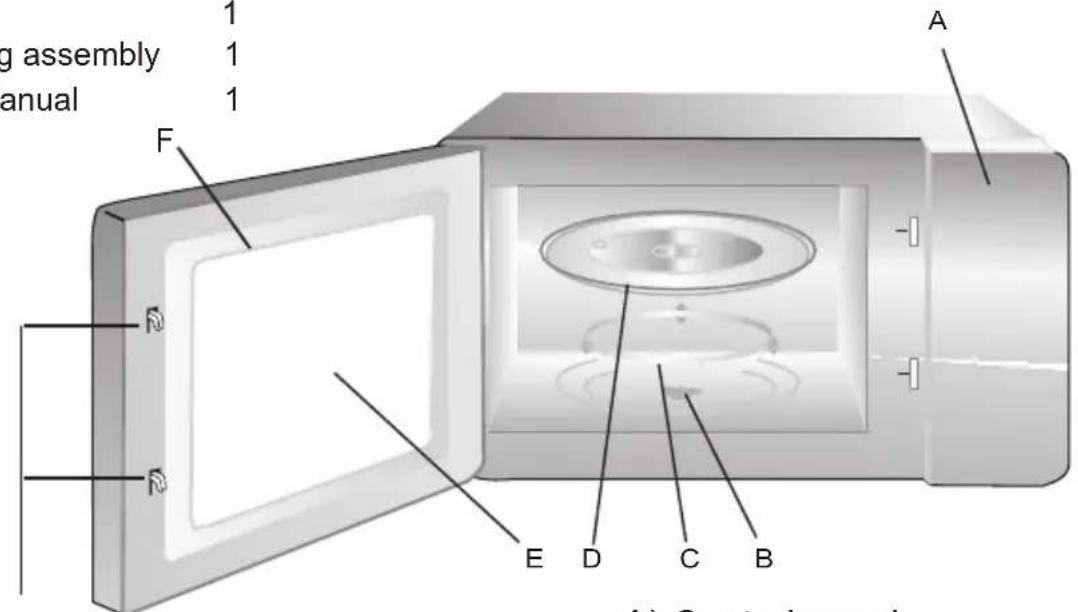
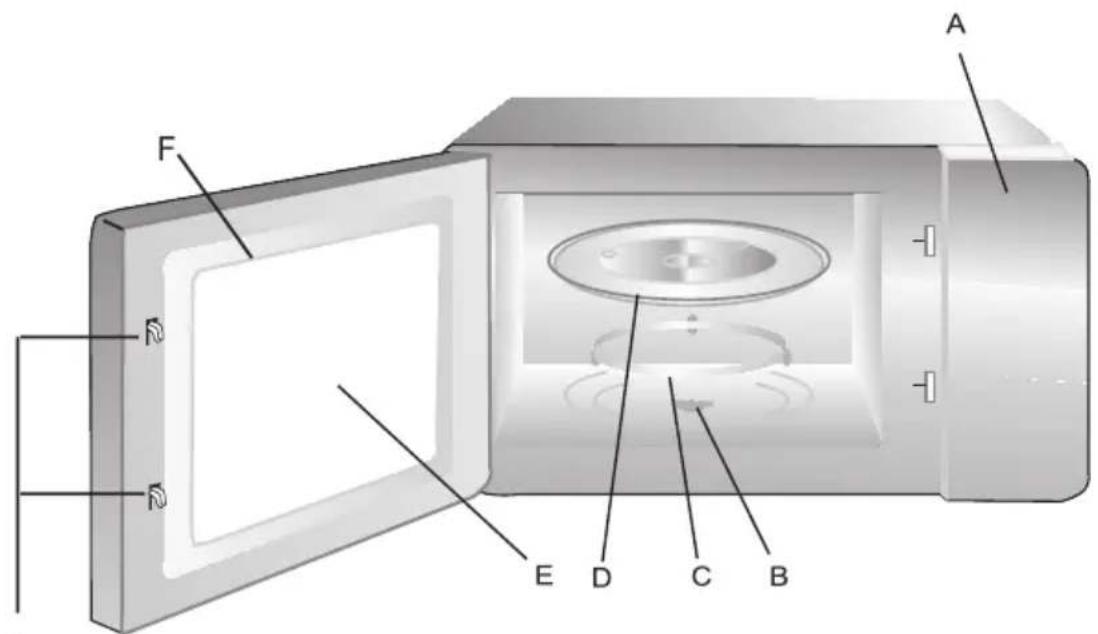
Names of Oven Parts and Accessories
Remove the oven and all materials from the carton and oven cavity.
Your oven comes with the following accessories:

G
A) Control panel
B) Turntable shaft
C) Turntable ring assembly
D) Glass tray
E) Observation window
F) Door assembly
G) Safety interlock system
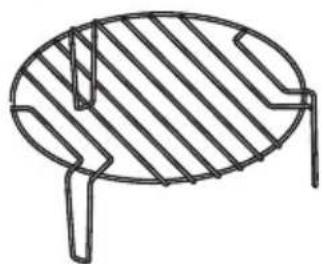
Grill Rack(Only be used in grill function and be placed on the glass tray)
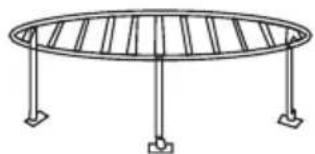
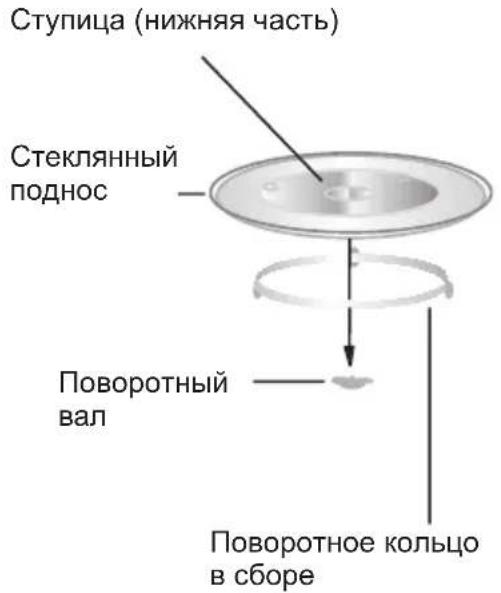
Turntable Installation
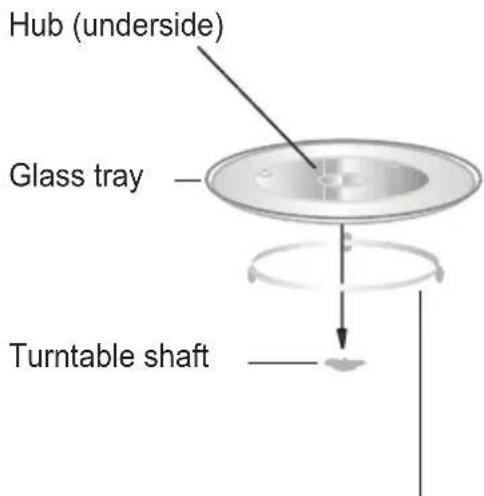
a. Never place the glass tray upside down. The glass tray should never be restricted.
b. Both glass tray and turntable ring assembly must always be used during cooking.
c. All food and containers of food are always placed on the glass tray for cooking.
d. If glass tray or turntable ring assembly cracks or breaks, contact your nearest authorized service center.
Turntable ring assembly
Countertop Installation
Remove all packing material and accessories. Examine the oven for any damage such as dents or broken door. Do not install if oven is damaged.
Cabinet: Remove any protective film found on the microwave oven cabinet surface. Do not remove the light brown Mica cover that is attached to the oven cavity to protect the magnetron.
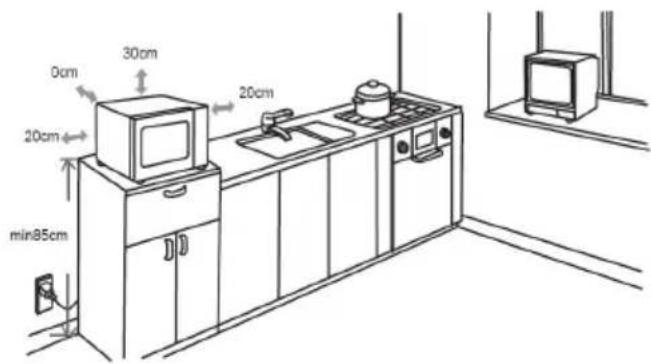
Installation
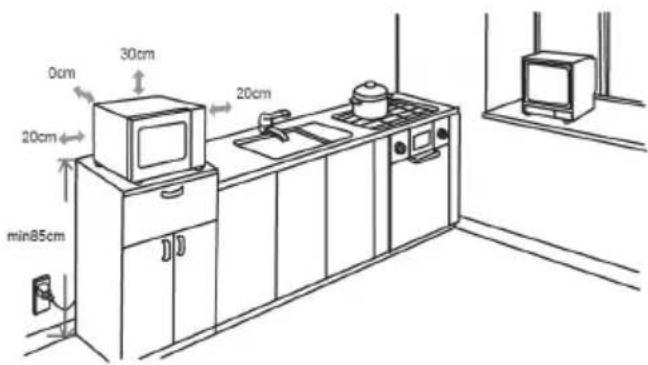
- Select a level surface that provide enough open space for the intake and/or outlet vents.
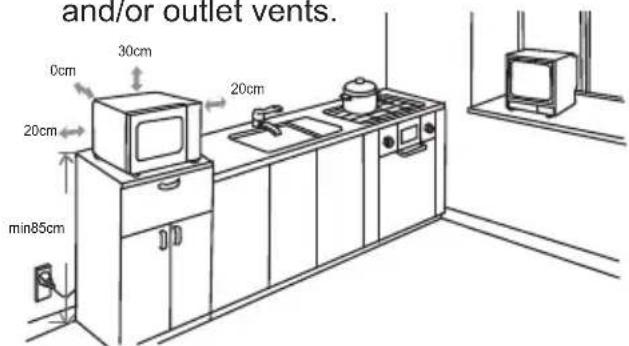
(1) The minimum installation height is 85cm.
(2) The rear surface of appliance shall be placed against a wall. Leave a minimum clearance of 30cm above the oven, a minimum clearance of 20cm is required between the oven and any adjacent walls.
(3) Do not remove the legs from the bottom of the oven.
(4) Blocking the intake and/or outlet openings can damage the oven.
(5) Place the oven as far away from radios and TV as possible. Operation of microwave oven may cause interference to your radio or TV reception.
2. Plug your oven into a standard household outlet. Be sure the voltage and the frequency is the same as the voltage and the frequency on the rating label.
WARNING: Do not install oven over a range cooktop or other heat-producing appliance. If installed near or over a heat source, the oven could be damaged and the warranty would be void.
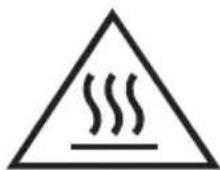
The accessible surface may be hot during operation.
This microwave oven uses modern electronic control to adjust cooking parameters to meet your needs better for cooking.
1. Clock Setting
When the microwave oven is electrified, the oven will display "0:00", buzzer will ring once.
1) Press " A, the hour figure flash;
2) Turn " " to adjust the hour figures, the input time should be within 0--23.
3) Press " , thminute figures will flash.
4) Turn " " to adjust the minute figures, the input time should be within 0--59.
5) Press "Ato fish clock setting.":" will flash.
Note: 1) If the clock is not set, it would not function when powered.
2) During the process of clock setting, if no appreation in 1 minute, the oven will go back to the previous status automatically.
2. Microwave Cooking
1) Press the "key once, and "P100" display.
2) Press " " for times or turn " " to select the microwave power "P100", "P80", "P50", "P30", "P10" will display in order.
3) Press " " to confirm.
4)Turn " " to adjust the cooking time. (The time setting should be 0:05- 95:00.)
5) Press " to start cooking.
NOTE: the step quantities for the adjustment time of the coding switch are as follow:
Microwave Power Chart
| Microwave Power | 80% 50% | 30% | 10%100% | ||
| Display | P100 | P80 | P50 | P30 | P10 |
3. Grill Cooking
1) Press the "key once, and "P100" display.
2) Press " " for times or turn " " to select the grill power .
3) Press " " confirm when the LED display "G".
4)Turn " " to adjust the grill time. (The time setting should be 0:05- 95:00.)
5) Press " start cooking.
Note: If half the grill time passes, the oven sounds twice, and this is normal. In order to have a better effect of grilling food, you should turn the food over, close the door, and then press " ① | OK " to continue cooking. If no operation, it will continue working.
4. Combination Cooking
1) Press the " 品 " key once, and "P100" display.
2) Press " " for times or turn " " to select the combination power "C-1(55%microwave+45%grill)" and "C-2(36%microwave+64%grill)" will display in order.
3) Press " " confirm.
4)Turn " " to adjust the cooking time. (The time setting should be 0:05- 95:00.)
5) Press " 0ol start cooking.
5. Speedy Cooking
1) In waiting state, press "OK to cook with 100% power level for 30 seconds. Each press on the same key can increase 30 seconds. The maximum cooking time is 95 minutes.
2) During the microwave, grill and combination cooking and time defrost process, press " " dolincrease the cooking time.
3) In waiting states, turn " " left to choose the cooking time directly. After choosing the time, press " " to start cooking. The microwave power is 100% .
Note: Under the states of auto menu and weight defrost, cooking time cannot be increased by pressing " " ① | OK
6. Defrost By Weight
1) Press " once, the screen will display "dEF1".
2) Turn " " to select the food weight. The range of weight is 100-2000g.
3) Press " 口 key to start defrosting.
7. Defrost By Time
1) Press " 串 ^ 串 twice, the screen will display "dEF2".
2) Turn " " to select the cooking time.
3) Press " Okeyoto start defrosting.
Note: The defrost power is P30. And it will not change.
8. Multi-Stage Cooking
Two stages can be maximumly set. If one stages is defrosting, it should be put in the first stage. The buzzer will ring once after each stage and the next stage will begin.
Note: Auto menu cannot be set as one of the multi-stage.
Example: if you want to defrost the food for 5 minutes, then to cook with 80%
microwave power for 7 minutes. The steps are as following:
1) Press "twice, the screen will display "dEF2";
2) Turn " " to adjust the defrost time of 5 minutes;
3) Press" "Once;
4) Turn " " to choose 80% microwave power till "P80" display;
5) Press " " to confirm;
6) Turn " to adjust the cooking time of 7 minutes;
7) Press " " 0 start cooking.
9. Pre-set Function
1) Set the clock first. (Consult the instruction of clock setting.)
2) Input the cooking program. Two stages can be set at most. Defrosting should not be set in preset function.
Example: if you want to cook with 80% microwave power for 7 minutes.
a. Press" "once;
b. Turn " " to choose 80% microwave power till "P80" display;
c. Press " "confirm;
d. Turn " " to adjust the cooking time of 7 minutes;
After the above steps, please do not press " ① Then
do as following:
3) Press " Thhour figures flash;
4) Turn " to adjust the hour figures, the input time should be within 0--23.
5) Press " thminute figures will flash.
6) Turn " " to adjust the minute figures, the input time should be within 0--59.
7) Press " ① | ok " to finish setting.":" will light, buzzer will ring twice when the time arrives, then cooking will start automatically.
Note: clock must be set first. Otherwise, pre-set function will not work.
10. Auto Menu
1) In waiting states, turn " right to choose the menu from "A-1" to "A-8";
2) Press "To confirm the menu you choose;
3) Turn " " to choose th food weight;
4) Press " Otd start cooking;
5) After cooking finish, the buzzer sounds five times.
Auto Menu
| Menu | Weight(g) | Display | Power |
| A-1 REHEAT | 200 | 200 | 100% |
| 400 | 400 | ||
| 600 | 600 | ||
| A-2 VEGETABLE | 200 | 200 | 100% |
| 300 | 300 | ||
| 400 | 400 | ||
| A-3 FISH | 250 | 250 | 80% |
| 350 | 350 | ||
| 450 | 450 | ||
| A-4 MEAT | 250 | 250 | 100% |
| 350 | 350 | ||
| 450 | 450 | ||
| A-5 PASTA | 50(with water 450 ml) | 50 | 80% |
| 100(with water 800 ml) | 100 | ||
| A-6 POTATO | 200 | 200 | 100% |
| 400 | 400 | ||
| 600 | 600 | ||
| A-7 PUZZA | 200 | 200 | 100% |
| 400 | 400 | ||
| A-8 SOUP | 200 | 200 | 80% |
| 400 | 400 |
11. Lock-out Function for Children
Lock: In waiting state, press " " for 31 seconds, there will be a long "beep"
denoting entering the children-lock state and screen will display " [ ]".
Lock quitting: In locked state, press " " for 3 seconds, there will be a long "beep" denoting that the lock is released.
12. Inquiring Function
1) In cooking states of microwave, grill and combination, press " " the current power will be displayed for 3 seconds.
2) In pre-set state, press " " to inquire the time for delay start cooking. The pre-set time will flash for 3 seconds, then the oven will turn back to the clock display.
3) During cooking state, press " " to check the current time. It will be displayed for 3 seconds.
13. Specification
(1) The buzzer will sound once when turning the knob at the beginning;
(2) " " must be pressed to continue cooking if the door is opened during cooking;
(3) Once the cooking programme has been set, " " ⑥ not pressed in 1 minute. The current time will be displayed. The setting will be cancelled.
(4) The buzzer sounds once by efficient press, inefficient press will be no response.
(5) The buzzer will sound five times to remind you when cooking is finished.
Trouble shooting
| Normal | |
| Microwave oven interfering TV reception | Radio and TV reception may be interfered when microwave oven operating. It is similar to the interference of small electrical appliances, like mixer, vacuum cleaner, and electric fan. It is normal. |
| Dim oven light | In low power microwave cooking, oven light may become dim. It is normal. |
| Steam accumulating on door, hot air out of vents | In cooking, steam may come out of food. Most will get out from vents. But some may accumulate on cool place like oven door. It is normal. |
| Oven started accidentally with no food in. | It is forbidden to run the unit without any food inside. It is very dangerous. |
| Trouble | Possible Cause | Remedy |
| Oven can not be started. | (1) Power cord not plugged in tightly. | Unplug. Then plug again after 10 seconds. |
| (2) Fuse blowing or circuit breaker works. | Replace fuse or reset circuit breaker (repaired by professional personnel of our company) | |
| (3) Trouble with outlet. | Test outlet with other electrical appliances. | |
| Oven does not heat. | (4) Door not closed well. | Close door well. |
| Glass turntable makes noise when microwave oven operates | (5) Dirty roller rest and oven bottom. | Refer to "Maintenance of Microwave" to clean dirty parts. |
According to Waste of Electrical and Electronic Equipment (WEEE) directive, WEEE should be separately collected and treated. If at any time in future you need to dispose of this product please do NOT dispose of this product with household waste. Please send this product to WEEE collecting points where available.
OCHOBHbIE INPABUNa TEXHnKn B3OpAChOCTN
PPEyPExKdEHNE
Heo6xoJMo npedpHnHMaTb npnbedeHHbIe HnXe OCHOBhIe MepblnpEOCTOPOXHOCTN DJIa CHNXeHn ONaCHOCTN NOxapOB, yApOB 3JIeKTPnuECKIM TOKOM, TpaBM N0lb3OBaTeNe I O6nyeHnM NKPOBOHOBO 3HeprnE INPn N0lb3OBaHN MKNPOBOHOBO NeybIO.
- Празурждени: He donyckaetca pa3orpeBaHne XndKoCTeN I dpynx NiueBbIX npOdyKTOB B repMeTnHyBX KOHTeHepax, TaK KaK 3TO MOKeT npNBecTN K B3pbYbY.
- ПpeDynpexdHne: K BblnoJHHeHIO cepBnchbIX n peMOHTbIX pa6Ot, BKlNoaHux DeMOHTaX 3KpaHa, 3aUuauoIero oT oblyeHnRA MKNPOBOHOB0N 3HeprnE, DOnyckaeTcR TOJbKO NODrTOBJIeHHbI HaJIeXaUM 6pa3OM nepcoHaJ.
3.ДeTN cTapWe BOCbMnJIeT n JIOHn COrpaHnueHHbIMN Φn3nueCKHMn N yMCTBeHHbIMN CnOcO6HOCTaMn N HeIOCTaTKAMn OprAHOB YyBCTB, a TaKKe JIOHn 6e3 HaJNeXaUeTo ONbIa N 3HaHn, MOrYT NOJIb3OBaTbcr 3TNM yCTPOIcTBOM NOD HAbJIIODeHNEm INIIN PocLe IPOBEdEHn IHCtpyKTaxKa IIO 6e3OnaChOH 3KcNlPyatauIN yCTPOIcTBa N OCO3HaHn IMN ONaCHOCTeK, KOTOpBIE C 3TNM CBra3aHbl. DeTm 3aIpeuaetc rIrpaTb C yCTPOIcTBOM. DOnyckaETcR OUnCTka N yXoD 3a yCTPOIcTBOM DeTbMn cTapWe BOCbMnJIeT, pRn ycNoBn npICMOtPa 3a HmN CO CTOpOHbI B3PocJIbIX.
4.ДерхиTe yctpoiCtBO uHyp nHTaHnBHe DOcraeMOCTn DeTeMnaDiWe BOCbMn JeT. - IcnoJb3yIte ToIbKO nocdy, KOTOPa cneuaJIbHO npedHa3NaueHa dIa MIKPOBOJHOBbIX neeH
- PerynpaHOn OunuAaIte neyb n ydaJIaTe octatKn NIIeBbIX npOdyKTOB.
7.O3HaKOMbTecB N BbIOnHЯTe CneuaJIbHbIE «MEPbI BE3OJNACHOCTINДЛРPEyIPPEXJEHHBO3MOxHOrO UPE3MEPHOROOBJUyEHHaMKPOBOLHOBOJ 3HEPRnEe - Пп пиг�тOBнENПицВппаСТИКOBыX ИИБуМжHbIX KOHTeHepax He OCTaBЯTTe neч 6e3 npICMOrpa BO n36ExKaHne BO3MOxHO BO3ROPaHnA
- Пи поьени дыма OTKIOHTe neb nIN n3BNEKITE BnIKy n3 po3eTKn IN Depxknte DBepb 3aKpbIToI dЯ NOdaBJIeHnBa03MOxHbIX OCharOB BO3rOpAHnA
-
He donyckaIte neperpeBa niiu.
-
He nCnoIb3yIe BHyTpEHHee npocTpaHCTBO neu B kaecTBe WkaΦa dIЯ xpaHEnHa. He xpaHInTe B neu TaKHe npOdyKTbI KaK XJIe6, neueHbe N T. I
- CHNIMnte npoBOJOnHbIe KpeJIeHnI n MeTajINueCKne pyuKn C 6yMaXhbIX NII INIaCTIKOBbIX KOHTeHepOB/MeXkoB NepeD INX NOMeUeHNEM B NeYb.
- MoNTaXn YcTaHOBky 3Toi neu CneDyET npOn3BOIDtB B COOTBeTCTBnC pNIOJKeHHoH INCHTpKUneN NO MOHTaKy.
- He donyckaetcpa3orpeBaTb B MUKPOBOHOBOIN neu nua BCMrTkU N ceJIbHbIe naBkpyTu, TaK KaK OHN MOrYT B3OpBaTcR daXe NoCne 3aBepWeHnHaRpeBa B neu.
- 3TO yCTPOIcTBO IpeHa3NaueHO dnia N CNOJIb3OBaHnB B DOMaUHem Xo3YJCTBe N IOIO6NbIx YCIOBnAx, KaK HApPIMeP:
- B MecTAX IIpiROTOBJIeHnRA NIIuN DIIra NepCOHaIa MaRa3INHOB, OΦIcAUX Ha IpyrNX NpeDpnpTn;
- NOCETInTeJIaMn IocTHnHc, MOTeJeN I pyrNX NOMeUeHn JINIOrTO TnPa;
- Na φeRMePCKnx Xo3YJCTBax;
- B IocTHnHcX TnPa «NoCTeJIb I 3aBTPaK».
- B clyuae noBpeJdeHna cTeBoro Hhypa cIeDyET 3aMeHnTb erO Ha 3aBoDe n3rTOBHTeJIy, y npEcdTaBnTeJIa 3aBOJa IInn NOdrotOBHeHHORo TEXHka BO n36eJxHne HeCchaTbIX cIyuaeB.
17.He donyckaetcxaheHne nnncnObl3OBaHHe yctpoiCTBa BHe nOmeueHn.
18.He donyckaetcncnoIb3ObaHne MIKPOBOJHOBOI neu B6JIIN3N NCTOCHNKOB BOblnnnIJaBaTeJIbHbIX 6accEHNOB,a TaKKe BO BIAJXbIX NOBaJIbHbIX NOMeUeHnX.
19.BoBpemraPabotbI TemnepaTpy DocTyHbIX NOBepxHOCTe Ney MoKet 6bITb BbICOKo. Harpe TaKnx NOBepxHOCTe npu paBoTe HOpMaJIbHOe ABLHeHne. DepxKeTe CeTeBOi SHyp BdAIN OT HarpTeBix NOBepxHOCTe, He 3aKpbBaIte BeHTINLAUHHbIE OTBepCTHn neu. -
He donyckaTe CBncaHna ceTeBOrO shhpa c Kpar CTola NIn npuNaBka.
-
He docta tohna yntota MnkpoBnHOBoN neu MoKeT npBecTu K pa3pyuHIO NOBepxHocTei neu, YTO OToPiCaTeJIbHo CkAkeTcHa CpOke CInjK6bl UcTPOIcTBA N MoKeT npBecTu K BO3HKnHOBeHNO ONaCHO CNtuaCm.
- CodepIXMoe 6bybIIOueK dIy KOpMJIeHnI I bAHOK c DeTCKIM NITaHHeM Heo6xOIMo nepemEiINBaTB nII IN B36aJIbTaIBaTB, a nepeI KOpMJIeHnEM CJIeDyET npOBepNTb TempepaTyPy NiU Bo n36exKaHne OXkOrB.
- HarpeB B MmKpOBoHOBo Neu HAnNTKOB MoKeT COnpOBOXdaTbC8 OToJoxeHHbIM 6yPbIM KInpeHnEM, TAKM O6pa30M, Pn O6paIeHnC KOHTeHepaMn DnA HAnNTKOB CNeDyET IpoRbJIaTb OCTOpOxHOCtB.
- 3To ycTpoiCTBO He npedHa3HaueHO IЯ nCNoJIb3OBAHnI JIOdbMn (BKNIOUaJeTeN) C ORpaHnueHHbIMN fH3NueCKHMn I yMCTBeHHbIMN cNOcO6HoCTaMn I HeJIOCTaTKaMn OpraHOB ChyBCTB, a TAKKe JIOdbMn 6e3 NaJnxJaIero ONbTa I 3HaHn, 3a NckJIIOUeHNMe cIyuaeB, KOrda TaKHe JIOdN HaxoJrTcR IOd Ha6JIoDeHNem IIN 6bl pOBeDeH INcHTpyKTaX NO 3KcnPnyatauMn YcTpoiCTBa CO CTOpOHbI NIIca, KOtOpoe HecET OTBeTCTBeHHocTb 3a INx 6e3OnaChOCTb.
- DeTN DoJXHbI HaxOuTbcn POncMoTpOM, He DOnyUckaIte nRp c npImeHeHHem yCTpoiCTBa.
- YcTpoiCTBO He npeHa3HaueHo IynpaBHeHn BHeuHM TaMHpOM nIIN OTdEhHOI NCTAHUOHHO CnCTeMoI.
- Доступные часту усточь могут HARpeBaTбя по erо pa6oTe. Дерхи te ystpoCTBO BHe 30ны досту na dete MlaDiIero Bo3pacta.
- He donyckaetca nCnoJIb3OBAHne npa dIy OUHCTKn yCTpoiCTBa.
- Пи пбоTe yctpoiCTBO harpeBaetcЯ.ИзberaIte kacaHЯнharpeBaTeNbHbIX элем entOB, paCnoJoxeHHbIX BHyTpNi Neu.
30.ДЯэToI peHpeKOMeHdyeTcHcNoIb3OBAHHe TOnbKO TempeaTpHbIX DaTuNKOB,ecnB Neu IpeDyCMOTpeHa BO3MOxHOCTb yCTaHOBKn TaKOro TePmOuyBCTBntJIbHoro DaTuNka. - PPEДУПЕЖDEHNE. 3TO yCTpoIcTBO n erO DoCTyINbIe qaCTn HArpeBaIoTc npn pa6oTe. PtPmnte Mepbl ppeIOCTOpOXHOCTn dIЯ nCKJIQUeHnK cAcHnHaRpeBaUOnx 3JIeMeHTOB neu. DeTn MJaIae BOCBM IeT MOrY nCNOJb3OBaTb Neyb TOnbKO NOI NOCTOAHbIM PnICMOTpOM
- Pn pa6oTe MnkpoBJIHOBOI neu cJeIyET depXaTb DeKopaTINBHyIO DBepb OTkpblToi (Jnpeey C KeKopaTINBHOI DBepbIO).
- 3aHra NOBepxHocTb yctpoCTBa dOJXHa 6bITb 6bpaueHa K cTeHe.
- He pa3meaTe MInKpOBoHOByU neYb B uKaΦy, ecn OHa He 6bla npoTeCTnpoBaHa dIra TaKOrOpnIMeHnIa.
BHNMATEJIbHO I3yUHTE IN COXPAHNTE JIAДАЛьHEIшERO INCПОЛь3OBAHNY
MepbI IO CHIXeHIO ONaCHOCTN NOJUyeHnRA TpaBM IJI, BbIIOJIHOUIX 3a3eMJIeHne ycTpoiCTBa
ONACHOCTb
Onachoctb nopaxeHn 3JIeKtpnuecknM TOKOM.
Ipi KOHTaKTe C HeKOtOpbIMN BHyTpEHHIMU qactMaY yCTpoiCTBa BO3MOxHO NOJyHeHETaKeJIbIX INI CMePeTJIbHbIX TpaBM. He pa3bnpaIte yCTpoiCTBO.
PPEyPExEHNIE
Onachocb npapxeHn 3JIeKTpueeCKIM TOKOM
HenpaBnIbHoe 3a3emIeHne MoXeT npNBecTn K nopaxKeHHO 3JIeKTpUcEckm TOKOM. He BCTaBnIte ceTeBOI uHyp B po3eTKy, noka yCTpOInCTBO He yCTaHOHe 3a3emJIeHO NaJExaum 6pa30M.
3To yCTpoiCTO DOJXHO 6bITb 3a3emJeHO. PnKOPOTKOM 3aMbIKAHN Ha KOpNyc yCTPOIcTBA3a3EMJIeHne CHNXaET ONACHOCTb NopaxHeHNAJIeKTpUeCKM TOK, TAK KAK 3JIeKTPuYeCKN TOK CJIeDyET Ha 3eMIIO NO pOBOy 3a3EmJIeHNA.3To yCTpoiCTO OCHaUeHO CeTeBbIM UHypomC JINIO 3a3EMJIeHNA, POdKIIUeHHo K BUNKeC 3a3EMJIIOUIM KOHTaKTOM. 3Ta BNJa DOJXHaNOkNIHOATbcr K PO3eTke, KOtOpAr yCTaHOBNeHa n3a3EMJIeHa HADLeJxauIm o6pa3OM.
O6paTntecb K KBaIINΦnIupOBaHHOMy 3JIeKTPNky IIN TexHNY PO O6cnyXuBaHNIO, ecNI He yBpeHbIB N0NJHom IOHNMaHm Tpe6oBaHm K CnCTeme 3a3eMJIeHnRA IIN Iprn COMHeHnIX OTHOCTeNbHO npABnIbHOCTN 3a3eMJIeHnA 3TOrO yCTPOiCtBA. Iprn Heo6xOIMOCtN IcNoJb3OBAHnY yDnHInTeJr cNeJyET pImMeHrTB ToIbKO TpExXuJIbHbI yDnHInTeJb.
- МнкpoBoHOBa Neb OchaueHa KOpOTKIM ceTeBbIM uHypOM Bo n36exKaHne ONaCHOCTu 3anyTaTbCra B dNHHOM uHype HnCNOTKHHyTbCra o6 Hero.
2.ПиИСПОЛБ3OBAHIN yДПИНHTeJIbHOrO шнурази Кабеля co6IIOdaIte cIeDyIoune Тpe6OBaHЯ.
1) Yka3aHHa MaKcImMaJIbHa
3NeKtpnuecka Harpy3Ka Ha
yDInHHTeNbHbI uHyp nIu Ka6eNb
DOJXHa 6bITb He MeHbWe, yEm
HOMHaJIbHa 3NeKtpnuecka MoUHOCTb
MVKPOBOLHOBOI Neu.
2)ДonyckaetcaИСПОЛБ3OBAHNETOЛБКOTpeXKNJbHOrOуДПиHITeJIcЖиЛоj3a3eMJIeHnI.
3)IpoKnaKy ydHnHnTeJcneDyET BbINOHNHT TaK, YTO6bI OH He CBnCaN C KpbIuKN CTOna IIN npnAbKa, rDe eRO MOrYT DOCTaTB DeT NIn eCTb BO3MOxHOCTb CnyaHNO 3a Hero 3aueHnTbcra.
OuNTKA
Y6eIITecb B TOM, YTO yCTpOJCTBO OTKJIIOUeHOOT CETN.
- Послесиноьзовая очирп Te BHyтpeHHne ПОВЕРХОCTN Пechи СпOMоцью Cпeгкa ВлajхнОТряпК.
- OuICTIte DOIOJIHITeJIbHbIe IpiHaIJIeXHOCTN 06bIHyIM CnOCO6OM B pAcTBOpE MOIOUeRO cpeIcTBA.
- PamyDbepn,ynnoTHHeHne npnneraUuNe qactN OCTOPoXHO ONUCTnte C NOMOUBBnaXHO TpAKN,ecnHa HNX eCTb 3arpa3HeHn.
4.HeOnyckaetcNcNoIb3ObaHne arpeccNBbIX abpa3nBbIX YnCTaUx CpeDCTB NIN OCTpbIX MeTaNIIuYeCKNX CKpe6KOB DnA ONUCTKN CTeKNa DBepn Neu, TAK KAK 3TO MOKeT NOUapanaTb NOBepxHOCTb, N, B pe3yJIbTaTe, INPBecTN K pa3pySeHHIO CTeKNa. - CoBET no ouhctke.Дяболгпяко OuHCTKn BHyTpEHHIX NOBepxHocTe Ney, KOTOpbIe MOrY KONTaKTIpOBaTb C NIIUeBbIMN IpoDyKTaMn: BblaBHTe B MNCky COK NIOBHHbl NIMMOHa, doBaBte 300 mN BODbl N HarpeTte B Neyu prn 100% MouHocTn B TeueHne 10 MNHyT. IpoTpIte NeYb C NOMoUsbIO MЯrKoN cyXoN TpAkn.
NOCyDA
BHIMAHNE
Onachoctb HecyaactHbIX cnyuaeB
K BbIOnHeHIO cepBnCHbIX
In peMOHTbIX pa6OT, BKJIouaHOuX
dEmOHTaX 3kpaHa, 3aUuAIOUeRO
OT obLyueHn MmKpOBoJHOBOi
3HeprnE, DOnyUcKaETc TOnbKO
NoDroTOBNeHHbI HaJIeJaUIM
06pa3OM nepcoHa..
Cm. yka3aHnB pa3deJe «ДOnyctTmbie n HeDOnyCTTmbie MaTePnaJIbI DnA NCNoJIb3OBAHnB B MmKpOBoJHOBOI neuN». OnpedeJIeHHyU HEmetAJIINueCKyU NocUdy He6e3OpacHO NCNoJIb3OBA Tb B MmKpOBoJHOBOI neu. PnHaJInuHn COMHeHn npOBepbTe TaKyU nocUdy CneDuOuIm o6pa3OM.
PopdoK npOBepKn nocybl
1.ПOMeCTIte B MmKpOBoHOByIO Neu b Ondn CTaKaH XoIoHOB BObI (250Mn) B 6e3OpacHom IpnIMeHnRA B MmKpOBoHOBOIN PeuN KOHTeHep BMeCTe C NOdJIeXaUe INpoBepKe nocdyon.
2. BkIIOHTe MIKPOBOHOBYIO neyHa MaKcIMaNbHyIO MOUHOCTb Ha ONDHYMHHTy.
3. Octopojno notporaTe nocyu, ecn nyctaNoCyda TeTna, ee npimeHneNIE JIra rTOBKN B MmKPOBOHOBOI neu 3anpeuaetc.
4.He donyckaTe pa6OTo neu 60Jee oHOH MHyTbI.
IOnyCTnMbIe K NcNoJIb3OBaHnIO B MmKpOBoJHOBOI Neu MaTePnaJIbI
Посуда 3ameyаня
PykoBoOCTBO noIb3OBaTeJI 1
G
CtoikaJnIrpnila
(NcNoB3yETcTOnbKO
IpynnyIOJXHa 6bItb
yCTaHOBnHa Ha CTeKJIaHHbI
noDnOc)
A) ΠaHeJIb ynpaBneHnIa
B) NOBOPOTbI BaI
C) NOBOPOTHoe KOJIbUo B c6ope
D)CTeKJIaHHbI IOdHoc
E) CMOTPOBOE OKHO
F)ДВервсборe
G) CnCTema 3aunTHoN 6IOKnpOBKn
MONTAX NOBOPOTHO TOTA
a. He donyckaetc yctahOBka cTeKnHHO NOHOCA B nepeBepHyTOM NIOXKeHH, DBNXeHne NOHOCA He DOJxHO 6bITb ORpaHnueHo.
b. Пи Использовани Neун обязаTeльно сеунуЕТИСПОЛБ3OBaTб КАСТЕКЛЯHHы ПОДHOC,ТAKИ NOВОРOTHOE KONьоВсборe.
c. Ppi nprirotOBHeHH Nnui O6ra3aTeIbHO CneDyET CTaBnTb NnueBblpe IPOdyKtbl N KOHTeHepbl Ha CTekJIaHHbI NOHOC.
d. Ipn O6hApxKeHn Tpeun Hnn NOJOMOK B CTeKJIHHOM IOHOce n nn KOJIbue NOBOPOTHO cTOna o6paNTeCb B 6JnxKaIshn aBTOpN3OBAHHbI CepBNCbI ueHTp.
YCTaHOBka Ha KyxOHHOI CToIKe
I3BnKeHTe BeCb yNaKOBOHyB MaTePnaJn DOnoJIHHTeJIbHbIe PnHaIeKHOCTN.
OcmotpTe neb Ha HauuHne NOBpeXdEHN, TAKNX kak BmTnHbI Nn NoJOMka DBepn. He DOnyckaETcYCTaHOBka Neu npn HauuHn NOBpeXdEHN.
Kopnyc: ydaJIte 3aIHTHyIO nJIeHky C NOBepxHOCTN KOpnyca MIKPOBOJHOBOI Neu. He ydaJIte CBETNO-KOpNUHeBOE CNIOJHOe NOKpbITNe C BHyTpeHHe NOBepxHOCTN Neu, PpeHa3NaueHHoe dJa 3aUNTbI MaHrTePOHa.
YCTaHOBka
- Bb6epnte poBHyIO NOBepxHocTb, o6ecneuBaOuSyIO DOCTaTOUHO MeCTa IJI npIeMHbIX N/INN BbIyCKhIx BEHTNJRAOHHbIX OTBepCTnI.
(1)MHHMaJIbHaB BbICota HaI NOJOM COCTaBnE85cm.
(2) 3aHЯ NOBepxHocTh yCTpoiCTBa DoJXHa 6bIb O6paueHa K CTeHe. CneDyET OCTaBHT b3a3Op HAd NeybHO He MeHee 30 cm, MInHMajbHoe pacCTOraHHe Mekdy neybIO n CTehoI — 20 cm.
(3) He BbHMaITe HOxKn N3 HxXHeY qACTn neu.
(4) 3aKpbItne npnemHbIX n/nn BbIpyckHbIX OTBepCTN MOKeT pNBECTN K NOJOMKE Neu.
(5) YCTaHOBNTe Nech KaK MOxHo DaJIbUe OT paIIOpneMHIKOB N TeJIeBN3Opa. Pa6Ota MmKPOBOHOBON Neu MoXeT CO3dABaTB NOMEXI DnPaIHO- INI IN TEJIeBN3NOHHORI pNema.
2.ПОДКЛЮЧNTe Neub K CTaHdApTHoN 6bIToBOBpo3eTke.Y6eINTEcB,HTO HAnpJKeHneИчAcTota COOTBeTCTByIOT DaHHbIM,yKa3aHHbIM B Ta6nue.
IPEyIPEKDEHNE.3apeaaetcyaTaHaBnBaTb MkpoBOHOByIO neb HakyoHHyo PnITy I npOue NCTOCHNK TeNIOBOrOn3nyeHnA.3TO MOKeT npuBeCTN K NOBpeKDeHNOycTroPocTBa I nISeHnIO npaba rapaHTnHOro06cnyKBAHnA.
OocTyHbIe NOBepxHOCTN MOryT HarpeBaTbc npn pa6oTe neu.
PYKOBODCTBO NO 3KcPlyATAUIN
3Ta MInKpOBoHOBa Neyb OChaSeHa COBpeMeHHo 3JeKtpOHHO CnCTeMOy npabJIeHn, KOTopra N03BOJRAET NOdEprXHBaTb peXIMbl rOtOBKn B COOTBcTcBn C BaUIMN NOTpe6HoCTaMn I ObecneuHBAe T BlicOKoe KaueCTBO pnproTOBJIeHn PNIuN.
1. Hac tropona yacob
Iocne noKIOUeHn MIKPOBOJHOBo NcN K cTeN nTaHn Ha dncnnee OTo6paXaETc3HaueHne 0:00 ,noJaETcOIN CNrHaJI 3yMMepa.
1)HaxMnte KhoNky « 》,HnduKaTOp YacOB HaUHeT MmTaTB;
2)ПовернITE«ДЯнсториЧаOB,ВБeДИТeВрмьДиana3OHeOTdo23.
3) HaxMMTe KhoNky « AnHkaTOp MNHy T 6yJeT MmraTb.
4)ПовернITE «»ДЯнстpoи KMHyT,ВБeДИТeВрЕВдиаэоHe ot 0do59.
5)HaxmTe « 1IJIaBepWeHnHaCTpOuKn YacOB. «:» 6yTe MraTb.
PpimMeaHne: 1) EcIn YacbI He HacTpoeHbI, npn NoKJIoueHN nITaHn OHI He 6yDyT pa6oTaTb.
2) EcnBbPemHaCTpOKn YacOB B TeueHne 1 MmHyTbI He BblNOJIHHOTc HnKaKNe onepaun,
Ieby aBtOMaTnueckn IpeeyTeB npdebldyuuee COCTOHNHe.
Sall, dally boll 1dally aolal lblld.
1 1 1 1 1 1 1 1 1 1 1 1 1 1 1 1 1 1 1 1 1 1 1
aill 16
yll yaiy aiil 15
i 16
.17
18
Jgllnloic aie gacall bawil 0jnnssd .19
aiaiwlcll jcbwyl s jn Jaiy. Jaiill ygaiial l wll n 12y jll clqj jy jn nn
. jll qy gaiy
20
21 jai 50
a 24
a a a a a a a a a a a a a a a a a a a a a a a a a a a a a a a a a a a a a a a a a a a a a a a a a a a a a a a a a a a a a a a a aaa
j 25
26
a 27 jll jll JbIy Ie
.15 1
1 2
J 9
J J J J J J J J J J J J J J J J J J J J J J J J J J J J J J J J J J J J J J J J J J J J J J J J J J J J J J J J J
11
12
.13
laolglall g jaiy 14
aaii iaii laiai yjaiy
.29
a 30
( 1,2)
dssssssssssssssssssssssssssssssssssssssssssssssssssssssssssssssssssssssssssssssssssssssssssssssssssssssssssss
J 1 J 1 J 1 J 1 J 1 J 1 J 1 J 1 J 1 J 1 J 1 J 1 J 1 J 1
(.).32
j 33
i 34
Jaiuall 1gll lgl bai g jy
b_i = 12 - a_i
jbi
ylll jlln no jll lss
aai 1
x1 = -b - ^2 - 4ac2a,x2 = -b + ^2 - 4ac2a
.ogolagclay oJzalil ayjBally CaiLall 2
1j 3
a 1
1 4
aee j 1y clj ybiil oall aiaeall
jlll 1000
jui jiu liu - iuiiui iuii iui 5
( x,y) = ( ab,532)
jilll 300 wai jiec gai
ssall aill lsl iis yio 1/2)
.
aaii iiaii laii jai jai jai jai jai jai jai jai jai jai jai jai jai jai jai jai jai jai jai jai jai jai jai jai jai jai jai jai jai jai jai jai jai jai jai jai jai jai jai jai jai jai jai jai jai jai jai jai jai jai jali jali jali jali jali jali jali jali jali jali jali
aIg, aocLi
auiy 1
y
jie 1iie ciie
#
ai a ai 分母最小值为 k .
y
jLJI 5J1
J 1
jia jia jia jia jia jia jia jia jia jia jia jia jia jia jia jia jia jia jia jia jia jia jia jia jia jia jia jia jia jia jia jia jia jia jia
y
i j 1
aaii jiallall jia jialll jia aill lks 1
A. jzilj 1 JgB1 1JSL1 1yL1 1e
2
1
aJdai aiai yIgua 1yIg 1yIg
- j = 1 5c j = 4 5c j = 8 5c
Sx, xu, xu, xu, xu, xu, xu, xu, xu, xu, xu, xu, xu, xu, xu, xu, xu, xu, xu, xu, xu, xu, xu, xu, xu, xu, xu, xu, xu, xu, xu, xu
.
J 3
jlllalil jll llllall jlllall h
1
aaii
alall ala (a laaa) alal
(a)jill a wall
S OBC = S COD + S BOC - S BOC
S OBC = S COD + S_ BOC
0jy jdy 100
ai a ai all(i)
aolai aiLi
1111ie gao (g)
jLj2 ① j z.( j - 1)
120 1

1
()
j
aLc bWg aJg aJb g all jy p: aLs
Gg Jdall
jglal glall jll aljll jji
.ogjjlall
Clll 100000000000000000000000000000000000000000000000
Jlalill jIyall yIyall 1234567890
Jlalill yIyall Jyaiw yIyall JAc yIyall
Jyaiy
Jyaiy
Jyaiy
Jyaiy
Jyaiy
Jyaiy
y 1 y
1
85 85
(2)
30 121 121 121 121 121 121 121 121 121 121 121 121 121 121
(3)
(4)
J 1
a c l l b u a . 1
12alw jg aialll 0:00" p 12
aclll 1c gall jg
0--23 1
i 1
0--59j j j j j j j j j j j j j j j j j j j j j j j j j j j j j j j j j j j j j j j j j j j j j
"
aBbBbBbBbBbBbBbBbBbBbBbBbBbBbBbBbBbBbBbBbBbBbBbBbBbBbBbBbBbBbBbBbBbBbBbBbBb
a 2
a 1
2
P100" aal 8gaiy jy gao y
"P50" , "P80" , "P100" aalal alal alal alal alal alal alal alal
"P10", "P30",
1511" 18
(95:00 0:05- jnnn nn nnnn nn nnnn nn nnnnnnnnnnnnnnnnnnnnnnnnnnnnnnnnnnnnnnnnnnnnnnnnnnnnnnnnnnnnnnnnnnnnnnnnnnnnnnnnnnnnnnnnnnnnnnnnnnnnnnnnnnnnnnnnnnnnnnnnnnn
5
jai jill ciay jia jilll jaii li jy laa
5 0----1
10:45 1---5
30:5-10
a1g a1s : a1s 10---30
5:430--95
S ADB = S COD + S BDO - S COD
| 100%80 | |||||
| P10 | P30 | P50 | P80 | P100 | العربية |
Cuisson au grill .3
"P100" aalss sss sss gssgss
" 1
. "G" 1
(0:05-95:00 jnnn nn nnnn nn nnnnnnnnnnnnnnnnnnnnnnnnnnnnnnnnnnnnnnnnnnnnnnnnnnnnnnnnnnnnnnnnnnnnnnnnnnnnnnnnnnnnnnnnnnnnnnnnnnnnnnnnnnnnnnnnnnnnnnn
5
g 1 1 1 1 1 1 1 1 1 1 1 1 1 1 1 1 1 1 1 1 1 1 1
Jell jll Jolal 12 p d. gall alalg ① jklkblalp, lll
4
"P100" 45
"
64% + 36%) C-2" , " (45% + 55%) C-1"
1
1511 ①
(95:00 0:05- 1
55
5
100% 0k" ok
95 130
0k" 1e biai, aie ydoaiaiaiaiaiaiaiaiaiaiaiaiaiaiaiaiaiaiaiaiaiaiaiaiaiaiaiaiaiaiaiaiaiaiaiaiaiaiaiaiaiaiaiaiaiaiaiaiaiaiaiaiaiaiaiaiaiaia
" ① OK " baii, cai jiljai jai jai jai jai jai jai jai jai jai jai jai jai jai jai jai jai jai jai jai jai jai jai jai jai jai jai jai jai jai jai jai jai jai jai jai jai jai jai jai jai jai jai jai jai jai jai jai jai jai jai
.
" ① OK "Ie IbiIyIyIyIyIyIyIyIyIyIyIyIyIyIyIyIyIy
J 6
"DEF1" aaii i 1
2000 100- jnnn nn nnnn nn nnnnnnnnnnnnnnnnnnnnnnnnnnnnnnnnnnnnnnnnnnnnnnnnnnnnnnnnnnnnnnnnnnnnnnnnnnnnnnnnnnnnnnnnnnnnnnnnnnnnn
A13
"DEF2" aaii
gall 12
A1y1 1
P30 1
Jololl 2200 g bll.8
J 1
gai li 12015 120
Jal jall siaia gablll aaiil aiails ayiatill aaiial al 1ay iiaia
7 80% 5 5
"DEF2" 1
5 5
foalgjra" 3
"P80" 1
S ADB = S COD + S BDO = S ADB + S COD + S BDO
7 10
1011 7
g.9
(aclllbbsclg)
12
7 80%
IMO2019 z I. dz = x^2 - yy^2
"P80" 80%
S木弟形 COBD = S COD + S BDO = S BOC +
7 10
i 10
sclll 1c 2g gall pll l.
0--23 j 1
5
0--59jnnn nn nnnnnnnnnnnnnnnnnnnnnnnnnnnnnnnnnnnnnnnnnnnnnnnnnnnnnnnnnnnnnnnnnnnnnnnnnnnnnnnnnnnnnnnnnnnnnnnnnnnnnnnnnnnnnnnnnnnnnnnnn
100 100
aal bai all aiae gll Jaa jie 21, yj ae lall buaa y
aaiiall aaiial1.10
"A-8" "A-1" 2
1
pabll jj y" 3
1
5 5
aaiilai


- PRECAUTIONS TO AVOID POSSIBLE EXPOSURE TO EXCESSIVE MICROWAVE ENERGY
- ADDENDUM
- Specifications
- IMPORTANT SAFETY INSTRUCTIONS
- WARNING
- READ CAREFULLY AND KEEP FOR FUTURE REFERENCE
- To Reduce the Risk of Injury to Persons Grounding Installation
- DANGER
- CLEANING
- UTENSILS
- CAUTION
- Utensil T est:
- Materials you can use in microwave oven
- Materials to be avoided in microwave oven
- SETTING UP YOUR OVEN
- Names of Oven Parts and Accessories
- Turntable Installation
- Countertop Installation
- Installation
- Clock Setting
- Microwave Cooking
- Grill Cooking
- Combination Cooking
- Speedy Cooking
- Defrost By Weight
- Defrost By Time
- Multi-Stage Cooking
- Pre-set Function
- Auto Menu
- Auto Menu
- Lock-out Function for Children
- Inquiring Function
- Specification
- Trouble shooting
- OCHOBHbIE INPABUNa TEXHnKn B3OpAChOCTN
- PPEyPExKdEHNE
- BHNMATEJIbHO I3yUHTE IN COXPAHNTE JIAДАЛьHEIшERO INCПОЛь3OBAHNY
- MepbI IO CHIXeHIO ONaCHOCTN NOJUyeHnRA TpaBM IJI, BbIIOJIHOUIX 3a3eMJIeHne ycTpoiCTBa
- ONACHOCTb
- PPEyPExEHNIE
- OuNTKA
- NOCyDA
- BHIMAHNE
- PopdoK npOBepKn nocybl
- IOnyCTnMbIe K NcNoJIb3OBaHnIO B MmKpOBoJHOBOI Neu MaTePnaJIbI
- MONTAX NOBOPOTHO TOTA
- YCTaHOBka Ha KyxOHHOI CToIKe
- YCTaHOBka
- PYKOBODCTBO NO 3KcPlyATAUIN
- Hac tropona yacob
- b_i = 12 - a_i
- jbi
- #
Brand : CATA
Model : FS 20 IX
Category : Microwave Oven