WG201E - Hedge trimmers WORX - Free user manual and instructions
Find the device manual for free WG201E WORX in PDF.

| Product Type | Electric Hedge Trimmer |
| Brand | Worx |
| Model | WG201E |
| Category | Hedge Trimmers |
| Rated Voltage | 220-240 V ~ 50/60 Hz |
| Power | 500 W |
| Max. Cutting Diameter | 24 mm |
| Blade Length | 53 cm |
| No-load Speed | 3,200 rpm |
| Blade Type | Double Action |
| Blade Stop | Less than 1 second |
| Double Insulation / Class | Yes / Class II |
| Weight | 4.4 kg |
| Sound Pressure Level LpA | 85 dB(A) (K=3 dB(A)) |
| Sound Power Level LwA | 99 dB(A) |
| Vibration Value | 3.76 m/s² (K=1.5 m/s²) |
| Main Functions | Cutting and trimming hedges and shrubs |
| Telescopic Rear Handle | Yes, 4 positions |
| Adjustable Front Handle | Yes, variable tilt |
| Safety | Double safety switch, protective shield |
| Maintenance and Cleaning | Clean with a brush, grease the blades before/after use |
| Protection Rating | Do not use in rain |
| Included Accessories | Safety shield, blade protective sheath |
Frequently Asked Questions - WG201E WORX
User questions about WG201E WORX
0 question about this device. Answer the ones you know or ask your own.
Ask a new question about this device
Download the instructions for your Hedge trimmers in PDF format for free! Find your manual WG201E - WORX and take your electronic device back in hand. On this page are published all the documents necessary for the use of your device. WG201E by WORX.
USER MANUAL WG201E WORX
Type WX4046HT/WG200E/WG201E/WG204E (2-designation of machinery, representative of Hedge Trimmer)
| Model no. WX4046HT W | WG200E WG201E | WG204E | ||
| Rated voltage 220-240V~50/60Hz | ||||
| Rated input 400W | 450W | 500W | 600W | |
| Cutting diameter | 20mm | 20mm | 24mm | 24mm |
| Blade length | 46cm | 51cm | 53cm | 53cm |
| Rated no load speed | 3200/min | 3200/min | 3200/min | 3400/min |
| Blade action | Double action blades | |||
| Blade stopping time | <1s | |||
| Double insulation | ☐/II | |||
| Machine weight | 4.3kg | 4.4kg | 4.4kg | 4.4kg |
NOISE AND VIBRATION DATA (WX4046HT)
| A weighted sound pressure L pA: 87dB(A) K=1dB(A) | |
| A weighted sound power L wA: 96dB(A) | |
| Wear ear protection when sound pressure is over 80dB(A) | |
| Typical weighted vibration 2.51m/s | 2 K:1.5m/s2 |
NOISE AND VIBRATION DATA (WG200E WG201E WG204E)
| A weighted sound pressure | L | pA: 85dB(A) K=3dB(A) |
| A weighted sound power | L | wA: 99dB(A) |
| Wear ear protection when sound pressure is over 80dB(A) | ||
| Typical weighted vibration 3.76m/s | 2 K:1.5m/s2 | |

WARNING: The vibration emission value during actual use of the power tool can differ
from the declared value depending on the ways in which the tool is used dependant on these living examples and other variations on how the tool is used:
How the tool is used and the materials being cut or drilled.
The tool being in good condition and well maintained.
The use the correct accessory for the tool and ensuring it is sharp and in good condition.
The tightness of the grip on the handles and if any anti vibration accessories are used.
And the tool is being used as intended by its design and these instructions.
This tool may cause hand-arm vibration syndrome if its use is not adequately managed.

WARNING: To be accurate, an estimation of exposure level in the actual conditions of use should also take account of all parts of the operating cycle such as the times when the too
is switched off and when it is running idle but not actually doing the job. This may significantly reduce the exposure level over the total working period.
Helping to minimise your vibration exposure risk.
ALWAYS use sharp chisels, drills and blades.
Maintain this tool in accordance with these instructions and keep well lubricated (where appropriate).
If the tool is to be used regularly then invest in anti vibration accessories.
Avoid using tools in temperatures of 10^ or less.
Plan your work schedule to spread any high vibration tool use across a number of days.
ACCESSIONS
Safety guard 1
Blade sheath 1
We recommend that you purchase your accessories from the same store that sold you the tool. Use good quality accessories marked with a well-known brand name. Choose the type according to the work you intend to undertake. Refer to the accessory packaging for further details. Store personnel can assist you and offer advice.
GENERAL POWER TOOL SAFETY WARNINGS

WARNING: Read all safety warnings and all instructions. Failure to follow
the warnings and instructions may result in electric shock, fire and/or serious injury.
Save all warnings and instructions for future reference.
The term "power tool" in the warnings refers to your mains-operated (corded) power tool or battery-operated (cordless) power tool.
1. WORK AREA SAFETY
a) Keep work area clean and well lit. Cluttered or dark areas invite accidents.
b) Do not operate power tools in explosive atmospheres, such as in the presence of flammable liquids, gases or dust. Power tools create sparks which may ignite the dust or fumes.
c) Keep children and bystanders away while operating a power tool. Distractions can cause you to lose control.
2. ELECTRICAL SAFETY
a) Power tool plugs must match the outlet. Never modify the plug in any way. Do not use any adapter plugs with earthed (grounded) power tools. Unmodified plugs and matching outlets will reduce risk of electric shock.
b) Avoid body contact with earthed or grounded surfaces, such as pipes, radiators, ranges and refrigerators. There is an increased risk of electric shock if your body is earthed or grounded.
c) Do not expose power tools to rain or wet conditions. Water entering a power tool will increase the risk of electric shock.
d) Do not abuse the cord. Never use the cord for carrying, pulling or unplugging the power tool. Keep cord away from heat, oil, sharp edges or moving parts. Damaged or entangled cords increase the risk of electric shock.
e) When operating a power tool outdoors, use an extension cord suitable for outdoor use. Use of a cord
suitable for outdoor use reduces the risk of electric shock.
f) If operating a power tool in a damp location is unavoidable, use a residual current device (RCD) protected supply. Use of an RCD reduces the risk of electric shock.
3. PERSONAL SAFETY
a) Stay alert, watch what you are doing and use common sense when operating a power tool. Do not use a power tool while you are tired or under the influence of drugs, alcohol or medication. A moment of inattention while operating power tools may result in serious personal injury.
b) Use personal protective equipment. Always wear eye protection. Protective equipment such as dust mask, non-skid safety shoes, hard hat, or hearing protection used for appropriate conditions will reduce personal injuries.
c) Prevent unintentional starting. Ensure the switch is in the off-position before connecting to power source and/or battery pack, picking up or carrying the tool. Carrying power tools with your finger on the switch or energising power tools that have the switch on invites accidents.
d) Remove any adjusting key or wrench before turning the power tool on. A wrench or a key left attached to a rotating part of the power tool may result in personal injury.
e) Do not overreach. Keep proper footing and balance at all times. This enables better control of the power tool in unexpected situations.
f) Dress properly. Do not wear loose clothing or jewellery. Keep your hair, clothing and gloves away from moving parts. Loose clothes, jewellery or long hair can be caught in moving parts.
g) If devices are provided for the connection of dust extraction and collection facilities, ensure these are connected and properly used. Use of dust collection can reduce dust-related hazards.
4. POWER TOOL USE AND CARE
a) Do not force the power tool. Use the correct power tool for your application. The correct power tool will do the job better and safer at the rate for which it was designed.
b) Do not use the power tool if the switch does not turn it on and off. Any power tool that cannot be controlled with the switch is dangerous and must be repaired.
c) Disconnect the plug from the power source and/or the battery pack from the power tool before making any adjustments, changing accessories, or storing power tools. Such preventive safety measures reduce the risk of starting the power tool accidentally.
d) Store idle power tools out of the reach of children and do not allow persons unfamiliar with the power tool or these instructions to operate the power tool. Power tools are dangerous in the hands of untrained users.
e) Maintain power tools. Check for misalignment or binding of moving parts, breakage of parts and any other condition that may affect the power tool's operation. If damaged, have the power tool repaired before use. Many accidents are caused by poorly maintained power tools.
f) Keep cutting tools sharp and clean. Properly maintained cutting tools with sharp cutting edges are less likely to bind and are easier to control.
g) Use the power tool, accessories and tool bits etc. in accordance with these instructions, taking into account the working conditions and the work to be performed. Use of the power tool for operations different from those intended could result in a hazardous situation.
5. SERVICE
a) Have your power tool serviced by a qualified repair person using only identical replacement parts. This will ensure that the safety of the power tool is maintained.
ADDITIONAL SAFETY POINTS FOR YOUR HEDGE TRIMMER
- Keep all parts of the body away from the cutter blade. Do not remove cut material or hold material to be cut when blades are moving. Make sure the switch is off when clearing jammed material. A moment of inattention while operating the hedge trimmer may result in serious personal injury.
- Carry the hedge trimmer by the handle with the cutter blade stopped. When transporting or storing the hedge trimmer always fit the cutting device cover. Proper handling of the hedge trimmer will reduce possible personal injury from the cutter blades.
- Keep cable away from cutting area. During operation the cable may be hidden in shrubs and can be accidentally cut by the blade.
- Hold the power tool by insulated gripping surfaces only, because the cutter blade may contact hidden wiring or its own cord. Cutter blades contacting a "live" wire may make exposed metal parts of the power tool "live" and could give the operator an electric shock.
ADDITIONAL SAFETY RULES
- Use the Hedge trimmer only in daylight or good artificial light.
- Know how to stop the Hedge trimmer quickly in an emergency.
- Never hold the Hedge trimmer by the guard.
- Never operate the Hedge trimmer with damaged guards or without guard in place.
- Remove the plug from mains before passing the hedge trimmer to another person.
- Avoid operating while people especially children are nearby.
- Whilst using the Hedge trimmer always
be sure of a safe and secure operating position.
- Keep hands and feet away from the cutting means at all times and especially when switching on the motor.
- Do not use step ladders whilst operating the Hedge trimmer.
- Remove the plug from the mains:
-Before leaving the Hedge trimmer unattended for any period,
-Before cleaning a blockage,
-Before checking, cleaning or working on the appliance,
-If you hit an object. Do not use your Hedge trimmer until you are sure that the entire Hedge trimmer is in a safe operating condition,
-If the Hedge trimmer starts to vibrate abnormally. Check immediately. Excessive vibration can cause injury,
-Before passing to another person.
- Do not expose to rain. Do not operate your Hedge trimmer on a wet hedge.
- Always ensure the hand guard supplied is fitted before using the Hedge trimmer. Never attempt to use an incomplete machine or one fitted with an unauthorised modification.
- Check cutting blades regularly for damage, and if damaged repair immediately.
- Keep cable away from the cutting area, check the cable for damage before starting work.
15.Do not start the Hedge trimmer with the blade cover fitted. - Take care not to overload the Hedge trimmer and do not use it on jobs for which it is not intended, i.e. you are allowed to use the Hedge trimmer only to cut hedges, shrubs and perennials.
- Always be sure of your footing when using steps and when using your hedge trimmer.
- Never run when using your hedge trimmer.
- Heavy duty gloves should always be worn when using the Hedge trimmer.
- Be careful during adjustment of placing your fingers between moving blades and fixed parts of the machine.
- During transportation and storage of the Hedge trimmer, keep the blades covered at
all times with the blade cover/storage.
- The use of a Residual Current Device (R.C.D.) with a tripping current of not more than 30mA is recommended.
- Do not try to grasp or remove hedge clippings when the hedge trimmer is running. Only remove hedge clippings when the appliance is switched off and disconnected from the mains supply.
- Carry the hedge trimmer at the handle while the cutter blade is not running.
Always ensure guard supplied is fitted when transporting or storing the hedge trimmer. Careful operation reduces the injury by the cuter blade.
- Keep cable away from the cutting area. Be aware that during operation the cable may be covered in hedge clippings and could be cut inadvertently.
- If the supply cord is damaged, it must be replaced by the manufacturer, its service agent or similarly qualified persons in order to avoid a hazard.
SYMBOLS

To reduce the risk of injury, user must read instruction manual

Warning

Wear eye protection

Wear ear protection

Wear dust mask

To avoid possibility of electric shock, do not expose to rain
Remove plug from the mains immediately if cable is damaged or cut

Double insulation

Keep hands away

Waste electrical products should not be disposed of with household waste. Please recycle where facilities exist. Check with your Local Authority or retailer for recycling advice.
OPERATING INSTRUCTIONS

WARNING: Do not use the product without fitting the guard and front plate.
INTENDED USE
The machine is intended for cutting and trimming hedges and bushes in domestic use.
ASSEMBLY OF THE GUARD
Insert the guard into the slot as illustrated in Fig A, allow the two locking tabs to insert into the holes, ensure it is securely located.
Then use two screws to fix the guard securely.
THE FRONT HANDLE, MUST BE ASSEMBLED BEFORE USE:
1) First, insert the left grooves-side to the housing. (See Fig. B)
2) Pull to insert the other side of the front handle to the other side of the housing. (See Fig. B)
3) Rotate each lock nut (7) as shown in Fig C. Check and ensure the lock nuts are locked onto the main housing.
STARTING AND STOPPING
BEFORE STARTING YOUR HEDGE TRIMMER
Remove blade cover (10) as illustrated in D.
TO START YOUR HEDGE TRIMMER
There are two switch levers fitted in your Hedge trimmer (2&4).
Both switch levers need to be depressed for the product to start. Depress and hold the front switch lever (4) and press the switch lever (2) (See Fig. E).
TO STOP YOUR HEDGE TRIMMER
Move Hedge trimmer away from cutting area before stopping.
To stop, release one of the switch levers (See Fig. G).

WARNING: If any parts are missing, damaged or broken, do not operate
your Hedge trimmer until all damaged parts have been replaced or repaired. Failure to do so could result in serious personal injury.
The rear handle of the Hedge trimmer can be extended to increase the reach of your hedge trimmer. To operate this feature you need to press and hold the extension button (5) with your thumb and pull the rear handle (1) away from the main housing. You can choose from 4 preset positions for the rear handle (See Fig. H).
ADJUSTING THE FRONT HANDLE POSITION
Press and hold the two buttons (6) and rotate the front handle to the most comfortable angle. The front handle will be locked after you release the buttons. You can choose from 4 preset positions for the front handle (See Fig. F).
Caution: Ensure you support the weight of the hedge trimmer before you adjust the front handle.
HOW TO USE YOUR HEDGE TRIMMER
For normal horizontal or vertical (side) cutting it is recommended to not extend the rear handle and to use the front handle in the two most forward positions.
When you require a longer reach you must extend the rear handle and use the front handle in the two most rear positions. This will increase your reach and maintain a balanced control (See Fig. H).
The front handle has a switch lever which can be activated on three sides. If your hand grip is on the top or either side of the front handle you can activate the switch whilst maintaining the most comfortable hand grip position. Inspect the area to be cut before each use, remove objects which can be thrown or become entangled in the cutting blades.
Always hold the Hedge trimmer with both
hands and with the blade away from you before turning it on.
Always keep the power cord behind the Hedge trimmer when in use. Do not place it over the hedge that you are trimming where it may be cut by the blade.
When trimming new growth, use a wide sweeping action so that the stems are fed directly into the blade.
Allow the cutting blades to reach full speed before entering the material to be cut.
Always work going away from people and solid objects such as walls, large stones, trees, vehicles etc.
If the blade stalls, immediately stop the Hedge trimmer. Disconnect the Hedge trimmer from the mains and clear the jammed debris from the cutting blades.
Wear gloves when trimming thorny or prickly growth.
Move the Hedge trimmer to feed the branches directly into the blade cutting edges.
Do not try to cut stems that are too large to feed into the cutting blade.
TOP CUTTING
Use a wide sweeping motion (See I). A slight downward tilt of the cutting blades in the direction of motion gives the best cutting results.
SIDE CUTTING
When trimming the sides of the hedge, begin at the bottom and cut upwards (See Fig. J), tapering the hedge inward at the top. This shape will expose more of the hedge, resulting in a more uniformed growth.
MAINTENANCE
CLEANING
Disconnect from mains electrics supply. Using a soft brush-remove debris from all air intakes and cutting blade.
Wipe over surface of your Hedge trimmer with a dry cloth.
WARNING: Never use water for cleaning your Hedge trimmer. Do not clean with chemicals, including petrol, or solvents as this can damage your hedge trimmer.
LUBRICATING THE CUTTING BLADE
For easier operation and longer life, lubricate the cutting blades before and after each use. Before lubricating, make sure your Hedge trimmer is disconnected from the mains electricity supply. Apply the oil so that it runs between the two blades (See Fig. K). Your trimmer should be stopped, disconnected and oiled occasionally during use.
AT THE END OF THE CUTTING SEASON
Clean your Hedge trimmer thoroughly. Check that all nuts and bolts are secure. Visually inspect the Hedge trimmer for any worn or damaged parts.
TO STORE YOUR HEDGE TRIMMER
The Hedge trimmer blade cover/storage holder is provided with 2 hanging slots for storing the Hedge trimmer on the wall (See Fig. L) Ensure the blade cover/storage holder is fitted before storage. Store in a dry place where your Hedge trimmer can be protected from damage.
ENVIRONMENTAL PROTECTION

Waste electrical products must not be disposed of with household waste.
Please recycle where facilities exist.
Check with your local authorities or retailer for recycling advice.
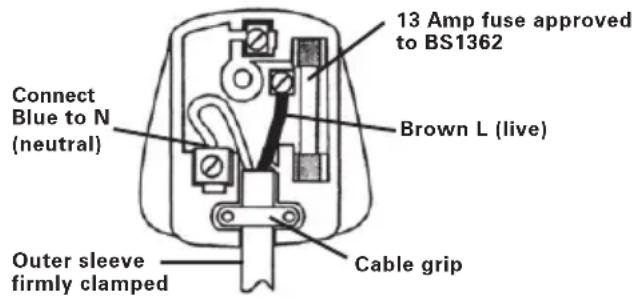
PLUG REPLACEMENT (UK & IRELAND ONLY)
If you need to replace the fitted plug then follow the instructions below.
IMPORTANT
The wires in the mains lead are colored in accordance with the following code:
Blue - Neutral
Brown - Live
As the colors of the wires in the mains lead of this appliance may not correspond with the coloured markings identifying the terminals in your plug, proceed as follows. The wire which is coloured blue must be connected to the terminal which is marked with N. The wire which is coloured brown must be connected to the terminal which is marked with L.
WARNING: Never connect live or neutral wires to the earth terminal of the plug. Only fit an approved BS1363/A plug and the correct rated fuse.
NOTE: If a moulded plug is fitted and has to be removed take great care in disposing of the plug and severed cable, it must be destroyed to prevent engaging into a socket.
EC DECLARATION OF CONFORMITY
We,
POSITEC Germany GmbH
Declare that the product,
Description
WORX Hedge trimmer
Type
WX4046HT WG200E WG201E
WG204E (2-designation of machinery, representative of Hedge Trimmer)
Function Trimming hedges and bushes
Complies with the following Directives,
EC Machinery Directive 2006/42/EC
EC Electromagnetic Compatibility Directive
2004/108/EC
Noise Emission in the Environment by
Equipment for Use Outdoors Directive
2000/14/EC amended by 2005/88/EC
- Conformity Assessment Procedure as per
Annex V
-
Measured Sound Power Level 96dB(A)
-
Declared Guaranteed Sound Power Level
96dB(A)(WX4046HT)
99dB(A)(WG200E WG201E WG204E)
Standards conform to,
EN 55014-1
EN 55014-2
EN 60745-1
EN 60745-2-15
EN 61000-3-2
EN 61000-3-3
EN ISO 3744
The person authorized to compile the technical file,
Name: Russell Nicholson
Address: Positec Power Tools (Europe)
Ltd, PO Box 152,Leeds,LS10 9DS,UK


2011/11/28
Leo Yue
POSITEC Quality Manager
Name: Russell Nicholson
Anschrift: Positec Power Tools (Europe)Ltd,
PO Box 152,Leeds,LS10 9DS,UK

EC DECLARATION CONFORMITE
Responsible qualite POSITEC
ALGEMENE VEILIGHEIDSWAARSCHUWINGEN VOOR VERMOGENSMACHINE

WAARSCHUWING: Lees alle
VEILIGHEIDSWAARSCHUWINGEN:
Standards in overeenstemming met,
EN 55014-1
EN 55014-2
EN 60745-1
EN 60745-2-15
EN 61000-3-2
EN 61000-3-3
EN ISO 3744
Adress: Positec Power Tools (Europe)Ltd,
PO Box 152,Leeds,LS10 9DS,UK


2011/11/28
Leo Yue
POSITEC Kvalitetsdirektor
- ARKA TUTAC
- ANAHTAR MANIVELASI
- ÖN TUTAC
- ON ANAHTAR MANIVELASI (Cok islevli anahtar)
- UZATMA TUŞU
- ÖN TUTACAGI DONDÜRME TUŞU
- EMNIYET SOMUNU
- GÜVENLIK KORUYU
- BIÇAK (Bkz D)
- BIÇAK KILIFI
TEKNIK VERILER
Tipi WX4046HT/WG200E/WG201E/WG204E (2-makine aciklamasi, Cit Kesme gÖsterimi)
KESICI BICAIGI YAGLAMA
duo TIO mTPOOTIVEc θEaIc.
OTAV EITIOUeIe VA qTaoTe TIO MAKPIA TpeTIe IVA TPOEKEIVETN Vn W AaBn KAI VA XpOIoTOIEITE TN MPTPOOTIVN AaBn OTIC DU OIO TIOW ΕeEIG.
Auto a auEnoTo mKoc TPOObaonc kai Oa diatnpnoi ooppoTnevo EeVxo (Aeite H).
H a i o oToioC mTopei va evpyoToinOe i e Tpeic nAeupEc.
Eav n xeipolaanac sivai oTo Tavw mepoc n Oe mia aTIO TIC TLEUPEc Tns MTPoOTIVnC AaBnC MTopeite va EVpyoTOINoETo DIAKOTTN Evw DIATnpTE TNV TIO AVETN 0eON xeipolaBnC.
Na 3103ewpeite Tnv TepioxkOTnC Tpv aTIO kAe Xpno, va apaipite avtkeiEvva ta otioa TTOpei va TTataxoov n va MPepdeuov OTIC AETIDEC KOTnC.
Kpatate Tavta Tnv Kottikn Ouakeun kai ta duo xepia kai kpatwtaç tn i a paaki aTTO eoc TPIV Tnv EVpyotoinoET.
Na kpatate navta to kalwoio
Tpoopobooiac niow ano to klaebeutnpi otav to xpnoiponoieite.Mnv to tonotheiTe naww ano to 4paKTn nou i kaohc ekei mnpei va konei ano tn Ienida.
Otau KoBETE eva veo oWpO, OKOUTIOTe TOLU ouTWCtTa 0TeAExn va TpoPooTouVTai kateuTheiav tN AeTia.
BHHMAHNE:Bn6paun, npOn3BoDIma npn pa6oTe mExaHn3npOBaHHoro nHCTpyMeHTa,
MOKET OTJINuATbcr O T 3aBHeHHbIX 3HaueHn B 3aBNCIMOCTN O T CNOOCOB NcNoJIb3OBAHn
ycTpoNCTBa. Hnke nepeuHneHb HeKOToPbIe ycNoBn, OT KOToPbIX 3aBNCIT INHTehCnBHOCTb Bn6paun:
Cnocob nCnoB3OBAHnI INHCTpyMeHTa N MaTePnaJIbI dIy CBepJeHHN.
CoCTOHNHnHCTpyMeHTa n ypoBeHb Texo6CnyKuBaHHa.
TIN NcnoJb3yeMbIX npHaIeKHOCTe IN IX TEXHNUeCKOE COCTOHNIE.
Cnla ydepkaHn pykotaK n Hannuie npOTNBOBn6paOnHHbIX cpeCTB.
IcnoJIb3yEmble pa6OueH INCTpyMeHTbl, COOTBeTCTBne npIMeHnH INCTpyMeHToB IN Ha3HaueHIO.
HnKOrda HnKoM o6pa30m He n3MeHnTe coeHNHTeNbHyIO BnIky. PpN 3a3eMnEHHbIX 3NeKtpoHnCtpyMeHTax He NCNoJIb3yIte HnKaNX nepexOndHKOB. Hen3MeHeHHbIe BNkN I COOTBeTCTByUOuNE po3ETKN CHnKaIOT PNCK NopaxeHnA 3NeKtpoTOKOM.
6) N36eraTe Φn3nueckoro KOHTaTa c 3a3eMJIeHHbIMN NOBepXHOCTaMM, TaKMM, KaK Tpy6bl, paHaTOpbl, NNtbl N XOJODINbHNKn. Puck nopaxeHnA 3JIeKTPOTOKOM NOBbIaETCr, ecJIBaIe TeNo 6yJeT 3a3eMJIeHo.
B) He noDBepraTe 3JIeKTPoHHCTpyMeHTbl BO3deIcTBIO DOXJN HIN BbICOKO BLnJXHOCTN.
Понадане BOДВ 3ЛЕКТРОИСТPyMeHT ПОБИШаET ONACHOCTb NOPAXEHN ЗЛЕКТPOTOKOM.
r)ПравильнообрашиаTecsb c эл ektpokabem.нкorda He nCNoIb3yIte ka6eIb dIЯ nepeHOCKN 3LektpoHHCTpymeHTa, a TAKKe He TAHNTe 3a Ka6eIb dIЯ BbIKJIIOUeHnru H3 po3eTKn.Держnte Ka6eJIb Ha 6e3OpanachompacSTOrHnOT NCTOCHKOB TeIIa,Macla,OcTpbIX KpOMOK IN DBNkUxxCJ qacteI.ПobpeXdEHbIe IIN 3aNYTaHHbIe Ka6eIIn NOBbIaIOT pIck npapXeHnra 3NeKTPoTOKOM.
Д) Пи pa6ote c 3JIeKtpoHcTpymeHTOM BHe NOMEuEHH uCNoIb3yIte ydnnHnTeN, KOTopbl e npedHa3NaueHHbI dJa pa6Otbl Ha OTKpbITOM BO3dyXe. 3To CHNXaET pNCK nopaxeHn 3JIeKTPoTOKOM.
e)Пи Использовани
электоринструмента BO Владжим
nomешини erо Heo6хдимо
норкlioчать К олектор стн
чeredустюгоство 3aunthoro
otknioчени (Y30) no TOky yTeчки.
Использоване Y30 chнжaelт рпс
порожени олектороком.
3.ЛИЧHAЯ BE3OПАСHOCTb
a)БудTe BHMMaTeIbHbI: CJIeInte 3a Tem, YTO Bbl DeIaeTe N pyKOBODCTByNTecb 3dpaBBIM CMBICJOM, pa6OTa R c 3JIeKTponHCTpyMeHTom. He IcNoJIb3yIte 3JIeKTPOINHCTpyMeHT, ecNI Bbl yCTaII INI HaxOJNTecb NOI BO3deIcTBnEM CINbHOJeICTBYUoIx CpeIcTB, aIKORONI INI MeDInKaMeHTOB. IpTePRA BHMaHnI DaJKe Ha KOpOTKOe MRHOBeHne npi pa6Ote
C 3JIeKTPoINHCTpyMeHTOM MOKeT IpnBecTu K cepbe3HbIM TpaBMam.
6) NcnoIb3yIte HndnBnDyaIbHbIe cpeIcTba 3aunIb. Bcerda NaIeBaIe CpeIcTba 3aunIb rna3. TakiE cpeIcTba 3aunIb, kak pecnnpatop, HeckoJIb3aJauA 3aunTHaObyB, kacka IIN 3aunTHbIe HayShNIK, NcNoIb3yUOuNecB COOTBeTCTByUOxYCIOBnX, CHNXIoT PNCI NOlyeHnTpaBM.
B)ПретоврааиTe cLчaHьнpyck 3NeKTPoHHCTpymeHTa.у6eNTecb, 7TO BbIKIIOuATEIb HaxOHTcB N0LOXeHN «BbIKIIOUeHO»пepd NOkJIIOUeHNEM K 3NeKTPocETn I / nIaKKyMylTopHoB 6aTapen, c6OpKOI INIpeHOCOM 3NeKTPoHHCTpymeHTa.пepd BKIOUChENm B cETb y6eINTeCb, YTO BbIKIIOUaTeIb HaxOHTcB B BbIKIIOUeHNOM N0LOXeHN. ПepeHOCKa INCTpymeHTa C nAJIbUcEM Ha KONKE NcKa IIN BKIIIOUeHENE B cETb 3NeKTPoHHCTpymeHTa C BKIIIOUeHNbIM BbIKIIOUaTeJIem CnOCO6CTByeT HeCchaCTHOMy cLnyaIO.
r) YdaJIaIe BCE peryInpOBOHbIe npncnoc6JeHn Hn raeHbIe KJIouH nepeB BKJIOUeHHeM 3NeKTPoHHCTpyMeHTa. OcTabJIeHHbIe Ha BpaauOuXcR DeTaNx 3NeKTPoHHCTpyMeHTa, OHN MOrY T npNBecTu K TpaBMe.
Д) He nepenapraTecb. NocToHHo 3aHMaIte yctOuHBOe nOIOXeHne H NOdepKmbAte paBHOBeCne. 3TO No3BOJReT LyUWe KOHTpOnIpOBaTb 3JIeKTpOHnHCTpyMeHT B HEnpeDbNdeHHbIX CNTyaUx.
e) OdeBaTecb HApIeKaum 6pa30m. He HaIeBaIte CBo6OHyIO ODeKdy IIn yKpaIeHnA. DePKeTe BOIocBi, ODeJy IN nepaTkn Ha ydaJIeHnN OT DBNkUxxCra Yactei. CBo6OHyIO ODeKdy, yKpaIeHnI INI dIIINHbIe BOIocBi MOKeT 3aTAYtB B DBNkUxncsca Yactn.
K) NcnoJIb3yIte npedymOTpeHHbIe CpeIcTBA n yCTpOInCTBa dJa c6Opa H ydaJIeHn Iblnn. NcnoJIb3OBaHne TaKnx CpeIcTB MOKeT CHN3NTb ONaCHOCTN, CBra3aHHbIe C nbIbIO.
4.ИСПОЛБ3OBAHNE 3ЛЕКТРОнHCTPМЕNTA И YXOD 3A HNM
a) He neperpykaTe 3JIeKTPoHHCTpymeHT. IcnoIb3yIte NOxOJaIuN INHCTpymeHT dIra KaJDoI ONpeJeHNo IeI. IpaBnIbHo NO6paHHbI 3JIeKTPoHHCTpymeHT BblONHt pa60Tu LyUWe n HaedXHee Ha yPoBHe, dIra KOTOpOrO OH IpeHa3HaueH.
6) He nCnoJb3yIte 3JIeKTPoHnHCTpyMeHT,ecnn BbIKJIIOuAteJIbHeBO3MOXHO BKJIIOUHTb HIN BBIKJIIOUHTb.JIIO6OJ 3JIeKTPoHnHCTpyMeHT,KOTOpbIi HEBO3MOXHO KOHTPOJINPOBaTb BbIKJIIOUaTeJIeM, IpeIcTaBnIeT ONaCHOCTb I DoJIKeH 6bITb OTpeMOHTnpOBaH.
B) OToCoeHnHTe WTeNceJIb OT 3JekTpocetn N / NInaKKyMylTOpHyIO 6aTapeIO OT3JekTpOHHCTpyMeHTa nepeI npOBedeHNem KaKnx-In6oHaCTpoEK, CMeHoi HacaDOK NInXpaHeHEm 3JekTpOHCTpyMeHTa.
IopobHbIe npedoxpAHntbHbIe Mepbl CHnkaT onaHocTB cnyaHoro nycka 3NeKtpoHHCTpyMeHTa.
r) XpaHnte He nCNoJIb3yIooJnecra 3JIeKTPoHHCTpyMeHTbl B MeCTax, He doctynhblx dIa deTei. He pa3pewaite pa6oTatb C 3JIeKTPoHHCTpyMeHTOM Iuam, KOtOpblie He 3HaOT erO oc06eHHocTe HII He O3HaKOMJIeHbI C DaHHoN IHCTpyKcnei. 3JIeKTPoHHCTpyMeHTbl B pykax Heo6yueHHblx Nolb3OBaTeJe npedCTabJIaOT onaCHOCTb.
Д) Пордерхивайт eлкгонсгчмент BИСправнOM coCTOHH.Проверп Te HNCTpymeHT Ha npedmet cmeшенЯ NIN 3aedahnЯ DBNXUxxCЯчteи, NOIOMKn DeTaleN IIN JIObIX NHbIX HeNCpabHocTeN, MOryux NOBJIrTaB Na pa6oty 3eKtpoHHcTpymehTa. B clyuae nobpekdeHn cJeDyET OTPeMOHTnpOBaTb 3eKtpoHHcTpymEH nepei npIMHeHHeM. MHorne Hechacthble
CnyaBbI3BaHbI IIOXIM yXoDOM 3a 3JIeKTPoINHCTpyMeHTOM.
e) PeKyuHn HNCTpyMeHT DOJKeH 6bITb 3aTOUeHHbIM N YNCTbIM. Pnp IOdEprXaHnpeKyuXn INHCTpyMeHTOB B NaIJIeKaIWeM COCTOHN I C OCTpbIM npexyIIMN KpOMkAMN BepoTHOCTb IX 3aKNINHBaHn yMeHbIaETcN IMN JERYe ynpabJIaTb.
K) IcnoIb3yIte 3JIeKTPoHCTpymENT, npHaJnEJXHOCTN, CBepna N T. N. B COOTBETCTBNN C DaHHbIMN IHCTpyKUJMAH, CneuΦHKoN KOHKpeTHORO Tnna 3JIeKTPoHCTpymENTa, yHTbIBaY cNoBnpa60tBu N BblIOJIHReMyo 3aDauy. IcnoIb3OBaHHe 3JIeKTPoHCTpymENTa dJa INhIx Oepaun, NOMMO Tex, dJa KOTOpbIX OH npedHa3NaueH, MOKeT pInBeCTN K BO3HnKHOBeHIO ONaCHOI CNTyaUn.
5. CEPBNC
a) Pemont 3JeKtpOnHCTpyMeHTa DOJXHO BbINONHtBcR KBaJIHΦNcIpuOBaHHbIM NepCOHaIOM C NCIOJIb3OBAHHeM TOJIbKO OpIHnHaJIbHbIX 3anachbIX qAcTei. 3TO o6ecneHT rapAHIO 6e3OpacHOCTn erO NCIOJIb3OBAHnI.
ПРавида TEХнКИ БЕОПАСHOCTN ПИ ПAPБОТЕ CO WIПАLEPHыIM HOCKHIцAMN:
1.Дерхитесь Na 6e3onachom
pacctoHn O T pexyuzero Hoxa.He
ydaJIne Cpe3aHHbIM MaTePnaI N
He DepxKIne MaTePnaI dIg Cpe3Kn
BO BpeM AINXKeHn HOxKe.Ipn
OuHCTKe 3actpBwero MaTePnaIa
y6eHntecb,уTO nITaHne OTKIOUcHo.
HeBHImaTeNbHocTb npi paBoTe co
UIIaJIepHBIM HOxHnCaMm MOxET pINBECTN K
cepbe3HbIM TpaBMam.
2.Шалегны Ножници с点点头переньшь, држась за ручу, пи остановлином ржунем диске. Пп траимсортуровке пихаеннишалегны Ножниц BCERда надевайт Кршки ржуну.
yctpoctba. Hndnexkauee o6paueHne co ⅢnaepbIMN HOXHNzAMN NOMOXET CHN3NTb pNCK NOUYEHNA TpaBM OT peKyuix HOxKe.
3.ДерхиTe Ka6eNb Ha 6e3onacHom pacctoHnn OT yuaCTka pe3Kn.Bo BpeMra60tbi Ka6eJIb MOxET 6bITb CkpbIT B KyCTapHNkax,И HOX MOxET cIyauHHO erO nepepe3aTb.
4.ДерхиTeMHCTpymeHT3a N3OJInpOBaHHbIe NOBepXHOCTn npN BbINOJIHeHm ONEpaU, KOrda peKyuSIn HNCTpymeHT MoKET KOCHyTbCRAckpbITOn pNOBOdKN.
Pn KOHTaKTe C npOBoDKoHaxOJaUeCnA NOI HApJxKeHEm, MetaJIInueckne DeTaN INCHTpymEnTa TOKe HAXOJrTCn POI HApJxKeHEm M MoYr Bbl3BaTb NopaxKeHne OepaTopa 3JNEKTpUeCKm TOKOM.
ДОПОЛНТЕЛБHBIE ПРавиJA TEXHнКИ БЕЗПАС"HOCTHN ПРИ PABOTE C ИНСТРУМЕТOM
- IcnoIb3yIte ⅦnapeHbIe HOxHnCbI TOJbKO B DHeBHOe BpeM aIIN npN XopoWem NCKYCCTBeHHOM OCBELeHN.
- Heo6xoJIMO 3HaTb, KaK 6bICTpo OCTaHOBNTb pa6OTo U7pAJIepHbIX HOXHNU, pRn ABAPINHOI CNTuayuun.
- HnKoIa He depXnTe WnanepeHbIe HOxHnUcbl 3a UNTKn.
- HnKOrda He nCnoB3yIe WnanePbIe HOxHnIcbl,ecn INX IuNTKN NOBpeJdeHbI NJIOTcyTCTByIOT.
- BbHMaIte wTeNceJIbHyIO BNkU y 3 po3eTKn Do nepeDaun IwnaIepHbIX HOxHNu Dpyromy NnCu.
6.ИЗбeraTe BbInOJIHЯТb pa6Oу,ecnI nO6n3OcTn HaxOДЯТсЯ JIOdN (OCo6eHHO detn). - Пи И сполььзовани Шпалерных HOЖИЗ 3аIMTe 6e3oNaChoe и Наджhoe pa6ooyeп поожени.
-
Bcerda depxknte pykn n Horn Ha 6e3oNaCHom pacctoHn ot pekyu x yCTpoiCTB, oc6eHHo npn BKNUOyeHN DBNrataTJI.
-
He nCnoB3yIe cTpeMnKy npn pa6Ote co WnnaepHbIMN HOxHnUaMn.
- BbHmMaTe 7TeTceBHyIO BnKy n3 po3eTKN B cNeDyUoXn CnyaJx:
-πpeXe Yem OCTaBnTB ⅢnaIepHbIe HOxHnCbI 6e3 npncMToTa;
-NepeD OuNcTko3acopa;
-NepeI npOBepKoI, OunchTKo IJI INTEXHnueckmO6cnykBaHHeM;
-πρι CTOLKHOBHeHn C KaKIM-JI6O IpeDMeTOM. He nCnoJIb3yIte ⅢaJIepHbIe HOXHnIbI, ecIIH Ye yBepeHbI, YTO BCE KOMNoHEHTbl HOxHnU HaxoJrTcB B 6e30NaChbIX ycNoBnX 3KcNlPyatauHn,
-Пичрзмерн Вьбрацишалерных HOЖИ. HeMeДлЕнHO BblONHITe OCMOTp. Чрзмерна Вьбраци можET CTaTb npчнOH TpaBM,
-IO nepeaun uanaepnbix HOxHnU dpyromy nucy.
- Bepernte yctpoNCTBO OTdoXJa. He pa6oTaIte ⅢpaIepHbIMn HOxHNzAmn C MOKpbIM KcTapHNIKOM.
- IpeE INCIOJIb3OBaHHeM UIIaJIepHbIX HOXHNU y6eIITecB, YTO yCTaHOBJIeHbI pINlaRaembl e pyKoORpaIteN. HIKOrJa He nbTaIteScb INcIOJIb3OBAtB yCTpOJCTBO B HENONHOM KOMnJIeKTe NIn NocNe HecaHKUHOHIpOBaHHoM MoIINKaun.
- PeryIaRHO npOBepaIte pexyUne HOxHa HauNue NOBpeKdEHN. Pn ObHapyKeHN IOBpeXdEHNr HEmeDJIeHNO BbINOJHITe peMOHT.
14.ДерхиTe Ka6eNb Ha 6e3oIacHOMpacCTOHHu yuaCTka pe3Kn.IpeπHaayanom pa6oTbI npOBepbTe Ka6eNb Ha HAnuYe NOBpeKdEHH. - He 3anyckaTe ⅢpaJIepHbIe HOxHnUcbl, ecnHa HOxN HaDeTa KpbIuKa.
16.ИЗбeraиTe neperpу3kn WnpaJIepHbIX HOxHnIc.He BbINOJIrTe C NOMOuBHOxHnIc DeIcTBnI,ДЯ KOTOpbIX OHI He npeHa3NaYeHbI.MoXHo IcNoJIb3OBaTb WIpaJIepHbIe HOxHnUc bToIbKO dIpe3Kn XINbIX IN3rOpOJei, KycTapHNKOB mMHoroneTHnx paCTeHnI. - Bcerda coxpaHЯTe paBHOBeCne n CTynaIte no TBepDoI onope npn pa6Ote co UNaJIepHbIMN HOXHNUaMn.
-
Hukorda He 6eHrTe BO Bpempa60tbo co UpanepHBIM HOXHuaMn.
-
Пи И спОЛьЗОВани Шпалерны HOЖИц. Надевайся поочны перчатки.
20.Будte octopoxHbI, KOrda MeHReTe INoIOXeHne pyK Ha INHCTpyMeHTe npN DBNXUxCra HOxax. - Пи Транспортуровке и Хаоннишпалерных Нжни BCERда DeржITE HOЖИ NOД Крblшков.
22.PekomeHdyeTcNcNoIb3OBAtB TOKOpa3HOCTHOe yCTPOINCTBO 3aUNTHORO OTKnIOUeHnA(Y3O)CdNΦΦepeHnAJIbHBIM TOKOMOTKnIOUeHnHe6Oee30mA. - He xbaataTe n He ybpaTe obpe3Kn JnBOJn3rOpOu BO Bpem pa60Tb IwnaIepHbIX HOxHnU. YdaTb Obpe3Kn 3rOpOu MoXHO, TOJIbKO ecn yCTpoIcTB OTKIIuOeHO nOTCOeINHeHO OT NCTOCHNk PNTAHJ.
- Ipehenocntb 7nanepehble HOXHNUcI MOXHO TOJbKO 3a pyuKy npn HENoDBHXOM pexyuem HOKe. Pn TpaHcnpTnPOBke nIN XpAHEnn 7nnaepHBIX HOxHnC o6ra3aTeNbHO y6eINTecb, UTO yCTaHOBNeHo npnlaraeMOe orpaXdHeNe. OctopoxHoe o6paueHne c ycTpoiCTBOM NOMOKe T CHN3NTb PNCK IOJyueHnRA TpaBM OT pexyuNX HOKeI.
25.ДеркiteKa6eNbHa 6e3oNaChOMpacCTOHHN OT yuaCTka pe3Kn.He 3a6bIBaITe,HTO BO BpeMpa6oTbI Ka6eNb MOKeT 6bITb CkpyIT B KycTapHnKax,N HOx MOKeT CnyaHNo ero Nepepe3aTb. - Ecni ceTeBOI shHyp nobpeXdH, To, BOn36exKaHN OnaCHOCTN NopaxeHn TOKOM, OH DoJKeH 6bITb 3aMeHeH n3ROTOBHTeJIeM, eO CepBnCHbIM aEHTOM IIN yNoJHMOUeHHbIM KBaJIuΦnUPOBaHHbIe JNUcOM.
YCJIOBHBIE O603HAUHIN

He doTpaIbaiTecb pykam

CeptnuKaT COOTBeCTBnI FOCT
ME77

OTXOdbI 3NEkTpoTeXHuecko npOdyKcHn He cJeDyET yTNIN3NPOBaTB C6bITOBbIMN OTXODAMN. OHN DOJXHbI 6bITb DOCTaBHeHb IMeTHbI CEHTp yTNIN3aCn INI HaJIeKaUeI nepepa60TK.
3KcPJIyATAUЯ

I P E D U N P E X K D E H N E: H I n cnoJb3yIte ycTpoiC T B O 6e3 T bI n nepeDne pyuKn.
ПРИМЕHEHNE NO HA3HAUYEHNIO
DaHoe yctpoicTBO npedHa3NaueHO nIPOdpe3AHJX KINBbIX N3rOpOeN KcYCTOB B6bITOBx cEJX.
CEOPKA 3AUHTbI
BCTaBBte 3aunTy B na3 (kak noka3aHo Ha Pnc. A) TaK, YTO6bl DBA 3anOpHbIX Ra3bUka BOuIN B OTBepCTnIyBeDNTecb, YTO OHN HAdexKHO 3aΦHKcPOBaJIncb.
3aTeM 3akpeHnTe 3auNTy DByMa BnHTamN.
IPED HAYAIONPABOTbICO
UHNAJIEPHBIM HOXHNUCAMN
BbINOJHNTCJEDYIOUNE DEICTBNA
CHIMITE KpbIuKy IJIa HOka (10), KaK noka3aHo Ha pucyHke D.
ДЯ HACHAJA PABOTBI CO ШАЛЕРьIMN HOЖИЦAMN ВынOLHNTE CLEDEYIOUINE DEIECTBNA
Ibnephe HoxnucbIMeOT Dba pbyaKa nepeknouatele (2&4).
Дя haçaна pa6obtI Heo6xOДmo HaxaTb 6a pbuajka. Haxmnte u ydepxnbaiTe φpoHTaHbI pyuakok nepeknioateTЯ (4) n Haxmnte pbuajok nepeknioateTЯ (2) (Cm.pnc.E).
ДЛЯ OKOHUAHNЯ PABOTbI CO WIJIAPHEPHbIMN HOXHNUCAMN BbINOJHNTE CLEDEYIOUne DEICTBnA
Ipeed OKOHuaHnem pa6oTbI OTBeiTe WIIaIepHbIe HOxHnUcIOT o6pe3aEMOrO MaTePnAna.
Дя OCTaHOBKи HOxHnC OTNyCTnTe OdIN H3 pyuKaKOB NepeKnUoHaTeTЯ (Cm. pnc. G).

ПЕДУПЕЖДECHNE: He pa6oTaIte co unanepnbl
HOKHNUaMn, ecJn 6bnapyKeHo, 4To KaKHe-JIb6o DetaH NcTcYcTcByIOT, NOBpeXdEhblnn cLOMaHbI, noka 3TN dTeaHn He 6ydyT 3aMeHEnbI nn OTpemOnTHnpOBaHbI. HecO6JIIOJeHne 3TOrO yCNoBnMa MoKet npNBecTn K cepBe3HbIM TpaBMam.
PABOTA CO шпалерныIMN HOЖнцамN
BbIDBXEHN3ADHEpyKIN
3aHЯ pyka shaIepHbIX HOxHnC MoXeT 6bIT BbIDBHyTa dIyYBeJIuYeHnO oblaCTn OXBaTA HOxHnC. IJN NCNoJIb3OBaHnE 3ToI ΦyHKUHN Heo6xOJIMO HaxaTb N yDePxNBaTb KHOKNy BblBHXeHnR (5) 60JIbIIM nJIbIeM n OToBbHyTb 3aDHIIO pyKy (1) ot OCHOBHO KOpnyCa.MoXHo Bbl6paTb OdHO n34 6IKcnpOBaHHbIX NOLOKeHn DJIa 3aDHeN pyKn (CM.pnc.H).
PEGYINPOBKA NOJOXEHNA PEPEDH NPYKNI
Haxmte u yepkuaTe DBe KhONKn (6) n NOBepHnTe nepeDnIO pyKu B HauboJeeyo6Hoe noLoXeHne. Ecnn OTnyCTnTB KHONKn, noLoXeHne nepeDHe pyKu 6ydet 3aФNKcnpoBaHo.MoxHO BbIbpaTb ONo H34 FHKscnpoBaHHbIX noLoXeHnДЯ nepeDHepyKu (Cm.pnc.F).NPEyPPEKDEHNE: npreYIpOBoKe noLoXeHnNepeDHe pyKu POndEprKNaBae TwnapeHbIe HOxHnCbI.
NCHOJIb3OBAHNE UPAJIEPHbIX HOXHNU
He nbItaTecb cpe3aTb cTe6n, dInHa KOTopbIX CNIUKOM BENKA.
BEPXHЯ CPE3KA
Pn cpe3ke nCnoB3yIe 7npokne nponeTbI (CM. pnc. I). HauynuUwne pe3yNbTaTbI dOCTnraIoTc npn He6oJbWOM hakIOHe pexyux HOKei.
БOKOBAR CPE3KA
Pn 6pe3ke 6OKOB JINBOH n3rOpOu HaunHaIte CHN3y N DnBraInTeCb BBepx (Cm. pnc.e J), orn6a Hoxkom BepXHIO BHyTpeHHIO KpOMKy n3rOpOu. IcnoJb3OBaHne TAKORO cnOCo6a no3BOJareT o6pa6aTBiBaTb 6OJIbSyU yAcTb n3rOpOu, Yem DOCTnIraETc8 6OJe paBHomepHbI poCT.
TEXHNUECKOE OBCJNUXKINBAHNE
OuHCTKA
OTCOeINHInTe yCTPOINCTBO OT NCTOCHNKA 3JIeKTPoINTaHnA.C NOMOuB MOyKOJ UeTKU ydaJIInTe 3acOpbl CO BCEx BO3dyX03a6OpHNKOB IN peKyuux HOKei.
BbITpnte nobepxHoctb wnaepHBIX HOKHNU cyXoT KtaHbIO.
PPEyPExKDEHNE: HnKorda He nCNoJIb3yIte BODy dIra OcNCTKn ⅢnaIepHBIX HOxHnU. He nCNoJIb3yIte dIra OOcNCTKN XIMNUeCKne BeIeCTBa, HApnPmEp 6eH3nH nIIN pactBOpHTelb, TaK KaK eT0 MoKeT npNBecTI K NOBpeJdeHnIO IinaIepHBIX HOxHnU.
CMA3KA PEXKUINX HOXEK
3AHTA OKPXXAOUeN CPeIbI
OToXoDbI 3neKtpotexHnuecko npOdyKuHn He cIeJyET yTINn3npuOBaTb C 6bITOBbIMN OTxOdaMn. OHn DOJnxHbI 6bITb DocTabHeHb I MeCThBi NcHTp yTINn3aCm n dJaHdJIeKaUe npepea6OTKn.