Comfort de Luxe - Steam cleaner BEEM - Free user manual and instructions
Find the device manual for free Comfort de Luxe BEEM in PDF.

| Product type | Steam cleaner |
| Brand | BEEM |
| Model | Comfort de Luxe |
| Dimensions (L x W x H) | 350 x 2405 x 253 mm |
| Weight | 5.52 kg |
| Mains voltage | 220-240 V~ |
| Frequency | 50 Hz |
| Rated power | 1500 W |
| Steam pressure | 3.5 bar |
| Tank capacity | 1.0 litre |
| Runtime (full tank) | 40 minutes |
| Protection type | IP X4 |
| Protection class | I |
| Steam control | Yes, continuously adjustable |
| Steam switch lock | Yes |
| Included accessories | Floor brush, rectangular steam nozzle, squeegee attachment, pencil jet nozzle, crevice nozzles, round brushes (metal and synthetic), microfiber cloths, extension hoses, adapter, measuring cup, funnel |
| Descaling required | Yes, with acetic or citric acid if using hard water |
| Spare parts available | Yes, via BEEM (references listed in the manual) |
Frequently Asked Questions - Comfort de Luxe BEEM
User questions about Comfort de Luxe BEEM
0 question about this device. Answer the ones you know or ask your own.
Ask a new question about this device
Download the instructions for your Steam cleaner in PDF format for free! Find your manual Comfort de Luxe - BEEM and take your electronic device back in hand. On this page are published all the documents necessary for the use of your device. Comfort de Luxe by BEEM.
USER MANUAL Comfort de Luxe BEEM
Open the fold-out page at the beginning and end of the user manual in order to view the illustrations during reading.
text_image
Labeled diagram of a yellow vacuum cleaner with numbered parts, alongside its internal exploded view.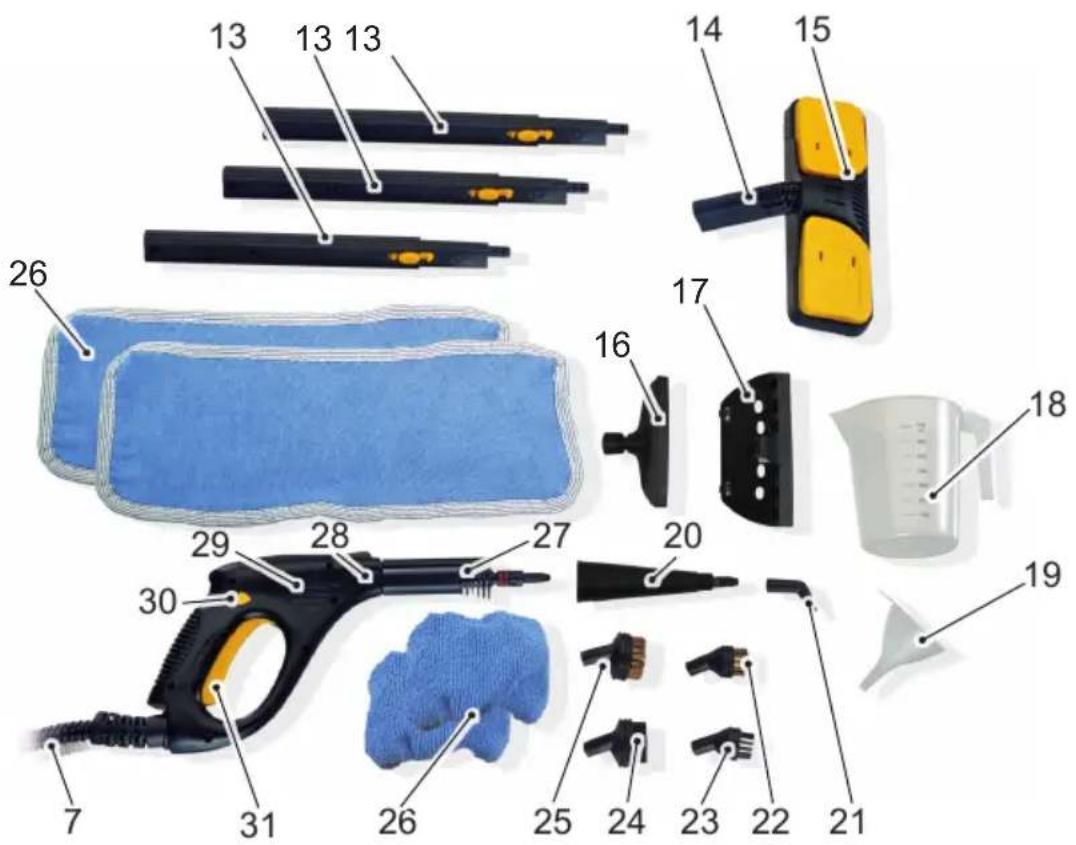
text_image
Exploded view diagram of a cleaning or hair cleaning tool with numbered parts for identificationInhalt
General instructions ..... 23
Safety instructions 25
Startup 28
Appliance description 29
Operation and use 33
After using 36
Cleaning and maintenance ..... 3 6
Storage 37
Troubleshooting 38
Spare parts and other accessories .. 39
Technical data 40
Dear Customer,
Before using the appliance, please read the instructions contained in this user manual on startup, safety, intended use as well as cleaning and care.
Open the fold-out page at the beginning and end of the user manual in order to view the illustrations during reading.
Keep this user manual in a safe place and pass it on to any future owners together with the appliance.
General instructions
Copyright
This document is copyrighted. Any duplication or reprinting, in whole or in part, and the reproduction of the illustrations, even in modified form, is only permitted with the written approval of the manufacturer.
Notes on environmental protection
The packaging materials used can be recycled. When no longer required, dispose of the packaging materials according to local environmental regulations.
This product may not be disposed of in the domestic refuse within the European Union. Dispose of the appliance via communal collection points.
Warranty / Guarantee
In addition to the statutory warranty obligation, BEEM also grants an extended manufacturer's guarantee for some products.
Provided this is granted, the corresponding details for each product can be found either on the product-specific packaging, advertising material or on the BEEM website.
Please visit our website to obtain more information on comprehensive guarantee conditions, available accessories and spare parts as well as user manuals in various languages
Symbols used

DANGER
This indicates an imminent hazardous situation, which could lead to severe physical injury or death.
Follow these instructions to avoid ▶ danger.

WARNING
This indicates a possible hazardous situation, which could lead to severe physical injury or death.
Follow these instructions to avoid ▶ danger.
ATTENTION
This indicates a potentially hazardous situation, which could lead to minor injuries or material damage.
Follow these instructions to avoid ▶ danger.
NOTE
A note contains additional information to simplify the use of the appliance.
Symbols on the appliance
Symbol Meaning

Warning of hot surfaces

Danger of scalding!
Intended use
This appliance is intended primarily for non-commercial to steam clean suitable surfaces.
Any use other than previously stated is considered as improper use.

WARNING
If not used for its intended purpose and/or used in any other way, the device may be or become a source of danger.
Use the appliance only for its intended purpose.
Observe the procedures described in this user manual.
No claims of any kind will be accepted for damage resulting from use of the appliance for other than its intended purpose.
The risk must be borne solely by the user.
Limitation of liability
We assume no liability for damage or follow-up damage in the case of:
failure to observe the instructions in ■ the user manual,
use for other than the intended purpose,
improper or unsuitable handling, ■
incorrectly performed repairs, ■
unauthorised modifications, ■
use of non-approved parts or spare ■ parts,
use of unsuitable supplementary or accessory parts.
Declaration of Conformity
BEEM hereby declares that this appliance complies with the fundamental requirements and other relevant provisions of 2006/95/EC and 2004/108/EC and und 2009/125/EC directives.
Safety instructions
This appliance is not intended for use by persons (including children) with restricted physical, sensory or mental capabilities or with insufficient experience and/or knowledge unless they are supervised by a person responsible for their safety or have received instructions on the use of the appliance from such a person.
Children must be supervised to ensure that they do not play with the appli- ance.
Inspect the appliance for visible signs of damage before use. Do not use a damaged device.
Do not leave the appliance unattended during operation.
Only allow repairs to the appliance ■ to be carried out by an authorised specialist or by the works customer service; this particularly applies to replacing a damaged connecting cable. Unqualified repairs can lead to considerable danger for the user. This will also invalidate the warranty or guarantee.
Repairs to the appliance during the ■ guarantee period may only be carried out by service centres authorised by the manufacturer otherwise the warranty or guarantee will become invalid in the event of damage or subsequent damage.
Defective parts may only be replaced with original spare parts. Only original spare parts guarantee that the safety requirements are met.
Do not use this appliance together with an external timer or a separate remote control system.

DANGER
Danger from electric current
Do not use the appliance if the mains cable or mains plug is damaged.
Do not open the housing of the appliance. Danger from electric current if live connections are touched and/or the electrical and mechanical configuration is changed.
Never immerse the appliance or the mains plug in water or other liquids. In wet areas, only use approved ▶ extension leads or multiple mains sockets.
Never use the appliance to clean ▶ switches, plug sockets and other live parts or electrical appliances.
Pull the plug out of the mains socket, when changing the attachments, – if you are not using the appliance, – if a malfunction occurs during operation, before you clean the appliance. – before you fill the tank, – when working with the accessory parts.
Risk of suffocation!
Never play with packaging material. Risk of suffocation.

WARNING
The device and the accessories used become very hot during use!
Observe the following safety precautions to avoid burning:
Never direct the steam jet towards yourself or other persons or animals.
Allow the appliance to cool down completely before storing it or carrying out work on the appliance.
Empty the tank completely before refilling.
Do not clean heat-sensitive materials with the appliance.
The mains socket must be easily accessible to enable quick disconnection of the appliance from the electric circuit in the event of an emergency.
Risk of injury from pressurised liquids!
Observe the following safety precautions to avoid any risk of injury:
Allow the appliance to cool down completely before opening the tank cap so that the pressure in the tank can be relieved.
Never loosen the tank cap when the appliance is in operation.
Danger of crushing!
Do not trap you fingers under the retaining clips on the floor brushes.
ATTENTION
Damage is possible from improper use of the device!
Observe the following instructions to avoid property to damage:
Before connecting the appliance, ▶ compare the connection data (voltage and frequency) on the rating plate with those of your mains power supply. This data must correspond in order to avoid damage to the appliance. If in doubt, ask your electrical appliance retailer.
Never immerse the device into water or other liquids.
Always carry the appliance at the ▶ grip handle, and not by the connecting cable.
Do not pull the connecting cable ▶ to remove the plug from the mains socket.
Do not crush the connecting cable ▶ (underneath doors, for example) and do not move the appliance over the connecting cable.
Do not expose the connecting cable or the appliance to heat or chemical liquids.
Do not pull the connecting lead ▶ across sharp edges or hot surfaces.
Make sure that the steam hose is not overstretched, crushed or bent. Do not use the appliance with a damaged steam hose.
ATTENTION
Operate the appliance only when the tank is filled.
Only pour water into the tank and no other fluids or additives.
Never fill the appliance with more ▶ than the maximum permitted quantity.
Do sit or stand on the appliance and do not place any heavy objects on it.
Do not leave the appliance out-▶ side and do not expose it to direct sunlight or humidity. Do not store the appliance in the immediate vicinity of heat sources (such as fire, radiators, fan heaters or other heat radiating appliances).
Requirements for the place of use
For safe and trouble-free operation of the appliance, the installation location must satisfy the following requirements:
Do not install the appliance in a hot-wet or very humid environment.
■ The mains socket must be easily accessible and allow fast disconnection in the event of an emergency.
Electrical connection
For safe and trouble-free operation of the appliance, the following instructions on the electrical connection must be observed:
Before connecting the appliance, ■ compare the connection data (voltage and frequency) on the rating plate with those of your mains power supply. This data must correspond in order to avoid damage to the appliance. If in doubt, ask your electrical appliance retailer.
The mains socket must be protected by at least a 10 A automatic circuit breaker.
Ensure that the mains cable is undamaged and is not laid over sharp edges.
The mains cable must not be pulled ■ tightly, bent or come into contact with hot surfaces.
Route the mains cable to prevent risk ■ of tripping.
The electrical safety of the appliance is only assured when it is connected to a properly installed protective earth (PE) conductor system. Connection to a mains socket without PE conductor is forbidden. If in doubt, the electrical system must be checked by a qualified electrician. The manufacturer assumes no liability for injury or damage caused by a missing or interrupted protective earth conductor.
Startup
Unpacking
Remove the appliance, all accessory parts and the user manual from the box.
Remove all packaging materials and protective foils from the product and the accessories before using it for the first time.
NOTE
Do not remove the rating plate or any warning signs on the appliance. If possible, keep the original packaging during the guarantee period in order to be able to pack the device properly in the event of a guarantee claim. Transport damage will invalidate the warranty or guarantee.
Checking the delivery contents
Check for visible signs of damage or missing items.
Report incomplete or damaged contents to your supplier immediately.
Appliance description
(See illustration on the left fold-out page)
Tank cap1
Carrying handle2
Basic appliance3
ON/OFF switch4
Steam ready indicator5
Steam flow regulator6
Steam hose7
Connecting socket for steam hose8
Power indicator light9
Accessories compartment10
Release button for accessories com-11 partment
Connecting cable12
Extension tube (3x)13
14 Connector for floor brush
15 Floor brushes
16 Rectangular steam nozzle
17 Window attachment
18 Measuring cup
19 Filling funnel
20 Spot spray nozzle
21 Joint nozzle
22 Small round brush with metal bristles
23 Small round brush with plastic bristles
24 Large round brush with plastic bristles
25 Large round brush with metal bristles
26 Cloth set
(2x microfibre cloth for rectangular steam nozzle and 2x microfibre cloth for floor brush)
27 Accessory adapter
28 Release button
29 Steam spray gun
30 Steam switch lock
31 Steam switch
32 User manual (not illustrated)
Safety devices
For safety reasons, the appliance is equipped with the following safety devices.
Steam switch lock
The steam switch can be locked to prevent unintentional discharge of steam.
Pressure controller
The pressure in the tank is kept as constant as possible during operation. The heater is switched off automatically when the maximum operating pressure is reached, and is switched on again in the event of a pressure drop after discharging steam.
NOTE
If steam escapes constantly from the tank cap during operation, the appliance is defective. In this case, please contact customer service.
Temperature controller
The heater is equipped with an automatic thermostat that prevents overheating of the appliance.
Overheat protection
In the event of failure of the thermostat due to malfunction, the appliance is protected against overheating. In this case, please contact customer service.
Filling with water
Loosen and remove the ◆ tank cap. Simultaneously press and unscrew the tank cap.
Fill the tank with water. Use the measuring cup (18) and filling funnel (19). The maximum filling quantity is 1.0 litre.
Screw on the ◆ tank cap again.
Simultaneously press the tank cap ◆ and screw it tight.
NOTE
Also pay attention to the section ▶ Refilling with water (page 33).
Connecting the steam hose
Push down the cover of the connecting socket (8).
Insert the connector of the steam ♦ hose into the connecting socket and allow it to snap in.
Opening/closing the accessories compartment
To open the accessories compartment (10), press the release button (11) and lift off the upper part of the appliance.
To close the accessory compartment, insert the accessory parts properly and put the recess on the front of the upper part of the appliance onto its counterpart in the accessory compartment. Press down the back of the upper part of the appliance until it snaps in.
Attaching accessories
Take the required accessory out of the accessory compartment (10).
NOTE
Allow accessories used to completely cool down after use and return them to the accessory compartment.
Connecting/removing extension tubes
◆Push the extension tubes (13) onto the steam spray gun (29) until they snap in.
To remove the extension tubes (13), press the release button (28) and pull off the extension tubes.
NOTE
▶Depending on requirements, you can use up to three extension tubes.
Attaching the floor brush
◆Push the connector (14) onto the floor brush so that the connection faces downwards, then turn the connector upwards 180° in a clockwise direction (image A1).
◆Push the connector onto the extension tube or steam spray gun (29) until it engages.
Attaching the microfibre cloth
Put the floor brush onto the middle of the cloth.
Press and hold down one of the re-♦ taining clips.
Put one end of the cloth under the retaining clip and release the retaining clip.
Press and hold down the other retaining clip.
Put the other end of the cloth under the retaining clip and release the retaining clip.
To remove the cloth, press on the re-♦ retaining clips and pull out the cloth.
Attaching the accessory adapter
To use accessories such as the spot spray nozzle (20) or the rectangular steam nozzle (16), you need the accessory adapter (27). Fit this as follows:
Put the accessory adapter (27) onto the extension tube or onto the steam gun (29).
While pressing the release button (28), the accessory adapter can be pulled off.
Connecting the spot spray nozzle with attachments
Fit the accessory adapter (27). ◆
Push the spot spray nozzle (20) onto the installed accessory adapter (27) and screw the spot spray nozzle tight in clockwise direction.
Push the desired attachment (16, 21-25) lightly onto the spot spray nozzle.
Pull lightly to remove the attachment ◆ (16, 21-25) again.
The spot spray nozzle can be re- moved again by turning in an anti-clockwise direction and pulling slightly.
◆Press the release button to pull off the accessory adapter again.
Attaching the rectangular steam nozzle
◆it the accessory adapter.
Push the spot spray nozzle (20) onto the installed accessory adapter (27) and screw the spot spray nozzle tight in a clockwise direction.
◆Push the rectangular steam nozzle (16) onto the attached spot spray nozzle (20).
NOTE
The rectangular steam nozzle can be used both with the window attachment (17) and with or without the microfibre cloth.
Attaching the window attachment
To attach the window attachment ◆ (17) hook the steam nozzle (16) into the window attachment (17) and fold down until it snaps in (images B1 and B2).
To remove, loosen the locking tab and pull off the window attachment.
The rectangular steam nozzle can be removed again by pulling.
General cleaning instructions
Before beginning with cleaning, read the instructions on caring for the material to be cleaned.
Use an unexposed area to check for tolerance of the material against steam.
ATTENTION
Do not use the steam cleaner without a microfibre cloth to clean cork floors or other sensitive floors.
Cleaning coated or painted surfaces
ATTENTION
Do not direct the steam at glued ▶ edges because this could soften the glue. Do not use the appliance on unsealed wood or parquet floors.

Prolonged use of steam can dissolve wax, furniture polish, plastic coatings or paint or cause stains. Clean kitchen and living room furniture, doors, parquet, coated or plastic-coated surfaces only with the microfibre cloth and do not wipe an area too long, otherwise damage can occur, particularly on natural parquet and similar sensitive surfaces.
Cleaning glass
ATTENTION
Do not direct the steam jet towards the sealed points of the window at the window frame in order not to damage the seal.
Do not clean glass at low outdoor temperatures. The hot steam can tension the glass surface and shatter the glass.
Operation and use
Switching on and using the appliance
Insert the plug into the mains socket.
Switch on the appliance by pressing the on/off switch (4). The power indicator (9) lights up red, the steam ready indicator (5) lights up green and the water in the tank is heated up.
When the operating temperature is reached, the steam ready indicator (5) extinguishes. The appliance is ready for use.
If necessary, unlock the steam ◆ switch (31) and set the steam quantity. Press the steam switch. Direct the steam jet at a cloth until the steam flows out evenly.
Press down the steam switch and direct the steam jet towards the surface to be cleaned.
NOTE
The heater in the appliance switches on and off frequently during use in order to maintain the pressure in the tank. The steam ready indicator lights up green when the heater is switched on.
Setting the steam flow
The steam flow is set with the steam flow regulator (6).
Turn the steam flow regulator in a clockwise direction to decrease the steam flow.
Turning completely to the right: steaming is switched off completely.
Turn the steam flow regulator in an anti-clockwise direction to increase the steam flow.
Locking/unlocking the steam switch
Push the steam switch lock (30) to the right to lock the steam switch.
Push the steam switch lock (30) to the left to unlock the steam switch.
Refilling with water
Switch off the appliance and pull the plug out of the mains socket.
Press down the steam switch (31) un- til steam is no longer discharged.
Lock the steam switch.
◆ Fill the tank, see section Filling with water (page 30).
Switch on the appliance again, see section Switching on and using the appliance (page 33).
Restarting after interruption
During an interruption in operation, condensation can form in the steam hose.
When restarting, allow the condensation to escape first. Direct the steam spray gun towards a cloth and press the steam switch. When steam flows out steadily, cleaning can be continued,
Switching off the appliance
Switch off the appliance by pressing the on/off switch (4). The power indicator light extinguishes.
Press down the steam switch (31) until steam is no longer discharged.
After using
Allow the appliance to cool down completely.
Detach all accessories.
To remove the steam hose, simultaneously press the two buttons on the side of the connector and pull out the steam hose.
Open the tank and empty it. ◆
Allow the tank to dry completely. ◆
Close the tank again with the tank ◆ cap.
Lock the steam switch. ◆
Using the accessories
Steam spray gun
You can also use the appliance without accessories:
Remove dust from plants
■ Damp dusting.
Spot spray nozzle (images C1-C5)
The closer you hold the nozzle to the dirty surface, the better the cleaning effect since the temperature and steam pressure are at their highest directly at the nozzle outlet.
The spot spray nozzle can be used with the following attachments:
■ Crevice nozzle,
■ Round brushes with metal bristles,
■ Round brushes with plastic bristles.
- For optimum deployment, use the brushes as follows:
Use the crevice nozzle to clean corners and locations that are difficult to access (image C1).
Both the round brushes with metal bristles and the round brushes with plastic bristles are suitable for cleaning joints (images C2 and C3).
Steam very dirty areas thoroughly and allow them to soak for a while. This enables the dirt to be removed more easily (image C4).
Only use the round brush with plastic brushes for cleaning stainless-steel fittings. Closely spray the areas to be cleaned with strong jets of steam (image C5).
NOTE
Only use the plastic brushes for cleaning surfaces susceptible to scratching.
Floor nozzle (images D1-D3)
The floor brush is suitable for cleaning large washable wall and floor coverings. It can be used both with and without the microfibre cloth (images D1 and D2).
For this, proceed as follows:
Move the floor brush rapidly back and forth after discharging the steam. To clean joints properly, move the floor brush diagonally to the joint.
Rinse the microfibre cloth at regular intervals to improve absorption of dirt.
When cleaning laminate and par-◆ quet floors, reduce the steam flow so that as little steam as possible is discharged directly onto the surface image D3).
Rectangular steam nozzle (image E1)
The rectangular steam nozzle is suitable for cleaning windows, mirrors, ceramic tiles and other smooth surfaces (image E1).
Rinse the microfibre cloth at regular intervals to improve absorption of dirt.
Window attachment (images E2-E3)
Steam the window panes with the rectangular steam nozzle and the microfibre cloth first.
Then wipe the glass surface from top to bottom with the rubber lip (images E2 and E3).
Wipe the rubber lip and the lower edge of the window dry with a cloth after each row.
After using
Switch off the appliance and pull the plug out of the mains socket.
Clean the appliance and the accessory parts as described in the section Cleaning and care (page 36).
Cleaning and maintenance
Before beginning any work, pay attention to the safety instructions in the section Safety instructions (page 25)!
Cleaning the appliance
Use a slightly moist cloth to wipe off the outside of the appliance housing and the accessory parts.
The microfibre cloths can be washed at 60^ C in the washing machine.
NOTE
Do not use any aggressive or abrasive cleaning agents.
In order to allow the cloths to properly absorb the dirt, do not use fabric softeners. Do not dry the microfibre cloths in the tumble drier.
Rinsing the tank
Rinse the tank at least after every fifth use.
Fill the tank with water, see also section Filling with water (page 30).
Shake the appliance vigorously. This will help loosen calcium residue that has formed on the bottom of the tank.
Pour out the water. ◆
Allow the tank to dry before closing ◆ the tank again.
Descaling the appliance.
NOTE
If normal distilled water is used at all times, descaling of the tank will not be necessary.
Scale deposits in the tank prolong ▶ the heating time. Descale the tank, when necessary.
Empty the tank completely.
Fill the tank with 0.75 litre of water (temperature approx. 50^ C) and 5% acetic or citric acid.
NOTE
When using descaling agents, pay attention to the instructions on use from the manufacturer.
Allow the solution to work for approx. 8 hours.
ATTENTION
Do not close the tank with the safety cap.
Do not use the appliance as long ▶ as there is descaling solution in the tank.
Pour out the descaling solution after 8 hours.
Rinse the tank with clean water two or three times.

Storage
If you do not intend to use the appliance for a longer period of time, clean it as described in the section Cleaning and care (page 36).
Wind the cable onto the cable winder (image F1) on the underneath if the appliance.

Store the appliance and all accessory parts at a dry, clean and frost-free location
◆ which is protected against direct sunlight.
Troubleshooting
The following table will help you locate and eliminate minor faults:
| Fault Possible cause Remedy | ||
| The power indicator does not light up after switching on. | Plug not inserted into socket. | Insert plug. |
| Automatic circuit breaker in electrical distribution board tripped. | Switch on the automatic circuit breaker again. | |
| The automatic circuit breaker in the electrical distribution board trips. | Too many appliances connected to the same power circuit. | Reduce the number of appliances on the power circuit. |
| No fault detected. Contact customer service. | ||
| Long heating-up time. The tank is scaled. Descale the tank. | ||
| Appliance not switched on. Switch on the appliance. | ||
| Appliance is not yet ready for operation. | Wait until the steam ready indicator extinguishes. | |
| No steam. | The accessories are not correctly attached. | Check the accessories. |
| Not enough water in the tank. | Fill the tank, see section Refilling the tank (page 33). | |
| Steam switch locked. Unlock the steam switch. | ||
| Steam flow set too low. Increase the steam flow. | ||
| Steam escapes constantly from the tank cap. | Appliance is defective. Contact customer service. | |
NOTE
If you cannot resolve the problem with the steps described above, please contact customer service.
Spare parts and other accessories
| Item* Article No. Designation | |
| 1 900 061 196 | Tank cap |
| 7+29 900 061 061 Steam hose with spray gun | |
| 13 900 061 071 Extension tube, 1-piece | |
| 15 900 061 091 Floor brushes | |
| 16, 17 900 061 116 | Combi-accessories 2 in 1 with rectangular steam nozzle + window attachment |
| 18 900 061 131 Measuring cup | |
| 19 900 061 081 Filling funnel | |
| 20 900 061 206 Spot spray nozzle | |
| 21 900 061 121 Joint nozzle | |
| 22 900 061 106 Small round brush with metal bristles | |
| 23 900 061 096 | Small round brush with plastic bristles |
| 24 900 061 101 | Large round brush with plastic bristles |
| 25 900 061 111 Large round brush with metal bristles | |
| 26 D10 004 24 | Cloth set, consisting of:Microfibre cloth for rectangular steam nozzle (2x) ■Microfibre cloth for floor brush (3x) ■ |
| 27 900 061 066 Accessory adapter | |
* numbering according to the description of the appliance
| Technical data | |
| Model | Steam cleaner"Comfort de Luxe" |
| Type number SC-386 L | |
| Dimensions | 350 x 2405 x 253 mm(H x W x D) |
| Approximate weight 5.52 kg | |
| Operating voltage 220-240 V~ | |
| Mains frequency 50 Hz | |
| Power consumption 1500 W | |
| Steam pressure 3.5 bar | |
| Tank volume 1.0 litre | |
| Operating time | max. 40 minutes per tank filling |
| Degree of protection IP X4 | |
| Protection class I | |
Sommaire
Monteer de accesssoire-adapter.
natural_image
Close-up of a black plastic device casing with internal compartments and mounting holes (no visible text or symbols)
natural_image
Close-up of a mechanical component with a lever and rotating arrow, labeled B2 (no text or symbols on the object itself)
natural_image
Hand holding a black spray gun on a tiled kitchen sink (no visible text or symbols)
natural_image
Hand holding a black spray gun on a tiled wall, no visible text or symbols
natural_image
Hand holding a black spray gun on a tiled wall, labeled C3 in the corner (no text or symbols on the gun itself)
natural_image
Hand using a black spray gun to clean four circular patterns on a tiled floor (no text or symbols visible)
natural_image
Hand holding a black spray gun on a tiled floor, with a kitchen sink visible in the background (no text or symbols)
natural_image
Close-up of a black tool with yellow buttons on a tiled floor, labeled D1 in the corner (no text or symbols on the tool itself)
natural_image
Black and yellow cleaning tool mounted on tiled floor, no visible text or symbols
natural_image
Close-up of a black cable with yellow connectors and a small blue connector, labeled D3 (no text or symbols on the object itself)
natural_image
Hand cleaning a tiled bathroom with a power tool on a wall (no text or symbols visible)
natural_image
Hand cleaning a window with a black brush (no text or symbols visible)
natural_image
Hand cleaning a wall-mounted tool with a black handle, against a blurred green outdoor background (no text or symbols visible)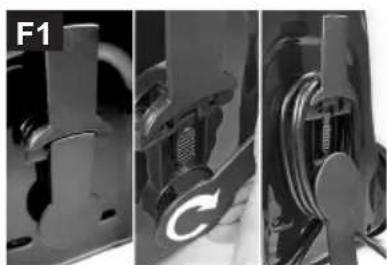
natural_image
Close-up of mechanical components with no visible text or symbolsElements of Lifestyle
BEEM
Subject to printing error
For service in other countries contact your local dealer.