
DMR250SET - Surveillance Camera Monacor - Free user manual and instructions
Find the device manual for free DMR250SET Monacor in PDF.
User questions about DMR250SET Monacor
0 question about this device. Answer the ones you know or ask your own.
Ask a new question about this device
Download the instructions for your Surveillance Camera in PDF format for free! Find your manual DMR250SET - Monacor and take your electronic device back in hand. On this page are published all the documents necessary for the use of your device. DMR250SET by Monacor.
USER MANUAL DMR250SET Monacor
Before switching on ...
We wish you much pleasure with your new MONACOR unit. Please read these operating instructions carefully prior to operating the unit. Thus, you will get to know all functions of the unit, operating errors will be prevented, and yourself and the unit will be protected against any damage caused by improper use. Please keep the oper-ating instructions for later use.
The English text starts on page 12.
All operating elements and connections described can be found on the fold-out page 3.
Contents
1 Operating Elements and Connections 12
1.1 Recorder 12
1.2 Accessories 13
2 Safety Notes 13
3 Applications 13
4 Making Connections, Inserting the Memory Card and Recharging the Battery 13
5 Switching On/ Off, Overview of Functions 14
6 Functional group SETTING Making settings 14
6.1 Overview of submenus and possible adjustments 15
7 Functional group RECORD Live surveillance, audio and video recordings 16
8 Functional group VIDEO Replaying and managing recordings 16
8.1Replayingrecordings 16
8.2 Managing recordings 17
9 Functional group VOICE Audio recordings 17
9.1 Audio recordings only 17
9.2Replaying audio recordings 17
9.3 Managing audio recordings 18
10 Functional group PHOTO
Taking, viewing, managing snapshots 18
10.1 Taking snapshots 18
10.2 Viewing snapshots 18
10.3 Managing snapshots 18
11 Further Possibilities 18
11.1 Button lock feature 18
11.2 Reset 19
11.3 Copying recordings onto a computer 19
11.4 Wrist strap 19
12 Specifications 19
1 Operating Elements and Connections
1.1 Recorder
1 Lug to attach the wrist strap provided
2 Sound output holes for the speaker on the rear side
3 Air vents; do not cover!
4 Button lock feature: When the button lock feature has been activated (left position), operation is not possible.
5 Button STOP/ESC
- to stop a recording or a replay
-
with the menu activated: to return to the previous menu level
6 Button REC/PAUSE to start, pause or continue a recording
7 Button MENU -
to activate submenus for the functions RECORD,VIDEO,VOLUME and PHOTO
- with the function SETTING activated: to directly return to the basic menu (fig. 2) from any menu branch
- with the basic menu displayed: to switch between internal memory and memory card: Keep the button pressed for 3 seconds.
8 Microphone
9 Slot (cover removed) for a micro SDHC memory card (16 GB max.) Insert the card with its contacts showing upwards.
10 USB port (cover removed) for connection to a computer
11 Buttons + and -
- to adjust the volume when replaying a recording
- to set the time and the date in the menus "Record Timer Setup" and "System Setup"
12 Buttons and
- to select a menu item and to change a setting
- for fast forward/reverse when replaying a recording
13 Button II
- to switch on or off, keep the button pressed for 3 seconds (PWR button)
- to start replaying a recording
- to pause and continue replaying
- to activate a submenu or menu item and to confirm a setting (ENT button)
14 Display, also see fig. 2
a date
b time
c clock icon when a time-controlled recording has been programmed
d SD icon when a memory card has been inserted and selected
e padlock icon with activated button lock feature
f speaker icon; crossed out when the sound has been deactivated
g value of the volume adjusted (0 - 30)
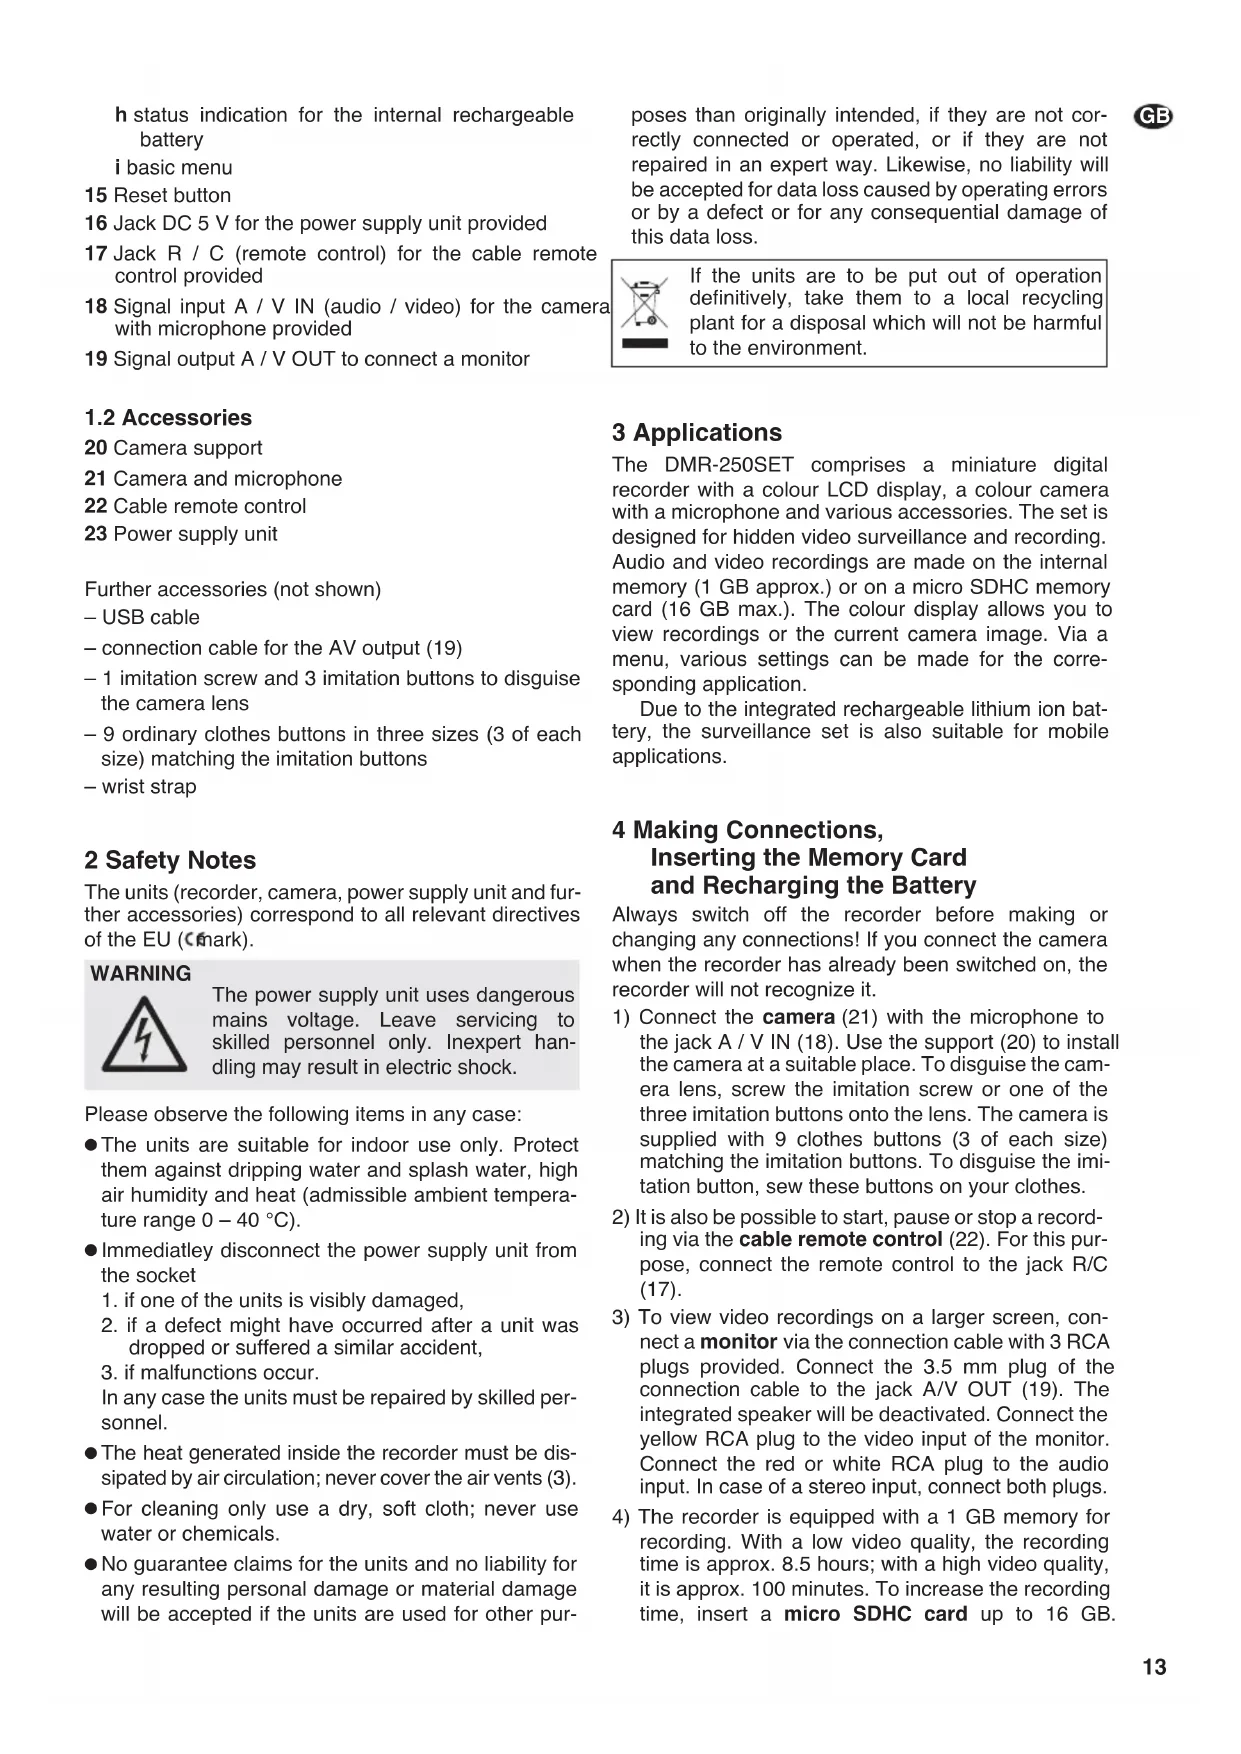
h status indication for the internal rechargeable battery i basic menu
15 Reset button
16 Jack DC 5 V for the power supply unit provided
17 Jack R / C (remote control) for the cable remote control provided
18 Signal input A / V IN (audio / video) for the camera with microphone provided
19 Signal output A / V OUT to connect a monitor
1.2 Accessories
20 Camera support
21 Camera and microphone
22 Cable remote control
23 Power supply unit
Further accessories (not shown)
- USB cable
- connection cable for the AV output (19)
- 1 imitation screw and 3 imitation buttons to disguise the camera lens
- 9 ordinary clothes buttons in three sizes (3 of each size) matching the imitation buttons
- wrist strap
2 Safety Notes
The units (recorder, camera, power supply unit and further accessories) correspond to all relevant directives of the EU (Cmark).
WARNING

The power supply unit uses dangerous mains voltage. Leave servicing to skilled personnel only. Inexpert handling may result in electric shock.
Please observe the following items in any case:
The units are suitable for indoor use only. Protect them against dripping water and splash water, high air humidity and heat (admissible ambient temperature range 0 - 40^ ).
- Immediatley disconnect the power supply unit from the socket
- if one of the units is visibly damaged,
- if a defect might have occurred after a unit was dropped or suffered a similar accident,
- if malfunctions occur.
In any case the units must be repaired by skilled personnel.
The heat generated inside the recorder must be dissipated by air circulation; never cover the air vents (3).
- For cleaning only use a dry, soft cloth; never use water or chemicals.
- No guarantee claims for the units and no liability for any resulting personal damage or material damage will be accepted if the units are used for other pur
poses than originally intended, if they are not correctly connected or operated, or if they are not repaired in an expert way. Likewise, no liability will be accepted for data loss caused by operating errors or by a defect or for any consequential damage of this data loss.

If the units are to be put out of operation definitively, take them to a local recycling plant for a disposal which will not be harmful to the environment.
3 Applications
The DMR-250SET comprises a miniature digital recorder with a colour LCD display, a colour camera with a microphone and various accessories. The set is designed for hidden video surveillance and recording. Audio and video recordings are made on the internal memory (1 GB approx.) or on a micro SDHC memory card (16 GB max.). The colour display allows you to view recordings or the current camera image. Via a menu, various settings can be made for the corresponding application.
Due to the integrated rechargeable lithium ion battery, the surveillance set is also suitable for mobile applications.
4 Making Connections, Inserting the Memory Card and Recharging the Battery
Always switch off the recorder before making or changing any connections! If you connect the camera when the recorder has already been switched on, the recorder will not recognize it.
1) Connect the camera (21) with the microphone to the jack A/V IN (18). Use the support (20) to install the camera at a suitable place. To disguise the camera lens, screw the imitation screw or one of the three imitation buttons onto the lens. The camera is supplied with 9 clothes buttons (3 of each size) matching the imitation buttons. To disguise the imitation button, sew these buttons on your clothes.
2) It is also be possible to start, pause or stop a recording via the cable remote control (22). For this purpose, connect the remote control to the jack R/C (17).
3) To view video recordings on a larger screen, connect a monitor via the connection cable with 3 RCA plugs provided. Connect the 3.5mm plug of the connection cable to the jack A/V OUT (19). The integrated speaker will be deactivated. Connect the yellow RCA plug to the video input of the monitor. Connect the red or white RCA plug to the audio input. In case of a stereo input, connect both plugs.
4) The recorder is equipped with a 1 GB memory for recording. With a low video quality, the recording time is approx. 8.5 hours; with a high video quality, it is approx. 100 minutes. To increase the recording time, insert a micro SDHC card up to 16 GB.
Remove the cover on the right side of the recorder, then push the card with its contacts showing upwards into the slot (9) until it engages. To remove the card, slightly push it in until it disengages.
Important! To prevent data loss, always make sure that the recorder has been switched off when you insert or remove the memory card.
When the basic menu (fig. 2) is displayed and you keep the button MENU (7) pressed for 3 seconds, the recorder will switch between the internal memory and the memory card [SD icon (d) inserted]. For further settings, select SETTING and activate the menu "Memory Setup" (chapter 6).
5) Connect the power supply unit (23) provided to the jack DC 5 V (16) and to a socket (230V / 50Hz)
When the power supply unit has been connected, the integrated battery will be recharged.
| Charging time of a discharged battery | |
| Recorder switched on | 5 h approx. |
| Recorder switched off | 3.5 h approx. |
| Operating time of a fully charged battery | |
| Recording mode | 2.5 h approx. |
| Replay mode | 4 h approx. |
The battery is fully charged when all three segments of the battery status indication (h) are displayed and the left segment stops flashing. Always fully charge the battery prior to initial operation and mobile applications.
If the recorder is not in use for a longer period of time, disconnect the power supply unit from the mains socket; even with the recorder switched off, it has a low power consumption.
5 Switching On/Off, Overview of Functions
To switch on, keep the button (13) pressed until the display (14) lights up. After loading the operating system, the basic menu (fig 2) will appear and the upper line will show the following information:
a date
b time
c clock icon when a time-controlled recording has been programmed
d SD icon when a memory card has been inserted and selected
e padlock icon with activated button lock feature
f speaker icon; crossed out when the sound has been deactivated
g value of the volume adjusted
h battery status indication = battery fully charged, = battery discharged
To switch off, keep the button pressed until the display shows POWER OFF.
Five functional groups are available for operation of the recorder:
RECORD
live surveillance
- preview of a recording
audio and video recordings
VIDEO
audio and video recordings
replaying recordings
- managing recordings
VOICE
- audio recording via the internal microphone or the camera microphone
- replaying audio recordings
- managing audio recordings
PHOTO
- preview of snapshots
- taking individual snapshots or a series of snapshots
-viewing snapshots
managing snapshots
SETTING
-making settings
To match the recorder optimally to its range of application, make all the required settings via the functional group SETTING first.
6 Functional group SETTING Making settings
1) If the basic menu (fig. 2) fails to appear on the display, press the button STOP/ ESC (5) [repeatedly].
2) Select SETTING with the button or and press the button (13). The main menu will appear:
Main Menu
Record Setup
Timer Record Setup
Play Setup
Display Setup
Memory Setup
System Setup
3) Press the buttons and to select the individual menu lines and the button /II (13) to activate the corresponding submenu. When you press the button STOP/ESC, you will return to the previous menu level; when you press the button MENU (7), you will always return to the basic menu.
4) To make a setting in a submenu, select the corresponding menu line and press the button / Press the button or make the setting and confirm with the button.
6.1 Overview of submenus and possible adjustments
The factory settings are underlined for information.
Record Setup
Input Source Video + Audio /Video recording: video + audio / video only
Video Quality High /Standard/Low video quality: high / standard / low
Resolution720x576 /352x288/176x144resolution (pixels horizontal x vertical)
Frame Rate 5/10/15/20/25 fps number of frames per second for video recordings
Motion Detect ON/OFF pause recording when no motion detected in image: on / off
Time Stamp ON /OFF insert time and date in recording: on / off
Record Time Off /10/20/30/60 Min stop recording automatically: no/after ... minutes
Endless Recording NO/YES endless recording: no / yes
Timer Record Setup
Set : Cancel/Once/Everyday no recording/one-time recording/daily recording* Start : Year/Month/Day start date* Hour/Minute start time* End : Year/Month/Day end of recording* Hour/Minute *Set with the buttons ^+ and- (11)!
Play Setup
Video Repeat No/One/ repeat replay of video recording: no/selected file/ All One/All replay all files once / continuous repeat of all files Voice Repeat No/One/All One /All repeat replay of audio recording: like "Video Repeat" Photo Thumbnail View NO/YES list of snapshots as thumbnail images: no (file names only) / yes Slide Show NO/YES show snapshots successively: no / yes Slide Show Time 1/3/5/7/10 Sec dwell time of a snapshot
Display Setup
Video Format NTSC/PAL colour standard: set PAL for the camera provided Display Out LCD /TV view recording via: display or jack A / V OUT (19) LCD Brightness 0/1/2/3/4/5/6/7/8/9 brightness of display (low brightness = longer battery operation) LCD Backlighting Off/3/5/10 Sec/All display remains on after the press of a button: no / ... sec / always
Memory Setup
Storage Select Internal/External store recordings: in internal memory/on memory card Format Internal/External format memory - All recordings will be deleted! Memory Change NQ/YES change memory automatically when recording: no / yes Memory Information Internal/SD Card (Total / Remain) memory information (total capacity / free storage space)
System Setup
Speaker Control ON/OFF speaker: on / off
Auto Power Off Time Off/1/3/5/7/10 Min automatic switch-off: off/after ... minutes
Time Set Date Set set date (year / month / day)
Time Set set time
Date Display: Y-M-D/M-D-Y display of date: year-month-day / month-day-year
Time Display: 12H /24H display of time: 12 / 24 hour
Factory Default Set NO/YES reset factory settings: no / yes
Firmware Version display of firmware version
Battery Pack ON/OFF battery pack (3× 1.5V) connected to DC jack (16): yes / no
*Set date and time with the buttons + and - (11)!
1) If the basic menu (fig. 2) fails to appear on the display, press the button STOP/ ESC (5) [repeatedly].
2) Select RECORD with the button or (12) and press the button 3). The display will show the image presently recorded by the camera (live surveillance). "Preview" will be inserted on the display for information. Note: To stop the live surveillance, press the button STOP/ESC(5).
3) To start recording, press the orange button REC / PAUSE (6) or the button the remote control (22).
4) To pause and continue the recording at any time, press the button REC / PAUSE on/11
5) To stop a recording, keep the button STOP/ESC (5) or the button on the remote control pressed until the display shows an hour glass and "Please Wait...".
The recorder will store the recording as a file and then switch to the functional group VIDEO. The list of video recordings will appear. The last recording is selected. Press the button to play it.
To stop the replay, press the button STOP/ ESC; the list of video recordings will reappear. To return to the basic menu, press the button STOP/ ESC twice.
Notes
- It is not possible to stop a recording again within the first 5 seconds.
- To start recording without a preview from the basic menu or from the functional groups VIDEO and SETTING, press the button REC/ PAUSE.
- The maximum size of a recording is 4GB. When the recording has reached this size, it will be stored as a file. The recording will then be continued with a new file.
- Audio recording is not possible when the frame rate has been set to 5 fps (SETTING Record Setup Frame Rate).
-
If an error message of a crossed-out camera icon and the text "No Signal" appears, check the following items:
-
Has the camera been correctly connected? If the camera was connected when the recorder had already been switched on, switch off the recorder, then switch it on again.
-
Via the menu item "Video Format", PAL must be set (SETTING Display Setup).
Further possibilities
- Endless recording: The file created will be continuously overwritten by more recent recordings. SETTING Record Setup Endless Recording
- Time-controlled recording (even with the recorder switched off): SETTING Timer Record Setup With a correct setting, the clock icon will appear (c); it will start flashing one minute before the recording starts.
- To be able to use the internal memory when an SDHC card has been inserted, set the menu item
"Memory Change" to YES (SETTING Memory Setup)
- When the display shows the camera preview ("Preview"), a press of the button MENU (7) will activate a submenu. This submenu allows you to set the recording time (Record Time) and to change the microphone sensitivity (Mic Sensitivity: High / Middle / Low).
- To activate and deactivate a submenu while recording, press the button MENU (7). Thissubmenu allows you to show the recording time adjusted (Record Time) and to change the microphone sensitivity (Mic Sensitivity).
-
To save storage space, the submenu "Record Setup" of the function SETTING allows you:
-
to make video recording only (Input Source)
to reduce the video quality
to reduce the resolution
to reduce the frame rate - to pause recording when no motion is detected in the image (Motion Detect)
- to set a maximum recording time
8 Functional GroupVIDEO
Replaying and managing recordings
1) If the basic menu (fig. 2) fails to appear on the display, press the button STOP/ESC (5) [repeatedly].
2) To access the recordings made on a memory card inserted, the SD card icon (d) must be displayed in the basic menu. If it is not displayed, keep the button MENU (7) pressed until the icon appears. To switch back to the internal memory, proceed in the same way.
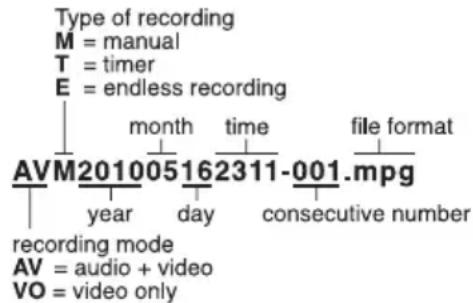
3) Select VIDEO with the button (12) and press the button. The display will show the list of video recordings. The file names created by the recorder are coded as follows:
8.1 Replaying recordings
1) Select the recording to be replayed from the file list with the button or (12) and start the replay with the button.
2) If the sound has also been recorded, adjust the volume with the buttons VOL - and + (11).
Note: If there is no sound, set the menu item "Speaker Control" to ON.
(SETTING System Setup Speaker Control)
3) To pause and continue the replay at any time, press the button
4) To increase the replay speed, press the button (repeatedly). The display will show the speed selected: 2× ,4× or 8× .To return to standard speed, press the button the button (repeatedly).
5) To rewind the recording, press the button (repeatedly). For rewinding, 8 × the standard speed is possible as a maximum. To return to fast forward, press the button the button (repeatedly).
6) To view the recording in slow motion, set the unit to pause with the button. Press the button (repeatedly) to select the speed: 1 / 8 × , 1 / 4 × , 1 / 2 × . To select 1 / 4 × or 1 / 8 × , press the button. To return to standard speed, press the button.
7) To activate and deactivate a submenu while replaying, press the button MENU (7). This submenu allows you to change the repeat function (Video Repeat: No/One/All One/All, see chapter 6.1, submenu "Play Setup") and to define if the recording is to be shown on the display of the recorder or on a monitor connected to the jack A / V OUT (19) [Display Out: LCD/TV].
8) To stop the replay, press the button STOP/ ESC (5); the list of video recordings will reappear. To return to the basic menu, press the button STOP/ ESC twice.
8.2 Managing recordings
A submenu allows you to delete recordings or to protect them against accidental deletion and to display file information. It is also possible to start the replay.
1) Select the desired recording from the file list with the button 2.
2) Press the button MENU (7) to activate the submenu:
Sub Menu
File Play
File Delete
File Protect
File Information (name, size, protection)
Note: To deactivate the submenu, press the button MENU once again.
3) Select the function with the button or and activate it with the button /II (13).
4) When deleting or protecting files, the following options are available with the button 山 der : No One All
Press the button /II to confirm.
Note: To disable the file protection, select the menu item "File Protect".
9 Functional Group VOICE
Audio recordings

9.1 Audio recordings only
The sound is recorded via the microphone of the camera (21) or, if this microphone has not been connected, via the internal microphone (8).
1) If the basic menu (fig. 2) fails to appear on the display, press the button STOP/ESC (5) [repeatedly].
2) Select VOICE with the button (12).
3) To start recording, press the orange button REC / PAUSE (6) or the button ●the remote control (22).
4) To pause and continue the replay at any time, press the button REC/PAUSE or /
5) To activate and deactivate a submenu while recording, press the button MENU (7). This submenu allows you to show the recording time adjusted (Record Time) and to change the microphone sensitivity (Mic Sensitivity: High/Middle/Low).
6) To stop a recording, keep the button STOP/ESC (5) or the button on the remote control pressed until the display shows the list of audio recordings. The last recording is selected; press the button to replay it.
To stop the replay, press the button STOP/ESC; the list of audio recordings will reappear. To return to the basic menu, press the button STOP/ ESC twice.
Notes
- It is not possible to stop a recording again within the first 5 seconds.
- When the display shows the list of audio recordings, it is also possible to start an audio recording with the button REC/PAUSE.
9.2 Replaying audio recordings
1) If the basic menu (fig. 2) fails to appear on the display, press the button STOP/ESC (5) [repeatedly].
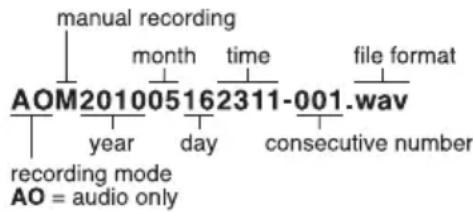
2) Select VOICE with the button or (12) and press the button. The display will show the list of audio recordings. The file names created by the recorder are coded as follows:
3) Select the recording to be replayed from the file list with the button and start the replay with the button /11 (13).
4) Adjust the volume with the buttons VOL - and + (11). Note: If there is no sound, set the menu item "Speaker Control" to ON. (SETTING System Setup Speaker Control)
5) To pause and continue the replay at any time, press the button .
6) To activate and deactivate a submenu while replaying, press the button MENU (7). This submenu allows you to change the repeat function (Voice Repeat: No/One/AllOne/All, see chapter 6.1, submenu "Play Setup").
7) To stop the replay, press the button STOP/ ESC (5); the list of audio recordings will reappear. To return to the basic menu, press the button STOP/ ESC twice.
9.3 Managing audio recordings
The audio recordings are managed in the same way as the video recordings, see chapter 8.2.
10 Functional Group PHOTO
Taking, viewing, managing snapshots
10.1 Taking snapshots
1) If the basic menu (fig. 2) fails to appear on the display, press the button STOP/ESC (5) [repeatedly].
2) Select PHOTO with the button or (12) and press the orange button REC/ PAUSE (6) or the button of the remote control (22). The display will show the image presently taken by the camera. "Preview" will be inserted on the display for information.
3) To take a snapshot, press the button REC/PAUSE or the button / II the display will briefly show "snap shot" for information.
4) To take a series of snapshots where the next snapshot is automatically taken after an interval to be defined, proceed as follows:
a) Press the button MENU (7) during the preview. The submenu "Snap Shot Time" will appear.
b) Press the button and select the interval with the button Off: Off/10/20/30/60 Sec (setting "Off" = no series of snapshots)
c) Confirm the setting selected with the button /II The submenu will disappear and the camera will start taking the series of snapshots.
5) To stop the preview or the series of snapshots, press the button STOP/ESC (5) or the button on the remote control. The display will show the snapshots as thumbnail images or as a file list (adjustable under SETTING Play Setup Photo Thumbnail View: YES/NO).
The last snapshot taken is selected. Press the button to view it. With the function "Slide Show" activated, all snapshots will be shown successively (SETTING Play Setup Slide Show). To stop this view, press the button STOP/ESC. To return to the basic menu, press the button STOP/ESC twice.
10.2 Viewing snapshots
1) The list of thumbnail images or of snapshot files must appear on the display. If it fails to appear, press the button STOP/ESC (5) repeatedly until the basic menu (fig. 2) is shown. Select PHOTO with the button or (12) and press the button (13).
2) The display will show the snapshots as thumbnail images or as a file list (adjustable under SETTING Play Setup Photo Thumbnail View: YES/NO). The file names created by the recorder are coded as follows:

3) Select the desired snapshot from the list with the button or 12 and press the button II (13).
4) To activate and deactivate a submenu while viewing a snapshot, press the button MENU (7).
Sub Menu
Slide Show show snapshots one after another Slide Show Time dwell time of a snapshot
Select the menu lines with the button or .To change a setting, press the button /II and make the setting with the button or . To confirm the setting, press the button /II; the submenu will disappear.
5) To stop the view of snapshots, press the button STOP/ESC. The list of snapshots will reappear. To return to the basic menu, press the button STOP/ ESC twice.
Note: Snapshots will not be displayed on a monitor connected to the jack A/V OUT (19).
10.3 Managing snapshots
The snapshots are managed in the same way as the video recordings, see chapter 8.2.
11 Further Possibilities
11.1 Button lock feature
To protect the buttons against any accidental actuation, set the sliding switch (4) of the lock to the left position. The padlock icon (e) indicates activation of the button lock feature. When you press a button, a large padlock icon will briefly appear.
The remote control (22) has a separate button lock. To activate it, push the sliding switch HOLD on the side of the remote control in arrow direction; the buttons will be locked mechanically.
11.2 Reset
In case of malfunction during operation, a reset is possible: Press the button RESET (15) on the lower edge of the recorder by means of a thin object. The display will be extinguished and the recorder will be restarted.
11.3 Copying recordings onto a computer
For data backup or for making space on the recorder for new recordings, you will be able to copy the files of the recordings onto a computer.
1) Remove the cover on the right side of the recorder and connect the USB port (10) via the USB cable provided to a USB port on the computer.
2) Switch on the recorder. In case of correct connection, the display will show "USB Connected".
3) Video recordings can be found in the folder VIDEO, audio recordings in the folder VOICE and snapshots in the folder PHOTO. From these folders, the files can be copied onto the computer and back from the computer into the corresponding folders for replay.
11.4 Wrist strap
To carry the recorder on your wrist, lead the wrist strap through the lug (1), then pull the other end through the loop to fasten it.

12 Specifications

Recorder
Max. resolution: .720 × 576 pixels
Max. frame rate: 25 fps
Video compression: . . . H.264
Internal memory: 1 GB
Display: colour LCD
Resolution: 320 × 240 pixels
Diagonal screen size: 6 cm (2.4")
Power supply: via rechargeable lithium ion battery (3.7 V, 2000 mAh) or 5 V via power supply unit provided and connected to 230V / 50Hz
Ambient temperature: .. 0 - 40 °C
Dimensions: 95 × 20 × 60 mm
Weight: 105 g
Other features: . . . . . integrated microphone and speaker
Camera
Image sensor: . CCD chip, 8.5 mm (13^ )
Number of pixels: . . . . . . hor. 768 x vert. 582
Resolution: 450 lines
Colour system. PAL
Lens: 3.7 mm/1:2.0
Minimum illumination: . . 0.1 lx
Power supply: 5 V-200 mA via the recorder
Ambient temperature: .. 0 - 40 °C
Dimensions: 30 × 20 × 28 mm
Weight: 22 g
Automatic functions: . . . white balance, electronic shutter
Subject to technical modification.
Dimensions: 95 × 20 × 60 mm
Poids: 105g
Dimensions: 30 × 20 × 28 mm
Poids: 22g
Fonctions
LCD Backlighting Off/3/5/10 Sec/All
Storage Select Internal/External
Format Internal/External