
KA DV 2 - Fan TEAM - Free user manual and instructions
Find the device manual for free KA DV 2 TEAM in PDF.
| Product type | Ceiling fan with light |
| Brand | TEAM |
| Model | KA DV 2 |
| Rated voltage | 220-240 V ~ 50 Hz |
| Maximum lamp wattage | 3 x 60 W max |
| Number of speeds | 3 (High, Medium, Low) + Stop |
| Direction of rotation | Reversible (summer/winter) |
| Minimum mounting height | 2.3 m |
| Minimum load capacity of support | 70 kg |
| Net weight | 6.2 kg (estimated) |
| Blade diameter | 132 cm (estimated) |
| Number of blades | 3 (estimated) |
| Blade material | Metal |
| Motor housing material | Metal |
| Tulip material | Glass |
| Control type | Pull chain and optional wall switch |
| Lighting function | Yes, with 3 lights |
| Reversible for season | Yes |
| Environmental protection | Compliant with Directive 2002/96/EC (WEEE) |
| Maintenance | Clean the blades and motor with a soft cloth. Do not use water on electrical parts. |
| Safety | Do not use with an external speed controller. Installation by a qualified electrician. |
| Accessories included | Balancing kit (clamp and weights), screws, washers, pins. |
| Warranty | Subject to proper installation by a qualified electrician. |
| Use | Indoor use only |
Frequently Asked Questions - KA DV 2 TEAM
User questions about KA DV 2 TEAM
0 question about this device. Answer the ones you know or ask your own.
Ask a new question about this device
Download the instructions for your Fan in PDF format for free! Find your manual KA DV 2 - TEAM and take your electronic device back in hand. On this page are published all the documents necessary for the use of your device. KA DV 2 by TEAM.
USER MANUAL KA DV 2 TEAM
Copies of the I/B. Please reproduce them without any changes except under special instruction from Team International BELGIUM. The pages must be reproduced and folded in order to obtain a booklet A5 (+/- 148.5 mm width x 210 mm height). When folding, make sure you keep the good numbering when you turn the pages of the I/B. Don't change the page numbering. Keep the language integrity.
GB
-
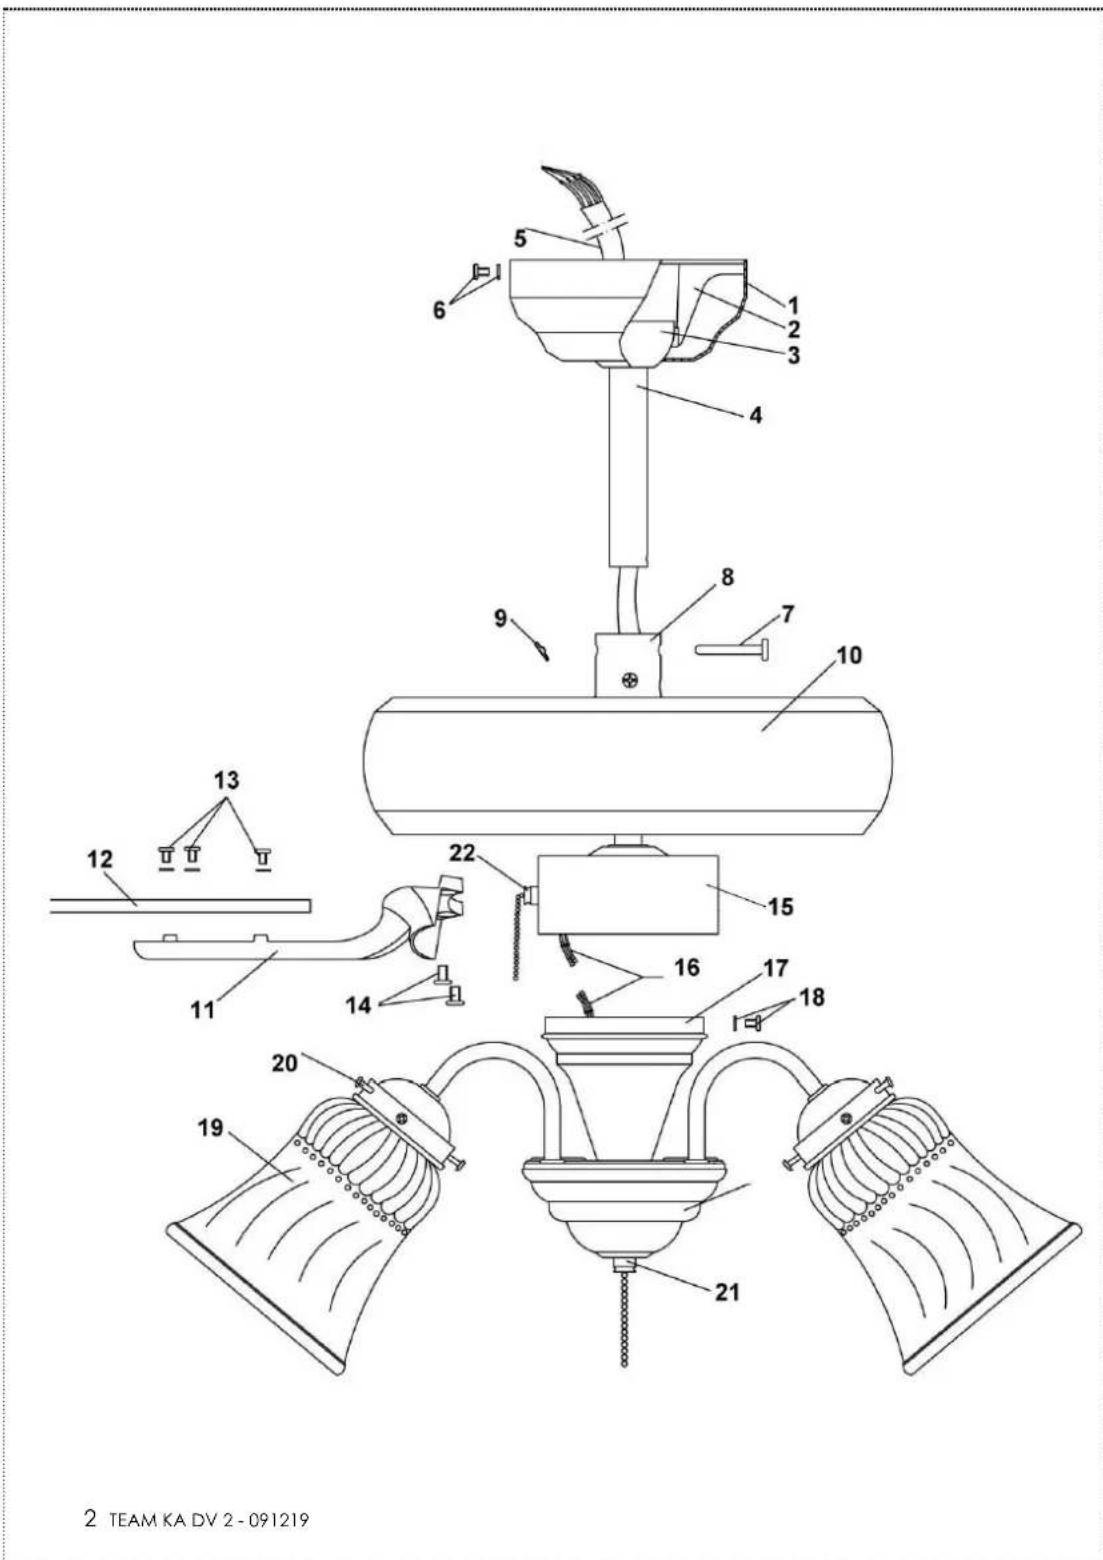
Upper canopy
-
Mounting plate
-
Metallic demi-ball
-
Rod
-
Electric wires
-
Screw & washer
-
Nail
-
Motor hanger
-
Split pin
-
Motor block
-
Blade holder
-
Blade
-
Screw & washer
-
Screw
-
Lighting block
-
Lamp wires
-
Lamp holder
-
Screw & washer
-
Tulip-shaped lampshade
-
Fixing screw of the tulip-shaped lampshades
-
Light switch
-
Fan switch
F
Please read these instructions carefully before using the appliance, and always follow the safety and operating instructions.
Important: People (including children) who are not able to use the appliance in a safe way, due to their physical, sensorial or mental capacity or their lack of experience or knowledge, must never use the appliance except if they are supervised by a person responsible for their safety or if they previously received instructions concerning the safe use of the appliance.
Close supervision is necessary to prevent children from using the appliance as a toy.
Check that your mains voltage corresponds to that stated on the appliance.
Never leave the appliance unsupervised when in use.
From time to time check the appliance for damages. Never use the appliance if cord or appliance shows any signs of damage but have it checked and repaired by a competent qualified service. Should the cord be damaged, it must be replaced by a competent qualified service.
Only use the appliance for domestic purposes and in the way indicated in these instructions.
Never immerse the appliance in water or any other liquid for any reason whatsoever. Avoid splashes on the appliance.
Never use the appliance near hot surfaces.
Switch off the appliance before cleaning it.
Never use the appliance outside and always place it in a dry environment.
Never use accessories that are not recommended by the producer. They could constitute a danger to the user and risk to damage the appliance.
ONE OF THE WARRANTY CONDITIONS IS THAT YOUR APPLIANCE HAS TO BE INSTALLED BY A QUALIFIED ELECTRICIAN. AN INCORRECT INSTALLATION CAN BE VERY DANGEROUS.
Make sure the assembly is correctly made before plugging in the appliance.
Make sure the appliance is switched to the off-position before unplugging it.
Do not touch the appliance with wet hands.
In order to avoid any risk of fire or electric shock, do not use any kind of electric softener to limit the rotating speed.
The height of installation, i.e. the distance between the propeller and the floor, has to be 2.3 m.
Do not hang your appliance on a non-metallic hook.
Every electric installation has to be in accordance with the local technical standards.
Pay attention to the rotation of the propeller.
Make sure that the appliance has been earthed properly in order to avoid electric shocks.
Make sure that the connection box (hook) on the ceiling can support at least 70kg.
Never stop the fan by blocking the fan blades with your hand or with any other object.
Never hang anything on the fan blades, not even when the fan is not in use.
When used in an inappropriate manner the appliance could constitute a danger to the user, in that case the producer cannot be held responsible for any kind of possible damages.
Do not let the fan in use for long periods during your absence. Make sure it is switched off before leaving.
- When cleaning the appliance, check the cleaning section.
Competent qualified electrician: after-sales department of the producer or importer or any person who is qualified, approved and competent to perform this kind of repairs in order to avoid all danger. In case of need you should return the appliance to this electrician.

Fax +32 23599550
Copies of the I/B. Please reproduce them without any changes except under special instruction from Team International BELGIUM. The pages must be reproduced and folded in order to obtain a booklet A5 (+/- 148.5 mm width x 210 mm height). When folding, make sure you keep the good numbering when you turn the pages of the I/B. Don't change the page numbering. Keep the language integrity.

INSTALLATION
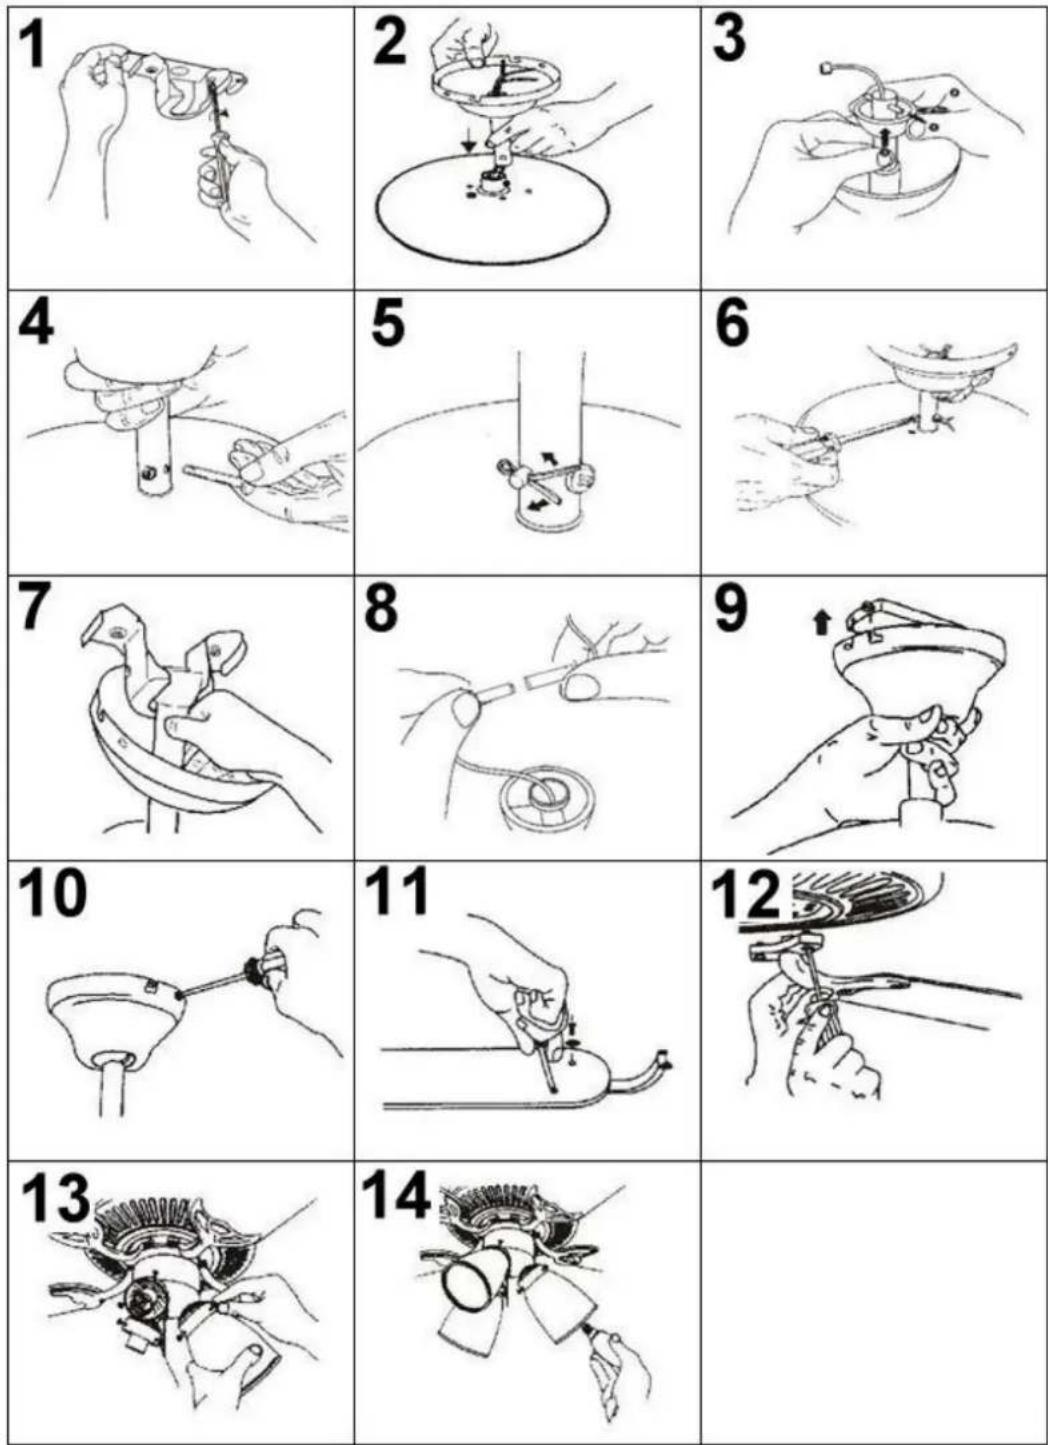
- Take the mounting plate out of the upper canopy (unscrew the 2 left screws and unscrew the 2 right screws lightly). Then attach the mounting plate firmly to the ceiling (Fig. 1).
- Make the upper canopy slide onto the rod and insert the electric wires in the rod (Fig. 2).
- Check if the metallic demi-ball is fixed correctly to the end of the rod (Fig. 3). If necessary, screw back the screw.
- Put the rod onto the motor hanger. Then insert the perforated nail (Fig. 4) in the corresponding holes.
- Put the split pin in the hole situated at the end of the nail (Fig. 5).
- Attach the rod to the motor by tightening the supplied screws (Fig. 6).
- Attach the obtained motor block to the mounting plate and make sure that the guide of the mounting plate enters into the slot of the metallic demi-ball (Fig. 7).
- Connect the wires of the light to the connector foreseen to this end.
- Attach the upper canopy to the mounting plate (Fig. 9).
- Tighten the upper canopy to the mounting plate (tighten the 2 right screws and add the 2 left screws) (Fig. 10).
- Assemble the fan blades and the blade holders (the nice side of the blade holders has to be on the same side as the nice side of the fan blades). Use the supplied screws and washers (Fig. 11).
- Attach the fan blades to the motor block. To do so, remove the screws and washers of the motor block, put one of the 1/4 pieces of carton with 2 holes between the blades and the motor block, then fix the blades with the washers and screws (Fig. 12).
- Connect the 2 wires of the lamp holder to the 2 wires of the motor block (respect the colours). Then attach the lamp holder to the motor block (remove the 3 screws and 3 washers, place the lamp holder, then fix it with the 3 screws and 3 washers) (Fig. 13).
- Fix the tulip-shaped glass lampshades on the lamp sockets (3 screws per lampshade), then insert the light bulbs (max. 60W) (Fig. 14).
- Connect the chain to the switch of the appliance.
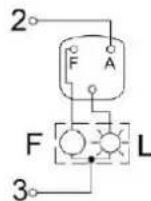
INSTALLATION OF THE WALL SWITCH
- Switch box
- ACTIVE
- NEUTRAL

- Check to make sure there is no electric current in your electric power supply.
- Attach the switch box to the wall.
- Connect the wires of your electric installation to the box as indicated on the pictures.
L:Light
F:Fan motor
USE
Switch on your appliance and check the good functioning of your appliance.
The chain/wall switch controls the fan as follows:
A. Pulling once/ Position HI -> High speed
B. Pulling twice/ Position MED -> Medium speed
C. Pulling three times/ Position LOW --> Low speed
D. Pulling four times/ Position OFF --> Stop
7 TEAM KA DV 2-091219
The reversible switch controls the direction of the airflow (descending or ascending) and thus the sense of rotation of the fan blades.
USE IN VERY HOT WEATHER (push the switch down) DESCENDING USE IN COLD WEATHER (push the switch up) ASCENDING
The second chain controls the light.
UNDESIRABLE OSCILLATIONS OF THE APPLIANCE
The following procedure allows you to correct most of the vibrations of the appliance. Please check after each stage.
Check if all blades, the mounting bracket and screws are fixed well. Switch on the appliance and let it rotate for about 10 minutes.
See to it that the distance between the ceiling and the tip of each blade is identical.
If all of the above does not help, a dynamic balancing needs to be carried out. To do so, a plastic balancing clip and some balancing weights have been delivered with your appliance. Please carry out the following procedure:
- Turn the fan on and adjust the speed control to the speed setting that creates the greatest wobble (usually the high speed setting).
- Turn the fan off. Select one blade and place the balancing clip on the rear edge of the blade, halfway between the blade holder and the tip of the blade.
- Turn the fan back on and check if the wobble has improved or worsened. Turn the fan off and move the clip to another blade. Test again, turn the fan off and repeat this process with all blades.
- Move the clip back to the blade which showed the most improvement. Move the clip to several positions on this blade and test the fan each time to find the position where the clip gives the most improvement.
- Remove the clip and stick a balancing weight on top of the blade along the centerline near the best position of the clip.
CLEANING AND CARE
- Always be sure that the power is OFF when cleaning the fan.
It is necessary to check the parts of the hanger assembly and mounting bracket twice a year. Because the fan has a long-time rotation, that may cause some parts to loosen. - Never clean the motor, switch housing and some other electric parts of the fan with water or any other liquid in order to avoid short circuit.
- You may clean the decorative housing and blades with a soft cloth in order to keep them bright.
PROTECTION OF THE ENVIRONMENT - DIRECTIVE 2002/96/EC
In order to preserve our environment and protect human health, the waste electrical and electronic equipment should be disposed of in accordance with specific rules with the implication
of both suppliers and users. For this reason, as indicated by the symbol the rating label or on the packaging, your appliance should not be disposed of as unsorted municipal waste. The user has the right to bring it to a municipal collection point performing waste recovery by means of reuse, recycling or use for other applications in accordance with the directive.
FR MODE D'EMPLOI
POUR VOTRE SECURITE
Copies of the I/B. Please reproduce them without any changes except under special instruction from Team International BELGIUM. The pages must be reproduced and folded in order to obtain a booklet A5 (+/- 148.5 mm width x 210 mm height). When folding, make sure you keep the good numbering when you turn the pages of the I/B. Don't change the page numbering. Keep the language integrity.

14 TEAM KA DV 2-091219
INSTALACION
Copies of the I/B. Please reproduce them without any changes except under special instruction from Team International BELGIUM. The pages must be reproduced and folded in order to obtain a booklet A5 (+/- 148.5 mm width x 210 mm height). When folding, make sure you keep the good numbering when you turn the pages of the I/B. Don't change the page numbering. Keep the language integrity.


19 TEAM KA DV 2-091219
INSTALAÇÃO
F:Motop HA BEHTAATOPa
PABOTA
BkIOyTe ypea n npOBepe pa60Ta My.
Bepnata/KAOKa HA CTeHata KOHTPOAHPa BEHTNAtOPa KAKTO CAEBA:
A.EaHOApbNAbe/NoaoXeHHe HI (BnCoka) -->
Bucoka ckopoct

Brand : TEAM
Model : KA DV 2
Category : Fan