IDJ - DJ Equipment ION - Free user manual and instructions
Find the device manual for free IDJ ION in PDF.


| Product Type | DJ Mixer Console with iPod Dock |
| Brand | ION |
| Model | iDJ |
| Category | DJ Equipment |
| Power Supply | Included AC adapter (plug and power switch) |
| Audio Inputs | 2 RCA channels (line/phono with selector), 6.35 mm microphone input jack |
| Audio Outputs | RCA main output, RCA recording output (constant level), 2 headphone outputs (1/4" and 1/8") |
| Video Output | S-Video (compatible with 4 or 7 pins) |
| iPod Compatibility | Dock with bottom connector (iPod Photo and recent models), adapters included |
| Equalizer | 3 bands per channel (treble, mid, bass) |
| Crossfader | Yes, with remote control for automatic stop/play of iPods |
| Line Faders | Yes, per channel (Line Fader) |
| Gain Adjustment | Per channel and master (Master Gain) |
| Input Selector | iPod / Phono-Line per channel |
| iPod Control Functions | Play/Pause, previous/next track, Menu, Back, control wheel |
| USB Connectivity | 2 USB ports for iPod data access |
| Microphone | Input, gain, tone (feedback reduction) |
| Security | Kensington cable slot, turntable ground connection |
| Included Accessories | Power supply, 2 iPod dock adapters, quick start guide |
| Power On/Off Instructions | Turn on sources, console, then amplifiers; turn off in reverse order |
Frequently Asked Questions - IDJ ION
User questions about IDJ ION
0 question about this device. Answer the ones you know or ask your own.
Ask a new question about this device
Download the instructions for your DJ Equipment in PDF format for free! Find your manual IDJ - ION and take your electronic device back in hand. On this page are published all the documents necessary for the use of your device. IDJ by ION.
USER MANUAL IDJ ION
Quick Start Owner's Manual
BOX CONTENTS
iDJ
- POWER SUPPLY
(2) iPod® DOCKING ADAPTERS
Apple® is a trademark of Apple Computer, Inc., registered in the U.S. and other countries. The iPod is a trademark of Apple Computer, Inc.
Quick Connection Diagram
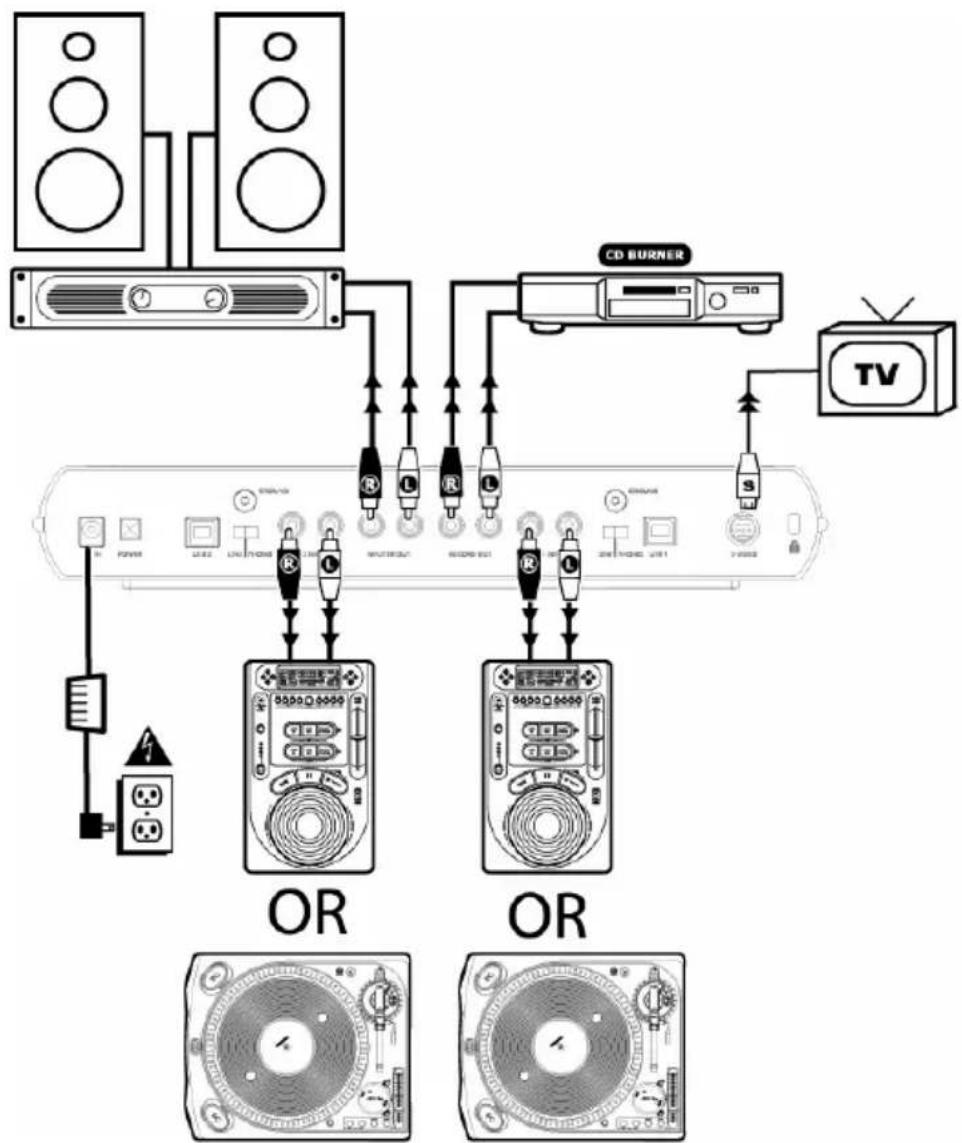
Quick Setup Guide
-
Make sure all items listed on the front of this guide are included in the box.
-
READ SAFETY INSTRUCTION BOOKLET BEFORE USING THE PRODUCT
-
Study this setup diagram.
-
Place the mixer in an appropriate position for operation.
-
Make sure all devices are turned off and all faders are at zero.
-
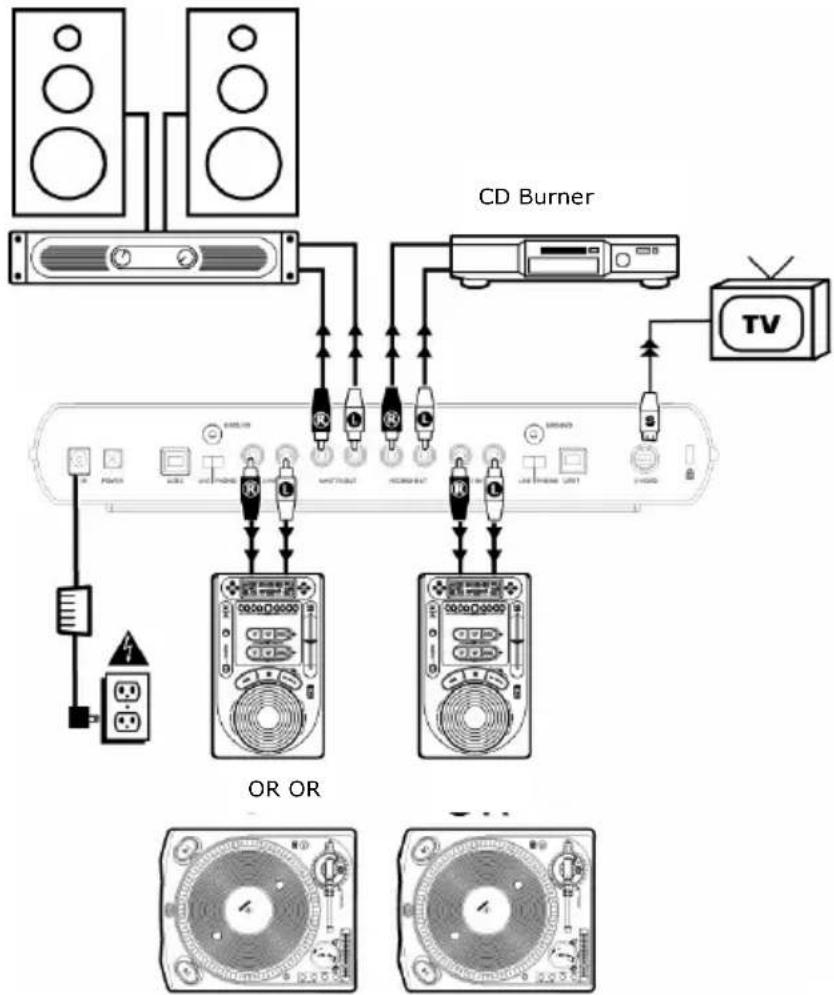
Connect all input sources as indicated in the diagram.
-
Connect the outputs to the power amplifier(s), monitors and/or projectors.
-
Plug your mixer and other devices into AC power.
-
Switch everything on in the following order:
Audio input sources (i.e. iPods, CD players) Your mixer
- Last, any amplifiers, televisions, monitors, projectors, etc.
-
When turning off, always reverse this operation by powering down in the following order:
-
Any amplifiers, televisions, monitors, projectors, etc.
- Your mixer.
-
Last, audio input sources.
-
Go to www.ION-Audio.com for product registration.
Rear Panel Overview
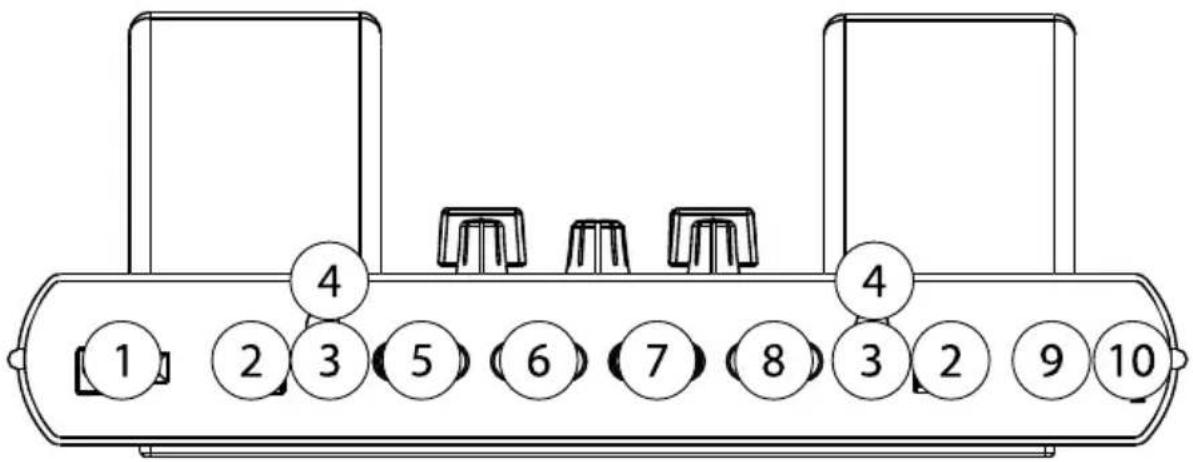
- Power Jack and Power Switch: Always use the included power adapter with your product.
- USB 2.0 Connection to iPOD: This connection is used to access information on the respective iPod. The iDJ does not need to be powered on to use the USB 2.0 connection. See computer data connection diagram below.
- Phono/Line Switch: Each respective line input has the option of using a Line Level input or a Phono level input used for turntables.
- Ground: This screw connector should be used to secure the ground lead from a turntable.
- Channel 2 RCA Inputs: CD players, tape players, portable MP3 players should be connected here with the PHONO/LINE Switch (3) set to LINE. Turntables may be plugged in here with the PHONO/LINE Switch (3) set to PHONO. These inputs are selected by setting the iPOD/Line switch on the top panel to PHONO/LINE.
- RCA Master Output: This is the master stereo output, which can be controlled by the Master Gain knob on the top panel. Connect this to your stereo or powered speakers.
- RCA Record Output: This is the record level stereo output which should be connected to any recording device such as a CD burner, Tape Recorder, or Line input on a computer.
- Channel 1 RCA Inputs: CD players, tape players, portable MP3 players should be connected here with the PHONO/LINE Switch (3) set to LINE. Turntables may be plugged in here with the PHONO/LINE Switch (3) set to PHONO. These inputs are controlled by the iPOD/Line switch on the top panel.
- S-Video Output: Connect a 4 or 7 Pin S-Video Cable from here to your monitor or projector. You must have a compatible iPOD that supports video such as the iPod Photo.
- Kensington® Security Slot: This Kensington® security slot allows you to secure your iDJ using a variety of Kensington® and compatible notebook locks. We recommend securing a loop to the back of any iPods to secure them to the iDJ with compatible cable locks.
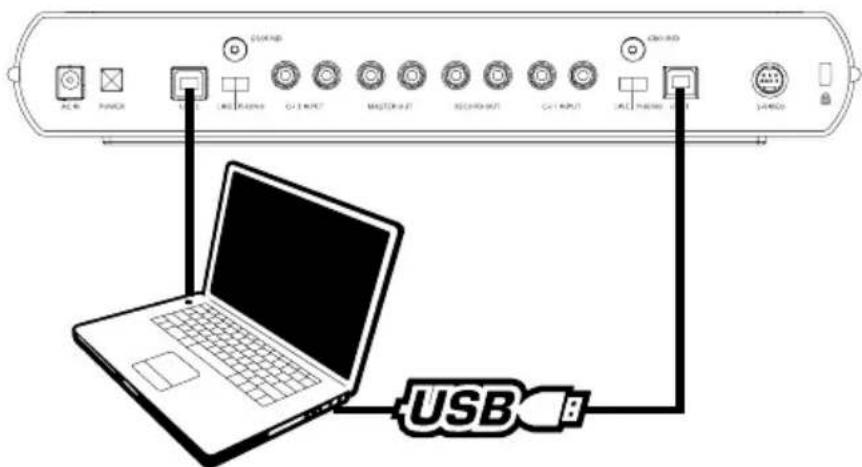
Computer Data Connection Diagram
USB Cables Not Included
Top Panel Overview
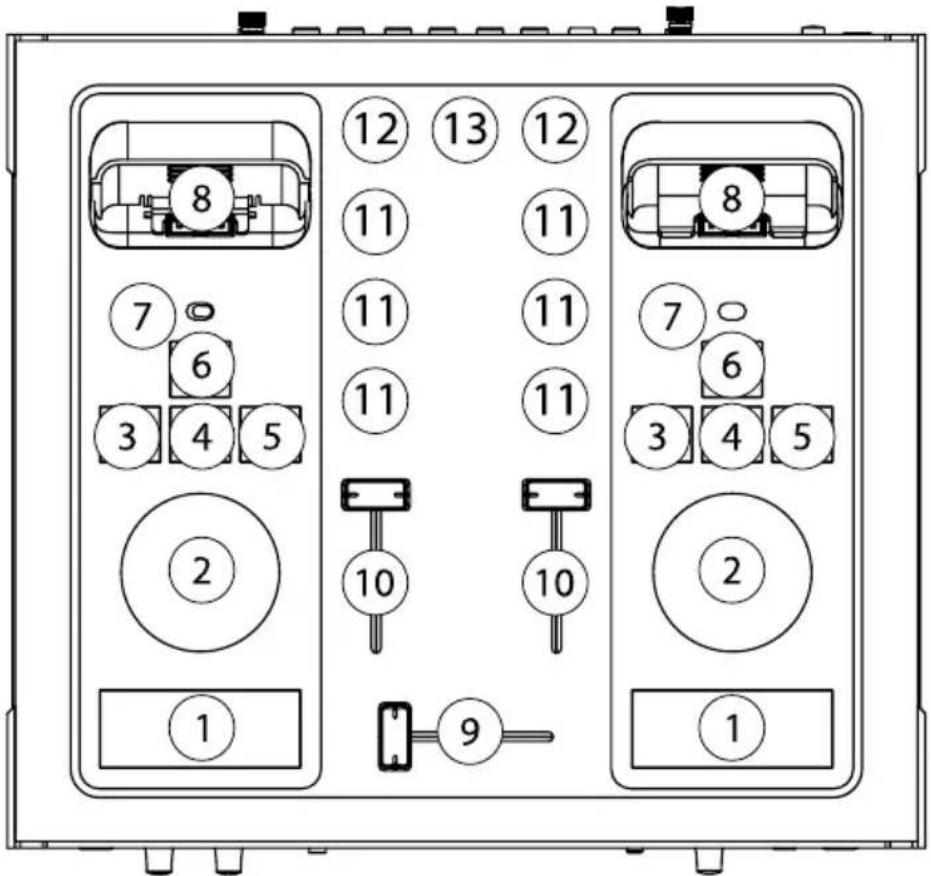
- Play/Pause: This button plays and pauses music from the iPod.
- Control Wheel**: This control duplicates the functionality of the control wheel on the iPod.
- Previous Track: This button selects the previous track on the iPod.
- Enter**: This duplicates the "Enter" button on the iPod.
- Next Track: This button goes to the next track on the iPod.
- Menu**: This duplicates the "Menu" button on the iPod.
- Input Selector: This toggles what input source is routed to the channel. When set to "iPod", the audio from the iPod connected in the dock (8) is routed to the mixer. When set to Phono/Line, the RCA stereo input from the rear panel is routed to the mixer.
- Dock Connector: Connect any iPod with a bottom connector here. Audio, Video, and the controls are communicated through this port from the iPod to the iDJ.
Adjust the supplied iPod adapters to accommodate different iPod models. The adapter has two positions. To adjust, gently pull up on the adapter to slide out. You will notice two groves (positions) inside the iDJ docking well. For example, when using an iPod Mini, the adapter should be in the forward groove and use the rear position for larger capacity iPods.
- Crossfader: This fader is used to mix between the two channels. When faderstart is activated on the front panel, the cross fader can automatically start and stop the iPods
- Line Fader: Adjusts the audio level of devices connected to the Line In jacks.
- 3 Band Channel Equalizer: Each channel has a three band equalizer to adjust the Treble, Midrange, and Bass levels of the audio.
- Gain Adjustment: Each channel has a gain adjustment which is used to equalize the levels between sources. This is very useful when working on MP3 files as they are often recorded at varying output levels.
- Master Output: This knob controls the master RCA output level of the iDJ.
Front Panel Overview
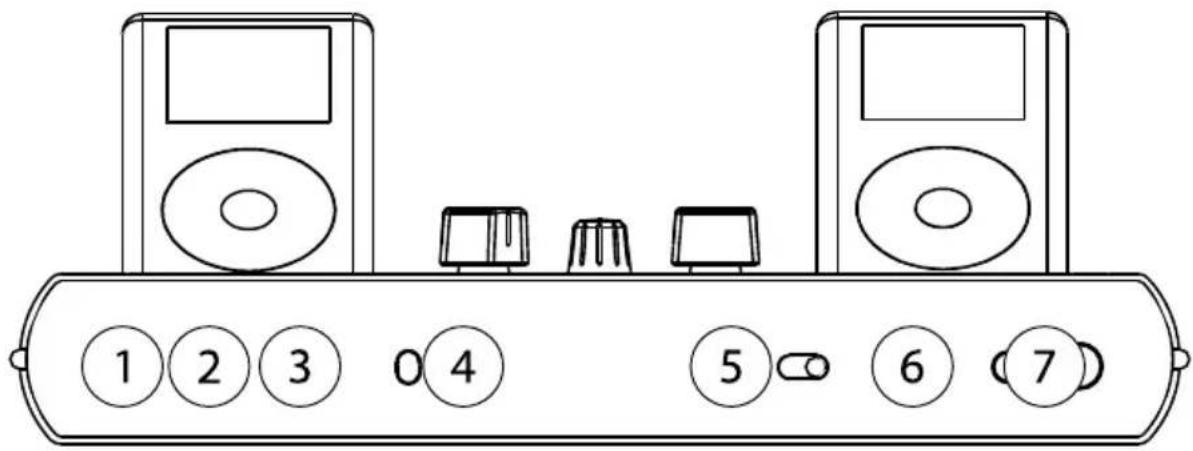
- MIC Input: 1 / 4^ microphone input.
- MIC GAIN: This knob controls the level of the microphone into the mixer.
- MIC TONE: This knob controls the tone of the microphone. Use this control to improve sound quality and to eliminate feedback.
- FADERSTART: In the ON position, the crossfader activates the PLAY and PAUSE function between one or two iPods (the iPod(s) must be connected via the docking connector).
- CUE MIX: This three position switch selects what output is sent to the headphones. Select Mix to receive the master output.
- CUE GAIN: This knob controls the headphone volume level. **Make sure that this is set completely counterclockwise before plugging in headphones to prevent any hearing damage.
- HEADPHONES: There are two jacks to plug in headphones, 1/4'' as well as 1/8'' (mini).
Troubleshooting Guide
1. I can't hear any audio.
a. Check to make sure that your source device (iPod, Turntable, CD Player) is playing.
b. Check to make sure that your INPUT SELECTOR SWITCH (top panel #7) is set to the appropriate setting (iPod or Phono/Line)
c. Move the Crossfader (top panel #9) to the middle
d. Move both LINE FADERS (top panel #10) to 70% or 75% of the way up.
e. Make sure that your CUE MIX switch (Front Panel #5) is set to MIX
f. Make sure that your CUE LEVEL knob (Front Panel #7) is at least 25% of maximum.
2. My iDJ is not turning ON.
a. Check to make sure that you are using the supplied iDJ power adapter and the power outlet is turned on.
3. I am getting Distortion and Feedback while listening to my turntable.
a. Make sure that the PHONO/LINE (rear panel #3) switch is set for LINE.
4. The music coming from my device that is plugged into the RCA input sounds very low.
a. Make sure that the PHONO/LINE switch is set for PHONO.
5. My iPod Controls are not working Properly.
a. If your iPod does not have the click wheel and there is a bottom connector, there is limited functionality. More information can be found on the top panel overview inside this manual or at Apple's website.
6. What is that round hole on the bottom of my iDJ for?
a. The round hole on the bottom of the iDJ is used to place the unit on a turntable platter which has a spindle.
7. There still Audio present on the record output when I turn down the Master Volume?
a. The master volume knob controls the RCA Master outputs. Make sure that you are not plugged into the record outputs, as the record output is a constant level (premaster and post-line fader).
8. My iPod isn't fitting properly in the docking station.
a. Adjust the supplied iPod adapters to accommodate different iPod sizes. The adapter has two positions. To adjust, gently pull up on the adapter to slide out. You will notice two groves (positions) inside the iDJ docking well. For example, when using an iPod Mini, the adapter should be in the forward groove and use the rear position for larger capacity iPods.
9. I am not getting video from my iPod.
a. Make sure you are using an iPod Photo or other iPod which is compatible with a video output. Only the left iPod is connected to the video output.
Diagrama de connexion
Guía de instalación
This page intentionally left blank.
Specifications
Product Dimensions (including knobs): 11.5'' × 10.75'' × 2.5'' (29cm × 27cm × 6cm)
Power Adapter:
- AC-AC Class 2 Transformer
Input: 120VAC 60Hz 32.4W
Output: 9V AC 2800mA
Weight:
iDJ: 4.5lbs (2Kg)
Power Adapter: 1.5Ibs (0.7Kg)
Inputs:
- 2 iPod with bottom connector
- 2 Phono/Line Switchable
1 microphone with tone control
2 Ground posts for turntables
Outputs:
- Master RCA
Line Level (Record) RCA
1/8" Headphone (mini jack)
1/4" Headphone
1 S-Video Output
MISC:
2 USB 2.0 data connection ports to each iPod Docking Connector
- Kensington Security Lock compatible.
S-VIDEO PINOUT
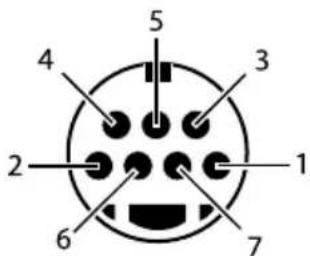
PIN 1,2: GROUND
PIN 3: Y(Intensity)
PIN 4: C (Color)
PIN 5,6,7: (Composite)

- Quick Start Owner's Manual
- Quick Connection Diagram
- Quick Setup Guide
- Rear Panel Overview
- Top Panel Overview
- Troubleshooting Guide
- I can't hear any audio.
- My iDJ is not turning ON.
- I am getting Distortion and Feedback while listening to my turntable.
- The music coming from my device that is plugged into the RCA input sounds very low.
- My iPod Controls are not working Properly.
- What is that round hole on the bottom of my iDJ for?
- There still Audio present on the record output when I turn down the Master Volume?
- My iPod isn't fitting properly in the docking station.
- I am not getting video from my iPod.
- Diagrama de connexion
- Guía de instalación
- Specifications
- Power Adapter:
- Weight:
- Inputs:
- Outputs:
- MISC:
- S-VIDEO PINOUT
Brand : ION
Model : IDJ
Category : DJ Equipment