USB 7326 - DJ Equipment US Blaster - Free user manual and instructions
Find the device manual for free USB 7326 US Blaster in PDF.
| Product type | Dual CD player for DJ |
| Brand | US Blaster |
| Model | USB 7326 |
| Power supply | Mains via power cord (appropriate mains plug) |
| Audio outputs | LINE OUT (RCA) and DIGITAL OUT (optical) |
| Main functions | Dual CD player, pitch control (±8% or ±16%), seamless loop (A/B/LOOP/RELOOP), BPM sync, jog wheel, fader start, programming (30 tracks), OUTRO mode, auto cue single/continuous |
| Connectivity | 8-pin interconnection plug between player and controller, START/PAUSE jack for fader |
| Display | LCD showing track, time, pitch, BPM, loop, mode |
| Maintenance and cleaning | Use a clean, dry cloth; avoid chemicals and volatile liquids |
| Safety | Do not open the casing; avoid heat, moisture, dust, vibration; unplug in case of malfunction; do not pull on the cable |
| Reparability | Do not repair yourself; contact the seller; warranty void if modified or used improperly |
| Operating temperature | 5 °C to 35 °C |
| Weight | Not specified in the manual |
Frequently Asked Questions - USB 7326 US Blaster
User questions about USB 7326 US Blaster
0 question about this device. Answer the ones you know or ask your own.
Ask a new question about this device
Download the instructions for your DJ Equipment in PDF format for free! Find your manual USB 7326 - US Blaster and take your electronic device back in hand. On this page are published all the documents necessary for the use of your device. USB 7326 by US Blaster.
USER MANUAL USB 7326 US Blaster
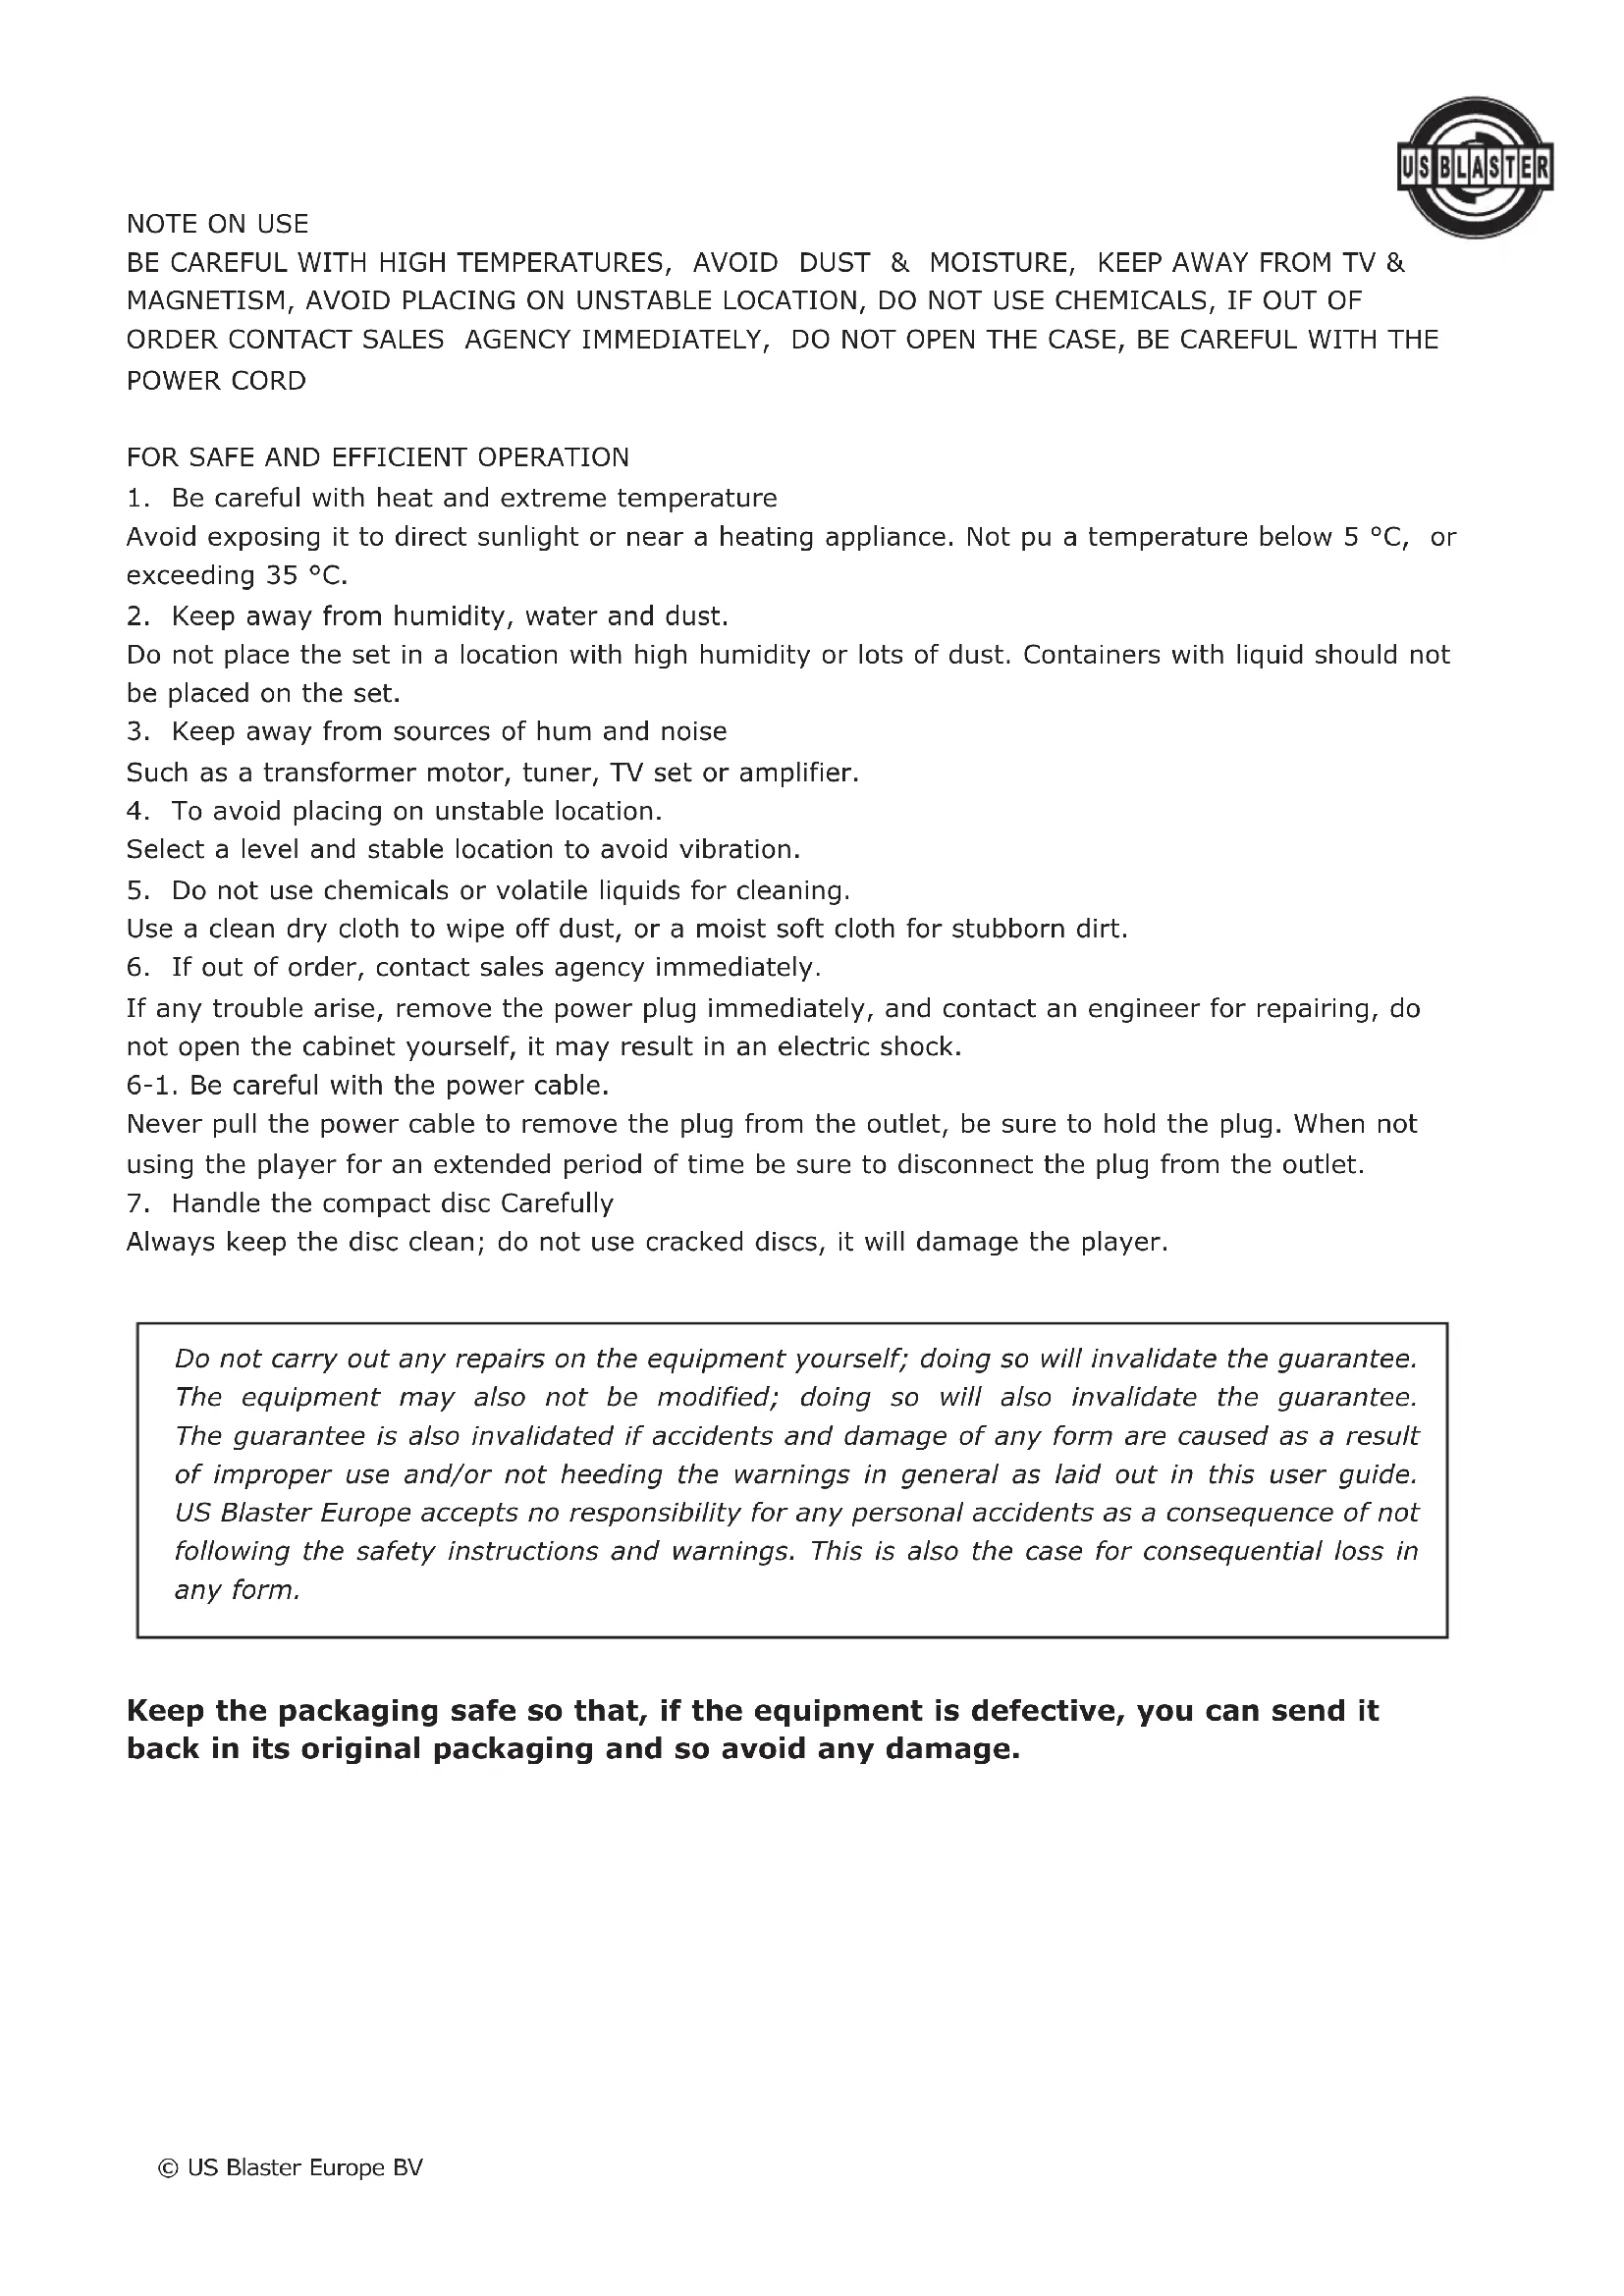
- Be careful with heat and extreme temperature
Avoid exposing it to direct sunlight or near a heating appliance. Not pu a temperature below 5 °C, or exceeding 35 °C.
- Keep away from humidity, water and dust.
Do not place the set in a location with high humidity or lots of dust. Containers with liquid should not be placed on the set.
- Keep away from sources of hum and noise
Such as a transformer motor, tuner, TV set or amplifier.
- To avoid placing on unstable location.
Select a level and stable location to avoid vibration.
- Do not use chemicals or volatile liquids for cleaning.
Use a clean dry cloth to wipe off dust, or a moist soft cloth for stubborn dirt.
- If out of order, contact sales agency immediately.
If any trouble arise, remove the power plug immediately, and contact an engineer for repairing, do not open the cabinet yourself, it may result in an electric shock.
6-1. Be careful with the power cable.
Never pull the power cable to remove the plug from the outlet, be sure to hold the plug. When not using the player for an extended period of time be sure to disconnect the plug from the outlet.
- Handle the compact disc Carefully
Always keep the disc clean; do not use cracked discs, it will damage the player.
Do not carry out any repairs on the equipment yourself; doing so will invalidate the guarantee. The equipment may also not be modified; doing so will also invalidate the guarantee. The guarantee is also invalidated if accidents and damage of any form are caused as a result of improper use and/or not heeding the warnings in general as laid out in this user guide. US Blaster Europe accepts no responsibility for any personal accidents as a consequence of not following the safety instructions and warnings. This is also the case for consequential loss in any form.
Keep the packaging safe so that, if the equipment is defective, you can send it back in its original packaging and so avoid any damage.
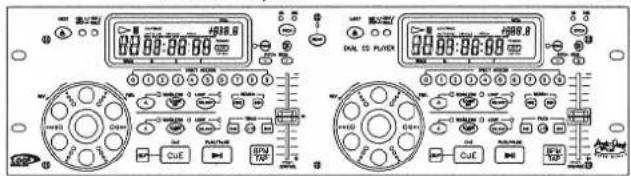
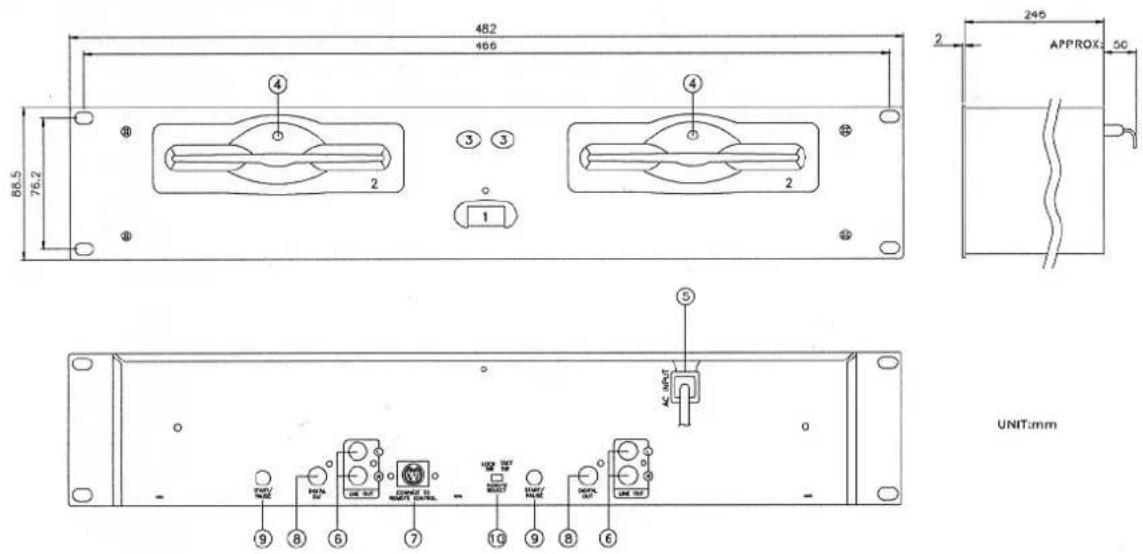
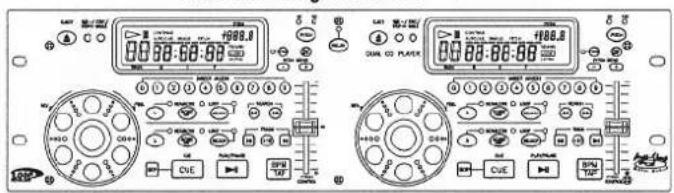
DESCRIPTION OF THE FUNCTIONS
Function of the Main Unit :
text_image
482 466 88.5 76.2 ④ ③ ③ ② 1 246 APPROX: 50 ⑤ AC INPUT UNIT:mm PAN ON OUT ON OUT UNIT UNIT:mm 9 8 6 7 10 9 8 61. POWER(Power Switch)
Press the power switch to turn the unit on. To switch the POWER off press the POWER switch again.
2.Disc Loader
The disc is placed on the loader and the CD disc will be loaded automatically. Pressing the Eject button to eject the CD Disc tray.
3.Eject Button
Press to load or eject the disc
4. DISC illuminator
To illuminate for disc.
5.AC INPUT
Connecting this power cord into an AC wall outlet with the proper AC voltage.
6.LINE OUT (Output Jacks)
The audio from each CD player is output from these jacks. Connect to the line input of the mixer.
7. CONNECTOR PORTS
The 8-pin termination permits the connection of the main unit to the control unit.
8.DIGITAL OUT
The digital from each CD player is output from these jacks. Connect to the line input of the D/A Amplifier.
9. START/PAUSE
This connector is used for fader start; connect it to a mixer, and remote control the "START/PAUSE" by moving the fader of mixer.
10.TACT-LOCK option
Select the type of switch in the mixer for FADERSTART wire remote control.
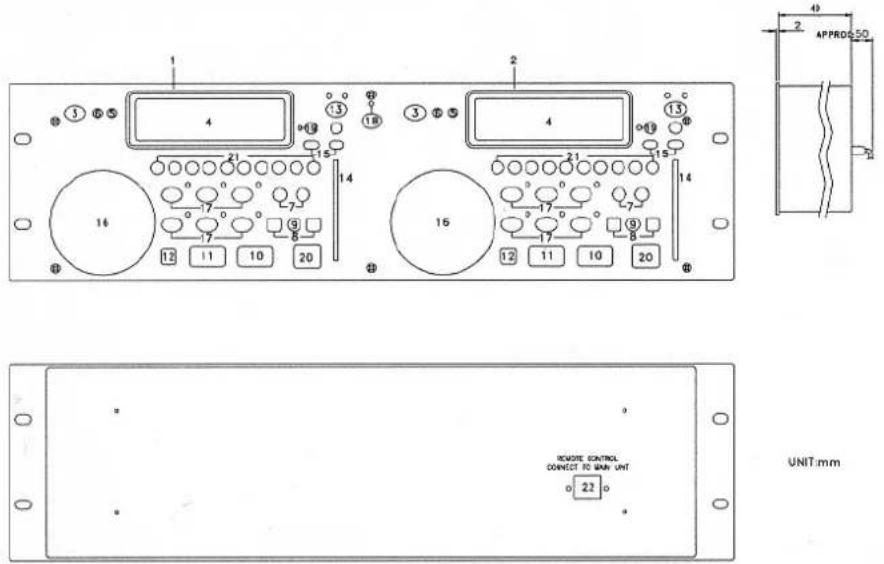
Function of the Control Unit
text_image
1 2 3 4 5 6 7 8 9 10 11 12 13 14 15 16 17 18 19 20 21 22 23 24 25 26 27 28 29 30 31 32 33 34 35 36 37 38 39 40 41 42 43 44 45 46 47 48 49 50 51 52 53 54 55 56 57 58 59 60 61 62 63 64 65 66 67 68 69 70 71 72 73 74 75 76 77 78 79 80 81 82 83 84 85 86 87 88 89 90 91 92 93 94 95 96 97 98 99 100 101 102 103 104 105 106 107 108 109 110 111 112 113 114 115 116 117 118 119 120 121 122 123 124 125 126 127 128 129 130 131 132 133 134 135 136 137 138 139 140This operation panel remotely controls the main unit 1.
This operation panel remotely controls the main unit 2.
3. OPEN/ CLOSE BUTTON
Press to load or eject the disc. Each press will open or close the disc tray.
Note: Disc will not eject. unless the stop or pause button has been push first
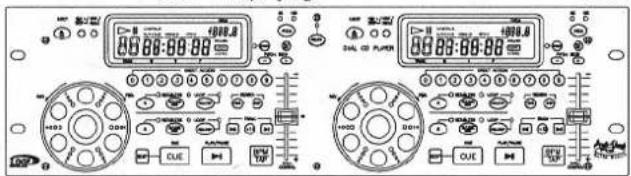
4.L.C.D
These liquid crystal display (L.C.D.) indicate the track numbers, time (minutes, second, frame), remain, pitch, beat, loop, auto cue single, continue and time bar.
5. CONT./SINGLE BUTTON (OUTRO)
To press this button it can switch between auto cue single and continue. The selected mode is indicated on the display.
*AUTO CUE SINGLE-After each track, the unit pauses at the beginning of next track. The playback starts from audible point.
*CONTINUE—To play the whole tracks.
*OUTRO-Press the button for 3 seconds for OUTRO function, the unit will play the last 30 seconds of each track.
6. TIME / STOP BUTTON
This button switches the time display between each remaining time, elapsed playing time, and total remaining time. The unit will be in the "stop" mode if you continue to press the button for more than 3 seconds.
7. SEARCH BUTTON
Pressing the button for quick forward or backward
8. TRACK BUTTON
This button selects the track to be played
9.+10 BUTTON
Pressed the button to forward 10 tracks. If you forward 10 tracks, and the tracks over total tracks, the unit will jump to track 1.
10. PLAY/ PAUSE BUTTON
Each press of this button causes the operation to change between PLAY and PAUSE modes.
11. CUE BUTTON
The cue function allows the CD to be played from the memorized point any number of times. With the unit
in the pause mode, pressing the CUE button to set up the memorized cue point and then the cue button blinks.
12. BOP BUTTON
The playback will automatically play from the CUE point upon the button is pressed.
13. PITCH BUTTON
With unit on the PITCH ON mode, to select the pitch range from 8%, 16%, which the LED indicator flashes. To select 8% will assign +/-8% to pitch control slider and so does 16%. With the unit on the PITCH OFF mode, it means playback speed is normal (0%). The playback speed will not change when you move the pitch control slider.
14. PITCH CONTROL SLIDER
To match the choices of playback speed (8%, 16%), you can choose what range you want between minimum (up side) and maximum (bottom side) by moving the pitch control slider.
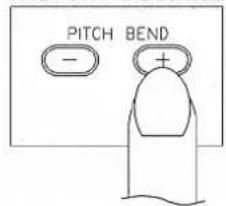
15. PITCH BEND + / - BUTTON
When each of the two CD players is playing, the pitch bend function allows the position of the bass beat to be matched after the pitch has been adjusted. The pitch will automatically rise up to +16% from the current setting while pressing the “+” button. While pressing the “-” button, the pitch will automatically drop to -16% from current setting. By the way of changing the pitch the position of the beats can be matched.
16. JOG WHEEL
This contains various functions, as follows:
*Speed Control
Rotating the wheel, in play mode, will change the playback speed accordingly. While rotating clockwise, the player speed increase; rotating counterclockwise, the speed decrease.
*Searching
Rotating the wheel in pause mode, the player will forward or backward to the desired point to start. The searching speed changed according to the dialing speed. It can be carried out by one frame increment.
17. Seamless Loop (2 set)
There is A, B/LOOP/ EXIT, RELOOP buttons.
-
A BUTTON---"start point" (A point. Also, Cue 1 could be a A point) After setting up the A point, the red Led light up!
-
B/LOOP/ EXIT BUTTON: ---" End point"(B point). Press the B /LOOP button to set up the B point and start the loop playback automatically. Loop lights on the display and the 3 LEDs flash. Press this button again to exit the LOOP playback.
3. RELOOP BUTTON
Return to the loop playback by pressing the RELOOP while in performance. However, if your want to return to loop playback, you can press RELOOP BUTTON.
- Change "START POINT" and"END POINT" by pressing the A& B/ LOOP/ EXIT button again.
The interval between A and B point must be more than 20 frames; otherwise, the B point will be canceled, then LOOP function disappear and LOOP fades on the display.
18. RELAY
Press the "RELAY" button to activate. When one unit is in play mode, and the other unit is in "pause" mode; pause the playing unit, the other unit will automatically start to play.
19. PROGRAM BUTTON
You can program the track you want. While the unit is stopped, pressing the PROG button first to enter memorized mode, by pressing the skip buttons to select the tracks you want to order and then press the PROG button again to compete set up per track. The max tracks you can program are 30 tracks. While playing programmed tracks, the LED of PROG lights up. While the unit is stopped, open the tray disc or turn off the power, the program will be exited.
20. BPM BUTTON
To get the BPM number manually.
21. Direct Access Key(0\~9)
To select the number of the track you would like to play.
22. CONNECTOR PORTS
The 8-pin termination permits the connection of the control unit to the main unit.
23. SLEEP:
Leave the unit unused for 30 minutes; the machine will shut off automatically.
MATCHING THE BEATS PER MINUTE
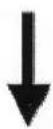
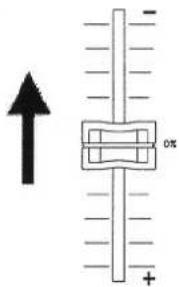
Match the pitch by monitoring the music of both UNIT 1 and UNIT 2 by ear. When the tempo of the music of the selected CD player is slow compared to the tempo of the other player, move the slider to the + side and match the tempo. When fast, move to the - side.
The following description is for the case of matching the pitch of UNIT 2 to the pitch of the music being played on UNIT 1.
text_image
Front panel of an electronic device with control panel, display screen, and indicator lights visibleUNIT 1 is playing.
text_image
00:00-89:88 00:00-89:88 00:00-89:88 00:00-89:88 00:00-89:88 00:00-89:88 00:00-89:88 00:00-89:88 00:00-89:88 00:123 1234 1255 1276 1297 1318 1339 1350 1361 1372 1383 1394 1405 1416 1427 1438 1449 1460 1471 1482 1493 1504 1515 1526 1537 1548 1559 1570 1581 1592 1603 1614 1625 1636 1647 1658 1669 1680 1691 1702 1713 1724 1735 1746 1757 1768 1779 1790 1801 1812 1823 1834 1845 1856 1867 1878 1889 1900Press PLAY/PAUSE to start UNIT 2.
Both CD players are playing discs.
Listen to UNIT 2 in your headphones.
When UNIT 2 is slow
compared to UNIT 1
When UNIT 2 is fast compared
to UNIT 1
text_image
Diagram showing a vertical scale with an arrow pointing upward and a labeled component marked 'ox' on the right side.Beat Matching Using Pitch Bend
A description of the procedure for matching the beat of UNIT 1 and UNIT 2 using the PITCH BEND stick is given below.
This description is for the case of matching the beat of UNIT 2 to the beat of the music being played on UNIT 1. (This procedure can be done on either Unit).
After Matching the BPM's
text_image
Front panel of a digital multimeter with analog displays, control knobs, and labeled buttons in ChineseBPM's (Beat Per Minute) are the same, however the bass beats are not matched.

When UNIT 2 is ahead.
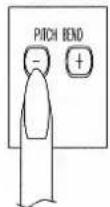
When UNIT 2 is behead.
text_image
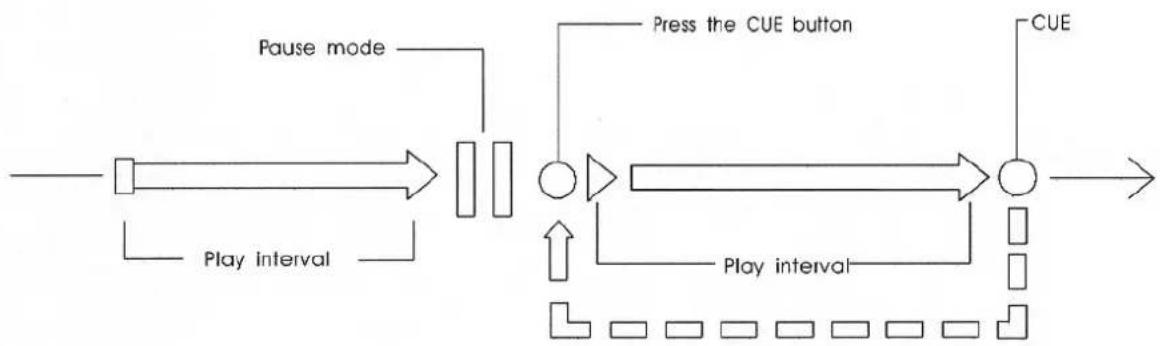
PITCH BEND - +OPERATION OF CUE (WITH PLAY/PAUSE)
flowchart
graph LR
    A["Start"] --> B["Pause mode"]
    B --> C["Play interval"]
    C --> D["Process Box 1"]
    D --> E["Press the CUE button"]
    E --> F["Process Box 2"]
    F --> G["CUE"]
    G --> H["End"]
    D --> I["Play interval"]
    I --> J["Loop L"]
    J --> K["Loop L"]
    K --> L["Loop L"]
    L --> M["Loop L"]
    M --> N["Loop L"]
    N --> O["Loop L"]
    O --> P["Loop L"]
    P --> Q["Loop L"]
    Q --> R["Loop L"]
    R --> S["Loop L"]
    S --> T["Loop L"]
    T --> U["Loop L"]
    U --> V["Loop L"]
    V --> W["Loop L"]
    W --> X["Loop L"]
    X --> Y["Loop L"]
    Y --> Z["Loop L"]
    Z --> AA["Loop L"]
    AA --> AB["Loop L"]
    AB --> AC["Loop L"]
    AC --> AD["Loop L"]
    AD --> AE["Loop L"]
    AE --> AF["Loop L"]
    AF --> AG["Loop L"]
    AG --> AH["Loop L"]
    AH --> AI["Loop L"]
    AI --> AJ["Loop L"]
    AJ --> AK["Loop L"]
    AK --> AL["Loop L"]
    AL --> AM["Loop L"]
    AM --> AN["Loop L"]
    AN --> AO["Loop L"]
    AO --> AP["Loop L"]
    AP --> AQ["Loop L"]
    AQ --> AR["Loop L"]
    AR --> AS["Loop L"]
    AS --> AT["Loop L"]
    AT --> AU["Loop L"]
    AU --> AV["Loop L"]
    AV --> AW["Loop L"]
    AW --> AX["Loop L"]
    AX --> AY["Loop L"]
    AY --> AZ["Loop L"]
    AZ --> BA["Loop L"]
    BA --> BB["Loop L"]
    BB --> BC["Loop L"]
    BC --> BD["Loop L"]
    BD --> BE["Loop L"]
    BE --> BF["Loop L"]
    BF --> BG["Loop L"]
    BG --> BH["Loop L"]
    BH --> BI["Loop L"]
    BI --> BJ["Loop L"]
    BJ --> BK["Loop L"]
    BK --> BL["Loop L"]
    BL --> BM["Loop L"]
    BM --> BN["Loop L"]
    BN --> BO["Loop L"]
    BO --> BP["Loop L"]
    BP --> BQ["Loop L"]
    BQ --> BR["Loop L"]
    BR --> BS["Loop L"]
    BS --> BT["Loop L"]
    BT --> BU["Loop L"]
    BU --> BV["Loop L"]
    BV --> BW["Loop L"]
Back CUE operation pause mode
- In pause mode, press CUE button to memorize a point for playing back. We mean it "cue point".
- After "cue point" is memorized, in play mode, pressing CUE button will return the music back to the cue point and keep it in pause mode.
- Press PLAY button again to perform from "cue point".
- Set "A POINT" under play mode by pressing A button (without interruption during playback).
- Press B/LOOP to memorize the ending point of loop, we mean it "B POINT". At the meantime, it blinks LOOP on the LCD, and the music automatically comes back to "A POINT" and loops between A & B points.
- While the music loops between A & B, press to leave the loop. At the meantime, it lights LOOP on the LCD.
- Press RELOOP again during playback, it returns the loop function.
- Within play interval, you can change "A POINT" & "B POINT" by pressing A & B/LOOP button under play mode.
- Also available to change "start point" by pressing A button in pause mode during loop function.
- The interval between A & B point must be more than 20 frames, or the B point will be canceled, then loop function disappear, and LOOP fades on the LCD.
BEFORE SWITCHING OFF THE POWER
When you have finished using the CD player, before switching off the power, ensure that the disc is ejected.
TROUBLESHOOTING GUIDE
If difficulties arise with your compact disc player, locate the apparent problem in the left-hand column of the table and follow the corrective action suggested in the right-hand column.
- Is the compact disc player properly connected to the amplifier?
- Is the amplifier set for the proper operation?
- Have the operating instructions for the compact disc player been followed?
| Symptom | Possible Cause | Corrective Action |
| The power fails to switch on when the POWER switch is set to ON | Poor power plug connection at the AC outlet. | Insert the power plug firmly into the AC outlet. |
| Disc play does not start | The disc is loaded upside down.The disc is too dirty. | Reload the disc with the label side up.Clean the disc. |
| No sound | Improper output cable connections.Improper amplifier operation. | Connect the output cable properly.Make sure that the amplifier controls are set properly. |
| Sound skips | The CD player is subject to vibrations or physical shock. | Change the installation location. |
| Hum | Loose cable connections. | Firmly connect all audio plugs. |
FONCTIONNEMENT
FAITES ATTENTION AUX TEMPERATURES ELEVEES, ÉVITEZ LES POUSSIÈRES & L'HUMIDITÉ, GARDEZ À DISTANCE DES TELEVISIONS & DES MAGNETISMES, ÉVITEZ DE PLACER L'UNITÉ À UN EMPLACEMENT INSTABLE, N'UTILISEZ PAS DE PRODUITS CHIMIQUES, SI L'UNITÉ TOMBE EN PANNE, CONTACTEZ IMMÉDIATEMENT LE VENDEUR, N'OUVREZ PAS LE BOITIER, PRENEZ SOIN DU CORDON D'ALIMENTATION
POUR UN FONCTIONNEMENT SECURISE ET EFFICACE
3. BOUTON OPEN/ CLOSE
text_image
Front panel of a digital multimeter or analog device with control buttons and display screen showing measurement data.text_image
Front panel of a digital audio workstation with multiple analog meters and control knobs, showing time and voltage readings.text_image
Diagram showing a vertical scale with an arrow pointing upward and a central rectangular component labeled '0%'.text_image
Front panel and back panel of an analog multimeter or audio recording device with display, control knobs, and buttons labeled in Chinese.AVANT LA MISE HORS TENSION
17. Seamless Loop (2 Sets)
text_image
Front panel of a digital multimeter with control panel and display screen showing measurement dataGERÄT 1 spielt